Page Summary
-
Passkey registration involves defining options, sending them to the client for passkey creation, and then verifying the credential and storing it on the server.
-
Server-side functionalities for passkey registration include creating
PublicKeyCredentialCreationOptionswith dynamic fields likerpId,user.name,user.displayName,user.id,excludeCredentials, andchallenge. -
Certain fields in
PublicKeyCredentialCreationOptionsand thePublicKeyCredentialobject returned from the client need to be encoded and decoded for transfer over HTTPS. -
After a passkey is successfully created on the client, the returned
PublicKeyCredentialobject needs to be sent to the server, verified, and the credential information stored in a database to enable future authentication. -
Server-side libraries are recommended for implementing passkey functionality and handle tasks like generating options, verifying responses, and managing encoding/decoding.
Overview
Here's a high-level overview of the key steps involved in passkey registration:
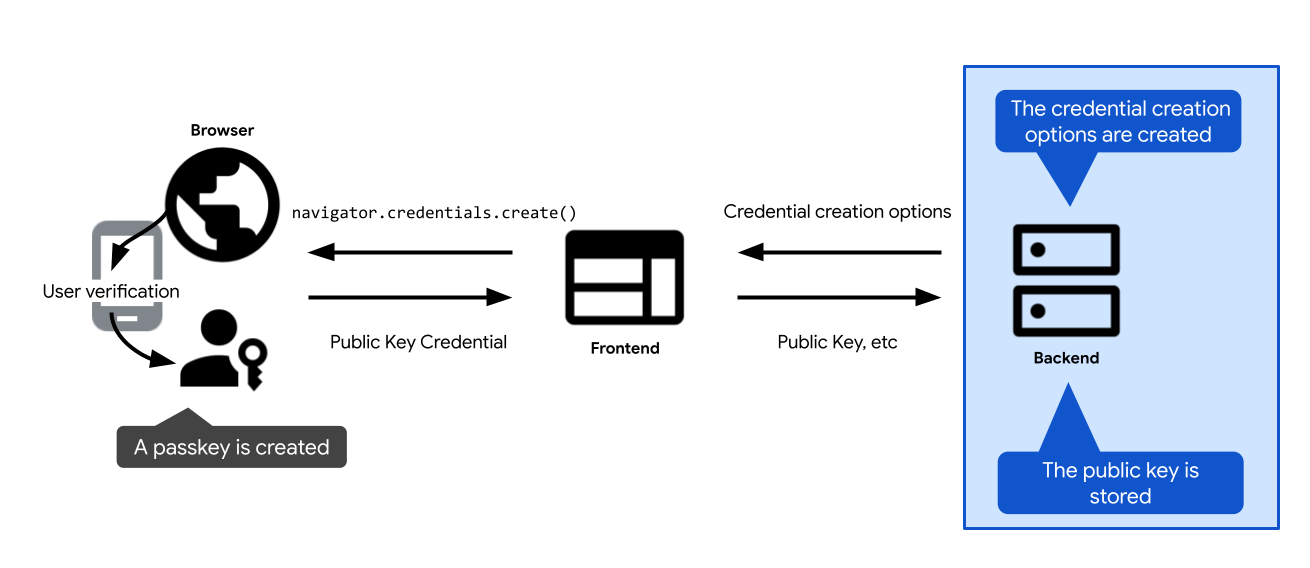
- Define options to create a passkey. Send them to the client, so you can pass them to your passkey creation call: the WebAuthn API call
navigator.credentials.createon the web, andcredentialManager.createCredentialon Android. After the user confirms creation of the passkey, the passkey creation call is resolved and returns a credentialPublicKeyCredential. - Verify the credential and store it on the server.
The following sections dive into the specifics of each step.
Create credential creation options
The first step you need to take on the server is to create a PublicKeyCredentialCreationOptions object.
To do so, rely on your FIDO server-side library. It will typically offer a utility function that can create these options for you. SimpleWebAuthn offers, for example, generateRegistrationOptions.
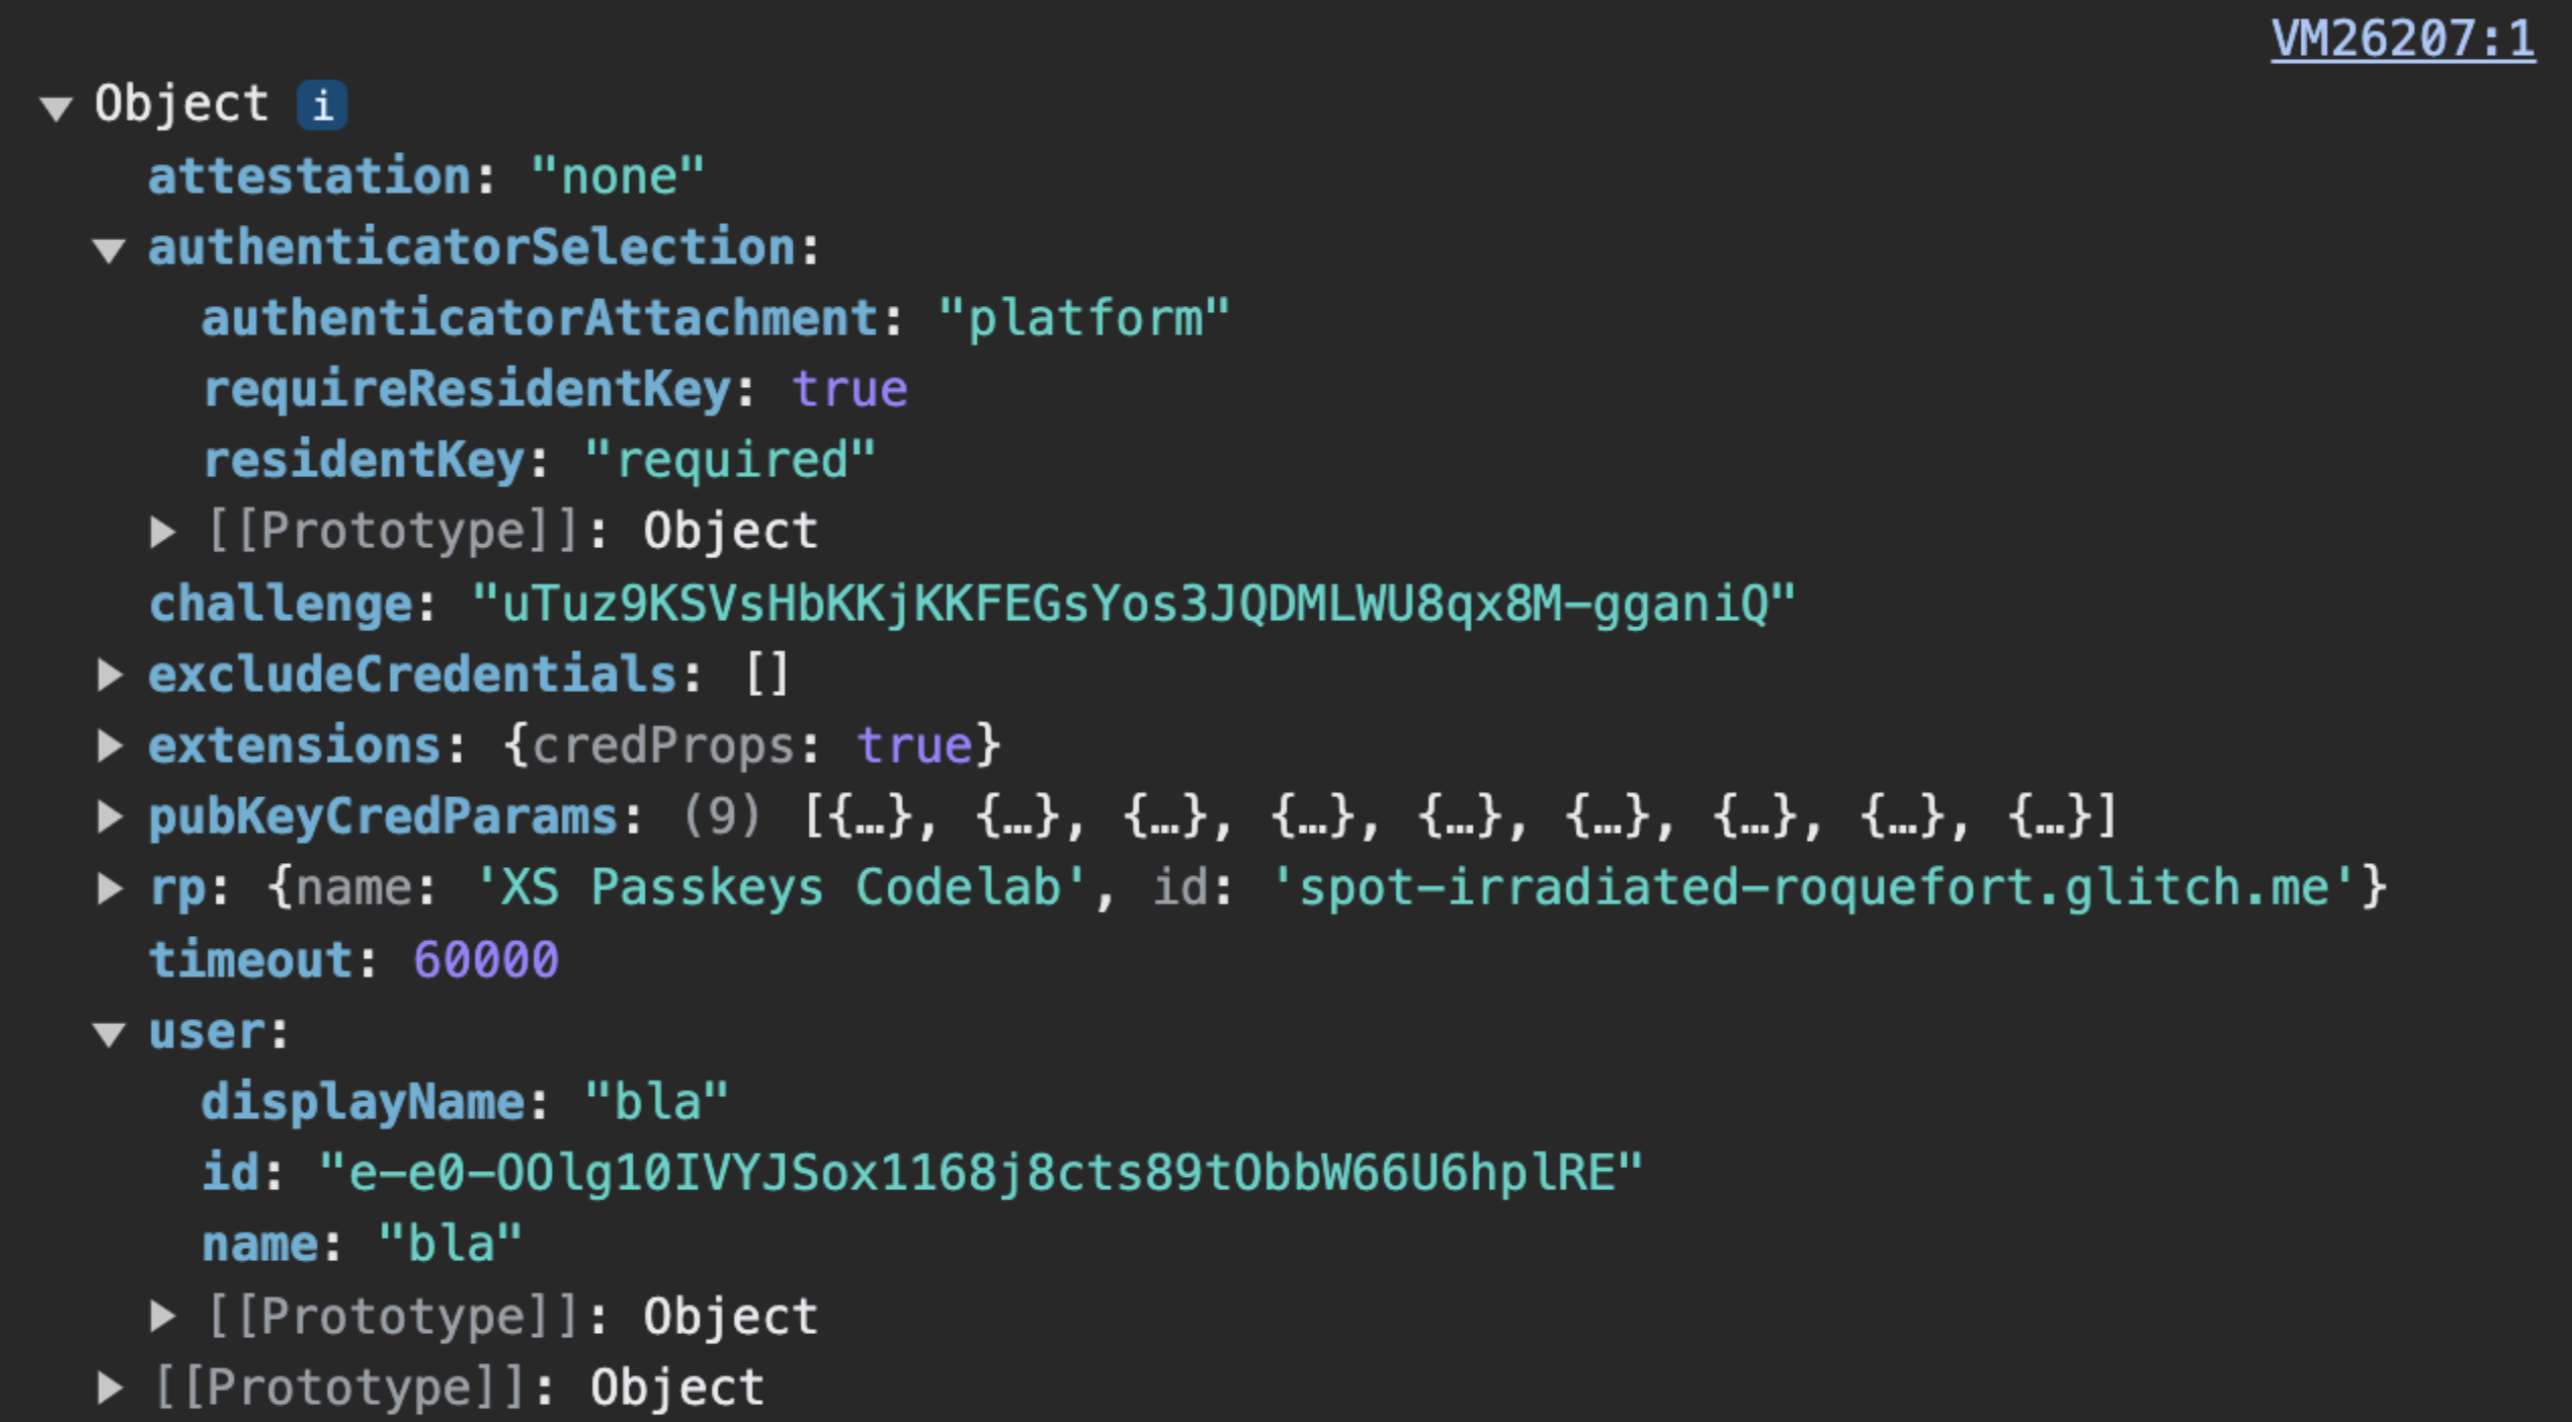
PublicKeyCredentialCreationOptions should include everything that's needed for passkey creation: information about the user, about the RP, and a configuration for the properties of the credential you're creating. Once you've defined all of these, pass them as needed to the function in your FIDO server-side library that's responsible for creating the PublicKeyCredentialCreationOptions object.
Some of PublicKeyCredentialCreationOptions' fields can be constants. Others should be dynamically defined on the server:
rpId: To populate the RP ID on the server, use server-side functions or variables that give you the hostname of your web application, such asexample.com.user.nameanduser.displayName: To populate these fields, use your signed-in user's session information (or the new user account information, if the user is creating a passkey on signup).user.nameis typically an email address, and is unique for the RP.user.displayNameis a user-friendly name. Note that not all platforms will usedisplayName.user.id: A random, unique string generated upon account creation. It should be permanent, unlike a username that may be editable. The user ID identifies an account, but should not contain any personally identifiable information (PII). You likely already have a user ID in your system, but if needed, create one specifically for passkeys to keep it free of any PII.excludeCredentials: A list of existing credentials' IDs to prevent duplicating a passkey from the passkey provider. To populate this field, look up in your database existing credentials for this user. Review details at Prevent creation of a new passkey if one already exists.challenge: For credential registration, the challenge is not relevant unless you use attestation, a more advanced technique to verify a passkey provider's identity and the data it emits. However, even if you don't use attestation, the challenge is still a required field. Instructions for creating a secure challenge for authentication are available in Server-side passkey authentication.
Encoding and decoding
PublicKeyCredentialCreationOptions sent by the server. challenge, user.id and excludeCredentials.credentials must be encoded server-side into base64URL, so that PublicKeyCredentialCreationOptions can be delivered over HTTPS.PublicKeyCredentialCreationOptions include fields that are ArrayBuffers, so they aren't supported by JSON.stringify(). This means that, at the moment, in order to deliver PublicKeyCredentialCreationOptions over HTTPS, some fields must be manually encoded on the server using base64URL and then decoded on the client.
- On the server, encoding and decoding is typically taken care of by your FIDO server-side library.
- On the client, encoding and decoding needs to be done manually at the moment. It will become easier in the future: a method to convert options as JSON into
PublicKeyCredentialCreationOptionswill be available. Check out the status of the implementation in Chrome.
Example code: create credential creation options
We're using the SimpleWebAuthn library in our examples. Here, we hand over the creation of public key credential options to its generateRegistrationOptions function.
import {
  generateRegistrationOptions,
  verifyRegistrationResponse,
  generateAuthenticationOptions,
  verifyAuthenticationResponse
} from '@simplewebauthn/server';
import { isoBase64URL } from '@simplewebauthn/server/helpers';

router.post('/registerRequest', csrfCheck, sessionCheck, async (req, res) => {
  const { user } = res.locals;
  // Ensure you nest verification function calls in try/catch blocks.
  // If something fails, throw an error with a descriptive error message.
  // Return that message with an appropriate error code to the client.
  try {
    // `excludeCredentials` prevents users from re-registering existing
    // credentials for a given passkey provider
    const excludeCredentials = [];
    const credentials = Credentials.findByUserId(user.id);
    if (credentials.length > 0) {
      for (const cred of credentials) {
        excludeCredentials.push({
          id: isoBase64URL.toBuffer(cred.id),
          type: 'public-key',
          transports: cred.transports,
        });
      }
    }

    // Generate registration options for WebAuthn create
    const options = await generateRegistrationOptions({
      rpName: process.env.RP_NAME,
      rpID: process.env.HOSTNAME,
      userID: user.id,
      userName: user.username,
      userDisplayName: user.displayName || '',
      attestationType: 'none',
      excludeCredentials,
      authenticatorSelection: {
        authenticatorAttachment: 'platform',
        requireResidentKey: true
      },
    });

    // Keep the challenge in the session
    req.session.challenge = options.challenge;

    return res.json(options);
  } catch (e) {
    console.error(e);
    return res.status(400).send({ error: e.message });
  }
});
Store the public key
navigator.credentials.create returns a PublicKeyCredential object.When navigator.credentials.create resolves successfully on the client, it means a passkey has been successfully created. A PublicKeyCredential object is returned.
The PublicKeyCredential object contains an AuthenticatorAttestationResponse object, which represents the passkey provider's response to the client’s instruction to create a passkey. It contains information about the new credential that you need as an RP to authenticate the user later. Learn more about AuthenticatorAttestationResponse in Appendix: AuthenticatorAttestationResponse.
Send the PublicKeyCredential object to the server. Once you've received it, verify it.
Hand over this verification step to your FIDO server-side library. It will typically offer a utility function for this purpose. SimpleWebAuthn offers, for example, verifyRegistrationResponse. Learn what's happening under the hood in Appendix: verification of the registration response.
Once verification is successful, store credential information in your database so the user can later authenticate with the passkey associated with that credential.
Use a dedicated table for public key credentials associated with passkeys. A user can only have a single password, but can have multiple passkeys — for example, a passkey synchronized via Apple iCloud Keychain and one via Google Password Manager.
Here's an example schema you can use to store credential information:

- Users table:
user_id: The primary user ID. A random, unique, permanent ID for the user. Use this as a primary key for your Users table.username. A user-defined username, potentially editable.passkey_user_id: The passkey-specific PII-free user ID, represented byuser.idin your registration options. When the user later attempts to authenticate, the authenticator will make thispasskey_user_idavailable in its authentication response inuserHandle. We recommend you don't setpasskey_user_idas a primary key. Primary keys tend to become de facto PII in systems, because they're extensively used.
- Public key credentials table:
id: Credential ID. Use this as a primary key for your Public key credentials table.public_key: Public key of the credential.passkey_user_id: Use this as a foreign key to establish a link with the Users table.backed_up: A passkey is backed up if it's synchronized by the passkey provider. Storing the backup state is useful if you want to consider dropping passwords in the future for users who holdbacked_uppasskeys. You can check whether the passkey is backed up by examining the BE flag inauthenticatorData, or by using a FIDO server-side library feature that's typically available to give you easy access to this information. Storing the backup eligibility can be helpful to address potential user inquiries.name: Optionally, a display name for the credential to enable users to give credentials custom names.transports: An array of transports. Storing transports is useful for the authentication user experience. When transports are available, the browser can behave accordingly and display a UI that matches the transport the passkey provider uses for communicating with clients—in particular for re-authentication use cases whereallowCredentialsis not empty.
Other information can be helpful to store for user experience purposes, including items like the passkey provider, the credential creation time and the last used time. Read more in Passkeys user interface design.
Example code: store the credential
We're using the SimpleWebAuthn library in our examples.
Here, we hand over the registration response verification to its verifyRegistrationResponse function.
import { isoBase64URL } from '@simplewebauthn/server/helpers';


router.post('/registerResponse', csrfCheck, sessionCheck, async (req, res) => {
  const expectedChallenge = req.session.challenge;
  const expectedOrigin = getOrigin(req.get('User-Agent'));
  const expectedRPID = process.env.HOSTNAME;
  const response = req.body;
  // This sample code is for registering a passkey for an existing,
  // signed-in user

  // Ensure you nest verification function calls in try/catch blocks.
  // If something fails, throw an error with a descriptive error message.
  // Return that message with an appropriate error code to the client.
  try {
    // Verify the credential
    const { verified, registrationInfo } = await verifyRegistrationResponse({
      response,
      expectedChallenge,
      expectedOrigin,
      expectedRPID,
      requireUserVerification: false,
    });

    if (!verified) {
      throw new Error('Verification failed.');
    }

    const {
      aaguid,
      credentialPublicKey,
      credentialID,
      credentialBackedUp
    } = registrationInfo;

    // Name the credential based on AAGUID
    const name =
      aaguid === undefined ||
      aaguid === '000000-0000-0000-0000-00000000' ?
        req.useragent?.platform : aaguids[aaguid].name;

    const base64CredentialID = isoBase64URL.fromBuffer(credentialID);
    const base64PublicKey = isoBase64URL.fromBuffer(credentialPublicKey);

    // Existing, signed-in user
    const { user } = res.locals;

    // Save the credential
    await Credentials.update({
      id: base64CredentialID,
      passkey_user_id: user.passkey_user_id,
      publicKey: base64PublicKey,
      name,
      aaguid,
      transports: response.response.transports,
      backed_up: credentialBackedUp,
      registered_at: new Date().getTime()
    });

    // Kill the challenge for this session
    delete req.session.challenge;

    return res.json(user);
  } catch (e) {
    delete req.session.challenge;

    console.error(e);
    return res.status(400).send({ error: e.message });
  }
});
Appendix: AuthenticatorAttestationResponse
AuthenticatorAttestationResponse contains two important objects:
response.clientDataJSONis a JSON version of client data, which on the web is data as seen by the browser. It contains the RP origin, the challenge andandroidPackageNameif the client is an Android app. As an RP, readingclientDataJSONgives you access to information the browser saw at the time of thecreaterequest.response.attestationObjectcontains two pieces of information:attestationStatementwhich is not relevant unless you use attestation.authenticatorDatais data as seen by the passkey provider. As an RP, readingauthenticatorDatagives you access to the data seen by the passkey provider and returned at the time of thecreaterequest.
authenticatorDatacontains essential information about the public key credential that's associated with the newly-created passkey:
- The public key credential itself, and a unique credential ID for it.
- The RP ID associated with the credential.
- Flags that describe user status when the passkey was created: whether a user was actually present, and whether the user was successfully verified (see userVerification deep dive).
- AAGUID is an identifier for the passkey provider such as Google Password Manager. Based on the AAGUID, you can identify the passkey provider and display the name in a passkey management page. (see Determine the passkey provider with AAGUID)
Even though authenticatorData is nested within attestationObject, the information it contains is needed for your passkey implementation whether or not you use attestation. authenticatorDatais encoded, and contains fields that are encoded in a binary format. Your server-side library will typically handle parsing and decoding. If you're not using a server-side library, consider leveraging getAuthenticatorData() client-side to save yourself some parsing and decoding work server-side.
Appendix: verification of the registration response
Under the hood, verifying the registration response consists of the following checks:
- Ensure that the RP ID matches your site.
- Ensure that the request's origin is an expected origin for your site (main site URL, Android app).
- If you require user verification, ensure that the user verification flag
authenticatorData.uvistrue. - The user presence flag
authenticatorData.upis usually expected to betrue, but if the credential is conditionally created, it's expected to befalse. - Check that the client was able to provide the challenge you gave it. If you don't use attestation, this check is unimportant. However, implementing this check is a best practice: it ensures your code is ready if you decide to use attestation in the future.
- Ensure that the credential ID is not yet registered for any user.
- Verify that the algorithm used by the passkey provider to create the credential is an algorithm you listed (in each
algfield ofpublicKeyCredentialCreationOptions.pubKeyCredParams, which is typically defined within your server-side library and not visible from you). This ensures that users can only register with algorithms that you have chosen to allow.
To learn more, check SimpleWebAuthn's source code for verifyRegistrationResponse or dive into the complete list of verifications in the specification.