
حسابها با استفاده از جریان کد مجوز استاندارد صنعتی OAuth 2.0 به هم مرتبط میشوند.
OAuth 2.1 و PKCE برای نمایندگان
برای عاملهای هوش مصنوعی بدون تابعیت و خطوط لوله چندوجهی، اجرای OAuth 2.1 توصیه میشود.
- PKCE (کلید اثبات برای تبادل کد) : باید برای ایمنسازی جریان کد مجوز و جلوگیری از حملات رهگیری استفاده شود.
- بدون جریان ضمنی : جریان ضمنی، توکنهای دسترسی را در URL نمایش میدهد که یک خطر امنیتی برای محیطهای عامل است.
سرویس شما باید از نقاط پایانی مجوز و تبادل توکن سازگار با OAuth 2.0/2.1 پشتیبانی کند.
پروژه را ایجاد کنید
برای ایجاد پروژه خود با استفاده از پیوند حساب:
- به کنسول API گوگل بروید.
- روی ایجاد پروژه کلیک کنید.
- یک نام وارد کنید یا پیشنهاد تولید شده را بپذیرید.
- فیلدهای باقی مانده را تأیید یا ویرایش کنید.
- روی ایجاد کلیک کنید.
برای مشاهده شناسه پروژه خود:
- به کنسول API گوگل بروید.
- پروژه خود را در جدول صفحه اصلی پیدا کنید. شناسه پروژه در ستون شناسه نمایش داده میشود.
صفحه رضایت OAuth خود را پیکربندی کنید
فرآیند پیوند حساب گوگل شامل یک صفحه رضایتنامه است که به کاربران میگوید برنامهای که درخواست دسترسی به دادههای آنها را دارد، چه نوع دادههایی را درخواست میکند و شرایط اعمال آن چیست. قبل از ایجاد شناسه کلاینت Google API، باید صفحه رضایتنامه OAuth خود را پیکربندی کنید.
- صفحهی رضایتنامهی OAuth را در کنسول Google APIs باز کنید.
- در صورت درخواست، پروژهای را که تازه ایجاد کردهاید انتخاب کنید.
در صفحه «صفحه رضایت OAuth»، فرم را پر کنید و روی دکمه «ذخیره» کلیک کنید.
نام برنامه: نام برنامهای که درخواست رضایت میکند. این نام باید دقیقاً منعکسکننده برنامه شما باشد و با نام برنامهای که کاربران در جاهای دیگر میبینند، مطابقت داشته باشد. نام برنامه در صفحه رضایتنامه پیوند حساب نمایش داده خواهد شد.
لوگوی برنامه: تصویری در صفحه رضایتنامه که به کاربران کمک میکند برنامه شما را بشناسند. این لوگو در صفحه رضایتنامه پیوند حساب و در تنظیمات حساب نمایش داده میشود.
ایمیل پشتیبانی: برای اینکه کاربران بتوانند در مورد رضایت خود با شما تماس بگیرند.
حوزههای دسترسی برای APIهای گوگل: حوزهها به برنامه شما اجازه میدهند تا به دادههای خصوصی گوگل کاربر دسترسی داشته باشد. برای مورد استفاده اتصال حساب گوگل، حوزه پیشفرض (ایمیل، نمایه، شناسه باز) کافی است، نیازی به اضافه کردن هیچ حوزه حساسی ندارید. به طور کلی، بهترین روش این است که حوزهها را به صورت تدریجی، در زمانی که دسترسی مورد نیاز است، درخواست کنید، نه اینکه از ابتدا درخواست دهید. اطلاعات بیشتر .
دامنههای مجاز: برای محافظت از شما و کاربرانتان، گوگل فقط به برنامههایی که با استفاده از OAuth احراز هویت میشوند، اجازه استفاده از دامنههای مجاز را میدهد. لینکهای برنامههای شما باید در دامنههای مجاز میزبانی شوند. اطلاعات بیشتر .
لینک صفحه اصلی برنامه: صفحه اصلی برنامه شما. باید روی یک دامنه مجاز میزبانی شود.
پیوند سیاست حفظ حریم خصوصی برنامه: در صفحه رضایتنامه پیوند حساب گوگل نشان داده میشود. باید در یک دامنه مجاز میزبانی شود.
لینک شرایط خدمات برنامه (اختیاری): باید روی یک دامنه مجاز میزبانی شود.
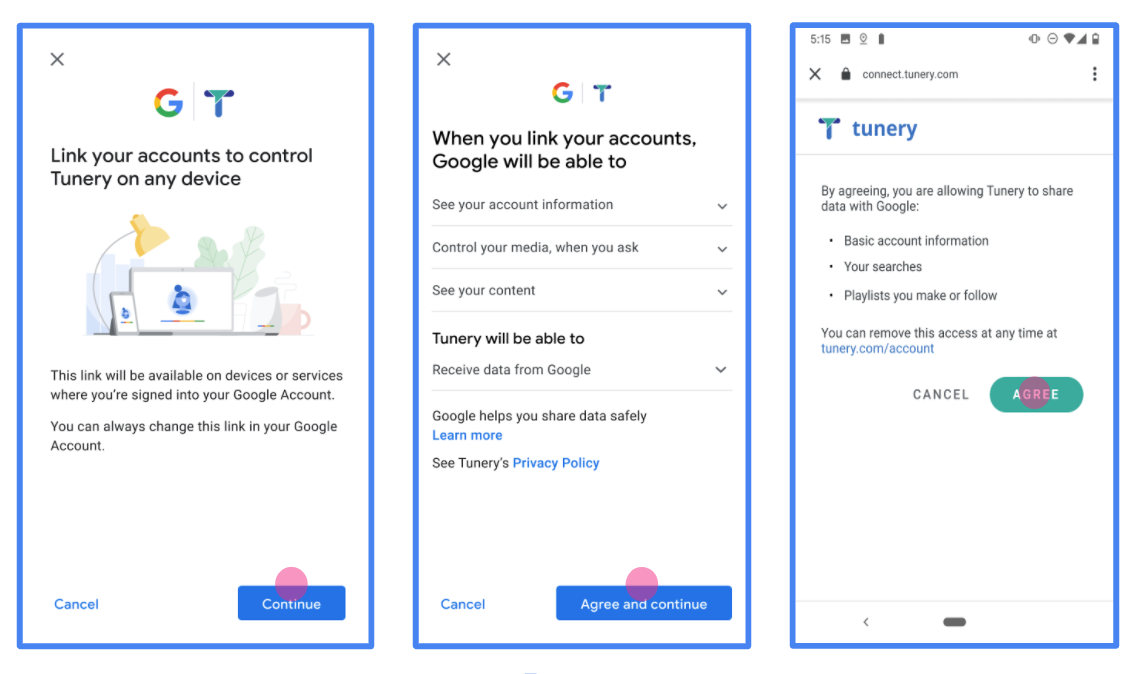
شکل ۱. صفحه رضایتنامه اتصال حساب گوگل برای یک برنامه جعلی، Tunery
«وضعیت تأیید» را بررسی کنید، اگر درخواست شما نیاز به تأیید دارد، روی دکمه «ارسال برای تأیید» کلیک کنید تا درخواست شما برای تأیید ارسال شود. برای جزئیات بیشتر به الزامات تأیید OAuth مراجعه کنید.
سرور OAuth خود را پیادهسازی کنید
پیادهسازی سرور OAuth 2.0 از جریان کد مجوز شامل دو نقطه پایانی است که سرویس شما از طریق HTTPS در دسترس قرار میدهد. نقطه پایانی اول، نقطه پایانی مجوز است که مسئول یافتن یا اخذ رضایت از کاربران برای دسترسی به دادهها است. نقطه پایانی مجوز، یک رابط کاربری ورود به سیستم را به کاربرانی که هنوز وارد سیستم نشدهاند ارائه میدهد و رضایت آنها را برای دسترسی درخواستی ثبت میکند. نقطه پایانی دوم، نقطه پایانی تبادل توکن است که برای دریافت رشتههای رمزگذاری شده، به نام توکنها، که به کاربر اجازه دسترسی به سرویس شما را میدهند، استفاده میشود.
وقتی یک برنامه گوگل نیاز به فراخوانی یکی از APIهای سرویس شما دارد، گوگل از این نقاط پایانی به صورت مشترک استفاده میکند تا از کاربران شما اجازه فراخوانی این APIها را از طرف آنها دریافت کند.
لینک کردن حساب گوگل: جریان کد مجوز OAuth
نمودار توالی زیر، جزئیات تعاملات بین کاربر، گوگل و نقاط پایانی سرویس شما را نشان میدهد.
نقشها و مسئولیتها
جدول زیر نقشها و مسئولیتهای بازیگران در جریان OAuth اتصال حساب گوگل (GAL) را تعریف میکند. توجه داشته باشید که در GAL، گوگل به عنوان کلاینت OAuth عمل میکند، در حالی که سرویس شما به عنوان ارائهدهنده هویت/سرویس عمل میکند.
| بازیگر / جزء | نقش GAL | مسئولیتها |
|---|---|---|
| برنامه/سرور گوگل | کلاینت OAuth | جریان را آغاز میکند، کد مجوز را دریافت میکند، آن را با توکنها مبادله میکند و آنها را به طور ایمن ذخیره میکند تا به APIهای سرویس شما دسترسی داشته باشد. |
| نقطه پایانی مجوز شما | سرور احراز هویت | کاربران شما را احراز هویت میکند و رضایت آنها را برای اشتراکگذاری دسترسی به دادههایشان با گوگل دریافت میکند. |
| نقطه پایانی تبادل توکن شما | Authorization Server | کدهای مجوز و توکنهای بهروزرسانی را اعتبارسنجی میکند و توکنهای دسترسی را به سرور گوگل صادر میکند. |
| آدرس اینترنتی ریدایرکت گوگل | نقطه پایانی پاسخ به تماس | تغییر مسیر کاربر را از سرویس احراز هویت شما به همراه code و مقادیر state دریافت میکند. |
یک جلسه جریان کد مجوز OAuth 2.0 که توسط گوگل آغاز شده است، جریان زیر را دارد:
- گوگل نقطه پایانی احراز هویت شما را در مرورگر کاربر باز میکند. اگر جریان برای یک اقدام در دستگاهی که فقط با صدا کار میکند شروع شده باشد، گوگل اجرا را به تلفن منتقل میکند.
- کاربر، اگر قبلاً وارد سیستم نشده باشد، وارد سیستم میشود و اگر قبلاً اجازه نداده باشد، به گوگل اجازه میدهد تا به دادههایش با API شما دسترسی پیدا کند.
- سرویس شما یک کد مجوز ایجاد میکند و آن را به گوگل برمیگرداند. برای انجام این کار، مرورگر کاربر را به همراه کد مجوز پیوست شده به درخواست، به گوگل هدایت کنید.
- گوگل کد مجوز را به نقطه پایانی تبادل توکن شما ارسال میکند، که صحت کد را تأیید میکند و یک توکن دسترسی و یک توکن بهروزرسانی را برمیگرداند. توکن دسترسی یک توکن کوتاهمدت است که سرویس شما آن را به عنوان اعتبارنامه برای دسترسی به APIها میپذیرد. توکن بهروزرسانی یک توکن بلندمدت است که گوگل میتواند آن را ذخیره کند و از آن برای به دست آوردن توکنهای دسترسی جدید پس از انقضا استفاده کند.
- پس از اینکه کاربر فرآیند اتصال حساب کاربری را تکمیل کرد، هر درخواست بعدی که از گوگل ارسال میشود حاوی یک توکن دسترسی است.
دستور العمل اجرا
برای پیادهسازی جریان کد مجوز، این مراحل را دنبال کنید.
مرحله ۱: رسیدگی به درخواستهای مجوز
وقتی گوگل اتصال حساب را آغاز میکند، کاربر را به نقطه پایانی مجوز شما هدایت میکند. برای جزئیات قراردادهای پروتکل و الزامات پارامتر، به نقطه پایانی مجوز مراجعه کنید.
برای مدیریت درخواست، اقدامات زیر را انجام دهید:
اعتبارسنجی درخواست :
- تأیید کنید که
client_idبا Client ID اختصاص داده شده به گوگل مطابقت دارد. - تأیید کنید که
redirect_uriبا آدرس اینترنتی ریدایرکت مورد انتظار گوگل مطابقت دارد:none https://oauth-redirect.googleusercontent.com/r/YOUR_PROJECT_ID https://oauth-redirect-sandbox.googleusercontent.com/r/YOUR_PROJECT_ID - تأیید کنید که
response_typecodeاست.
- تأیید کنید که
احراز هویت کاربر :
- بررسی کنید که آیا کاربر به سرویس شما وارد شده است یا خیر.
- اگر کاربر وارد سیستم نشده است، از او بخواهید مراحل ورود یا ثبتنام شما را تکمیل کند.
تولید کد مجوز :
- یک کد مجوز منحصر به فرد و غیرقابل حدس مرتبط با کاربر و کلاینت ایجاد کنید.
- کد را طوری تنظیم کنید که تقریباً 10 دقیقه دیگر منقضی شود.
ریدایرکت مجدد به گوگل :
- مرورگر را به URL ارائه شده در
redirect_uriهدایت کنید. - پارامترهای پرس و جوی زیر را اضافه کنید:
-
code: کد مجوزی که ایجاد کردهاید. -
state: مقدار وضعیت اصلاح نشدهای که از گوگل دریافت شده است.
-
- مرورگر را به URL ارائه شده در
مرحله ۲: رسیدگی به درخواستهای تبادل توکن
نقطه پایانی تبادل توکن شما دو نوع درخواست را پردازش میکند: تبادل کدها با توکنها، و بهروزرسانی توکنهای دسترسی منقضی شده. برای جزئیات قراردادهای پروتکل و الزامات پارامتر، به نقطه پایانی تبادل توکن مراجعه کنید.
الف. تبادل کدهای مجوز با توکنها
وقتی گوگل کد مجوز را دریافت میکند، نقطه پایانی تبادل توکن شما (POST) را برای بازیابی توکنها فراخوانی میکند.
اعتبارسنجی درخواست :
-
client_idوclient_secretرا تأیید کنید. - بررسی کنید که کد مجوز معتبر است و منقضی نشده است.
- تأیید کنید که
redirect_uriبا مقدار استفاده شده در مرحله ۱ مطابقت دارد. - اگر اعتبارسنجی با شکست مواجه شد، یک
400 Bad Requestبا{"error": "invalid_grant"}برگردانید.
-
توکنهای صدور :
- یک
refresh_tokenبا طول عمر بالا و یکaccess_tokenبا طول عمر کوتاه (معمولاً ۱ ساعت) تولید کنید. - یک HTTP
200 OKبا پاسخ استاندارد توکن JSON برگردانید.
- یک
ب. بهروزرسانی توکنهای دسترسی
وقتی توکن دسترسی منقضی میشود، گوگل با استفاده از توکن رفرش، درخواست جدیدی میدهد.
اعتبارسنجی درخواست :
- شناسه
client_id،client_secretوrefresh_tokenرا تأیید کنید. - اگر اعتبارسنجی با شکست مواجه شد، یک
400 Bad Requestبا{"error": "invalid_grant"}برگردانید.
- شناسه
صدور توکن دسترسی جدید :
- Generate a new short-lived
access_token. - یک
200 OKبه همراه پاسخ توکن JSON (به صورت اختیاری شامل یک توکن بهروزرسانی جدید) برگردانید.
- Generate a new short-lived
رسیدگی به درخواست های اطلاعات کاربر
نقطه پایانی userinfo یک منبع محافظت شده OAuth 2.0 است که ادعاهای مربوط به کاربر پیوند شده را برمیگرداند. پیاده سازی و میزبانی نقطه پایانی اطلاعات کاربر اختیاری است، به جز موارد استفاده زیر:
- ورود به سیستم حساب پیوندی با Google One Tap.
- اشتراک بدون اصطکاک در AndroidTV.
پس از اینکه رمز دسترسی با موفقیت از نقطه پایانی نشانه شما بازیابی شد، Google درخواستی را به نقطه پایانی اطلاعات کاربری شما ارسال می کند تا اطلاعات نمایه اولیه کاربر پیوند داده شده را بازیابی کند.
| سرصفحه های درخواست نقطه پایانی کاربر | |
|---|---|
Authorization header | نشانه دسترسی از نوع Bearer. |
به عنوان مثال، اگر نقطه پایانی اطلاعات کاربری شما در https://myservice.example.com/userinfo در دسترس باشد، ممکن است یک درخواست به شکل زیر باشد:
GET /userinfo HTTP/1.1
Host: myservice.example.com
Authorization: Bearer ACCESS_TOKEN
برای اینکه نقطه پایانی اطلاعات کاربری شما به درخواستها رسیدگی کند، مراحل زیر را انجام دهید:
- رمز دسترسی را از سربرگ Authorization استخراج کنید و اطلاعات کاربر مرتبط با نشانه دسترسی را برگردانید.
- اگر رمز دسترسی نامعتبر است، با استفاده از سربرگ پاسخ
WWW-Authenticateخطای غیرمجاز HTTP 401 را برگردانید. در زیر نمونه ای از پاسخ خطای userinfo آورده شده است:HTTP/1.1 401 Unauthorized WWW-Authenticate: error="invalid_token", error_description="The Access Token expired"
اگر نشانه دسترسی معتبر است، پاسخ HTTP 200 را با شی JSON زیر در بدنه پاسخ HTTPS برگردانید:
{ "sub": "USER_UUID", "email": "EMAIL_ADDRESS", "given_name": "FIRST_NAME", "family_name": "LAST_NAME", "name": "FULL_NAME", "picture": "PROFILE_PICTURE", }پاسخ نقطه پایانی اطلاعات کاربر subیک شناسه منحصر به فرد که کاربر را در سیستم شما شناسایی می کند. emailآدرس ایمیل کاربر. given_nameاختیاری: نام کاربر. family_nameاختیاری: نام خانوادگی کاربر. nameاختیاری: نام کامل کاربر. pictureاختیاری: تصویر نمایه کاربر.
اعتبارسنجی پیادهسازی شما
شما میتوانید پیادهسازی خود را با استفاده از ابزار OAuth 2.0 Playground اعتبارسنجی کنید.
در ابزار، مراحل زیر را انجام دهید:
- برای باز کردن پنجره پیکربندی OAuth 2.0، پیکربندی کلیک کنید.
- در فیلد جریان OAuth ، گزینه Client-side را انتخاب کنید.
- در فیلد OAuth Endpoints ، گزینه Custom را انتخاب کنید.
- نقطه پایانی OAuth 2.0 خود و شناسه کلاینتی که به گوگل اختصاص دادهاید را در فیلدهای مربوطه مشخص کنید.
- در بخش مرحله ۱ ، هیچ محدوده گوگلی را انتخاب نکنید. در عوض، این فیلد را خالی بگذارید یا یک محدوده معتبر برای سرور خود تایپ کنید (یا اگر از محدودههای OAuth استفاده نمیکنید، یک رشته دلخواه). وقتی کارتان تمام شد، روی Authorize APIs کلیک کنید.
- در بخشهای مرحله ۲ و مرحله ۳ ، جریان OAuth 2.0 را بررسی کنید و تأیید کنید که هر مرحله طبق برنامه عمل میکند.
شما میتوانید پیادهسازی خود را با استفاده از ابزار Google Account Linking Demo اعتبارسنجی کنید.
در ابزار، مراحل زیر را انجام دهید:
- روی دکمه ورود با گوگل کلیک کنید.
- حسابی را که میخواهید پیوند دهید انتخاب کنید.
- شناسه سرویس را وارد کنید.
- به صورت اختیاری یک یا چند محدودهای را که برای دسترسی به آنها درخواست خواهید کرد، وارد کنید.
- روی شروع نسخه نمایشی کلیک کنید.
- وقتی از شما خواسته شد، تأیید کنید که میتوانید درخواست پیوند را تأیید یا رد کنید.
- تأیید کنید که به پلتفرم خود هدایت میشوید.