
Akun ditautkan menggunakan alur kode otorisasi OAuth 2.0 standar industri.
OAuth 2.1 &PKCE untuk Agen
Untuk agen AI tanpa status dan pipeline multi-modal, sebaiknya terapkan OAuth 2.1.
- PKCE (Proof Key for Code Exchange): Harus digunakan untuk mengamankan alur kode otorisasi, sehingga mencegah serangan intersepsi.
- Tidak Ada Alur Implisit: Alur implisit mengekspos token akses di URL, yang merupakan risiko keamanan untuk lingkungan agen.
Layanan Anda harus mendukung endpoint otorisasi dan pertukaran token yang sesuai dengan OAuth 2.0/2.1.
Membuat project
Untuk membuat project Anda agar dapat menggunakan penautan akun:
- Buka Konsol Google API.
- Klik Buat proyek.
- Masukkan nama atau terima saran yang dibuat.
- Konfirmasi atau edit kolom yang tersisa.
- Klik Buat.
Untuk melihat project ID Anda:
- Buka Konsol Google API.
- Cari project Anda di tabel pada halaman landing. Project ID muncul di kolom ID.
Mengonfigurasi Layar Izin OAuth Anda
Proses Penautan Akun Google mencakup layar izin yang memberi tahu pengguna aplikasi yang meminta akses ke data mereka, jenis data yang diminta, dan persyaratan yang berlaku. Anda harus mengonfigurasi layar izin OAuth sebelum membuat ID klien Google API.
- Buka halaman Layar izin OAuth di konsol API Google.
- Jika diminta, pilih project yang baru saja Anda buat.
Di halaman "Layar izin OAuth", isi formulir, lalu klik tombol “Simpan”.
Nama aplikasi: Nama aplikasi yang meminta izin. Nama harus mencerminkan aplikasi Anda secara akurat dan konsisten dengan nama aplikasi yang dilihat pengguna di tempat lain. Nama aplikasi akan ditampilkan di layar izin Penautan Akun.
Logo aplikasi: Gambar di layar izin yang akan membantu pengguna mengenali aplikasi Anda. Logo ditampilkan di layar izin Penautan akun dan di setelan akun
Email dukungan: Agar pengguna dapat menghubungi Anda jika ada pertanyaan tentang izin mereka.
Cakupan untuk Google API: Cakupan memungkinkan aplikasi Anda mengakses data pribadi Google pengguna Anda. Untuk kasus penggunaan Penautan Akun Google, cakupan default (email, profil, openid) sudah cukup, Anda tidak perlu menambahkan cakupan sensitif. Secara umum, praktik terbaiknya adalah meminta cakupan secara bertahap, pada saat akses diperlukan, bukan di awal. Pelajari lebih lanjut.
Domain yang diizinkan: Guna melindungi Anda dan pengguna Anda, Google hanya mengizinkan aplikasi yang melakukan autentikasi menggunakan OAuth untuk menggunakan Domain yang Diizinkan. Link aplikasi Anda harus dihosting di Domain yang Diotorisasi. Pelajari lebih lanjut.
Link Halaman Beranda Aplikasi: Halaman beranda untuk aplikasi Anda. Harus dihosting di Domain yang Diotorisasi.
Link Kebijakan Privasi Aplikasi: Ditampilkan di layar izin Penautan Akun Google. Harus dihosting di Domain yang Diotorisasi.
Link Persyaratan Layanan Aplikasi (Opsional): Harus dihosting di Domain yang Diotorisasi.
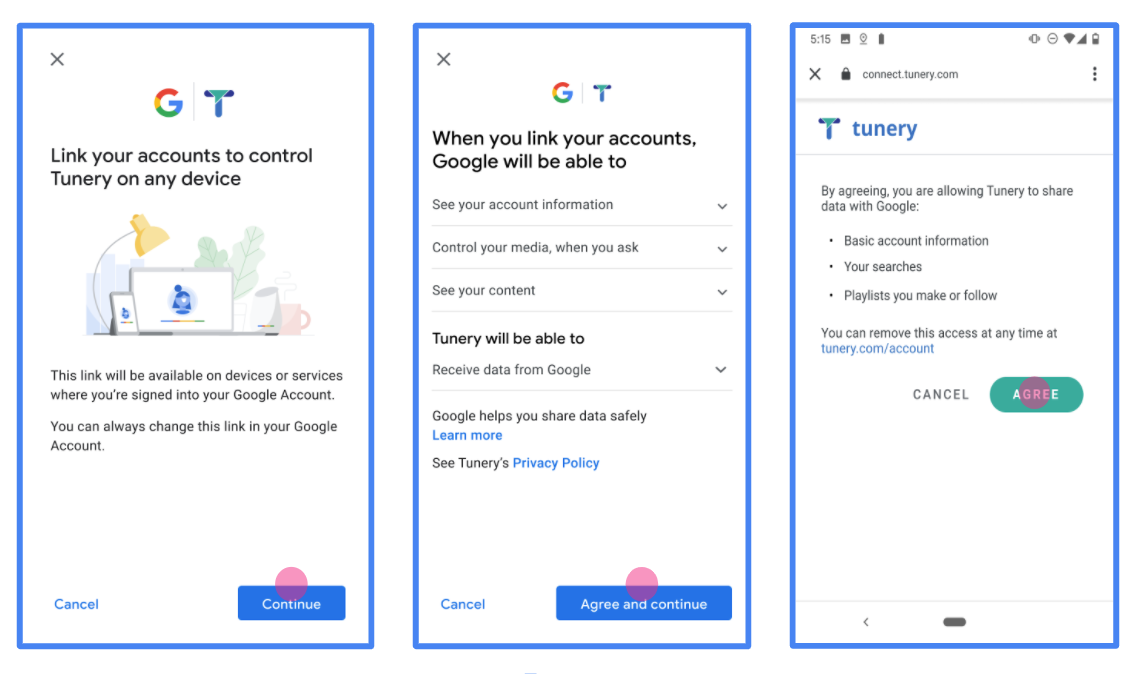
Gambar 1. Layar Izin Penautan Akun Google untuk Aplikasi fiktif, Tunery
Periksa "Status Verifikasi", jika aplikasi Anda memerlukan verifikasi, klik tombol "Kirim Untuk Verifikasi" untuk mengirimkan aplikasi Anda untuk diverifikasi. Lihat persyaratan verifikasi OAuth untuk mengetahui detailnya.
Mengimplementasikan server OAuth
Implementasi server OAuth 2.0 dari alur kode otorisasi terdiri dari dua endpoint, yang disediakan oleh layanan Anda melalui HTTPS. Endpoint pertama adalah endpoint otorisasi, yang bertanggung jawab untuk menemukan atau mendapatkan izin dari pengguna untuk akses data. Endpoint otorisasi menampilkan UI login kepada pengguna Anda yang belum login dan mencatat izin untuk akses yang diminta. Endpoint kedua adalah endpoint pertukaran token, yang digunakan untuk mendapatkan string terenkripsi, yang disebut token, yang mengotorisasi pengguna untuk mengakses layanan Anda.
Saat aplikasi Google perlu memanggil salah satu API layanan Anda, Google menggunakan endpoint ini bersama-sama untuk mendapatkan izin dari pengguna Anda untuk memanggil API ini atas nama mereka.
Penautan Akun Google: Alur Kode Otorisasi OAuth
Diagram urutan berikut menjelaskan interaksi antara Pengguna, Google, dan endpoint layanan Anda.
Peran dan tanggung jawab
Tabel berikut menentukan peran dan tanggung jawab aktor dalam alur OAuth Penautan Akun Google (GAL). Perhatikan bahwa di GAL, Google bertindak sebagai Klien OAuth, sedangkan layanan Anda bertindak sebagai Penyedia Identitas/Layanan.
| Aktor / Komponen | Peran GAL | Tanggung Jawab |
|---|---|---|
| Aplikasi / Server Google | Klien OAuth | Memulai alur, menerima kode otorisasi, menukarnya dengan token, dan menyimpannya dengan aman untuk mengakses API layanan Anda. |
| Endpoint Otorisasi Anda | Server Otorisasi | Mengautentikasi pengguna Anda dan mendapatkan izin mereka untuk membagikan akses ke data mereka kepada Google. |
| Endpoint Pertukaran Token Anda | Server Otorisasi | Memvalidasi kode otorisasi dan token refresh, serta menerbitkan token akses ke Server Google. |
| URI Pengalihan Google | Endpoint Callback | Menerima pengalihan pengguna dari layanan otorisasi Anda dengan nilai
code dan state. |
Sesi alur kode otorisasi OAuth 2.0 yang dimulai oleh Google memiliki alur berikut:
- Google membuka endpoint otorisasi Anda di browser pengguna. Jika alur dimulai di perangkat khusus suara untuk Tindakan, Google akan mentransfer eksekusi ke ponsel.
- Pengguna login, jika belum login, dan memberikan izin kepada Google untuk mengakses data mereka dengan API Anda, jika mereka belum memberikan izin.
- Layanan Anda membuat kode otorisasi dan menampilkannya ke Google. Untuk melakukannya, alihkan browser pengguna kembali ke Google dengan kode otorisasi yang dilampirkan ke permintaan.
- Google mengirimkan kode otorisasi ke endpoint pertukaran token Anda, yang memverifikasi keaslian kode dan menampilkan token akses dan token refresh. Token akses adalah token berumur pendek yang diterima layanan Anda sebagai kredensial untuk mengakses API. Token refresh adalah token berumur panjang yang dapat disimpan dan digunakan Google untuk mendapatkan token akses baru saat masa berlakunya berakhir.
- Setelah pengguna menyelesaikan alur penautan akun, setiap permintaan berikutnya yang dikirim dari Google akan berisi token akses.
Resep Implementasi
Ikuti langkah-langkah berikut untuk mengimplementasikan alur Kode Otorisasi.
Langkah 1: Menangani permintaan otorisasi
Saat Google memulai penautan akun, Google akan mengalihkan pengguna ke endpoint otorisasi Anda. Untuk mengetahui detail kontrak protokol dan persyaratan parameter, lihat Endpoint Otorisasi.
Untuk menangani permintaan, lakukan tindakan berikut:
Validasi permintaan:
- Pastikan
client_idcocok dengan Client ID yang ditetapkan ke Google. - Pastikan
redirect_uricocok dengan URL pengalihan Google yang diharapkan:none https://oauth-redirect.googleusercontent.com/r/YOUR_PROJECT_ID https://oauth-redirect-sandbox.googleusercontent.com/r/YOUR_PROJECT_ID - Pastikan
response_typeadalahcode.
- Pastikan
Autentikasi pengguna:
- Periksa apakah pengguna login ke layanan Anda.
- Jika pengguna tidak login, minta mereka untuk menyelesaikan alur login atau pendaftaran Anda.
Buat kode otorisasi:
- Buat kode otorisasi unik yang tidak dapat ditebak dan terkait dengan pengguna dan klien.
- Tetapkan masa berlaku kode menjadi sekitar 10 menit.
Alihkan kembali ke Google:
- Alihkan browser ke URL yang diberikan di
redirect_uri. - Tambahkan parameter kueri berikut:
code: Kode otorisasi yang Anda buat.state: Nilai status yang tidak diubah yang diterima dari Google.
- Alihkan browser ke URL yang diberikan di
Langkah 2: Menangani permintaan pertukaran token
Endpoint pertukaran token Anda memproses dua jenis permintaan: menukar kode dengan token, dan memperbarui token akses yang masa berlakunya telah berakhir. Untuk mengetahui detail kontrak protokol dan persyaratan parameter, lihat Endpoint Pertukaran Token.
A. Menukar kode otorisasi dengan token
Saat menerima kode otorisasi, Google akan memanggil endpoint pertukaran token Anda (POST) untuk mengambil token.
Validasi permintaan:
- Verifikasi
client_iddanclient_secret. - Pastikan kode otorisasi valid dan masa berlakunya belum berakhir.
- Pastikan
redirect_uricocok dengan nilai yang digunakan di Langkah 1. - Jika validasi gagal, tampilkan HTTP
400 Bad Requestdengan{"error": "invalid_grant"}.
- Verifikasi
Terbitkan token:
- Buat
refresh_tokenberumur panjang danaccess_tokenberumur pendek (biasanya 1 jam). - Tampilkan
200 OKHTTP dengan respons token JSON standar.
- Buat
B. Memperbarui token akses
Saat masa berlaku token akses berakhir, Google akan meminta token baru menggunakan token refresh.
Validasi permintaan:
- Verifikasi
client_id,client_secret, danrefresh_token. - Jika validasi gagal, tampilkan HTTP
400 Bad Requestdengan{"error": "invalid_grant"}.
- Verifikasi
Terbitkan token akses baru:
- Buat
access_tokenberumur pendek baru. - Tampilkan
200 OKHTTP dengan respons token JSON (secara opsional menyertakan token refresh baru).
- Buat
Menangani permintaan info pengguna
Endpoint userinfo adalah resource yang dilindungi OAuth 2.0 yang menampilkan klaim tentang pengguna yang ditautkan. Menerapkan dan menghosting endpoint userinfo bersifat opsional, kecuali untuk kasus penggunaan berikut:
- Login dengan Akun Tertaut dengan Google One Ketuk.
- Langganan tanpa hambatan di Android TV.
Setelah token akses berhasil diambil dari endpoint token Anda, Google akan mengirimkan permintaan ke endpoint userinfo Anda untuk mengambil informasi profil dasar tentang pengguna yang ditautkan.
| header permintaan endpoint userinfo | |
|---|---|
Authorization header |
Token akses jenis Bearer. |
Misalnya, jika endpoint userinfo Anda tersedia di
https://myservice.example.com/userinfo, permintaan mungkin akan terlihat seperti berikut:
GET /userinfo HTTP/1.1
Host: myservice.example.com
Authorization: Bearer ACCESS_TOKEN
Agar endpoint userinfo Anda dapat menangani permintaan, lakukan langkah-langkah berikut:
- Ekstrak token akses dari header Otorisasi dan tampilkan informasi untuk pengguna yang terkait dengan token akses.
- Jika token akses tidak valid, tampilkan error HTTP 401 Tidak Sah dengan menggunakan Header Respons
WWW-Authenticate. Berikut adalah contoh respons error userinfo:HTTP/1.1 401 Unauthorized WWW-Authenticate: error="invalid_token", error_description="The Access Token expired"
Jika token akses valid, tampilkan dan respons HTTP 200 dengan objek JSON berikut dalam isi HTTPS respons:
{ "sub": "USER_UUID", "email": "EMAIL_ADDRESS", "given_name": "FIRST_NAME", "family_name": "LAST_NAME", "name": "FULL_NAME", "picture": "PROFILE_PICTURE", }respons endpoint userinfo subID unik yang mengidentifikasi pengguna di sistem Anda. emailAlamat email pengguna. given_nameOpsional: Nama depan pengguna. family_nameOpsional: Nama belakang pengguna. nameOpsional: Nama lengkap pengguna. pictureOpsional: Foto profil pengguna.
Memvalidasi implementasi
Anda dapat memvalidasi penerapan dengan menggunakan alat OAuth 2.0 Playground.
Di alat, lakukan langkah-langkah berikut:
- Klik Konfigurasi untuk membuka jendela Konfigurasi OAuth 2.0.
- Di kolom OAuth flow, pilih Client-side.
- Di kolom OAuth Endpoints, pilih Custom.
- Tentukan endpoint OAuth 2.0 dan client ID yang Anda tetapkan ke Google di kolom yang sesuai.
- Di bagian Langkah 1, jangan pilih cakupan Google apa pun. Sebagai gantinya, biarkan kolom ini kosong atau ketik cakupan yang valid untuk server Anda (atau string arbitrer jika Anda tidak menggunakan cakupan OAuth). Setelah selesai, klik Izinkan API.
- Di bagian Langkah 2 dan Langkah 3, ikuti alur OAuth 2.0 dan verifikasi bahwa setiap langkah berfungsi sebagaimana mestinya.
Anda dapat memvalidasi penerapan dengan menggunakan alat Demo Penautan Akun Google.
Di alat, lakukan langkah-langkah berikut:
- Klik tombol Login dengan Google.
- Pilih akun yang ingin Anda tautkan.
- Masukkan ID layanan.
- Secara opsional, masukkan satu atau beberapa cakupan yang akan Anda minta aksesnya.
- Klik Mulai Demo.
- Jika diminta, konfirmasi bahwa Anda dapat menyetujui dan menolak permintaan penautan.
- Konfirmasi bahwa Anda dialihkan ke platform Anda.