
הקישור בין החשבונות מתבצע באמצעות תהליך קוד ההרשאה של OAuth 2.0, שהוא תקן בתעשייה.
OAuth 2.1 ו-PKCE לסוכנים
לסוכני AI חסרי מצב ולצינורות מולטי-מודאליים, מומלץ להשתמש ב-OAuth 2.1.
- PKCE (Proof Key for Code Exchange): חובה להשתמש בו כדי לאבטח את הרשאה באמצעות קוד ולמנוע מתקפות יירוט.
- אין זרם הענקת גישה משתמע: זרם הענקת הגישה המשתמע חושף את טוקני הגישה בכתובת ה-URL, מה שיוצר סיכון אבטחה בסביבות של סוכנים.
השירות שלכם צריך לתמוך בנקודות קצה של הרשאה והחלפת אסימונים שתואמות ל-OAuth 2.0/2.1.
Create the project
To create your project to use account linking:
- Go to the Google API Console.
- Click Create project.
- Enter a name or accept the generated suggestion.
- Confirm or edit any remaining fields.
- Click Create.
To view your project ID:
- Go to the Google API Console.
- Find your project in the table on the landing page. The project ID appears in the ID column.
Configure your OAuth Consent Screen
The Google Account Linking process includes a consent screen which tells users the application requesting access to their data, what kind of data they are asking for and the terms that apply. You will need to configure your OAuth consent screen before generating a Google API client ID.
- Open the OAuth consent screen page of the Google APIs console.
- If prompted, select the project you just created.
On the "OAuth consent screen" page, fill out the form and click the “Save” button.
Application name: The name of the application asking for consent. The name should accurately reflect your application and be consistent with the application name users see elsewhere. The application name will be shown on the Account Linking consent screen.
Application logo: An image on the consent screen that will help users recognize your app. The logo is shown on Account linking consent screen and on account settings
Support email: For users to contact you with questions about their consent.
Scopes for Google APIs: Scopes allow your application to access your user's private Google data. For the Google Account Linking use case, default scope (email, profile, openid) is sufficient, you don’t need to add any sensitive scopes. It is generally a best practice to request scopes incrementally, at the time access is required, rather than up front. Learn more.
Authorized domains: To protect you and your users, Google only allows applications that authenticate using OAuth to use Authorized Domains. Your applications' links must be hosted on Authorized Domains. Learn more.
Application Homepage link: Home page for your application. Must be hosted on an Authorized Domain.
Application Privacy Policy link: Shown on Google Account Linking consent screen. Must be hosted on an Authorized Domain.
Application Terms of Service link (Optional): Must be hosted on an Authorized Domain.
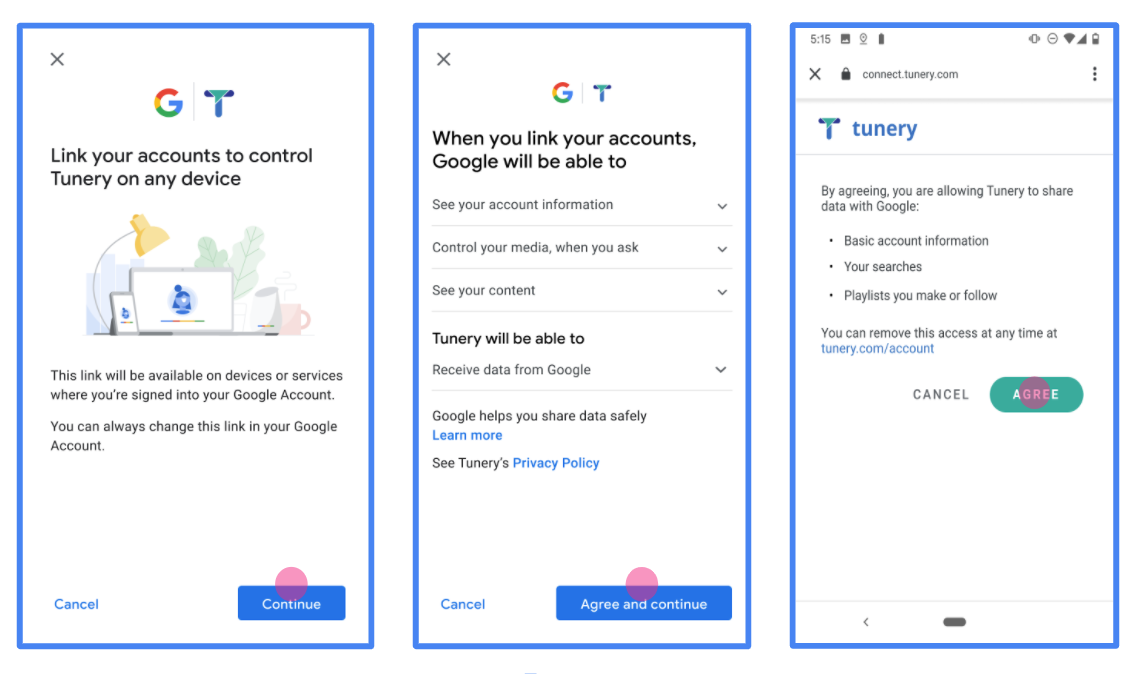
Figure 1. Google Account Linking Consent Screen for a fictitious Application, Tunery
Check "Verification Status", if your application needs verification then click the "Submit For Verification" button to submit your application for verification. Refer to OAuth verification requirements for details.
הטמעת שרת OAuth
An OAuth 2.0 server implementation of the authorization code flow consists of two endpoints, which your service makes available by HTTPS. The first endpoint is the authorization endpoint, which is responsible for finding or obtaining consent from users for data access. The authorization endpoint presents a sign-in UI to your users that aren't already signed in and records consent to the requested access. The second endpoint is the token exchange endpoint, which is used to obtain encrypted strings, called tokens, that authorize a user to access your service.
When a Google application needs to call one of your service's APIs, Google uses these endpoints together to get permission from your users to call these APIs on their behalf.
Google Account Linking: OAuth Authorization Code Flow
The following sequence diagram details interactions between the User, Google, and your service's endpoints.
Roles and responsibilities
The following table defines the roles and responsibilities of the actors in the Google Account Linking (GAL) OAuth flow. Note that in GAL, Google acts as the OAuth Client, while your service acts as the Identity/Service Provider.
| Actor / Component | GAL Role | Responsibilities |
|---|---|---|
| Google App / Server | OAuth Client | Initiates the flow, receives the authorization code, exchanges it for tokens, and securely stores them to access your service's APIs. |
| Your Authorization Endpoint | Authorization Server | Authenticates your users and obtains their consent to share access to their data with Google. |
| Your Token Exchange Endpoint | Authorization Server | Validates authorization codes and refresh tokens, and issues access tokens to the Google Server. |
| Google Redirect URI | Callback Endpoint | Receives the user redirect from your authorization service with the
code and state values. |
An OAuth 2.0 authorization code flow session initiated by Google has the following flow:
- Google opens your authorization endpoint in the user's browser. If the flow started on a voice-only device for an Action, Google transfers the execution to a phone.
- The user signs in, if not signed in already, and grants Google permission to access their data with your API, if they haven't already granted permission.
- Your service creates an authorization code and returns it to Google. To do so, redirect the user's browser back to Google with the authorization code attached to the request.
- Google sends the authorization code to your token exchange endpoint, which verifies the authenticity of the code and returns an access token and a refresh token. The access token is a short-lived token that your service accepts as credentials to access APIs. The refresh token is a long-lived token that Google can store and use to acquire new access tokens when they expire.
- After the user has completed the account linking flow, every subsequent request sent from Google contains an access token.
Implementation Recipe
Follow these steps to implement the Authorization Code flow.
Step 1: Handle authorization requests
When Google initiates account linking, it redirects the user to your authorization endpoint. For detailed protocol contracts and parameter requirements, see the Authorization Endpoint.
To handle the request, perform the following actions:
Validate the request:
- Confirm that the
client_idmatches the Client ID assigned to Google. - Confirm that the
redirect_urimatches the expected Google redirect URL:- Prod:
https://oauth-redirect.googleusercontent.com/r/YOUR_PROJECT_ID - Sandbox:
https://oauth-redirect-sandbox.googleusercontent.com/r/YOUR_PROJECT_ID
- Prod:
- Verify that
response_typeiscode.
- Confirm that the
Authenticate the user:
- Check if the user is signed in to your service.
- If the user is not signed in, prompt them to complete your sign-in or sign-up flow.
Generate authorization code:
- Create a unique, non-guessable authorization code associated with the user and client.
- Set the code to expire in approximately 10 minutes.
Redirect back to Google:
- Redirect the browser to the URL provided in
redirect_uri. - Append the following query parameters:
code: The authorization code you generated.state: The unmodified state value received from Google.
- Redirect the browser to the URL provided in
Step 2: Handle token exchange requests
Your token exchange endpoint processes two types of requests: exchanging codes for tokens, and refreshing expired access tokens. For detailed protocol contracts and parameter requirements, see the Token Exchange Endpoint.
A. Exchange authorization codes for tokens
When Google receives the authorization code, it calls your token exchange endpoint (POST) to retrieve tokens.
Validate the request:
- Verify
client_idandclient_secret. - Verify the authorization code is valid and not expired.
- Confirm
redirect_urimatches the value used in Step 1. - If validation fails, return an HTTP
400 Bad Requestwith{"error": "invalid_grant"}.
- Verify
Issue tokens:
- Generate a long-lived
refresh_tokenand a short-livedaccess_token(typically 1 hour). - Return an HTTP
200 OKwith the standard JSON token response.
- Generate a long-lived
B. Refresh access tokens
When the access token expires, Google requests a new one using the refresh token.
Validate the request:
- Verify
client_id,client_secret, andrefresh_token. - If validation fails, return an HTTP
400 Bad Requestwith{"error": "invalid_grant"}.
- Verify
Issue new access token:
- Generate a new short-lived
access_token. - Return an HTTP
200 OKwith the JSON token response (optionally including a new refresh token).
- Generate a new short-lived
טיפול בבקשות למידע על משתמשים
נקודת הקצה של userinfo היא משאב מוגן ב-OAuth 2.0 שמחזיר תלונות לגבי המשתמש המקושר. ההטמעה והאירוח של נקודת הקצה של userinfo הם אופציונליים, חוץ מאשר בתרחישים הבאים לדוגמה:
- כניסה לחשבון המקושר באמצעות Google One Tap.
- מינוי פשוט וקל ב-AndroidTV.
אחרי שהאחזור של אסימון הגישה מנקודת הקצה של האסימון מתבצע, Google שולחת בקשה לנקודת הקצה (endpoint) של userinfo כדי לאחזר פרטי פרופיל בסיסיים של המשתמש המקושר.
| כותרות של בקשות של נקודות קצה של userinfo | |
|---|---|
Authorization header |
אסימון הגישה מסוג נושא. |
לדוגמה, אם נקודת הקצה של Userinfo זמינה
https://myservice.example.com/userinfo, בקשה עשויה להיראות כך:
GET /userinfo HTTP/1.1
Host: myservice.example.com
Authorization: Bearer ACCESS_TOKEN
כדי שנקודת הקצה של userinfo תטפל בבקשות, מבצעים את השלבים הבאים:
- מחלצים את אסימון הגישה מהכותרת Authorization ומחזירים מידע עבור המשתמש שמשויך לאסימון הגישה.
- אם אסימון הגישה לא חוקי, צריך להחזיר שגיאה מסוג HTTP 401 מאושר עם שימוש בכותרת התגובה
WWW-Authenticate. דוגמה לתגובה עם שגיאה של userinfo:HTTP/1.1 401 Unauthorized WWW-Authenticate: error="invalid_token", error_description="The Access Token expired"
אם אסימון הגישה תקין, מוחזר ותגובת HTTP 200 עם אובייקט ה-JSON הבא בגוף ה-HTTPS תגובה:
{ "sub": "USER_UUID", "email": "EMAIL_ADDRESS", "given_name": "FIRST_NAME", "family_name": "LAST_NAME", "name": "FULL_NAME", "picture": "PROFILE_PICTURE", }תגובה של נקודת הקצה של userinfo subמזהה ייחודי שמזהה את המשתמש במערכת שלכם. emailכתובת האימייל של המשתמש. given_nameאופציונלי: השם הפרטי של המשתמש. family_nameאופציונלי: שם המשפחה של המשתמש. nameאופציונלי: השם המלא של המשתמש. pictureאופציונלי: תמונת פרופיל של המשתמש.
אימות ההטמעה
כדי לאמת את ההטמעה, אפשר להשתמש בכלי OAuth 2.0 Playground.
בכלי, מבצעים את השלבים הבאים:
- לוחצים על Configuration (הגדרה) כדי לפתוח את חלון ההגדרה של OAuth 2.0.
- בשדה OAuth flow (תהליך OAuth), בוחרים באפשרות Client-side (בצד הלקוח).
- בשדה OAuth Endpoints (נקודות קצה של OAuth), בוחרים באפשרות Custom (מותאם אישית).
- בשדות המתאימים, מציינים את נקודת הקצה של OAuth 2.0 ואת מזהה הלקוח שהקציתם ל-Google.
- בקטע Step 1, לא בוחרים אף היקף של Google. במקום זאת, משאירים את השדה הזה ריק או מקלידים היקף הרשאות שתקף לשרת (או מחרוזת שרירותית אם לא משתמשים בהיקפי הרשאות OAuth). בסיום, לוחצים על הרשאת ממשקי API.
- בקטעים שלב 2 ושלב 3, עוברים על תהליך ההרשאה באמצעות OAuth 2.0 ומוודאים שכל שלב פועל כמו שצריך.
כדי לאמת את ההטמעה, אפשר להשתמש בכלי Google Account Linking Demo.
בכלי, מבצעים את השלבים הבאים:
- לוחצים על הכפתור כניסה באמצעות חשבון Google.
- בוחרים את החשבון שרוצים לקשר.
- מזינים את מזהה השירות.
- אפשר להזין היקף אחד או יותר שרוצים לבקש גישה אליהם.
- לוחצים על התחלת ההדגמה.
- כשמופיעה הבקשה, מאשרים שרוצים להסכים לבקשת הקישור או לדחות אותה.
- מוודאים שמופנים לפלטפורמה שלכם.