
खातों को लिंक करने के लिए, इंडस्ट्री के स्टैंडर्ड OAuth 2.0 ऑथराइज़ेशन कोड फ़्लो का इस्तेमाल किया जाता है.
एजेंट के लिए OAuth 2.1 और पीकेसीई
स्टेटलेस एआई एजेंट और मल्टी-मॉडल पाइपलाइन के लिए, OAuth 2.1 को लागू करने का सुझाव दिया जाता है.
- पीकेसीई (प्रूफ़ की फ़ॉर कोड एक्सचेंज): ऑथराइज़ेशन कोड फ़्लो को सुरक्षित करने के लिए, इसका इस्तेमाल करना ज़रूरी है. इससे इंटरसेप्शन हमलों को रोका जा सकता है.
- इंप्लिसिट फ़्लो नहीं: इंप्लिसिट फ़्लो, यूआरएल में ऐक्सेस टोकन दिखाता है, इससे एजेंट के एनवायरमेंट के लिए सुरक्षा से जुड़ा जोखिम पैदा होता है.
आपकी सेवा में, OAuth 2.0/2.1 के मुताबिक ऑथराइज़ेशन और टोकन एक्सचेंज एंडपॉइंट काम करने चाहिए.
Create the project
To create your project to use account linking:
- Go to the Google API Console.
- Click Create project.
- Enter a name or accept the generated suggestion.
- Confirm or edit any remaining fields.
- Click Create.
To view your project ID:
- Go to the Google API Console.
- Find your project in the table on the landing page. The project ID appears in the ID column.
Configure your OAuth Consent Screen
The Google Account Linking process includes a consent screen which tells users the application requesting access to their data, what kind of data they are asking for and the terms that apply. You will need to configure your OAuth consent screen before generating a Google API client ID.
- Open the OAuth consent screen page of the Google APIs console.
- If prompted, select the project you just created.
On the "OAuth consent screen" page, fill out the form and click the “Save” button.
Application name: The name of the application asking for consent. The name should accurately reflect your application and be consistent with the application name users see elsewhere. The application name will be shown on the Account Linking consent screen.
Application logo: An image on the consent screen that will help users recognize your app. The logo is shown on Account linking consent screen and on account settings
Support email: For users to contact you with questions about their consent.
Scopes for Google APIs: Scopes allow your application to access your user's private Google data. For the Google Account Linking use case, default scope (email, profile, openid) is sufficient, you don’t need to add any sensitive scopes. It is generally a best practice to request scopes incrementally, at the time access is required, rather than up front. Learn more.
Authorized domains: To protect you and your users, Google only allows applications that authenticate using OAuth to use Authorized Domains. Your applications' links must be hosted on Authorized Domains. Learn more.
Application Homepage link: Home page for your application. Must be hosted on an Authorized Domain.
Application Privacy Policy link: Shown on Google Account Linking consent screen. Must be hosted on an Authorized Domain.
Application Terms of Service link (Optional): Must be hosted on an Authorized Domain.
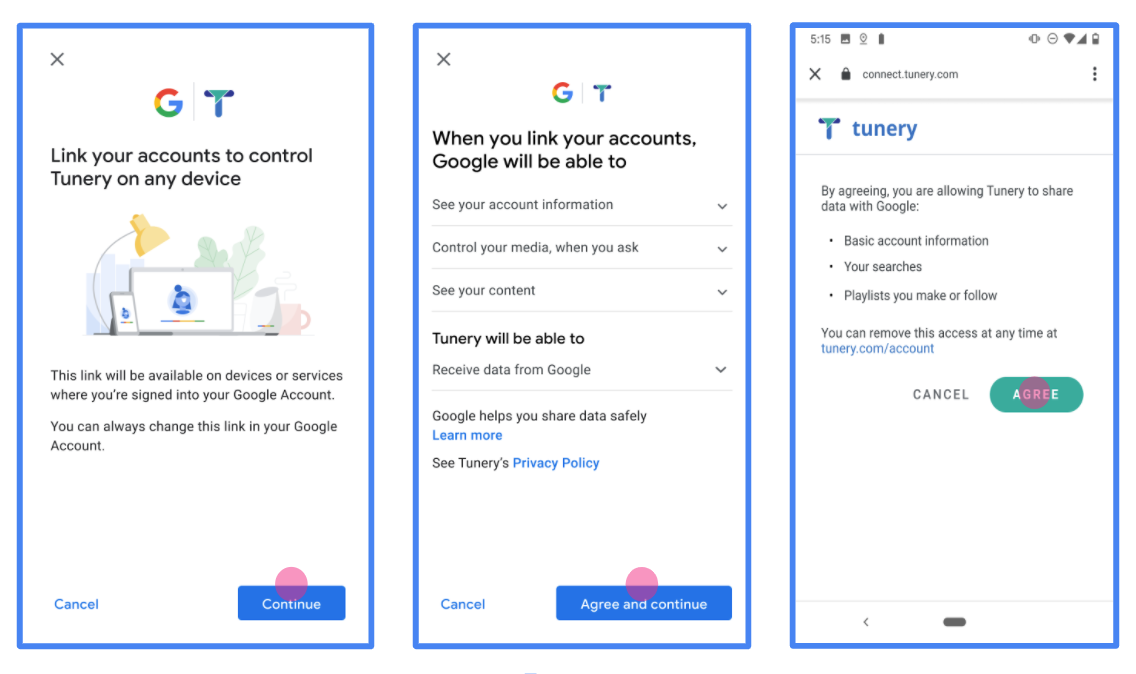
Figure 1. Google Account Linking Consent Screen for a fictitious Application, Tunery
Check "Verification Status", if your application needs verification then click the "Submit For Verification" button to submit your application for verification. Refer to OAuth verification requirements for details.
अपना OAuth सर्वर लागू करना
ऑथराइज़ेशन कोड फ़्लो के लिए, OAuth 2.0 सर्वर को लागू करने के लिए दो एंडपॉइंट की ज़रूरत होती है. आपकी सेवा, एचटीटीपीएस के ज़रिए इन एंडपॉइंट को उपलब्ध कराती है. पहला एंडपॉइंट, ऑथराइज़ेशन एंडपॉइंट होता है. यह डेटा ऐक्सेस करने के लिए, उपयोगकर्ताओं से सहमति पाने या हासिल करने के लिए ज़िम्मेदार होता है. ऑथराइज़ेशन एंडपॉइंट, आपके उन उपयोगकर्ताओं को साइन-इन यूज़र इंटरफ़ेस (यूआई) दिखाता है जिन्होंने पहले से साइन इन नहीं किया है. साथ ही, यह अनुरोध किए गए ऐक्सेस के लिए सहमति रिकॉर्ड करता है. दूसरा एंडपॉइंट, टोकन एक्सचेंज एंडपॉइंट होता है. इसका इस्तेमाल, एनक्रिप्ट किए गए स्ट्रिंग पाने के लिए किया जाता है. इन्हें टोकन कहा जाता है. ये टोकन, किसी उपयोगकर्ता को आपकी सेवा को ऐक्सेस करने की अनुमति देते हैं.
जब Google के किसी ऐप्लिकेशन को आपकी सेवा के किसी एपीआई को कॉल करना होता है, तो Google इन एंडपॉइंट का इस्तेमाल एक साथ करता है, ताकि आपके उपयोगकर्ताओं से उनकी ओर से इन एपीआई को कॉल करने की अनुमति मिल सके.
Google खाता लिंक करना: OAuth ऑथराइज़ेशन कोड फ़्लो
इस क्रम के डायग्राम में, उपयोगकर्ता, Google, और आपकी सेवा के एंडपॉइंट के बीच होने वाले इंटरैक्शन के बारे में बताया गया है.
भूमिकाएं और ज़िम्मेदारियां
इस टेबल में, Google खाता लिंक करने (जीएएल) के OAuth फ़्लो में शामिल लोगों की भूमिकाओं और ज़िम्मेदारियों के बारे में बताया गया है. ध्यान दें कि जीएएल में, Google, OAuth क्लाइंट के तौर पर काम करता है. वहीं, आपकी सेवा, पहचान/सेवा देने वाली कंपनी के तौर पर काम करती है.
| ऐक्टर / कॉम्पोनेंट | जीएएल में भूमिका | ज़िम्मेदारियां |
|---|---|---|
| Google ऐप्लिकेशन / सर्वर | OAuth क्लाइंट | यह फ़्लो शुरू करता है, ऑथराइज़ेशन कोड हासिल करता है, उसे टोकन के लिए एक्सचेंज करता है, और आपकी सेवा के एपीआई को ऐक्सेस करने के लिए, उन्हें सुरक्षित तरीके से सेव करता है. |
| आपका ऑथराइज़ेशन एंडपॉइंट | ऑथराइज़ेशन सर्वर | यह आपके उपयोगकर्ताओं की पुष्टि करता है और Google के साथ अपने डेटा का ऐक्सेस शेयर करने के लिए, उनकी सहमति लेता है. |
| आपका टोकन एक्सचेंज एंडपॉइंट | ऑथराइज़ेशन सर्वर | यह ऑथराइज़ेशन कोड और रीफ़्रेश टोकन की पुष्टि करता है. साथ ही, Google सर्वर को ऐक्सेस टोकन जारी करता है. |
| Google रीडायरेक्ट यूआरआई | कॉलबैक एंडपॉइंट | यह
code और state वैल्यू के साथ, आपके ऑथराइज़ेशन सेवा से उपयोगकर्ता के रीडायरेक्ट को स्वीकार करता है. |
Google की ओर से शुरू किए गए OAuth 2.0 ऑथराइज़ेशन कोड फ़्लो सेशन का फ़्लो इस तरह होता है:
- Google, उपयोगकर्ता के ब्राउज़र में आपका ऑथराइज़ेशन एंडपॉइंट खोलता है. अगर किसी कार्रवाई के लिए, सिर्फ़ आवाज़ वाले डिवाइस पर फ़्लो शुरू किया गया है, तो Google, फ़ोन पर कार्रवाई ट्रांसफ़र कर देता है.
- उपयोगकर्ता साइन इन करता है. अगर उसने पहले से साइन इन नहीं किया है, तो वह Google को आपके एपीआई की मदद से अपने डेटा को ऐक्सेस करने की अनुमति देता है. अगर उसने पहले से अनुमति नहीं दी है, तो वह अनुमति देता है.
- आपकी सेवा, एक ऑथराइज़ेशन कोड बनाती है और उसे Google को लौटाती है. ऐसा करने के लिए, उपयोगकर्ता के ब्राउज़र को Google पर रीडायरेक्ट करें. साथ ही, अनुरोध में ऑथराइज़ेशन कोड जोड़ें.
- Google, ऑथराइज़ेशन कोड को आपके टोकन एक्सचेंज एंडपॉइंट पर भेजता है. यह कोड की पुष्टि करता है और ऐक्सेस टोकन और रीफ़्रेश टोकन लौटाता है. ऐक्सेस टोकन, कम समय के लिए मान्य होता है. आपकी सेवा, एपीआई को ऐक्सेस करने के लिए, इसे क्रेडेंशियल के तौर पर स्वीकार करती है. रीफ़्रेश टोकन, लंबे समय के लिए मान्य होता है. Google इसे सेव कर सकता है और इसकी समयसीमा खत्म होने पर, नए ऐक्सेस टोकन पाने के लिए इसका इस्तेमाल कर सकता है.
- उपयोगकर्ता के खाता लिंक करने का फ़्लो पूरा करने के बाद, Google से भेजे गए हर अनुरोध में एक ऐक्सेस टोकन शामिल होता है.
लागू करने की रेसिपी
ऑथराइज़ेशन कोड फ़्लो लागू करने के लिए, यह तरीका अपनाएं.
पहला चरण: ऑथराइज़ेशन के अनुरोधों को मैनेज करना
जब Google, खाता लिंक करने की प्रोसेस शुरू करता है, तो वह उपयोगकर्ता को आपके ऑथराइज़ेशन एंडपॉइंट पर रीडायरेक्ट करता है. प्रोटोकॉल के कॉन्ट्रैक्ट और पैरामीटर की ज़रूरी शर्तों के बारे में ज़्यादा जानने के लिए, ऑथराइज़ेशन एंडपॉइंट देखें.
अनुरोध को मैनेज करने के लिए, यह तरीका अपनाएं:
अनुरोध की पुष्टि करना:
- पुष्टि करें कि
client_id, Google को असाइन किए गए क्लाइंट आईडी से मेल खाता हो. - पुष्टि करें कि
redirect_uriGoogle के रीडायरेक्ट यूआरएल से मेल खाता हो:none https://oauth-redirect.googleusercontent.com/r/YOUR_PROJECT_ID https://oauth-redirect-sandbox.googleusercontent.com/r/YOUR_PROJECT_ID - पुष्टि करें कि
response_typecodeहो.
- पुष्टि करें कि
उपयोगकर्ता की पुष्टि करना:
- देखें कि उपयोगकर्ता ने आपकी सेवा में साइन इन किया है या नहीं.
- अगर उपयोगकर्ता ने साइन इन नहीं किया है, तो उसे साइन-इन या साइन-अप फ़्लो पूरा करने के लिए कहें.
ऑथराइज़ेशन कोड जनरेट करना:
- उपयोगकर्ता और क्लाइंट के लिए, अनुमान न लगाया जा सकने वाला यूनीक ऑथराइज़ेशन कोड बनाएं.
- कोड की समयसीमा करीब 10 मिनट पर सेट करें.
Google पर वापस रीडायरेक्ट करना:
- ब्राउज़र को
redirect_uriमें दिए गए यूआरएल पर रीडायरेक्ट करें. - ये क्वेरी पैरामीटर जोड़ें:
code: आपके जनरेट किए गए ऑथराइज़ेशन कोड.state: Google से मिली, बिना बदलाव वाली स्टेट वैल्यू.
- ब्राउज़र को
दूसरा चरण: टोकन एक्सचेंज के अनुरोधों को मैनेज करना
आपका टोकन एक्सचेंज एंडपॉइंट, दो तरह के अनुरोधों को प्रोसेस करता है: कोड को टोकन के लिए एक्सचेंज करना और समयसीमा खत्म हो चुके ऐक्सेस टोकन को रीफ़्रेश करना. प्रोटोकॉल के कॉन्ट्रैक्ट और पैरामीटर की ज़रूरी शर्तों के बारे में ज़्यादा जानने के लिए, टोकन एक्सचेंज एंडपॉइंट देखें.
A. टोकन के लिए ऑथराइज़ेशन कोड एक्सचेंज करना
जब Google को ऑथराइज़ेशन कोड मिलता है, तो वह टोकन पाने के लिए, आपके टोकन एक्सचेंज एंडपॉइंट (POST) को कॉल करता है.
अनुरोध की पुष्टि करना:
client_idऔरclient_secretकी पुष्टि करें.- पुष्टि करें कि ऑथराइज़ेशन कोड मान्य है और उसकी समयसीमा खत्म नहीं हुई है.
- पुष्टि करें कि
redirect_uri, पहले चरण में इस्तेमाल की गई वैल्यू से मेल खाता हो. - अगर पुष्टि नहीं हो पाती है, तो एचटीटीपी
400 Bad Requestके साथ{"error": "invalid_grant"}दिखाएं.
टोकन जारी करना:
- लंबे समय के लिए मान्य
refresh_tokenऔर कम समय के लिए मान्यaccess_token(आम तौर पर, एक घंटा) जनरेट करें. - मानक JSON टोकन के जवाब के साथ, एचटीटीपी
200 OKदिखाएं.
- लंबे समय के लिए मान्य
B. ऐक्सेस टोकन रीफ़्रेश करना
जब ऐक्सेस टोकन की समयसीमा खत्म हो जाती है, तो Google, रीफ़्रेश टोकन का इस्तेमाल करके, नए टोकन का अनुरोध करता है.
अनुरोध की पुष्टि करना:
client_id,client_secret, औरrefresh_tokenकी पुष्टि करें.- अगर पुष्टि नहीं हो पाती है, तो एचटीटीपी
400 Bad Requestके साथ{"error": "invalid_grant"}दिखाएं.
नया ऐक्सेस टोकन जारी करना:
- कम समय के लिए मान्य नया
access_tokenजनरेट करें. - JSON टोकन के जवाब के साथ, एचटीटीपी
200 OKदिखाएं. इसमें, नया रीफ़्रेश टोकन भी शामिल किया जा सकता है.
- कम समय के लिए मान्य नया
Handle userinfo requests
The userinfo endpoint is an OAuth 2.0 protected resource that return claims about the linked user. Implementing and hosting the userinfo endpoint is optional, except for the following use cases:
- Linked Account Sign-In with Google One Tap.
- Frictionless subscription on AndroidTV.
After the access token has been successfully retrieved from your token endpoint, Google sends a request to your userinfo endpoint to retrieve basic profile information about the linked user.
| userinfo endpoint request headers | |
|---|---|
Authorization header |
The access token of type Bearer. |
For example, if your userinfo endpoint is available at
https://myservice.example.com/userinfo, a request might look like the following:
GET /userinfo HTTP/1.1
Host: myservice.example.com
Authorization: Bearer ACCESS_TOKEN
For your userinfo endpoint to handle requests, do the following steps:
- Extract access token from the Authorization header and return information for the user associated with the access token.
- If the access token is invalid, return an HTTP 401 Unauthorized error with using the
WWW-AuthenticateResponse Header. Below is an example of a userinfo error response:HTTP/1.1 401 Unauthorized WWW-Authenticate: error="invalid_token", error_description="The Access Token expired"
If the access token is valid, return and HTTP 200 response with the following JSON object in the body of the HTTPS response:
{ "sub": "USER_UUID", "email": "EMAIL_ADDRESS", "given_name": "FIRST_NAME", "family_name": "LAST_NAME", "name": "FULL_NAME", "picture": "PROFILE_PICTURE", }userinfo endpoint response subA unique ID that identifies the user in your system. emailEmail address of the user. given_nameOptional: First name of the user. family_nameOptional: Last name of the user. nameOptional: Full name of the user. pictureOptional: Profile picture of the user.
लागू करने की पुष्टि करना
OAuth 2.0 Playground टूल का इस्तेमाल करके, लागू करने की पुष्टि की जा सकती है.
टूल में, यह तरीका अपनाएं:
- OAuth 2.0 कॉन्फ़िगरेशन विंडो खोलने के लिए, कॉन्फ़िगरेशन पर क्लिक करें.
- OAuth फ़्लो फ़ील्ड में, क्लाइंट-साइड चुनें.
- OAuth एंडपॉइंट फ़ील्ड में, कस्टम चुनें.
- अपने OAuth 2.0 एंडपॉइंट और Google को असाइन किया गया क्लाइंट आईडी, उससे जुड़े फ़ील्ड में डालें.
- पहला चरण सेक्शन में, कोई भी Google स्कोप न चुनें. इसके बजाय, इस फ़ील्ड को खाली छोड़ दें या अपने सर्वर के लिए मान्य स्कोप टाइप करें. अगर OAuth स्कोप का इस्तेमाल नहीं किया जाता है, तो कोई भी स्ट्रिंग टाइप करें. जब आपका काम पूरा हो जाए, तो एपीआई को अनुमति दें पर क्लिक करें.
- दूसरे चरण और तीसरे चरण सेक्शन में, OAuth 2.0 फ़्लो देखें. साथ ही, यह पुष्टि करें कि हर चरण उम्मीद के मुताबिक काम कर रहा है.
Google खाता लिंक करने की सुविधा का डेमो टूल का इस्तेमाल करके, लागू की गई सुविधा की पुष्टि की जा सकती है.
टूल में, यह तरीका अपनाएं:
- Google से साइन इन करें बटन पर क्लिक करें.
- वह खाता चुनें जिसे आपको लिंक करना है.
- सेवा आईडी डालें.
- विकल्प के तौर पर, एक या उससे ज़्यादा ऐसे स्कोप डालें जिनके लिए आपको ऐक्सेस का अनुरोध करना है.
- डेमो शुरू करें पर क्लिक करें.
- जब कहा जाए, तब पुष्टि करें कि आपके पास खाते को लिंक करने के अनुरोध को स्वीकार या अस्वीकार करने का विकल्प है.
- पुष्टि करें कि आपको अपने प्लैटफ़ॉर्म पर रीडायरेक्ट किया गया हो.