
您可以直接在行動應用程式中完成帳戶連結程序,讓使用者將您在服務中的帳戶連結至自己的 Google 帳戶。已建立的連結會授權 Google 存取使用者同意分享的資料。
使用者可享有的好處包括:
- 使用者可在應用程式中完成並完成帳戶連結程序。
- 由於使用者先前已在裝置上和行動應用程式中完成驗證,因此不需要使用登入憑證。
開發人員享有以下好處:
- 掌控您希望在行動應用程式中宣傳及啟動帳戶連結的位置 (例如使用者設定、插頁式廣告或使用者登入行動應用程式後), ,進而提高參與度和已連結帳戶數量。
- 轉換率比使用者完成的標準 OAuth 流程更少,因為使用者只需完成幾個步驟就能完成連結程序。
- 由於您的流程已採用現有的 OAuth2.0 技術,因為這個流程已採用您目前導入的 OAuth2.0 整合功能,因此您不必導入平台 (Android) 即可完成連結。
- 減少使用者流失率,因為使用者不必重新輸入自己的登入憑證,而且只需完成幾個步驟就能完成程序。 在流程中,流失率可能高達 80%,使用者必須強制回頭輸入登入憑證。
運作方式
如要從平台連結,請完成下列步驟:
- 使用者會在行動應用程式中點選 / 切換連結觸發條件。
- 使用者選取要連結的 Google 帳戶。
- 使用者選取裝置上要連結的現有 Google 帳戶,或登入新帳戶
- 系統會向使用者顯示 Google 代管的同意畫面,使用者必須同意繼續操作,或取消連結過程。
- 系統會向使用者顯示同意畫面,使用者必須同意繼續操作,或取消連結過程。
- 系統會在使用者在您服務上的帳戶與 Google 帳戶之間建立連結。

圖 1. 從平台流程連結
需求條件
如要從平台實作連結,請準備下列項目:
- Android 應用程式。
- 擁有、管理及維護支援 OAuth 2.0 授權碼流程的 OAuth 2.0 伺服器。
設定
請先完成帳戶連結註冊程序,再進行下列步驟。
設定開發環境
在開發主機上取得最新版 Google Play 服務:
在「SDK 工具」下方,找到「Google Play 服務」。
如果這些套件的狀態不是「已安裝」,請同時選取這兩個套件,然後按一下「安裝套件」。
設定應用程式
在專案層級的
build.gradle檔案中,同時在buildscript和allprojects區段中加入 Google 的 Maven 存放區。buildscript { repositories { google() } } allprojects { repositories { google() } }將「使用 Google 帳戶連結」API 的依附元件新增至模組的應用程式層級 Gradle 檔案,通常為
app/build.gradle:dependencies { implementation 'com.google.android.gms:play-services-auth:22.0.0' }
新增從平台連結的支援
在「從平台連結」流程中,Google 會儲存服務提供的存取權杖。必須先取得同意聲明,才能傳回使用者的權杖。
請按照下列步驟取得使用者同意聲明,並透過 Google Play 服務 SDK 傳回授權碼權杖。
建立可啟動同意聲明活動的 PendingIntent - 同意聲明是由 Play 服務 API 啟動。呼叫 API 時,您需要提供
PendingIntent(為求明確起見,以下稱為consentPendingIntent)Kotlin
// Build a PendingIntent that can launch the consent activity
val consentPendingIntent = buildConsentPendingIntent()
Java
// Build a PendingIntent that can launch your consent activity
PendingIntent consentPendingIntent =
          buildConsentPendingIntent();
建立對應的 Activity 來處理同意聲明意圖
Kotlin
  class ConsentActivity : AppCompatActivity

  private fun onConsentAccepted() {
      // Obtain a token (for simplicity, we’ll ignore the async nature
      // of the following call)
      val token = getToken()
      val intent = Intent()
                  .putExtra(SaveAccountLinkingTokenRequest.EXTRA_TOKEN,
                            token)
      setResult(Activity.RESULT_OK, intent)
      finish()
  }

  private fun onConsentRejectedOrCanceled() {
      setResult(Activity.RESULT_CANCELED)
      finish()
  }
Java
  public class ConsentActivity extends AppCompatActivity {
    ...
    private void onConsentAccepted() {
      // Obtain a token (for simplicity, we’ll ignore the async nature of
      // the following call
      String token = getToken();
      Intent intent = new Intent();
      intent.putExtra(SaveAccountLinkingTokenRequest.EXTRA_TOKEN, token);
      setResult(Activity.RESULT_OK, intent);
      finish();
    }

    private void onConsentRejectedOrCanceled() {
      setResult(Activity.RESULT_CANCELED, null);
      finish();
    }
 }
我們假設使用者接受或拒絕/取消同意聲明時,系統會分別呼叫
onConsentAccpeted()和onConsentRejectedOrCanceled()方法。建立要求以儲存權杖,並傳遞在上述步驟 1 中建立的
PendingIntent,以及其他設定參數。Kotlin
  // Create an ActivityResultLauncher which registers a callback for the
  // Activity result contract
  val activityResultLauncher = registerForActivityResult(
    ActivityResultContracts.StartIntentSenderForResult())
    { result ->
      if (result.resultCode == RESULT_OK) {
        // Successfully finished the flow and saved the token
      } else {
        // Flow failed, for example the user may have canceled the flow
      }
    }

  // Build token save request
  val request = SaveAccountLinkingTokenRequest.builder()
    .setTokenType(SaveAccountLinkingTokenRequest.TOKEN_TYPE_AUTH_CODE)
    .setConsentPendingIntent(consentPendingIntent)
    .setServiceId("service-id-of-and-defined-by-developer")
    //Set the scopes that the token is valid for on your platform
    .setScopes(scopes)
    .build()

   // Launch consent activity and retrieve token
   Identity.getCredentialSavingClient(this)
     .saveAccountLinkingToken(request)
     .addOnSuccessListener( saveAccountLinkingTokenResult -> {
        if (saveAccountLinkingTokenResult.hasResolution()) {
          val pendingIntent = saveAccountLinkingTokenResult
                              .getPendingIntent()
          val intentSenderRequest = IntentSenderRequest
                                    .Builder(pendingIntent).build()
          activityResultLauncher.launch(intentSenderRequest)
        } else {
           // This should not happen, let’s log this
           Log.e(TAG, "Failed to save token");
        }
      })
      .addOnFailureListener(e -> Log.e(TAG, “Failed to save token”, e))
Java
  // Create an ActivityResultLauncher which registers a callback for the
  // Activity result contract
  ActivityResultLauncher<IntentSenderRequest>
      activityResultLauncher =
      registerForActivityResult(new ActivityResultContracts
                                    .StartIntentSenderForResult(),
                                result -> {
      if (result.getResultCode() == RESULT_OK) {
          // Successfully finished the flow and saved the token
      } else {
          // Flow failed, for example the user may have canceled the flow
      }
  });

 // Build token save request
 SaveAccountLinkingTokenRequest request =
    SaveAccountLinkingTokenRequest.builder()
        .setTokenType(
            SaveAccountLinkingTokenRequest.TOKEN_TYPE_AUTH_CODE)
        .setConsentPendingIntent(consentPendingIntent)
        .setServiceId("service-id-of-and-defined-by-developer")
        //Set the scopes that the token is valid for on your platform
        .setScopes(scopes)
        .build();

  // Launch consent activity and retrieve token
  Identity.getCredentialSavingClient(this)
      .saveAccountLinkingToken(request)
      .addOnSuccessListener(
          saveAccountLinkingTokenResult -> {
            if (saveAccountLinkingTokenResult.hasResolution()) {
              // Launch the resolution intent
              PendingIntent pendingIntent =
                  saveAccountLinkingTokenResult.getPendingIntent();
              IntentSenderRequest intentSenderRequest =
                  new IntentSenderRequest.Builder(pendingIntent).build();
              activityResultLauncher.launch(intentSenderRequest);
            } else {
              // This should not happen, let’s log this
              Log.e(TAG, "Failed to save token");
            }
          })
      .addOnFailureListener(e -> Log.e(TAG, "Failed to save token", e));
  ```
上述步驟會提示使用者同意,並將授權碼回傳給 Google。
最佳做法
應用程式應透過按鈕、切換開關或類似的視覺元素,向使用者顯示連結狀態。
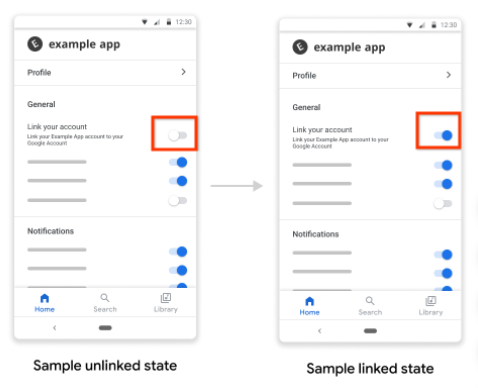
圖 1. 連結狀態圖片範例
連結成功後,您應通知使用者,例如顯示浮動式訊息、觸發切換狀態變更,或將使用者重新導向至另一個連結成功頁面。
建議您提示應用程式內的使用者連結帳戶,最好是根據強烈信號判斷連結帳戶對使用者有益時,再提示使用者。
連結成功後,請向使用者說明如何運用連結的帳戶,例如連結音樂串流服務後,要求 Google 助理播放音樂。
讓使用者管理已連結的帳戶,包括取消連結。請他們前往 Google 連結帳戶管理頁面 (https://myaccount.google.com/accountlinking)。