
Page Summary
-
This page discusses older Google Data APIs, many of which have been replaced by newer APIs, and is relevant only to those listed in the Google Data APIs directory.
-
The Google Data PHP Client Library, part of the Zend Framework or available separately, is a collection of classes for interacting with Google Data APIs.
-
Before installing the client library, verify your PHP installation and ensure it is version 5.1.4 or newer.
-
The client library files need to be accessible by PHP by setting the
include_pathvariable in thephp.inifile, or by using.htaccessor theset_include_path()function. -
The installation can be verified by running the PHP Installation Checker script.
Warning: This page is about Google's older APIs, the Google Data APIs; it's relevant only to the APIs that are listed in the Google Data APIs directory, many of which have been replaced with newer APIs. For information about a specific new API, see the new API's documentation. For information about authorizing requests with a newer API, see Google Accounts Authentication and Authorization.
Video: Watch Trevor Johns go through client library installation, library architecture, and a code walkthrough.
Updated October 2008 (Originally written by Daniel Holevoet)
- Introduction
- Pre-Installation
- Installing PHP
- Installing the Google Data PHP Client Library
- Checking to make sure that you can access the client library files
- Where to Learn More
- Appendix A: Editing your PHP path in your
php.iniconfiguration file - Appendix B.: Using PHP from the command line
- Appendix C: Hints and Solutions
- Revision History
Introduction
The Google Data PHP Client Library is a powerful collection of classes that allow you to interact with the Google Data APIs. Unlike our other client libraries, it is packaged as part of the popular Zend Framework but can also be downloaded separately. Similar to our other client libraries it is also open-source and designed to be simple and efficient, allowing you to get started on your projects quickly.
Pre-Installation
PHP may already be installed on your development machine or web-server so the first step is to verify that fact and to make sure that the version of PHP is recent enough to be used for the client library. The easiest way to check is to place a new file into a web-accessible directory on your server. Type the following information into the file:
<?php phpinfo(); ?>
Then make sure that it is accessible from the web by setting the appropriate permissions and navigate to its location from within your browser. If PHP is installed and your server is able to render PHP pages, then you should see something similar to the screenshot below:
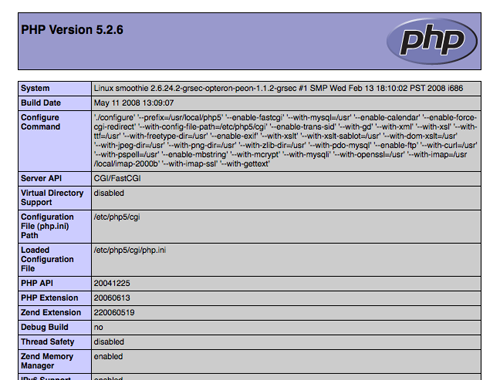
The screenshot shows the PHP info page. This page shows you the version of PHP that has been installed (5.2.6 in this case), along with which extensions have been enabled (in the 'Configure Command' section) and the location of PHP's internal configuration file (in the 'Loaded Configuration File' section). If the page is not displayed or if your version of PHP is older than 5.1.4 you will need to install or upgrade your version of PHP. Otherwise you can skip the next section and continue to installing the PHP Client Library.
Note: If you have access to the command line and are planning to use PHP to run command line scripts, please see the command line PHP section of this article.
Installing PHP
Installation varies a bit by platform, so it is important to follow the instructions for your specific platform during installation. Before we dive in, it is worth pointing out that pre-installed packages that also include the Apache web server and the MySQL database along with PHP have gained in popularity. For Windows, Mac OS X and Linux, there is the XAMPP project. Mac OS X users also have the choice of using the MAMP project. Both of these packages support OpenSSL in PHP (which is required for interacting with authenticated feeds).
If you install PHP using the steps that follow below, make sure that you also install and enable support for OpenSSL. More details about that can be found in the OpenSSL section of the PHP site. The following sections are focused on how to install PHP by itself.
On Windows
The easiest way to install or upgrade PHP on Windows is with the PHP installer available on the PHP downloads page.
- Choose the PHP installer option (in the Windows binaries section) corresponding to the newest version of PHP and allow it to download.
- Open the installer and follow the installation wizard's instructions.
- When the wizard prompts you, choose the web server that is installed on your system, so that it configures the server to work with PHP.
- Check your installation by following the steps outlined in the section above.
On Mac OS X
PHP is included in OS X, but before you use it, you should upgrade to the latest version of PHP. To upgrade, you can install any of several free binary packages, or compile it yourself. For details, see the PHP documentation page about installation on Mac OS X.
After installing or otherwise setting up OS X, check your installation by following the steps outlined in the pre-installation section of this document.
On Linux
Depending on the Linux distribution, there may be a built-in or easy to use setup option for PHP installation. For example, on Ubuntu, you can either use a package manager or just type the following on in a terminal:
sudo apt-get install php5
If there isn't a packaged install available with your Linux distribution, you must install from source code. There are detailed instructions for compiling PHP for Apache 1.3 and compiling PHP for Apache 2. PHP.net also has instructions for other servers.
Installing the Google Data PHP Client Library
Now that you have a working version of PHP installed, it's time to install the client library. The client library is part of the open-source Zend Framework but can also be downloaded as a standalone version. If you already have a version of the Zend Framework installed (version 1.6 or higher), you can skip installation, because the Google Data Client Library is included. However, making sure you are using the latest version of the framework will guarantee that you have all the newest features and bug fixes available to you, so it is usually recommended.
Downloading the complete framework will give you access to not just the Google Data Client Library, but also the rest of the framework. The client library itself uses a few other classes that are part of the complete Zend Framework, but there is no need to download the entire framework as we have bundled them into the standalone download.
- Download the Google Data Client Library files. (Search in that page for "Google Data APIs".)
- Decompress the downloaded files. Four sub-directories should be created:
demos— Sample applicationsdocumentation— Documentation for the client library fileslibrary— The actual client library source files.tests— Unit-test files for automated testing.
- Add the location of the
libraryfolder to your PHP path (see the next section)
Checking to make sure that you can access the client library files
The last step is to make sure that you can reference and include the PHP Client Library files from the directory that you are building your project. This is accomplished by setting the include_path variable in PHP's configuration file (php.ini). The include_path variable contains a number of directory location that PHP looks into when you issue a require or include statement that pulls external classes, libraries or files into your current script, similar to the import statement in Java. You need to append the location of the client library files to what has already been set in your include_path. This can be accomplished in two ways (both of which are explained in detail below):
- Permanently set the
include_pathdirective in yourphp.iniconfiguration file from the command line — requires shell access and write permissions. - Set the
include_pathpath variable on a "per directory" level — requires the Apache web server and the ability to create.htaccessfiles. - Use the
set_include_path()function to dynamically set the include path in your scripts — can be set dynamically in each of your .php files.
If you have shell access and write permissions to the php.ini file (or if you are writing code on your local machine), simply follow the instructions in appendix A. If you are using the Apache web server and have the ability to create .htaccess files then you can set the include_path variable on a "per directory" level, which means that all of the files in the directory that you are working in are automatically able to reference the client library directory.
You can specify PHP configuration options as shown in the snippet below:
# This works for PHP5 in both Apache versions 1 and 2
<IfModule mod_php5.c>
  php_value include_path        ".:/usr/local/lib/php:/path/to/ZendGdata/library"
</IfModule>
Note: Refer to the PHP Manual for more information about changing configuration settings.
If you don't have shell access to your server and can't modify or create .htaccess files that you can always use the set_include_path function. Note that you may already have some value set for your include_path so it may be a good idea to follow the model below to append the new values, instead of overwriting the entire path:
$clientLibraryPath = '/path/to/ZendGdata/library';
$oldPath = set_include_path(get_include_path() . PATH_SEPARATOR . $clientLibraryPath);
Note: Please refer to the PHP manual pages for more details on the set_include_path function.
Running the PHP Installation Checker
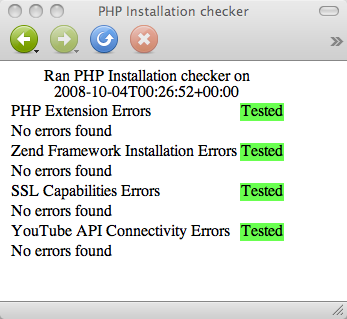
To verify that your include path has been set properly, you can run the PHP Installation Checker script. Simply copy and paste the contents of that file into a new file in a web-accessible directory on your server and navigate to it from your browser. If you see output similar to the below, then everything has been configured properly and you are ready to use the PHP Client Library:
If you see errors (as in the screenshot below), make sure you follow the direction. You may be missing extensions or your path may still not be set correctly. Remember that you may need to restart your server for the changes to take effect. This only applies if you are actually modifying the php.ini file. The screenshot below shows that the include_path is set to /path/to/nowhere:
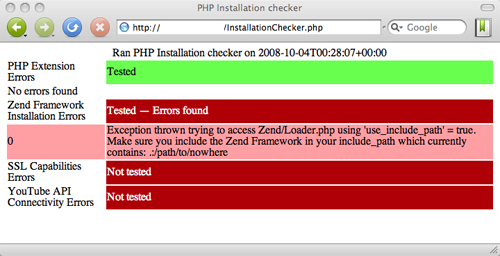
Note: Please note that the PHP Installation checker checks the following in succession: (1) are the required PHP extensions installed, (2) does the include_path point to the directory of the PHP Client Library, (3) can SSL connections be made and lastly, can a connection be made to the YouTube Data API. If a specific test fails, the remaining tests will not be run.
Now that the client library is installed, it's time to try running the samples.
Running the samples
At the root of the Zend/Gdata directory is a folder of demos — samples to help you get started. Some of these samples are designed to be run from the command line such as demos/Zend/Gdata/Blogger.php and demos/Zend/Gdata/Spreadsheet-ClientLogin.php, and you can execute them with php /path/to/example. The remaining samples can be run from both the command-line and a web browser. If you would like to view them in a browser, these should be placed in whatever directory you would use to serve web pages. These samples should give a basic idea of how to write and run a Google Data application, but when you're ready for more, there are other resources for the inquisitive programmer.
Note: If you are interested in seeing the web-based demos online, please visit googlecodesamples.com and look for the PHP applications.
Where to Learn More
The best places to look for information on the classes that are part of the client library is the API reference guide on the Zend Framework site. Make sure to select the Zend_Gdata package from the drop-down.
At this point you should be all set to start coding. So, go on, write some great applications. We look forward to seeing your results!
You can find PHP developer guides for the following services:
Since the PHP Client Library is an open-source project, support for more APIs is continually being added. Each service has it's own support group, please see our FAQ entry for a listing of available support groups.
If you need help troubleshooting your API calls, there are articles available on debugging API requests using network traffic capture tools and on using proxy servers with the Google Data APIs. There are also a few external articles available on installing XAMPP on Linux and on installing XAMPP on Windows. In addition to all of these articles be sure to check out the posts about the PHP Client Library on the Google Data API Tips blog.
Appendix A: Editing your PHP path in your php.ini configuration file
The PHP path is variable that contains a list of locations that PHP searches when it looks for additional libraries during loading. In order for PHP to be able to load and access the Google Data PHP Client Library files on your machine or server, they will need to be put into a location that PHP knows about. Or alternatively the location of the files needs to be appended to your PHP path. Note that changes to the php.ini file typically require a restart of your server. You can always verify the current value of the include_path variable by navigating to the PHP Info page discussed earlier. Look for the Loaded Configuration File cell in the first table and find the path in the column to the right.
Note: If you find that you are using php from the command line, you may need to modify an additional path variable. Make sure to review Appendix B: Using PHP from the command line.
Once you've found the php.ini file, follow these steps to append to the path.
- Open the
php.inifile in your favorite text editor. - Locate the line referencing the PHP path, it should begin with
include_path. - Append the path you stored the Zend Framework to the list of locations already present, pre-pending your new path with the designated separator for your OS (
:on Unix-like systems,;on Windows). A correct path on Unix-like systems would look something like this:/path1:/path2:/usr/local/lib/php/library
\path1;\path2;\php\library
- Save and close the file.
Note: On Mac OS X, the Finder does not allow access to files that are in system locations such as the /etc directory. Therefore it may be easiest to edit them using a command line editor such as vi or pico. To do so use a command such as: pico /path/to/php.ini.
Appendix B: Using PHP from the command line
As of PHP version 5, there is a command-line utility available in PHP which is referred to as CLI for 'command line interpreter'. Using this utility allows for php scripts to be run from the command line. The situations in which this may be useful is if you are running PHP locally on your machine and are looking for ways to quickly test some scripts. On your server of course, this will require shell access. One important thing to note is that PHP typically uses two separate php.ini files, one contains the configuration options for PHP running on your server, and another for the configurations that PHP uses when running from the command line. If you are interested in running the command-line demo applications from the client library, you will need to modify the command-line php.ini file as well.
To locate it, type the following commands on Unix-like systems (Mac OS X, Linux, and others):
php -i | grep php.ini
That command should result in the following information being displayed in your terminal:
Configuration File (php.ini) Path => /etc/php5/cli
Loaded Configuration File => /etc/php5/cli/php.ini
Note: Of course the actual path locations (/etc/php...) may differ on your system.
Appendix C: Hints and Solutions
This section contains a brief outline of some of the issue that developers have discovered when working with PHP and the appropriate solutions.
Problem with the dom-xml extension in XAMPP
The PHP client library uses the DOMDocument classes to transform XML requests and responses into PHP objects. The dom-xml extension can cause problems with XML handling and result in incorrect transformations. Some of our developers have found that when using XAMPP, the DOMDocument constructor gets overriden with an older function call, as explained on the PHP site. To fix this problem, make sure that XML handling is not overwritten in your php.ini file. Make sure to remove references to php_domxml.dll from your configuration file.
Requests are timing out when using the client library
If you are using the client library to perform fairly large requests, such as uploading videos to the YouTube Data API, you may need to change the timeout parameter in your Zend_Http_Client class. This can be done easily by passing a $config parameter during instantiation, which sets the timeout value to something other than the 10 second default:
// assuming your Zend_Http_Client already exists as $httpClient
// and that you want to change the timeout from the 10 second default to 30 seconds

$config = array('timeout' => 30);
$httpClient->setConfig($config);
Some hosting providers do not allow https connections to be made from their servers
We have heard that some hosting providers do not allow you to make https connections from their default servers. If you get an error message similar to the below, you may need to make your https connections through a secure proxy:
Unable to Connect to sslv2://www.google.com:443. Error #110: Connection timed out
Your hosting provider should have information on the actual address of the proxy server to use. The below snippet demonstrates how a custom proxy configuration can be used with the PHP Client Library:
// Load the proxy adapter class in addition to the other required classes
Zend_Loader::loadClass('Zend_Http_Client_Adapter_Proxy');

// Configure the proxy connection with your hostname and portnumber
$config = array(
    'adapter'    => 'Zend_Http_Client_Adapter_Proxy',
    'proxy_host' => 'your.proxy.server.net',
    'proxy_port' => 3128
);

// A simple https request would be an attempt to authenticate via ClientLogin
$proxiedHttpClient = new Zend_Http_Client('http://www.google.com:443', $config);

$username = 'foo@example.com';
$password = 'barbaz';

// The service name would depend on what API you are interacting with, here
// we are using the Google DocumentsList Data API
$service = Zend_Gdata_Docs::AUTH_SERVICE_NAME;

// Try to perform the ClientLogin authentication using our proxy client.
// If there is an error, we exit since it doesn't make sense to go on.
try {

  // Note that we are creating another Zend_Http_Client
  // by passing our proxied client into the constructor.

  $httpClient = Zend_Gdata_ClientLogin::getHttpClient(
      $username, $password, $service, $proxiedHttpClient);

} catch (Zend_Gdata_App_HttpException $httpException) {

  // You may want to handle this differently in your application
  exit("An error occurred trying to connect to the proxy server\n" .
      $httpException->getMessage() . "\n");

}
Revision History
October 1, 2008
Updated by Jochen Hartmann. This update contains the following changes:
- Made PHP configuration for web servers clearer by moving sections that refer to command-line PHP into an appendix.
- Added note about multiple php.ini configuration files.
- Added sections on how to dynamically set the include_path.
- Added section on the installation checker script.
- Added link to online samples.
- Added links for XAMPP and MAMP.
- Added an 'Hints and Solutions' appendix.