
1. ก่อนเริ่มต้น
การใช้พาสคีย์แทนรหัสผ่านเป็นวิธีที่ยอดเยี่ยมสำหรับเว็บไซต์ในการทำให้บัญชีผู้ใช้ปลอดภัยขึ้น เรียบง่ายขึ้น และใช้งานง่ายขึ้น เมื่อใช้พาสคีย์ ผู้ใช้จะลงชื่อเข้าใช้เว็บไซต์หรือแอปได้โดยใช้ฟีเจอร์ล็อกหน้าจอของอุปกรณ์ เช่น ลายนิ้วมือ ใบหน้า หรือ PIN ของอุปกรณ์ ต้องสร้างพาสคีย์ เชื่อมโยงกับบัญชีผู้ใช้ และจัดเก็บคีย์สาธารณะไว้ในเซิร์ฟเวอร์ก่อนที่ผู้ใช้จะลงชื่อเข้าใช้ด้วยพาสคีย์ได้
ใน Codelab นี้ คุณจะเปลี่ยนการลงชื่อเข้าใช้ด้วยชื่อผู้ใช้และรหัสผ่านแบบฟอร์มพื้นฐานเป็นการลงชื่อเข้าใช้ที่รองรับพาสคีย์และมีสิ่งต่อไปนี้
- ปุ่มที่สร้างพาสคีย์หลังจากที่ผู้ใช้ลงชื่อเข้าใช้
- UI ที่แสดงรายการพาสคีย์ที่ลงทะเบียน
- แบบฟอร์มลงชื่อเข้าใช้ที่มีอยู่ซึ่งช่วยให้ผู้ใช้ลงชื่อเข้าใช้ด้วยพาสคีย์ที่ลงทะเบียนผ่านการป้อนข้อความอัตโนมัติของแบบฟอร์ม
ข้อกำหนดเบื้องต้น
- ความเข้าใจพื้นฐานเกี่ยวกับ JavaScript
- ความเข้าใจพื้นฐานเกี่ยวกับ Web Authentication API (WebAuthn)
สิ่งที่คุณจะได้เรียนรู้
- วิธีสร้างพาสคีย์
- วิธีตรวจสอบสิทธิ์ผู้ใช้ด้วยพาสคีย์
- วิธีอนุญาตให้แบบฟอร์มแนะนำพาสคีย์เป็นตัวเลือกการลงชื่อเข้าใช้
2. ตั้งค่า
ใน Codelab นี้ คุณจะโคลนแอปเดโมที่ไม่สมบูรณ์จาก GitHub แล้วจึงติดตั้งการรองรับพาสคีย์ให้เสร็จสมบูรณ์
โคลนโปรเจ็กต์
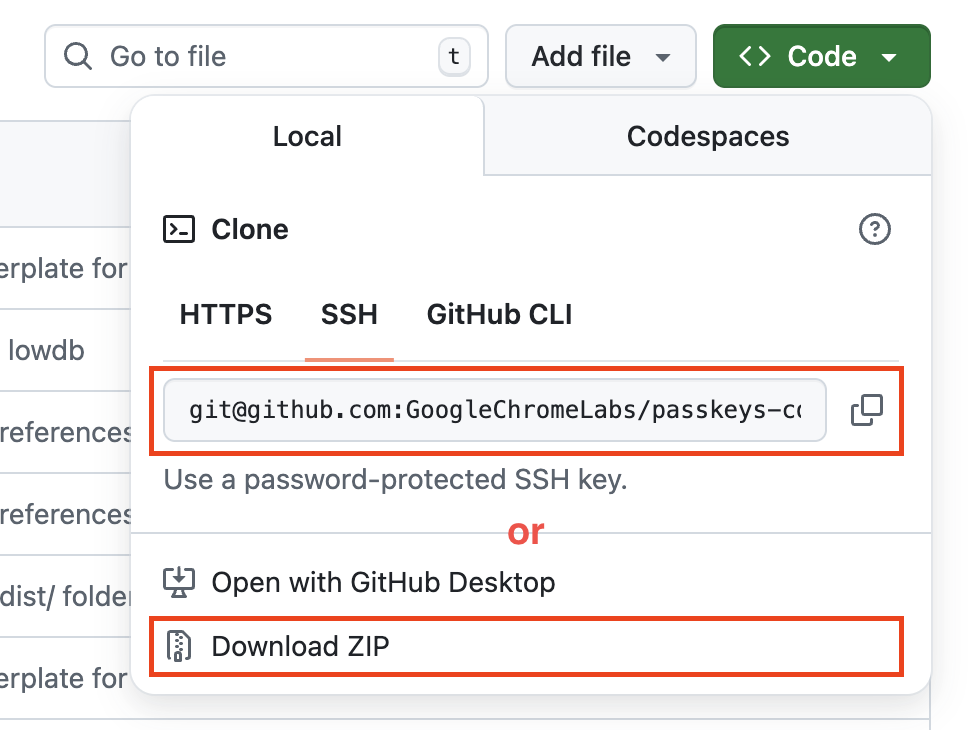
- เปิดโปรเจ็กต์ใน GitHub
- โคลนหรือดาวน์โหลดโปรเจ็กต์
เรียกใช้โปรเจ็กต์
- เปิดเทอร์มินัลและ
cd startเพื่อเปลี่ยนไดเรกทอรี - เรียกใช้
npm installเพื่อติดตั้งการอ้างอิงของโปรเจ็กต์ - สร้างและเรียกใช้โปรเจ็กต์ด้วย
npm run build && IS_LOCAL=1 npm run start - เปิด http://localhost:8080/ ในเบราว์เซอร์
ตรวจสอบสถานะเริ่มต้นของเว็บไซต์
- ในเว็บไซต์ ให้ป้อนชื่อผู้ใช้แบบสุ่ม แล้วคลิกถัดไป
- ป้อนรหัสผ่านแบบสุ่ม แล้วคลิกลงชื่อเข้าใช้ ระบบจะไม่สนใจรหัสผ่าน แต่คุณจะยังคงได้รับการตรวจสอบสิทธิ์และไปที่หน้าแรก
- หากต้องการเปลี่ยนชื่อที่แสดง ให้ดำเนินการได้เลย คุณทำได้เพียงเท่านี้ในสถานะเริ่มต้น
- คลิกออกจากระบบ
ในสถานะนี้ ผู้ใช้ต้องป้อนรหัสผ่านทุกครั้งที่เข้าสู่ระบบ คุณเพิ่มการรองรับพาสคีย์ลงในแบบฟอร์มนี้เพื่อให้ผู้ใช้ลงชื่อเข้าใช้ด้วยฟังก์ชันการล็อกหน้าจอของอุปกรณ์ได้
ดูข้อมูลเพิ่มเติมเกี่ยวกับวิธีการทำงานของพาสคีย์ได้ที่พาสคีย์ทำงานอย่างไร
3. เพิ่มความสามารถในการสร้างพาสคีย์
หากต้องการให้ผู้ใช้ตรวจสอบสิทธิ์ด้วยพาสคีย์ได้ คุณต้องให้สิทธิ์ผู้ใช้ในการสร้างและลงทะเบียนพาสคีย์ รวมถึงจัดเก็บคีย์สาธารณะของพาสคีย์ไว้ในเซิร์ฟเวอร์
คุณต้องการอนุญาตให้สร้างพาสคีย์หลังจากที่ผู้ใช้เข้าสู่ระบบด้วยรหัสผ่าน และเพิ่ม UI ที่ช่วยให้ผู้ใช้สร้างพาสคีย์และดูรายการพาสคีย์ที่ลงทะเบียนทั้งหมดในหน้า /home ในส่วนถัดไป คุณจะสร้างฟังก์ชันที่สร้างและลงทะเบียนพาสคีย์
สร้างฟังก์ชัน registerCredential()
- เปิดไดเรกทอรี
startในเครื่องมือแก้ไขโค้ดที่คุณเลือก - ไปที่
public/client.jsไฟล์ แล้วเลื่อนไปที่ด้านล่างสุด - หลังจากความคิดเห็นที่เกี่ยวข้อง ให้เพิ่มฟังก์ชัน
registerCredential()ต่อไปนี้
public/client.js
// TODO: Add an ability to create a passkey: Create the registerCredential() function.
export async function registerCredential() {

  // TODO: Add an ability to create a passkey: Obtain the challenge and other options from the server endpoint.

  // TODO: Add an ability to create a passkey: Create a credential.

  // TODO: Add an ability to create a passkey: Register the credential to the server endpoint.

};
ฟังก์ชันนี้จะสร้างและลงทะเบียนพาสคีย์ในเซิร์ฟเวอร์
รับคำท้าและตัวเลือกอื่นๆ จากปลายทางของเซิร์ฟเวอร์
ก่อนที่จะสร้างพาสคีย์ คุณต้องขอพารามิเตอร์เพื่อส่งใน WebAuthn จากเซิร์ฟเวอร์ ซึ่งรวมถึงการท้าทาย WebAuthn คือ API ของเบราว์เซอร์ที่ช่วยให้ผู้ใช้สร้างพาสคีย์และตรวจสอบสิทธิ์ผู้ใช้ด้วยพาสคีย์ได้ โชคดีที่คุณมีปลายทางเซิร์ฟเวอร์ที่ตอบสนองด้วยพารามิเตอร์ดังกล่าวในโค้ดแล็บนี้อยู่แล้ว
- หากต้องการรับคำท้าและตัวเลือกอื่นๆ จากปลายทางของเซิร์ฟเวอร์ ให้เพิ่มโค้ดต่อไปนี้ลงในเนื้อหาของฟังก์ชัน
registerCredential()หลังจากความคิดเห็นที่เกี่ยวข้อง
public/client.js
// TODO: Add an ability to create a passkey: Obtain the challenge and other options from the server endpoint.
const _options = await _fetch('/auth/registerRequest');
ข้อมูลโค้ดต่อไปนี้มีตัวเลือกตัวอย่างที่คุณได้รับจากเซิร์ฟเวอร์
{
  challenge: *****,
  rp: {
    id: "example.com",
  },
  user: {
    id: *****,
    name: "john78",
    displayName: "John",
  },
  pubKeyCredParams: [{
    alg: -7, type: "public-key"
  },{
    alg: -257, type: "public-key"
  }],
  excludeCredentials: [{
    id: *****,
    type: 'public-key',
    transports: ['internal', 'hybrid'],
  }],
  authenticatorSelection: {
    authenticatorAttachment: "platform",
    requireResidentKey: true,
  }
}
โปรโตคอลระหว่างเซิร์ฟเวอร์และไคลเอ็นต์ไม่ได้เป็นส่วนหนึ่งของข้อกำหนด WebAuthn อย่างไรก็ตาม เซิร์ฟเวอร์ของ Codelab นี้ออกแบบมาเพื่อแสดงผล JSON ที่คล้ายกับพจนานุกรม PublicKeyCredentialCreationOptions ที่ส่งไปยัง WebAuthn navigator.credentials.create() API มากที่สุด
ตารางต่อไปนี้ไม่ได้ครอบคลุมทั้งหมด แต่มีพารามิเตอร์ที่สำคัญในพจนานุกรม PublicKeyCredentialCreationOptions
พารามิเตอร์ | คำอธิบาย |
คำท้าที่เซิร์ฟเวอร์สร้างขึ้นในออบเจ็กต์ | |
รหัสที่ไม่ซ้ำกันของผู้ใช้ ค่านี้ต้องเป็นออบเจ็กต์ | |
ฟิลด์นี้ควรมีตัวระบุที่ไม่ซ้ำกันสำหรับบัญชีที่ผู้ใช้จดจำได้ เช่น อีเมลหรือชื่อผู้ใช้ โดยจะแสดงในตัวเลือกบัญชี (หากใช้ชื่อผู้ใช้ ให้ใช้ค่าเดียวกับการตรวจสอบสิทธิ์ด้วยรหัสผ่าน) | |
ฟิลด์นี้เป็นชื่อบัญชีที่เรียกง่ายซึ่งผู้ใช้จะระบุหรือไม่ก็ได้ ไม่จำเป็นต้องไม่ซ้ำกันและอาจเป็นชื่อที่ผู้ใช้เลือก หากเว็บไซต์ไม่มีค่าที่เหมาะสมที่จะรวมไว้ที่นี่ ให้ส่งสตริงว่าง ซึ่งอาจแสดงในตัวเลือกบัญชี ทั้งนี้ขึ้นอยู่กับเบราว์เซอร์ | |
รหัสผู้ให้บริการ (RP) คือโดเมน เว็บไซต์ระบุได้ทั้งโดเมนหรือคำต่อท้ายที่จดทะเบียนได้ ตัวอย่างเช่น หากต้นทางของ RP คือ https://login.example.com:1337 รหัส RP อาจเป็น | |
ฟิลด์นี้ระบุอัลกอริทึมคีย์สาธารณะที่ RP รองรับ เราขอแนะนำให้ตั้งค่าเป็น | |
แสดงรายการรหัสข้อมูลเข้าสู่ระบบที่ลงทะเบียนแล้วเพื่อป้องกันการลงทะเบียนอุปกรณ์เดียวกัน 2 ครั้ง หากระบุไว้ สมาชิก | |
ตั้งค่าเป็น | |
ตั้งค่าเป็นค่าบูลีน | |
ตั้งค่าเป็น |
สร้างข้อมูลเข้าสู่ระบบ
- ในส่วนเนื้อหาของฟังก์ชัน
registerCredential()หลังจากความคิดเห็นที่เกี่ยวข้อง ให้แปลงพารามิเตอร์บางอย่างที่เข้ารหัสด้วย Base64URL กลับเป็นไบนารี โดยเฉพาะสตริงuser.idและchallengeรวมถึงอินสแตนซ์ของสตริงidที่รวมอยู่ในอาร์เรย์excludeCredentialsซึ่งทำได้ด้วยฟังก์ชันPublicKeyCredential.parseCreationOptionsFromJSON()ดังนี้
public/client.js
// TODO: Add an ability to create a passkey: Create a credential.

// Deserialize and decode the `PublicKeyCredential.parseCreationOptionsFromJSON()`.
const options = PublicKeyCredential.parseCreationOptionsFromJSON(_options);
- ในบรรทัดถัดไป ให้ตั้งค่า
authenticatorSelection.authenticatorAttachmentเป็น"platform"และauthenticatorSelection.requireResidentKeyเป็นtrueซึ่งจะอนุญาตให้ใช้เฉพาะ Authenticator แพลตฟอร์ม (อุปกรณ์เอง) ที่มีความสามารถของข้อมูลเข้าสู่ระบบที่ค้นพบได้
public/client.js
// Use platform authenticator and discoverable credential.
options.authenticatorSelection = {
  authenticatorAttachment: 'platform',
  requireResidentKey: true
}
- ในบรรทัดถัดไป ให้เรียกใช้เมธอด
navigator.credentials.create()เพื่อสร้างข้อมูลเข้าสู่ระบบ
public/client.js
// Invoke the WebAuthn create() method.
const cred = await navigator.credentials.create({
  publicKey: options,
});
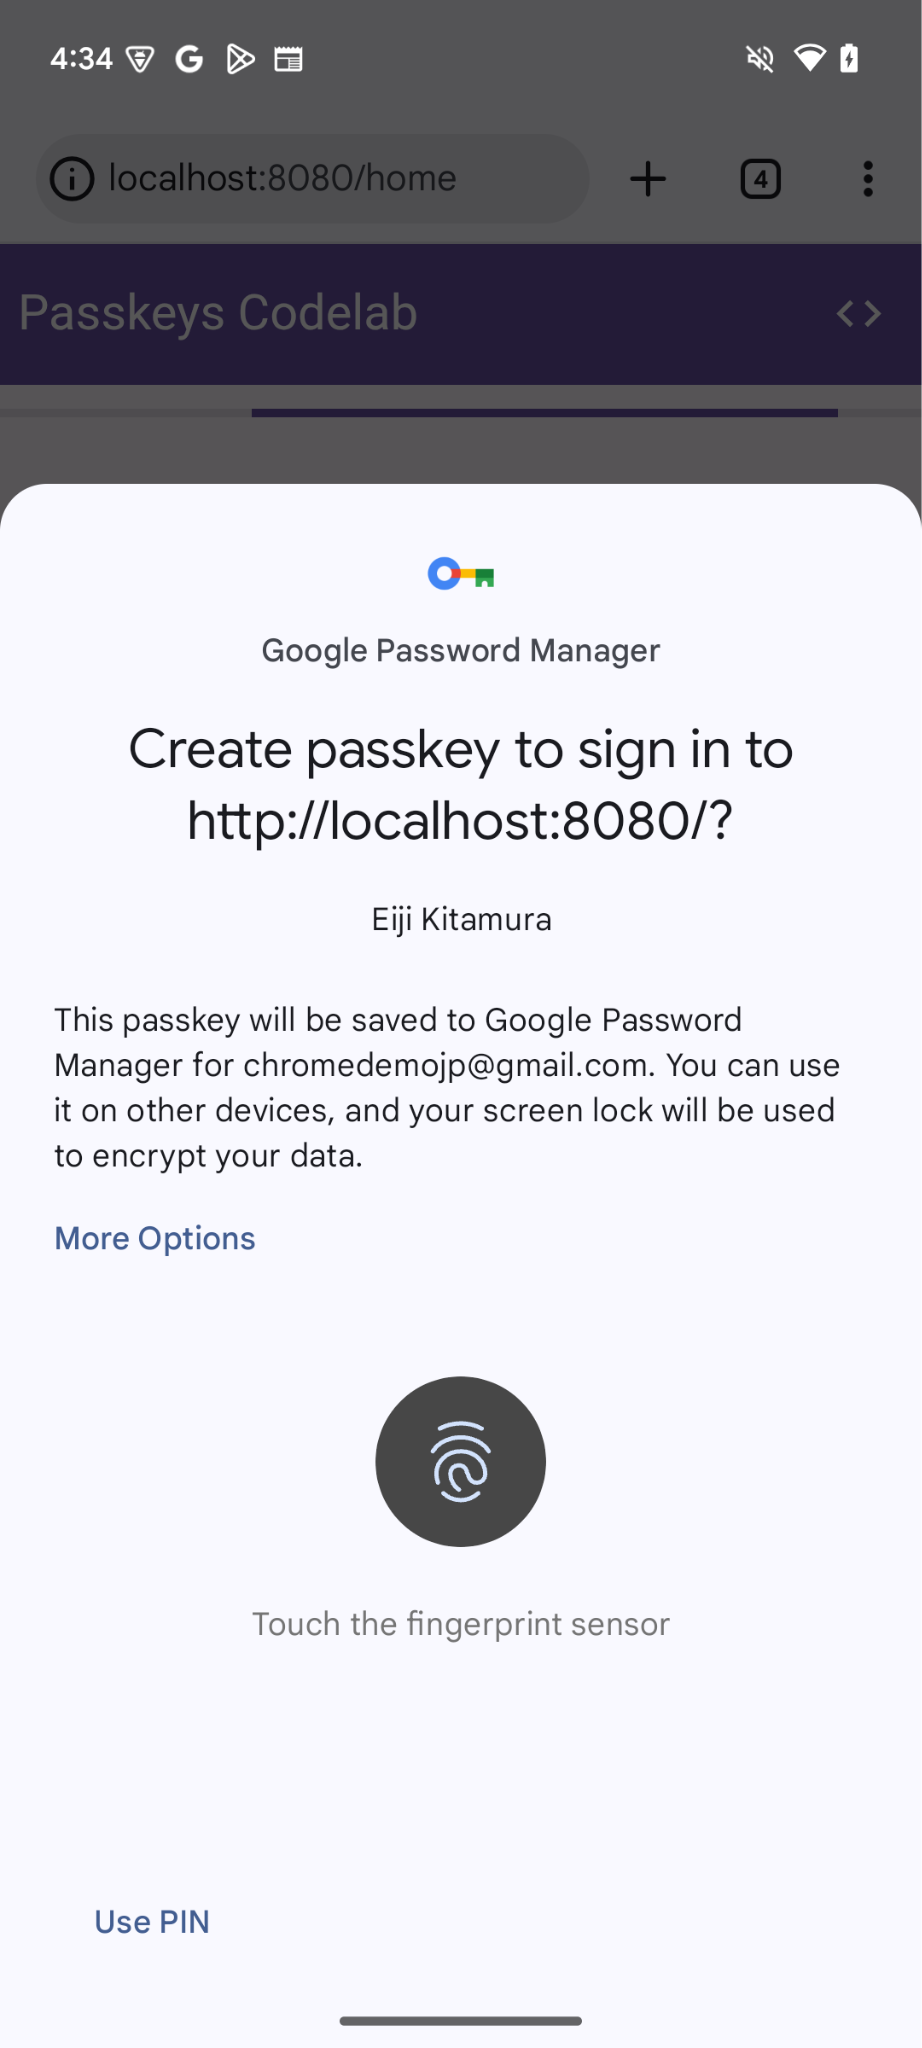
การเรียกนี้ทำให้เบราว์เซอร์พยายามยืนยันตัวตนของผู้ใช้ด้วยการล็อกหน้าจอของอุปกรณ์
ลงทะเบียนข้อมูลเข้าสู่ระบบกับอุปกรณ์ปลายทางของเซิร์ฟเวอร์
หลังจากที่ผู้ใช้ยืนยันตัวตนแล้ว ระบบจะสร้างและจัดเก็บพาสคีย์ เว็บไซต์จะได้รับออบเจ็กต์ข้อมูลเข้าสู่ระบบที่มีคีย์สาธารณะซึ่งคุณสามารถส่งไปยังเซิร์ฟเวอร์เพื่อลงทะเบียนพาสคีย์ได้
ข้อมูลโค้ดต่อไปนี้มีตัวอย่างออบเจ็กต์ข้อมูลเข้าสู่ระบบ
{
  "id": *****,
  "rawId": *****,
  "type": "public-key",
  "response": {
    "clientDataJSON": *****,
    "attestationObject": *****,
    "transports": ["internal", "hybrid"]
  },
  "authenticatorAttachment": "platform"
}
ตารางต่อไปนี้ไม่ได้ครอบคลุมทั้งหมด แต่มีพารามิเตอร์ที่สำคัญในออบเจ็กต์ PublicKeyCredential
พารามิเตอร์ | คำอธิบาย |
รหัสที่เข้ารหัส Base64URL ของพาสคีย์ที่สร้างขึ้น รหัสนี้ช่วยให้เบราว์เซอร์พิจารณาได้ว่ามีพาสคีย์ที่ตรงกันในอุปกรณ์หรือไม่เมื่อมีการตรวจสอบสิทธิ์ ค่านี้ต้องจัดเก็บไว้ในฐานข้อมูลในแบ็กเอนด์ | |
| |
ออบเจ็กต์ | |
ออบเจ็กต์การรับรองที่เข้ารหัส | |
รายการการรับส่งที่อุปกรณ์รองรับ: | |
แสดง |
หากต้องการส่งออบเจ็กต์ข้อมูลเข้าสู่ระบบไปยังเซิร์ฟเวอร์ ให้ทำตามขั้นตอนต่อไปนี้
- เข้ารหัสพารามิเตอร์ไบนารีของข้อมูลเข้าสู่ระบบเป็น Base64URL เพื่อให้ส่งไปยังเซิร์ฟเวอร์เป็นสตริงได้ คุณใช้
.toJSON()เพื่อทำสิ่งนี้ได้โดยทำดังนี้
public/client.js
// TODO: Add an ability to create a passkey: Register the credential to the server endpoint.

// Encode and serialize the `PublicKeyCredential`.
const credential = JSON.stringify(cred);
- ในบรรทัดถัดไป ให้ส่งออบเจ็กต์ไปยังเซิร์ฟเวอร์
public/client.js
return await _fetch('/auth/registerResponse', credential);
เมื่อเรียกใช้โปรแกรม เซิร์ฟเวอร์จะแสดง HTTP code 200 ซึ่งบ่งบอกว่ามีการลงทะเบียนข้อมูลเข้าสู่ระบบแล้ว
ตอนนี้คุณมีฟังก์ชัน registerCredential() ที่สมบูรณ์แล้ว
ตรวจสอบโค้ดโซลูชันสำหรับส่วนนี้
public/client.js
// TODO: Add an ability to create a passkey: Create the registerCredential() function.

export async function registerCredential() {

  // TODO: Add an ability to create a passkey: Obtain the challenge and other options from the server endpoint.

  const _options = await _fetch('/auth/registerRequest');

  // TODO: Add an ability to create a passkey: Create a credential.

  // Deserialize and decode the `PublicKeyCredential.parseCreationOptionsFromJSON()`.
  const options = PublicKeyCredential.parseCreationOptionsFromJSON(_options);

  // Use platform authenticator and discoverable credential.
  options.authenticatorSelection = {
    authenticatorAttachment: 'platform',
    requireResidentKey: true
  }

  // Invoke the WebAuthn create() method.
  const cred = await navigator.credentials.create({
    publicKey: options,
  });

  // TODO: Add an ability to create a passkey: Register the credential to the server endpoint.

  // Encode and serialize the `PublicKeyCredential`.
  const credential = JSON.stringify(cred);

  return await _fetch('/auth/registerResponse', credential);
};
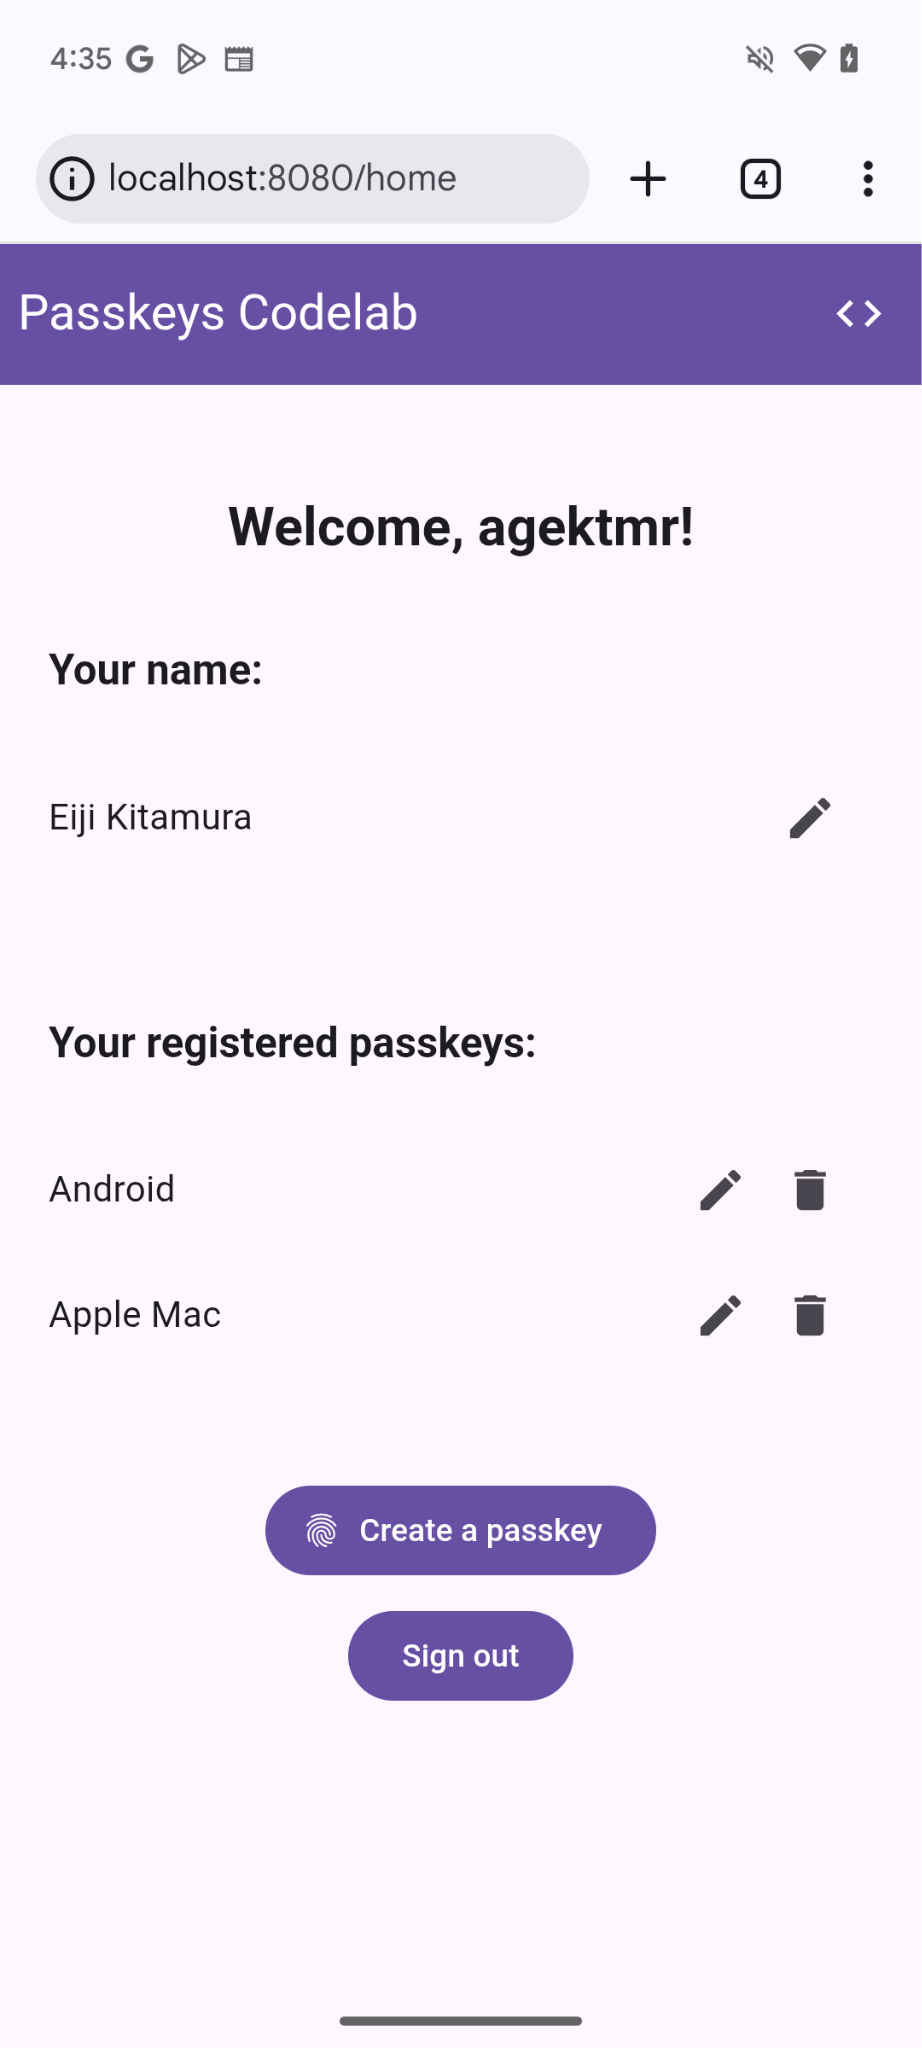
4. สร้าง UI เพื่อลงทะเบียนและจัดการข้อมูลเข้าสู่ระบบพาสคีย์
เมื่อฟังก์ชัน registerCredential() พร้อมใช้งานแล้ว คุณจะต้องมีปุ่มเพื่อเรียกใช้ฟังก์ชันดังกล่าว นอกจากนี้ คุณต้องแสดงรายการพาสคีย์ที่ลงทะเบียนไว้ด้วย
เพิ่ม HTML ของตัวยึดตำแหน่ง
- ในเครื่องมือแก้ไข ให้ไปที่ไฟล์
views/home.html - หลังจากความคิดเห็นที่เกี่ยวข้อง ให้เพิ่มตัวยึดตำแหน่ง UI ที่แสดงปุ่มเพื่อลงทะเบียนพาสคีย์และรายการพาสคีย์
views/home.html
<!-- TODO: Add an ability to create a passkey: Add placeholder HTML. -->
<section>
<h3>Your registered passkeys:</h3>
<div id="list"></div>
</section>
<p id="message" class="instructions"></p>
<mdui-button id="create-passkey" class="hidden" icon="fingerprint" type="button">Create a passkey</mdui-button>
องค์ประกอบ div#list เป็นตัวยึดตำแหน่งสำหรับรายการ
ตรวจสอบว่าอุปกรณ์รองรับพาสคีย์หรือไม่
หากต้องการแสดงเฉพาะตัวเลือกในการสร้างพาสคีย์แก่ผู้ใช้ที่มีอุปกรณ์ที่รองรับพาสคีย์ คุณต้องตรวจสอบก่อนว่า WebAuthn พร้อมใช้งานหรือไม่ หากเป็นเช่นนั้น คุณจะต้องนำคลาส hidden ออกเพื่อแสดงปุ่มสร้างพาสคีย์
หากต้องการตรวจสอบว่าสภาพแวดล้อมรองรับพาสคีย์หรือไม่ ให้ทำตามขั้นตอนต่อไปนี้
- ที่ส่วนท้ายของ
views/home.htmlไฟล์หลังจากความคิดเห็นที่เกี่ยวข้อง ให้เขียนเงื่อนไขที่จะดำเนินการหากwindow.PublicKeyCredential,PublicKeyCredential.isUserVerifyingPlatformAuthenticatorAvailableและPublicKeyCredential.isConditionalMediationAvailableเป็นtrue
views/home.html
// TODO: Add an ability to create a passkey: Check for passkey support.
const createPasskey = $('#create-passkey');
// Feature detections
if (window.PublicKeyCredential &&
    PublicKeyCredential.isUserVerifyingPlatformAuthenticatorAvailable &&
    PublicKeyCredential.isConditionalMediationAvailable) {
- ในส่วนเนื้อหาของเงื่อนไข ให้ตรวจสอบว่าอุปกรณ์สร้างพาสคีย์ได้หรือไม่ จากนั้นตรวจสอบว่าระบบแนะนำพาสคีย์ในการป้อนข้อความอัตโนมัติในแบบฟอร์มได้หรือไม่
views/home.html
try {
    const capabilities = await PublicKeyCredential.getClientCapabilities();
    // Is conditional UI available in this browser?
    if (capabilities.conditionalGet === true &&
        capabilities.passkeyPlatformAuthenticator === true) {
- หากเป็นไปตามเงื่อนไขทั้งหมด ให้แสดงปุ่มเพื่อสร้างพาสคีย์ ไม่เช่นนั้น ให้แสดงข้อความเตือน
views/home.html
      createPasskey.classList.remove('hidden');
    } else {

      // If conditional UI isn't available, show a message.
      $('#message').innerText = 'This device does not support passkeys.';
    }
  } catch (e) {
    console.error(e);
  }
} else {

  // If WebAuthn isn't available, show a message.
  $('#message').innerText = 'This device does not support passkeys.';
}
แสดงพาสคีย์ที่ลงทะเบียนในรายการ
- กำหนด
renderCredentials()ฟังก์ชันที่ดึงพาสคีย์ที่ลงทะเบียนจากเซิร์ฟเวอร์และแสดงในรายการ โชคดีที่คุณมี/auth/getKeysปลายทางเซิร์ฟเวอร์อยู่แล้วเพื่อดึงพาสคีย์ที่ลงทะเบียนไว้สำหรับผู้ใช้ที่ลงชื่อเข้าใช้
views/home.html
// TODO: Add an ability to create a passkey: Render registered passkeys in a list.
async function renderCredentials() {
  const res = await _fetch('/auth/getKeys');
  const list = $('#list');
  const creds = res.length > 0 ? html`
    <mdui-list>
      ${res.map(cred => html`
        <mdui-list-item>
          ${cred.name || 'Unnamed'}
          <mdui-button-icon data-cred-id="${cred.id}" data-name="${cred.name || 'Unnamed'}" @click="${rename}" icon="edit" slot="end-icon"></mdui-button-icon>
          <mdui-button-icon data-cred-id="${cred.id}" @click="${remove}" icon="delete" slot="end-icon"></mdui-button-icon>
        </mdui-list-item>`)}
    </mdui-list>` : html`
    <mdui-list>
      <mdui-list-item>No credentials found.</mdui-list-item>
    </mdui-list>`;
  render(creds, list);
};
- ในบรรทัดถัดไป ให้เรียกใช้ฟังก์ชัน
renderCredentials()เพื่อแสดงพาสคีย์ที่ลงทะเบียนทันทีที่ผู้ใช้ไปที่หน้า/homeเพื่อเป็นการเริ่มต้น
views/home.html
renderCredentials();
สร้างและลงทะเบียนพาสคีย์
หากต้องการสร้างและลงทะเบียนพาสคีย์ คุณต้องเรียกใช้ฟังก์ชัน registerCredential() ที่คุณใช้งานก่อนหน้านี้
หากต้องการเรียกใช้ฟังก์ชัน registerCredential() เมื่อคลิกปุ่มสร้างพาสคีย์ ให้ทำตามขั้นตอนต่อไปนี้
- ในไฟล์ หลังจาก HTML ตัวยึดตำแหน่ง ให้ค้นหาคำสั่ง
importต่อไปนี้
views/home.html
import {
  $,
  _fetch,
  loading,
  updateCredential,
  unregisterCredential,
} from '/client.js';
- ที่ส่วนท้ายของเนื้อหา
importคำสั่งregisterCredential()ให้เพิ่มฟังก์ชัน
views/home.html
// TODO: Add an ability to create a passkey: Create and register a passkey.
import {
  $,
  _fetch,
  loading,
  updateCredential,
  unregisterCredential,
  registerCredential
} from '/client.js';
- ที่ส่วนท้ายของไฟล์หลังจากความคิดเห็นที่เกี่ยวข้อง ให้กำหนด
register()ฟังก์ชันที่เรียกใช้ฟังก์ชันregisterCredential()และ UI การโหลด และเรียกใช้renderCredentials()หลังจากลงทะเบียน ซึ่งจะอธิบายว่าเบราว์เซอร์สร้างพาสคีย์และแสดงข้อความแสดงข้อผิดพลาดเมื่อมีสิ่งผิดปกติเกิดขึ้น
views/home.html
// TODO: Add an ability to create a passkey: Create and register a passkey.
async function register() {
  try {

    // Start the loading UI.
    loading.start();

    // Start creating a passkey.
    await registerCredential();

    // Stop the loading UI.
    loading.stop();

    // Render the updated passkey list.
    renderCredentials();
- ในส่วนเนื้อหาของ
register()ฟังก์ชัน ให้ดักจับข้อยกเว้น เมธอดnavigator.credentials.create()จะแสดงข้อผิดพลาดInvalidStateErrorเมื่อมีพาสคีย์ในอุปกรณ์อยู่แล้ว โดยจะตรวจสอบด้วยอาร์เรย์excludeCredentialsในกรณีนี้ คุณจะแสดงข้อความที่เกี่ยวข้องต่อผู้ใช้ นอกจากนี้ ยังแสดงข้อผิดพลาดNotAllowedErrorเมื่อผู้ใช้ยกเลิกกล่องโต้ตอบการตรวจสอบสิทธิ์ด้วย ในกรณีนี้ คุณไม่จำเป็นต้องสนใจ
views/home.html
  } catch (e) {

    // Stop the loading UI.
    loading.stop();

    // An InvalidStateError indicates that a passkey already exists on the device.
    if (e.name === 'InvalidStateError') {
      alert('A passkey already exists for this device.');

    // A NotAllowedError indicates that the user canceled the operation.
    } else if (e.name === 'NotAllowedError') {
      Return;

    // Show other errors in an alert.
    } else {
      alert(e.message);
      console.error(e);
    }
  }
};
- ในบรรทัดหลังฟังก์ชัน
register()ให้แนบฟังก์ชันregister()กับเหตุการณ์clickสำหรับปุ่มสร้างพาสคีย์
views/home.html
createPasskey.addEventListener('click', register);
ตรวจสอบโค้ดโซลูชันสำหรับส่วนนี้
views/home.html
<!-- TODO: Add an ability to create a passkey: Add placeholder HTML. -->
<section>
  <h3>Your registered passkeys:</h3>
  <div id="list"></div>
</section>
<p id="message" class="instructions"></p>
<mdui-button id="create-passkey" icon="fingerprint" type="button">Create a passkey</mdui-button>
views/home.html
// TODO: Add an ability to create a passkey: Create and register a passkey.
import {
  $,
  _fetch,
  loading,
  updateCredential,
  unregisterCredential,
  registerCredential
} from '/client.js';
views/home.html
// TODO: Add an ability to create a passkey: Check for passkey support.
const createPasskey = $('#create-passkey');

// Is WebAuthn available in this browser?
if (window.PublicKeyCredential &&
  PublicKeyCredential.isUserVerifyingPlatformAuthenticatorAvailable &&
  PublicKeyCredential.isConditionalMediationAvailable) {
  try {
    const capabilities = await PublicKeyCredential.getClientCapabilities();
    // Is conditional UI available in this browser?
    if (capabilities.conditionalGet === true &&
      capabilities.passkeyPlatformAuthenticator === true) {
      // If conditional UI is available, reveal the Create a passkey button.
      createPasskey.classList.remove('hidden');
    } else {
      // If conditional UI isn't available, show a message.
      $('#message').innerText = 'This device does not support passkeys.';
    }
  } catch (e) {
    console.error(e);
  }
} else {
  // If WebAuthn isn't available, show a message.
  $('#message').innerText = 'This device does not support passkeys.';
}

// TODO: Add an ability to create a passkey: Render registered passkeys in a list.

async function renderCredentials() {
  const res = await _fetch('/auth/getKeys');
  const list = $('#list');
  const creds = html`${res.length > 0 ? html`
    <mdui-list>
      ${res.map(cred => html`
        <mdui-list-item>
          ${cred.name || 'Unnamed'}
          <mdui-button-icon data-cred-id="${cred.id}" data-name="${cred.name || 'Unnamed'}" @click="${rename}" icon="edit" slot="end-icon"></mdui-button-icon>
          <mdui-button-icon data-cred-id="${cred.id}" @click="${remove}" icon="delete" slot="end-icon"></mdui-button-icon>
        </mdui-list-item>`)}
    </mdui-list>` : html`
    <mdui-list>
      <mdui-list-item>No credentials found.</mdui-list-item>
    </mdui-list>`}`;
  render(creds, list);
};

renderCredentials();

// TODO: Add an ability to create a passkey: Create and register a passkey.

async function register() {
  try {
    // Start the loading UI.
    loading.start();
    // Start creating a passkey.
    await registerCredential();
    // Stop the loading UI.
    loading.stop();
    // Render the updated passkey list.
    renderCredentials();
  } catch (e) {
    // Stop the loading UI.
    loading.stop();
    // An InvalidStateError indicates that a passkey already exists on the device.
    if (e.name === 'InvalidStateError') {
      alert('A passkey already exists for this device.');
      // A NotAllowedError indicates the user canceled the operation.
    } else if (e.name === 'NotAllowedError') {
      return;
      // Show other errors in an alert.
    } else {
      alert(e.message);
      console.error(e);
    }
  }
};

createPasskey.addEventListener('click', register);
ลองใช้
หากทำตามขั้นตอนทั้งหมดที่ผ่านมา คุณได้ติดตั้งใช้งานความสามารถในการสร้าง ลงทะเบียน และแสดงพาสคีย์ในเว็บไซต์แล้ว
หากต้องการลองใช้ ให้ทำตามขั้นตอนต่อไปนี้
- ลงชื่อเข้าใช้เว็บไซต์ด้วยชื่อผู้ใช้และรหัสผ่านแบบสุ่ม
- คลิกสร้างพาสคีย์
- ยืนยันตัวตนด้วยการล็อกหน้าจอของอุปกรณ์
- ยืนยันว่ามีการลงทะเบียนพาสคีย์และแสดงในส่วนพาสคีย์ที่ลงทะเบียนของหน้าเว็บ

เปลี่ยนชื่อและนำพาสคีย์ที่ลงทะเบียนออก
คุณควรเปลี่ยนชื่อหรือลบรหัสผ่านที่ลงทะเบียนไว้ในรายการได้ คุณสามารถดูวิธีการทำงานในโค้ดได้เนื่องจากมาพร้อมกับ Codelab
ใน Chrome คุณสามารถนำพาสคีย์ที่ลงทะเบียนไว้ออกจาก chrome://settings/passkeys บนเดสก์ท็อป หรือจากเครื่องมือจัดการรหัสผ่านในการตั้งค่าบน Android
ดูข้อมูลเกี่ยวกับวิธีเปลี่ยนชื่อและนำพาสคีย์ที่ลงทะเบียนไว้ออกในแพลตฟอร์มอื่นๆ ได้ที่หน้าการสนับสนุนของแพลตฟอร์มเหล่านั้น
5. เพิ่มความสามารถในการตรวจสอบสิทธิ์ด้วยพาสคีย์
ตอนนี้ผู้ใช้สามารถสร้างและลงทะเบียนพาสคีย์ได้แล้ว และพร้อมที่จะใช้พาสคีย์เป็นวิธีตรวจสอบสิทธิ์ในเว็บไซต์ของคุณอย่างปลอดภัย ตอนนี้คุณต้องเพิ่มความสามารถในการตรวจสอบสิทธิ์ด้วยพาสคีย์ลงในเว็บไซต์
สร้างฟังก์ชัน authenticate()
- ในไฟล์
public/client.jsหลังจากความคิดเห็นที่เกี่ยวข้อง ให้สร้างฟังก์ชันชื่อauthenticate()ที่ยืนยันผู้ใช้ในเครื่อง แล้วจึงยืนยันกับเซิร์ฟเวอร์
public/client.js
// TODO: Add an ability to authenticate with a passkey: Create the authenticate() function.
export async function authenticate() {

  // TODO: Add an ability to authenticate with a passkey: Obtain the challenge and other options from the server endpoint.

  // TODO: Add an ability to authenticate with a passkey: Locally verify the user and get a credential.

  // TODO: Add an ability to authenticate with a passkey: Verify the credential.

};
รับคำท้าและตัวเลือกอื่นๆ จากปลายทางของเซิร์ฟเวอร์
ก่อนขอให้ผู้ใช้ตรวจสอบสิทธิ์ คุณต้องขอพารามิเตอร์เพื่อส่งใน WebAuthn จากเซิร์ฟเวอร์ รวมถึงการท้าทาย
- ในเนื้อหาของฟังก์ชัน
authenticate()หลังจากความคิดเห็นที่เกี่ยวข้อง ให้เรียกใช้ฟังก์ชัน_fetch()เพื่อส่งคำขอPOSTไปยังเซิร์ฟเวอร์
public/client.js
// TODO: Add an ability to authenticate with a passkey: Obtain the challenge and other options from the server endpoint.

// Base64URL decode the challenge.
const options = PublicKeyCredential.parseRequestOptionsFromJSON(_options);
เซิร์ฟเวอร์ของ Codelab นี้ออกแบบมาเพื่อแสดงผล JSON ที่คล้ายกับพจนานุกรม PublicKeyCredentialRequestOptions ที่ส่งไปยัง WebAuthn navigator.credentials.get() API มากที่สุด ข้อมูลโค้ดต่อไปนี้มีตัวเลือกตัวอย่างที่คุณควรได้รับ
{
  "challenge": *****,
  "rpId": "localhost",
  "allowCredentials": []
}
ตารางต่อไปนี้ไม่ได้ครอบคลุมทั้งหมด แต่มีพารามิเตอร์ที่สำคัญในพจนานุกรม PublicKeyCredentialRequestOptions
พารามิเตอร์ | คำอธิบาย |
คำท้าที่เซิร์ฟเวอร์สร้างขึ้นในออบเจ็กต์ | |
รหัส RP คือโดเมน เว็บไซต์ระบุได้ทั้งโดเมนหรือคำต่อท้ายที่จดทะเบียนได้ ค่านี้ต้องตรงกับพารามิเตอร์ | |
ระบบใช้พร็อพเพอร์ตี้นี้เพื่อค้นหาเครื่องมือตรวจสอบสิทธิ์ที่มีสิทธิ์สำหรับการตรวจสอบสิทธิ์นี้ ส่งอาร์เรย์ว่างหรือปล่อยให้ไม่ได้ระบุเพื่อให้เบราว์เซอร์แสดงตัวเลือกบัญชี ดูข้อมูลเพิ่มเติมเกี่ยวกับลักษณะการทำงานของ | |
ตั้งค่าเป็น |
ยืนยันตัวตนผู้ใช้ในเครื่องและรับข้อมูลเข้าสู่ระบบ
- ในส่วนเนื้อหาของฟังก์ชัน
authenticate()หลังจากความคิดเห็นที่เกี่ยวข้อง ให้แปลงพารามิเตอร์challengeกลับเป็นไบนารี
public/client.js
// TODO: Add an ability to authenticate with a passkey: Locally verify the user and get a credential.
// Base64URL decode the challenge.
options.challenge = base64url.decode(options.challenge);
- ส่งอาร์เรย์ว่างไปยังพารามิเตอร์
allowCredentialsเพื่อเปิดตัวเลือกบัญชีเมื่อผู้ใช้ตรวจสอบสิทธิ์
public/client.js
// An empty allowCredentials array invokes an account selector by discoverable credentials.
options.allowCredentials = [];
ตัวเลือกบัญชีจะใช้ข้อมูลของผู้ใช้ที่จัดเก็บไว้กับพาสคีย์
- เรียกใช้เมธอด
navigator.credentials.get()พร้อมกับตัวเลือกmediation: 'conditional'ดังนี้
public/client.js
// Invoke the WebAuthn get() method.
const cred = await navigator.credentials.get({
  publicKey: options,

  // Request a conditional UI.
  mediation: 'conditional'
});
ตัวเลือกนี้จะสั่งให้เบราว์เซอร์แนะนำพาสคีย์แบบมีเงื่อนไขเป็นส่วนหนึ่งของการป้อนข้อความอัตโนมัติในแบบฟอร์ม
ยืนยันข้อมูลเข้าสู่ระบบ
หลังจากที่ผู้ใช้ยืนยันตัวตนในเครื่องแล้ว คุณควรได้รับออบเจ็กต์ข้อมูลเข้าสู่ระบบที่มีลายเซ็นซึ่งคุณยืนยันได้ในเซิร์ฟเวอร์
ข้อมูลโค้ดต่อไปนี้มีตัวอย่างออบเจ็กต์ PublicKeyCredential
{
  "id": *****,
  "rawId": *****,
  "type": "public-key",
  "response": {
    "clientDataJSON": *****,
    "authenticatorData": *****,
    "signature": *****,
    "userHandle": *****
  },
  authenticatorAttachment: "platform"
}
ตารางต่อไปนี้ไม่ได้ครอบคลุมทั้งหมด แต่มีพารามิเตอร์ที่สำคัญในออบเจ็กต์ PublicKeyCredential
พารามิเตอร์ | คำอธิบาย |
รหัสที่เข้ารหัส Base64URL ของข้อมูลเข้าสู่ระบบพาสคีย์ที่ได้รับการตรวจสอบสิทธิ์ | |
| |
ออบเจ็กต์ | |
ออบเจ็กต์ | |
ออบเจ็กต์ | |
| |
แสดงผล |
หากต้องการส่งออบเจ็กต์ข้อมูลเข้าสู่ระบบไปยังเซิร์ฟเวอร์ ให้ทำตามขั้นตอนต่อไปนี้
- ในส่วนเนื้อหาของฟังก์ชัน
authenticate()หลังจากความคิดเห็นที่เกี่ยวข้อง ให้เข้ารหัสพารามิเตอร์ไบนารีของข้อมูลเข้าสู่ระบบเพื่อให้ส่งไปยังเซิร์ฟเวอร์เป็นสตริงได้ คุณใช้.toJSON()เพื่อทำสิ่งนี้ได้โดยทำดังนี้
public/client.js
// TODO: Add an ability to authenticate with a passkey: Verify the credential.
// Encode and serialize the `PublicKeyCredential`.
const credential = JSON.stringify(cred);
- ส่งออบเจ็กต์ไปยังเซิร์ฟเวอร์
public/client.js
return await _fetch(`/auth/signinResponse`, credential);
เมื่อเรียกใช้โปรแกรม เซิร์ฟเวอร์จะแสดง HTTP code 200 ซึ่งบ่งบอกว่ามีการยืนยันข้อมูลเข้าสู่ระบบแล้ว
ตอนนี้คุณมีฟังก์ชัน authentication() ครบถ้วนแล้ว
ตรวจสอบโค้ดโซลูชันสำหรับส่วนนี้
public/client.js
// TODO: Add an ability to authenticate with a passkey: Create the authenticate() function.
export async function authenticate() {

  // TODO: Add an ability to authenticate with a passkey: Obtain the
  challenge and other options from the server endpoint.
  const options = await _fetch('/auth/signinRequest');

  // TODO: Add an ability to authenticate with a passkey: Locally verify
  the user and get a credential.
  // Base64URL decode the challenge.
  options.challenge = base64url.decode(options.challenge);

  // The empty allowCredentials array invokes an account selector
  by discoverable credentials.
  options.allowCredentials = [];

  // Invoke the WebAuthn get() function.
  const cred = await navigator.credentials.get({
    publicKey: options,

    // Request a conditional UI.
    mediation: 'conditional'
  });

  // TODO: Add an ability to authenticate with a passkey: Verify the credential.
  const credential = {};
  credential.id = cred.id;
  credential.rawId = cred.id; // Pass a Base64URL encoded ID string.
  credential.type = cred.type;

  // Base64URL encode some values.
  const clientDataJSON = base64url.encode(cred.response.clientDataJSON);
  const authenticatorData =
  base64url.encode(cred.response.authenticatorData);
  const signature = base64url.encode(cred.response.signature);
  const userHandle = base64url.encode(cred.response.userHandle);

  credential.response = {
    clientDataJSON,
    authenticatorData,
    signature,
    userHandle,
  };

  return await _fetch(`/auth/signinResponse`, credential);
};
6. เพิ่มพาสคีย์ลงในข้อมูลที่ป้อนอัตโนมัติของเบราว์เซอร์
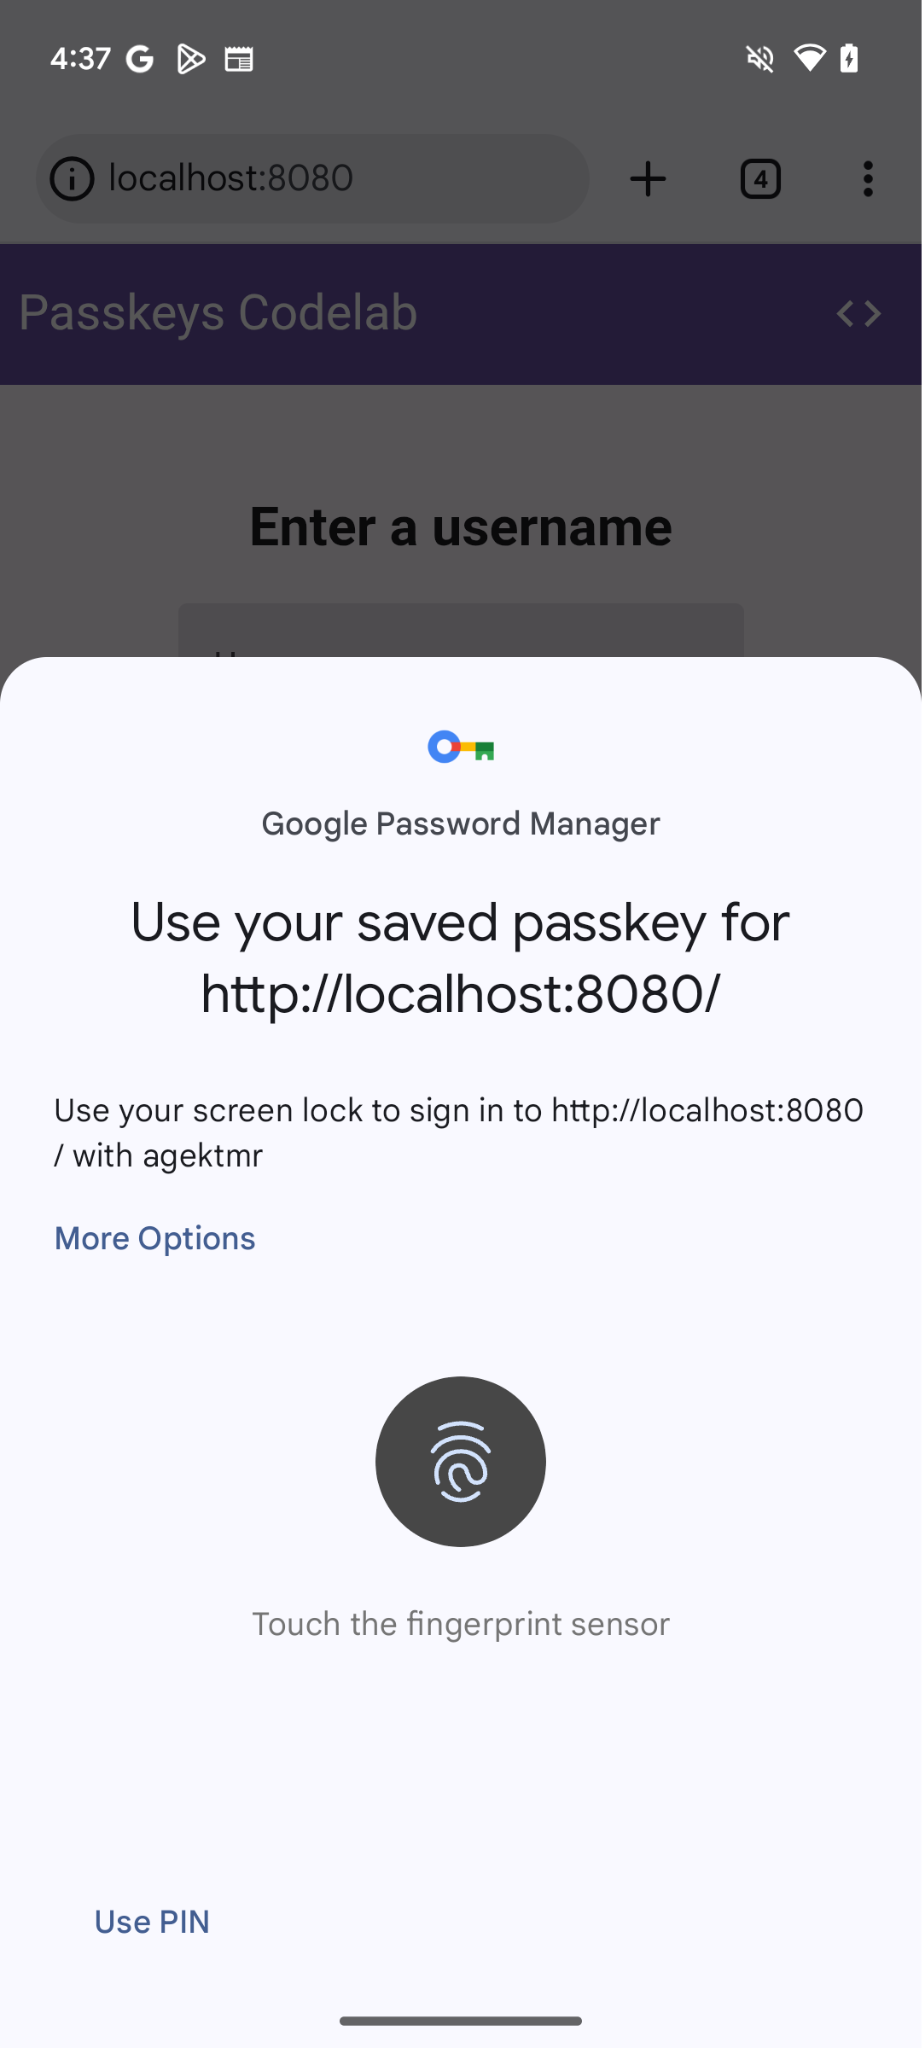
เมื่อผู้ใช้กลับมา คุณต้องการให้ผู้ใช้ลงชื่อเข้าใช้ได้ง่ายและปลอดภัยที่สุด หากเพิ่มปุ่มลงชื่อเข้าใช้ด้วยพาสคีย์ในหน้าเข้าสู่ระบบ ผู้ใช้จะกดปุ่ม เลือกพาสคีย์ในตัวเลือกบัญชีของเบราว์เซอร์ และใช้การล็อกหน้าจอเพื่อยืนยันตัวตนได้
อย่างไรก็ตาม การเปลี่ยนจากรหัสผ่านเป็นพาสคีย์ไม่ได้เกิดขึ้นกับผู้ใช้ทุกคนในคราวเดียว ซึ่งหมายความว่าคุณจะกำจัดรหัสผ่านไม่ได้จนกว่าผู้ใช้ทั้งหมดจะเปลี่ยนไปใช้พาสคีย์ ดังนั้นคุณจึงต้องปล่อยให้แบบฟอร์มลงชื่อเข้าใช้ด้วยรหัสผ่านไว้จนกว่าจะถึงตอนนั้น อย่างไรก็ตาม หากคุณปล่อยให้มีทั้งแบบฟอร์มรหัสผ่านและปุ่มพาสคีย์ ผู้ใช้จะต้องเลือกระหว่างรหัสผ่านกับพาสคีย์เพื่อใช้ลงชื่อเข้าใช้ ซึ่งเป็นการเลือกที่ไม่จำเป็น คุณควรมีกระบวนการลงชื่อเข้าใช้ที่ไม่ซับซ้อน
UI แบบมีเงื่อนไขจึงเข้ามามีบทบาทในจุดนี้ UI แบบมีเงื่อนไขเป็นฟีเจอร์ WebAuthn ที่คุณสามารถสร้างช่องป้อนข้อมูลแบบฟอร์มเพื่อแนะนำพาสคีย์เป็นส่วนหนึ่งของรายการกรอกข้อมูลอัตโนมัติได้ นอกเหนือจากรหัสผ่าน หากผู้ใช้แตะพาสคีย์ในคำแนะนำการป้อนข้อความอัตโนมัติ ระบบจะขอให้ผู้ใช้ใช้การล็อกหน้าจอของอุปกรณ์เพื่อยืนยันตัวตนในเครื่อง ซึ่งเป็นประสบการณ์ของผู้ใช้ที่ราบรื่นเนื่องจากการดำเนินการของผู้ใช้แทบจะเหมือนกับการลงชื่อเข้าใช้ด้วยรหัสผ่าน
เปิดใช้ UI แบบมีเงื่อนไข
หากต้องการเปิดใช้ UI แบบมีเงื่อนไข สิ่งที่คุณต้องทำคือเพิ่มโทเค็น webauthn ในแอตทริบิวต์ autocomplete ของช่องป้อนข้อมูล เมื่อตั้งค่าโทเค็นแล้ว คุณจะเรียกใช้เมธอด navigator.credentials.get() ด้วยสตริง mediation: 'conditional' เพื่อทริกเกอร์ UI การล็อกหน้าจอแบบมีเงื่อนไขได้
- หากต้องการเปิดใช้ UI แบบมีเงื่อนไข ให้แทนที่ช่องป้อนชื่อผู้ใช้ที่มีอยู่ด้วย HTML ต่อไปนี้หลังจากความคิดเห็นที่เกี่ยวข้องในไฟล์
view/index.html
view/index.html
<!-- TODO: Add passkeys to the browser autofill: Enable conditional UI. -->
<mdui-text-field id="username" label="Username" name="username" autocomplete="username webauthn" autofocus></mdui-text-field>
ตรวจหาฟีเจอร์ เรียกใช้ WebAuthn และเปิดใช้ UI แบบมีเงื่อนไข
- ในไฟล์
view/index.htmlหลังความคิดเห็นที่เกี่ยวข้อง ให้แทนที่คำสั่งimportที่มีอยู่ด้วยโค้ดต่อไปนี้
view/index.html
// TODO: Add passkeys to the browser autofill: Detect features, invoke WebAuthn, and enable a conditional UI.
import {
  $,
  _fetch,
  loading,
  authenticate
} from "/client.js";
โค้ดนี้จะนำเข้าฟังก์ชัน authenticate() ที่คุณใช้ก่อนหน้านี้
- ตรวจสอบว่าออบเจ็กต์
window.PulicKeyCredentialพร้อมใช้งานและเมธอดPublicKeyCredential.isConditionalMediationAvailable()แสดงผลค่าtrueจากนั้นเรียกใช้ฟังก์ชันauthenticate()ดังนี้
view/index.html
// TODO: Add passkeys to the browser autofill: Detect features, invoke WebAuthn, and enable a conditional UI.
if (window.PublicKeyCredential &&
    PublicKeyCredential.getClientCapabilities) {
  try {

    // Is conditional UI available in this browser?
      const capabilities = await PublicKeyCredential.getClientCapabilities();
      if (capabilities.conditionalGet) {

      // If conditional UI is available, invoke the authenticate() function.
      const user = await authenticate();
      if (user) {

        // Proceed only when authentication succeeds.
        $("#username").value = user.username;
        loading.start();
        location.href = "/home";
      } else {
        throw new Error("User not found.");
      }
    }
  } catch (e) {
    loading.stop();

    // A NotAllowedError indicates that the user canceled the operation.
    if (e.name !== "NotAllowedError") {
      console.error(e);
      alert(e.message);
    }
  }
}
ตรวจสอบโค้ดโซลูชันสำหรับส่วนนี้
view/index.html
<!-- TODO: Add passkeys to the browser autofill: Enable conditional UI. -->
<mdui-text-field id="username" label="Username" name="username" autocomplete="username webauthn" autofocus></mdui-text-field>
view/index.html
// TODO: Add passkeys to the browser autofill: Detect features, invoke WebAuthn, and enable a conditional UI.
import {
  $,
  _fetch,
  loading,
  authenticate
} from '/client.js';
view/index.html
// TODO: Add passkeys to the browser autofill: Detect features, invoke WebAuthn, and enable a conditional UI.

// Is WebAuthn available on this browser?
if (window.PublicKeyCredential &&
    PublicKeyCredential.getClientCapabilities) {
  try {
    // Is conditional UI available in this browser?
    const capabilities = await PublicKeyCredential.getClientCapabilities();
    if (capabilities.conditionalGet) {
      // If conditional UI is available, invoke the authenticate() function.
      const user = await authenticate();
      if (user) {
        // Proceed only when authentication succeeds.
        $('#username').value = user.username;
        loading.start();
        location.href = '/home';
      } else {
        throw new Error('User not found.');
      }
    }
  } catch (e) {
    loading.stop();
    // A NotAllowedError indicates that the user canceled the operation.
    if (e.name !== 'NotAllowedError') {
      console.error(e);
      alert(e.message);
    }
  }
}
ลองใช้
คุณได้ติดตั้งใช้งานการสร้าง การลงทะเบียน การแสดง และการตรวจสอบสิทธิ์ของพาสคีย์ในเว็บไซต์
หากต้องการลองใช้ ให้ทำตามขั้นตอนต่อไปนี้
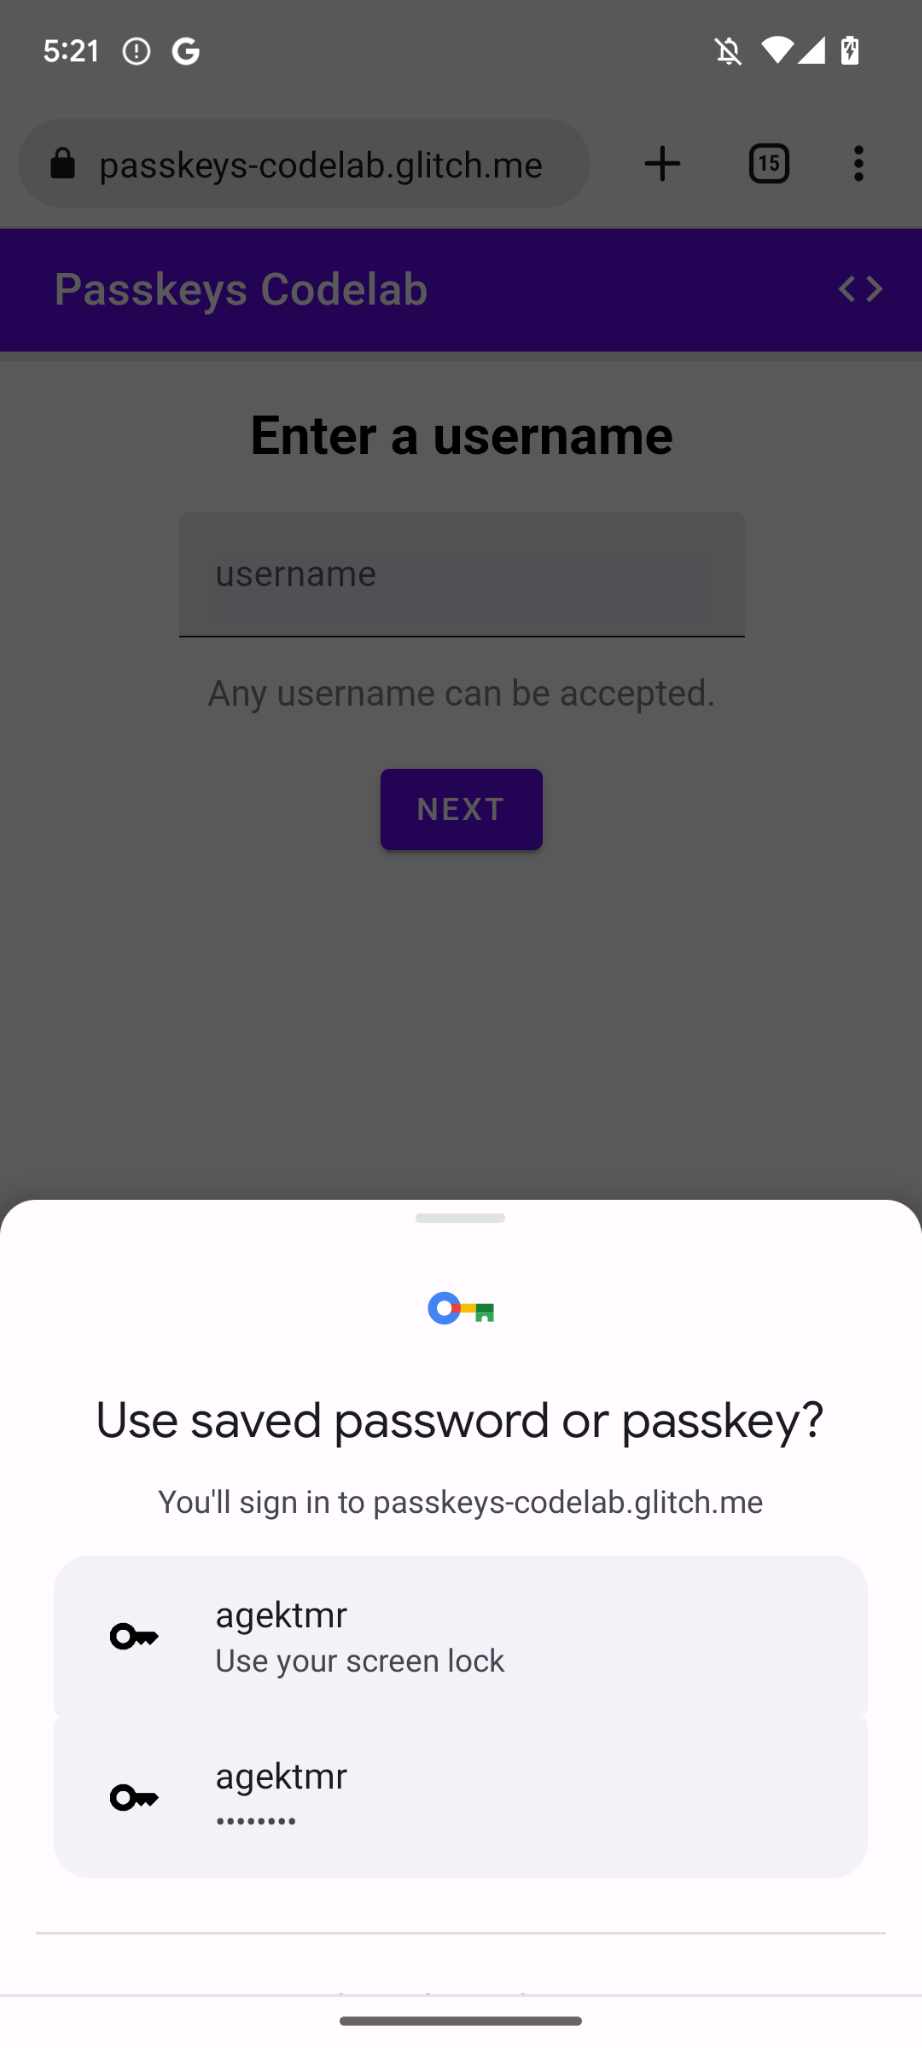
- ไปที่แท็บตัวอย่าง
- ออกจากระบบหากจำเป็น
- คลิกกล่องข้อความชื่อผู้ใช้ กล่องโต้ตอบจะปรากฏขึ้น
- เลือกบัญชีที่ต้องการใช้ลงชื่อเข้าใช้
- ยืนยันตัวตนด้วยการล็อกหน้าจอของอุปกรณ์ ระบบจะเปลี่ยนเส้นทางคุณไปยังหน้า
/homeและลงชื่อเข้าใช้
7. ยินดีด้วย
คุณทำ Codelab นี้เสร็จแล้ว หากมีคำถาม โปรดถามในรายชื่ออีเมล FIDO-DEV หรือใน StackOverflow โดยใช้แท็ก passkey