
1. Before you begin
The use of passkeys instead of passwords is a great way for websites to make their user accounts safer, simpler, and easier to use. With a passkey, a user can sign in to a website or an app by using the device's screen lock feature, such as a fingerprint, face, or device PIN. A passkey has to be created, associated with a user account, and have its public key stored on a server before a user can sign in with it.
In this codelab, you turn a basic form-based username and password sign-in into one that supports passkeys and includes the following:
- A button that creates a passkey after the user signs in.
- A UI that displays a list of registered passkeys.
- The existing sign-in form that lets users sign in with a registered passkey through form autofill.
Prerequisites
- Basic understanding of JavaScript
- Basic understanding of the Web Authentication API (WebAuthn)
What you'll learn
- How to create a passkey.
- How to authenticate users with a passkey.
- How to let a form suggest a passkey as a sign-in option.
2. Get set up
In this codelab, you'll clone an incomplete demo app from GitHub and then finish the implementation of passkey support.
Clone the project
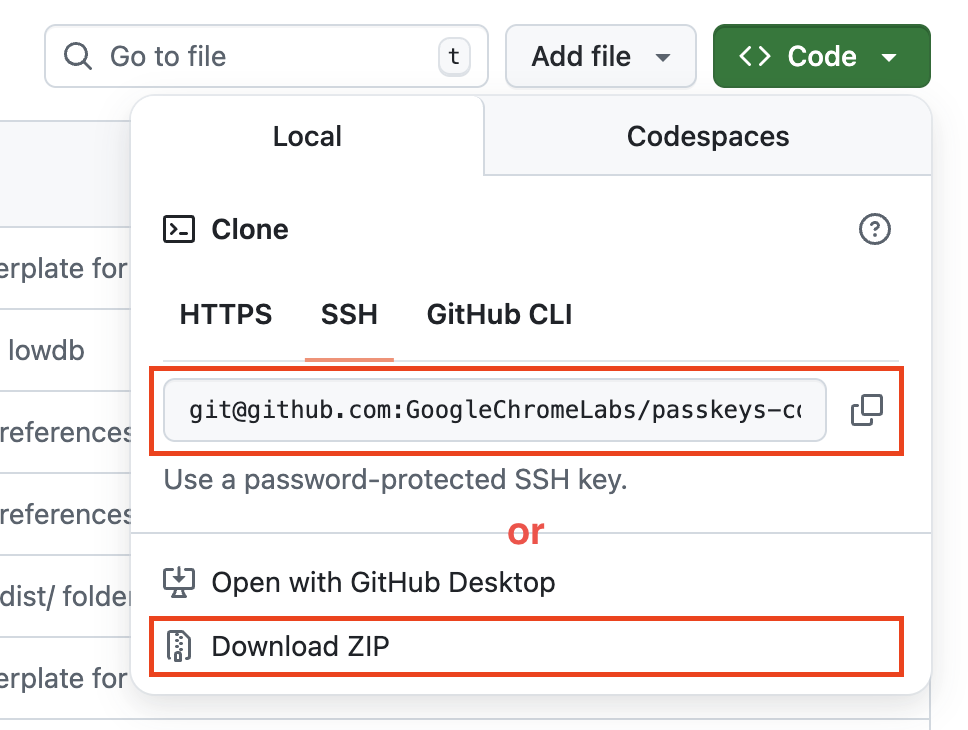
- Open the project on GitHub.
- Clone or download the project.
Run the project
- Open a terminal and
cd startto change directory. - Run
npm installto install the project dependencies. - Build and run the project with
npm run build && IS_LOCAL=1 npm run start. - Open http://localhost:8080/ in your browser.
Examine the website's initial state
- On the site, enter a random username and then click Next.
- Enter a random password and then click Sign-in. The password is ignored, but you're still authenticated and land on the home page.
- If you want to change your display name, do so. That's all you can do in the initial state.
- Click Sign out.
In this state, users must enter a password every time that they log in. You add passkey support to this form so that users can sign in with the device's screen-lock functionality.
For more information about how passkeys work, see How do passkeys work?.
3. Add an ability to create a passkey
To let users authenticate with a passkey, you need to give them the ability to create and register a passkey, and store its public key on the server.
You want to allow the creation of a passkey after the user logs in with a password, and add a UI that lets users create a passkey and see a list of all registered passkeys on the /home page. In the next section, you create a function that creates and registers a passkey.
Create the registerCredential() function
- In your code editor of choice, open the
startdirectory. - Navigate to the
public/client.jsfile and then scroll to the end. - After the relevant comment, add the following
registerCredential()function:
public/client.js
// TODO: Add an ability to create a passkey: Create the registerCredential() function.
export async function registerCredential() {

  // TODO: Add an ability to create a passkey: Obtain the challenge and other options from the server endpoint.

  // TODO: Add an ability to create a passkey: Create a credential.

  // TODO: Add an ability to create a passkey: Register the credential to the server endpoint.

};
This function creates and registers a passkey on the server.
Obtain the challenge and other options from the server endpoint
Before a passkey is created, you need to request parameters to pass in WebAuthn from the server, including a challenge. WebAuthn is a browser API that lets a user create a passkey and authenticate the user with the passkey. Luckily, you already have a server endpoint that responds with such parameters in this codelab.
- To obtain the challenge and other options from the server endpoint, add the following code to the
registerCredential()function's body after the relevant comment:
public/client.js
// TODO: Add an ability to create a passkey: Obtain the challenge and other options from the server endpoint.
const _options = await _fetch('/auth/registerRequest');
The following code snippet includes sample options that you receive from the server:
{
  challenge: *****,
  rp: {
    id: "example.com",
  },
  user: {
    id: *****,
    name: "john78",
    displayName: "John",
  },
  pubKeyCredParams: [{
    alg: -7, type: "public-key"
  },{
    alg: -257, type: "public-key"
  }],
  excludeCredentials: [{
    id: *****,
    type: 'public-key',
    transports: ['internal', 'hybrid'],
  }],
  authenticatorSelection: {
    authenticatorAttachment: "platform",
    requireResidentKey: true,
  }
}
The protocol between a server and a client isn't part of the WebAuthn specification. However, this codelab's server is designed to return a JSON that's as similar as possible to the PublicKeyCredentialCreationOptions dictionary that's passed to the WebAuthn navigator.credentials.create() API.
The following table isn't exhaustive, but it contains the important parameters in the PublicKeyCredentialCreationOptions dictionary:
Parameters | Descriptions |
A server-generated challenge in an | |
A user's unique ID. This value must be an | |
This field should hold a unique identifier for the account that's recognizable by the user, such as their email address or username. It's displayed in the account selector. (If you use a username, use the same value as in password authentication.) | |
This field is an optional, user-friendly name for the account. It doesn't need to be unique and could be the user's chosen name. If your website doesn't have a suitable value to include here, pass an empty string. This might be displayed on the account selector depending on the browser. | |
A relying party (RP) ID is a domain. A website can specify either its domain or a registrable suffix. For example, if an RP's origin is https://login.example.com:1337, the RP ID can be either | |
This field specifies the RP's supported public-key algorithms. We recommend setting it to | |
Provides a list of already registered credential IDs to prevent registration of the same device twice. If provided, the | |
Set to a | |
Set to a Boolean | |
Set to a |
Create a credential
- In the
registerCredential()function's body after the relevant comment, convert some parameters encoded with Base64URL back to binary, specifically theuser.idandchallengestrings, and instances of theidstring included in theexcludeCredentialsarray. This can be done withPublicKeyCredential.parseCreationOptionsFromJSON()function:
public/client.js
// TODO: Add an ability to create a passkey: Create a credential.

// Deserialize and decode the `PublicKeyCredential.parseCreationOptionsFromJSON()`.
const options = PublicKeyCredential.parseCreationOptionsFromJSON(_options);
- On the next line, set
authenticatorSelection.authenticatorAttachmentto"platform"andauthenticatorSelection.requireResidentKeytotrue. This allows only the use of a platform authenticator (the device itself) with a discoverable credential capability.
public/client.js
// Use platform authenticator and discoverable credential.
options.authenticatorSelection = {
  authenticatorAttachment: 'platform',
  requireResidentKey: true
}
- On the next line, call the
navigator.credentials.create()method to create a credential.
public/client.js
// Invoke the WebAuthn create() method.
const cred = await navigator.credentials.create({
  publicKey: options,
});
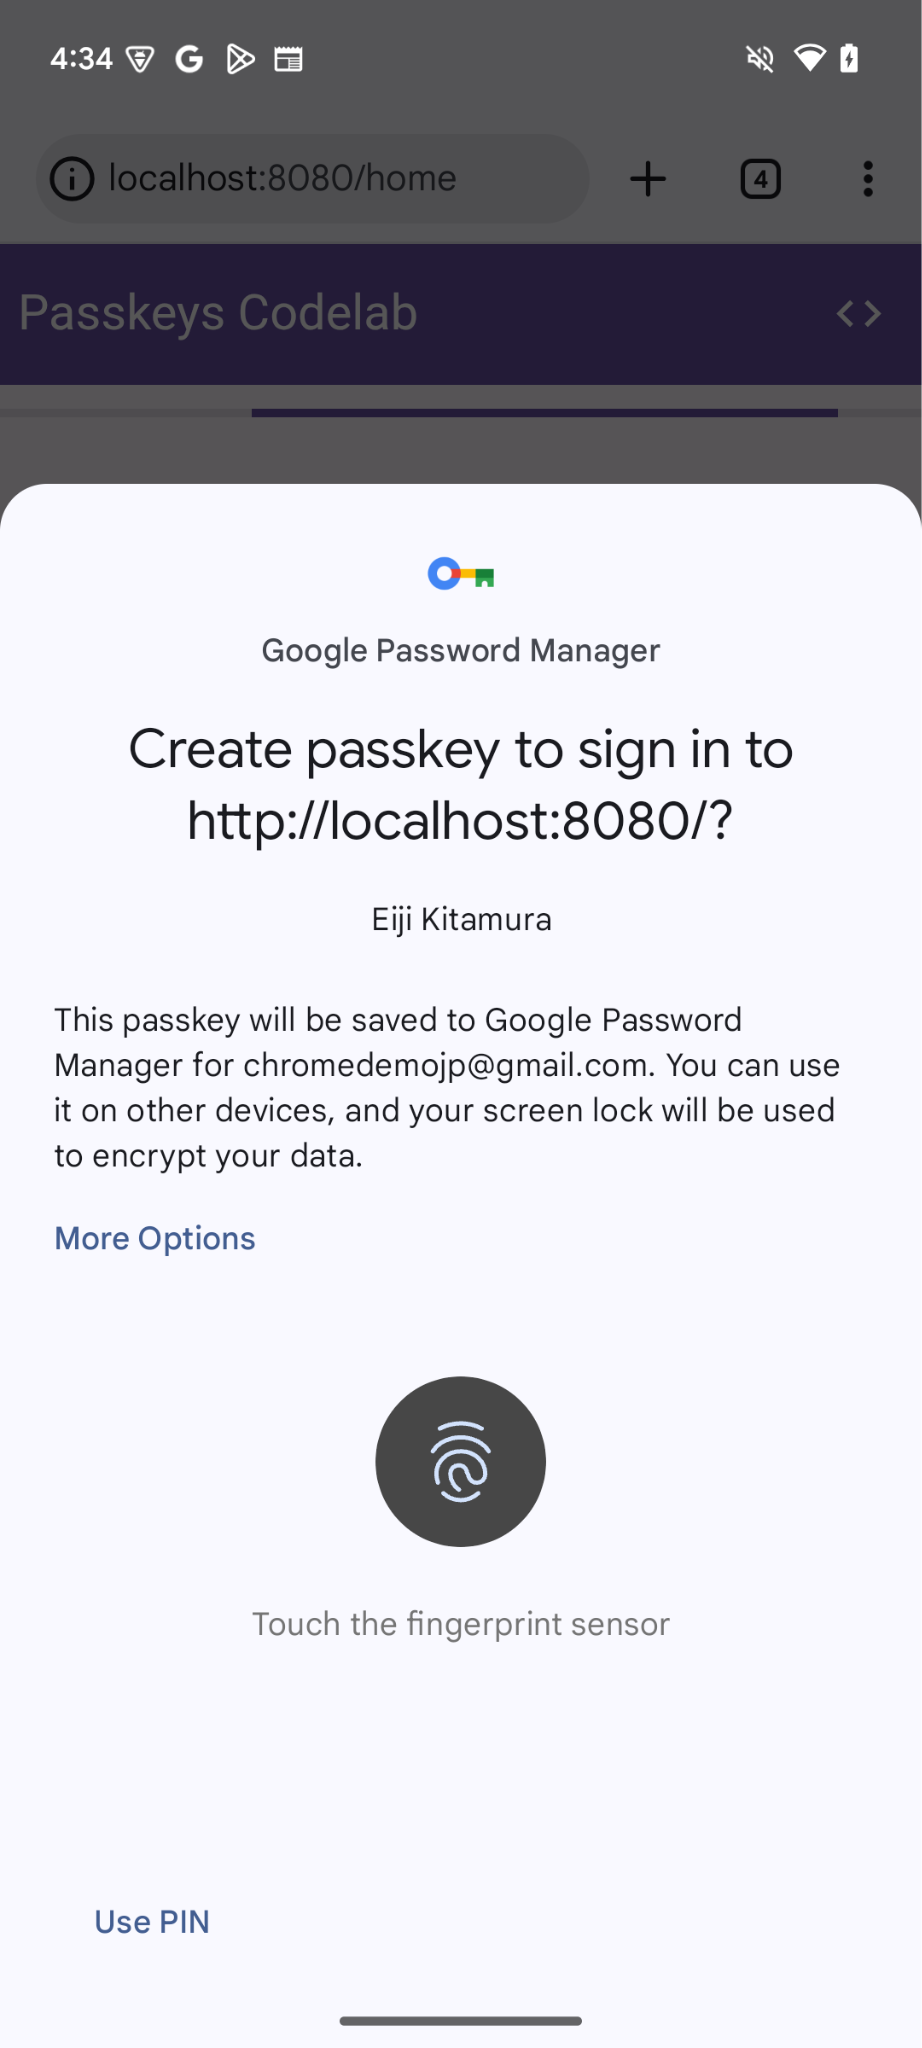
With this call, the browser tries to verify the user's identity with the device's screen lock.
Register the credential to the server endpoint
After the user verifies their identity, a passkey is created and stored. The website receives a credential object that contains a public key that you can send to the server to register the passkey.
The following code snippet contains an example credential object:
{
  "id": *****,
  "rawId": *****,
  "type": "public-key",
  "response": {
    "clientDataJSON": *****,
    "attestationObject": *****,
    "transports": ["internal", "hybrid"]
  },
  "authenticatorAttachment": "platform"
}
The following table isn't exhaustive, but it contains the important parameters in the PublicKeyCredential object:
Parameters | Descriptions |
A Base64URL encoded ID of the created passkey. This ID helps the browser determine whether a matching passkey is in the device upon authentication. This value must be stored in the database on the backend. | |
An | |
An | |
An | |
A list of transports the device supports: | |
Returns |
To send the credential object to the server, follow these steps:
- Encode the binary parameters of the credential as Base64URL so that it can be delivered to the server as a string. You can use
.toJSON()to do this:
public/client.js
// TODO: Add an ability to create a passkey: Register the credential to the server endpoint.

// Encode and serialize the `PublicKeyCredential`.
const credential = JSON.stringify(cred);
- On the next line, send the object to the server:
public/client.js
return await _fetch('/auth/registerResponse', credential);
When you run the program, the server returns HTTP code 200, which indicates that the credential is registered.
Now you have the complete registerCredential() function!
Review the solution code for this section
public/client.js
// TODO: Add an ability to create a passkey: Create the registerCredential() function.

export async function registerCredential() {

  // TODO: Add an ability to create a passkey: Obtain the challenge and other options from the server endpoint.

  const _options = await _fetch('/auth/registerRequest');

  // TODO: Add an ability to create a passkey: Create a credential.

  // Deserialize and decode the `PublicKeyCredential.parseCreationOptionsFromJSON()`.
  const options = PublicKeyCredential.parseCreationOptionsFromJSON(_options);

  // Use platform authenticator and discoverable credential.
  options.authenticatorSelection = {
    authenticatorAttachment: 'platform',
    requireResidentKey: true
  }

  // Invoke the WebAuthn create() method.
  const cred = await navigator.credentials.create({
    publicKey: options,
  });

  // TODO: Add an ability to create a passkey: Register the credential to the server endpoint.

  // Encode and serialize the `PublicKeyCredential`.
  const credential = JSON.stringify(cred);

  return await _fetch('/auth/registerResponse', credential);
};
4. Build a UI to register and manage passkey credentials
Now that the registerCredential() function is available, you need a button to invoke it. Also, you need to display a list of registered passkeys.
Add placeholder HTML
- In your editor, navigate to the
views/home.htmlfile. - After the relevant comment, add a UI placeholder that displays a button to register a passkey and a list of passkeys:
views/home.html
<!-- TODO: Add an ability to create a passkey: Add placeholder HTML. -->
<section>
<h3>Your registered passkeys:</h3>
<div id="list"></div>
</section>
<p id="message" class="instructions"></p>
<mdui-button id="create-passkey" class="hidden" icon="fingerprint" type="button">Create a passkey</mdui-button>
The div#list element is the placeholder for the list.
Check for passkey support
To only show the option to create a passkey to users with devices that support passkeys, you first need to check whether WebAuthn is available. If so, you then need to remove the hidden class to show the Create a passkey button.
To check whether an environment supports passkeys, follow these steps:
- At the end of the
views/home.htmlfile after the relevant comment, write a conditional that executes ifwindow.PublicKeyCredential,PublicKeyCredential.isUserVerifyingPlatformAuthenticatorAvailable, andPublicKeyCredential.isConditionalMediationAvailablearetrue.
views/home.html
// TODO: Add an ability to create a passkey: Check for passkey support.
const createPasskey = $('#create-passkey');
// Feature detections
if (window.PublicKeyCredential &&
    PublicKeyCredential.isUserVerifyingPlatformAuthenticatorAvailable &&
    PublicKeyCredential.isConditionalMediationAvailable) {
- In the body of the conditional, check whether the device can create a passkey and then check whether the passkey can be suggested in a form autofill.
views/home.html
try {
    const capabilities = await PublicKeyCredential.getClientCapabilities();
    // Is conditional UI available in this browser?
    if (capabilities.conditionalGet === true &&
        capabilities.passkeyPlatformAuthenticator === true) {
- If all conditions are met, show the button to create a passkey. Otherwise, show a warning message.
views/home.html
      createPasskey.classList.remove('hidden');
    } else {

      // If conditional UI isn't available, show a message.
      $('#message').innerText = 'This device does not support passkeys.';
    }
  } catch (e) {
    console.error(e);
  }
} else {

  // If WebAuthn isn't available, show a message.
  $('#message').innerText = 'This device does not support passkeys.';
}
Render registered passkeys in a list
- Define a
renderCredentials()function that fetches registered passkeys from the server and renders them in a list. Luckily, you already have the/auth/getKeysserver endpoint to fetch registered passkeys for the signed-in user.
views/home.html
// TODO: Add an ability to create a passkey: Render registered passkeys in a list.
async function renderCredentials() {
  const res = await _fetch('/auth/getKeys');
  const list = $('#list');
  const creds = res.length > 0 ? html`
    <mdui-list>
      ${res.map(cred => html`
        <mdui-list-item>
          ${cred.name || 'Unnamed'}
          <mdui-button-icon data-cred-id="${cred.id}" data-name="${cred.name || 'Unnamed'}" @click="${rename}" icon="edit" slot="end-icon"></mdui-button-icon>
          <mdui-button-icon data-cred-id="${cred.id}" @click="${remove}" icon="delete" slot="end-icon"></mdui-button-icon>
        </mdui-list-item>`)}
    </mdui-list>` : html`
    <mdui-list>
      <mdui-list-item>No credentials found.</mdui-list-item>
    </mdui-list>`;
  render(creds, list);
};
- On the next line, invoke the
renderCredentials()function to display registered passkeys as soon as the user lands on the/homepage as an initialization.
views/home.html
renderCredentials();
Create and register a passkey
To create and register a passkey, you need to call the registerCredential() function that you implemented earlier.
To trigger the registerCredential() function when you click the Create a passkey button, follow these steps:
- In the file after the placeholder HTML, find the following
importstatement:
views/home.html
import {
  $,
  _fetch,
  loading,
  updateCredential,
  unregisterCredential,
} from '/client.js';
- At the end of the
importstatement's body, add theregisterCredential()function.
views/home.html
// TODO: Add an ability to create a passkey: Create and register a passkey.
import {
  $,
  _fetch,
  loading,
  updateCredential,
  unregisterCredential,
  registerCredential
} from '/client.js';
- At the end of the file after the relevant comment, define a
register()function that invokes theregisterCredential()function and a loading UI, and calls therenderCredentials()after a registration. This clarifies that the browser creates a passkey and shows an error message when something goes wrong.
views/home.html
// TODO: Add an ability to create a passkey: Create and register a passkey.
async function register() {
  try {

    // Start the loading UI.
    loading.start();

    // Start creating a passkey.
    await registerCredential();

    // Stop the loading UI.
    loading.stop();

    // Render the updated passkey list.
    renderCredentials();
- In the body of the
register()function, catch exceptions. Thenavigator.credentials.create()method throws anInvalidStateErrorerror when a passkey already exists on the device. This is examined with theexcludeCredentialsarray. You show a relevant message to the user in this case. It also throws aNotAllowedErrorerror when the user cancels the authentication dialog. You silently ignore it in this case.
views/home.html
  } catch (e) {

    // Stop the loading UI.
    loading.stop();

    // An InvalidStateError indicates that a passkey already exists on the device.
    if (e.name === 'InvalidStateError') {
      alert('A passkey already exists for this device.');

    // A NotAllowedError indicates that the user canceled the operation.
    } else if (e.name === 'NotAllowedError') {
      Return;

    // Show other errors in an alert.
    } else {
      alert(e.message);
      console.error(e);
    }
  }
};
- On the line after the
register()function, attach theregister()function to aclickevent for the Create a passkey button.
views/home.html
createPasskey.addEventListener('click', register);
Review the solution code for this section
views/home.html
<!-- TODO: Add an ability to create a passkey: Add placeholder HTML. -->
<section>
  <h3>Your registered passkeys:</h3>
  <div id="list"></div>
</section>
<p id="message" class="instructions"></p>
<mdui-button id="create-passkey" icon="fingerprint" type="button">Create a passkey</mdui-button>
views/home.html
// TODO: Add an ability to create a passkey: Create and register a passkey.
import {
  $,
  _fetch,
  loading,
  updateCredential,
  unregisterCredential,
  registerCredential
} from '/client.js';
views/home.html
// TODO: Add an ability to create a passkey: Check for passkey support.
const createPasskey = $('#create-passkey');

// Is WebAuthn available in this browser?
if (window.PublicKeyCredential &&
  PublicKeyCredential.isUserVerifyingPlatformAuthenticatorAvailable &&
  PublicKeyCredential.isConditionalMediationAvailable) {
  try {
    const capabilities = await PublicKeyCredential.getClientCapabilities();
    // Is conditional UI available in this browser?
    if (capabilities.conditionalGet === true &&
      capabilities.passkeyPlatformAuthenticator === true) {
      // If conditional UI is available, reveal the Create a passkey button.
      createPasskey.classList.remove('hidden');
    } else {
      // If conditional UI isn't available, show a message.
      $('#message').innerText = 'This device does not support passkeys.';
    }
  } catch (e) {
    console.error(e);
  }
} else {
  // If WebAuthn isn't available, show a message.
  $('#message').innerText = 'This device does not support passkeys.';
}

// TODO: Add an ability to create a passkey: Render registered passkeys in a list.

async function renderCredentials() {
  const res = await _fetch('/auth/getKeys');
  const list = $('#list');
  const creds = html`${res.length > 0 ? html`
    <mdui-list>
      ${res.map(cred => html`
        <mdui-list-item>
          ${cred.name || 'Unnamed'}
          <mdui-button-icon data-cred-id="${cred.id}" data-name="${cred.name || 'Unnamed'}" @click="${rename}" icon="edit" slot="end-icon"></mdui-button-icon>
          <mdui-button-icon data-cred-id="${cred.id}" @click="${remove}" icon="delete" slot="end-icon"></mdui-button-icon>
        </mdui-list-item>`)}
    </mdui-list>` : html`
    <mdui-list>
      <mdui-list-item>No credentials found.</mdui-list-item>
    </mdui-list>`}`;
  render(creds, list);
};

renderCredentials();

// TODO: Add an ability to create a passkey: Create and register a passkey.

async function register() {
  try {
    // Start the loading UI.
    loading.start();
    // Start creating a passkey.
    await registerCredential();
    // Stop the loading UI.
    loading.stop();
    // Render the updated passkey list.
    renderCredentials();
  } catch (e) {
    // Stop the loading UI.
    loading.stop();
    // An InvalidStateError indicates that a passkey already exists on the device.
    if (e.name === 'InvalidStateError') {
      alert('A passkey already exists for this device.');
      // A NotAllowedError indicates the user canceled the operation.
    } else if (e.name === 'NotAllowedError') {
      return;
      // Show other errors in an alert.
    } else {
      alert(e.message);
      console.error(e);
    }
  }
};

createPasskey.addEventListener('click', register);
Try it
If you followed all the steps so far, you implemented the ability to create, register, and display passkeys on the website!
To try it, follow these steps:
- On the site, sign in with a random username and password.
- Click Create a passkey.
- Verify your identity with the device's screen lock.
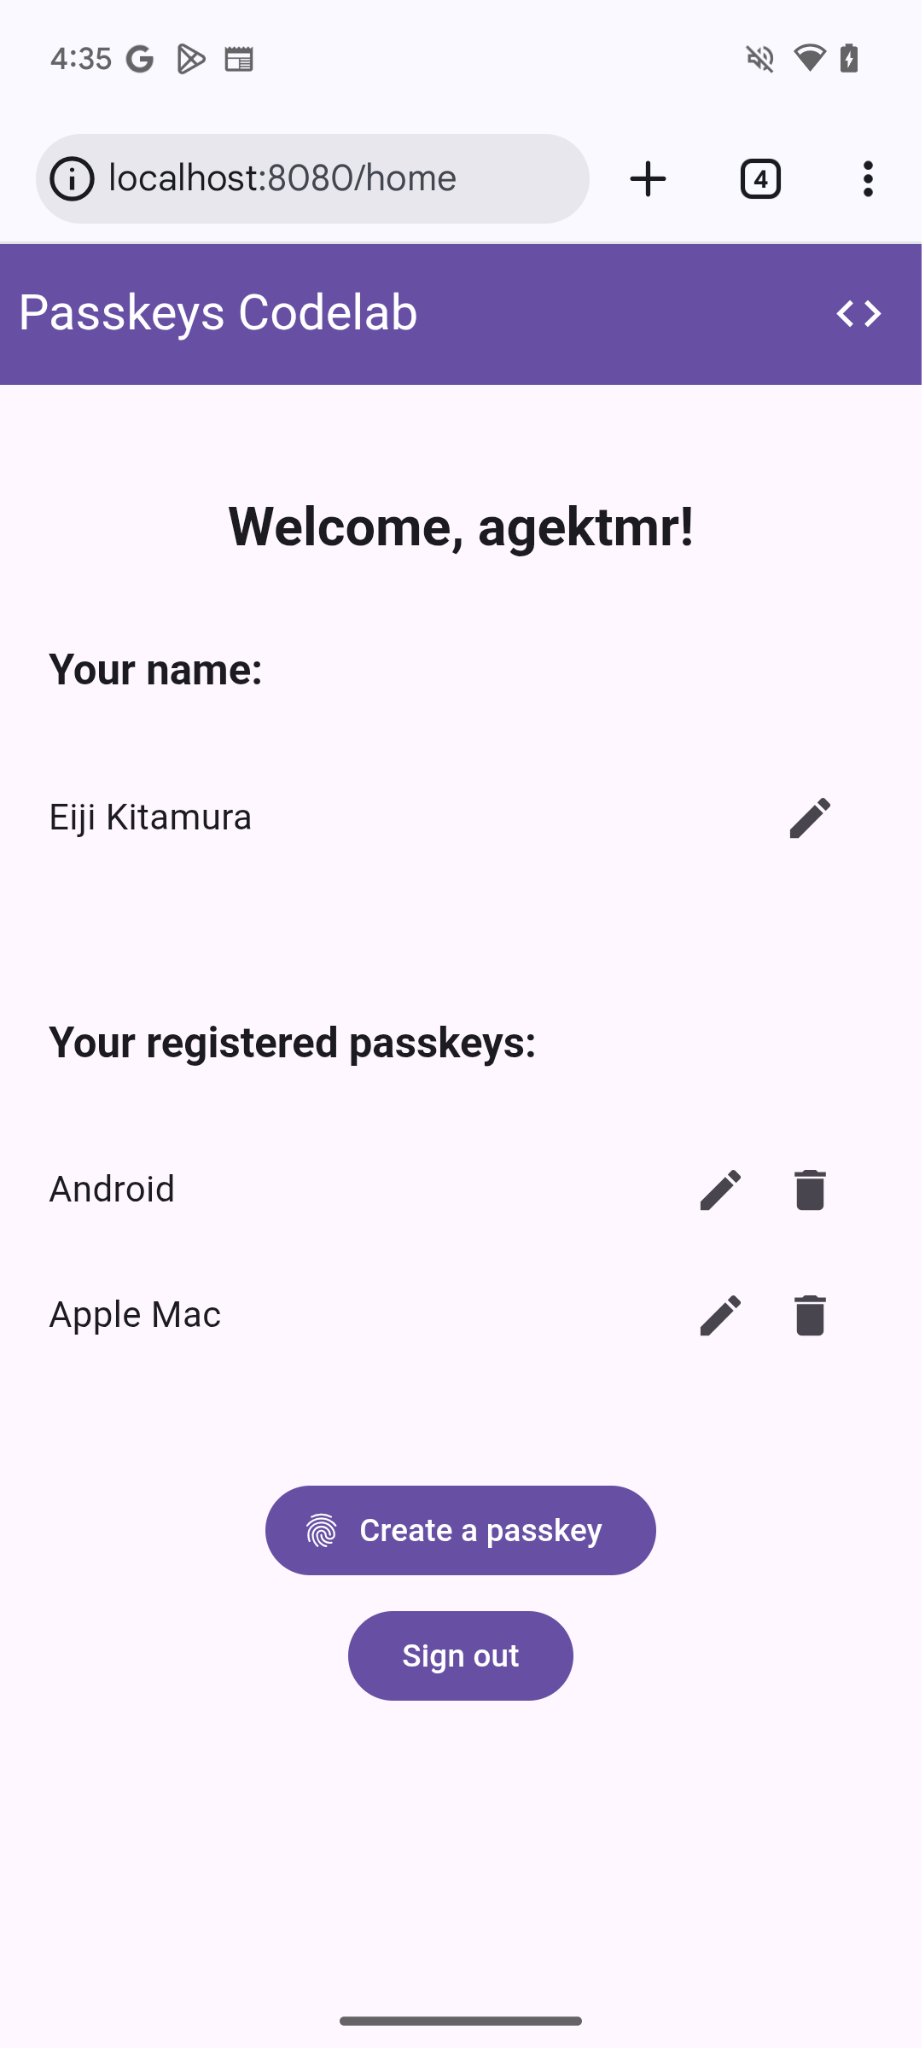
- Confirm that a passkey is registered and displayed under the Your registered passkeys section of the web page.
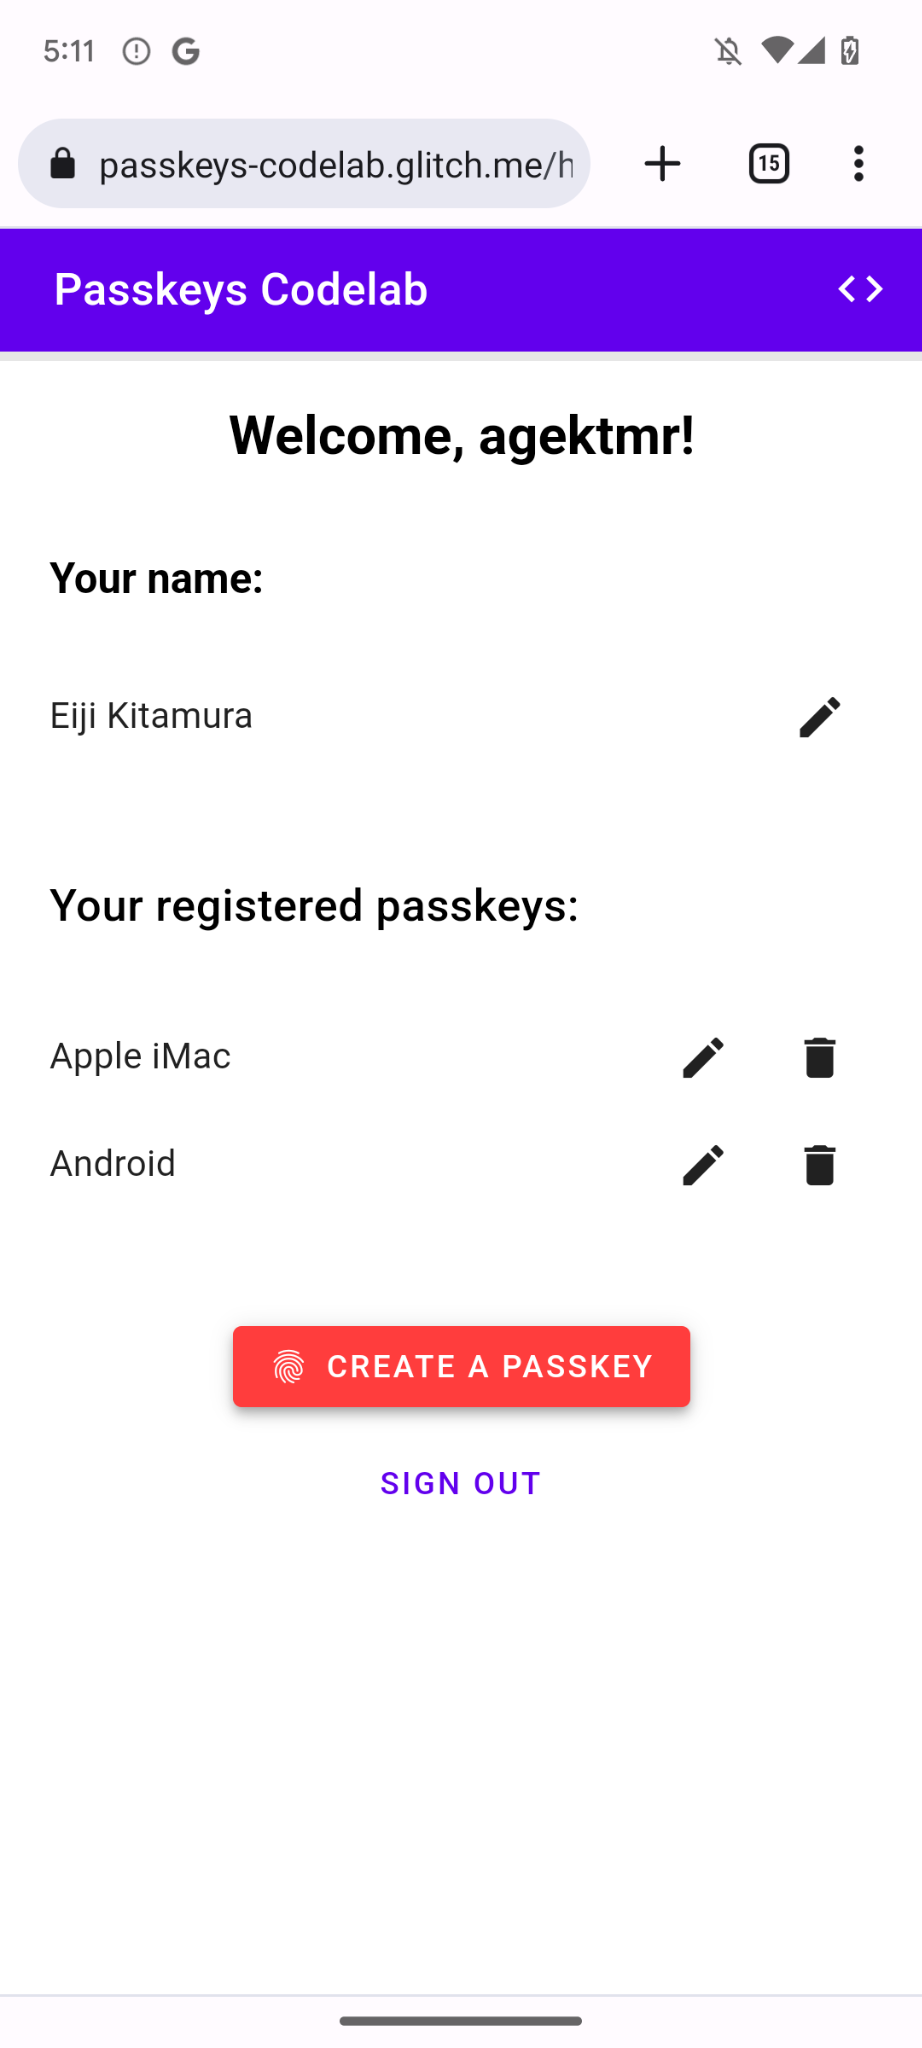
Rename and remove registered passkeys
You should be able to rename or delete the registered passkeys on the list. You can check how it works in the code as they come with the codelab.
In Chrome, you can remove registered passkeys from chrome://settings/passkeys on desktop or from the password manager in settings on Android.
For information about how to rename and remove registered passkeys on other platforms, see the respective support pages for those platforms.
5. Add the ability to authenticate with a passkey
Users can now create and register a passkey, and are ready to use it as a way to authenticate to your website safely. Now you need to add a passkey authentication capability to your website.
Create the authenticate() function
- In the
public/client.jsfile after the relevant comment, create a function calledauthenticate()that locally verifies the user and then against the server:
public/client.js
// TODO: Add an ability to authenticate with a passkey: Create the authenticate() function.
export async function authenticate() {

  // TODO: Add an ability to authenticate with a passkey: Obtain the challenge and other options from the server endpoint.

  // TODO: Add an ability to authenticate with a passkey: Locally verify the user and get a credential.

  // TODO: Add an ability to authenticate with a passkey: Verify the credential.

};
Obtain the challenge and other options from server endpoint
Before you ask the user to authenticate, you need to request parameters to pass in WebAuthn from the server, including a challenge.
- In the body of the
authenticate()function after the relevant comment, call the_fetch()function to send aPOSTrequest to the server:
public/client.js
// TODO: Add an ability to authenticate with a passkey: Obtain the challenge and other options from the server endpoint.

// Base64URL decode the challenge.
const options = PublicKeyCredential.parseRequestOptionsFromJSON(_options);
This codelab's server is designed to return JSON that's as similar as possible to the PublicKeyCredentialRequestOptions dictionary that's passed to the WebAuthn navigator.credentials.get() API. The following code snippet includes example options that you should receive:
{
  "challenge": *****,
  "rpId": "localhost",
  "allowCredentials": []
}
The following table isn't exhaustive, but it contains the important parameters in the PublicKeyCredentialRequestOptions dictionary:
Parameters | Descriptions |
A server-generated challenge in an | |
An RP ID is a domain. A website can specify either its domain or a registrable suffix. This value must match the | |
This property is used to find authenticators eligible for this authentication. Pass an empty array or leave it unspecified to let the browser show an account selector. Learn more how | |
Set to a |
Locally verify the user and get a credential
- In the
authenticate()function's body after the relevant comment, convert thechallengeparameter back to binary:
public/client.js
// TODO: Add an ability to authenticate with a passkey: Locally verify the user and get a credential.
// Base64URL decode the challenge.
options.challenge = base64url.decode(options.challenge);
- Pass an empty array to the
allowCredentialsparameter to open an account selector when a user authenticates:
public/client.js
// An empty allowCredentials array invokes an account selector by discoverable credentials.
options.allowCredentials = [];
The account selector uses the user's information stored with the passkey.
- Call the
navigator.credentials.get()method along with amediation: 'conditional'option:
public/client.js
// Invoke the WebAuthn get() method.
const cred = await navigator.credentials.get({
  publicKey: options,

  // Request a conditional UI.
  mediation: 'conditional'
});
This option instructs the browser to suggest passkeys conditionally as part of form autofill.
Verify the credential
After the user verifies their identity locally, you should receive a credential object that contains a signature that you can verify on the server.
The following code snippet includes an example PublicKeyCredential object:
{
  "id": *****,
  "rawId": *****,
  "type": "public-key",
  "response": {
    "clientDataJSON": *****,
    "authenticatorData": *****,
    "signature": *****,
    "userHandle": *****
  },
  authenticatorAttachment: "platform"
}
The following table isn't exhaustive, but it contains the important parameters in the PublicKeyCredential object:
Parameters | Descriptions |
The Base64URL encoded ID of the authenticated passkey credential. | |
An | |
An | |
An | |
An | |
An | |
Returns a |
To send the credential object to the server, follow these steps:
- In the
authenticate()function's body after the relevant comment, encode the binary parameters of the credential so that it can be delivered to the server as a string. You can use.toJSON()to do this:
public/client.js
// TODO: Add an ability to authenticate with a passkey: Verify the credential.
// Encode and serialize the `PublicKeyCredential`.
const credential = JSON.stringify(cred);
- Send the object to the server:
public/client.js
return await _fetch(`/auth/signinResponse`, credential);
When you run the program, the server returns HTTP code 200, which indicates that the credential is verified.
You now have the full authentication() function!
Review the solution code for this section
public/client.js
// TODO: Add an ability to authenticate with a passkey: Create the authenticate() function.
export async function authenticate() {

  // TODO: Add an ability to authenticate with a passkey: Obtain the
  challenge and other options from the server endpoint.
  const options = await _fetch('/auth/signinRequest');

  // TODO: Add an ability to authenticate with a passkey: Locally verify
  the user and get a credential.
  // Base64URL decode the challenge.
  options.challenge = base64url.decode(options.challenge);

  // The empty allowCredentials array invokes an account selector
  by discoverable credentials.
  options.allowCredentials = [];

  // Invoke the WebAuthn get() function.
  const cred = await navigator.credentials.get({
    publicKey: options,

    // Request a conditional UI.
    mediation: 'conditional'
  });

  // TODO: Add an ability to authenticate with a passkey: Verify the credential.
  const credential = {};
  credential.id = cred.id;
  credential.rawId = cred.id; // Pass a Base64URL encoded ID string.
  credential.type = cred.type;

  // Base64URL encode some values.
  const clientDataJSON = base64url.encode(cred.response.clientDataJSON);
  const authenticatorData =
  base64url.encode(cred.response.authenticatorData);
  const signature = base64url.encode(cred.response.signature);
  const userHandle = base64url.encode(cred.response.userHandle);

  credential.response = {
    clientDataJSON,
    authenticatorData,
    signature,
    userHandle,
  };

  return await _fetch(`/auth/signinResponse`, credential);
};
6. Add passkeys to the browser autofill
When the user returns, you want the user to sign in as easily and securely as possible. If you add a Sign in with a passkey button to the login page, the user can press the button, select a passkey in the browser's account selector, and use screen lock to verify identity.
However, the transition from a password to a passkey doesn't happen to all users at once. This means that you can't get rid of passwords until all users transition to passkeys, so you need to leave the password-based sign-in form until then. Although, if you leave a password form and a passkey button, users will have to make a needless choice between which one to use to sign in. Ideally, you want a straightforward sign-in process.
This is where a conditional UI comes in. A conditional UI is a WebAuthn feature where you can make a form input field to suggest a passkey as part of autofill items in addition to passwords. If a user taps on a passkey in the autofill suggestions, the user is asked to use the device's screen lock to locally verify their identity. This is a seamless user experience because the user action is almost identical to that of a password based sign-in.
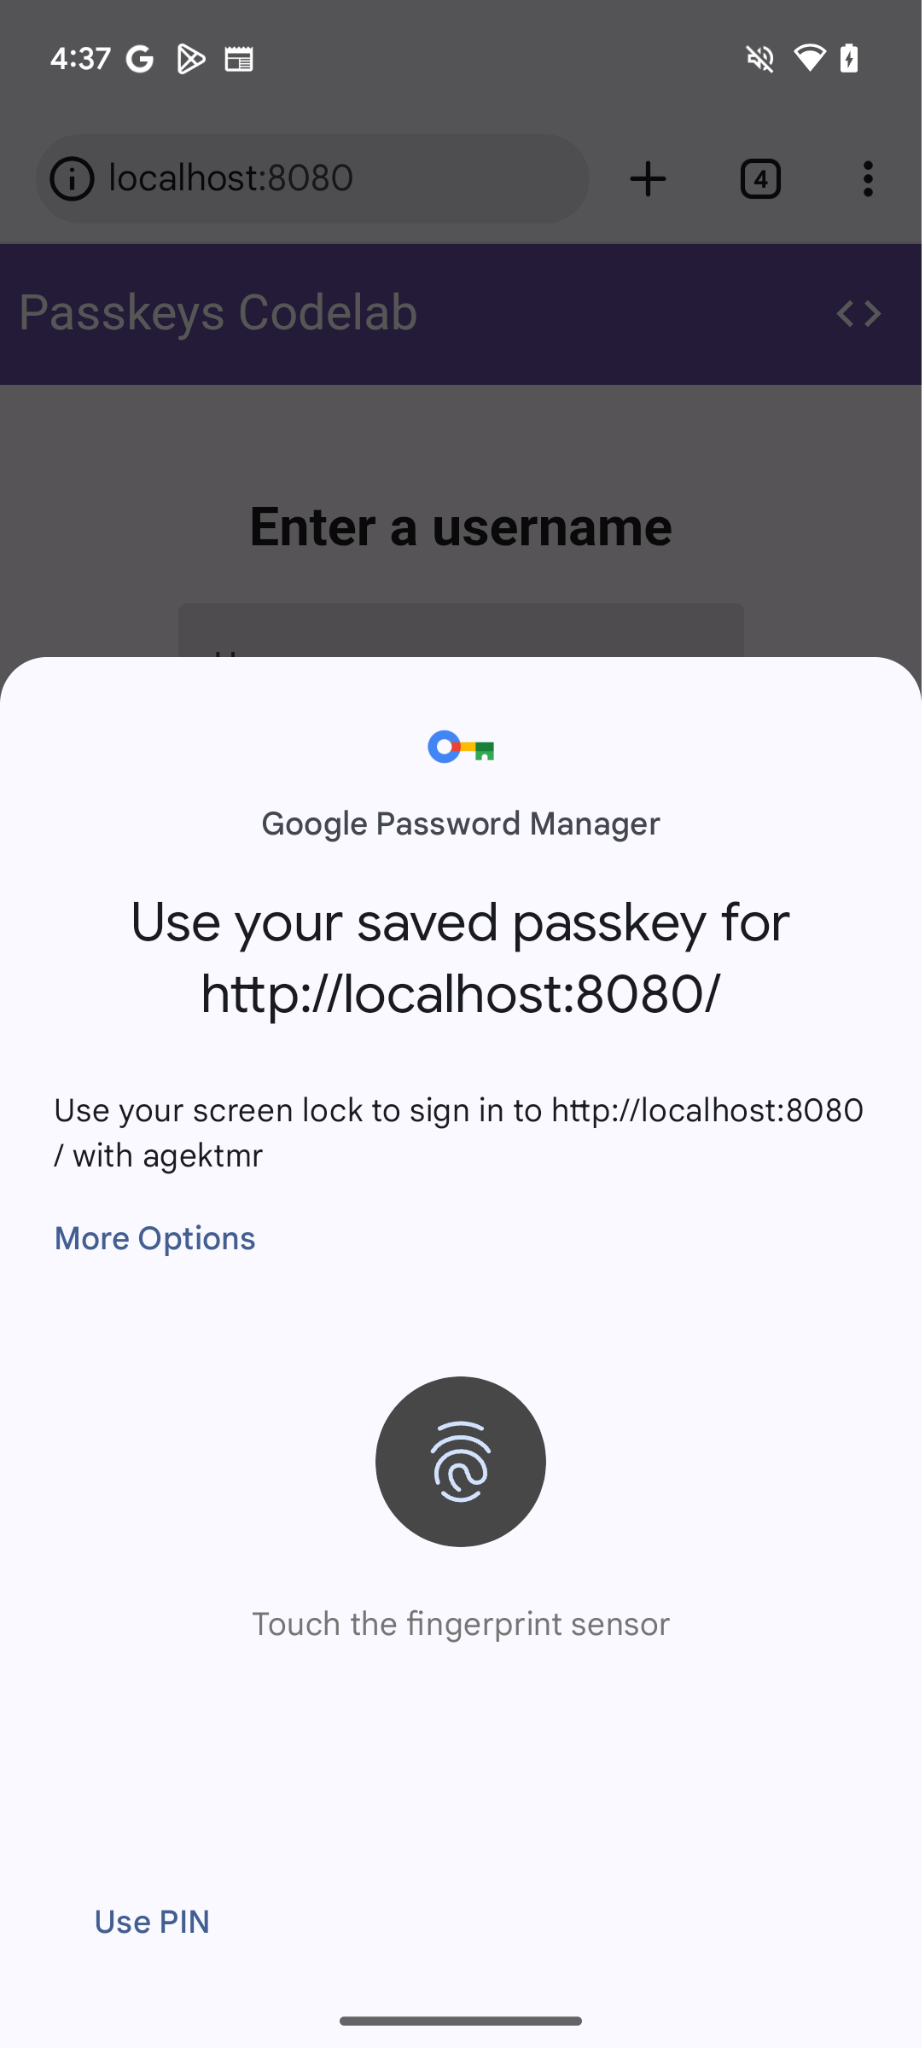
Enable a conditional UI
To enable a conditional UI, all you need to do is add a webauthn token in the autocomplete attribute of an input field. With the token set, you can call the navigator.credentials.get() method with the mediation: 'conditional' string to conditionally trigger the screen lock UI.
- To enable a conditional UI, replace the existing username input fields with the following HTML after the relevant comment in the
view/index.htmlfile:
view/index.html
<!-- TODO: Add passkeys to the browser autofill: Enable conditional UI. -->
<mdui-text-field id="username" label="Username" name="username" autocomplete="username webauthn" autofocus></mdui-text-field>
Detect features, invoke WebAuthn, and enable a conditional UI
- In the
view/index.htmlfile after the relevant comment, replace the existingimportstatement with the following code:
view/index.html
// TODO: Add passkeys to the browser autofill: Detect features, invoke WebAuthn, and enable a conditional UI.
import {
  $,
  _fetch,
  loading,
  authenticate
} from "/client.js";
This code imports the authenticate() function that you implemented earlier.
- Confirm that the
window.PulicKeyCredentialobject is available and that thePublicKeyCredential.isConditionalMediationAvailable()method returns atruevalue, and then call theauthenticate()function:
view/index.html
// TODO: Add passkeys to the browser autofill: Detect features, invoke WebAuthn, and enable a conditional UI.
if (window.PublicKeyCredential &&
    PublicKeyCredential.getClientCapabilities) {
  try {

    // Is conditional UI available in this browser?
      const capabilities = await PublicKeyCredential.getClientCapabilities();
      if (capabilities.conditionalGet) {

      // If conditional UI is available, invoke the authenticate() function.
      const user = await authenticate();
      if (user) {

        // Proceed only when authentication succeeds.
        $("#username").value = user.username;
        loading.start();
        location.href = "/home";
      } else {
        throw new Error("User not found.");
      }
    }
  } catch (e) {
    loading.stop();

    // A NotAllowedError indicates that the user canceled the operation.
    if (e.name !== "NotAllowedError") {
      console.error(e);
      alert(e.message);
    }
  }
}
Review the solution code for this section
view/index.html
<!-- TODO: Add passkeys to the browser autofill: Enable conditional UI. -->
<mdui-text-field id="username" label="Username" name="username" autocomplete="username webauthn" autofocus></mdui-text-field>
view/index.html
// TODO: Add passkeys to the browser autofill: Detect features, invoke WebAuthn, and enable a conditional UI.
import {
  $,
  _fetch,
  loading,
  authenticate
} from '/client.js';
view/index.html
// TODO: Add passkeys to the browser autofill: Detect features, invoke WebAuthn, and enable a conditional UI.

// Is WebAuthn available on this browser?
if (window.PublicKeyCredential &&
    PublicKeyCredential.getClientCapabilities) {
  try {
    // Is conditional UI available in this browser?
    const capabilities = await PublicKeyCredential.getClientCapabilities();
    if (capabilities.conditionalGet) {
      // If conditional UI is available, invoke the authenticate() function.
      const user = await authenticate();
      if (user) {
        // Proceed only when authentication succeeds.
        $('#username').value = user.username;
        loading.start();
        location.href = '/home';
      } else {
        throw new Error('User not found.');
      }
    }
  } catch (e) {
    loading.stop();
    // A NotAllowedError indicates that the user canceled the operation.
    if (e.name !== 'NotAllowedError') {
      console.error(e);
      alert(e.message);
    }
  }
}
Try it
You implemented the creation, registration, display, and authentication of passkeys on your website.
To try it, follow these steps:
- Navigate to the preview tab.
- If necessary, sign out.
- Click the username text box. A dialog appears.
- Select the account with which you want to sign in.
- Verify your identity with the device's screen lock. You're redirected to the
/homepage and signed in.

7. Congratulations!
You finished this codelab! If you have any questions, ask them on the FIDO-DEV mailing list or on StackOverflow with a passkey tag.