
1. 總覽
無論是展開公路旅行、規劃日常通勤路線,還是要在熱鬧的城市中導航,從 A 點前往 B 點不僅僅是知道目的地,可靠的路線產生工具也至關重要。
有了 Google 地圖平台,您就能在應用程式中加入動態地圖、讓使用者透過自動完成功能快速輸入地點,以及在地圖上顯示路線。
本程式碼研究室會引導開發人員使用 Maps JavaScript API、Place Autocomplete 和 Routes API 建構網路應用程式。您將透過可自訂的教學課程,瞭解如何整合多個 Google 地圖平台 API。
建構項目
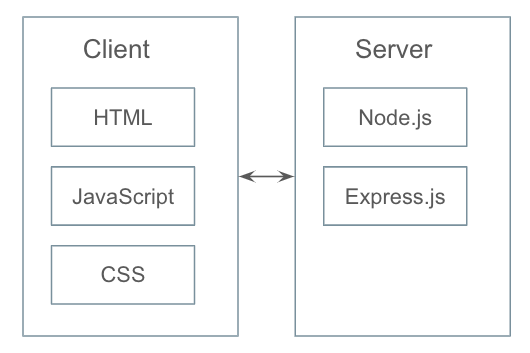
本程式碼研究室將引導您使用 HTML、CSS、JavaScript 和 Node.js 後端,建構網頁應用程式。
課程內容
- 如何啟用 Google 地圖平台 API
- 如何將動態地圖整合至網頁應用程式
- 如何整合 Place Autocomplete 服務
- 如何透過 Routes API 要求路線
- 如何在動態地圖上顯示路線
- 如何建立地圖 ID
- 如何在動態地圖中新增進階標記
軟硬體需求
- Google Cloud 專案
- Maps JavaScript API
- Places API(地點自動完成)
- Routes API
- 具備 HTML 和 CSS 的基礎知識
- 熟悉 Javascript/Node.js 的使用方式
程式碼範例
如需完整解決方案和逐步程式碼,請前往 GitHub。程式碼未包含必要的 Node 套件。執行程式碼前,請先安裝必要的依附元件。如要瞭解必要套件的詳細資料,請參閱 package.json 檔案(說明請見步驟 3)。
2. 設定專案並啟用 API
在啟用步驟中,您需要啟用 Maps JavaScript API、Place Autocomplete 和 Routes API。
設定 Google 地圖平台
如果您尚未建立 Google Cloud Platform 帳戶,以及啟用計費功能的專案,請參閱「開始使用 Google 地圖平台」指南,建立帳單帳戶和專案。
3. 設定 Node.js 專案
在本實驗室中,我們將使用 Node.js 從網頁收集起點和目的地,並透過 Routes API 要求路線。
假設您已安裝 Node.js,請建立用於執行這個專案的目錄:
$ mkdir ac_routes
$ cd ac_routes
在應用程式的目錄中初始化新的 Node.js 套件:
$ npm init
這個指令會提示您輸入多項資訊,例如應用程式名稱和版本。目前只要按下 RETURN 鍵,即可接受大部分設定的預設值。預設進入點為 index.js,您可以將其變更為主要檔案。在本實驗室中,主要檔案為 function/server.js(詳情請參閱步驟 6)。
此外,您也可以安裝偏好的架構和模組。本實驗室使用網路架構(Express) 和主體剖析器(body-parser)。詳情請參閱 package.json 檔案。
4. 建立動態地圖
Node.js 後端已就位,接下來要瞭解用戶端所需的步驟。
- 為應用程式建立 HTML 網頁
- 建立 CSS 檔案以設定樣式
- 將 Google Maps JavaScript API 載入 HTML 網頁
- 將 API 金鑰貼到指令碼標記中,驗證應用程式
- 建立 JavaScript 檔案來處理應用程式功能
建立 HTML 網頁
- 在專案資料夾中建立新目錄(本例為 ac_routes)
$ mkdir public $ cd public - 在公開目錄中建立 index.html
- 將下列程式碼複製到 index.html
 <!DOCTYPE html>
 <html>
 <head>
   <title>GMP Autocomplete + Routes</title>
   <meta charset="utf-8">
   <link rel="stylesheet" type="text/css" href="style.css">
 </head>
 <body>
   <div class="container">
     <!-- Start of the container for map -->
     <div class="main">
       <div id="map"></div>
     </div>
     <!-- End of the container for map -->
   </div>
   </body>
 </html>
建立 CSS 檔案
- 在公開目錄中建立 style.css
- 將下列程式碼複製到 style.css:
 html, body {height: 100%;}
 body {
   background: #fff;
   font-family: "Helvetica Neue", Helvetica, Roboto, Arial, sans-serif;
   font-style: normal;
   font-weight: normal;
   font-size:16px;
   line-height: 1.5;
   margin: 0;
   padding: 0;
 }
 .container {display:flex; width:90%; padding:100px 0; margin:0 auto;}
 .main {width:70%; height:800px;}
  #map {height:100%; border-radius:20px;}
載入 Maps JavaScript API
在本實驗室中,我們將使用動態程式庫匯入功能載入 Maps JavaScript API。詳情請參閱這裡。
在 index.html 中,複製結尾 body 標記前的下列程式碼。將「YOUR_API_KEY」替換成您自己的 API 金鑰。
<script>(g=>{var h,a,k,p="The Google Maps JavaScript API",c="google",l="importLibrary",q="__ib__",m=document,b=window;b=b[c]||(b[c]={});var d=b.maps||(b.maps={}),r=new Set,e=new URLSearchParams,u=()=>h||(h=new Promise(async(f,n)=>{await (a=m.createElement("script"));e.set("libraries",[...r]+"");for(k in g)e.set(k.replace(/[A-Z]/g,t=>"_"+t[0].toLowerCase()),g[k]);e.set("callback",c+".maps."+q);a.src=`https://maps.${c}apis.com/maps/api/js?`+e;d[q]=f;a.onerror=()=>h=n(Error(p+" could not load."));a.nonce=m.querySelector("script[nonce]")?.nonce||"";m.head.append(a)}));d[l]?console.warn(p+" only loads once. Ignoring:",g):d[l]=(f,...n)=>r.add(f)&&u().then(()=>d[l](f,...n))})({key: "YOUR_API_KEY", v: "weekly"});</script>
建立 JavaScript 檔案
- 在公開目錄中建立 app.js
- 將下列程式碼複製到 app.js
 (function(){
   let map;

   async function initMap() {
       const { Map } = await google.maps.importLibrary('maps');
       map = new Map(document.getElementById('map'), {
           center: { lat: -34.397, lng: 150.644 },
           zoom: 8,
           mapId: 'DEMO_MAP_ID'
       });
   }

   initMap();
 }());
DEMO_MAP_ID 是可用於需要地圖 ID 的程式碼範例。這個 ID 不適用於正式版應用程式,也無法用於需要雲端樣式設定的功能。在本實驗室的後續階段,我們需要地圖 ID 才能使用進階標記。進一步瞭解如何為應用程式建立地圖 ID。
連結 JavaScript 檔案
在 index.html 中,將 app.js 連結至 body 結尾標記前,以及載入 Maps JavaScript API 的指令碼標記後。
<script type="text/JavaScript" src="app.js"></script>
完整程式碼範例
您可以在 GitHub:step1_createDynamicMap 取得目前為止的完整程式碼。
5. 輸入起點和目的地地址
- 在 index.html 中新增兩個文字欄位,分別用於輸入起點和目的地
- 匯入 Autocomplete 程式庫
- 將 Autocomplete 服務繫結至來源和目的地文字欄位
新增文字欄位
在 index.html 中,將下列程式碼新增為 div 的第一個子項,類別為 container。
<div class="aside">
  <div class="inputgroup">
    <label for="origin">Start</label>
    <input type="text" id="origin" name="origin" class="input-location" placeholder="Enter an address">
  </div>
  <div class="inputgroup">
    <label for="origin">End</label>
    <input type="text" id="destination" name="destination" class="input-location" placeholder="Enter an address">
  </div>
</div>
匯入並啟用自動完成功能
google.maps.places.Autocomplete 類別是小工具,可根據使用者輸入的文字提供地點預測結果。這個指令會附加至文字類型的輸入元素,並監聽該欄位中的文字輸入內容。預測結果清單會以下拉式清單的形式顯示,並在您輸入文字時更新。
在 app.js 中,於地圖初始化後加入下列程式碼:
let placeIds = [];
async function initPlace() {
  const { Autocomplete } = await google.maps.importLibrary('places');
  let autocomplete = [];
  let locationFields = Array.from(document.getElementsByClassName('input-location'));
  //Enable autocomplete for input fields
  locationFields.forEach((elem,i) => {
      autocomplete[i] = new Autocomplete(elem);
      google.maps.event.addListener(autocomplete[i],"place_changed", () => {
          let place = autocomplete[i].getPlace();
          if(Object.keys(place).length > 0){
              if (place.place_id){
                  placeIds[i] = place.place_id; //We use Place Id in this example
              } else {
                  placeIds.splice(i,1); //If no place is selected or no place is found, remove the previous value from the placeIds.
                  window.alert(`No details available for input: ${place.name}`);
                  return;
              }
          }
      });
  });
}
initPlace();
使用者從自動完成預測清單選取地點後,即可使用 getPlace() 方法擷取地點結果詳細資料。地點結果包含大量地點資訊,在本實驗室中,我們將使用 place_id 識別所選地點。地點 ID 可以用來辨識 Google 地點介面集資料庫和 Google 地圖中的特定地點。進一步瞭解地點 ID。
新增相關樣式
在 style.css 中新增下列程式碼:
.aside {width:30%; padding:20px;}
.inputgroup {margin-bottom:30px;}
.aside label {display:block; padding:0 10px; margin-bottom:10px; font-size:18px; color:#666565;}
.aside input[type=text] {width:90%;padding:10px; font-size:16px; border:1px solid #e6e8e6; border-radius:10px;}
完整程式碼範例
您可以在 GitHub:step2_inputAddress 取得目前為止的完整程式碼。
6. 要求路線
- 在 index.html 中新增「取得路線」按鈕,以啟動路線要求
- 這個按鈕會觸發將來源和目的地資料傳送至 Node.js 服務
- Node.js 服務會將要求傳送至 Routes API
- API 回應會傳回用戶端以供顯示
設定出發地和目的地,並準備好動態地圖後,就可以取得路線。新一代的 Routes API 是效能最佳化的路線和距離矩陣服務,可解決上述問題。在本實驗室中,我們將使用 Node.js 從網頁收集起點和目的地,並透過 Routes API 要求路線。
在 index.html 中,於 div 的結尾標記前新增「Get a route」按鈕,並加上 aside 類別:
<div class="inputgroup">
  <button id="btn-getroute">Get a route</button>
</div>
在 style.css 中新增以下程式碼:
.aside button {padding:20px 30px; font-size:16px; border:none; border-radius:50px; background-color:#1a73e8; color:#fff;}
在 app.js 中,加入下列程式碼,將來源和目的地資料傳送至 Node.js 服務:
function requestRoute(){
  let btn = document.getElementById('btn-getroute');
  btn.addEventListener('click', () => {
    //In this example, we will extract the Place IDs from the Autocomplete response
    //and use the Place ID for origin and destination
    if(placeIds.length == 2){
        let reqBody = {
            "origin": {
                "placeId": placeIds[0]
            },
            "destination": {
                "placeId": placeIds[1]
            }
        }

        fetch("/request-route", {
            method: 'POST',
            body: JSON.stringify(reqBody),
            headers: {
                "Content-Type": "application/json"
            }
        }).then((response) => {
            return response.json();
        }).then((data) => {
            //Draw the route on the map
            //Details will be covered in next step
            renderRoutes(data);
        }).catch((error) => {
            console.log(error);
        });
    } else {
        window.alert('Location must be set');
        return;
    }
  });
}

requestRoute();
renderRoutes() 是用來在地圖上繪製路線的函式。我們會在下一個步驟中說明細節。
建立伺服器
在專案目錄(本例為 ac_routes) 中,建立名為 function 的新資料夾。在這個資料夾中,建立名為 server.js 的檔案。這個檔案是專案的進入點,會在設定 Node.js 專案時進行設定,並處理三項重要函式:
- 從網頁用戶端收集資料
- 傳送要求至 Routes API
- 將 API 回應傳回用戶端
將下列程式碼複製到 server.js。將「YOUR_API_KEY」替換成您自己的 API 金鑰。為提升 API 金鑰安全性,我們強烈建議您為後端使用不同的金鑰。請參閱安全性指南。
const express = require('express');
const app = express();
const bodyParser = require('body-parser');

const port  = 8080;
const urlencodedParser = bodyParser.urlencoded({extended:true});

function main() {
  app.use('/', express.static('public'));
  app.use(urlencodedParser);
  app.use(express.json());

  app.post('/request-route', (req,res) => {
    fetch("https://routes.googleapis.com/directions/v2:computeRoutes", {
      method: "POST",
      headers: {
        "Content-Type": "application/json",
        "X-Goog-Api-Key": "YOUR_API_KEY",
        "X-Goog-FieldMask": "*"
      },
      body: JSON.stringify(req.body)
    }).then((response) => {
      return response.json();
    }).then((data) => {
      if('error' in data){
        console.log(data.error);
      } else if(!data.hasOwnProperty("routes")){
        console.log("No route round");
      } else {
        res.end(JSON.stringify(data));
      }
    }).catch((error) => {
      console.log(error)
    });
  });

  app.listen(port, () => {
      console.log('App listening on port ${port}: ' + port);
      console.log('Press Ctrl+C to quit.');
  });
}

main();
如要進一步瞭解 Routes API,請參閱這篇文章。
執行程式碼
在指令列中執行下列程式碼:
$ node function/server.js
開啟瀏覽器並前往 http://127.0.0.1:8080/index.html。您應該會看到應用程式頁面。到這個階段為止,API 回應會傳回給網路用戶端。請參閱下一個步驟,瞭解如何在 Google 地圖上顯示路線。
完整程式碼範例
您可以在 GitHub:step3_requestRoute 取得目前為止的完整程式碼
7. 在地圖上顯示路線
在上一個步驟中,我們在成功收到 Node.js 服務的回應時,會參照 renderRoutes()。現在,我們來加入實際程式碼,在地圖上顯示路線。
在 app.js 中新增下列程式碼:
let paths = [];
async function renderRoutes(data) {
const { encoding } = await google.maps.importLibrary("geometry");
let routes = data.routes;
let decodedPaths = [];
///Display routes and markers
routes.forEach((route,i) => {
if(route.hasOwnProperty('polyline')){
//Decode the encoded polyline
decodedPaths.push(encoding.decodePath(route.polyline.encodedPolyline));
//Draw polyline on the map
for(let i = decodedPaths.length - 1; i >= 0; i--){
let polyline = new google.maps.Polyline({
map: map,
path: decodedPaths[i],
strokeColor: "#4285f4",
strokeOpacity: 1,
strokeWeight: 5
});
paths.push(polyline);
}
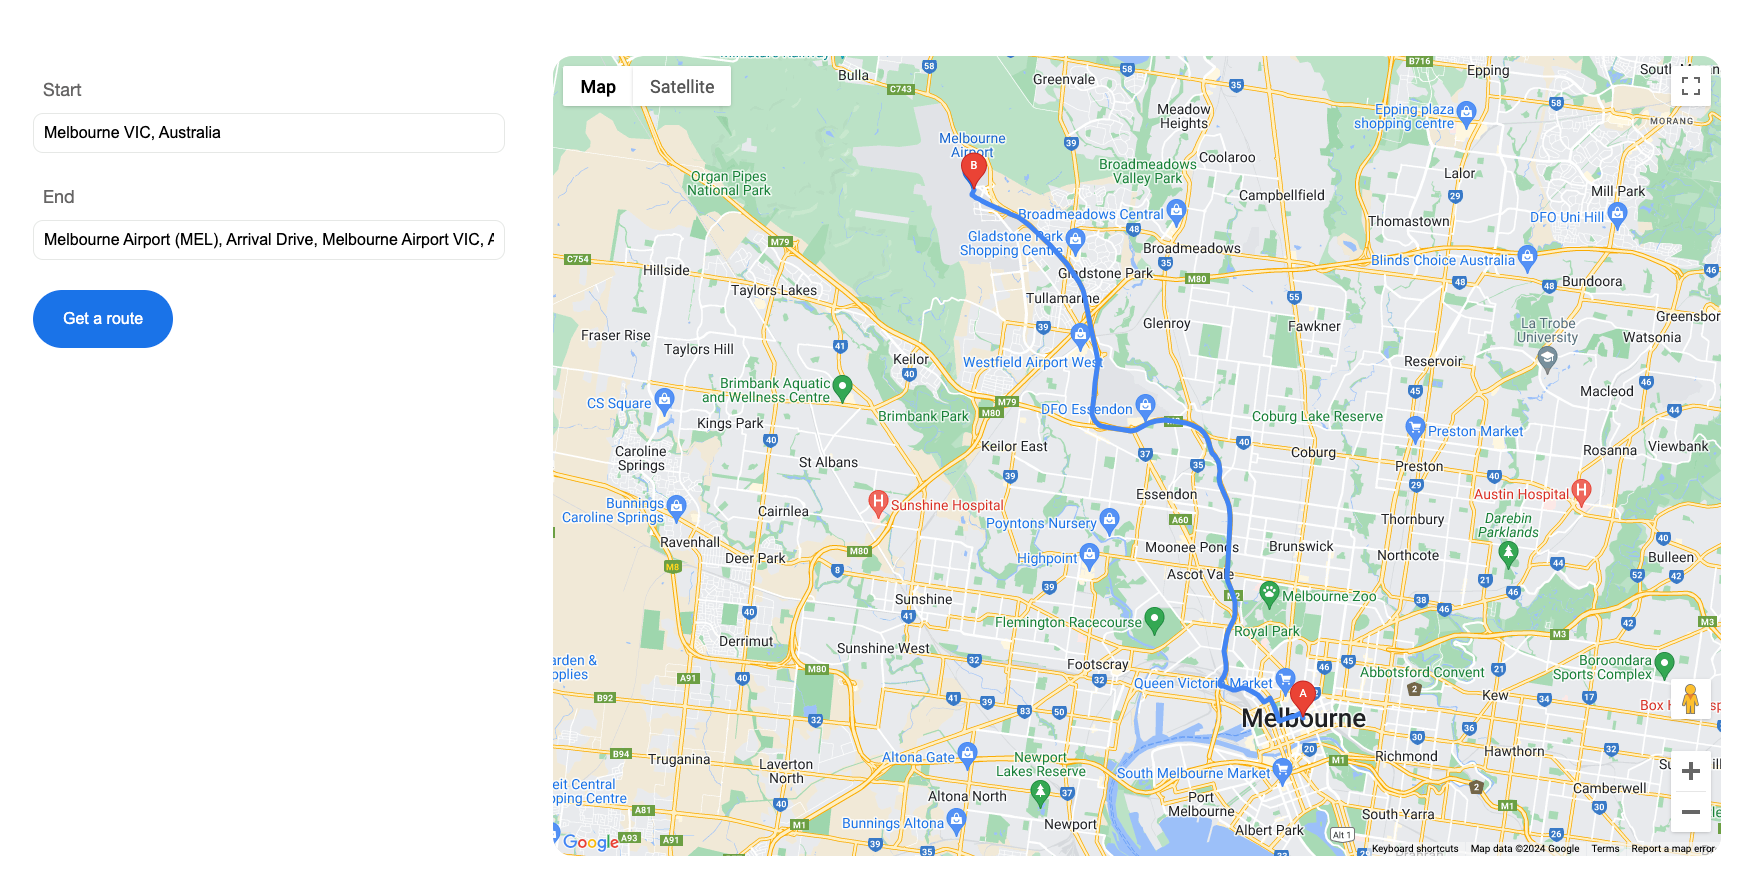
//Add markers for origin/destination
addMarker(route.legs[0].startLocation.latLng,"A");
addMarker(route.legs[0].endLocation.latLng,"B");
//Set the viewport
setViewport(route.viewport);
} else {
console.log("Route cannot be found");
}
});
}
Routes API 會以 encodedPolyline(預設) 或 geoJsonLinestring 格式傳回折線。在本實驗室中,我們使用 encodedPolyline 格式,並透過 Maps JavaScript 幾何圖形程式庫解碼。
我們會使用 addMarker() 為起點和目的地新增進階標記。在 app.js 中新增下列程式碼:
let markers = [];
async function addMarker(pos,label){
  const { AdvancedMarkerElement } = await google.maps.importLibrary("marker");
  const { PinElement } = await google.maps.importLibrary("marker");
  const { LatLng } = await google.maps.importLibrary("core");
  let pinGlyph = new PinElement({
      glyphColor: "#fff",
      glyph: label
  });
  let marker = new AdvancedMarkerElement({
      position: new LatLng({lat:pos.latitude,lng:pos.longitude}),
      gmpDraggable: false,
      content: pinGlyph.element,
      map: map
  });
  markers.push(marker);
}
我們在這裡建立兩個進階標記,分別是起點的 A 和目的地的 B。進一步瞭解進階標記。
接著,我們會使用 Routes API 提供的便利 viewport 資訊,將地圖檢視區塊置中於擷取的路線。在 app.js 中新增下列程式碼:
async function setViewport(viewPort) {
  const { LatLng } = await google.maps.importLibrary("core");
  const { LatLngBounds } = await google.maps.importLibrary("core");
  let sw = new LatLng({lat:viewPort.low.latitude,lng:viewPort.low.longitude});
  let ne = new LatLng({lat:viewPort.high.latitude,lng:viewPort.high.longitude});
  map.fitBounds(new LatLngBounds(sw,ne));
}
完整程式碼範例:您可以在 GitHub:step4_displayRoute 取得目前為止的完整程式碼。
8. 從地圖中移除元素
現在,我們要採取更進一步的行動。請先清除地圖,再繪製新標記和路線,以免畫面過於雜亂。
在 app.js 中,我們再新增一個函式:
function clearUIElem(obj,type) {
  if(obj.length > 0){
      if(type == 'advMarker'){
          obj.forEach(function(item){
              item.map = null;
          });
      } else {
          obj.forEach(function(item){
              item.setMap(null);
          });
      }
  }
}
在 renderRoutes() 開頭加入以下程式碼:
clearUIElem(paths,'polyline');
在 addMarker() 開頭加入以下程式碼:
clearUIElem(markers,'advMarker');
完整程式碼範例
您可以在 GitHub:step5_removeElements 取得目前為止的完整程式碼。
9. 恭喜
您已成功建構物體。
您學到的內容
- 啟用 Google 地圖平台 API
- 將 Google Maps JavaScript API 載入 HTML 網頁
- 匯入 Maps JavaScript API 的 Places Library
- 將 Place Autocomplete 服務繫結至文字欄位
- 透過 Routes API 要求路線
- 在動態地圖上顯示路線
- 建立地圖 ID
- 建立進階標記
瞭解詳情
- 進一步瞭解 Google 地圖 Routes API
- 進一步瞭解 Google Maps JavaScript API
- 進一步瞭解 Google 地圖 Places API
你還想看到哪些程式碼研究室?
如果想找的程式碼研究室未列於上方,請在這裡提出新的問題。