
1. 事前準備
本程式碼研究室會教您如何整合 Maps SDK for Android 與應用程式,並使用其核心功能,建構可顯示美國加州舊金山自行車店地圖的應用程式。

必要條件
- 具備 Kotlin 和 Android 開發作業的基本知識
學習內容
- 啟用並使用 Maps SDK for Android,在 Android 應用程式中加入 Google 地圖。
- 新增、自訂及叢集標記。
- 在地圖上繪製折線和多邊形。
- 以程式輔助方式控制攝影機的視點。
軟硬體需求
- Maps SDK for Android
- 已啟用計費功能的 Google 帳戶
- Android Studio 2020.3.1 以上版本
- Android Studio 中已安裝 Google Play 服務
- 搭載 Android 4.2.2 以上版本的 Android 裝置或 Android 模擬器 (請參閱「在 Android 模擬器上執行應用程式」一文,瞭解安裝步驟)。
2. 做好準備
在啟用步驟中,您需要啟用 Maps SDK for Android。
設定 Google 地圖平台
如果您尚未建立 Google Cloud Platform 帳戶,以及啟用計費功能的專案,請參閱「開始使用 Google 地圖平台」指南,建立帳單帳戶和專案。
- 在 Cloud 控制台中,按一下專案下拉式選單,然後選取要用於本程式碼研究室的專案。

- 在 Google Cloud Marketplace 中,啟用本程式碼研究室所需的 Google 地圖平台 API 和 SDK。如要瞭解如何操作,請觀看這部影片或參閱這份說明文件。
- 在 Cloud Console 的「憑證」頁面中產生 API 金鑰。你可以按照這部影片或這份文件中的步驟操作。所有 Google 地圖平台要求都需要 API 金鑰。
3. 快速入門
為協助您盡快上手,我們提供一些範例程式碼,方便您跟著本程式碼研究室的說明操作。歡迎直接前往解決方案,但如果您想按照所有步驟自行建構,請繼續閱讀。
- 如果已安裝
git,請複製存放區。
git clone https://github.com/googlecodelabs/maps-platform-101-android.git
或者,您也可以點選下列按鈕下載原始碼。
- 取得程式碼後,請在 Android Studio 中開啟
starter目錄內的專案。
4. 新增 Google 地圖
在本節中,您將新增 Google 地圖,以便在啟動應用程式時載入地圖。

新增 API 金鑰
您必須將先前步驟中建立的 API 金鑰提供給應用程式,這樣 Maps SDK for Android 才能將金鑰與應用程式建立關聯。
- 如要提供這項資訊,請開啟專案根目錄中的
local.properties檔案 (與gradle.properties和settings.gradle位於同一層級)。 - 在該檔案中,定義新的金鑰
GOOGLE_MAPS_API_KEY,並將值設為您建立的 API 金鑰。
local.properties
GOOGLE_MAPS_API_KEY=YOUR_KEY_HERE
請注意,Git 存放區的 .gitignore 檔案中會列出 local.properties。這是因為 API 金鑰屬於機密資訊,盡可能不要簽入原始碼控管。
- 接下來,如要公開 API 以供整個應用程式使用,請在
app/目錄的應用程式build.gradle檔案中加入 Secrets Gradle Plugin for Android 外掛程式,並在plugins區塊中新增以下程式碼:
應用程式層級 build.gradle
plugins {
    // ...
    id 'com.google.android.libraries.mapsplatform.secrets-gradle-plugin'
}
您也需要修改專案層級的 build.gradle 檔案,加入下列類路徑:
專案層級的 build.gradle
buildscript {
    dependencies {
        // ...
        classpath "com.google.android.libraries.mapsplatform.secrets-gradle-plugin:secrets-gradle-plugin:1.3.0"
    }
}
這個外掛程式會在建構期間,將您在 local.properties 檔案中定義的金鑰,當成 Android 資訊清單檔案中的建構變數,以及 Gradle 產生的 BuildConfig 類別中的變數。使用這個外掛程式可移除原本需要用來從 local.properties 讀取屬性的樣板程式碼,讓應用程式各處都能存取屬性。
新增 Google 地圖依附元件
- 現在應用程式可以存取 API 金鑰,下一步是在應用程式的
build.gradle檔案中新增 Maps SDK for Android 依附元件。
在本程式碼研究室隨附的起始專案中,這項依附元件已新增完畢。
build.gradle
dependencies {
   // Dependency to include Maps SDK for Android
   implementation 'com.google.android.gms:play-services-maps:17.0.0'
}
- 接下來,請在
AndroidManifest.xml中新增meta-data標記,傳遞您在先前步驟中建立的 API 金鑰。如要這麼做,請在 Android Studio 中開啟這個檔案,然後在app/src/main中的AndroidManifest.xml檔案內,將下列meta-data標記加進application物件。
AndroidManifest.xml
<meta-data
   android:name="com.google.android.geo.API_KEY"
   android:value="${GOOGLE_MAPS_API_KEY}" />
- 接著,在
app/src/main/res/layout/目錄中建立名為activity_main.xml的新版面配置檔案,並定義如下:
activity_main.xml
<FrameLayout xmlns:android="http://schemas.android.com/apk/res/android"
   xmlns:tools="http://schemas.android.com/tools"
   android:layout_width="match_parent"
   android:layout_height="match_parent"
   tools:context=".MainActivity">

   <fragment
       class="com.google.android.gms.maps.SupportMapFragment"
       android:id="@+id/map_fragment"
       android:layout_width="match_parent"
       android:layout_height="match_parent" />

</FrameLayout>
這個版面配置具有單一 FrameLayout,其中包含 SupportMapFragment。這個片段包含您在後續步驟中使用的基礎 GoogleMaps 物件。
- 最後,請更新
app/src/main/java/com/google/codelabs/buildyourfirstmap中的MainActivity類別,加入下列程式碼來覆寫onCreate方法,以便使用您剛建立的新版面配置設定其內容。
MainActivity
override fun onCreate(savedInstanceState: Bundle?) {
   super.onCreate(savedInstanceState)
   setContentView(R.layout.activity_main)
}
- 現在請執行應用程式,裝置螢幕上應該會載入地圖。
5. 雲端式地圖樣式設定 (選用)
您可以使用雲端式地圖樣式設定自訂地圖樣式。
建立地圖 ID
如果尚未建立地圖 ID 並與地圖樣式建立關聯,請參閱「地圖 ID」指南,完成下列步驟:
- 建立地圖 ID。
- 將地圖 ID 與地圖樣式建立關聯。
在應用程式中加入地圖 ID
如要使用您建立的地圖 ID,請修改 activity_main.xml 檔案,並在 SupportMapFragment 的 map:mapId 屬性中傳遞地圖 ID。
activity_main.xml
<fragment xmlns:map="http://schemas.android.com/apk/res-auto"
    class="com.google.android.gms.maps.SupportMapFragment"
    <!-- ... -->
    map:mapId="YOUR_MAP_ID" />
完成後,請執行應用程式,查看所選樣式的地圖!
6. 新增標記
在這項工作中,您會在要醒目顯示的搜尋點地圖上新增標記。首先,您要擷取入門專案中提供的地點清單,然後將這些地點加到地圖上。在本例中,這些是自行車店。

取得 GoogleMap 的參照
首先,您需要取得 GoogleMap 物件的參照,才能使用其方法。如要這麼做,請在呼叫 setContentView() 後,於 MainActivity.onCreate() 方法中加入下列程式碼:
MainActivity.onCreate()
val mapFragment = supportFragmentManager.findFragmentById(
    R.id.map_fragment
) as? SupportMapFragment
mapFragment?.getMapAsync { googleMap ->
    addMarkers(googleMap)
}
實作方式是先使用 SupportFragmentManager 物件的 findFragmentById() 方法,找出您在上一個步驟中新增的 SupportMapFragment。取得參照後,系統會叫用 getMapAsync() 呼叫,然後傳遞 lambda。這個 lambda 會傳遞 GoogleMap 物件。在這個 lambda 內,系統會叫用 addMarkers() 方法呼叫,我們很快就會定義這個方法。
提供的類別:PlacesReader
在範例專案中,系統已為您提供 PlacesReader 類別。這個類別會讀取儲存在名為 places.json 的 JSON 檔案中的 49 個地點清單,並以 List<Place> 形式傳回。這些地點代表美國加州舊金山附近的自行車店清單。
如要瞭解這個類別的實作方式,請前往 GitHub 或在 Android Studio 中開啟 PlacesReader 類別。
PlacesReader
package com.google.codelabs.buildyourfirstmap.place

import android.content.Context
import com.google.codelabs.buildyourfirstmap.R
import com.google.gson.Gson
import com.google.gson.reflect.TypeToken
import java.io.InputStream
import java.io.InputStreamReader

/**
* Reads a list of place JSON objects from the file places.json
*/
class PlacesReader(private val context: Context) {

   // GSON object responsible for converting from JSON to a Place object
   private val gson = Gson()

   // InputStream representing places.json
   private val inputStream: InputStream
       get() = context.resources.openRawResource(R.raw.places)

   /**
    * Reads the list of place JSON objects in the file places.json
    * and returns a list of Place objects
    */
   fun read(): List<Place> {
       val itemType = object : TypeToken<List<PlaceResponse>>() {}.type
       val reader = InputStreamReader(inputStream)
       return gson.fromJson<List<PlaceResponse>>(reader, itemType).map {
           it.toPlace()
       }
   }
載入地點
如要載入自行車店清單,請在 MainActivity 中新增名為 places 的屬性,並定義如下:
MainActivity.places
private val places: List<Place> by lazy {
   PlacesReader(this).read()
}
這段程式碼會對 PlacesReader 叫用 read() 方法,並傳回 List<Place>。Place 具有名為 name 的屬性 (地點名稱) 和 latLng (地點所在位置的座標)。
地點
data class Place(
   val name: String,
   val latLng: LatLng,
   val address: LatLng,
   val rating: Float
)
在地圖中加入標記
現在地點清單已載入記憶體,下一步是在地圖上呈現這些地點。
- 在
MainActivity中建立名為addMarkers()的方法,並定義如下:
MainActivity.addMarkers()
/**
* Adds marker representations of the places list on the provided GoogleMap object
*/
private fun addMarkers(googleMap: GoogleMap) {
   places.forEach { place ->
       val marker = googleMap.addMarker(
           MarkerOptions()
               .title(place.name)
               .position(place.latLng)
       )
   }
}
這個方法會逐一查看 places 清單,然後在提供的 GoogleMap 物件上叫用 addMarker() 方法。標記是透過例項化 MarkerOptions 物件建立,可供您自訂標記本身。在本例中,系統會提供標記的名稱和位置,分別代表自行車店名稱和座標。
- 請執行應用程式,然後前往舊金山,查看您剛才新增的標記!
7. 自訂標記
您可以透過多種自訂選項,讓剛新增的標記更加顯眼,並向使用者傳達實用資訊。在這項工作中,您將自訂每個標記的圖片,以及輕觸標記時顯示的資訊視窗,進一步瞭解這些功能。
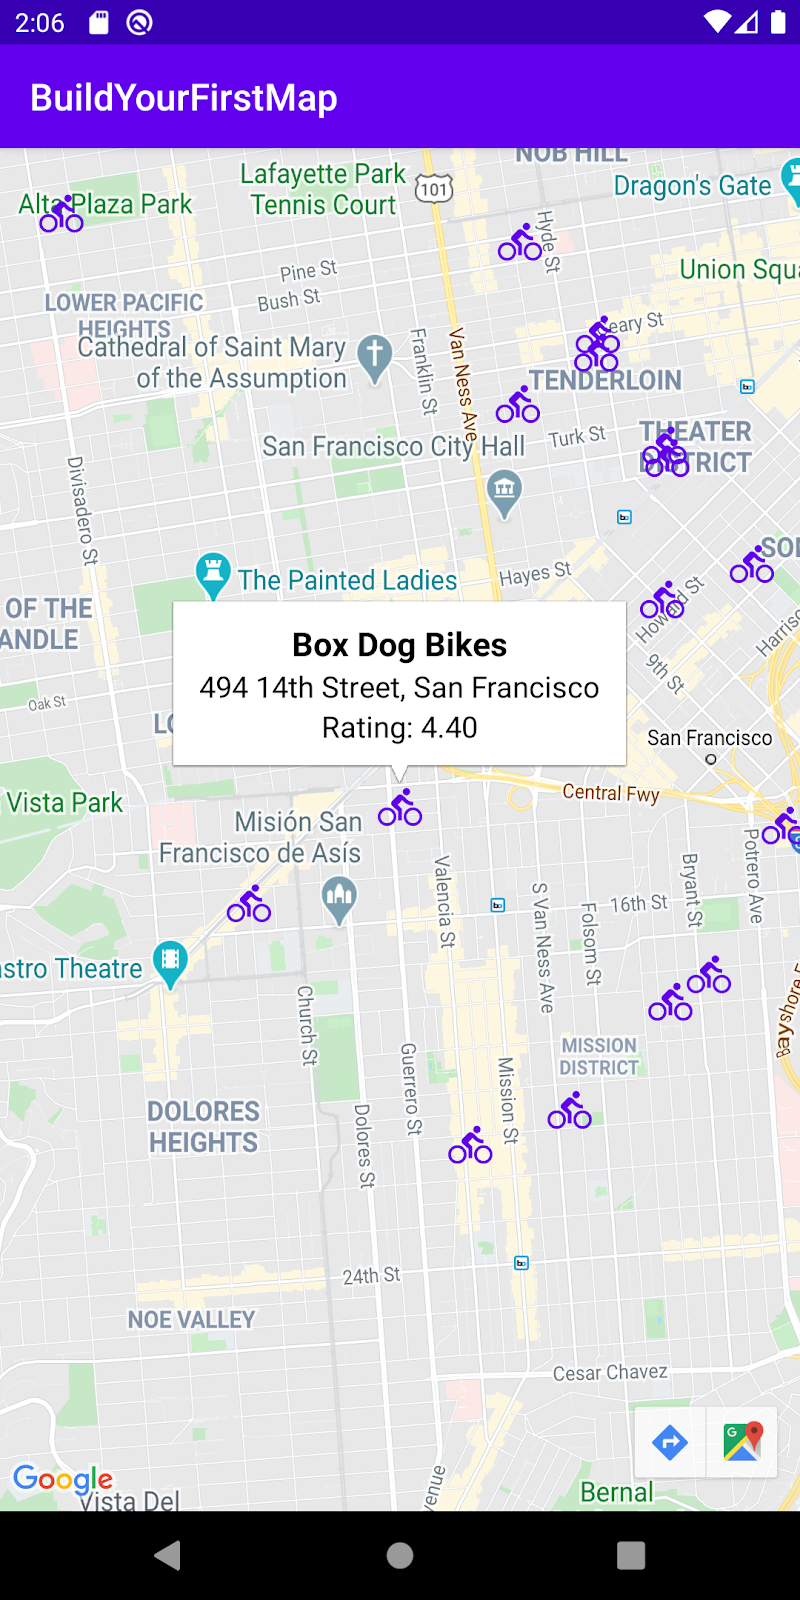
新增資訊視窗
根據預設,輕觸標記時,資訊視窗會顯示標題和文字片段 (如有設定)。您可以自訂這項資訊,顯示地點的地址和評分等額外資訊。
建立 marker_info_contents.xml
首先,建立名為 marker_info_contents.xml 的新版面配置檔案。
- 方法是在 Android Studio 的專案檢視畫面中,對
app/src/main/res/layout資料夾按一下滑鼠右鍵,然後依序選取「New」 >「Layout Resource File」。

- 在對話方塊的「File name」(檔案名稱) 欄位中輸入
marker_info_contents,並在Root element欄位中輸入LinearLayout,然後按一下「OK」(確定)。

這個版面配置檔案稍後會膨脹,代表資訊視窗內的內容。
- 複製以下程式碼片段中的內容,在垂直
LinearLayout檢視群組中新增三個TextViews,然後覆寫檔案中的預設程式碼。
marker_info_contents.xml
<?xml version="1.0" encoding="utf-8"?>
<LinearLayout xmlns:android="http://schemas.android.com/apk/res/android"
   xmlns:tools="http://schemas.android.com/tools"
   android:orientation="vertical"
   android:layout_width="wrap_content"
   android:layout_height="wrap_content"
   android:gravity="center_horizontal"
   android:padding="8dp">

   <TextView
       android:id="@+id/text_view_title"
       android:layout_width="wrap_content"
       android:layout_height="wrap_content"
       android:textColor="@android:color/black"
       android:textSize="18sp"
       android:textStyle="bold"
       tools:text="Title"/>

   <TextView
       android:id="@+id/text_view_address"
       android:layout_width="wrap_content"
       android:layout_height="wrap_content"
       android:textColor="@android:color/black"
       android:textSize="16sp"
       tools:text="123 Main Street"/>

   <TextView
       android:id="@+id/text_view_rating"
       android:layout_width="wrap_content"
       android:layout_height="wrap_content"
       android:textColor="@android:color/black"
       android:textSize="16sp"
       tools:text="Rating: 3"/>

</LinearLayout>
建立 InfoWindowAdapter 的實作項目
為自訂資訊視窗建立版面配置檔案後,下一步就是實作 GoogleMap.InfoWindowAdapter 介面。這個介面包含 getInfoWindow() 和 getInfoContents() 這兩種方法。這兩種方法都會傳回選用的 View 物件,前者用於自訂視窗本身,後者則用於自訂視窗內容。在您的情況下,您會同時實作這兩者,並在 getInfoWindow() 中傳回空值時,自訂 getInfoContents() 的傳回值,這表示應使用預設視窗。
- 在與
MainActivity相同的套件中,建立名為MarkerInfoWindowAdapter的新 Kotlin 檔案。方法是在 Android Studio 的專案檢視畫面中,以滑鼠右鍵按一下app/src/main/java/com/google/codelabs/buildyourfirstmap資料夾,然後依序選取「New」 >「Kotlin File/Class」。

- 在對話方塊中輸入
MarkerInfoWindowAdapter,並保持「File」醒目顯示。

- 建立檔案後,請將下列程式碼片段的內容複製到新檔案中。
MarkerInfoWindowAdapter
import android.content.Context
import android.view.LayoutInflater
import android.view.View
import android.widget.TextView
import com.google.android.gms.maps.GoogleMap
import com.google.android.gms.maps.model.Marker
import com.google.codelabs.buildyourfirstmap.place.Place

class MarkerInfoWindowAdapter(
    private val context: Context
) : GoogleMap.InfoWindowAdapter {
   override fun getInfoContents(marker: Marker?): View? {
       // 1. Get tag
       val place = marker?.tag as? Place ?: return null

       // 2. Inflate view and set title, address, and rating
       val view = LayoutInflater.from(context).inflate(
           R.layout.marker_info_contents, null
       )
       view.findViewById<TextView>(
           R.id.text_view_title
       ).text = place.name
       view.findViewById<TextView>(
           R.id.text_view_address
       ).text = place.address
       view.findViewById<TextView>(
           R.id.text_view_rating
       ).text = "Rating: %.2f".format(place.rating)

       return view
   }

   override fun getInfoWindow(marker: Marker?): View? {
       // Return null to indicate that the
       // default window (white bubble) should be used
       return null
   }
}
在 getInfoContents() 方法的內容中,方法中提供的標記會轉換為 Place 型別,如果無法轉換,方法會傳回空值 (您尚未在 Marker 上設定標記屬性,但會在下一個步驟中執行此操作)。
接著,版面配置 marker_info_contents.xml 會膨脹,然後在包含 TextViews 的 Place 標記上設定文字。
更新 MainActivity
如要將目前建立的所有元件黏合在一起,您需要在 MainActivity 類別中新增兩行。
首先,如要傳遞自訂 InfoWindowAdapter,請在 getMapAsync 方法呼叫中,對 GoogleMap 物件叫用 setInfoWindowAdapter() 方法,並建立 MarkerInfoWindowAdapter 的新例項。MarkerInfoWindowAdapter
- 方法是在
getMapAsync()lambda 內,於addMarkers()方法呼叫後新增下列程式碼。
MainActivity.onCreate()
// Set custom info window adapter
googleMap.setInfoWindowAdapter(MarkerInfoWindowAdapter(this))
最後,您需要在新增至地圖的每個標記上,將每個地點設為標記屬性。
- 為此,請將
addMarkers()函式中的places.forEach{}呼叫修改為下列內容:
MainActivity.addMarkers()
places.forEach { place ->
   val marker = googleMap.addMarker(
       MarkerOptions()
           .title(place.name)
           .position(place.latLng)
           .icon(bicycleIcon)
   )

   // Set place as the tag on the marker object so it can be referenced within
   // MarkerInfoWindowAdapter
   marker.tag = place
}
新增自訂標記圖片
自訂標記圖片是很有趣的方式,可讓地圖上的標記代表特定類型的地點。在這個步驟中,您會顯示單車,而非預設的紅色標記,代表地圖上的每間商店。入門專案的 app/src/res/drawable 中包含自行車圖示 ic_directions_bike_black_24dp.xml,您可以使用該圖示。

在標記上設定自訂點陣圖
有了向量可繪項目自行車圖示,下一步就是將該可繪項目設為地圖上每個標記的圖示。MarkerOptions 有一個 icon 方法,可擷取您用來完成這項作業的 BitmapDescriptor。
首先,您需要將剛才新增的向量可繪項目轉換為 BitmapDescriptor。範例專案中名為 BitMapHelper 的檔案包含名為 vectorToBitmap() 的輔助函式,可執行這項操作。
BitmapHelper
package com.google.codelabs.buildyourfirstmap

import android.content.Context
import android.graphics.Bitmap
import android.graphics.Canvas
import android.util.Log
import androidx.annotation.ColorInt
import androidx.annotation.DrawableRes
import androidx.core.content.res.ResourcesCompat
import androidx.core.graphics.drawable.DrawableCompat
import com.google.android.gms.maps.model.BitmapDescriptor
import com.google.android.gms.maps.model.BitmapDescriptorFactory

object BitmapHelper {
   /**
    * Demonstrates converting a [Drawable] to a [BitmapDescriptor],
    * for use as a marker icon. Taken from ApiDemos on GitHub:
    * https://github.com/googlemaps/android-samples/blob/main/ApiDemos/kotlin/app/src/main/java/com/example/kotlindemos/MarkerDemoActivity.kt
    */
   fun vectorToBitmap(
      context: Context,
      @DrawableRes id: Int,
      @ColorInt color: Int
   ): BitmapDescriptor {
       val vectorDrawable = ResourcesCompat.getDrawable(context.resources, id, null)
       if (vectorDrawable == null) {
           Log.e("BitmapHelper", "Resource not found")
           return BitmapDescriptorFactory.defaultMarker()
       }
       val bitmap = Bitmap.createBitmap(
           vectorDrawable.intrinsicWidth,
           vectorDrawable.intrinsicHeight,
           Bitmap.Config.ARGB_8888
       )
       val canvas = Canvas(bitmap)
       vectorDrawable.setBounds(0, 0, canvas.width, canvas.height)
       DrawableCompat.setTint(vectorDrawable, color)
       vectorDrawable.draw(canvas)
       return BitmapDescriptorFactory.fromBitmap(bitmap)
   }
}
這個方法會接收 Context、可繪製資源 ID 和顏色整數,並建立 BitmapDescriptor 的表示法。
使用輔助方法宣告名為 bicycleIcon 的新屬性,並提供下列定義:MainActivity.bicycleIcon
private val bicycleIcon: BitmapDescriptor by lazy {
   val color = ContextCompat.getColor(this, R.color.colorPrimary)
   BitmapHelper.vectorToBitmap(this, R.drawable.ic_directions_bike_black_24dp, color)
}
這項屬性會使用應用程式中預先定義的顏色 colorPrimary,並使用該顏色為自行車圖示著色,然後以 BitmapDescriptor 形式傳回。
- 使用這個屬性,在
addMarkers()方法中叫用MarkerOptions的icon方法,完成圖示自訂作業。完成後,標記屬性應如下所示:
MainActivity.addMarkers()
val marker = googleMap.addMarker(
    MarkerOptions()
        .title(place.name)
        .position(place.latLng)
        .icon(bicycleIcon)
)
- 執行應用程式,即可查看更新後的標記!
8. 叢集標記
您可能已發現,根據地圖的縮放程度,新增的標記可能會重疊。重疊的標記難以互動,且會產生大量干擾,影響應用程式的可用性。

為改善這項功能的使用者體驗,建議您在有大量緊密叢集的資料集時,導入標記叢集。使用叢集功能時,當您縮放地圖,鄰近的標記會聚類在一起,如下所示:
如要實作這項功能,請使用 Maps SDK for Android 公用程式庫。
Maps SDK for Android 公用程式庫
Maps SDK for Android 公用程式庫的用途是擴充 Maps SDK for Android 的功能。這項工具提供多項進階功能,例如標記叢集、熱度圖、KML 和 GeoJSON 支援、折線編碼和解碼,以及與球面幾何相關的輔助函式。
更新 build.gradle
公用程式庫與 Maps SDK for Android 是分開封裝,因此您需要在 build.gradle 檔案中新增其他依附元件。
- 請繼續更新
app/build.gradle檔案的dependencies區段。
build.gradle
implementation 'com.google.maps.android:android-maps-utils:1.1.0'
- 新增這行程式碼後,您必須執行專案同步處理,才能擷取新依附元件。

實作叢集
如要在應用程式中實作叢集功能,請按照下列三個步驟操作:
- 導入
ClusterItem介面。 - 將
DefaultClusterRenderer類別設為子類別。 - 建立
ClusterManager並新增項目。
實作 ClusterItem 介面
代表地圖上可叢集標記的所有物件,都必須實作 ClusterItem 介面。在您的案例中,這表示 Place 模型必須符合 ClusterItem。請開啟 Place.kt 檔案,並進行下列修改:
地點
data class Place(
   val name: String,
   val latLng: LatLng,
   val address: String,
   val rating: Float
) : ClusterItem {
   override fun getPosition(): LatLng =
       latLng

   override fun getTitle(): String =
       name

   override fun getSnippet(): String =
       address
}
ClusterItem 定義了下列三種方法:
getPosition(),代表地點的LatLng。getTitle(),代表地點名稱getSnippet(),代表地點的地址。
將 DefaultClusterRenderer 類別設為子類別
負責實作叢集功能的 ClusterManager 類別,會在您平移及縮放地圖時,於內部使用 ClusterRenderer 類別處理叢集建立作業。根據預設,它會隨附實作 ClusterRenderer 的預設轉譯器 DefaultClusterRenderer。在簡單的情況下,這應該就足夠了。不過,由於標記需要自訂,因此您必須擴充這個類別,並在其中新增自訂項目。
請在 com.google.codelabs.buildyourfirstmap.place 套件中建立 Kotlin 檔案 PlaceRenderer.kt,並定義如下:
PlaceRenderer
package com.google.codelabs.buildyourfirstmap.place

import android.content.Context
import androidx.core.content.ContextCompat
import com.google.android.gms.maps.GoogleMap
import com.google.android.gms.maps.model.BitmapDescriptor
import com.google.android.gms.maps.model.Marker
import com.google.android.gms.maps.model.MarkerOptions
import com.google.codelabs.buildyourfirstmap.BitmapHelper
import com.google.codelabs.buildyourfirstmap.R
import com.google.maps.android.clustering.ClusterManager
import com.google.maps.android.clustering.view.DefaultClusterRenderer

/**
* A custom cluster renderer for Place objects.
*/
class PlaceRenderer(
   private val context: Context,
   map: GoogleMap,
   clusterManager: ClusterManager<Place>
) : DefaultClusterRenderer<Place>(context, map, clusterManager) {

   /**
    * The icon to use for each cluster item
    */
   private val bicycleIcon: BitmapDescriptor by lazy {
       val color = ContextCompat.getColor(context,
           R.color.colorPrimary
       )
       BitmapHelper.vectorToBitmap(
           context,
           R.drawable.ic_directions_bike_black_24dp,
           color
       )
   }

   /**
    * Method called before the cluster item (the marker) is rendered.
    * This is where marker options should be set.
    */
   override fun onBeforeClusterItemRendered(
      item: Place,
      markerOptions: MarkerOptions
   ) {
       markerOptions.title(item.name)
           .position(item.latLng)
           .icon(bicycleIcon)
   }

   /**
    * Method called right after the cluster item (the marker) is rendered.
    * This is where properties for the Marker object should be set.
    */
   override fun onClusterItemRendered(clusterItem: Place, marker: Marker) {
       marker.tag = clusterItem
   }
}
這個類別會覆寫下列兩個函式:
onBeforeClusterItemRendered(),會在叢集顯示在地圖上之前呼叫。您可以在這裡透過MarkerOptions提供自訂項目,在本例中,這會設定標記的標題、位置和圖示。onClusterItemRenderer(),會在標記在地圖上算繪完成後立即呼叫。您可以在這裡存取建立的Marker物件,在本例中,該物件會設定標記的標記屬性。
建立 ClusterManager 並新增項目
最後,如要讓叢集功能正常運作,您需要修改 MainActivity,例項化 ClusterManager,並提供必要的依附元件。ClusterManager 會在內部處理標記 (ClusterItem 物件) 的新增作業,因此這項責任會委派給 ClusterManager,而不是直接在地圖上新增標記。此外,ClusterManager 也會在內部呼叫 setInfoWindowAdapter(),因此必須在 ClusterManger 的 MarkerManager.Collection 物件上設定自訂資訊視窗。
- 首先,請修改
MainActivity.onCreate()中getMapAsync()呼叫的 lambda 內容。請註解掉對addMarkers()和setInfoWindowAdapter()的呼叫,然後改為叫用名為addClusteredMarkers()的方法,您將在下一個步驟中定義這個方法。
MainActivity.onCreate()
mapFragment?.getMapAsync { googleMap ->
    //addMarkers(googleMap)
    addClusteredMarkers(googleMap)

    // Set custom info window adapter.
    // googleMap.setInfoWindowAdapter(MarkerInfoWindowAdapter(this))
}
- 接著在
MainActivity中定義addClusteredMarkers()。
MainActivity.addClusteredMarkers()
/**
* Adds markers to the map with clustering support.
*/
private fun addClusteredMarkers(googleMap: GoogleMap) {
   // Create the ClusterManager class and set the custom renderer.
   val clusterManager = ClusterManager<Place>(this, googleMap)
   clusterManager.renderer =
       PlaceRenderer(
           this,
           googleMap,
           clusterManager
       )

   // Set custom info window adapter
   clusterManager.markerCollection.setInfoWindowAdapter(MarkerInfoWindowAdapter(this))

   // Add the places to the ClusterManager.
   clusterManager.addItems(places)
   clusterManager.cluster()

   // Set ClusterManager as the OnCameraIdleListener so that it
   // can re-cluster when zooming in and out.
   googleMap.setOnCameraIdleListener {
       clusterManager.onCameraIdle()
   }
}
這個方法會例項化 ClusterManager、將自訂算繪器 PlacesRenderer 傳遞至該例項、新增所有地點,並叫用 cluster() 方法。此外,由於 ClusterManager 會使用地圖物件的 setInfoWindowAdapter() 方法,因此必須在 ClusterManager.markerCollection 物件上設定自訂資訊視窗。最後,由於您希望叢集會隨著使用者平移和縮放地圖而變更,因此請為 googleMap 提供 OnCameraIdleListener,這樣攝影機閒置時就會叫用 clusterManager.onCameraIdle()。
- 請執行應用程式,查看新的分群商店!
9. 在地圖上繪圖
您已瞭解在地圖上繪製內容的一種方式 (新增標記),但 Maps SDK for Android 支援多種其他繪製方式,可在地圖上顯示實用資訊。
舉例來說,如要在地圖上顯示路線和區域,可以使用折線和多邊形。如要將圖片固定在地面上,可以使用區域疊加層。
在這項工作中,您將學習如何在輕觸標記時,在標記周圍繪製形狀 (具體來說是圓圈)。

新增點擊事件監聽器
一般來說,如要將點擊事件監聽器新增至標記,請透過 setOnMarkerClickListener() 直接在 GoogleMap 物件中傳入點擊事件監聽器。不過,由於您使用叢集功能,因此點擊事件監聽器必須提供給 ClusterManager。
- 在
MainActivity的addClusteredMarkers()方法中,請在呼叫cluster()後新增下列程式碼。
MainActivity.addClusteredMarkers()
// Show polygon
clusterManager.setOnClusterItemClickListener { item ->
   addCircle(googleMap, item)
   return@setOnClusterItemClickListener false
}
這個方法會新增監聽器並叫用 addCircle() 方法,您將在下一個步驟中定義這個方法。最後,這個方法會傳回 false,表示這個方法尚未取用該事件。
- 接下來,您需要在
MainActivity中定義屬性circle和方法addCircle()。
MainActivity.addCircle()
private var circle: Circle? = null

/**
* Adds a [Circle] around the provided [item]
*/
private fun addCircle(googleMap: GoogleMap, item: Place) {
   circle?.remove()
   circle = googleMap.addCircle(
       CircleOptions()
           .center(item.latLng)
           .radius(1000.0)
           .fillColor(ContextCompat.getColor(this, R.color.colorPrimaryTranslucent))
           .strokeColor(ContextCompat.getColor(this, R.color.colorPrimary))
   )
}
系統會設定 circle 屬性,以便在輕觸新標記時移除先前的圓圈,並新增圓圈。請注意,新增圓圈的 API 與新增標記的 API 非常相似。
- 現在請執行應用程式,查看變更。
10. 攝影機控制
最後一項工作是查看攝影機控制選項,以便將畫面焦點放在特定區域。
攝影機和檢視畫面
如果您在執行應用程式時發現,相機顯示的是非洲大陸,而且您必須費力平移和縮放才能找到新增的標記,雖然這是不錯的探索世界方式,但如果想立即顯示標記,就不適合使用這項功能。
為此,您可以透過程式輔助設定攝影機位置,將畫面中心對準所需位置。
- 請繼續將下列程式碼新增至
getMapAsync()呼叫,調整攝影機檢視畫面,以便在應用程式啟動時初始化為舊金山。
MainActivity.onCreate()
mapFragment?.getMapAsync { googleMap ->
   // Ensure all places are visible in the map.
   googleMap.setOnMapLoadedCallback {
       val bounds = LatLngBounds.builder()
       places.forEach { bounds.include(it.latLng) }
       googleMap.moveCamera(CameraUpdateFactory.newLatLngBounds(bounds.build(), 20))
   }
}
首先,系統會呼叫 setOnMapLoadedCallback(),確保攝影機更新作業只會在載入地圖後執行。這是必要步驟,因為必須先計算地圖屬性 (例如維度),才能發出攝影機更新呼叫。
在 lambda 中,系統會建構新的 LatLngBounds 物件,定義地圖上的矩形區域。這會逐步建構,方法是納入所有地點的 LatLng 值,確保所有地點都在界線內。建構這個物件後,系統會叫用 GoogleMap 上的 moveCamera() 方法,並透過 CameraUpdateFactory.newLatLngBounds(bounds.build(), 20) 提供 CameraUpdate。
- 執行應用程式,並注意攝影機現在已在舊金山初始化。
監聽攝影機變更
除了修改攝影機位置,您也可以在使用者移動地圖時,監聽攝影機更新。如果想在攝影機移動時修改 UI,這項功能就非常實用。
為了好玩,您修改了程式碼,讓標記在攝影機移動時變成半透明。
- 在
addClusteredMarkers()方法中,繼續在方法底部新增下列程式碼:
MainActivity.addClusteredMarkers()
// When the camera starts moving, change the alpha value of the marker to translucent.
googleMap.setOnCameraMoveStartedListener {
   clusterManager.markerCollection.markers.forEach { it.alpha = 0.3f }
   clusterManager.clusterMarkerCollection.markers.forEach { it.alpha = 0.3f }
}
這會新增 OnCameraMoveStartedListener,因此每當攝影機開始移動時,所有標記 (叢集和標記) 的 Alpha 值都會修改為 0.3f,讓標記呈現半透明狀態。
- 最後,如要讓半透明標記在攝影機停止時恢復不透明,請將
addClusteredMarkers()方法中的setOnCameraIdleListener內容修改為下列內容:
MainActivity.addClusteredMarkers()
googleMap.setOnCameraIdleListener {
   // When the camera stops moving, change the alpha value back to opaque.
   clusterManager.markerCollection.markers.forEach { it.alpha = 1.0f }
   clusterManager.clusterMarkerCollection.markers.forEach { it.alpha = 1.0f }

   // Call clusterManager.onCameraIdle() when the camera stops moving so that reclustering
   // can be performed when the camera stops moving.
   clusterManager.onCameraIdle()
}
- 請執行應用程式,看看結果如何!
11. Maps KTX
如果 Kotlin 應用程式使用一或多個 Google 地圖平台 Android SDK,您可以運用 Kotlin 擴充功能或 KTX 程式庫,充分利用 Kotlin 語言功能,例如協同程式、擴充屬性/函式等。每個 Google 地圖 SDK 都有對應的 KTX 程式庫,如下所示:

在這項工作中,您會將 Maps KTX 和 Maps Utils KTX 程式庫新增至應用程式,並重構先前工作的實作項目,以便在應用程式中使用 Kotlin 專屬語言功能。
- 在應用程式層級的 build.gradle 檔案中加入 KTX 依附元件
由於應用程式同時使用 Maps SDK for Android 和 Maps SDK for Android 公用程式庫,因此您需要為這些程式庫加入對應的 KTX 程式庫。您也會在本工作中使用 AndroidX Lifecycle KTX 程式庫中的功能,因此請在應用程式層級的 build.gradle 檔案中加入該依附元件。
build.gradle
dependencies {
    // ...

    // Maps SDK for Android KTX Library
    implementation 'com.google.maps.android:maps-ktx:3.0.0'

    // Maps SDK for Android Utility Library KTX Library
    implementation 'com.google.maps.android:maps-utils-ktx:3.0.0'

    // Lifecycle Runtime KTX Library
    implementation 'androidx.lifecycle:lifecycle-runtime-ktx:2.3.1'
}
- 使用 GoogleMap.addMarker() 和 GoogleMap.addCircle() 擴充功能函式
Maps KTX 程式庫提供 DSL 樣式的 API,可替代先前步驟中使用的 GoogleMap.addMarker(MarkerOptions) 和 GoogleMap.addCircle(CircleOptions)。如要使用上述 API,必須建構含有標記或圓圈選項的類別,但使用 KTX 替代方案時,您可以在提供的 lambda 中設定標記或圓圈選項。
如要使用這些 API,請更新 MainActivity.addMarkers(GoogleMap) 和 MainActivity.addCircle(GoogleMap) 方法:
MainActivity.addMarkers(GoogleMap)
/**
 * Adds markers to the map. These markers won't be clustered.
 */
private fun addMarkers(googleMap: GoogleMap) {
    places.forEach { place ->
        val marker = googleMap.addMarker {
            title(place.name)
            position(place.latLng)
            icon(bicycleIcon)
        }
        // Set place as the tag on the marker object so it can be referenced within
        // MarkerInfoWindowAdapter
        marker.tag = place
    }
}
MainActivity.addCircle(GoogleMap)
/**
 * Adds a [Circle] around the provided [item]
 */
private fun addCircle(googleMap: GoogleMap, item: Place) {
    circle?.remove()
    circle = googleMap.addCircle {
        center(item.latLng)
        radius(1000.0)
        fillColor(ContextCompat.getColor(this@MainActivity, R.color.colorPrimaryTranslucent))
        strokeColor(ContextCompat.getColor(this@MainActivity, R.color.colorPrimary))
    }
}
以這種方式重新編寫上述方法,可讓程式碼更簡潔易讀,而這要歸功於 Kotlin 的具有接收端的函式常值。
- 使用 SupportMapFragment.awaitMap() 和 GoogleMap.awaitMapLoad() 擴充功能暫停函式
Maps KTX 程式庫也提供暫停函式擴充功能,可在協同程式中使用。具體來說,SupportMapFragment.getMapAsync(OnMapReadyCallback) 和 GoogleMap.setOnMapLoadedCallback(OnMapLoadedCallback) 都有暫停函式替代方案。使用這些替代 API 時,您不必傳遞回呼,而是能以序列和同步方式接收這些方法的回應。
由於這些方法是暫停函式,因此必須在協同程式中使用。生命週期執行階段 KTX 程式庫提供擴充功能,可提供生命週期感知協同程式範圍,確保協同程式在適當的生命週期事件中執行及停止。
結合這些概念,更新 MainActivity.onCreate(Bundle) 方法:
MainActivity.onCreate(Bundle)
override fun onCreate(savedInstanceState: Bundle?) {
    super.onCreate(savedInstanceState)
    setContentView(R.layout.activity_main)
    val mapFragment =
        supportFragmentManager.findFragmentById(R.id.map_fragment) as SupportMapFragment
    lifecycleScope.launchWhenCreated {
        // Get map
        val googleMap = mapFragment.awaitMap()

        // Wait for map to finish loading
        googleMap.awaitMapLoad()

        // Ensure all places are visible in the map
        val bounds = LatLngBounds.builder()
        places.forEach { bounds.include(it.latLng) }
        googleMap.moveCamera(CameraUpdateFactory.newLatLngBounds(bounds.build(), 20))

        addClusteredMarkers(googleMap)
    }
}
當活動至少處於已建立狀態時,lifecycleScope.launchWhenCreated 協同程式範圍就會執行該區塊。另請注意,擷取 GoogleMap 物件的呼叫,以及等待地圖完成載入的呼叫,已分別替換為 SupportMapFragment.awaitMap() 和 GoogleMap.awaitMapLoad()。使用這些暫停函式重構程式碼,即可依序撰寫對等的以回呼為基礎的程式碼。
- 請使用重構的變更重新建構應用程式!
12. 恭喜
恭喜!您已瞭解許多內容,希望您對 Maps SDK for Android 提供的核心功能有更深入的認識。
瞭解詳情
- Places SDK for Android:探索豐富的地點資料,發掘附近的商家。
- android-maps-ktx:開放原始碼程式庫,可讓您以 Kotlin 友善的方式整合 Maps SDK for Android 和 Maps SDK for Android 公用程式庫。
- android-place-ktx:開放原始碼程式庫,可讓您以 Kotlin 友善的方式整合 Places SDK for Android。
- android-samples:GitHub 上的程式碼範例,說明本程式碼研究室涵蓋的所有功能,以及更多內容。
- 更多 Kotlin 程式碼研究室,協助您使用 Google 地圖平台建構 Android 應用程式