
1. Before you begin
Typing out code is a great way to build muscle memory and deepen your understanding of the material. While copy-pasting can be a time-saver, investing in this practice can lead to greater efficiency and stronger coding skills in the long run.
In this codelab, you'll learn how to build a C++ image segmentation binary that runs directly on an Android device using Google's high-performance on-device runtime, LiteRT. Instead of using Kotlin or Android Studio, this codelab focuses on building a C++ binary. You will cross-compile it with CMake or Bazel and deploy it using ADB. The same LiteRT C++ API works on any platform (Android, Linux, embedded), making this a useful foundation for performance-critical applications, robotics, and edge systems.
You will walk through the full pipeline:
- Setting up the build environment (CMake + Android NDK or Bazel).
- Linking the LiteRT C++ SDK — either from a prebuilt release or from source.
- Using OpenGL ES compute shaders for GPU-accelerated image pre- and post-processing.
- Running the
selfie_multiclasssegmentation model with the LiteRT C++ API. - Accelerating inference on CPU, GPU (OpenCL), and NPU (Qualcomm / MediaTek).
- Postprocessing the raw model output into a color-blended segmentation image.
- Deploying to a physical Android device with ADB and retrieving the result.
In the end, you'll produce something similar to the following image — a static image processed through the full pipeline, with each of the 6 segmentation classes overlaid in a distinct color:

Prerequisites
This codelab is designed for developers comfortable with C++ who want to gain experience running machine learning models on Android at the C++ layer. You should be familiar with:
- C++ fundamentals (pointers, vectors, includes).
- Basic Android/ADB concepts (
adb push,adb shell). - Using a terminal and shell scripts on Linux or macOS.
What you'll learn
- How to cross-compile a C++ binary for Android
arm64-v8awith CMake + NDK or Bazel. - How to use the LiteRT C++ API (
Environment,CompiledModel,TensorBuffer) for efficient on-device inference. - How OpenGL ES 3.1 compute shaders accelerate pre- and post-processing entirely on the GPU.
- How to configure LiteRT for CPU, GPU (OpenCL), and NPU (Qualcomm HTP, MediaTek APU, Google Tensor) acceleration.
- The difference between synchronous (
Run) and asynchronous (RunAsync) inference. - How to deploy and run a C++ binary on Android using ADB.
What you'll need
- A Linux or macOS machine (Windows users should use WSL2).
- Android NDK r25c or later (download).
- For CMake path: CMake ≥ 3.22 (
sudo apt-get install cmake). - For Bazel path: Bazel installed, plus the full LiteRT samples repository.
- ADB in your
PATH(Android Platform Tools). - A physical Android device — best tested on Galaxy S24/S25 or Pixel.
2. Image Segmentation
Image segmentation is a computer vision task that assigns a class label to every pixel in an image. Unlike object detection, which draws a bounding box, segmentation produces a precise, pixel-perfect understanding of where each object begins and ends.
This codelab uses the selfie_multiclass_256x256 model, which classifies each pixel into one of 6 classes:
Class index | Segment |
0 | Background |
1 | Hair |
2 | Body skin |
3 | Face skin |
4 | Clothes |
5 | Accessories (glasses, jewelry, etc.) |
The model outputs a float tensor of shape [1, 256, 256, 6]. For each of the 256×256 pixels, there are 6 confidence scores — one per class. The class with the highest score wins that pixel (argmax).
LiteRT: Performance at the Edge
LiteRT is Google's next-generation, high-performance runtime for TFLite models. Its C++ API gives you direct, low-overhead access to hardware accelerators with a consistent interface across all three:
- CPU — universally compatible; ~128 ms inference on a mid-range device.
- GPU (OpenCL) — ~1 ms inference; ~17–43 ms end-to-end depending on the buffer strategy.
- NPU — ~9–28 ms end-to-end on Qualcomm Snapdragon, MediaTek Dimensity 9400, and Google Tensor devices, depending on AOT versus. JIT compilation.
The key abstraction is CompiledModel: the model is pre-compiled and optimized for the target hardware at load time, reducing inference to a Run() call on pre-allocated buffers.
3. Get set up
Clone the repository
git clone https://github.com/google-ai-edge/litert-samples.git
All resources for this codelab are in:
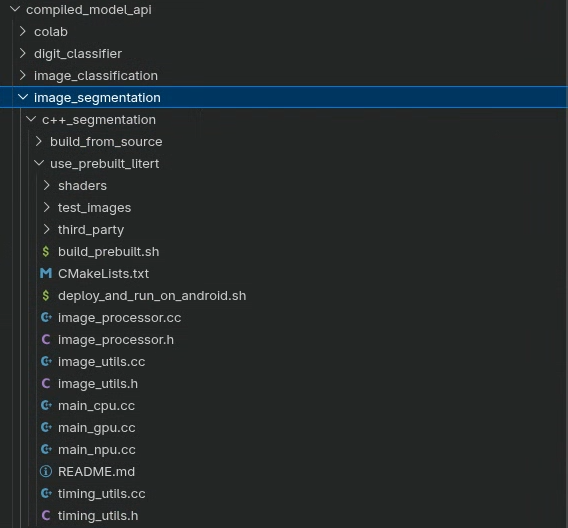
litert-samples/compiled_model_api/image_segmentation/c++_segmentation/
This directory has two sub-projects, each a complete build of the same sample:
Directory | Build system | LiteRT dependency |
| CMake + Android NDK | Prebuilt |
| Bazel | Compiles LiteRT from source |
Choose one path and follow it. The code is identical between the two directories — only the build system and dependency strategy differ. If you want the fastest setup, choose use_prebuilt_litert/. If you need to modify LiteRT itself or work within an existing Bazel monorepo, use build_from_source/.
A note on file paths
All file paths in this tutorial use Linux/macOS format. Windows users should use WSL2.
Directory overview
Both sub-projects share the same source layout:
<variant>/
├── main_cpu.cc              # CPU inference entry point
├── main_gpu.cc              # GPU (OpenCL) inference entry point
├── main_npu.cc              # NPU (Qualcomm / MediaTek) entry point
├── image_processor.h/.cc    # OpenGL ES preprocessing and postprocessing
├── image_utils.h/.cc        # STB-based image load / save utilities
├── timing_utils.h/.cc       # Profiling helpers
├── shaders/                 # GLSL ES 3.1 compute shaders
│   ├── preprocess_compute.glsl
│   ├── resize_compute.glsl
│   ├── mask_blend_compute.glsl
│   ├── deinterleave_masks.glsl
│   └── passthrough_shader.vert
├── models/
│   ├── selfie_multiclass_256x256.tflite        (CPU / GPU / NPU JIT)
│   ├── selfie_multiclass_256x256_SM8650.tflite (Qualcomm S24 AOT)
│   └── selfie_multiclass_256x256_SM8750.tflite (Qualcomm S25 AOT)
└── test_images/
    └── image.jpeg
Additionally:
use_prebuilt_litert/addsCMakeLists.txt,build_prebuilt.sh,deploy_and_run_on_android.sh, andthird_party/stb/.build_from_source/adds a BazelBUILDfile and usesdeploy_and_run_on_android.shpointing atbazel-bin/.
4. Understand the project structure
Three entry points, one pipeline
main_cpu.cc, main_gpu.cc, and main_npu.cc each contain a main() function that drives the full segmentation pipeline. The pipeline is identical across all three; only the LiteRT accelerator configuration and buffer strategy differ:
File | Accelerator | Buffer strategy |
|
| CPU memory |
|
| CPU memory with OpenCL backend |
|
| CPU memory with CPU fallback |
All three share the same ImageProcessor (OpenGL ES compute shaders for preprocessing and postprocessing) and ImageUtils (STB image I/O) utilities.
The full pipeline
Every entry point follows the same five-phase structure:
Load → GPU upload → Preprocess (shader) → Inference (LiteRT) → Postprocess (shader) → Save
- Load —
ImageUtils::LoadImage()decodes the JPEG into CPU memory using the STB image library. - Upload —
processor.CreateOpenGLTexture()uploads the raw pixels to a GPU texture (OpenGL RGBA8). - Preprocess —
processor.PreprocessInputForSegmentation()runs a GLSL compute shader that resizes the texture to 256×256 and normalizes pixel values from[0, 1]to[-1, 1]. The result lands in a GPU SSBO. - Infer — SSBO data is written into a LiteRT
TensorBufferandcompiled_model.Run()(orRunAsync()) executes the model. - Postprocess — The model's 6-channel float output is deinterleaved into 6 single-channel mask SSBOs, which are then color-blended back onto the original image.
- Save —
ImageUtils::SaveImage()writes the final RGBA image as PNG.
5. Core LiteRT C++ APIs
Before building, familiarize yourself with the three key LiteRT C++ types used across all entry points. All live in the litert:: namespace.
litert::Environment
The Environment is the root context for all LiteRT operations. Create it once and pass it to CompiledModel::Create. For NPU usage, configure it with the vendor plugin library directory.
// For CPU or GPU - no extra options needed
LITERT_ASSIGN_OR_ABORT(auto env, litert::Environment::Create({}));

// For NPU: point at the vendor dispatch library directory on the device
std::vector<litert::Environment::Option> opts;
opts.push_back({litert::Environment::OptionTag::DispatchLibraryDir,
                "/data/local/tmp/cpp_segmentation_android/npu/"});
LITERT_ASSIGN_OR_ABORT(auto env,
    litert::Environment::Create(std::move(opts)));
litert::CompiledModel
CompiledModel loads and pre-compiles your TFLite model for the requested hardware at construction time. Inference then reduces to filling buffers and calling Run().
// CPU
LITERT_ASSIGN_OR_ABORT(auto model,
    litert::CompiledModel::Create(env, model_path,
                                  litert::HwAccelerators::kCpu));

// GPU (pass an Options object with GpuOptions configured)
LITERT_ASSIGN_OR_ABORT(auto model,
    litert::CompiledModel::Create(env, model_path, gpu_options));

// NPU (pass an Options object with kNpu | kCpu and vendor options)
LITERT_ASSIGN_OR_ABORT(auto model,
    litert::CompiledModel::Create(env, model_path, npu_options));
litert::TensorBuffer
Tensor buffers hold input/output data. Always create them from the CompiledModel so they are correctly sized and aligned for the target hardware.
LITERT_ASSIGN_OR_ABORT(auto input_buffers,
                       compiled_model.CreateInputBuffers());
LITERT_ASSIGN_OR_ABORT(auto output_buffers,
                       compiled_model.CreateOutputBuffers());

// Write preprocessed float data, run, read results
LITERT_ABORT_IF_ERROR(
    input_buffers[0].Write(absl::MakeConstSpan(preprocessed_data)));
LITERT_ABORT_IF_ERROR(
    compiled_model.Run(input_buffers, output_buffers));
LITERT_ABORT_IF_ERROR(
    output_buffers[0].Read(absl::MakeSpan(output_data)));
Error-handling macros
Macro | Behavior |
| Assigns or calls |
| Calls |
| Assigns or propagates error to caller |
6. Build — Option A: Prebuilt LiteRT C++ SDK (CMake)
This is the recommended path if you don't need to modify LiteRT itself. The build script handles downloading the SDK headers, copying your .so, fetching STB, and invoking CMake + NDK in a single command.
Step 1 — Get libLiteRt.so from Maven
LiteRT ships its runtime as a shared library inside an Android AAR on Google Maven. Download it and extract the arm64-v8a .so:
# Download the AAR
wget -O litert.aar \
    "https://dl.google.com/dl/android/maven2/com/google/ai/edge/litert/litert/2.1.3/litert-2.1.3.aar"

# Extract the runtime library
unzip litert.aar "jni/arm64-v8a/libLiteRt.so" -d extracted/
For GPU support, also extract the OpenCL/GL accelerator:
unzip litert.aar "jni/arm64-v8a/libLiteRtClGlAccelerator.so" -d extracted/

Step 2 — Run build_prebuilt.sh
cd litert-samples/compiled_model_api/image_segmentation/c++_segmentation/use_prebuilt_litert/

bash build_prebuilt.sh \
    --litert_version=2.1.3 \
    --ndk_path=/path/to/android-ndk \
    --litert_so=extracted/jni/arm64-v8a/libLiteRt.so
The script will:
- Download
litert_cc_sdk.zip(SDK headers + cmake files) from the LiteRT GitHub release — skipped on subsequent runs if already present. - Copy
libLiteRt.sointolitert_cc_sdk/. - Download STB image headers into
third_party/stb/— skipped if present. - Configure and build with CMake using the Android NDK toolchain for
arm64-v8aatandroid-26.
On success you will see three binaries in build/:
build/cpp_segmentation_cpu
build/cpp_segmentation_gpu
build/cpp_segmentation_npu

What CMakeLists.txt does
Open CMakeLists.txt. It requires C++20, pulls in the LiteRT SDK via add_subdirectory, links OpenGL ES 3 (GLESv3) and EGL, then uses a helper macro to create each binary from its main_*.cc source:
macro(add_segmentation_target target_name main_source)
  add_executable(${target_name} ${main_source})
  target_link_libraries(${target_name}
    PRIVATE
      image_processor image_utils timing_utils litert_cc_api
      absl::log absl::check EGL GLESv3 android log
  )
endmacro()

add_segmentation_target(cpp_segmentation_cpu main_cpu.cc)
add_segmentation_target(cpp_segmentation_gpu main_gpu.cc)
add_segmentation_target(cpp_segmentation_npu main_npu.cc)
7. Build — Option B: Build with Bazel (From Source)
Choose this path if you prefer Bazel as your build system, which compiles the LiteRT runtime from source, or if you need to work within an existing Bazel workspace.
Prerequisites
In addition to the NDK and ADB listed in the "Before you begin" section, you will need:
- Bazel installed and on your
PATH. - A full clone of the LiteRT samples source repository.
Step 1 — Configure the LiteRT samples workspace
All commands run from the root of the LiteRT samples repository
cd /path/to/litert-samples
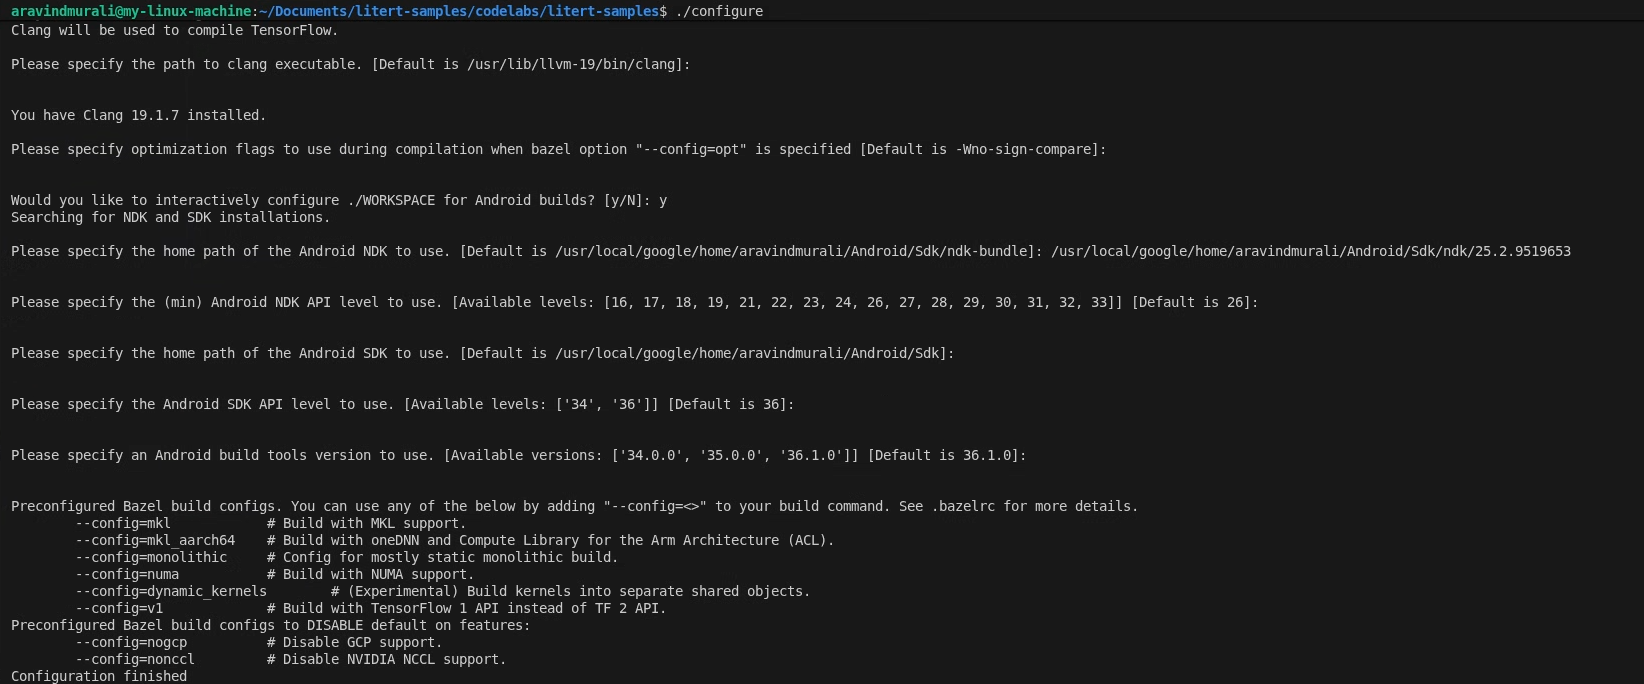
./configure
When prompted:
- Accept defaults for Python and Python lib path.
- Answer N to ROCm and CUDA support.
- Select clang (tested with 18.1.3) as the compiler.
- Accept default optimization flags.
- Answer Y to configure the WORKSPACE for Android builds.
- Set minimum Android NDK level to at least 26.
- Provide the path to your Android SDK.
- Set Android SDK API level to default (36) and build tools to 36.0.0.
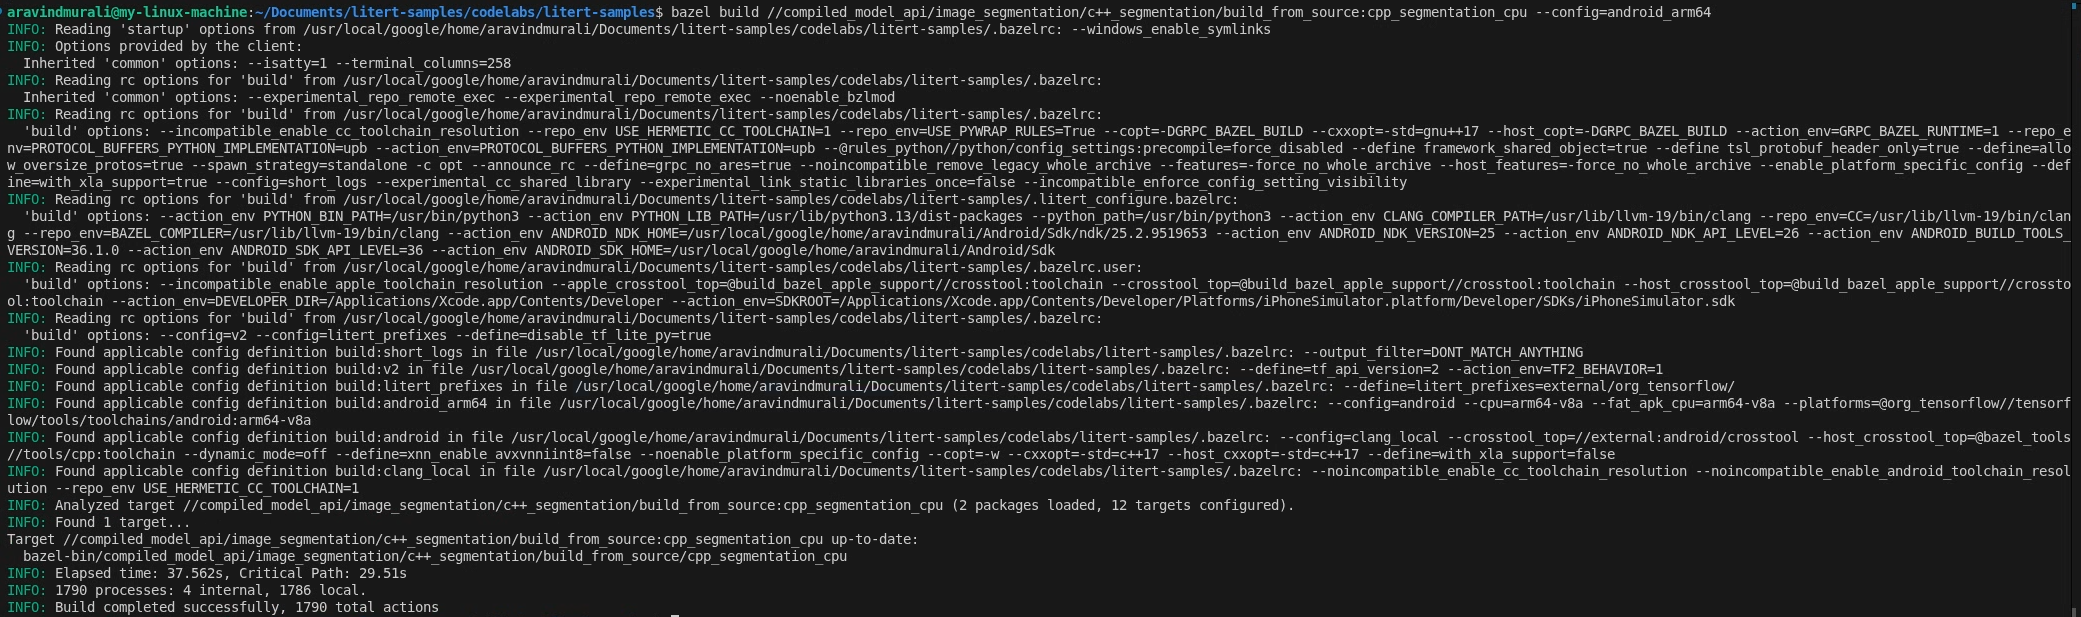
Step 2 — Build the CPU and GPU targets
# CPU
bazel build \
  //compiled_model_api/image_segmentation/c++_segmentation/build_from_source:cpp_segmentation_cpu \
  --config=android_arm64

# GPU
bazel build \
  //compiled_model_api/image_segmentation/c++_segmentation/build_from_source:cpp_segmentation_gpu \
  --config=android_arm64
Step 3 — Build the NPU target
Qualcomm HTP
- Download QAIRT SDK v2.41 or later and extract it.
- Ensure the extracted SDK contents are inside a subdirectory named
latest/:/path/to/qairt_sdk/ └── latest/ ├── include/ ├── lib/ └── ... - Build, passing the parent path ending with
/:bazel build \ //compiled_model_api/image_segmentation/c++_segmentation/build_from_source:cpp_segmentation_npu \ --config=android_arm64 \ --nocheck_visibility \ --action_env LITERT_QAIRT_SDK=/path/to/qairt_sdk/
The --nocheck_visibility flag is required because some upstream LiteRT targets have restricted visibility defaults.
MediaTek APU
No extra SDK is required. The NeuroPilot runtime is a system library on Dimensity 9400 devices.
bazel build \
  //compiled_model_api/image_segmentation/c++_segmentation/build_from_source:cpp_segmentation_npu_mtk \
  --config=android_arm64 \
  --nocheck_visibility
The BUILD file
Open build_from_source/BUILD. It defines four cc_binary targets — one per accelerator plus a dedicated MediaTek NPU target — each depending on the shared image_processor, image_utils, and timing_utils library targets:
cc_binary(
    name = "cpp_segmentation_cpu",
    srcs = ["main_cpu.cc"],
    deps = [
        ":image_processor",
        ":image_utils",
        ":timing_utils",
        "@litert_archive//litert/cc:litert_api_with_dynamic_runtime",
        "@com_google_absl//absl/time",
        "@com_google_absl//absl/types:span",
    ] + gles_deps() + gl_native_deps(),
    ...
)
The GPU target adds libLiteRtClGlAccelerator.so as a data dependency so Bazel includes it in the runfiles. The NPU targets add vendor dispatch and compiler plugin .so files as data dependencies.
8. GPU-Accelerated Preprocessing with Compute Shaders
All three entry points use the same OpenGL ES compute shader pipeline for preprocessing. Understanding it is key to understanding why the GPU path is so much faster than the CPU path.
Set up a headless EGL context
ImageProcessor::InitializeGL() creates a headless EGL context — an OpenGL context with no window or display attached. This is standard practice for off-screen GPU compute on Android. It then compiles the five GLSL compute shader programs from disk:
processor.InitializeGL(
    "shaders/passthrough_shader.vert",
    "shaders/mask_blend_compute.glsl",
    "shaders/resize_compute.glsl",
    "shaders/preprocess_compute.glsl",
    "shaders/deinterleave_masks.glsl");
Upload the input image to the GPU
The JPEG is decoded into CPU memory by ImageUtils::LoadImage() (via the STB library), then uploaded to a GPU texture:
auto img_data_cpu = ImageUtils::LoadImage(
    input_file, width_orig, height_orig, channels_file, /*desired=*/3);

GLuint tex_id_orig = processor.CreateOpenGLTexture(
    img_data_cpu, width_orig, height_orig, loaded_channels);

ImageUtils::FreeImageData(img_data_cpu);  // CPU copy no longer needed
From this point the original image lives in GPU memory as an OpenGL texture.
The preprocess compute shader
shaders/preprocess_compute.glsl dispatches 8×8 thread groups across the 256×256 output grid. Each thread handles one output pixel: it samples the input texture using bilinear filtering (hardware resize for free), converts the [0, 1] RGB value to [-1, 1], and writes to the output SSBO:
vec2 uv = vec2(float(pos.x) / float(out_width - 1),
               float(pos.y) / float(out_height - 1));
vec4 color_0_1 = texture(inputTexture, uv);
vec3 color_neg1_1 = (color_0_1.rgb * 2.0) - 1.0;

int base = (pos.y * out_width + pos.x) * num_channels;
preprocessed_output.data[base + 0] = color_neg1_1.r;
preprocessed_output.data[base + 1] = color_neg1_1.g;
preprocessed_output.data[base + 2] = color_neg1_1.b;
For the standard (non-zero-copy) path, this SSBO is then read back to CPU and written into the LiteRT tensor:
std::vector<float> preprocessed(256 * 256 * num_channels);
processor.ReadBufferData(preprocessed_buffer_id, 0,
                         preprocessed.size() * sizeof(float),
                         preprocessed.data());
LITERT_ABORT_IF_ERROR(
    input_buffers[0].Write(absl::MakeConstSpan(preprocessed)));
9. CPU Inference
Open main_cpu.cc. The LiteRT setup is three lines:
// Create the root environment
LITERT_ASSIGN_OR_ABORT(auto env, litert::Environment::Create({}));

// Compile the model for the CPU
LITERT_ASSIGN_OR_ABORT(auto compiled_model,
    litert::CompiledModel::Create(
        env, model_path, litert::HwAccelerators::kCpu));

// Allocate input and output tensor buffers
LITERT_ASSIGN_OR_ABORT(auto input_buffers,
                       compiled_model.CreateInputBuffers());
LITERT_ASSIGN_OR_ABORT(auto output_buffers,
                       compiled_model.CreateOutputBuffers());
After preprocessing, inference is a single synchronous call:
LITERT_ABORT_IF_ERROR(compiled_model.Run(input_buffers, output_buffers));
Run() blocks until inference is complete. The selfie_multiclass_256x256.tflite floating-point model runs on the ARM Cortex cores and typically takes ~116–128 ms on a mid-range device.
Binary usage:
cpp_segmentation_cpu <model_path> <input_image> <output_image>
10. GPU Inference (OpenCL)
Open main_gpu.cc. The GPU path introduces two concepts not present in the CPU path: litert::Options for configuring the GPU accelerator (with the OpenCL backend), and asynchronous execution.
Configure GPU options
litert::Options CreateGpuOptions() {
  LITERT_ASSIGN_OR_ABORT(litert::Options options, litert::Options::Create());
  LITERT_ASSIGN_OR_ABORT(auto& gpu_options, options.GetGpuOptions());

  LITERT_ABORT_IF_ERROR(
      gpu_options.SetBackend(litert::GpuOptions::Backend::kOpenCl));

  // Allow CPU fallback for any ops not supported by the GPU delegate
  options.SetHardwareAccelerators(litert::HwAccelerators::kGpu |
                                  litert::HwAccelerators::kCpu);
  return options;
}
Asynchronous inference
The GPU path uses RunAsync() instead of Run(). This submits work to the GPU command queue and returns immediately. You then synchronize before reading results:
bool async = false;
LITERT_ABORT_IF_ERROR(
    compiled_model.RunAsync(0, input_buffers, output_buffers, async));

if (output_buffers[0].HasEvent()) {
  LITERT_ASSIGN_OR_ABORT(auto event, output_buffers[0].GetEvent());
  event.Wait();
}
This non-blocking design lets you overlap CPU work with GPU execution in a real-time pipeline.
Binary usage:
cpp_segmentation_gpu <model_path> <input_image> <output_image>
11. Postprocess — Deinterleave and Blend
After Run() or RunAsync() completes, output_buffers[0] holds a flat float array of shape [256 × 256 × 6] in interleaved order. The 6 class scores for pixel (row, col) are at indexes (row * 256 + col) * 6 through (row * 256 + col) * 6 + 5.
Deinterleave into 6 mask SSBOs
A CPU helper splits the interleaved array into 6 single-channel float arrays and uploads each to its own GPU SSBO:
std::vector<float> data(256 * 256 * 6);
output_buffers[0].Read(absl::MakeSpan(data));

std::vector<GLuint> mask_ids(6);
for (int i = 0; i < 6; ++i)
  mask_ids[i] = processor.CreateOpenGLBuffer(nullptr, 256 * 256 * sizeof(float));

processor.DeinterleaveMasksCpu(data.data(), 256, 256, mask_ids);
Color-blend masks onto the original image
processor.ApplyColoredMasks() runs the mask_blend_compute.glsl shader. For each output pixel it finds the class with the highest score (argmax across the 6 mask SSBOs) and alpha-composites the corresponding color over the original image pixel. The six colors are defined in each entry point:
std::vector<RGBAColor> mask_colors = {
    {1.0f, 0.0f, 0.0f, 0.1f},  // red     - background
    {0.0f, 1.0f, 0.0f, 0.1f},  // green   - hair
    {0.0f, 0.0f, 1.0f, 0.1f},  // blue    - body skin
    {1.0f, 1.0f, 0.0f, 0.1f},  // yellow  - face skin
    {1.0f, 0.0f, 1.0f, 0.1f},  // magenta - clothes
    {0.0f, 1.0f, 1.0f, 0.1f},  // cyan    - accessories
};
The alpha of 0.1f keeps the tint subtle so the original image remains visible.
Save the output
The final blended RGBA float SSBO is read back, clamped to [0, 1], converted to unsigned char, and saved as PNG:
for (size_t i = 0; i < float_data.size(); ++i)
  uchar_data[i] = static_cast<unsigned char>(
      std::max(0.0f, std::min(1.0f, float_data[i])) * 255.0f);
ImageUtils::SaveImage(output_file, width, height, 4, uchar_data.data());
12. Deploy and Run on Device
Connect your Android device using USB and verify ADB connectivity:
adb devices

Use deploy_and_run_on_android.sh
Each variant has its own deploy script. The CMake variant points at the build/ directory; the Bazel variant points at bazel-bin/. Both scripts:
- Create
/data/local/tmp/cpp_segmentation_android/on the device. - Push the binary, GLSL shaders, model, test image, and runtime
.sofiles. - Run inference using
adb shell. - Pull
output_segmented.pngback to your machine.
CMake variant (use_prebuilt_litert/)
# CPU
./deploy_and_run_on_android.sh --accelerator=cpu --phone=s25 build/

# GPU
./deploy_and_run_on_android.sh --accelerator=gpu --phone=s25 build/
Bazel variant (build_from_source/)
Run these commands from the LiteRT samples repo root:
# CPU
./compiled_model_api/image_segmentation/c++_segmentation/build_from_source/deploy_and_run_on_android.sh \
    --accelerator=cpu --phone=s25 bazel-bin/

# GPU
./compiled_model_api/image_segmentation/c++_segmentation/build_from_source/deploy_and_run_on_android.sh \
    --accelerator=gpu --phone=s25 bazel-bin/
The --phone flag controls which device-specific model and vendor libraries are used. Supported values: s24 (Snapdragon 8 Gen 3), s25 (Snapdragon 8 Elite), dim9400 (MediaTek Dimensity 9400), pixel8 (Tensor G3), pixel9 (Tensor G4), pixel10 (Tensor G5), and pixel11 (Tensor G6).
Inference Timing
After inference, PrintTiming() prints a full profiling breakdown:
Load image:    X ms
Preprocess:    X ms
Inference:     X ms
Postprocess:   X ms
E2E:           X ms
Save image:    X ms
Reference performance on Samsung S25 Ultra (Snapdragon 8 Elite):
Accelerator | Execution type | Inference | E2E |
CPU | Sync | ~116–128 ms | ~157 ms |
GPU (OpenCL) | Async | ~0.95 ms | ~35–43 ms |
13. Advanced (Optional): NPU Inference
For maximum performance, LiteRT supports NPU acceleration using vendor-specific plugin libraries. The NPU path can achieve end-to-end latency as low as 9 ms.
Supported devices and modes
Chip | Device example | Mode | E2E |
Qualcomm SM8650 | Galaxy S24 | AOT | ~17 ms |
Qualcomm SM8750 | Galaxy S25 | AOT | ~17 ms |
Qualcomm (any) | — | JIT | ~28 ms |
MediaTek Dimensity 9400 | — | JIT | ~9 ms |
Google Tensor G3-G6 | Pixel 8-11 | AOT/JIT | Varies |
AOT (Ahead-of-Time) uses a device-specific pre-compiled model (e.g., selfie_multiclass_256x256_SM8650.tflite). These are the fastest option but are chip-specific.
JIT (Just-in-Time) uses the standard selfie_multiclass_256x256.tflite and compiles to the NPU at runtime — slower first run, chip-independent.
Extra prerequisites
Qualcomm HTP:
- QAIRT SDK v2.41+ (provides
libQnnHtp.so, stub or skel.sofiles). libLiteRtDispatch_Qualcomm.sofrom the LiteRT NPU runtime libraries release on GitHub.
MediaTek APU:
libLiteRtDispatch_MediaTek.sofrom the LiteRT NPU runtime libraries release.- NeuroPilot runtime (already a system library on Dimensity 9400 devices — nothing to push).
Google Tensor:
libLiteRtDispatch_GoogleTensor.sofrom the LiteRT NPU runtime libraries release.
NPU environment and options
main_npu.cc points the Environment at the vendor dispatch library directory on the device, then sets vendor-specific performance options:
// Configure LiteRT to find the dispatch library
std::vector<litert::Environment::Option> env_opts;
env_opts.push_back({litert::Environment::OptionTag::DispatchLibraryDir,
                    kQualcommDispatchDir});
LITERT_ASSIGN_OR_ABORT(auto env,
    litert::Environment::Create(std::move(env_opts)));

// Target NPU with CPU fallback
LITERT_ASSIGN_OR_ABORT(litert::Options options, litert::Options::Create());
options.SetHardwareAccelerators(litert::HwAccelerators::kNpu |
                                litert::HwAccelerators::kCpu);

// Qualcomm: burst performance mode
auto& qnn_opts = options.GetQualcommOptions();
qnn_opts.SetLogLevel(litert::qualcomm::QualcommOptions::LogLevel::kOff);
qnn_opts.SetHtpPerformanceMode(
    litert::qualcomm::QualcommOptions::HtpPerformanceMode::kBurst);

LITERT_ASSIGN_OR_ABORT(auto model,
    litert::CompiledModel::Create(env, model_path, options));
For MediaTek, replace the GetQualcommOptions() block:
// MediaTek: fast single-answer mode + low-latency hint
auto& mtk_opts = options.GetMediatekOptions();
mtk_opts.SetPerformanceMode(
    kLiteRtMediatekNeuronAdapterPerformanceModeNeuronPreferFastSingleAnswer);
mtk_opts.SetOptimizationHint(
    kLiteRtMediatekNeuronAdapterOptimizationHintLowLatency);
mtk_opts.SetNeronSDKVersionType(
    kLiteRtMediatekOptionsNeronSDKVersionTypeVersion8);
Deploy for NPU
CMake variant — Qualcomm S25 (AOT)
./deploy_and_run_on_android.sh \
    --accelerator=npu --phone=s25 \
    --host_npu_lib=/path/to/qairt/lib \
    --host_npu_dispatch_lib=/path/to/dir/with/libLiteRtDispatch_Qualcomm.so \
    build/
CMake variant — MediaTek Dimensity 9400 (JIT)
./deploy_and_run_on_android.sh \
    --accelerator=npu --phone=dim9400 --jit \
    --host_npu_dispatch_lib=/path/to/dir/with/libLiteRtDispatch_MediaTek.so \
    build/
Bazel variant — Qualcomm S25 (AOT)
./compiled_model_api/image_segmentation/c++_segmentation/build_from_source/deploy_and_run_on_android.sh \
    --accelerator=npu --phone=s25 bazel-bin/
Bazel variant — MediaTek Dimensity 9400 (JIT)
./compiled_model_api/image_segmentation/c++_segmentation/build_from_source/deploy_and_run_on_android.sh \
    --accelerator=npu --phone=dim9400 --jit bazel-bin/
Bazel variant — Google Tensor Pixel 9 (JIT)
./compiled_model_api/image_segmentation/c++_segmentation/build_from_source/deploy_and_run_on_android.sh \
    --accelerator=npu --phone=pixel9 --jit bazel-bin/
For the Bazel variant, QAIRT SDK libraries are picked up automatically from the bazel-bin runfiles tree when LITERT_QAIRT_SDK is set at build time. The CMake variant requires the --host_npu_lib flag to point at your extracted QAIRT SDK.
14. Congratulations!
You have successfully built and run a C++ image segmentation pipeline on Android using LiteRT. You've learned how to:
- Cross-compile a C++ binary for Android
arm64-v8awith CMake + NDK or Bazel. - Use the LiteRT C++ API (
Environment,CompiledModel,TensorBuffer) for efficient on-device inference. - Preprocess image data on the GPU with OpenGL ES 3.1 compute shaders.
- Run synchronous CPU inference, and asynchronous GPU (OpenCL) inference.
- Configure NPU acceleration for Qualcomm, MediaTek, and Google Tensor devices.
- Deploy and run a C++ binary on Android using ADB.
Next Steps
- Swap in a different TFLite model (e.g., depth estimation or pose detection).
- Integrate the C++ pipeline into an Android NDK app using JNI.
- Profile memory usage with the Android GPU Inspector alongside timing output.
- Explore model quantization to further reduce NPU inference latency.