
1. Before you begin
In this codelab, you learn how to run an object-detection inference from an Android app using TensorFlow Serving with REST and gRPC.
Prerequisites
- Basic knowledge of Android development with Java
- Basic knowledge of machine learning with TensorFlow, such as training and deployment
- Basic knowledge of terminals and Docker
What you'll learn
- How to find pretrained object detection models on TensorFlow Hub.
- How to build a simple Android app and make predictions with the downloaded object detection model through TensorFlow Serving (REST and gRPC).
- How to render the detection result in the UI.
What you'll need
- The latest version of Android Studio
- Docker
- Bash
2. Get set up
To download the code for this codelab:
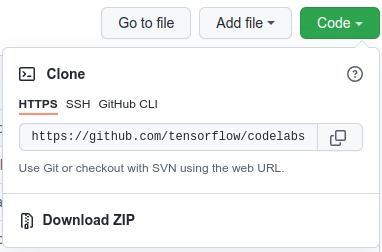
- Navigate to the GitHub repository for this codelab.
- Click Code > Download zip to download all the code for this codelab.
- Unzip the downloaded zip file to unpack a
codelabsroot folder with all of the resources you need.
For this codelab, you only need the files in the TFServing/ObjectDetectionAndroid subdirectory in the repository, which contains two folders:
- The
starterfolder contains the starter code that you build upon for this codelab. - The
finishedfolder contains the completed code for the finished sample app.
3. Add the dependencies to the project
Import the starter app into Android Studio
- In Android Studio, click File > New > Import project and then choose the
starterfolder from the source code that you downloaded earlier.
Add the dependencies for OkHttp and gRPC
- In the
app/build.gradlefile of your project, confirm the presence of the dependencies.
dependencies {
  // ...
    implementation 'com.squareup.okhttp3:okhttp:4.9.0'
    implementation 'javax.annotation:javax.annotation-api:1.3.2'
    implementation 'io.grpc:grpc-okhttp:1.29.0'
    implementation 'io.grpc:grpc-protobuf-lite:1.29.0'
    implementation 'io.grpc:grpc-stub:1.29.0'
}
Sync your project with Gradle files
- Select
 Sync Project with Gradle Files from the navigation menu.
4. Run the starter app
- Start the Android Emulator, and then click
 Run ‘app' in the navigation menu.
Run and explore the app
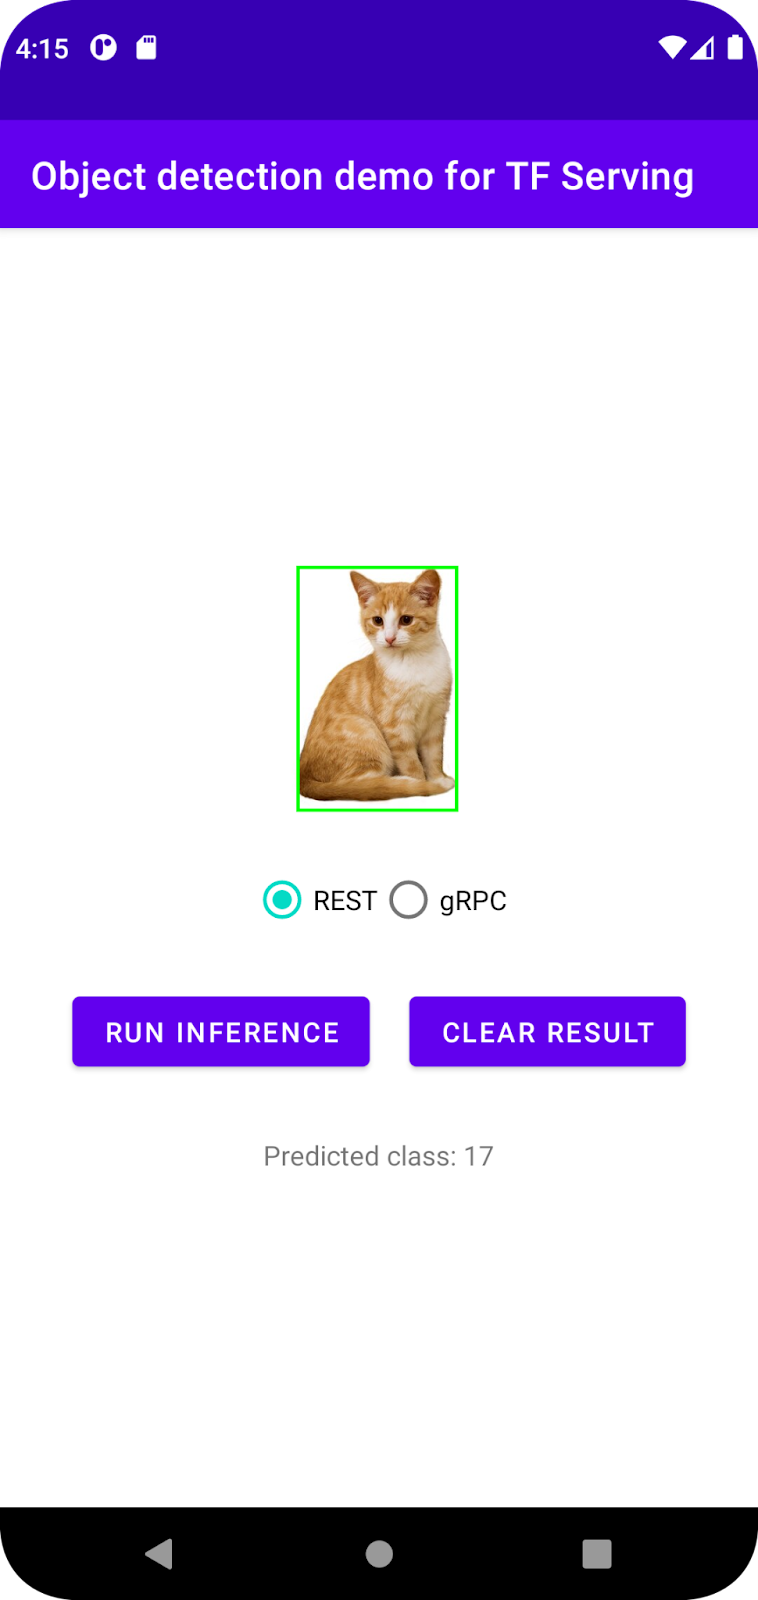
The app should launch on your Android device. The UI is pretty straightforward: there's a cat image in which you want to detect objects and the user can choose the way to send the data to the backend, with REST or gRPC. The backend performs object detection on the image and returns the detection results to the client app, which renders the UI again.
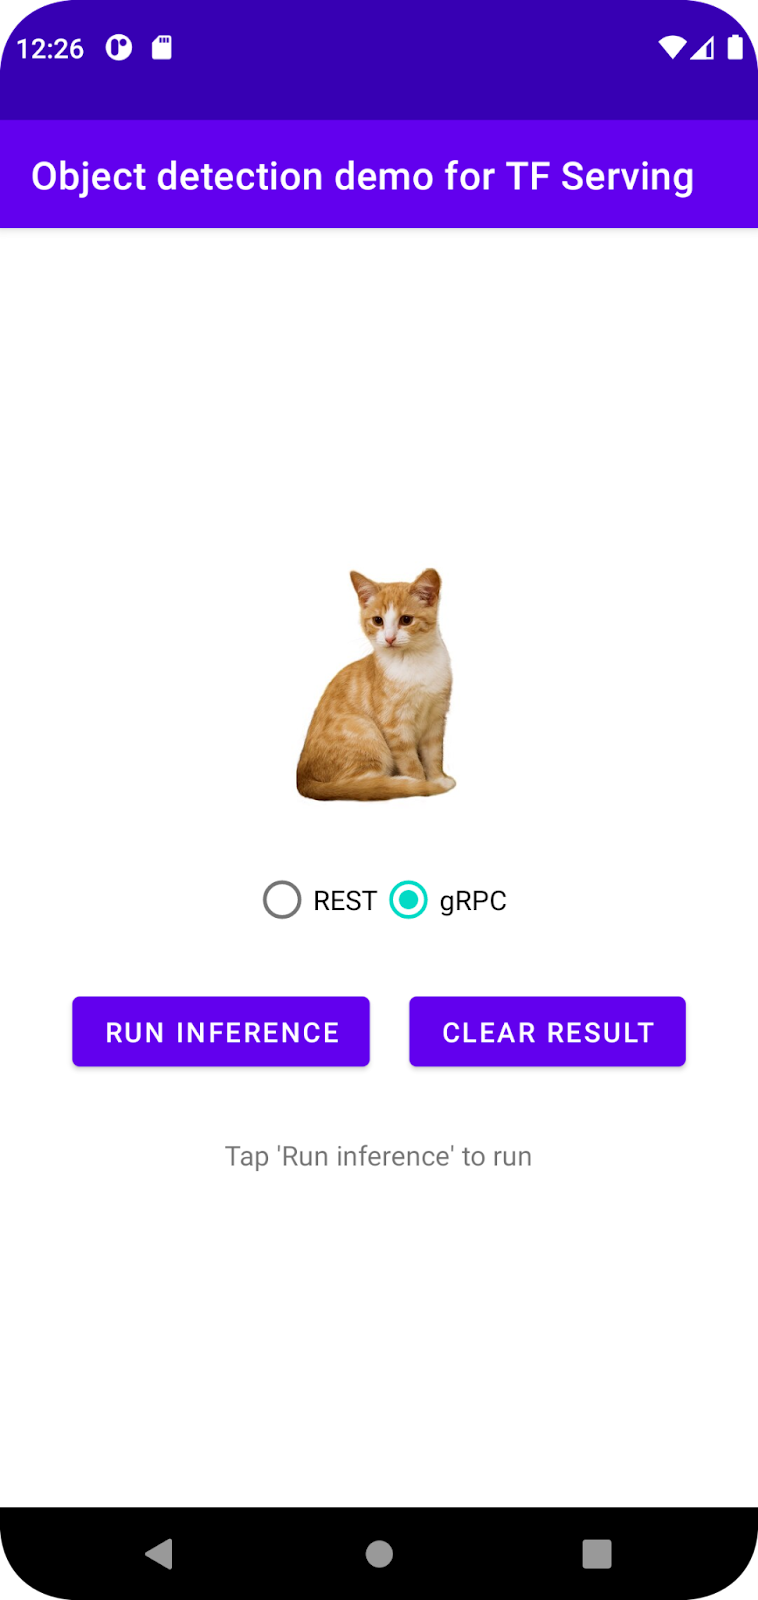
Right now, if you click Run inference, nothing happens. This is because it cannot communicate with the backend yet.
5. Deploy an object detection model with TensorFlow Serving
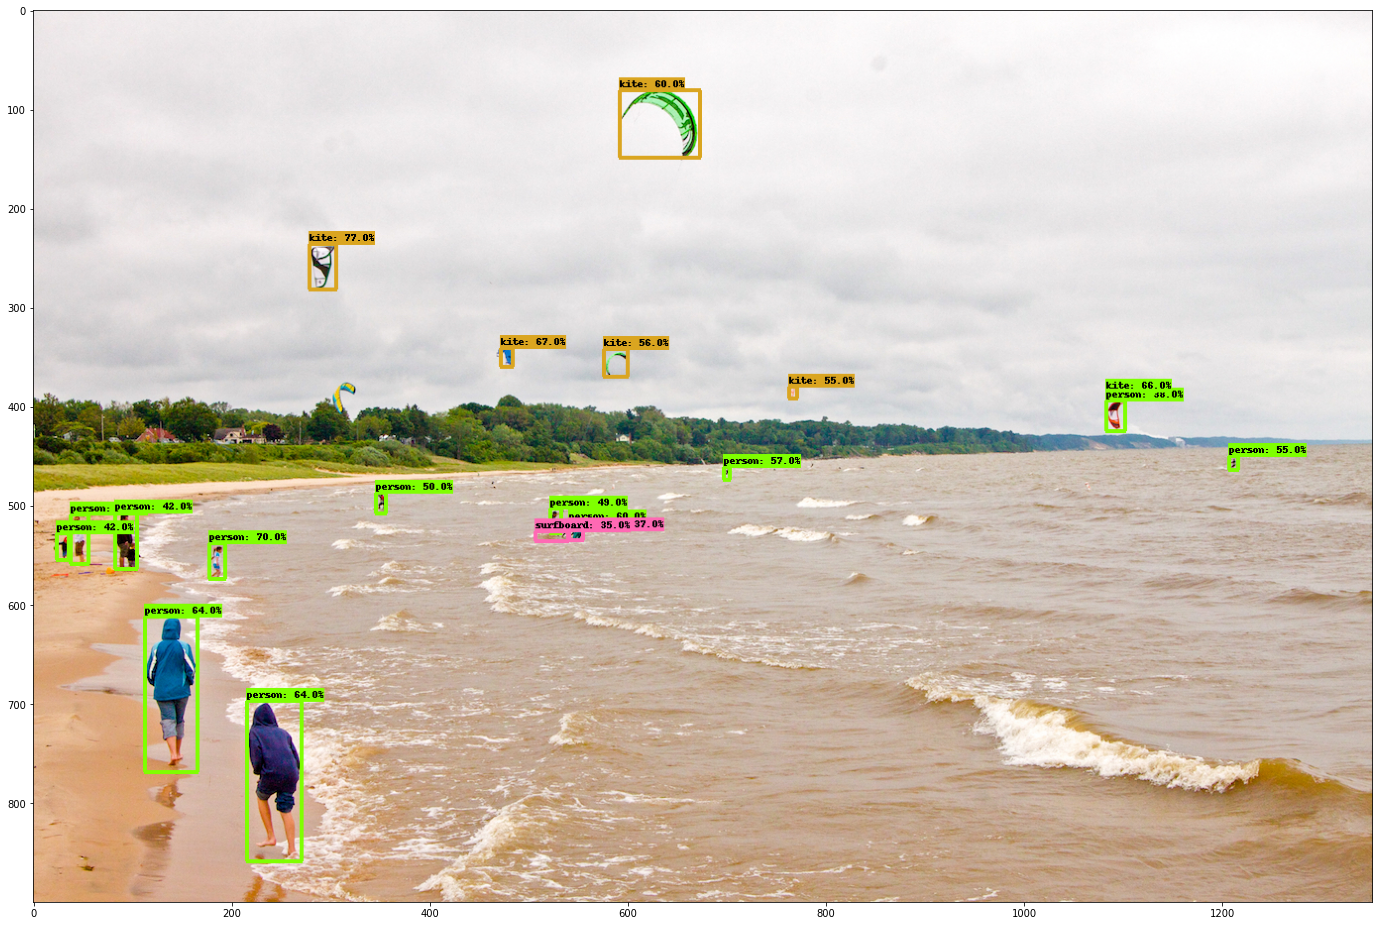
Object detection is a very common ML task and its goal is to detect objects within images, namely to predict possible categories of the objects and bounding boxes around them. Here's an example of a detection result:
Google has published a number of pretrained models on TensorFlow Hub. To see the complete list, visit the object_detection page. You use the relatively lightweight SSD MobileNet V2 FPNLite 320x320 model for this codelab so that you don't necessarily need to use a GPU to run it.
To deploy the object detection model with TensorFlow Serving:
- Download the model file.
- Uncompress the downloaded
.tar.gzfile with a decompression tool, such as 7-Zip. - Create a
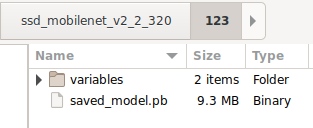
ssd_mobilenet_v2_2_320folder and then create a123subfolder inside it. - Put the extracted
variablesfolder andsaved_model.pbfile into the123subfolder.
You can refer to the ssd_mobilenet_v2_2_320 folder as the SavedModel folder. 123 is an example version number. If you'd like, you can pick another number.
The folder structure should look like this image:
Start TensorFlow Serving
- In your terminal, start TensorFlow Serving with Docker, but replace the
PATH/TO/SAVEDMODELplaceholder with the absolute path of thessd_mobilenet_v2_2_320folder on your computer.
docker pull tensorflow/serving

docker run -it --rm -p 8500:8500 -p 8501:8501 -v "PATH/TO/SAVEDMODEL:/models/ssd_mobilenet_v2_2" -e MODEL_NAME=ssd_mobilenet_v2_2 tensorflow/serving
Docker automatically downloads the TensorFlow Serving image first, which takes a minute. Afterward, TensorFlow Serving should start. The log should look like this code snippet:
2022-02-25 06:01:12.513231: I external/org_tensorflow/tensorflow/cc/saved_model/loader.cc:206] Restoring SavedModel bundle.
2022-02-25 06:01:12.585012: I external/org_tensorflow/tensorflow/core/platform/profile_utils/cpu_utils.cc:114] CPU Frequency: 3000000000 Hz
2022-02-25 06:01:13.395083: I external/org_tensorflow/tensorflow/cc/saved_model/loader.cc:190] Running initialization op on SavedModel bundle at path: /models/ssd_mobilenet_v2_2/123
2022-02-25 06:01:13.837562: I external/org_tensorflow/tensorflow/cc/saved_model/loader.cc:277] SavedModel load for tags { serve }; Status: success: OK. Took 1928700 microseconds.
2022-02-25 06:01:13.877848: I tensorflow_serving/servables/tensorflow/saved_model_warmup_util.cc:59] No warmup data file found at /models/ssd_mobilenet_v2_2/123/assets.extra/tf_serving_warmup_requests
2022-02-25 06:01:13.929844: I tensorflow_serving/core/loader_harness.cc:87] Successfully loaded servable version {name: ssd_mobilenet_v2_2 version: 123}
2022-02-25 06:01:13.985848: I tensorflow_serving/model_servers/server_core.cc:486] Finished adding/updating models
2022-02-25 06:01:13.985987: I tensorflow_serving/model_servers/server.cc:367] Profiler service is enabled
2022-02-25 06:01:13.988994: I tensorflow_serving/model_servers/server.cc:393] Running gRPC ModelServer at 0.0.0.0:8500 ...
[warn] getaddrinfo: address family for nodename not supported
2022-02-25 06:01:14.033872: I tensorflow_serving/model_servers/server.cc:414] Exporting HTTP/REST API at:localhost:8501 ...
[evhttp_server.cc : 245] NET_LOG: Entering the event loop ...
6. Connect the Android app with TensorFlow Serving through REST
The backend is ready now, so you can send client requests to TensorFlow Serving to detect objects within images. There are two ways to send requests to TensorFlow Serving:
- REST
- gRPC
Send requests and receive responses via REST
There are three simple steps:
- Create the REST request.
- Send the REST request to TensorFlow Serving.
- Extract the predicted result from the REST response and render the UI.
You will achieve these in MainActivity.java.
Create the REST request
Right now, there's an empty createRESTRequest() function in the MainActivity.java file. You implement this function to create a REST request.
private Request createRESTRequest() {
}
TensorFlow Serving expects a POST request that contains the image tensor for the SSD MobileNet model that you use, so you need to extract the RGB values from each pixel of the image into an array and then wrap the array in a JSON, which is the payload of the request.
- Add this code to the
createRESTRequest()function:
//Create the REST request.
int[] inputImg = new int[INPUT_IMG_HEIGHT * INPUT_IMG_WIDTH];
int[][][][] inputImgRGB = new int[1][INPUT_IMG_HEIGHT][INPUT_IMG_WIDTH][3];
inputImgBitmap.getPixels(inputImg, 0, INPUT_IMG_WIDTH, 0, 0, INPUT_IMG_WIDTH, INPUT_IMG_HEIGHT);
int pixel;
for (int i = 0; i < INPUT_IMG_HEIGHT; i++) {
    for (int j = 0; j < INPUT_IMG_WIDTH; j++) {
    // Extract RBG values from each pixel; alpha is ignored
    pixel = inputImg[i * INPUT_IMG_WIDTH + j];
    inputImgRGB[0][i][j][0] = ((pixel >> 16) & 0xff);
    inputImgRGB[0][i][j][1] = ((pixel >> 8) & 0xff);
    inputImgRGB[0][i][j][2] = ((pixel) & 0xff);
    }
}

RequestBody requestBody =
    RequestBody.create("{\"instances\": " + Arrays.deepToString(inputImgRGB) + "}", JSON);

Request request =
    new Request.Builder()
        .url("http://" + SERVER + ":" + REST_PORT + "/v1/models/" + MODEL_NAME + ":predict")
        .post(requestBody)
        .build();

return request;
Send the REST request to TensorFlow Serving
The app lets the user choose REST or gRPC to communicate with TensorFlow Serving, so there are two branches in the onClick(View view) listener.
predictButton.setOnClickListener(
    new View.OnClickListener() {
        @Override
        public void onClick(View view) {
            if (requestRadioGroup.getCheckedRadioButtonId() == R.id.rest) {
                // TODO: REST request
            }
            else {

            }
        }
    }
)
- Add this code to the REST branch of the
onClick(View view)listener to use OkHttp to send the request to TensorFlow Serving:
// Send the REST request.
Request request = createRESTRequest();
try {
    client =
        new OkHttpClient.Builder()
            .connectTimeout(20, TimeUnit.SECONDS)
            .writeTimeout(20, TimeUnit.SECONDS)
            .readTimeout(20, TimeUnit.SECONDS)
            .callTimeout(20, TimeUnit.SECONDS)
            .build();
    Response response = client.newCall(request).execute();
    JSONObject responseObject = new JSONObject(response.body().string());
    postprocessRESTResponse(responseObject);
} catch (IOException | JSONException e) {
    Log.e(TAG, e.getMessage());
    responseTextView.setText(e.getMessage());
    return;
}
Process the REST response from TensorFlow Serving
The SSD MobileNet model returns a number of results, which include:
num_detections: the number of detectionsdetection_scores: detection scoresdetection_classes: the detection class indexdetection_boxes: the bounding-box coordinates
You implement the postprocessRESTResponse() function to handle the response.
private void postprocessRESTResponse(Predict.PredictResponse response) {

}
- Add this code to the
postprocessRESTResponse()function:
// Process the REST response.
JSONArray predictionsArray = responseObject.getJSONArray("predictions");
//You only send one image, so you directly extract the first element.
JSONObject predictions = predictionsArray.getJSONObject(0);
// Argmax
int maxIndex = 0;
JSONArray detectionScores = predictions.getJSONArray("detection_scores");
for (int j = 0; j < predictions.getInt("num_detections"); j++) {
    maxIndex =
        detectionScores.getDouble(j) > detectionScores.getDouble(maxIndex + 1) ? j : maxIndex;
}
int detectionClass = predictions.getJSONArray("detection_classes").getInt(maxIndex);
JSONArray boundingBox = predictions.getJSONArray("detection_boxes").getJSONArray(maxIndex);
double ymin = boundingBox.getDouble(0);
double xmin = boundingBox.getDouble(1);
double ymax = boundingBox.getDouble(2);
double xmax = boundingBox.getDouble(3);
displayResult(detectionClass, (float) ymin, (float) xmin, (float) ymax, (float) xmax);
Now the postprocessing function extracts predicted values from the response, identifies the most probable category of the object and the coordinates of the bounding-box vertices, and lastly renders the detection bounding box on the UI.
Run it
- Click Run ‘app' in the navigation menu and then wait for the app to load.
- Select REST > Run inference.
It takes a few seconds before the app renders the bounding box of the cat and shows 17 as the category of the object, which maps to the cat object in the COCO dataset.
7. Connect the Android app with TensorFlow Serving through gRPC
In addition to REST, TensorFlow Serving also supports gRPC.
gRPC is a modern, open source, high-performance Remote Procedure Call (RPC) framework that can run in any environment. It can efficiently connect services in, and across, data centers with pluggable support for load balancing, tracing, health checking, and authentication. It's been observed that gRPC is more performant than REST in practice.
Send requests and receive responses with gRPC
There are four simple steps:
- [Optional] Generate the gRPC client stub code.
- Create the gRPC request.
- Send the gRPC request to TensorFlow Serving.
- Extract the predicted result from the gRPC response and render the UI.
You will achieve these in MainActivity.java.
Optional: Generate the gRPC client stub code
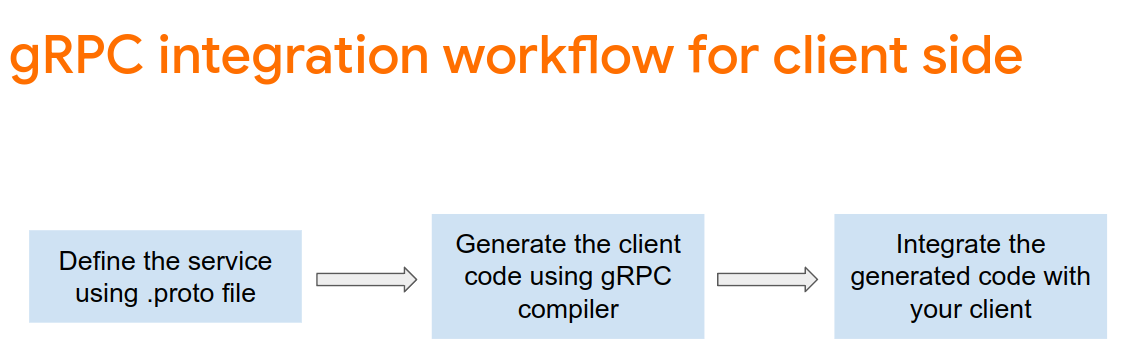
To use gRPC with TensorFlow Serving, you need to follow the gRPC workflow. To learn more about the details, see the gRPC documentation.
TensorFlow Serving and TensorFlow define the .proto files for you. As of TensorFlow and TensorFlow Serving 2.8, these .proto files are the ones needed:
tensorflow/core/example/example.proto
tensorflow/core/example/feature.proto
tensorflow/core/protobuf/struct.proto
tensorflow/core/protobuf/saved_object_graph.proto
tensorflow/core/protobuf/saver.proto
tensorflow/core/protobuf/trackable_object_graph.proto
tensorflow/core/protobuf/meta_graph.proto
tensorflow/core/framework/node_def.proto
tensorflow/core/framework/attr_value.proto
tensorflow/core/framework/function.proto
tensorflow/core/framework/types.proto
tensorflow/core/framework/tensor_shape.proto
tensorflow/core/framework/full_type.proto
tensorflow/core/framework/versions.proto
tensorflow/core/framework/op_def.proto
tensorflow/core/framework/graph.proto
tensorflow/core/framework/tensor.proto
tensorflow/core/framework/resource_handle.proto
tensorflow/core/framework/variable.proto

tensorflow_serving/apis/inference.proto
tensorflow_serving/apis/classification.proto
tensorflow_serving/apis/predict.proto
tensorflow_serving/apis/regression.proto
tensorflow_serving/apis/get_model_metadata.proto
tensorflow_serving/apis/input.proto
tensorflow_serving/apis/prediction_service.proto
tensorflow_serving/apis/model.proto
- To generate the stub, add this code to the
app/build.gradlefile.
apply plugin: 'com.google.protobuf'

protobuf {
    protoc { artifact = 'com.google.protobuf:protoc:3.11.0' }
    plugins {
        grpc { artifact = 'io.grpc:protoc-gen-grpc-java:1.29.0'
        }
    }
    generateProtoTasks {
        all().each { task ->
            task.builtins {
                java { option 'lite' }
            }
            task.plugins {
                grpc { option 'lite' }
            }
        }
    }
}
Create the gRPC request
Similar to the REST request, you create the gRPC request in the createGRPCRequest() function.
private Request createGRPCRequest() {

}
- Add this code to
createGRPCRequest()function:
if (stub == null) {
  channel = ManagedChannelBuilder.forAddress(SERVER, GRPC_PORT).usePlaintext().build();
  stub = PredictionServiceGrpc.newBlockingStub(channel);
}

Model.ModelSpec.Builder modelSpecBuilder = Model.ModelSpec.newBuilder();
modelSpecBuilder.setName(MODEL_NAME);
modelSpecBuilder.setVersion(Int64Value.of(MODEL_VERSION));
modelSpecBuilder.setSignatureName(SIGNATURE_NAME);

Predict.PredictRequest.Builder builder = Predict.PredictRequest.newBuilder();
builder.setModelSpec(modelSpecBuilder);

TensorProto.Builder tensorProtoBuilder = TensorProto.newBuilder();
tensorProtoBuilder.setDtype(DataType.DT_UINT8);
TensorShapeProto.Builder tensorShapeBuilder = TensorShapeProto.newBuilder();
tensorShapeBuilder.addDim(TensorShapeProto.Dim.newBuilder().setSize(1));
tensorShapeBuilder.addDim(TensorShapeProto.Dim.newBuilder().setSize(INPUT_IMG_HEIGHT));
tensorShapeBuilder.addDim(TensorShapeProto.Dim.newBuilder().setSize(INPUT_IMG_WIDTH));
tensorShapeBuilder.addDim(TensorShapeProto.Dim.newBuilder().setSize(3));
tensorProtoBuilder.setTensorShape(tensorShapeBuilder.build());
int[] inputImg = new int[INPUT_IMG_HEIGHT * INPUT_IMG_WIDTH];
inputImgBitmap.getPixels(inputImg, 0, INPUT_IMG_WIDTH, 0, 0, INPUT_IMG_WIDTH, INPUT_IMG_HEIGHT);
int pixel;
for (int i = 0; i < INPUT_IMG_HEIGHT; i++) {
    for (int j = 0; j < INPUT_IMG_WIDTH; j++) {
    // Extract RBG values from each pixel; alpha is ignored.
    pixel = inputImg[i * INPUT_IMG_WIDTH + j];
    tensorProtoBuilder.addIntVal((pixel >> 16) & 0xff);
    tensorProtoBuilder.addIntVal((pixel >> 8) & 0xff);
    tensorProtoBuilder.addIntVal((pixel) & 0xff);
    }
}
TensorProto tensorProto = tensorProtoBuilder.build();

builder.putInputs("input_tensor", tensorProto);

builder.addOutputFilter("num_detections");
builder.addOutputFilter("detection_boxes");
builder.addOutputFilter("detection_classes");
builder.addOutputFilter("detection_scores");

return builder.build();
Send the gRPC request to TensorFlow Serving
Now you can finish the onClick(View view) listener.
predictButton.setOnClickListener(
    new View.OnClickListener() {
        @Override
        public void onClick(View view) {
            if (requestRadioGroup.getCheckedRadioButtonId() == R.id.rest) {

            }
            else {
                // TODO: gRPC request
            }
        }
    }
)
- Add this code to the gRPC branch:
try {
    Predict.PredictRequest request = createGRPCRequest();
    Predict.PredictResponse response = stub.predict(request);
    postprocessGRPCResponse(response);
} catch (Exception e) {
    Log.e(TAG, e.getMessage());
    responseTextView.setText(e.getMessage());
    return;
}
Process the gRPC response from TensorFlow Serving
Similar to gRPC, you implement the postprocessGRPCResponse() function to handle the response.
private void postprocessGRPCResponse(Predict.PredictResponse response) {

}
- Add this code to the
postprocessGRPCResponse()function:
// Process the response.
float numDetections = response.getOutputsMap().get("num_detections").getFloatValList().get(0);
List<Float> detectionScores =    response.getOutputsMap().get("detection_scores").getFloatValList();
int maxIndex = 0;
for (int j = 0; j < numDetections; j++) {
    maxIndex = detectionScores.get(j) > detectionScores.get(maxIndex + 1) ? j : maxIndex;
}
Float detectionClass =    response.getOutputsMap().get("detection_classes").getFloatValList().get(maxIndex);
List<Float> boundingBoxValues =    response.getOutputsMap().get("detection_boxes").getFloatValList();
float ymin = boundingBoxValues.get(maxIndex * 4);
float xmin = boundingBoxValues.get(maxIndex * 4 + 1);
float ymax = boundingBoxValues.get(maxIndex * 4 + 2);
float xmax = boundingBoxValues.get(maxIndex * 4 + 3);
displayResult(detectionClass.intValue(), ymin, xmin, ymax, xmax);
Now the postprocessing function can extract predicted values from the response and render the detection bounding box in the UI.
Run it
- Click Run ‘app' in the navigation menu and then wait for the app to load.
- Select gRPC > Run inference.
It takes a few seconds before the app renders the bounding box of the cat and shows 17 as the category of the object, which maps to the cat category in the COCO dataset.
8. Congratulations
You used TensorFlow Serving to add object detection capabilities to your app!