
1. 事前準備
在本程式碼研究室中,您將瞭解如何透過 REST 和 gRPC,使用 TensorFlow Serving 從 Flutter 應用程式執行文字分類推論。
必要條件
- 具備使用 Dart 進行 Flutter 開發的基本知識
- 具備 TensorFlow 機器學習基本知識,例如訓練與部署的差異
- 終端機和 Docker 的基本知識
- 透過 TensorFlow Lite Model Maker Codelab 訓練留言垃圾內容偵測模型
課程內容
- 如何建構簡易的 Flutter 應用程式,並透過 TensorFlow Serving (REST 和 gRPC) 分類文字。
- 如何在 UI 中顯示結果。
軟硬體需求
- Flutter SDK
- Flutter 的 Android 或 iOS 設定
- 設定 Visual Studio Code (VS Code) 以使用 Flutter 和 Dart
- Docker
- Bash
- 通訊協定緩衝區編譯器和通訊協定編譯器的 gRPC Dart 外掛程式 (只有在您想自行重新產生 gRPC 存根時才需要)
2. 設定 Flutter 開發環境
如要進行 Flutter 開發,您需要兩項軟體才能完成本實驗室活動,分別是 Flutter SDK 和編輯器。
您可以使用下列任一裝置執行程式碼研究室:
- iOS 模擬器 (需要安裝 Xcode 工具)。
- Android Emulator (需在 Android Studio 中設定)。
- 瀏覽器 (偵錯時必須使用 Chrome)。
- 以 Windows、Linux 或 macOS 桌面應用程式的形式。您必須在要部署的平台上進行開發。因此,如要開發 Windows 桌面應用程式,您必須在 Windows 上開發,才能存取適當的建構鏈。如需作業系統專屬需求,請參閱 docs.flutter.dev/desktop。
3. 做好準備
如要下載本程式碼研究室的程式碼,請按照下列步驟操作:
- 前往本程式碼研究室的 GitHub 存放區。
- 依序點選「Code」>「Download zip」,下載這個程式碼研究室的所有程式碼。
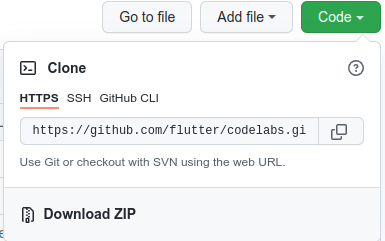
- 將下載的 ZIP 檔案解壓縮,解壓縮後會產生
codelabs-main根資料夾,內含所有需要的資源。
在本程式碼研究室中,您只需要存放區中 tfserving-flutter/codelab2 子目錄的檔案,其中包含兩個資料夾:
starter資料夾包含本程式碼研究室的範例程式碼。finished資料夾包含完成的程式碼,適用於完成的範例應用程式。
4. 下載專案的依附元件
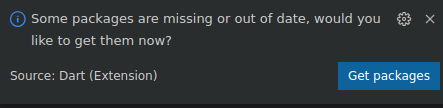
- 在 VS Code 中,依序點選「File」>「Open folder」,然後選取先前下載的原始碼中的
starter資料夾。 - 如果看到對話方塊,提示您下載入門應用程式所需的套件,請按一下「取得套件」。
- 如果沒有看到這個對話方塊,請開啟終端機,然後在
starter資料夾中執行flutter pub get指令。
5. 執行範例應用程式
- 在 VS Code 中,確認 Android 模擬器或 iOS 模擬器已正確設定,且顯示在狀態列中。
舉例來說,在 Android 模擬器中使用 Pixel 5 時,畫面會顯示以下內容:

使用 iOS 模擬器搭配 iPhone 13 時,您會看到以下畫面:

- 按一下「開始偵錯」
 。
。
執行並探索應用程式
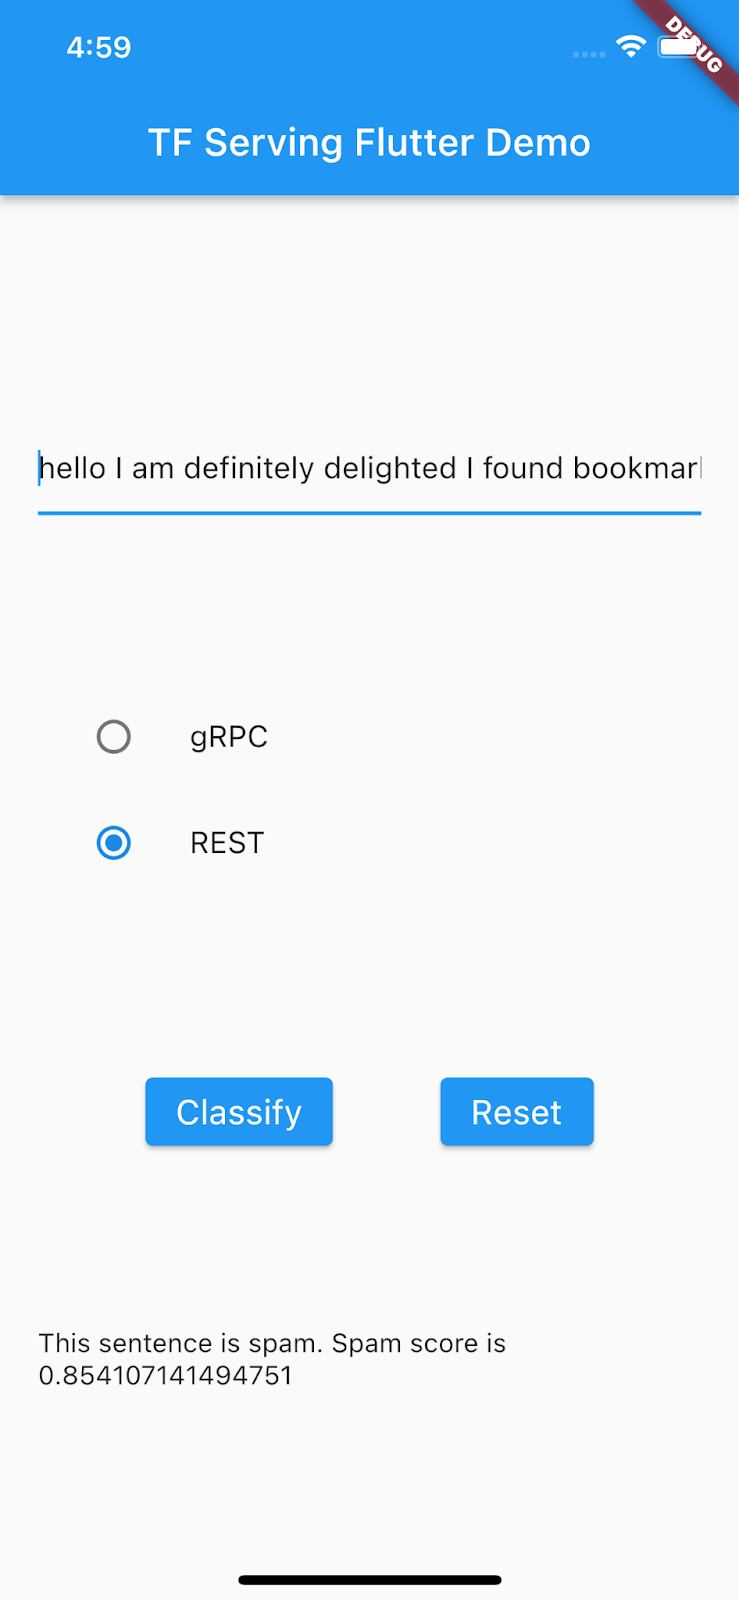
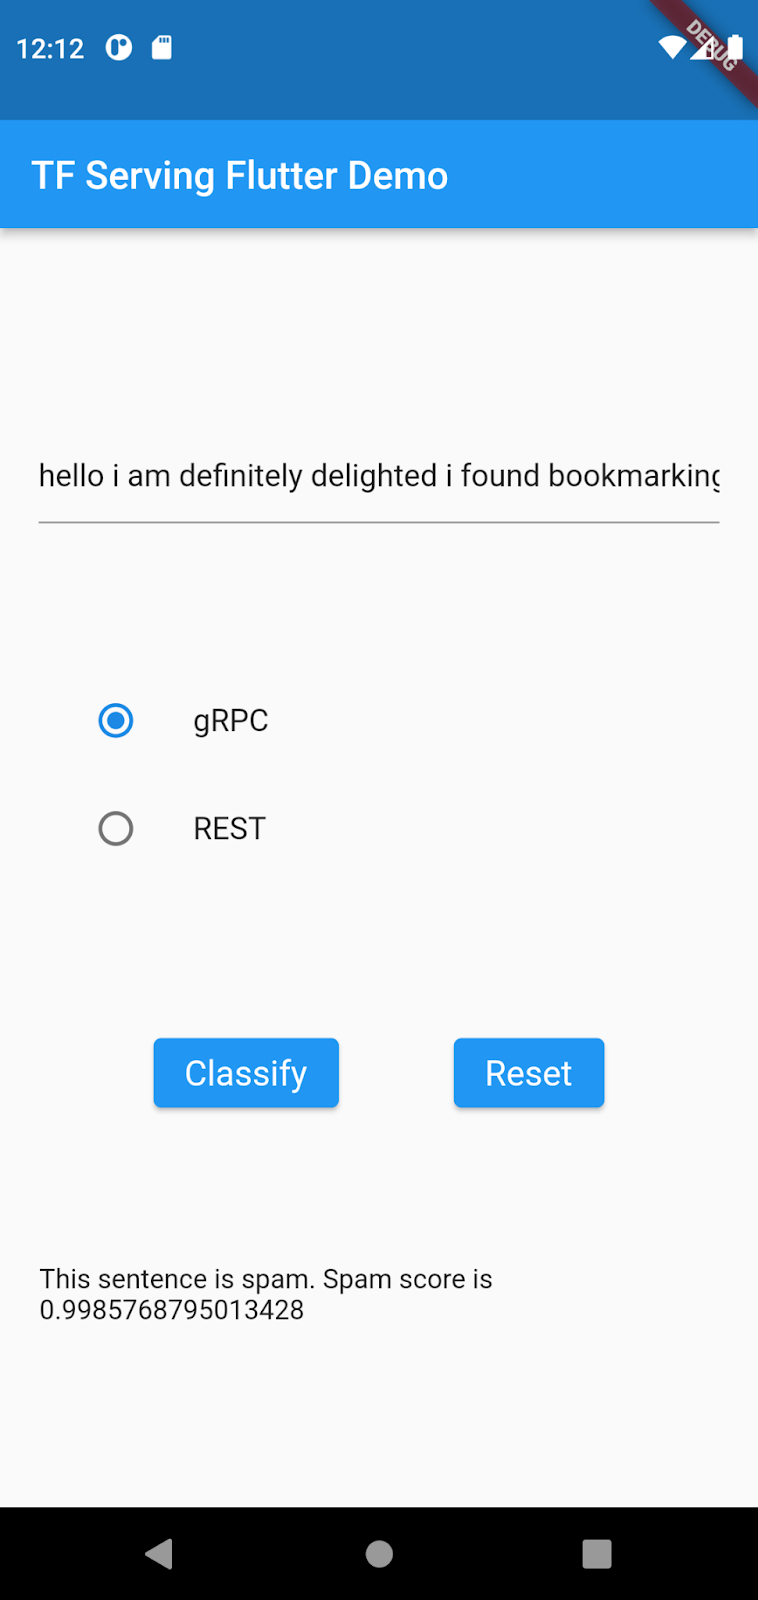
應用程式應會在 Android 模擬器或 iOS 模擬器上啟動。這個 UI 相當簡單,使用者可透過文字欄位輸入文字。使用者可以選擇透過 REST 或 gRPC 將資料傳送至後端。後端會使用 TensorFlow 模型對預先處理的輸入內容執行文字分類,並將分類結果傳回給用戶端應用程式,後者會更新 UI。
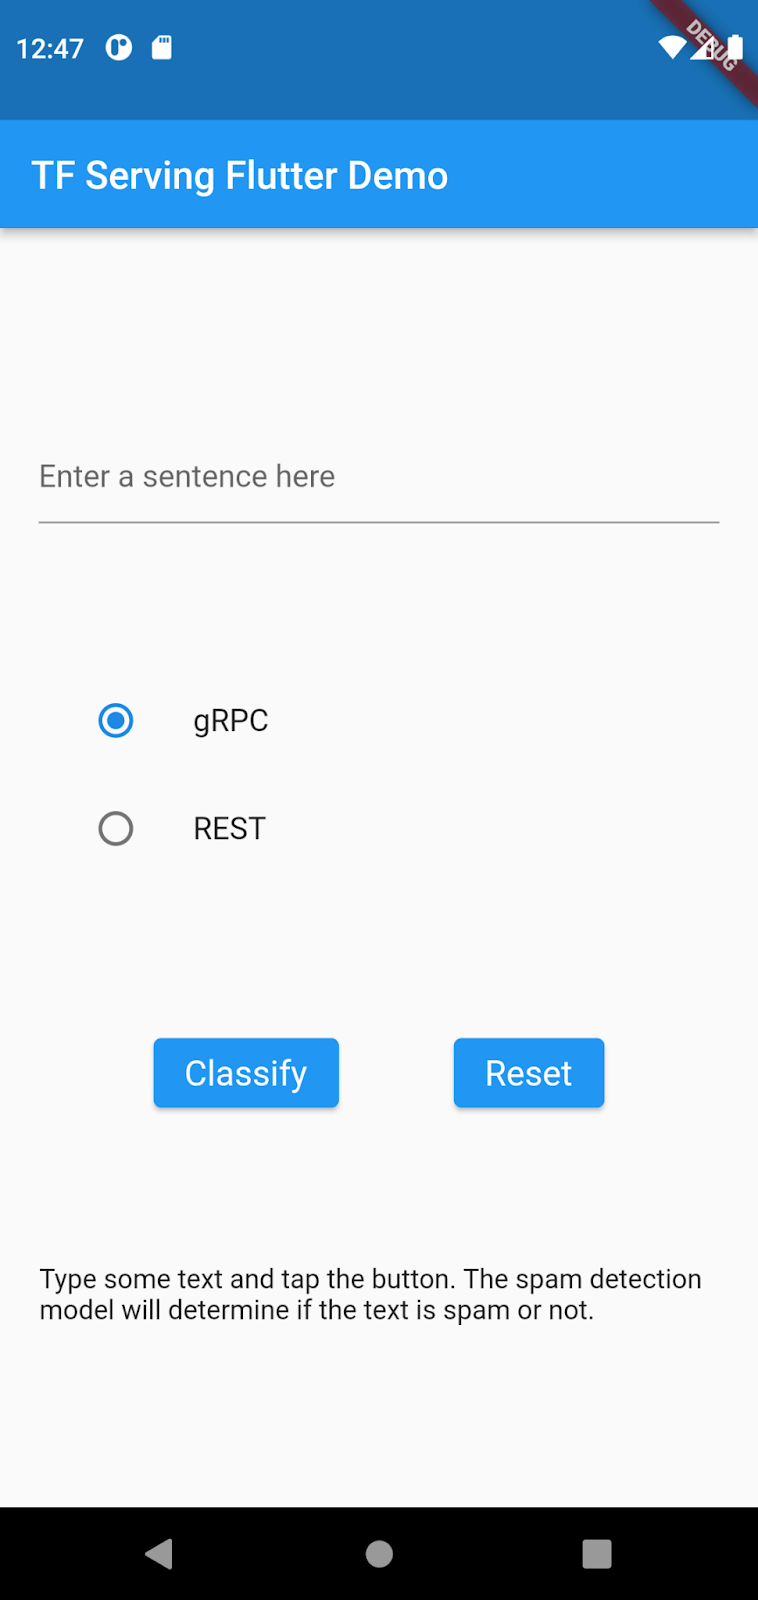

如果您點選「分類」,系統不會有任何反應,因為目前還無法與後端通訊。
6. 使用 TensorFlow Serving 部署文字分類模型
文字分類是相當常見的機器學習工作,可將文字分類到預先定義的類別。在本程式碼研究室中,您會使用 TensorFlow Serving 部署使用 TensorFlow Lite Model Maker 程式碼研究室訓練的留言垃圾內容偵測模型,並從 Flutter 前端呼叫後端,將輸入文字分類為「垃圾內容」或「非垃圾內容」。
啟動 TensorFlow Serving
- 在終端機中,使用 Docker 啟動 TensorFlow Serving,但請將
PATH/TO/SAVEDMODEL預留位置替換為電腦上mm_spam_savedmodel資料夾的絕對路徑。
docker pull tensorflow/serving

docker run -it --rm -p 8500:8500 -p 8501:8501 -v "PATH/TO/SAVEDMODEL:/models/spam-detection" -e MODEL_NAME=spam-detection tensorflow/serving
Docker 會先自動下載 TensorFlow Serving 映像檔,這需要一分鐘。TensorFlow Serving 隨即會啟動。記錄應如下列程式碼片段所示:
2022-02-25 06:01:12.513231: I external/org_tensorflow/tensorflow/cc/saved_model/loader.cc:206] Restoring SavedModel bundle.
2022-02-25 06:01:12.585012: I external/org_tensorflow/tensorflow/core/platform/profile_utils/cpu_utils.cc:114] CPU Frequency: 3000000000 Hz
2022-02-25 06:01:13.395083: I external/org_tensorflow/tensorflow/cc/saved_model/loader.cc:190] Running initialization op on SavedModel bundle at path: /models/ssd_mobilenet_v2_2/123
2022-02-25 06:01:13.837562: I external/org_tensorflow/tensorflow/cc/saved_model/loader.cc:277] SavedModel load for tags { serve }; Status: success: OK. Took 1928700 microseconds.
2022-02-25 06:01:13.877848: I tensorflow_serving/servables/tensorflow/saved_model_warmup_util.cc:59] No warmup data file found at /models/ssd_mobilenet_v2_2/123/assets.extra/tf_serving_warmup_requests
2022-02-25 06:01:13.929844: I tensorflow_serving/core/loader_harness.cc:87] Successfully loaded servable version {name: spam-detection version: 123}
2022-02-25 06:01:13.985848: I tensorflow_serving/model_servers/server_core.cc:486] Finished adding/updating models
2022-02-25 06:01:13.985987: I tensorflow_serving/model_servers/server.cc:367] Profiler service is enabled
2022-02-25 06:01:13.988994: I tensorflow_serving/model_servers/server.cc:393] Running gRPC ModelServer at 0.0.0.0:8500 ...
[warn] getaddrinfo: address family for nodename not supported
2022-02-25 06:01:14.033872: I tensorflow_serving/model_servers/server.cc:414] Exporting HTTP/REST API at:localhost:8501 ...
[evhttp_server.cc : 245] NET_LOG: Entering the event loop ...
7. 將輸入語句權杖化
後端現在已準備就緒,您幾乎可以將用戶端要求傳送至 TensorFlow Serving,但首先需要將輸入句子權杖化。檢查模型的輸入張量時,您會發現模型預期的是 20 個整數的清單,而不是原始字串。在將您在應用程式中輸入的個別字詞傳送至後端進行分類之前,系統會先根據字彙字典,將這些字詞對應至整數清單,這就是權杖化。舉例來說,如果您輸入 buy book online to learn more,代碼化程序會將其對應至 [32, 79, 183, 10, 224, 631, 0, 0, 0, 0, 0, 0, 0, 0, 0, 0, 0, 0, 0, 0]。具體數字可能因詞彙字典而異。
- 在
lib/main.dart檔案中,將下列程式碼新增至predict()方法,以建構_vocabMap字彙字典。
// Build _vocabMap if empty.
if (_vocabMap.isEmpty) {
  final vocabFileString = await rootBundle.loadString(vocabFile);
  final lines = vocabFileString.split('\n');
  for (final l in lines) {
    if (l != "") {
      var wordAndIndex = l.split(' ');
      (_vocabMap)[wordAndIndex[0]] = int.parse(wordAndIndex[1]);
    }
  }
}
- 在前一個程式碼片段後方,立即新增下列程式碼來實作權杖化:
// Tokenize the input sentence.
final inputWords = _inputSentenceController.text
    .toLowerCase()
    .replaceAll(RegExp('[^a-z ]'), '')
    .split(' ');
// Initialize with padding token.
_tokenIndices = List.filled(maxSentenceLength, 0);
var i = 0;
for (final w in inputWords) {
  if ((_vocabMap).containsKey(w)) {
    _tokenIndices[i] = (_vocabMap)[w]!;
    i++;
  }

  // Truncate the string if longer than maxSentenceLength.
  if (i >= maxSentenceLength - 1) {
    break;
  }
}
這段程式碼會將句子字串轉換為小寫、移除非字母字元,並根據字彙表將字詞對應至 20 個整數索引。
8. 透過 REST 將 Flutter 應用程式連結至 TensorFlow Serving
您可以透過兩種方式將要求傳送至 TensorFlow Serving:
- REST
- gRPC
透過 REST 傳送要求及接收回應
透過 REST 傳送要求及接收回應的步驟非常簡單,只要三步即可完成:
- 建立 REST 要求。
- 將 REST 要求傳送至 TensorFlow Serving。
- 從 REST 回應中擷取預測結果,並算繪 UI。
您會在 main.dart 檔案中完成這些步驟。
建立並傳送 REST 要求至 TensorFlow Serving
- 目前
predict()函式不會將 REST 要求傳送至 TensorFlow Serving。您需要實作 REST 分支,才能建立 REST 要求:
if (_connectionMode == ConnectionModeType.rest) {
  // TODO: Create and send the REST request.

}
- 將這段程式碼新增至 REST 分支:
//Create the REST request.
final response = await http.post(
  Uri.parse('http://' +
      _server +
      ':' +
      restPort.toString() +
      '/v1/models/' +
      modelName +
      ':predict'),
  body: jsonEncode(<String, List<List<int>>>{
    'instances': [_tokenIndices],
  }),
);
處理 TensorFlow Serving 的 REST 回應
- 在前一個程式碼片段後方加上這段程式碼,即可處理 REST 回應:
// Process the REST response.
if (response.statusCode == 200) {
  Map<String, dynamic> result = jsonDecode(response.body);
  if (result['predictions']![0][1] >= classificationThreshold) {
    return 'This sentence is spam. Spam score is ' +
        result['predictions']![0][1].toString();
  }
  return 'This sentence is not spam. Spam score is ' +
      result['predictions']![0][1].toString();
} else {
  throw Exception('Error response');
}
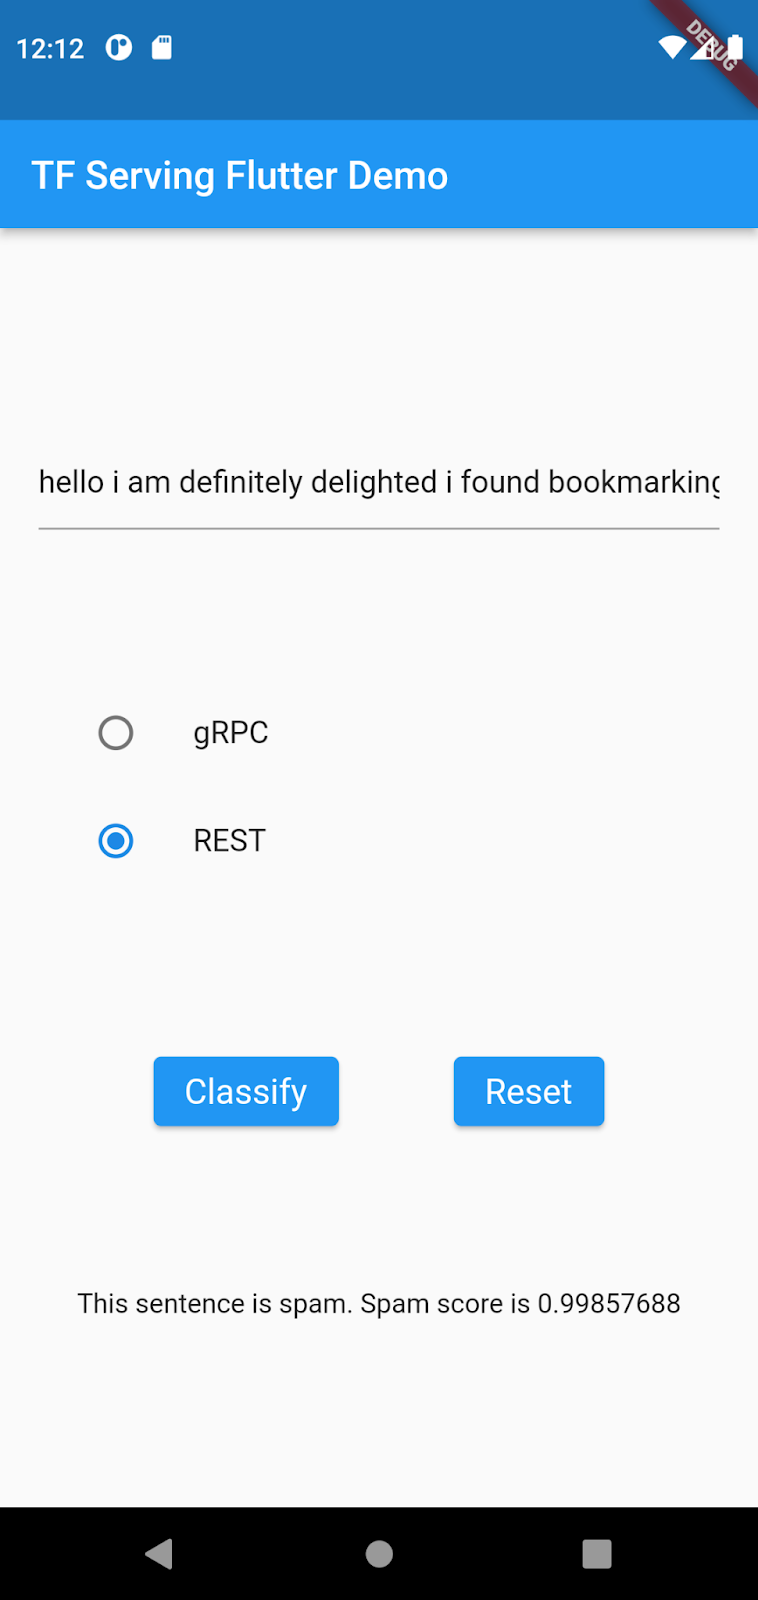
後續處理程式碼會從回應中擷取輸入句子是垃圾郵件的機率,並在 UI 中顯示分類結果。
開始執行
- 按一下「Start debugging」圖示 ,然後等待應用程式載入。
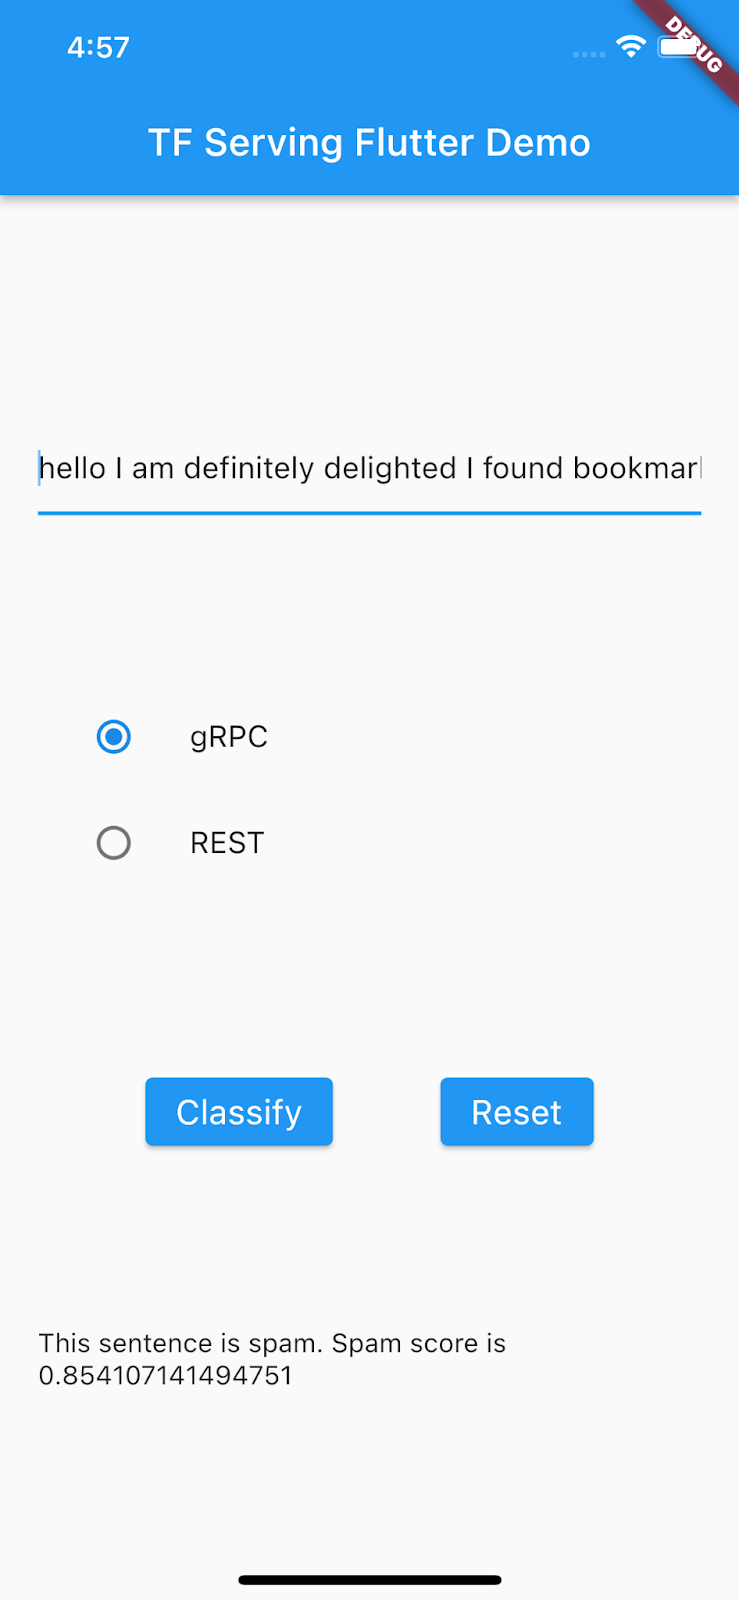
- 輸入一些文字,然後選取「REST」>「Classify」。
9. 透過 gRPC 將 Flutter 應用程式連結至 TensorFlow Serving
除了 REST,TensorFlow Serving 也支援 gRPC。
gRPC 是一種高效能的現代化開放原始碼遠端程序呼叫 (RPC) 架構,可在任何環境中執行。可有效連結資料中心內和跨資料中心的服務,並支援負載平衡、追蹤、健康狀態檢查和驗證功能。實務上,gRPC 的效能比 REST 更出色。
使用 gRPC 傳送要求及接收回應
使用 gRPC 傳送要求及接收回應的步驟很簡單,只要四個步驟即可完成:
- 選用:產生 gRPC 用戶端虛設常式程式碼。
- 建立 gRPC 要求。
- 將 gRPC 要求傳送至 TensorFlow Serving。
- 從 gRPC 回應中擷取預測結果,並算繪 UI。
您會在 main.dart 檔案中完成這些步驟。
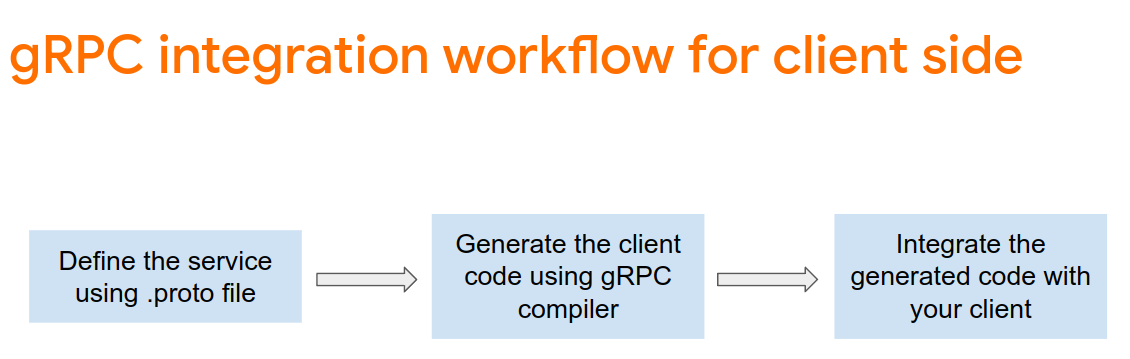
選用:產生 gRPC 用戶端存根程式碼
如要搭配 TensorFlow Serving 使用 gRPC,請按照 gRPC 工作流程操作。如要瞭解詳情,請參閱 gRPC 說明文件。
TensorFlow Serving 和 TensorFlow 會為您定義 .proto 檔案。在 TensorFlow 和 TensorFlow Serving 2.8 中,需要下列 .proto 檔案:
tensorflow/core/example/example.proto
tensorflow/core/example/feature.proto
tensorflow/core/protobuf/struct.proto
tensorflow/core/protobuf/saved_object_graph.proto
tensorflow/core/protobuf/saver.proto
tensorflow/core/protobuf/trackable_object_graph.proto
tensorflow/core/protobuf/meta_graph.proto
tensorflow/core/framework/node_def.proto
tensorflow/core/framework/attr_value.proto
tensorflow/core/framework/function.proto
tensorflow/core/framework/types.proto
tensorflow/core/framework/tensor_shape.proto
tensorflow/core/framework/full_type.proto
tensorflow/core/framework/versions.proto
tensorflow/core/framework/op_def.proto
tensorflow/core/framework/graph.proto
tensorflow/core/framework/tensor.proto
tensorflow/core/framework/resource_handle.proto
tensorflow/core/framework/variable.proto

tensorflow_serving/apis/inference.proto
tensorflow_serving/apis/classification.proto
tensorflow_serving/apis/predict.proto
tensorflow_serving/apis/regression.proto
tensorflow_serving/apis/get_model_metadata.proto
tensorflow_serving/apis/input.proto
tensorflow_serving/apis/prediction_service.proto
tensorflow_serving/apis/model.proto

google/protobuf/any.proto
google/protobuf/wrappers.proto
- 在終端機中,前往
starter/lib/proto/資料夾並產生存根:
bash generate_grpc_stub_dart.sh
建立 gRPC 要求
與 REST 要求類似,您會在 gRPC 分支中建立 gRPC 要求。
if (_connectionMode == ConnectionModeType.rest) {

} else {
  // TODO: Create and send the gRPC request.

}
- 加入這段程式碼,建立 gRPC 要求:
//Create the gRPC request.
final channel = ClientChannel(_server,
    port: grpcPort,
    options:
        const ChannelOptions(credentials: ChannelCredentials.insecure()));
_stub = PredictionServiceClient(channel,
    options: CallOptions(timeout: const Duration(seconds: 10)));

ModelSpec modelSpec = ModelSpec(
  name: 'spam-detection',
  signatureName: 'serving_default',
);

TensorShapeProto_Dim batchDim = TensorShapeProto_Dim(size: Int64(1));
TensorShapeProto_Dim inputDim =
    TensorShapeProto_Dim(size: Int64(maxSentenceLength));
TensorShapeProto inputTensorShape =
    TensorShapeProto(dim: [batchDim, inputDim]);
TensorProto inputTensor = TensorProto(
    dtype: DataType.DT_INT32,
    tensorShape: inputTensorShape,
    intVal: _tokenIndices);

// If you train your own model, update the input and output tensor names.
const inputTensorName = 'input_3';
const outputTensorName = 'dense_5';
PredictRequest request = PredictRequest(
    modelSpec: modelSpec, inputs: {inputTensorName: inputTensor});
注意:即使模型架構相同,不同模型的輸入和輸出張量名稱也可能不同。如果您訓練自己的模型,請務必更新這些檔案。
將 gRPC 要求傳送至 TensorFlow Serving
- 在先前的程式碼片段後方新增這段程式碼,將 gRPC 要求傳送至 TensorFlow Serving:
// Send the gRPC request.
PredictResponse response = await _stub.predict(request);
處理 TensorFlow Serving 的 gRPC 回應
- 在前一個程式碼片段後方加入這段程式碼,實作回呼函式來處理回應:
// Process the response.
if (response.outputs.containsKey(outputTensorName)) {
  if (response.outputs[outputTensorName]!.floatVal[1] >
      classificationThreshold) {
    return 'This sentence is spam. Spam score is ' +
        response.outputs[outputTensorName]!.floatVal[1].toString();
  } else {
    return 'This sentence is not spam. Spam score is ' +
        response.outputs[outputTensorName]!.floatVal[1].toString();
  }
} else {
  throw Exception('Error response');
}
現在,後續處理程式碼會從回應中擷取分類結果,並顯示在 UI 中。
開始執行
- 按一下「Start debugging」圖示 ,然後等待應用程式載入。
- 輸入一些文字,然後選取「gRPC」>「Classify」。
10. 恭喜
您已使用 TensorFlow Serving,在應用程式中加入文字分類功能!
在下一個程式碼研究室中,您將強化模型,偵測目前應用程式無法偵測到的特定垃圾訊息。