
1. Before you begin
In this codelab, you learn how to run an image-classification inference from a website using TensorFlow Serving with REST and gRPC.
Prerequisites
- Basic knowledge of web development, such as HTML and JavaScript
- Basic knowledge of machine learning with TensorFlow, such as training and deployment
- Basic knowledge of terminals and Docker
What you'll learn
- How to find pretrained image-classification models on TensorFlow Hub.
- How to build a simple website and make predictions with the downloaded image-classification model through TensorFlow Serving (REST and gRPC).
- How to render the detection result in the UI.
What you'll need
- Docker
- Google Chrome
- Web Server for Chrome
- Node.js and NPM
- Bash
- Protocol buffer compiler (only needed if you want to re-generate the gRPC stub by yourself)
- gRPC-web code generator plugin (only needed if you want to re-generate the gRPC stub by yourself)
2. Get set up
To download the code for this codelab:
- Navigate to this GitHub repository.
- Click Code > Download zip to download all the code for this codelab.
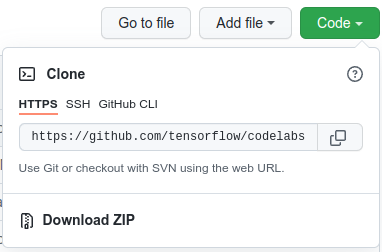
- Unzip the downloaded zip file to unpack a
codelabsroot folder with all of the resources you need.
For this codelab, you only need the files in the TFServing/ImageClassificationWeb subdirectory in the repository, which contains two folders:
- The
starterfolder contains the starter code that you build upon for this codelab. - The
finishedfolder contains the completed code for the finished sample app.
3. Install the dependencies
To install the dependencies:
- In your terminal, navigate to the
starterfolder and then install the required NPM packages:
npm install
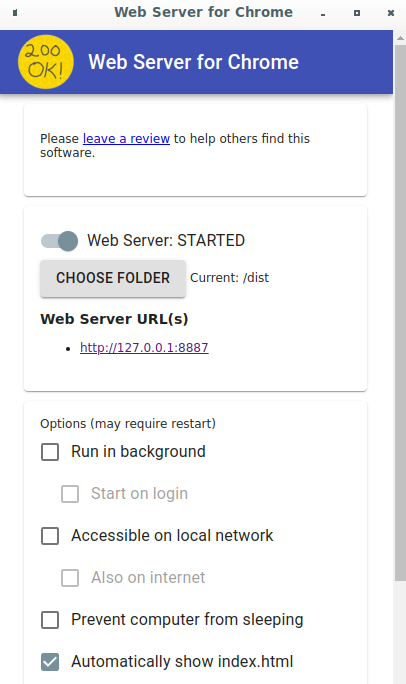
4. Run the starter website
Use Web Server for Chrome to load the TFServing/ImageClassificationWeb/starter/dist/index.html file:
- Enter
Chrome://apps/in the address bar of Chrome and then find Web Server for Chrome in the app list. - Launch Web Server for Chrome and then choose the
TFServing/ImageClassificationWeb/starter/dist/folder. - Click the Web Server toggle to enable it and then navigate to http://localhost:8887/ in your browser.
Run and explore the website
You should see the website now. The UI is pretty straightforward: there's a cat image in which you want to classify and the user can send the data to the backend with REST or gRPC. The backend performs image classification on the image and returns the classification result to the website, which displays the result.
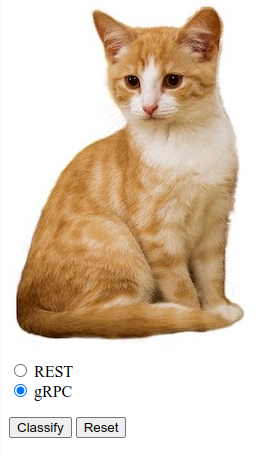
If you click Classify, nothing happens because it can't communicate with the backend yet.
5. Deploy an image-classification model with TensorFlow Serving
Image classification is a very common ML task that classifies an image into predefined categories based on the primary content of the image. Here's an example of classifying flowers:

There are a number of pretrained image-classification models on TensorFlow Hub. You use a popular Inception v3 model for this codelab.
To deploy the image-classification model with TensorFlow Serving:
- Download the Inception v3 model file.
- Uncompress the downloaded
.tar.gzfile with a decompression tool, such as 7-Zip. - Create an
inception_v3folder and then create a123subfolder inside it. - Put the extracted
variablesfolder andsaved_model.pbfile into the123subfolder.
You can refer to the inception_v3 folder as the SavedModel folder. 123 is an example version number. If you'd like, you can pick another number.
The folder structure should look like this image:

Start TensorFlow Serving
- In your terminal, start TensorFlow Serving with Docker, but replace
PATH/TO/SAVEDMODELwith the absolute path of theinception_v3folder on your computer.
docker pull tensorflow/serving

docker run -it --rm -p 8500:8500 -p 8501:8501 -v "PATH/TO/SAVEDMODEL:/models/inception" -e MODEL_NAME=inception tensorflow/serving
Docker automatically downloads the TensorFlow Serving image first, which takes a minute. Afterward, TensorFlow Serving should start. The log should look like this code snippet:
2022-02-25 06:01:12.513231: I external/org_tensorflow/tensorflow/cc/saved_model/loader.cc:206] Restoring SavedModel bundle.
2022-02-25 06:01:12.585012: I external/org_tensorflow/tensorflow/core/platform/profile_utils/cpu_utils.cc:114] CPU Frequency: 3000000000 Hz
2022-02-25 06:01:13.395083: I external/org_tensorflow/tensorflow/cc/saved_model/loader.cc:190] Running initialization op on SavedModel bundle at path: /models/inception/123
2022-02-25 06:01:13.837562: I external/org_tensorflow/tensorflow/cc/saved_model/loader.cc:277] SavedModel load for tags { serve }; Status: success: OK. Took 1928700 microseconds.
2022-02-25 06:01:13.877848: I tensorflow_serving/servables/tensorflow/saved_model_warmup_util.cc:59] No warmup data file found at /models/inception/123/assets.extra/tf_serving_warmup_requests
2022-02-25 06:01:13.929844: I tensorflow_serving/core/loader_harness.cc:87] Successfully loaded servable version {name: inception version: 123}
2022-02-25 06:01:13.985848: I tensorflow_serving/model_servers/server_core.cc:486] Finished adding/updating models
2022-02-25 06:01:13.985987: I tensorflow_serving/model_servers/server.cc:367] Profiler service is enabled
2022-02-25 06:01:13.988994: I tensorflow_serving/model_servers/server.cc:393] Running gRPC ModelServer at 0.0.0.0:8500 ...
[warn] getaddrinfo: address family for nodename not supported
2022-02-25 06:01:14.033872: I tensorflow_serving/model_servers/server.cc:414] Exporting HTTP/REST API at:localhost:8501 ...
[evhttp_server.cc : 245] NET_LOG: Entering the event loop ...
6. Set up Envoy proxy
Currently TensorFlow Serving doesn't set the Access-Control-Allow-Origin header, so the browser blocks the request from the frontend JavaScript to TensorFlow Serving for security reasons. To work around this, you need to use a proxy, such as Envoy, to proxy the request from JavaScript to the TensorFlow Serving backend.
Start Envoy
- In your terminal, download the Envoy image and start Envoy with Docker, but replace the
PATH/TO/ENVOY-CUSTOM.YAMLplaceholder with the absolute path of theenvoy-custom.yamlfile in thestarterfolder.
docker pull envoyproxy/envoy-dev:fd3e8370ddb7a96634c192d1461516e6de1d1797

docker run --add-host host.docker.internal:host-gateway --rm -it -p 9901:9901 -p 8000:8000 -p 8080:8080 -v PATH/TO/ENVOY-CUSTOM.YAML:/envoy-custom.yaml envoyproxy/envoy-dev:fd3e8370ddb7a96634c192d1461516e6de1d1797 -c /envoy-custom.yaml
Docker automatically downloads the Envoy image first. Afterward, Envoy should start. The log should look like this code snippet:
[2022-03-02 07:51:48.563][1][info][main] [source/server/server.cc:436]   response trailer map: 152 bytes: grpc-message,grpc-status
[2022-03-02 07:51:48.681][1][info][main] [source/server/server.cc:772] runtime: {}
[2022-03-02 07:51:48.682][1][info][admin] [source/server/admin/admin.cc:134] admin address: 0.0.0.0:9901
[2022-03-02 07:51:48.683][1][info][config] [source/server/configuration_impl.cc:127] loading tracing configuration
[2022-03-02 07:51:48.683][1][info][config] [source/server/configuration_impl.cc:87] loading 0 static secret(s)
[2022-03-02 07:51:48.683][1][info][config] [source/server/configuration_impl.cc:93] loading 2 cluster(s)
[2022-03-02 07:51:48.687][1][info][config] [source/server/configuration_impl.cc:97] loading 2 listener(s)
[2022-03-02 07:51:48.694][1][info][config] [source/server/configuration_impl.cc:109] loading stats configuration
[2022-03-02 07:51:48.696][1][info][main] [source/server/server.cc:868] starting main dispatch loop
[2022-03-02 07:51:48.881][1][info][runtime] [source/common/runtime/runtime_impl.cc:446] RTDS has finished initialization
[2022-03-02 07:51:48.881][1][info][upstream] [source/common/upstream/cluster_manager_impl.cc:207] cm init: all clusters initialized
[2022-03-02 07:51:48.881][1][info][main] [source/server/server.cc:849] all clusters initialized. initializing init manager
[2022-03-02 07:51:48.881][1][info][config] [source/server/listener_manager_impl.cc:784] all dependencies initialized. starting workers
[2022-03-02 07:51:48.902][1][warning][main] [source/server/server.cc:747] there is no configured limit to the number of allowed active connections. Set a limit via the runtime key overload.global_downstream_max_connections
7. Connect the website with TensorFlow through REST
The backend is ready now so you can send client requests to TensorFlow Serving to classify images. There are two ways to send requests to TensorFlow Serving:
- REST
- gRPC
Send requests and receive responses through REST
There are three simple steps to send and receive requests through REST:
- Create the REST request.
- Send the REST request to TensorFlow Serving.
- Extract the predicted result from the REST response and display the result.
You achieve these steps in the src/index.js file.
Create the REST request
Right now, the classify_img() function doesn't send the REST request to TensorFlow Serving. You need to implement this REST branch to create a REST request first:
if (radioButtons[0].checked) {
    console.log('Using REST');
    // TODO: Add code to send a REST request to TensorFlow Serving.

}
TensorFlow Serving expects a POST request that contains the image tensor for the Inception v3 model that you use, so you need to extract the RGB values from each pixel of the image into an array and then wrap the array in a JSON, which is the payload of the request.
- Add this code to the REST branch:
//Create the REST request.
let imgTensor = new Array();
let pixelArray = new Array();
context.drawImage(img, 0, 0);
for(let i=0; i<inputImgHeight; i++) {
    pixelArray[i] = new Array();
    for (let j=0; j<inputImgWidth; j++) {
        pixelArray[i][j] = new Array();
        pixelArray[i][j].push(context.getImageData(i, j, 1, 1).data[0]/255);
        pixelArray[i][j].push(context.getImageData(i, j, 1, 1).data[1]/255);
        pixelArray[i][j].push(context.getImageData(i, j, 1, 1).data[2]/255);
    }
}
imgTensor.push(pixelArray);

const RESTURL = 'http://localhost:8000/v1/models/inception:predict';
let xhr = new XMLHttpRequest();
xhr.open('POST', RESTURL);
xhr.setRequestHeader('Content-Type', 'application/json;charset=utf-8;');
let data = JSON.stringify({
    instances: imgTensor
});
xhr.onload = () => {

}
xhr.onerror = () => {
    console.log('REST request error');
}
Send the REST request to TensorFlow Serving
Now you can send the request.
- Add this code right after the code above in the REST branch:
// Send the REST request.
xhr.send(data);
Process the REST response from TensorFlow Serving
The Inception v3 model returns an array of probabilities that the image belongs to predefined categories. When the prediction is successful, you should output the most probable category in the UI.
You implement the onload() listener to handle the response.
xhr.onload = () => {

}
- Add this code to the
onload()listener:
// Process the REST response.
const response = JSON.parse(xhr.responseText);
const maxIndex = argmax(response['predictions'][0])
document.getElementById('category').textContent = 'Predicted category: ' + maxIndex;
Now the listener extracts predicted probabilities from the response, identifies the most probable category of the object, and displays the result in the UI.
Run it
- In your terminal, go to the
starterfolder and use webpack to bundle all JavaScript files into a single file that you can embed in thedist/index.htmlfile:
npm install -g npx
npm install --save-dev webpack
npx webpack
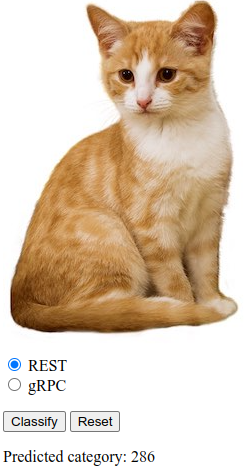
- Refresh http://localhost:8887/ in your browser and then click REST > Classify.
The website displays 286 as the predicted category, which maps to the Egyptian Cat label in the ImageNet dataset.
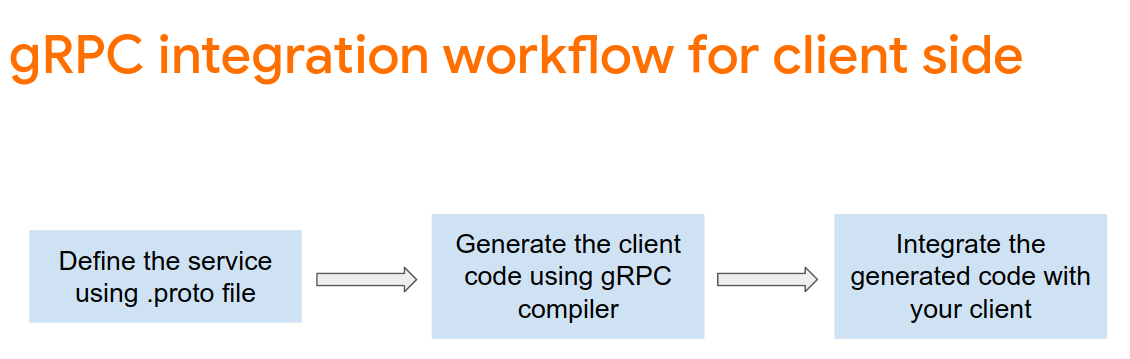
8. Connect the website with TensorFlow Serving through gRPC
In addition to REST, TensorFlow Serving also supports gRPC.
gRPC is a modern, open source, high-performance Remote Procedure Call (RPC) framework that can run in any environment. It can efficiently connect services in, and across, data centers with pluggable support for load balancing, tracing, health checking, and authentication. It's been observed that gRPC is more performant than REST in practice.
Send requests and receive responses with gRPC
There are four simple steps:
- Optional: Generate the gRPC client stub code.
- Create the gRPC request.
- Send the gRPC request to TensorFlow Serving.
- Extract the predicted result from the gRPC response and display it in the UI.
You complete these steps in the src/index.js file.
Optional: Generate the gRPC client stub code
To use gRPC with TensorFlow Serving, you need to follow the gRPC workflow. To learn more about the details, see the gRPC documentation.
TensorFlow Serving and TensorFlow define the .proto files for you. As of TensorFlow and TensorFlow Serving 2.8, these .proto files are the ones needed:
tensorflow/core/example/example.proto
tensorflow/core/example/feature.proto
tensorflow/core/protobuf/struct.proto
tensorflow/core/protobuf/saved_object_graph.proto
tensorflow/core/protobuf/saver.proto
tensorflow/core/protobuf/trackable_object_graph.proto
tensorflow/core/protobuf/meta_graph.proto
tensorflow/core/framework/node_def.proto
tensorflow/core/framework/attr_value.proto
tensorflow/core/framework/function.proto
tensorflow/core/framework/types.proto
tensorflow/core/framework/tensor_shape.proto
tensorflow/core/framework/full_type.proto
tensorflow/core/framework/versions.proto
tensorflow/core/framework/op_def.proto
tensorflow/core/framework/graph.proto
tensorflow/core/framework/tensor.proto
tensorflow/core/framework/resource_handle.proto
tensorflow/core/framework/variable.proto

tensorflow_serving/apis/inference.proto
tensorflow_serving/apis/classification.proto
tensorflow_serving/apis/predict.proto
tensorflow_serving/apis/regression.proto
tensorflow_serving/apis/get_model_metadata.proto
tensorflow_serving/apis/input.proto
tensorflow_serving/apis/prediction_service.proto
tensorflow_serving/apis/model.proto
- In your terminal, navigate to the
starter/src/proto/folder and generate the stub:
bash generate_grpc_stub_js.sh
Create the gRPC request
Similar to the REST request, you create the gRPC request in the gRPC branch.
if (connectionMode[picker.selectedRow(inComponent: 0)] == "REST") {

}
else {
    print("Using gRPC")
    // TODO: Add code to send a gRPC request to TensorFlow Serving.

}
- Add this code to the gRPC branch:
// Create the gRPC request.
const PredictModule = require('./proto/generated/tensorflow_serving/apis/predict_pb.js');
const PredictionServiceClientModule = require('./proto/generated/tensorflow_serving/apis/prediction_service_grpc_web_pb.js');
const ModelModule = require('./proto/generated/tensorflow_serving/apis/model_pb.js');
const TensorModule = require('./proto/generated/tensorflow/core/framework/tensor_pb.js');

const GPRCURL = 'http://localhost:8080';
const stub = new PredictionServiceClientModule.PredictionServiceClient(GPRCURL);

const modelSpec = new ModelModule.ModelSpec();
modelSpec.setName('inception');

const tensorProto = new TensorModule.TensorProto();
const tensorShapeProto = new TensorModule.TensorShapeProto();

const batchDim = (new TensorModule.TensorShapeProto.Dim()).setSize(1);
const heightDim = (new TensorModule.TensorShapeProto.Dim()).setSize(inputImgHeight);
const widthDim = (new TensorModule.TensorShapeProto.Dim()).setSize(inputImgWidth);
const channelDim = (new TensorModule.TensorShapeProto.Dim()).setSize(3);

tensorShapeProto.setDimList([batchDim, heightDim, widthDim, channelDim]);

tensorProto.setDtype(proto.tensorflow.DataType.DT_FLOAT);
tensorProto.setTensorShape(tensorShapeProto);
context.drawImage(img, 0, 0);
for(let i=0; i<inputImgHeight; i++) {
    for (let j=0; j<inputImgWidth; j++) {
        tensorProto.addFloatVal(context.getImageData(i, j, 1, 1).data[0]/255);
        tensorProto.addFloatVal(context.getImageData(i, j, 1, 1).data[1]/255);
        tensorProto.addFloatVal(context.getImageData(i, j, 1, 1).data[2]/255);
    }
}

const predictionServiceRequest = new PredictModule.PredictRequest();
predictionServiceRequest.setModelSpec(modelSpec);
predictionServiceRequest.getInputsMap().set('inputs', tensorProto);
Send the gRPC request to TensorFlow Serving
Now you can send the request.
- Add this code immediately after the code in the gRPC branch in the previous code snippet:
// Send the gRPC request.
stub.predict(predictionServiceRequest, {}, function(err, response) {
    // TODO: Add code to process the response.
});
Process the gRPC response from TensorFlow Serving
Lastly, you implement the callback function above to handle the response.
- Add this code to the function body in the previous code snippet:
// Process the gRPC response.
if (err) {
    console.log(err.code);
    console.log(err.message);
}
else {
    const maxIndex = argmax(response.getOutputsMap().get('logits').getFloatValList());
    document.getElementById('category').textContent = 'Predicted category: ' + maxIndex;
}
Now the listener extracts predicted probabilities from the response, identifies the most probable category of the object, and displays the result in the UI.
Run it
- In your terminal, use webpack to bundle all JavaScript files into a single file that you can embed in the
index.htmlfile:
npx webpack
- Refresh http://localhost:8887/ in your browser.
- Click gRPC > Classify.
The website displays the predicted category of 286, which maps to the Egyptian Cat label in the ImageNet dataset.
9. Congratulations
You used TensorFlow Serving to add image classification capabilities to your website!