
1. Before you begin
ARCore is Google's framework for building augmented reality (AR) experiences on smartphones. The Scene Semantics and Geospatial Depth APIs help your AR experiences understand the environment around your users.
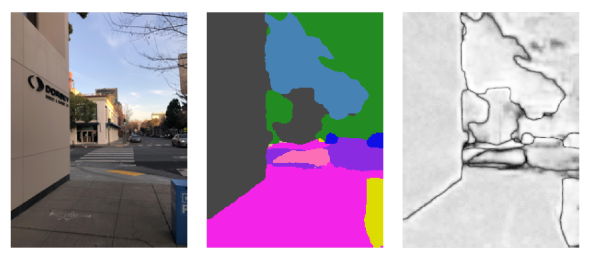
The Scene Semantics API uses a machine-learning (ML) model to analyze camera images and provide an image of labelled pixels. It can distinguish between 11 different outdoor labels.
The Geospatial Depth API combines depth information from motion and any active hardware sensors, such as time-of-flight, with Streetscape Geometry API data. It improves errors in depth observations up to 65 meters away.
In this codelab, you build an AR app that visualizes the results of the Scene Semantics and Geospatial Depth APIs.
Prerequisites
- Basic knowledge of AR
What you'll learn
- How to enable the Scene Semantics API.
- How to obtain and visualize a semantic image.
- How to obtain and visualize a semantic-confidence image.
- How to determine what percentage of pixels corresponds to a given label.
- How to set up a Google Cloud project that can use ARCore Geospatial APIs.
- How to enable the Geospatial Depth API.
- How to visualize depth images.
What you'll need
- A supported ARCore Android device that's connected with a USB cable to your development machine and configured with USB debugging.
- Google Play Services for AR 1.37 or higher installed on the Android development device.
- Android Studio installed and configured to build Android apps.
2. Set up your environment
To get started with the Geospatial API, we provided a starter project that includes the basics of an ARCore project and some helper functions.
To set up the starter project, follow these steps:
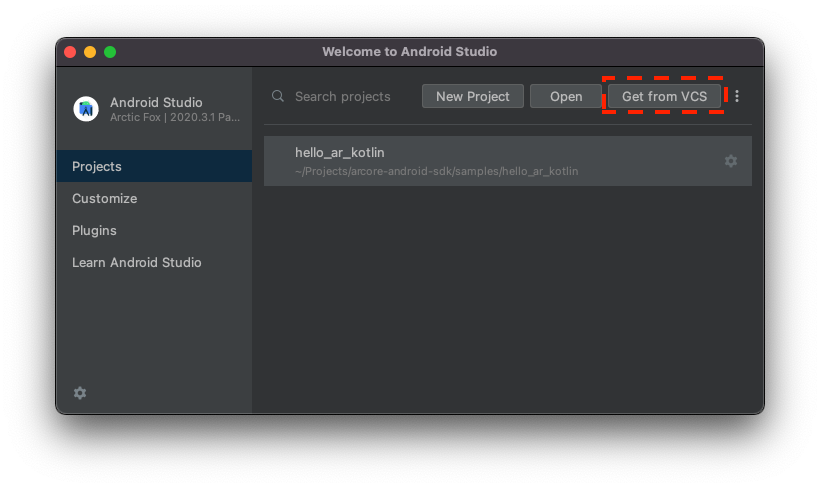
- Open Android Studio and do one of the following:
- If you already have a project open, click File > New > Project from version control.
- If you see the Welcome to Android Studio window, click Get from VCS.
- Select Git and enter
https://github.com/google-ar/codelab-scene-semantics-geospatial-depth.gitto import the project.
3. Visualize Scene Semantics API data
Enable the Scene Semantics API
The Scene Semantics API is disabled by default to save processing power.
To enable the Scene Semantics API, follow these steps:
- In the
CodelabActivity.ktfile, find the following line:// TODO: Enable the Scene Semantics API. - After that line, if your device supports it, enable the Scene Semantics API in the session's configuration:
if (session.isSemanticModeSupported(Config.SemanticMode.ENABLED)) {
  semanticMode = Config.SemanticMode.ENABLED
}
Obtain and visualize a semantic image
The semantic image is a result of the ARCore ML model that assigns a SemanticLabel Enum to each pixel in the camera feed.
To obtain a semantic image and display it on the screen, follow these steps:
- In the
CodelabRenderer.ktfile, find the following line:// TODO: Obtain the semantic image for this frame. - After that line, get a semantic image:
frame.acquireSemanticImage().use { image -> semanticRenderer.updateCameraSemanticsTexture(image) activity.view.semanticLabelAtCenter = getLabelAt(image, image.width/2, image.height/2) }SemanticRendererclass for display on the screen. You update thesemanticLabelAtCentervariable to display the semantic label at the center of the screen in the app's view. - Run your app, and aim the camera at different objects outside. The semantic label display changes when you look at different types of objects.
- Tap
 Settings to enable the semantic-confidence image overlay.
Obtain and visualize a semantic-confidence image
The semantic-confidence image gives an indication of how confident ARCore is in the semantic label at the matching pixel.
To obtain a semantic image and display it on the screen, follow these steps:
- In the
CodelabRenderer.ktfile, find the following line:// TODO: Obtain the confidence image for this frame. - After this line, get a semantic image:
frame.acquireSemanticConfidenceImage().use { image -> semanticRenderer.updateConfidenceSemanticsTexture(image) activity.view.confidenceAtCenter = getConfidenceAt(image, image.width/2, image.height/2) }SemanticRendererclass for display on the screen. You update theconfidenceAtCentervariable to display the semantic label at the center of the screen in the app's view. - Run your app, and aim the camera at different objects outside. The semantic-confidence display changes when you look at different types of objects.
- Tap Settings to enable the semantic-confidence image overlay.
Determine the prevalence of a label
The prevalence of a label is the percentage of a semantic image that's equal to a given label. For example, if 26% of the image has the SemanticLabel.SKY value, then the prevalence value for the SemanticLabel.SKY value is 0.26f.
To obtain prevalence of labels and display them on the screen, follow these steps:
- In the
CodelabRenderer.ktfile, find the following line:// TODO: Obtain the prevalence of the selected label for this frame. - After that line, get the prevalence for the selected label:
activity.view.fractionOfLabel = frame.getSemanticLabelFraction(activity.view.selectedSemanticLabel) - Run your app, and aim the camera at different objects outside. The fraction value changes when you look at different types of objects. Tap Settings to change the label fraction that's being displayed. For example, try BUILDING and try to fill the viewport with a building and see how that affects the fraction.
4. Visualize Geospatial Depth API data
The Geospatial Depth API improves depth readings when the Geospatial and Streetscape Geometry APIs are enabled. To use the Geospatial Depth API with Kotlin and Android Studio, you need a Google Cloud project.
Set up a Google Cloud project
The ARCore Geospatial API connects with Google Cloud to provide localization information from Google's Visual Positioning System (VPS) in areas covered by Google Street View.
To use this server in your project, follow these steps:
- Create a project in Google Cloud.
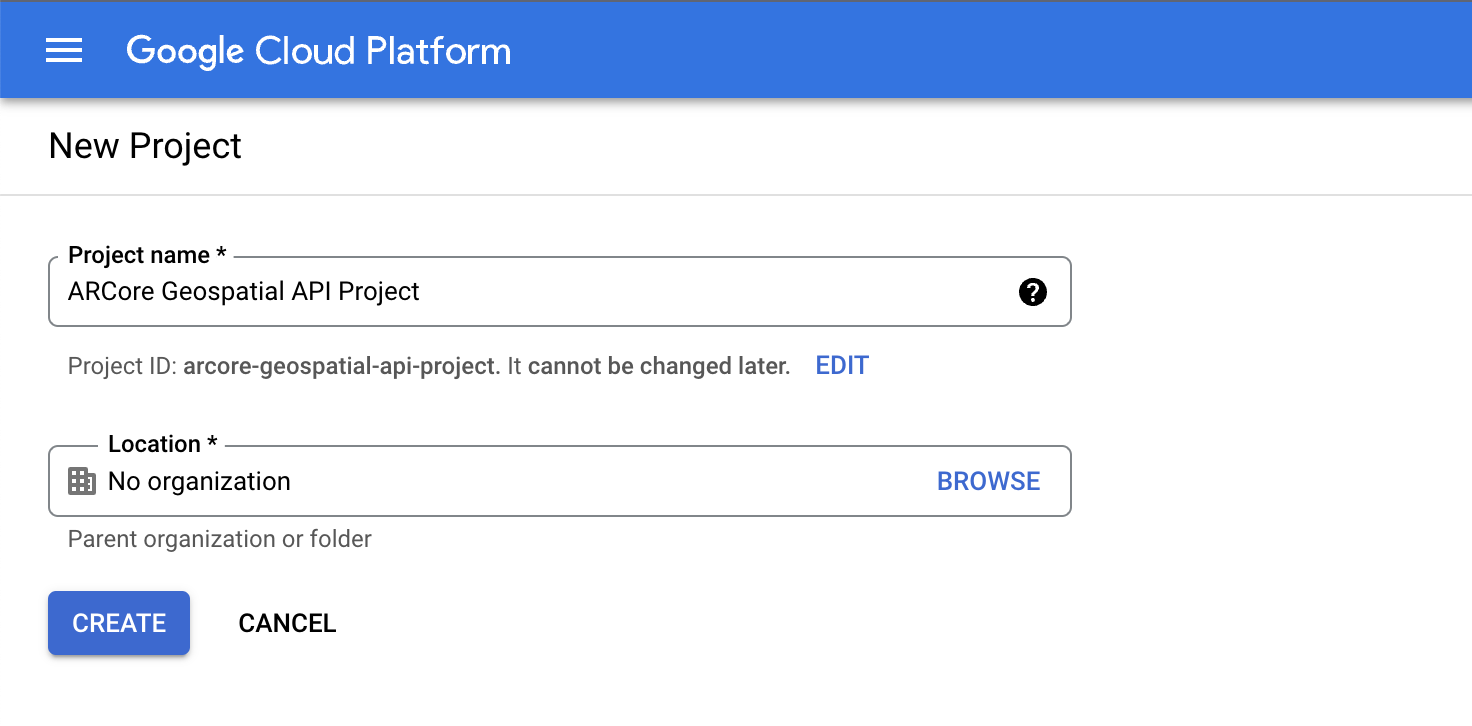
- In the Project name field, enter an appropriate name, such as
ARCore Geospatial API project, and choose any location. - Click Create.
- In the Google Cloud console on the project-selector page, click Create Project.
- Click the following link to view the ARCore API for this project and click Enable:
- Create an API key for your project:
- Under APIs & services, select Credentials.
- Click Create credentials and select API key.
- Note the key because you need it later.
You created a Google Cloud project with API-key authorization, and you're ready to use the Geospatial API in the sample project.
Integrate the API key with the Android Studio project
To associate the API key from Google Cloud with your project, follow these steps:
- In Android Studio, click app > src and double-click
AndroidManifest.xml. - Find the following
meta-dataentries:<meta-data android:name="com.google.android.ar.API_KEY" android:value="API_KEY" /> - Replace the
API_KEYplaceholder with the API key that you created in your Google Cloud project. The value stored incom.google.android.ar.API_KEYauthorizes this app to use the Geospatial API.
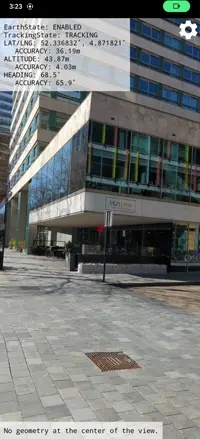
Verify your project
- To verify your project, run your app on your development device. You should see a camera view and geospatial debug information at the top of the screen.
Enable required configurations
The Geospatial Depth API requires three settings to be enabled in your app's session configuration.
To enable them, follow these steps:
- In the
CodelabRenderer.ktfile, find the following line:// TODO: Enable the Geospatial API, the Streetscape Geometry API, and the Depth API. - On the next line, add the following code:
val isDepthSupported = session.isDepthModeSupported(Config.DepthMode.AUTOMATIC)
val isGeospatialSupported = session.isGeospatialModeSupported(Config.GeospatialMode.ENABLED)
if (isDepthSupported && isGeospatialSupported) {
  // These three settings are needed to use Geospatial Depth.
  geospatialMode = Config.GeospatialMode.ENABLED
  streetscapeGeometryMode = Config.StreetscapeGeometryMode.ENABLED
  depthMode = Config.DepthMode.AUTOMATIC
}
Visualize depth information
- Run your app and visit a building in your area.
- After Geospatial localization is completed, tap Settings and enable the geospatial-depth visualization.
- View the building in AR, and compare it to the depth information without geospatial depth.
5. Conclusion
Congratulations! You built an AR app that visualizes scene semantics and geospatial depth!