1. Overview
The Google Assistant developer platform lets you create software to extend the functionality of Google Assistant, a virtual personal assistant, across more than 1 billion devices, including smart speakers, phones, cars, TVs, headphones, and more. Users engage Assistant in conversation to get things done, such as buying groceries or booking a ride. As a developer, you can use the Assistant developer platform to easily create and manage delightful and effective conversational experiences between users and your own third-party fulfillment service.
This codelab covers beginner-level concepts for developing with Google Assistant; you do not need any prior experience with the platform to complete it. In this codelab, you build a simple Action for the Google Assistant that tells users their fortune as they begin their adventure in the mythical land of Gryffinberg. In the Actions Builder level 2 codelab, you build out this Action further to customize the user's fortune based on their input.
What you'll build
In this codelab, you build a simple Action with the following functions:
- Responds to users with a greeting message
- Asks users a question. When they answer, your Action responds appropriately to the user's selection
- Provides suggestion chips users can click to provide input
- Modifies the greeting message to the user based on whether they are a returning user
When you've finished this codelab, your completed Action will have the following conversational flow:
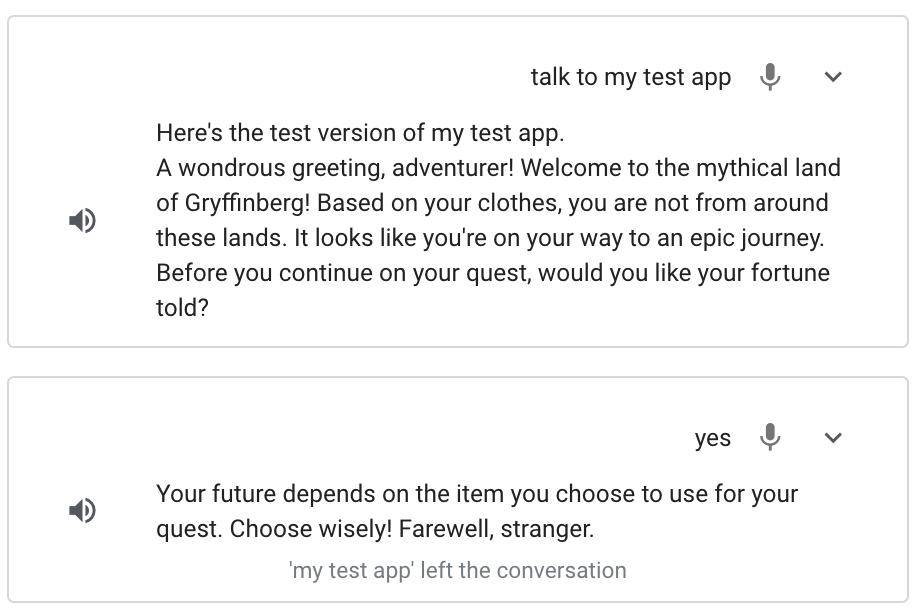
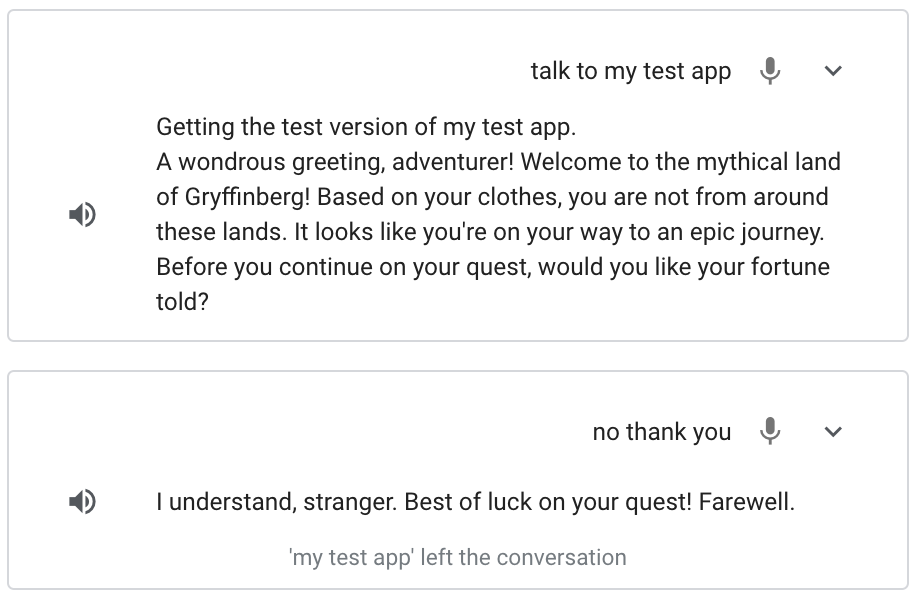
What you'll learn
- How to create a project in the Actions console
- How to send a prompt to the user after they invoke your Action
- How to process a user's input and return a response
- How to test your Action in the Actions simulator
- How to implement fulfillment using the Cloud Functions editor
What you'll need
The following tools must be in your environment:
- A web browser, such as Google Chrome
2. Set up
The following sections describe how to set up your development environment and create your Actions project.
Check your Google permission settings
To test the Action you build in this codelab, you need to enable the necessary permissions so the simulator can access your Action. To enable permissions, follow these steps:
- Go to the Activity controls page.
- If you haven't already done so, sign in with your Google Account.
- Enable the following permissions:
- Web & App Activity
- Under Web & App Activity, select the Include Chrome history and activity from sites, apps, and devices that use Google services checkbox.
Create an Actions project
Your Actions project is a container for your Action. To create your Actions project for this codelab, follow these steps:
- Open the Actions console.
- Click New project.
- Type in a project name, such as
actions-codelab. (The name is for your internal reference. Later, you can set an external name for your project.)
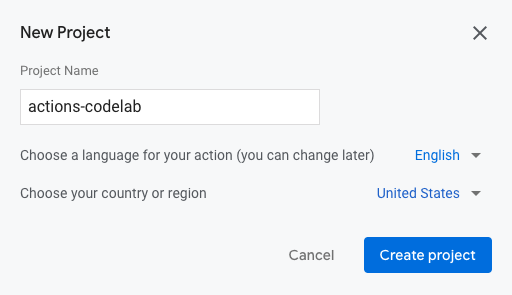
- Click Create project.
- In the What kind of Action do you want to build? screen, select the Custom card.
- Click Next.
- Select the Blank project card.
- Click Start building.
Associate a billing account
To deploy your fulfillment later in this codelab using Cloud Functions, you must associate a billing account with your project in Google Cloud.
If you haven't already associated a billing account with your project, follow these steps:
- Go to the Google Cloud Platform billing page.
- Click Add billing account or Create Account.
- Enter your payment information.
- Click Start my free trial or Submit and enable billing.
- Go to the Google Cloud Platform billing page.
- Click the My Projects tab.
- Click the three dots under Actions next to the Actions project for the codelab.
- Click Change billing.
- In the drop-down menu, select the billing account you configured. Click Set account.
To avoid incurring charges, follow the steps in the Clean up your project section at the end of this codelab.
3. Start a conversation
Users start the conversation with your Action through invocation. For example, if you have an Action named MovieTime, users can invoke your Action by saying a phrase like "Hey Google, talk to MovieTime", where MovieTime is the display name. Your Action must have a display name if you want to deploy it to production; however, to test your Action, you don't need to define the display name. Instead, you can use the phrase "Talk to my test app" in the simulator to invoke your Action.
You must edit the main invocation to define what happens after a user invokes your Action.
By default, Actions Builder provides a generic prompt when your invocation is triggered ("Start building your Action by defining main invocation.").
In the next section, you customize the prompt for your main invocation in the Actions console.
Set up main invocation
To modify the prompt your Action sends back to the user when they invoke your Action, follow these steps:
- Click Main invocation in the navigation bar.
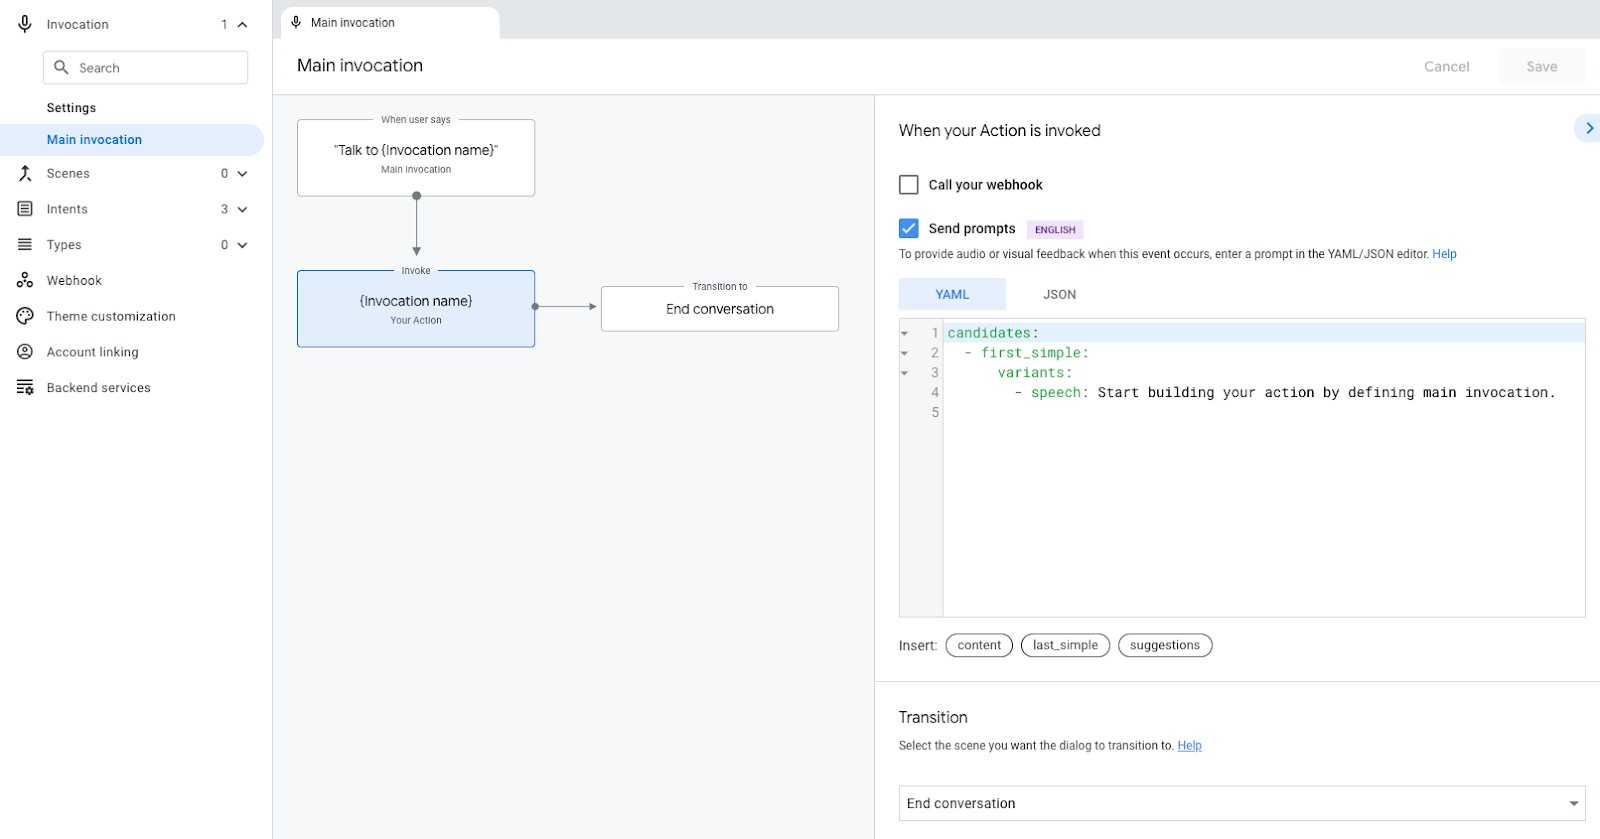
- In the code editor, replace the text in the
speechfield (Start building your action...) with the following welcome message:A wondrous greeting, adventurer! Welcome to the mythical land of Gryffinberg! Based on your clothes, you are not from around these lands. It looks like you're on your way to an epic journey.
- Click Save.
Test the main invocation in the simulator
The Actions console provides a web tool for testing your Action called the simulator. The interface simulates hardware devices and their settings, so you can converse with your Action as if it were running on a Smart Display, phone, speaker, or KaiOS.
When you invoke your Action, it should now respond with the customized prompt you added ("A wondrous greeting, adventurer!...")
To test your Action's main invocation in the simulator, follow these steps:
- In the top navigation bar, click Test to go to the simulator.
- To invoke your Action in the simulator, type
Talk to my test appin the Input field and pressEnter.
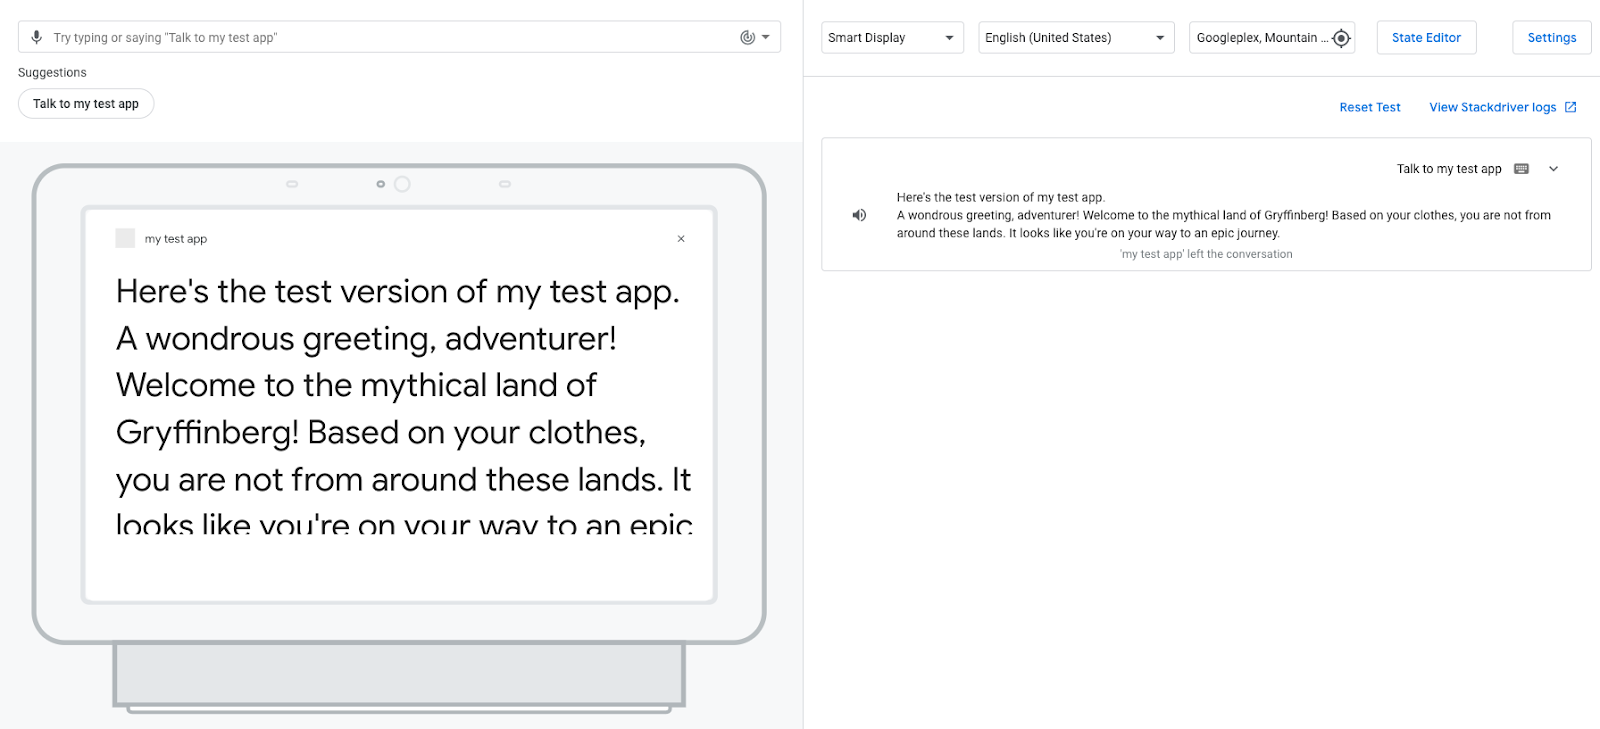
When you trigger your Action's main invocation, the Assistant responds with your customized welcome message. At this point, the conversation ends after the Assistant responds with a greeting. In the next section, you modify your Action so that the conversation continues.
View event logs
When you are in the Test tab, the panel on the right shows the event logs, which display the conversation history as event logs. Each event log displays the events that happen during that turn of the conversation.
Your Action currently has one event log, which shows both the user's input ("Talk to my test app") and your Action's response. The following screenshot shows your Action's event log:
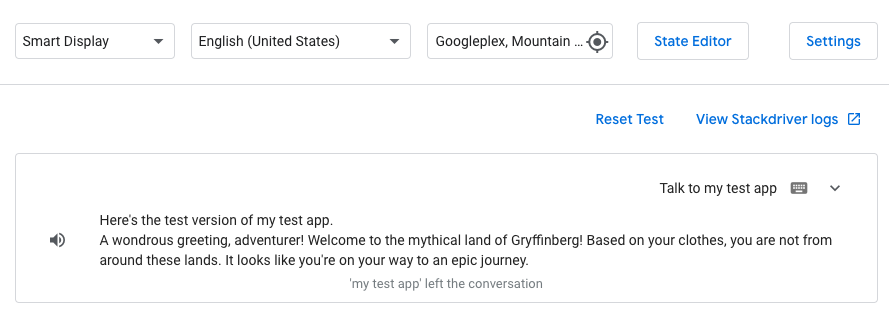
If you click the downward arrow in the event log, you can see the events, arranged chronologically, that occurred in that turn of the conversation:
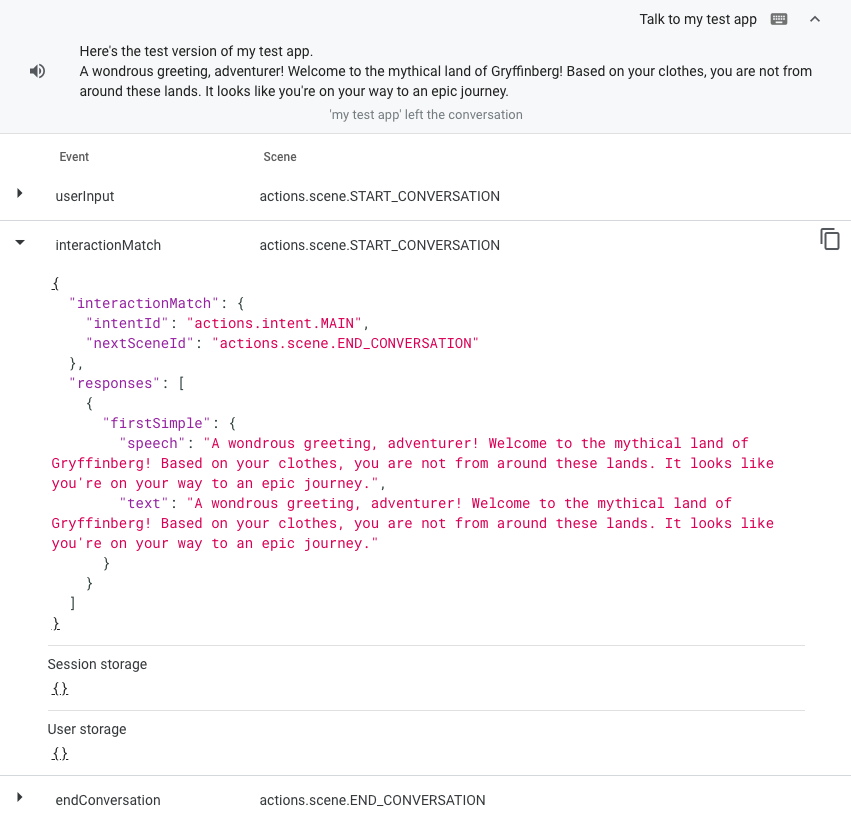
userInput: Corresponds to the user's input ("Talk to my test app").interactionMatch: Corresponds to your Action's main invocation response, which was triggered by the user's input. If you expand this row by clicking the arrow, you can see the prompt you added for the main invocation (A wondrous greeting, adventurer!...)endConversation: Corresponds to the selected transition in theMain invocationintent, which currently ends the conversation. (You learn more about transitions in the next section of this codelab.)
Event logs provide visibility into how your Action is working and are useful tools for debugging your Action if you have any issues. To see the details of an event, click the arrow next to the event name, as shown in the following screenshot:
4. Create your Action's conversation
Now that you've defined what happens after a user invokes your Action, you can build out the rest of your Action's conversation. Before continuing on with this codelab, familiarize yourself with the following terms to understand how your Action's conversation works:
Your Action can have one or many scenes, and you must activate each scene before it can run. (The Action you build in this codelab only has one scene titled Start.) The most common way to activate a scene is to configure your Action so that, when a user matches a user intent within a scene, that intent triggers the transition to another scene and activates it.
For example, imagine a hypothetical Action that provides the user with animal facts. When the user invokes this Action, the Main invocation intent is matched and triggers the transition to a scene named Facts. This transition activates the Facts scene, which sends the following prompt to the user: Would you like to hear a fact about cats or dogs? Within the Facts scene is a user intent called Cat, which contains training phrases that the user might say to hear a cat fact, like "I want to hear a cat fact." or "cat". When the user asks to hear a cat fact, the Cat intent is matched, and triggers a transition to a scene called Cat fact. The Cat fact scene activates and sends a prompt to the user that includes a cat fact.
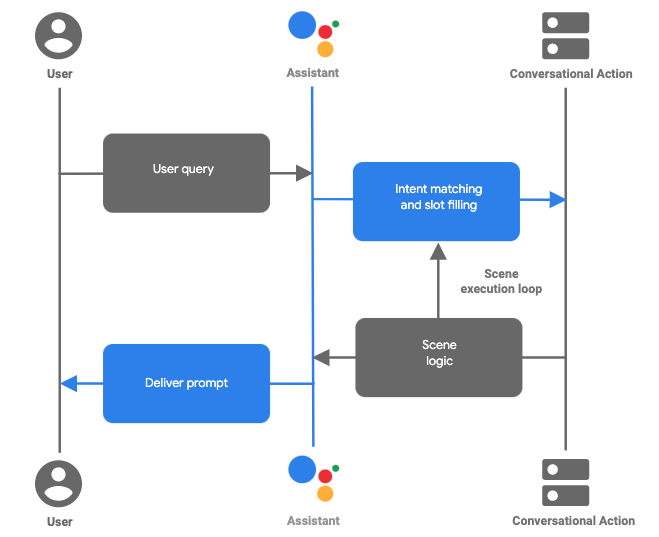
Figure 1. The flow of a typical conversational turn in an Action built with Actions Builder
Together, scenes, intents, and transitions make up the logic for your conversation and define the various paths your user can take through your Action's conversation. In the following section, you create a scene and define how that scene is activated after a user invokes your Action.
Transition from main invocation to scene
In this section, you create a new scene called Start, which sends a prompt to the user asking if they would like their fortune told. You also add a transition from the main invocation to the new Start scene.
To create this scene and add a transition to it, follow these steps:
- Click Develop in the navigation bar.
- Click Main invocation in the side navigation bar.
- In the Transition section, click the drop-down menu and type
Startin the text field.

- Click Add. This creates a scene called
Start, and tells the Action to transition to theStartscene after the Action delivers the welcome prompt to the user. - Click Scenes in the side navigation bar to show the list of scenes.
- Under Scenes, click Start to see the
Startscene. - Click + in the On enter section of the
Startscene. - Select Send prompts.
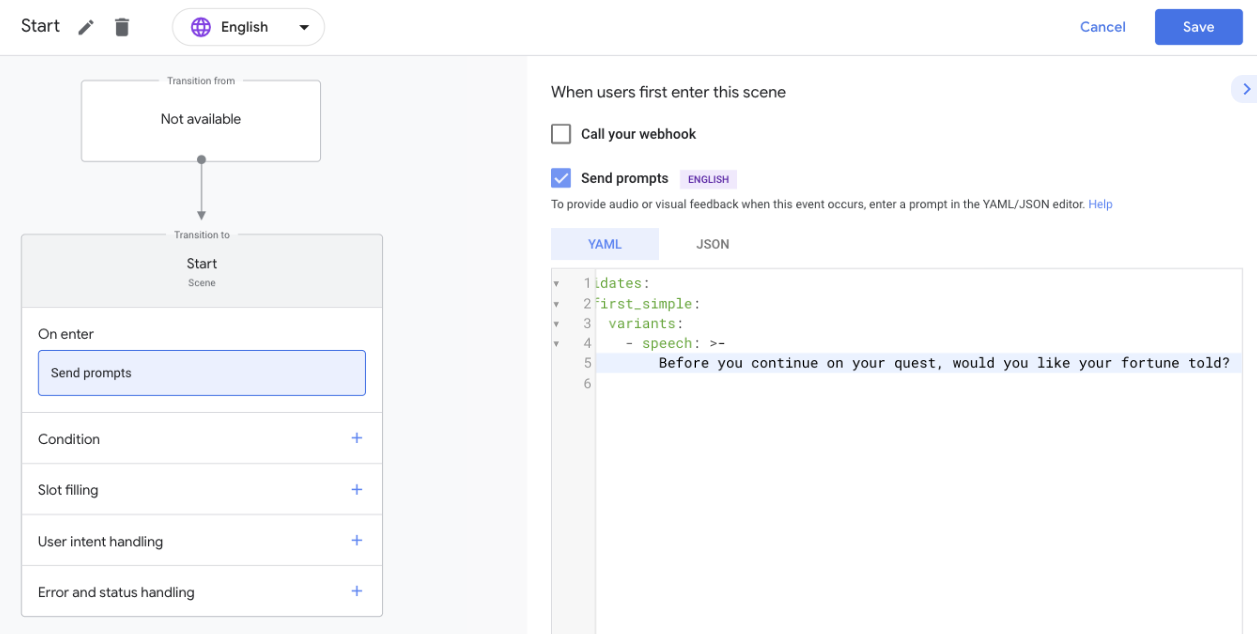
- Replace the sentence in the
speechfield (Enter the response that users will see or hear...) with a question to ask the user:Before you continue on your quest, would you like your fortune told?
- Click Save.
Google Assistant provides this prompt (Before you continue on your quest...) to the user when they enter the Start scene.
Add suggestion chips
Suggestion chips offer clickable suggestions for the user that your Action processes as user input. In this section, you add suggestion chips to support users on devices with screens.
To add suggestion chips to the Start scene's prompt, follow these steps:
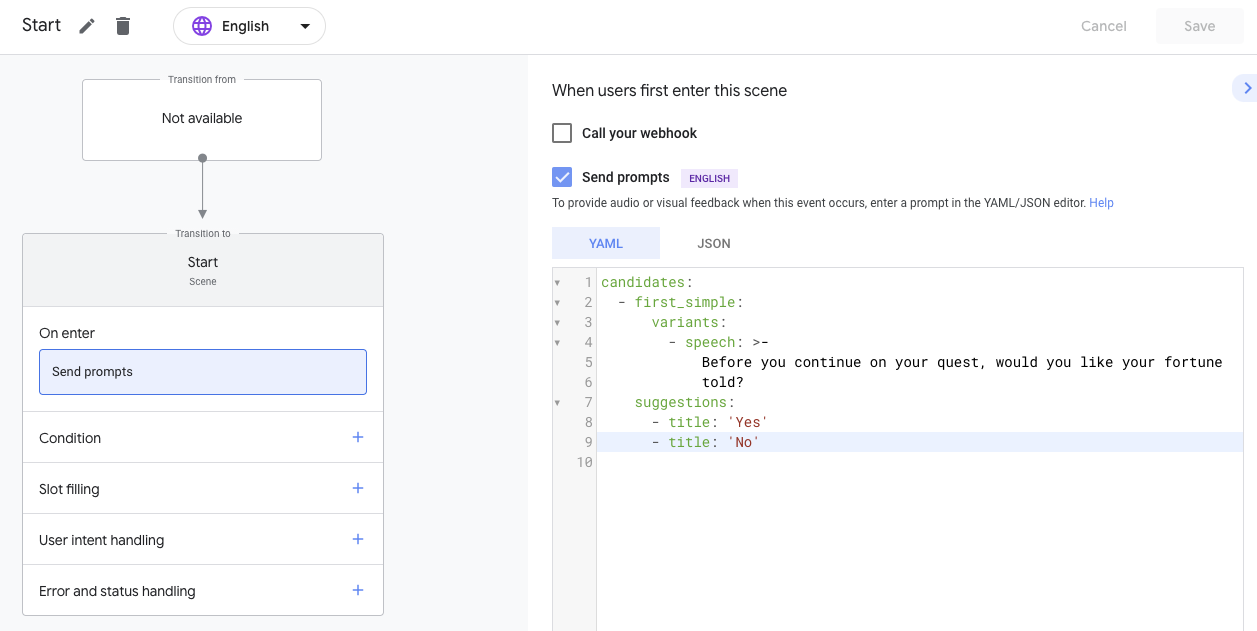
- In the
Startscene, click suggestions. This action adds a single suggestion chip. - In the
titlefield, replaceSuggested Responsewith'Yes'. - Using the same formatting, manually add a suggestion chip titled
'No'. Your code should look like the following snippet:
    suggestions:
      - title: 'Yes'
      - title: 'No'
- Click Save.
Test your Action in the simulator
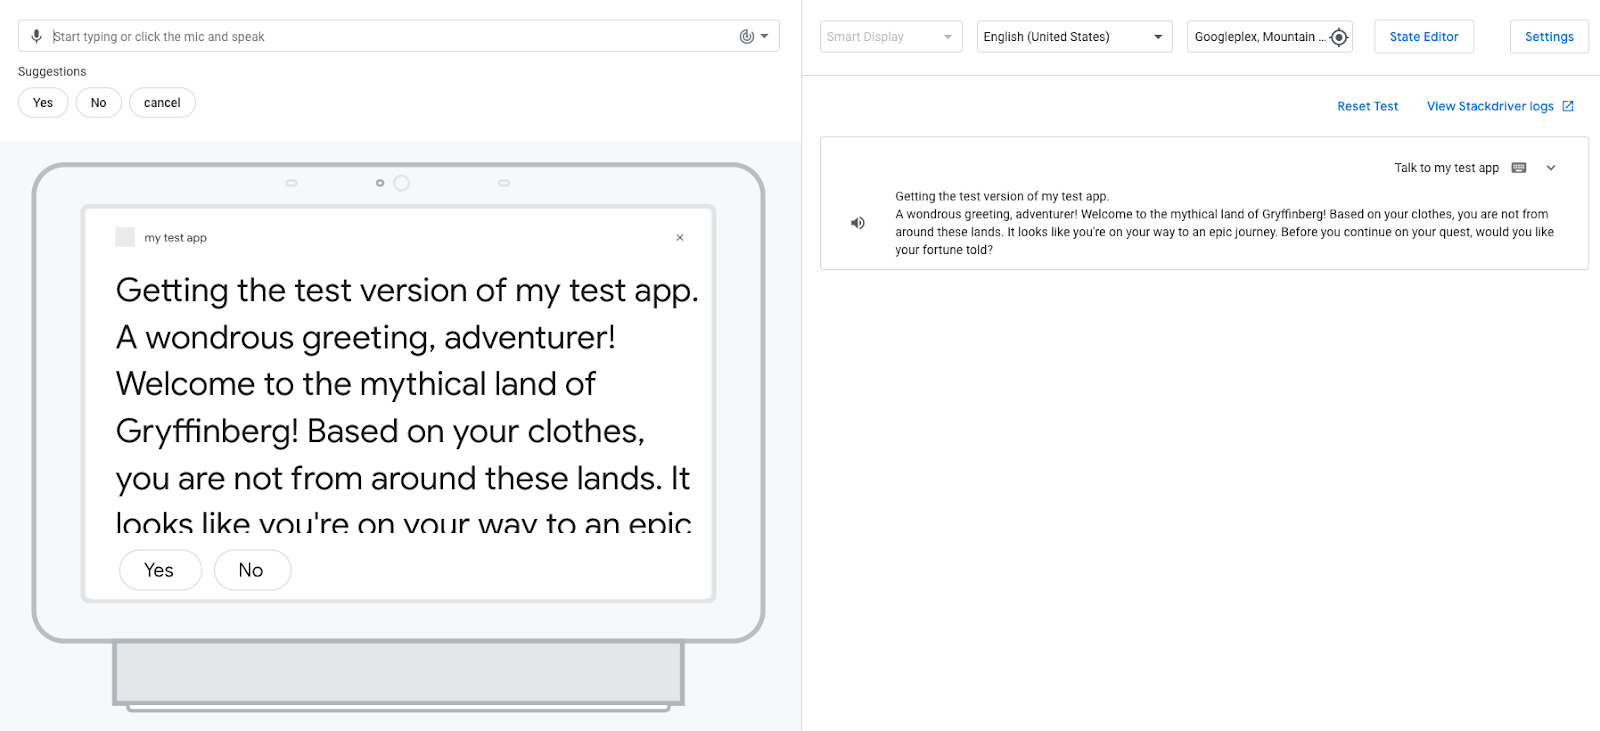
At this point, your Action should transition from the main invocation to the Start scene and ask the user if they'd like their fortune told. Suggestion chips should also appear in the simulated display.
To test your Action in the simulator, follow these steps:
- In the navigation bar, click Test to take you to the simulator.
- To test your Action in the simulator, type
Talk to my test appin the Input field and pressEnter. Your Action should respond with theMain invocationprompt and the addedStartscene prompt,"Before you continue on your quest, would you like your fortune told?".
The following screenshot shows this interaction:
- Click the
YesorNosuggestion chip to respond to the prompt. (You can also say "Yes" or "No" or enterYesorNoin the Input field.)
When you respond to the prompt, your Action responds with a message indicating that it can't understand your input: "Sorry, I didn't catch that. Can you try again?" Since you haven't yet configured your Action to understand and respond to "Yes" or "No" input, your Action matches your input to a NO_MATCH intent.
By default, the NO_MATCH system intent provides generic responses, but you can customize these responses to indicate to the user that you didn't understand their input. The Assistant ends the user's conversation with your Action after it can't match user input three times.
Add yes and no intents
Now that users can respond to the question your Action poses, you can configure your Action to understand the users' responses ("Yes" or "No"). In the following sections, you create user intents that are matched when the user says "Yes" or "No", and add these intents to the Start scene.
Create yes intent
To create the yes intent, follow these steps:
- Click Develop in the navigation bar.
- Click Custom Intents in the navigation bar to open the list of intents.
- Click + (plus sign) at the end of the list of intents.
- Name the new intent
yesand pressEnter. - Click the
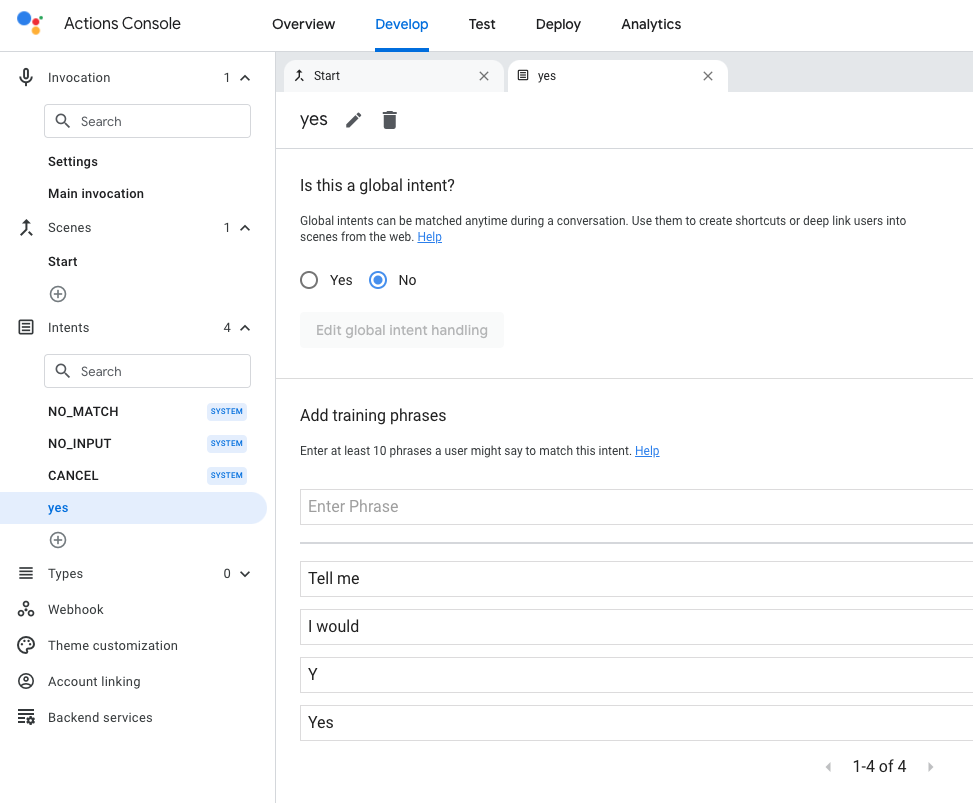
yesintent to open theyesintent page. - In the Add training phrases section, click the Enter Phrase text box and enter the following phrases:
YesYI wouldTell me
- Click Save.
Add yes intent to Start scene
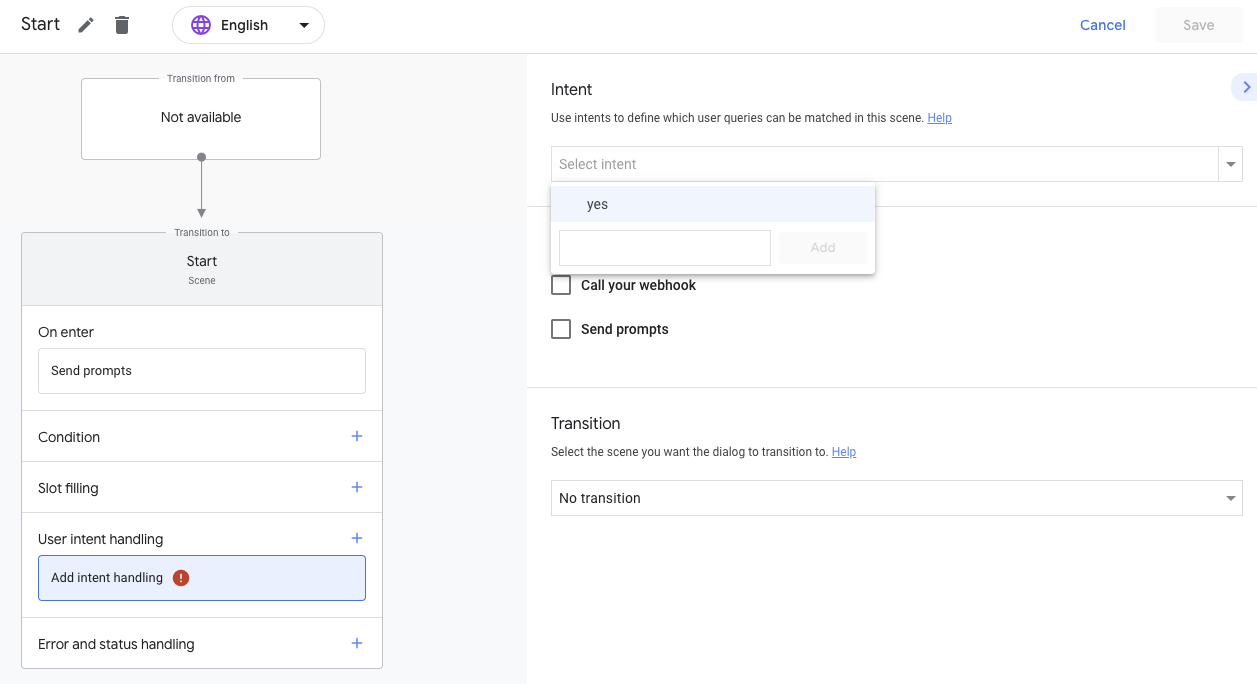
Now, the Action can understand when a user is expressing a "yes" intent. You can add the yes user intent to the Start scene because the user is responding to the Start prompt ("Before you continue on your quest, would you like your fortune told?").
To add this user intent to the Start scene, follow these steps:
- Click the Start scene in the navigation bar.
- Click the + (plus sign) in the
Startscene next to User intent handling. - Select yes in the intent drop-down menu.
- Click Send prompts and update the
speechfield with the following text:Your future depends on the aid you choose to use for your quest. Choose wisely! Farewell, stranger.
The code in your editor should look like the following snippet:
candidates:
  - first_simple:
      variants:
        - speech: >-
            Your future depends on the aid you choose to use for your quest. Choose
            wisely! Farewell, stranger.
- In the Transition section, click the drop-down menu and select End conversation.
- Click Save.
Test yes intent in simulator
At this point, your Action understands when the user wants to hear their fortune and returns the appropriate response.
To test this intent in the simulator, follow these steps:
- In the navigation bar, click Test.
- To test your Action in the simulator, type
Talk to my test appin the Input field and pressEnter. - Type
Yesin the Input field and pressEnter. Alternatively, click the Yes suggestion chip.
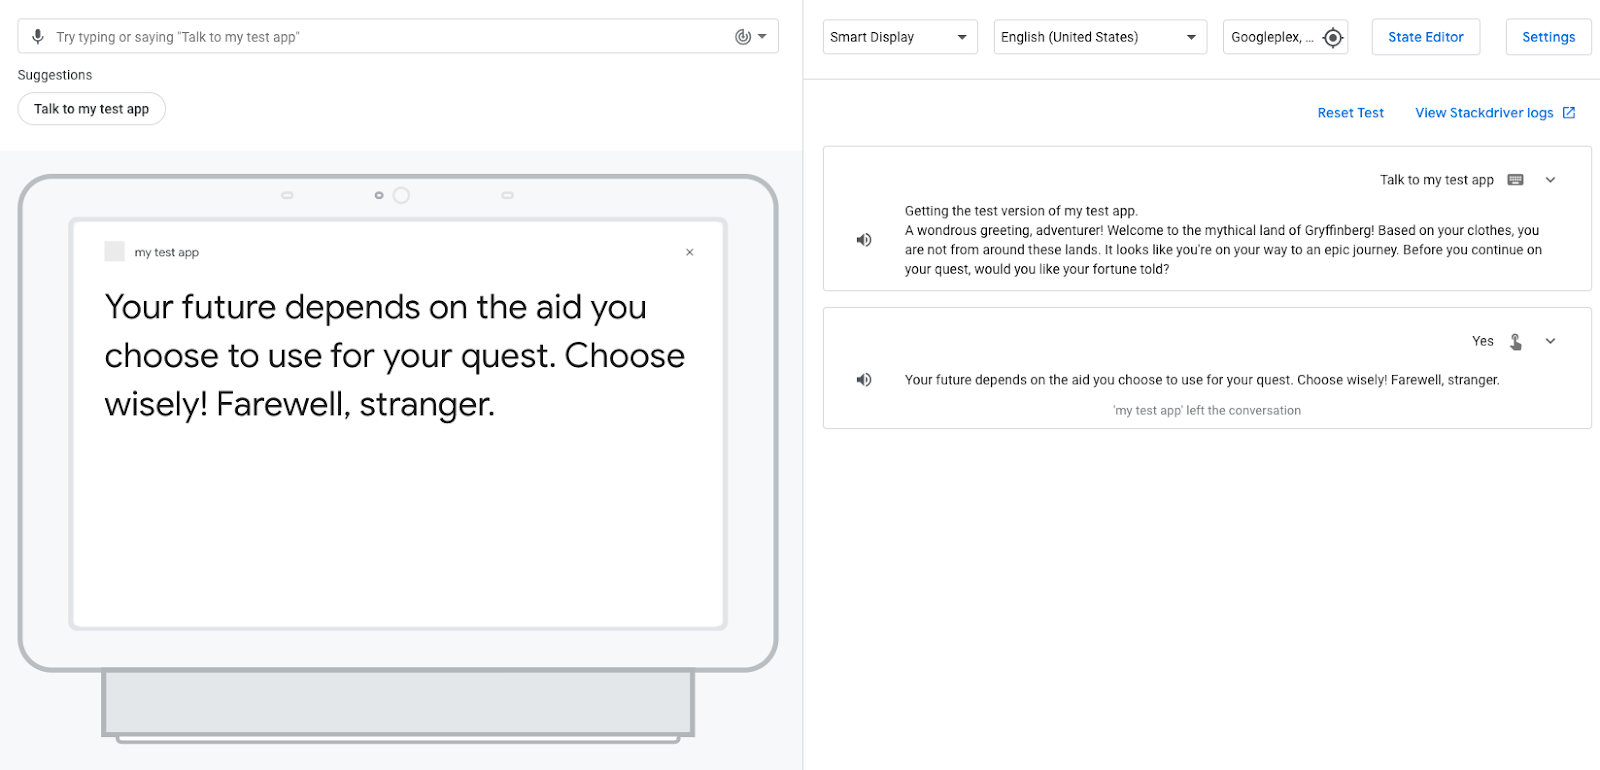
Your Action responds to the user and tells them their fortune depends on the aid they choose. Your Action then ends the session because you selected the End conversation transition for the yes intent.
Create no intent
Now, you need to create the no intent to understand and respond to the user when they don't want to hear their fortune. To create this intent, follow these steps:
- Click Develop in the navigation bar.
- Click Custom Intents in the navigation bar to open the list of intents.
- Click + (plus sign) at the end of the list of intents.
- Name the new intent
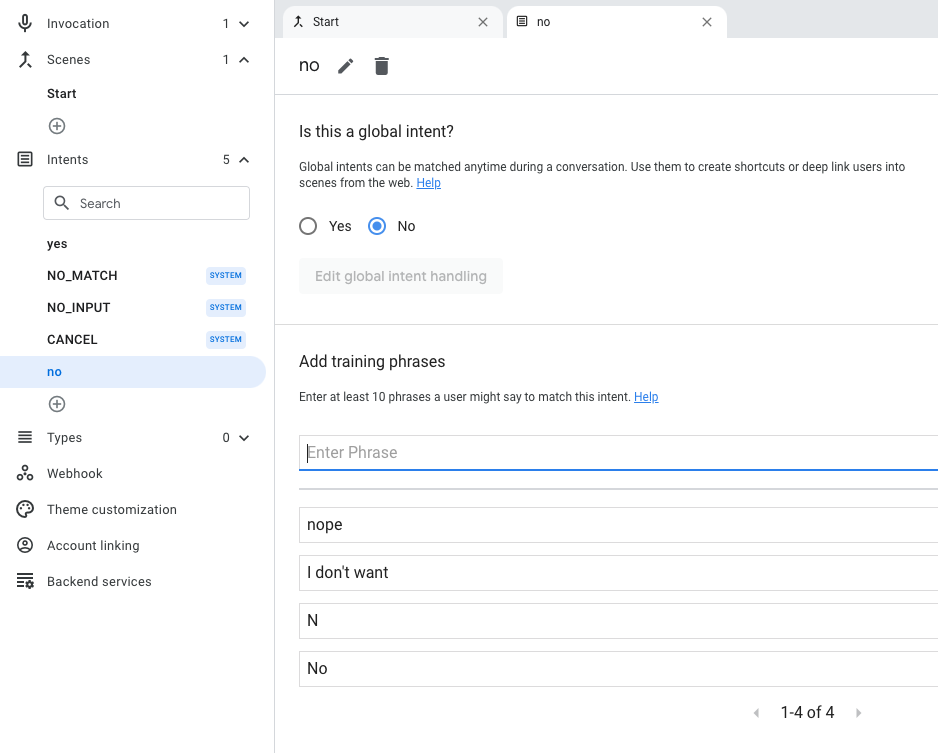
noand pressEnter. - Click no to open the **
no** intent page. - In the Add training phrases section, click in to the Enter Phrase text box and enter the following phrases:
NoNI don't wantnope
- Click Save.
Add no intent to Start scene
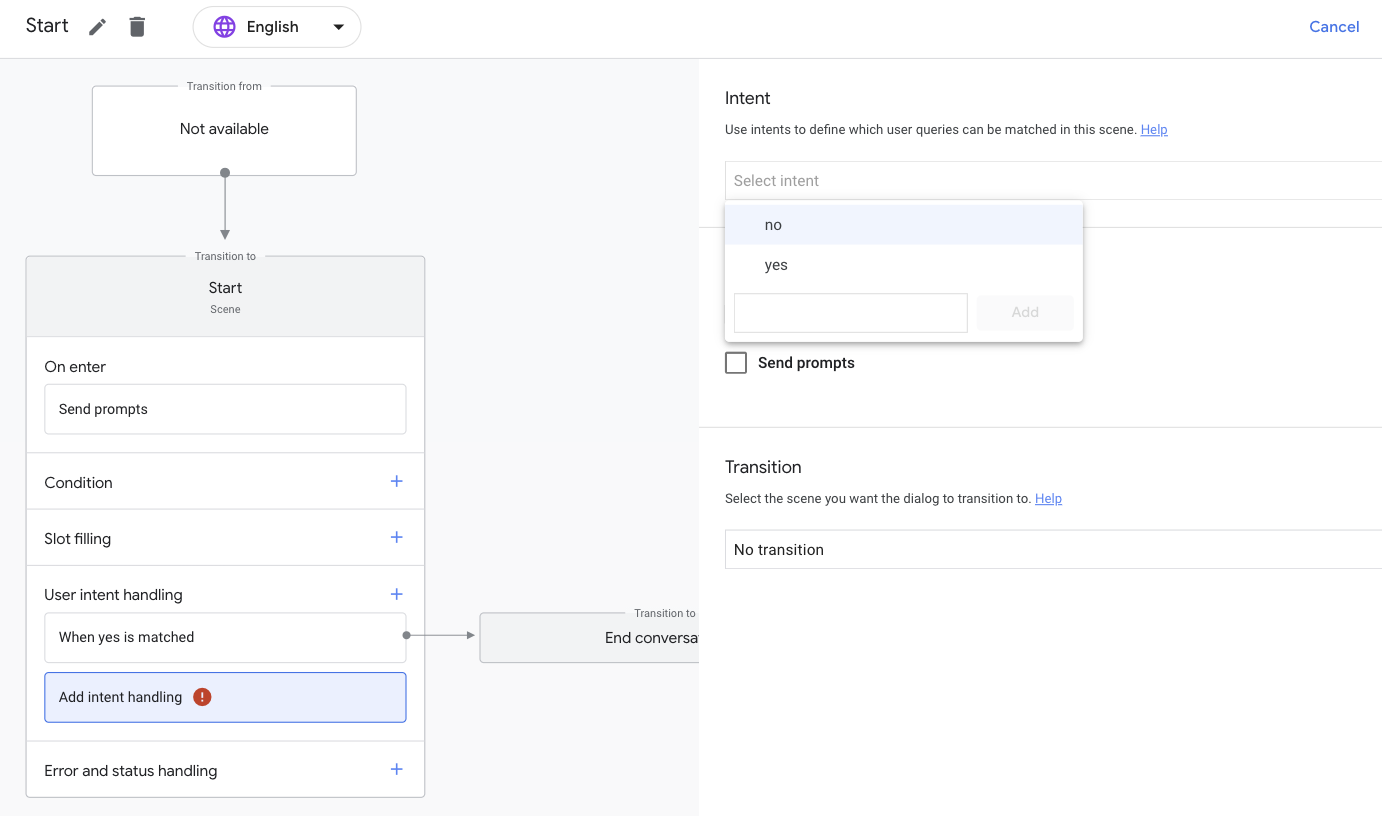
Now, the Action can understand when a user is expressing "no" or something similar to "no", like "nope". You need to add the no user intent to the Start scene because the user is responding to the Start prompt ("Before you continue on your quest, would you like your fortune told?").
To add this intent for the Start scene, follow these steps:
- Click the Start scene in the navigation bar.
- Click the + (plus sign) in the
Startscene next to User intent handling. - In the Intent section, select no in the drop-down menu.
- Click Send prompts.
- Update the
speechfield with the following text:I understand, stranger. Best of luck on your quest! Farewell.
The code in your editor should look like the following snippet:
 candidates:
  - first_simple:
      variants:
        - speech: >-
             I understand, stranger. Best of luck on your quest! Farewell.
- In the Transition section, select End conversation from the drop-down menu.
- Click Save.
Test no intent in simulator
At this point, your Action understands when the user does not want to hear their fortune and returns the appropriate response.
To test this intent in the simulator, follow these steps:
- In the navigation bar, click Test.
- Type
Talk to my test appin the Input field and pressEnter. - Type
Noin the Input field and pressEnter. Alternatively, click the No suggestion chip.
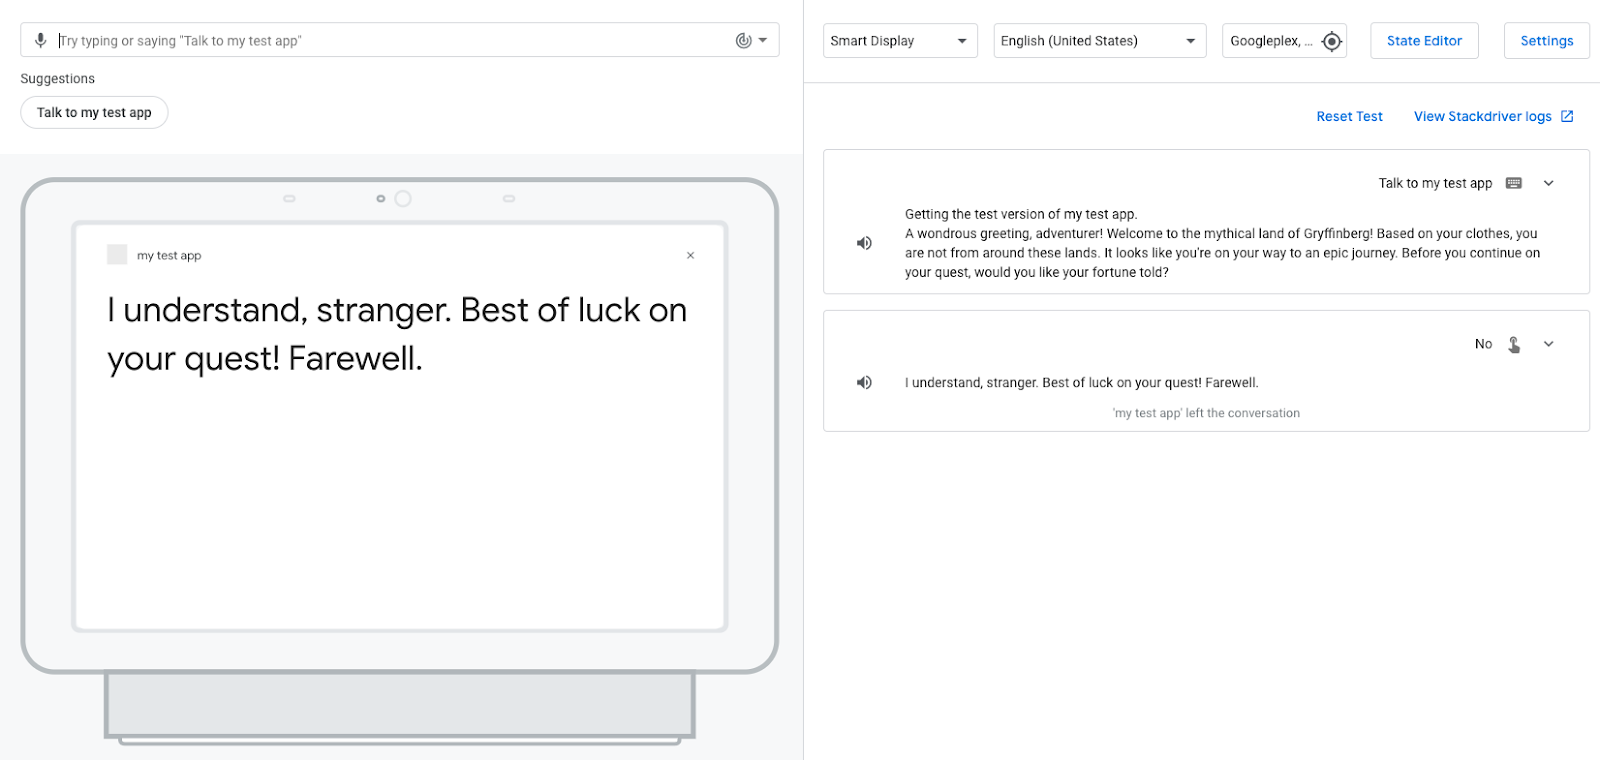
Instead of giving the user their fortune, your Action wishes them luck on their journey. Your Action then ends the session because you selected the End conversation transition for the no intent.
5. Implement fulfillment
Currently, your Action's responses are static; when a scene containing a prompt is activated, your Action sends the same prompt each time. In this section, you implement fulfillment that contains the logic to construct a dynamic conversational response.
Your fulfillment identifies whether the user is a returning user or a new user and modifies the greeting message of the Action for returning users. The greeting message is shortened for returning users and acknowledges the user's return: "A wondrous greeting, adventurer! Welcome back to the mythical land of Gryffinberg!"
For this codelab, use the Cloud Functions editor in the Actions console to edit and deploy your fulfillment code.
Your Action can trigger webhooks that notify your fulfillment of an event that occurs during an invocation or specific parts of a scene's execution. When a webhook is triggered, your Action sends a request with a JSON payload to your fulfillment along with the name of the handler to use to process the event. This handler carries out some logic and returns a corresponding JSON response.
Build your fulfillment
You can now modify your fulfillment in the inline editor to generate different prompts for returning users and new users when they invoke your Action.
To add this logic to your fulfillment, follow these steps:
- Click Develop in the navigation bar.
- Click the Webhook tab in the navigation bar.
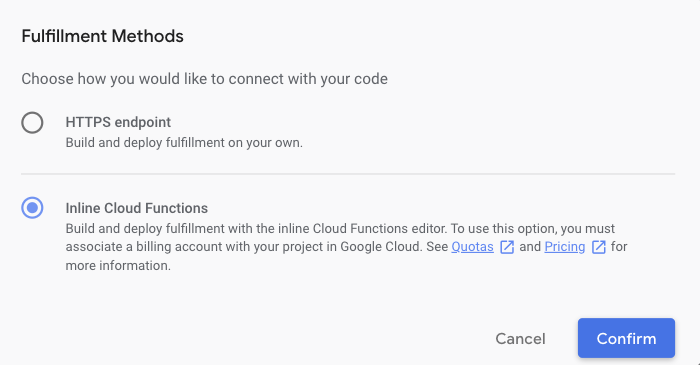
- Select the Inline Cloud Functions checkbox.
- Click Confirm. Boilerplate code is automatically added for the
index.jsandpackage.jsonfiles.
- Replace the contents of
index.jswith the following code:
index.js
const { conversation } = require('@assistant/conversation');
const functions = require('firebase-functions');

const app = conversation({debug: true});

app.handle('greeting', conv => {
 let message = 'A wondrous greeting, adventurer! Welcome back to the mythical land of Gryffinberg!';
 if (!conv.user.lastSeenTime) {
   message = 'Welcome to the mythical land of  Gryffinberg! Based on your clothes, you are not from around these lands. It looks like you\'re on your way to an epic journey.';
 }
 conv.add(message);
});


exports.ActionsOnGoogleFulfillment = functions.https.onRequest(app);
- Click Save Fulfillment.
- Click Deploy Fulfillment.
Wait a couple minutes for Cloud Functions to provision and deploy your fulfillment. You should see a Cloud Function deployment in progress... message above the code editor. When the code deploys successfully, the message updates to Your Cloud Function deployment is up to date.
Understand the code
Your fulfillment, which uses the Actions on Google Fulfillment library for Node.js, responds to HTTP requests from Google Assistant.
In the previous code snippet, you define the greeting handler, which checks if the user has previously visited the Action by checking the lastSeenTime property. If lastSeenTime is not defined, the user is new, and the greeting handler provides the new user greeting.
Update main invocation to trigger a webhook
Now that you've defined the greeting function, you can configure the greeting event handler in your main invocation intent so your Action knows to call this function when the user invokes your Action.
To configure your Action to call the new greeting handler, follow these steps:
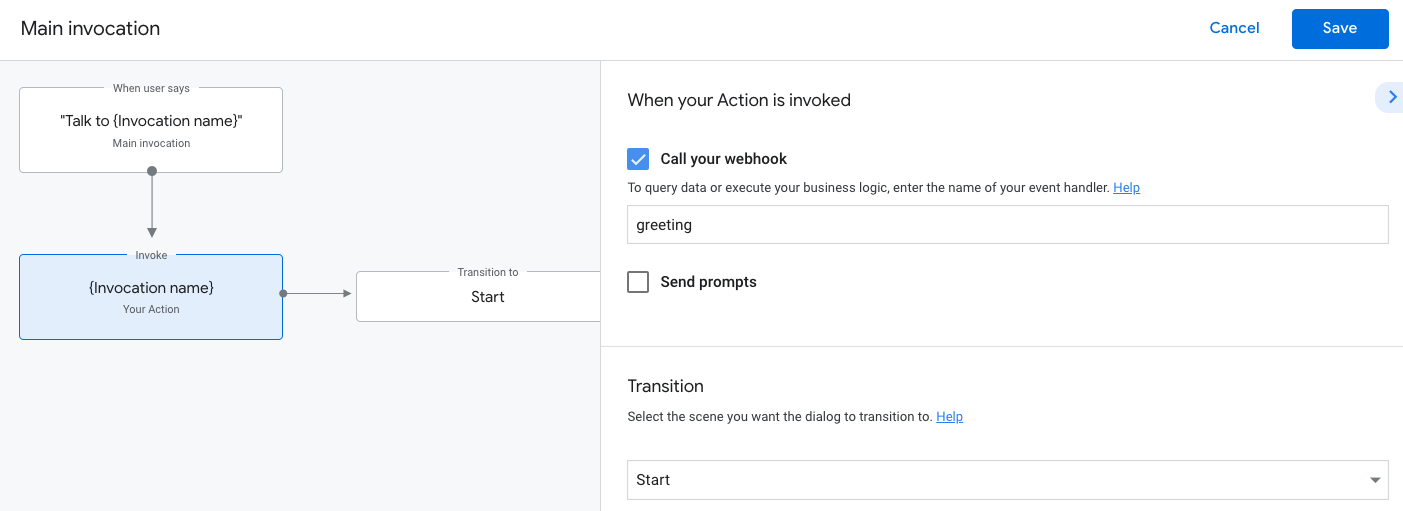
- Click Main invocation in the navigation bar.
- Clear Send prompt.
- Select the Call your webhook checkbox.
- Add
greetingin the text box.
- Click Save.
Test updated main invocation in simulator
To test your Action in the simulator, follow these steps:
- In the navigation bar, click Test to take you to the simulator.
- Type
Talk to my test appin the Input field and pressEnter.
Because you've tested your Action earlier in this codelab, you are not a new user, so you receive the following shortened greeting: "A wondrous greeting, adventurer! Welcome back to the mythical land of Gryffinberg!..."
Clean up your project [recommended]
To avoid incurring possible charges, it is recommended to remove projects that you don't intend to use. To delete the projects you created in this codelab, follow these steps:
- To delete the Cloud Project and resources, complete the steps listed in the Shutting down (deleting) projects section.
- Optional: To immediately remove your project from the Actions console, complete the steps listed in the Delete a project section. If you don't complete this step, your project will automatically be removed after approximately 30 days.
6. Congratulations!
You know the basics of building Actions for Google Assistant.
What you covered
- How to set up an Actions project with the Actions console
- How to add a prompt to the main invocation so that users can start a conversation with your Action
- How to create a conversational interface with scenes, intents, transitions, suggestion chips, and fulfillment
- How to test your Action with the Actions simulator
Learn more
Explore the following resources to learn more about building Actions for Google Assistant:
- Build Actions for Google Assistant using Actions Builder (Level 2) codelab to continue building out your Conversational Action from this codelab
- The official documentation site for developing Actions for Google Assistant
- Actions on Google GitHub page for sample code and libraries
- The official Reddit community for developers working with Assistant
- @ActionsOnGoogle on Twitter for the latest announcements (tweet with #AoGDevs to share what you build)
Feedback survey
Before you go, please fill out a brief survey about your experience.
