1. 總覽

本程式碼研究室將教您如何修改現有的網頁影片應用程式,在支援 Google Cast 的裝置上投放內容。
什麼是 Google Cast?
使用者可以透過 Google Cast,將行動裝置中的內容投放到電視上。使用者就能將行動裝置當成遙控器,控制電視上的媒體播放。
透過 Google Cast SDK,您可以擴充應用程式,控制電視或音響系統。Cast SDK 可讓您根據 Google Cast 設計檢查清單新增必要的使用者介面元件。
我們提供 Google Cast 設計檢查清單,確保所有支援的平台都能提供簡單易懂的 Cast 使用者體驗。
我們要建構什麼內容?
完成本程式碼研究室後,您將擁有一個 Chrome 網頁影片應用程式,可將影片 Cast 到 Google Cast 裝置。
課程內容
- 如何將 Google Cast SDK 新增至範例影片應用程式。
- 如何新增 Cast 按鈕,選取 Google Cast 裝置。
- 如何連線至 Cast 裝置並啟動媒體接收器。
- 如何投放影片。
- 如何整合 Cast Connect
軟硬體需求
- 最新版 Google Chrome 瀏覽器。
- HTTPS 代管服務,例如 Firebase 代管或 ngrok。
- 已設定網路連線的 Google Cast 裝置,例如 Chromecast 或 Android TV。
- 具備 HDMI 輸入端的電視或螢幕。
- 如要測試 Cast Connect 整合,必須使用 Chromecast (支援 Google TV),但其餘程式碼研究室內容則不一定需要。如果沒有,請略過本教學課程結尾的「新增 Cast Connect 支援」步驟。
體驗
- 須具備先前的網頁開發知識。
- 你還需要具備觀看電視的相關知識 :)
您會如何使用本教學課程?
您對建構網頁應用程式的體驗滿意嗎?
你對觀看電視的體驗滿意嗎?
2. 取得程式碼範例
您可以將所有範例程式碼下載到電腦...
並解壓縮下載的 ZIP 檔案。
3. 執行範例應用程式
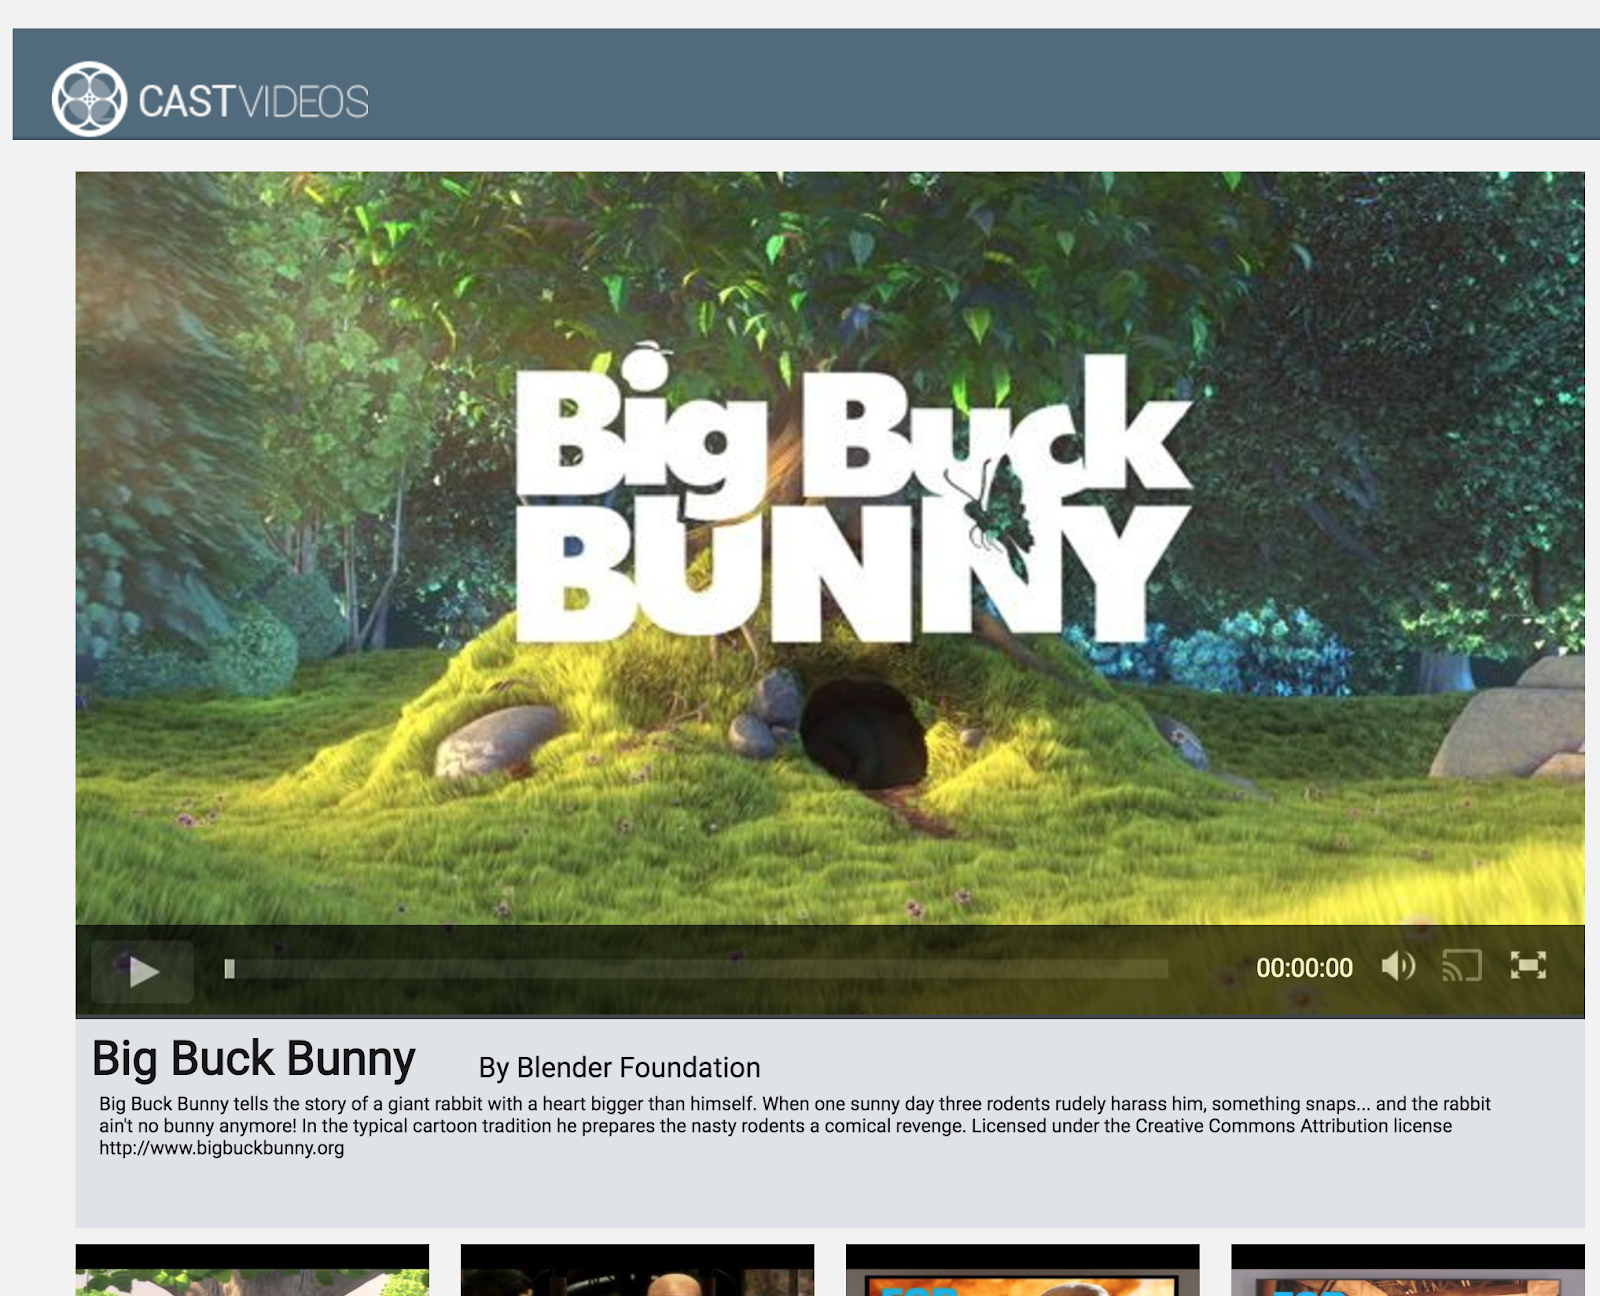
首先,我們來看看完成的範例應用程式。這個應用程式是基本影片播放器。使用者可以從清單中選取影片,然後在裝置上播放影片,或將影片投放到 Google Cast 裝置。
如要使用完成的應用程式,必須先代管。
如果沒有可用的伺服器,可以使用 Firebase Hosting 或 ngrok。
執行伺服器
設定好所選服務後,請前往 app-done 並啟動伺服器。
在瀏覽器中,前往您代管的範例 HTTPS 網址。
- 畫面中應會顯示視訊應用程式。
- 按一下「投放」按鈕,然後選取 Google Cast 裝置。
- 選取影片,然後按一下播放按鈕。
- 影片就會開始在 Google Cast 裝置上播放。
按一下影片元素中的暫停按鈕,即可暫停接收器上的影片。按一下影片元素中的播放按鈕,即可繼續播放影片。
按一下「投放」按鈕,即可停止將內容投放到 Google Cast 裝置。
請先停止伺服器,再繼續操作。
4. 準備啟動專案
我們需要為您下載的啟動應用程式新增 Google Cast 支援。以下是我們在本程式碼研究室中會使用的 Google Cast 術語:
- 傳送者應用程式在行動裝置或筆電上執行,
- Google Cast 裝置上執行接收端應用程式。
現在,您可以使用慣用的文字編輯器,在入門專案的基礎上進行建構:
- 從下載的程式碼範例中選取

app-start目錄。 - 使用伺服器執行應用程式,並探索 UI。
請注意,在完成本程式碼研究室的過程中,您需要根據服務在伺服器上重新託管範例。
應用程式設計
應用程式會從遠端網路伺服器擷取影片清單,並提供清單供使用者瀏覽。使用者可以選取影片查看詳細資料,或在行動裝置上播放影片。
這個應用程式包含一個主要檢視畫面 (定義於 index.html) 和主要控制器 CastVideos.js.
index.html
這個 HTML 檔案會宣告網頁應用程式的幾乎所有 UI。
檢視畫面有幾個部分,我們有 div#main_video,其中包含影片元素。與影片 div 相關的是 div#media_control,這個元素會定義影片元素的所有控制項。下方是 media_info,顯示所選影片的詳細資料。最後,carousel div 會在 div 中顯示影片清單。
index.html 檔案也會啟動 Cast SDK,並告知 CastVideos 函式載入。
這些元素的大部分內容都會在 CastVideos.js 中定義、插入及控管。我們來看看吧。
CastVideos.js
這個指令碼會管理 Cast Videos 網頁應用程式的所有邏輯。CastVideos.js 中定義的影片清單和相關中繼資料會包含在名為 mediaJSON 的物件中。
有幾個主要區段共同負責管理及播放本機和遠端影片。整體而言,這是一個相當簡單的網頁應用程式。
CastPlayer 是管理整個應用程式的主要類別,負責設定播放器、選取媒體,以及將事件繫結至 PlayerHandler 以播放媒體。CastPlayer.prototype.initializeCastPlayer 方法會設定所有 Cast 功能。CastPlayer.prototype.switchPlayer 可在本地和遠端播放器之間切換狀態。CastPlayer.prototype.setupLocalPlayer 和 CastPlayer.prototype.setupRemotePlayer 會初始化本機和遠端玩家。
PlayerHandler 類別負責管理媒體播放作業。還有許多其他方法負責管理媒體和播放的詳細資料。
常見問題
5. 新增「投放」按鈕
支援 Cast 的應用程式會在影片元素中顯示「投放」按鈕。按一下「投放」按鈕,即可選取要使用的 Cast 裝置。如果使用者在傳送端裝置上播放本機內容,選取 Cast 裝置後,系統就會在該裝置上開始或繼續播放內容。在 Cast 工作階段期間,使用者隨時可以按一下「投放」按鈕,停止將應用程式投放到 Cast 裝置。如 Google Cast 設計檢查清單所述,使用者必須能在應用程式的任何畫面中連線或中斷與 Cast 裝置的連線。
設定
啟動專案需要與完成的範例應用程式相同的依附元件和設定,但這次請代管 app-start 的內容。
在瀏覽器中前往您代管的範例 https 網址。
請注意,視服務而定,您進行變更後,可能需要在伺服器上重新託管範例。
初始化
Cast 架構具有全域單例模式物件 CastContext,可協調所有架構活動。這個物件必須在應用程式生命週期的早期初始化,通常是從指派給 window['__onGCastApiAvailable'] 的回呼呼叫,該回呼會在載入 Cast SDK 後呼叫,並可供使用。在本例中,CastContext 會在 CastPlayer.prototype.initializeCastPlayer 中呼叫,而 CastPlayer.prototype.initializeCastPlayer 則會從上述回呼呼叫。
初始化 CastContext 時,必須提供 options JSON 物件。這個類別包含會影響架構行為的選項。其中最重要的就是接收器應用程式 ID,這個 ID 可用來篩選可用的 Cast 裝置清單,只顯示能夠執行指定應用程式的裝置,並在啟動 Cast 工作階段時啟動接收器應用程式。
開發支援 Cast 的應用程式時,您必須先註冊成為 Cast 開發人員,然後取得應用程式的應用程式 ID。在本程式碼研究室中,我們將使用範例應用程式 ID。
在 body 區段的結尾,將下列程式碼新增至 index.html:
<script type="text/javascript" src="https://www.gstatic.com/cv/js/sender/v1/cast_sender.js?loadCastFramework=1"></script>
在 index.html 中加入下列程式碼,初始化 CastVideos 應用程式,以及初始化 CastContext:
<script src="CastVideos.js"></script>
<script type="text/javascript">
var castPlayer = new CastPlayer();
window['__onGCastApiAvailable'] = function(isAvailable) {
  if (isAvailable) {
    castPlayer.initializeCastPlayer();
  }
};
</script>
現在,我們需要在 CastVideos.js 中新增對應的方法,也就是我們剛在 index.html 中呼叫的方法。讓我們新增名為 initializeCastPlayer 的方法,在 CastContext 上設定選項,並初始化新的 RemotePlayer 和 RemotePlayerControllers:
/**
 * This method sets up the CastContext, and a few other members
 * that are necessary to play and control videos on a Cast
 * device.
 */
CastPlayer.prototype.initializeCastPlayer = function() {

    var options = {};

    // Set the receiver application ID to your own (created in
    // the Google Cast Developer Console), or optionally
    // use the chrome.cast.media.DEFAULT_MEDIA_RECEIVER_APP_ID
    options.receiverApplicationId = 'C0868879';

    // Auto join policy can be one of the following three:
    // ORIGIN_SCOPED - Auto connect from same appId and page origin
    // TAB_AND_ORIGIN_SCOPED - Auto connect from same appId, page origin, and tab
    // PAGE_SCOPED - No auto connect
    options.autoJoinPolicy = chrome.cast.AutoJoinPolicy.ORIGIN_SCOPED;

    cast.framework.CastContext.getInstance().setOptions(options);

    this.remotePlayer = new cast.framework.RemotePlayer();
    this.remotePlayerController = new cast.framework.RemotePlayerController(this.remotePlayer);
    this.remotePlayerController.addEventListener(
        cast.framework.RemotePlayerEventType.IS_CONNECTED_CHANGED,
        this.switchPlayer.bind(this)
    );
};
最後,我們需要為 RemotePlayer 和 RemotePlayerController 建立變數:
var CastPlayer = function() {
  //...
  /* Cast player variables */
  /** @type {cast.framework.RemotePlayer} */
  this.remotePlayer = null;
  /** @type {cast.framework.RemotePlayerController} */
  this.remotePlayerController = null;
  //...
};
投放按鈕
CastContext 初始化完成後,我們需要新增 Cast 按鈕,讓使用者選取 Cast 裝置。Cast SDK 提供名為 google-cast-launcher 的 Cast 按鈕元件,ID 為「castbutton"」。只要在 media_control 區段中新增 button,即可將這個元件加入應用程式的影片元素。
按鈕元素應如下所示:
<google-cast-launcher id="castbutton"></google-cast-launcher>
在 media_control 區段的 index.html 中新增下列程式碼:
<div id="media_control">
  <div id="play"></div>
  <div id="pause"></div>
  <div id="progress_bg"></div>
  <div id="progress"></div>
  <div id="progress_indicator"></div>
  <div id="fullscreen_expand"></div>
  <div id="fullscreen_collapse"></div>
  <google-cast-launcher id="castbutton"></google-cast-launcher>
  <div id="audio_bg"></div>
  <div id="audio_bg_track"></div>
  <div id="audio_indicator"></div>
  <div id="audio_bg_level"></div>
  <div id="audio_on"></div>
  <div id="audio_off"></div>
  <div id="duration">00:00:00</div>
</div>
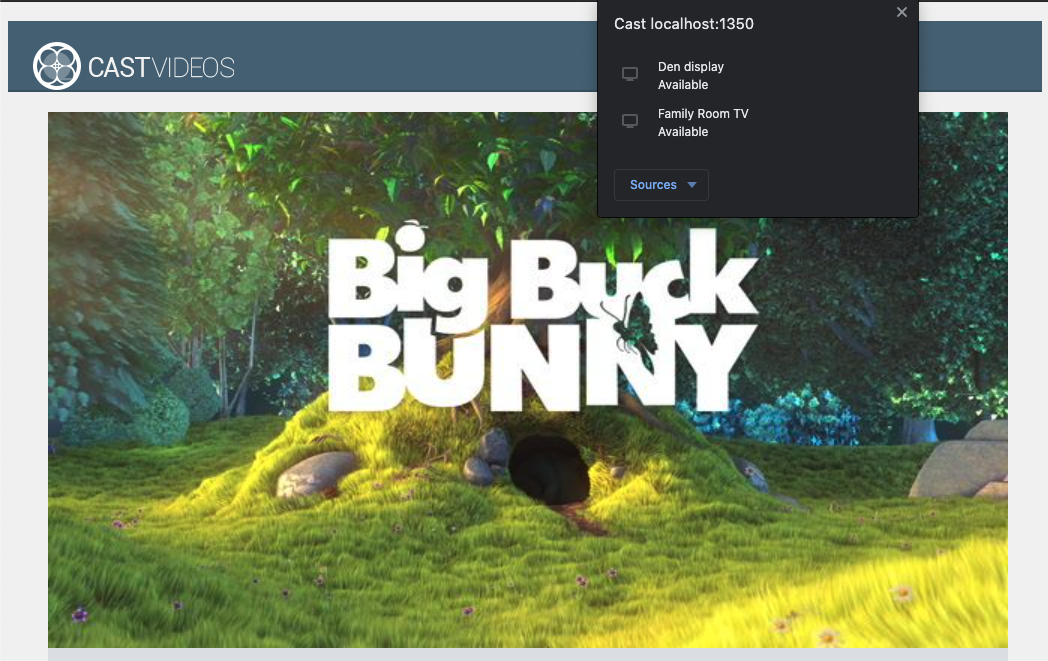
現在請重新整理 Chrome 瀏覽器中的網頁。影片元素中會顯示「投放」按鈕,點選後會列出區域網路中的 Cast 裝置。裝置探索功能由 Chrome 瀏覽器自動管理。選取 Cast 裝置,範例接收器應用程式就會載入至 Cast 裝置。
我們尚未支援媒體播放功能,因此你還無法在 Cast 裝置上播放影片。按一下「投放」按鈕即可停止投放。
6. 投放影片內容
我們會擴充範例應用程式,以便在 Cast 裝置上遠端播放影片。為此,我們需要監聽 Cast 架構產生的各種事件。
投放媒體
整體來說,如要在 Cast 裝置上播放媒體,必須執行下列操作:
- 從 Cast SDK 建立
MediaInfoJSON物件,模擬媒體項目。 - 使用者連線至 Cast 裝置,啟動接收器應用程式。
- 將
MediaInfo物件載入接收器,然後播放內容。 - 追蹤媒體狀態。
- 根據使用者互動,將播放指令傳送至接收器。
步驟 1 是將一個物件對應至另一個物件;MediaInfo 是 Cast SDK 可解讀的內容,而 mediaJSON 是媒體項目的應用程式封裝內容,我們可以輕鬆將 mediaJSON 對應至 MediaInfo。我們已在上一個章節中完成步驟 2。使用 Cast SDK 即可輕鬆完成步驟 3。
範例應用程式的 switchPlayer 方法已區分本機和遠端播放:CastPlayer
if (cast && cast.framework) {
  if (this.remotePlayer.isConnected) {
    //...
在本程式碼研究室中,您不必瞭解所有範例播放器邏輯的確切運作方式。不過,請務必瞭解,您必須修改應用程式的媒體播放器,才能同時支援本機和遠端播放。
目前本機播放器一律處於本機播放狀態,因為播放器還不瞭解投放狀態。我們需要根據 Cast 架構中發生的狀態轉換更新 UI。舉例來說,如果開始投放,我們需要停止本機播放並停用部分控制項。同樣地,如果我們在這個檢視畫面控制器中停止投放,就需要轉換為本機播放。如要處理這類情況,我們需要監聽 Cast 架構產生的各種事件。
管理 Cast 工作階段
在 Cast 架構中,Cast 工作階段會結合連線至裝置、啟動 (或加入現有工作階段)、連線至接收器應用程式,以及視需要初始化媒體控制項管道等步驟。Cast 架構會透過媒體控制管道,從接收器傳送及接收媒體播放相關訊息。
使用者選取 Cast 按鈕中的裝置後,系統就會自動啟動 Cast 工作階段,並在使用者中斷連線時自動停止。如果發生網路問題,Cast 架構也會自動重新連線至接收器工作階段。
Cast 工作階段由 CastSession 管理,可透過 cast.framework.CastContext.getInstance().getCurrentSession() 存取。EventListener 回呼可用於監控工作階段事件,例如建立、暫停、繼續和終止。
在目前的應用程式中,所有工作階段和狀態管理作業都會在 setupRemotePlayer 方法中處理。請在應用程式的 CastVideos.js 中加入下列程式碼,開始設定:
/**
 * Set the PlayerHandler target to use the remote player
 */
CastPlayer.prototype.setupRemotePlayer = function () {
    var castSession = cast.framework.CastContext.getInstance().getCurrentSession();

    this.playerHandler.setTarget(playerTarget);

    // Setup remote player volume right on setup
    // The remote player may have had a volume set from previous playback
    if (this.remotePlayer.isMuted) {
        this.playerHandler.mute();
    }
    var currentVolume = this.remotePlayer.volumeLevel * FULL_VOLUME_HEIGHT;
    var p = document.getElementById('audio_bg_level');
    p.style.height = currentVolume + 'px';
    p.style.marginTop = -currentVolume + 'px';

    this.hideFullscreenButton();

    this.playerHandler.play();
};
我們仍需繫結回呼中的所有事件,並處理所有傳入的事件。這項作業相當簡單,現在就來完成:
/**
 * Set the PlayerHandler target to use the remote player
 */
CastPlayer.prototype.setupRemotePlayer = function () {
    var castSession = cast.framework.CastContext.getInstance().getCurrentSession();

    // Add event listeners for player changes which may occur outside sender app
    this.remotePlayerController.addEventListener(
        cast.framework.RemotePlayerEventType.IS_PAUSED_CHANGED,
        function() {
            if (this.remotePlayer.isPaused) {
                this.playerHandler.pause();
            } else {
                this.playerHandler.play();
            }
        }.bind(this)
    );

    this.remotePlayerController.addEventListener(
        cast.framework.RemotePlayerEventType.IS_MUTED_CHANGED,
        function() {
            if (this.remotePlayer.isMuted) {
                this.playerHandler.mute();
            } else {
                this.playerHandler.unMute();
            }
        }.bind(this)
    );

    this.remotePlayerController.addEventListener(
        cast.framework.RemotePlayerEventType.VOLUME_LEVEL_CHANGED,
        function() {
            var newVolume = this.remotePlayer.volumeLevel * FULL_VOLUME_HEIGHT;
            var p = document.getElementById('audio_bg_level');
            p.style.height = newVolume + 'px';
            p.style.marginTop = -newVolume + 'px';
        }.bind(this)
    );

    // This object will implement PlayerHandler callbacks with
    // remotePlayerController, and makes necessary UI updates specific
    // to remote playback
    var playerTarget = {};

    playerTarget.play = function () {
        if (this.remotePlayer.isPaused) {
            this.remotePlayerController.playOrPause();
        }

        var vi = document.getElementById('video_image');
        vi.style.display = 'block';
        var localPlayer = document.getElementById('video_element');
        localPlayer.style.display = 'none';
    }.bind(this);

    playerTarget.pause = function () {
        if (!this.remotePlayer.isPaused) {
            this.remotePlayerController.playOrPause();
        }
    }.bind(this);

    playerTarget.stop = function () {
         this.remotePlayerController.stop();
    }.bind(this);

    playerTarget.getCurrentMediaTime = function() {
        return this.remotePlayer.currentTime;
    }.bind(this);

    playerTarget.getMediaDuration = function() {
        return this.remotePlayer.duration;
    }.bind(this);

    playerTarget.updateDisplayMessage = function () {
        document.getElementById('playerstate').style.display = 'block';
        document.getElementById('playerstatebg').style.display = 'block';
        document.getElementById('video_image_overlay').style.display = 'block';
        document.getElementById('playerstate').innerHTML =
            this.mediaContents[ this.currentMediaIndex]['title'] + ' ' +
            this.playerState + ' on ' + castSession.getCastDevice().friendlyName;
    }.bind(this);

    playerTarget.setVolume = function (volumeSliderPosition) {
        // Add resistance to avoid loud volume
        var currentVolume = this.remotePlayer.volumeLevel;
        var p = document.getElementById('audio_bg_level');
        if (volumeSliderPosition < FULL_VOLUME_HEIGHT) {
            var vScale =  this.currentVolume * FULL_VOLUME_HEIGHT;
            if (volumeSliderPosition > vScale) {
                volumeSliderPosition = vScale + (pos - vScale) / 2;
            }
            p.style.height = volumeSliderPosition + 'px';
            p.style.marginTop = -volumeSliderPosition + 'px';
            currentVolume = volumeSliderPosition / FULL_VOLUME_HEIGHT;
        } else {
            currentVolume = 1;
        }
        this.remotePlayer.volumeLevel = currentVolume;
        this.remotePlayerController.setVolumeLevel();
    }.bind(this);

    playerTarget.mute = function () {
        if (!this.remotePlayer.isMuted) {
            this.remotePlayerController.muteOrUnmute();
        }
    }.bind(this);

    playerTarget.unMute = function () {
        if (this.remotePlayer.isMuted) {
            this.remotePlayerController.muteOrUnmute();
        }
    }.bind(this);

    playerTarget.isMuted = function() {
        return this.remotePlayer.isMuted;
    }.bind(this);

    playerTarget.seekTo = function (time) {
        this.remotePlayer.currentTime = time;
        this.remotePlayerController.seek();
    }.bind(this);

    this.playerHandler.setTarget(playerTarget);

    // Setup remote player volume right on setup
    // The remote player may have had a volume set from previous playback
    if (this.remotePlayer.isMuted) {
        this.playerHandler.mute();
    }
    var currentVolume = this.remotePlayer.volumeLevel * FULL_VOLUME_HEIGHT;
    var p = document.getElementById('audio_bg_level');
    p.style.height = currentVolume + 'px';
    p.style.marginTop = -currentVolume + 'px';

    this.hideFullscreenButton();

    this.playerHandler.play();
};
正在載入媒體
在 Cast SDK 中,RemotePlayer 和 RemotePlayerController 提供一組便利的 API,可管理接收器上的遠端媒體播放作業。如果 CastSession 支援媒體播放,SDK 會自動建立 RemotePlayer 和 RemotePlayerController 的執行個體。如本程式碼研究室稍早所示,您可以分別建立 cast.framework.RemotePlayer 和 cast.framework.RemotePlayerController 的例項,藉此存取這些屬性。
接著,我們需要為 SDK 建構 MediaInfo 物件,以便處理並傳遞要求,在接收器上載入目前選取的影片。如要這麼做,請在 setupRemotePlayer 中加入下列程式碼:
/**
 * Set the PlayerHandler target to use the remote player
 */
CastPlayer.prototype.setupRemotePlayer = function () {
    //...

    playerTarget.load = function (mediaIndex) {
        console.log('Loading...' + this.mediaContents[mediaIndex]['title']);
        var mediaInfo = new chrome.cast.media.MediaInfo(
            this.mediaContents[mediaIndex]['sources'][0], 'video/mp4');

        mediaInfo.metadata = new chrome.cast.media.GenericMediaMetadata();
        mediaInfo.metadata.metadataType = chrome.cast.media.MetadataType.GENERIC;
        mediaInfo.metadata.title = this.mediaContents[mediaIndex]['title'];
        mediaInfo.metadata.images = [
            {'url': MEDIA_SOURCE_ROOT + this.mediaContents[mediaIndex]['thumb']}];

        var request = new chrome.cast.media.LoadRequest(mediaInfo);
        castSession.loadMedia(request).then(
            this.playerHandler.loaded.bind(this.playerHandler),
            function (errorCode) {
                this.playerState = PLAYER_STATE.ERROR;
                console.log('Remote media load error: ' +
                    CastPlayer.getErrorMessage(errorCode));
            }.bind(this));
    }.bind(this);

    //...
};
現在請新增方法,以便在本機和遠端播放之間切換:
/**
 * This is a method for switching between the local and remote
 * players. If the local player is selected, setupLocalPlayer()
 * is run. If there is a cast device connected we run
 * setupRemotePlayer().
 */
CastPlayer.prototype.switchPlayer = function() {
    this.stopProgressTimer();
    this.resetVolumeSlider();
    this.playerHandler.stop();
    this.playerState = PLAYER_STATE.IDLE;
    if (cast && cast.framework) {
        if (this.remotePlayer.isConnected) {
            this.setupRemotePlayer();
            return;
        }
    }
    this.setupLocalPlayer();
};
最後,新增方法來處理任何 Cast 錯誤訊息:
/**
 * Makes human-readable message from chrome.cast.Error
 * @param {chrome.cast.Error} error
 * @return {string} error message
 */
CastPlayer.getErrorMessage = function(error) {
  switch (error.code) {
    case chrome.cast.ErrorCode.API_NOT_INITIALIZED:
      return 'The API is not initialized.' +
        (error.description ? ' :' + error.description : '');
    case chrome.cast.ErrorCode.CANCEL:
      return 'The operation was canceled by the user' +
        (error.description ? ' :' + error.description : '');
    case chrome.cast.ErrorCode.CHANNEL_ERROR:
      return 'A channel to the receiver is not available.' +
        (error.description ? ' :' + error.description : '');
    case chrome.cast.ErrorCode.EXTENSION_MISSING:
      return 'The Cast extension is not available.' +
        (error.description ? ' :' + error.description : '');
    case chrome.cast.ErrorCode.INVALID_PARAMETER:
      return 'The parameters to the operation were not valid.' +
        (error.description ? ' :' + error.description : '');
    case chrome.cast.ErrorCode.RECEIVER_UNAVAILABLE:
      return 'No receiver was compatible with the session request.' +
        (error.description ? ' :' + error.description : '');
    case chrome.cast.ErrorCode.SESSION_ERROR:
      return 'A session could not be created, or a session was invalid.' +
        (error.description ? ' :' + error.description : '');
    case chrome.cast.ErrorCode.TIMEOUT:
      return 'The operation timed out.' +
        (error.description ? ' :' + error.description : '');
  }
};
現在請執行應用程式,連線至 Cast 裝置,然後開始播放影片。接收裝置上應該會開始播放影片。
7. 新增 Cast Connect 支援功能
現有的發送端應用程式可透過 Cast Connect 程式庫,使用 Cast 協定與 Android TV 應用程式通訊。Cast Connect 以 Cast 基礎架構為基礎,Android TV 應用程式則做為接收器。
依附元件
- Chrome M87 以上版本的瀏覽器
設定 Android 接收器相容性
如要啟動 Android TV 應用程式 (又稱 Android 接收器),我們需要在 CastOptions 物件中將 androidReceiverCompatible 標記設為 true。
在 initializeCastPlayer 函式的 CastVideos.js 中加入下列程式碼:
var options = {};
...
options.androidReceiverCompatible = true;

cast.framework.CastContext.getInstance().setOptions(options);
設定啟動憑證
在傳送端,您可以指定 CredentialsData 代表加入工作階段的使用者。credentials 是使用者可定義的字串,只要 ATV 應用程式能解讀即可。CredentialsData 只會在啟動或加入時傳遞至 Android TV 應用程式。如果連線時重新設定,系統不會將密碼傳送至 Android TV 應用程式。
設定啟動憑證 CredentialsData 必須在設定啟動選項後定義。
在 CastVideos.js 函式下方,將下列程式碼新增至 CastVideos.js 類別:initializeCastPlayer
cast.framework.CastContext.getInstance().setOptions(options);
...
let credentialsData = new chrome.cast.CredentialsData("{\"userId\": \"abc\"}");
cast.framework.CastContext.getInstance().setLaunchCredentialsData(credentialsData);
...
在載入要求中設定憑證
如果網頁接收器應用程式和 Android TV 應用程式處理 credentials 的方式不同,您可能需要為兩者分別定義憑證。為此,請在 setupRemotePlayer 函式的 playerTarget.load 中,將下列程式碼新增至 CastVideos.js 下方:
...
var request = new chrome.cast.media.LoadRequest(mediaInfo);
request.credentials = 'user-credentials';
request.atvCredentials = 'atv-user-credentials';
...
視傳送端投放內容的接收端應用程式而定,SDK 現在會自動處理目前工作階段要使用的憑證。
測試 Cast Connect
如要在 Chromecast (支援 Google TV) 上安裝 Android TV APK,請按照下列步驟操作:
- 找出 Android TV 裝置的 IP 位址。通常可以在「設定」>「網路與網際網路」>「(裝置連上的網路名稱)」下方找到。右側會顯示詳細資料和裝置在網路上的 IP。
- 使用裝置的 IP 位址,透過終端機以 ADB 連線至裝置:
$ adb connect <device_ip_address>:5555
- 在終端機視窗中,前往本程式碼研究室開頭下載的程式碼研究室範例頂層資料夾。例如:
$ cd Desktop/chrome_codelab_src
- 執行下列指令,將這個資料夾中的 .apk 檔案安裝到 Android TV:
$ adb -s <device_ip_address>:5555 install android-tv-app.apk
- 現在 Android TV 裝置的「你的應用程式」選單中,應該會顯示名為「投放影片」的應用程式。
- 執行更新後的網頁傳送器程式碼,然後使用投放圖示或在 Chrome 瀏覽器的下拉式選單中選取
Cast..,與 Android TV 裝置建立投放工作階段。現在應該會在 Android 接收器上啟動 Android TV 應用程式,並允許你使用 Android TV 遙控器控制播放。
8. 恭喜
現在您已經知道如何在 Chrome 網頁應用程式上,使用 Cast SDK 小工具啟用影片應用程式的投放功能。
詳情請參閱 Web Sender 開發人員指南。