1. ภาพรวม

Codelab นี้จะสอนวิธีแก้ไขแอปวิดีโอบนเว็บที่มีอยู่เพื่อแคสต์เนื้อหาในอุปกรณ์ที่พร้อมใช้งาน Google Cast
Google Cast คืออะไร
Google Cast ช่วยให้ผู้ใช้แคสต์เนื้อหาจากอุปกรณ์เคลื่อนที่ไปยังทีวีได้ จากนั้นผู้ใช้จะใช้อุปกรณ์เคลื่อนที่เป็นรีโมตคอนโทรลสำหรับการเล่นสื่อบนทีวีได้
Google Cast SDK ช่วยให้คุณขยายแอปเพื่อควบคุมทีวีหรือระบบเสียงได้ Cast SDK ช่วยให้คุณเพิ่มคอมโพเนนต์ UI ที่จำเป็นตามรายการตรวจสอบการออกแบบ Google Cast ได้
รายการตรวจสอบการออกแบบ Google Cast มีไว้เพื่อให้ประสบการณ์ของผู้ใช้ Cast นั้นเรียบง่ายและคาดการณ์ได้ในทุกแพลตฟอร์มที่รองรับ
เราจะสร้างอะไร
เมื่อทำ Codelab นี้เสร็จแล้ว คุณจะมีแอปวิดีโอบนเว็บของ Chrome ที่จะแคสต์วิดีโอไปยังอุปกรณ์ Google Cast ได้
สิ่งที่คุณจะได้เรียนรู้
- วิธีเพิ่ม Google Cast SDK ลงในแอปวิดีโอตัวอย่าง
- วิธีเพิ่มปุ่มแคสต์เพื่อเลือกอุปกรณ์ Google Cast
- วิธีเชื่อมต่อกับอุปกรณ์แคสต์และเปิดตัวรับสื่อ
- วิธีแคสต์วิดีโอ
- วิธีผสานรวม Cast Connect
สิ่งที่คุณต้องมี
- เบราว์เซอร์ Google Chrome เวอร์ชันล่าสุด
- บริการโฮสติ้ง HTTPS เช่น Firebase Hosting หรือ ngrok
- อุปกรณ์ Google Cast เช่น Chromecast หรือ Android TV ที่กำหนดค่าให้เข้าถึงอินเทอร์เน็ตได้
- ทีวีหรือจอภาพที่มีอินพุต HDMI
- คุณต้องมี Chromecast พร้อม Google TV เพื่อทดสอบการผสานรวม Cast Connect แต่จะใช้หรือไม่ก็ได้สำหรับ Codelab ที่เหลือ หากไม่มี ให้ข้ามขั้นตอนเพิ่มการรองรับ Cast Connect ที่อยู่ท้ายบทแนะนำนี้
ประสบการณ์
- คุณจะต้องมีความรู้ด้านการพัฒนาเว็บมาก่อน
- นอกจากนี้ คุณยังต้องมีความรู้พื้นฐานเกี่ยวกับการดูทีวีด้วย :)
คุณจะใช้บทแนะนำนี้อย่างไร
คุณจะให้คะแนนประสบการณ์ในการสร้างเว็บแอปเท่าใด
คุณจะให้คะแนนประสบการณ์การดูทีวีเท่าใด
2. รับโค้ดตัวอย่าง
คุณดาวน์โหลดโค้ดตัวอย่างทั้งหมดลงในคอมพิวเตอร์ได้...
และแตกไฟล์ ZIP ที่ดาวน์โหลด
3. เรียกใช้แอปตัวอย่าง
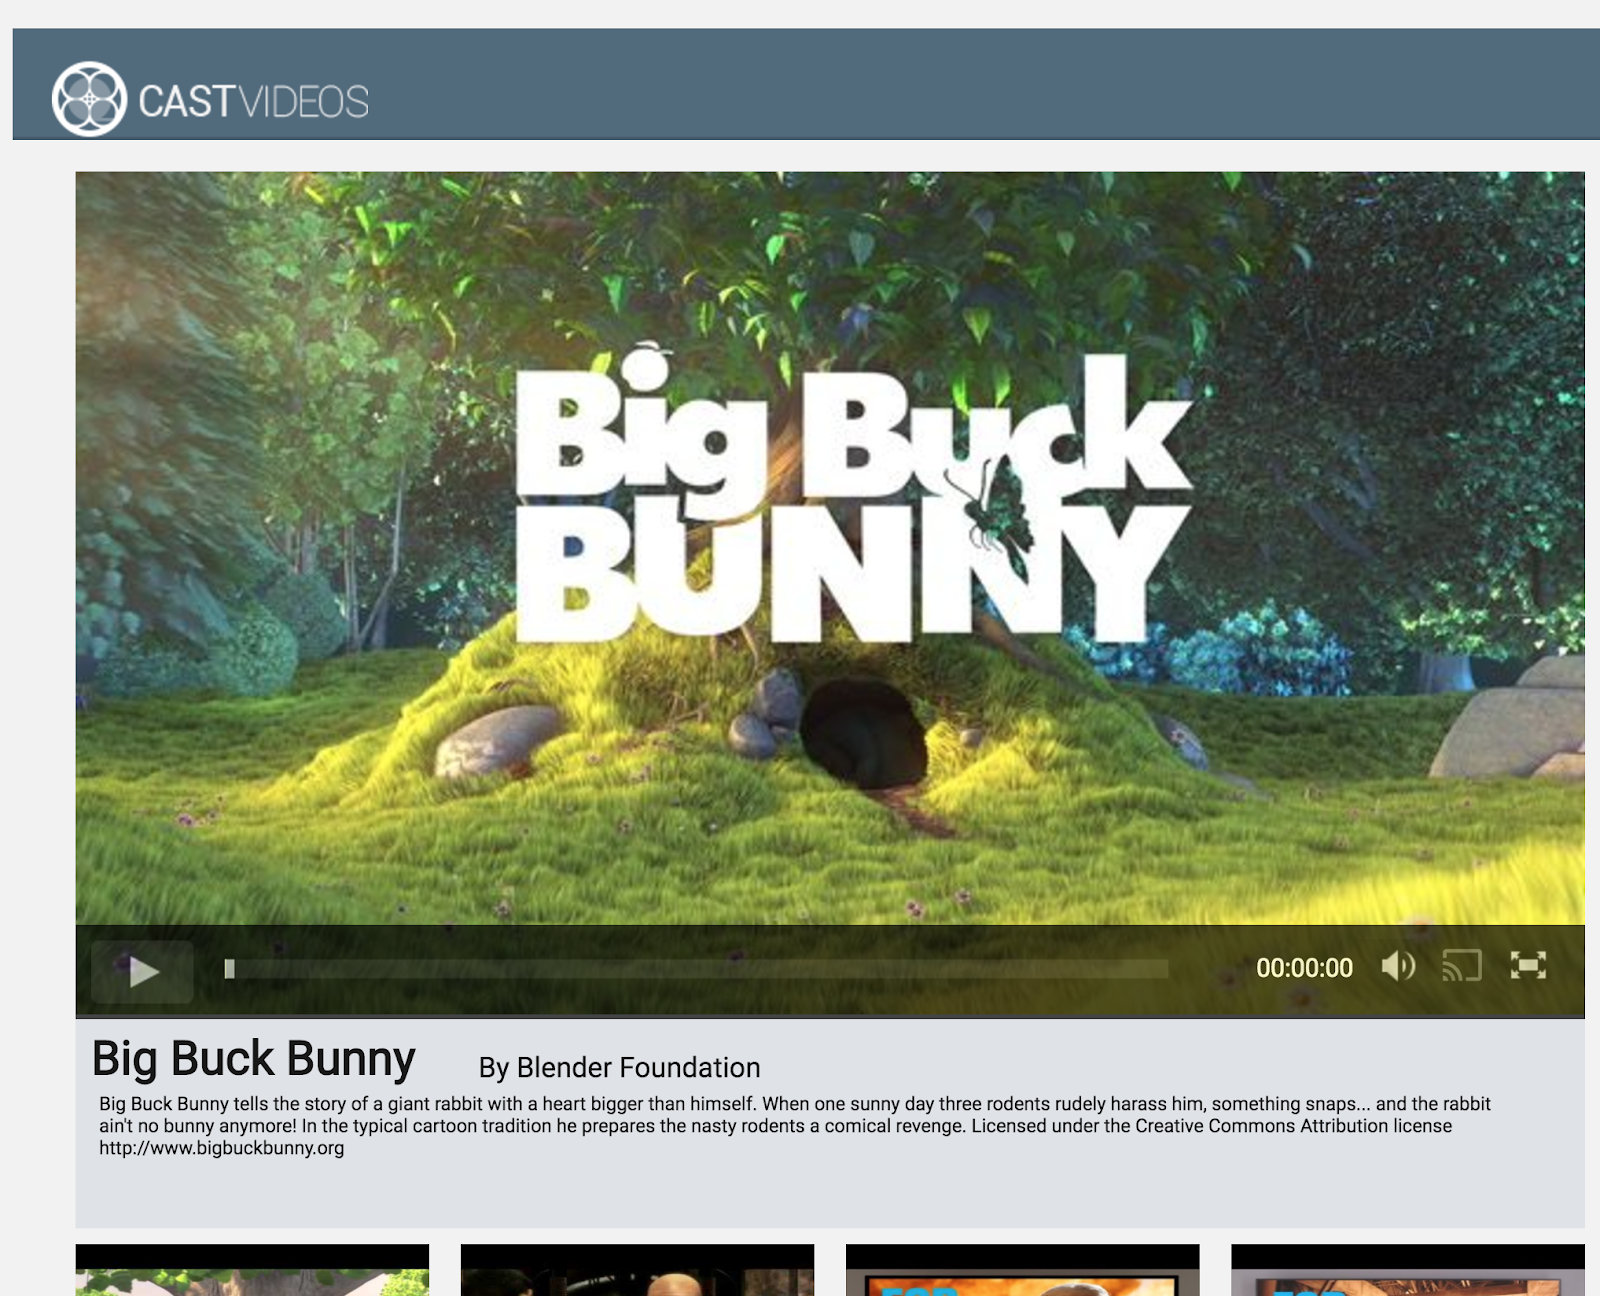
ก่อนอื่น มาดูตัวอย่างแอปที่เสร็จสมบูรณ์กัน แอปนี้เป็นวิดีโอเพลเยอร์พื้นฐาน ผู้ใช้สามารถเลือกวิดีโอจากรายการ แล้วเล่นวิดีโอบนอุปกรณ์แบบออฟไลน์หรือแคสต์ไปยังอุปกรณ์ Google Cast ได้
หากต้องการใช้แบบฟอร์มที่สร้างเสร็จแล้ว คุณต้องโฮสต์แบบฟอร์ม
หากไม่มีเซิร์ฟเวอร์ให้ใช้งาน คุณสามารถใช้ Firebase Hosting หรือ ngrok
เรียกใช้เซิร์ฟเวอร์
เมื่อตั้งค่าบริการที่ต้องการแล้ว ให้ไปที่ app-done แล้วเริ่มเซิร์ฟเวอร์
ในเบราว์เซอร์ ให้ไปที่ URL แบบ HTTPS ของตัวอย่างที่คุณโฮสต์
- คุณควรเห็นแอปวิดีโอปรากฏขึ้น
- คลิกปุ่มแคสต์ แล้วเลือกอุปกรณ์ Google Cast
- เลือกวิดีโอ แล้วคลิกปุ่มเล่น
- วิดีโอจะเริ่มเล่นในอุปกรณ์ Google Cast
คลิกปุ่มหยุดชั่วคราวในองค์ประกอบวิดีโอเพื่อหยุดวิดีโอชั่วคราวบนตัวรับ คลิกปุ่มเล่นในองค์ประกอบวิดีโอเพื่อเล่นวิดีโอต่อ
คลิกปุ่มแคสต์เพื่อหยุดแคสต์ไปยังอุปกรณ์ Google Cast
ก่อนจะไปต่อ ให้หยุดเซิร์ฟเวอร์
4. เตรียมโปรเจ็กต์เริ่มต้น
เราต้องเพิ่มการรองรับ Google Cast ลงในแอปเริ่มต้นที่คุณดาวน์โหลด คำศัพท์บางคำที่เกี่ยวข้องกับ Google Cast ซึ่งเราจะใช้ใน Codelab นี้มีดังนี้
- แอปผู้ส่งทำงานบนอุปกรณ์เคลื่อนที่หรือแล็ปท็อป
- แอปตัวรับจะทำงานบนอุปกรณ์ Google Cast
ตอนนี้คุณก็พร้อมที่จะสร้างโปรเจ็กต์เริ่มต้นโดยใช้โปรแกรมแก้ไขข้อความที่ชื่นชอบแล้ว
- เลือกไดเรกทอรี

app-startจากการดาวน์โหลดโค้ดตัวอย่าง - เรียกใช้แอปโดยใช้เซิร์ฟเวอร์ของคุณและสำรวจ UI
โปรดทราบว่าในขณะที่คุณทำตาม Codelab นี้ คุณจะต้องโฮสต์ตัวอย่างอีกครั้งในเซิร์ฟเวอร์ของคุณโดยขึ้นอยู่กับบริการ
การออกแบบแอป
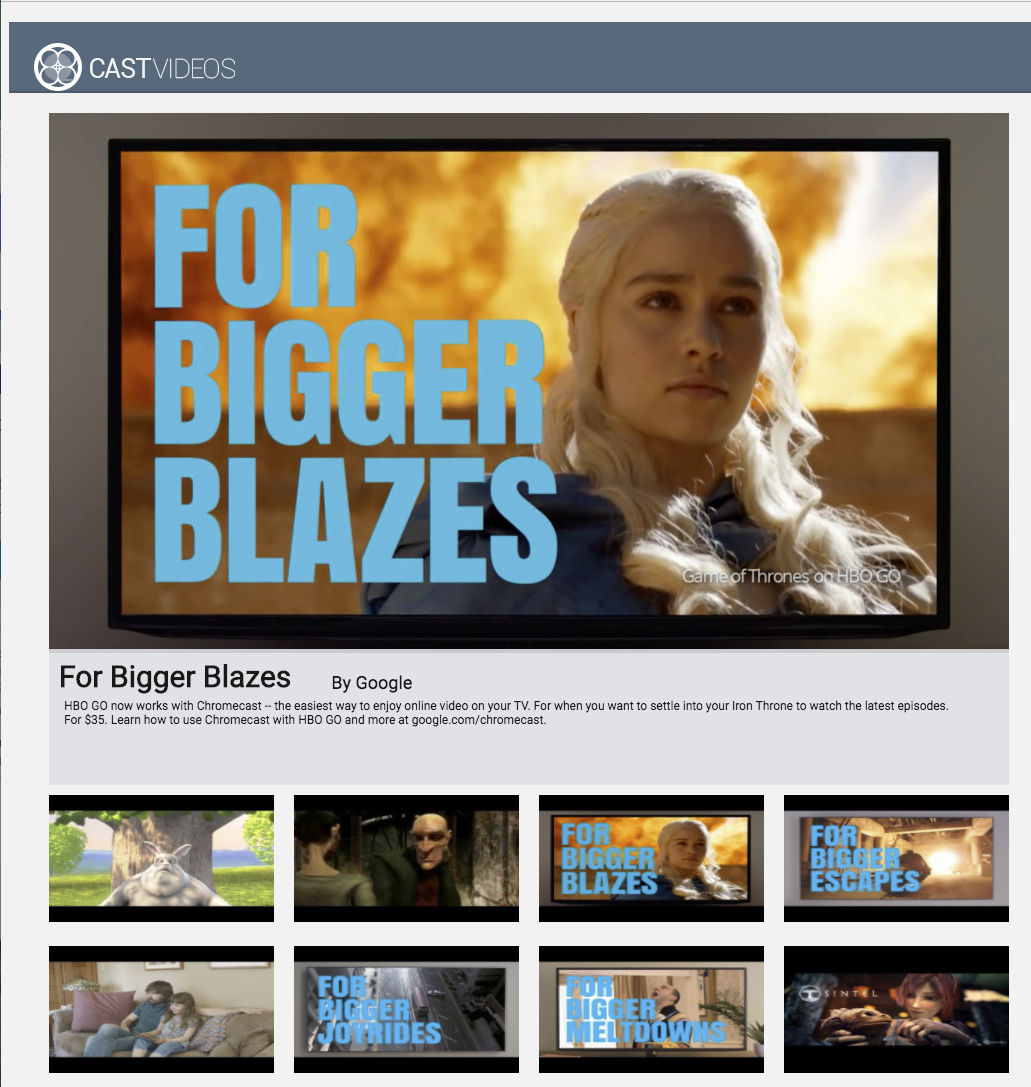
แอปจะดึงรายการวิดีโอจากเว็บเซิร์ฟเวอร์ระยะไกลและแสดงรายการให้ผู้ใช้เรียกดู ผู้ใช้สามารถเลือกวิดีโอเพื่อดูรายละเอียดหรือเล่นวิดีโอในอุปกรณ์เคลื่อนที่ได้
แอปประกอบด้วยมุมมองหลัก 1 มุมมอง ซึ่งกำหนดไว้ใน index.html และตัวควบคุมหลัก CastVideos.js.
index.html
ไฟล์ HTML นี้ประกาศ UI เกือบทั้งหมดสำหรับเว็บแอป
ยอดดูมีอยู่ 2-3 ส่วน เรามี div#main_video ซึ่งมีองค์ประกอบวิดีโอ ในส่วนของวิดีโอ เรามี div#media_control ซึ่งกำหนดตัวควบคุมทั้งหมดสำหรับองค์ประกอบวิดีโอ ด้านล่างคือ media_info ซึ่งแสดงรายละเอียดของวิดีโอที่กำลังดู สุดท้าย carousel div จะแสดงรายการวิดีโอใน div
index.html ยังเริ่มต้น Cast SDK และบอกให้ฟังก์ชัน CastVideos โหลดด้วย
เนื้อหาส่วนใหญ่ที่จะแสดงในองค์ประกอบเหล่านี้จะได้รับการกำหนด แทรก และควบคุมใน CastVideos.js มาดูกันเลย
CastVideos.js
สคริปต์นี้จัดการตรรกะทั้งหมดสำหรับเว็บแอปวิดีโอ Cast รายการวิดีโอและข้อมูลเมตาที่เกี่ยวข้องซึ่งกำหนดไว้ใน CastVideos.js จะอยู่ในออบเจ็กต์ชื่อ mediaJSON
โดยมีส่วนหลักๆ 2-3 ส่วนที่รับผิดชอบร่วมกันในการจัดการและเล่นวิดีโอทั้งในเครื่องและจากระยะไกล โดยรวมแล้ว นี่คือเว็บแอปพลิเคชันที่ไม่ซับซ้อน
CastPlayer เป็นคลาสหลักที่จัดการทั้งแอป ตั้งค่าเพลเยอร์ เลือกสื่อ และเชื่อมโยงเหตุการณ์กับ PlayerHandler เพื่อเล่นสื่อ CastPlayer.prototype.initializeCastPlayer เป็นเมธอดที่ตั้งค่าฟังก์ชันการทำงานของ Cast ทั้งหมด CastPlayer.prototype.switchPlayer จะสลับสถานะระหว่างผู้เล่นในพื้นที่กับผู้เล่นระยะไกล CastPlayer.prototype.setupLocalPlayer และ CastPlayer.prototype.setupRemotePlayer จะเริ่มต้นผู้เล่นในพื้นที่และระยะไกล
PlayerHandler คือคลาสที่มีหน้าที่จัดการการเล่นสื่อ นอกจากนี้ ยังมีเมธอดอื่นๆ อีกหลายรายการที่รับผิดชอบรายละเอียดของการจัดการสื่อและการเล่น
คำถามที่พบบ่อย
5. การเพิ่มปุ่มแคสต์
แอปพลิเคชันที่พร้อมใช้งาน Cast จะแสดงปุ่ม "แคสต์" ในองค์ประกอบวิดีโอ การคลิกปุ่มแคสต์จะแสดงรายการอุปกรณ์แคสต์ที่ผู้ใช้เลือกได้ หากผู้ใช้เล่นเนื้อหาในอุปกรณ์ที่ส่งแบบโลคัล การเลือกอุปกรณ์แคสต์จะเริ่มหรือเล่นต่อในอุปกรณ์แคสต์นั้น ผู้ใช้สามารถคลิกปุ่มแคสต์และหยุดแคสต์แอปพลิเคชันไปยังอุปกรณ์แคสต์ได้ทุกเมื่อในระหว่างเซสชัน Cast ผู้ใช้ต้องสามารถเชื่อมต่อหรือยกเลิกการเชื่อมต่อกับอุปกรณ์ Cast ขณะอยู่ในหน้าจอใดก็ได้ของแอปพลิเคชันตามที่อธิบายไว้ในรายการตรวจสอบการออกแบบ Google Cast
การกำหนดค่า
โปรเจ็กต์เริ่มต้นต้องใช้การตั้งค่าและการขึ้นต่อกันแบบเดียวกับที่คุณใช้สำหรับแอปตัวอย่างที่เสร็จสมบูรณ์ แต่คราวนี้ให้โฮสต์เนื้อหาของ app-start
ในเบราว์เซอร์ ให้ไปที่ URL ของ https สำหรับตัวอย่างที่คุณโฮสต์
โปรดทราบว่าเมื่อทำการเปลี่ยนแปลง คุณจะต้องโฮสต์ตัวอย่างอีกครั้งในเซิร์ฟเวอร์ของคุณโดยขึ้นอยู่กับบริการ
การเริ่มต้น
เฟรมเวิร์ก Cast มีออบเจ็กต์ Singleton ส่วนกลางคือ CastContext ซึ่งประสานงานกิจกรรมทั้งหมดของเฟรมเวิร์ก ต้องเริ่มต้นออบเจ็กต์นี้ตั้งแต่เนิ่นๆ ในวงจรของแอปพลิเคชัน โดยปกติจะเรียกใช้จากโค้ดเรียกกลับที่กำหนดให้กับ window['__onGCastApiAvailable'] ซึ่งจะเรียกใช้หลังจากโหลด Cast SDK แล้วและพร้อมใช้งาน ในกรณีนี้ ระบบจะเรียกใช้ CastContext ใน CastPlayer.prototype.initializeCastPlayer ซึ่งเรียกใช้จากแฮนเดิลการตอบกลับที่กล่าวถึงข้างต้น
ต้องระบุoptionsออบเจ็กต์ JSON เมื่อเริ่มต้นCastContext คลาสนี้มีตัวเลือกที่ส่งผลต่อลักษณะการทำงานของเฟรมเวิร์ก สิ่งที่สำคัญที่สุดคือรหัสแอปพลิเคชันตัวรับ ซึ่งใช้เพื่อกรองรายการอุปกรณ์ที่พร้อมใช้งานสำหรับการแคสต์ให้แสดงเฉพาะอุปกรณ์ที่สามารถเรียกใช้แอปที่ระบุและเปิดแอปพลิเคชันตัวรับเมื่อเริ่มเซสชันการแคสต์
เมื่อพัฒนาแอปที่พร้อมใช้งาน Cast ของคุณเอง คุณต้องลงทะเบียนเป็นนักพัฒนาแอป Cast แล้วขอรหัสแอปพลิเคชันสำหรับแอปของคุณ สำหรับ Codelab นี้ เราจะใช้รหัสแอปตัวอย่าง
เพิ่มโค้ดต่อไปนี้ลงใน index.html ที่ส่วนท้ายของส่วน body
<script type="text/javascript" src="https://www.gstatic.com/cv/js/sender/v1/cast_sender.js?loadCastFramework=1"></script>
เพิ่มโค้ดต่อไปนี้ลงใน index.html เพื่อเริ่มต้นแอป CastVideos รวมถึงเริ่มต้น CastContext
<script src="CastVideos.js"></script>
<script type="text/javascript">
var castPlayer = new CastPlayer();
window['__onGCastApiAvailable'] = function(isAvailable) {
  if (isAvailable) {
    castPlayer.initializeCastPlayer();
  }
};
</script>
ตอนนี้เราต้องเพิ่มเมธอดใหม่ใน CastVideos.js ซึ่งสอดคล้องกับเมธอดที่เราเพิ่งเรียกใช้ใน index.html มาเพิ่มเมธอดใหม่ที่ชื่อ initializeCastPlayer ซึ่งตั้งค่าตัวเลือกใน CastContext และเริ่มต้น RemotePlayer และ RemotePlayerControllers ใหม่กัน
/**
 * This method sets up the CastContext, and a few other members
 * that are necessary to play and control videos on a Cast
 * device.
 */
CastPlayer.prototype.initializeCastPlayer = function() {

    var options = {};

    // Set the receiver application ID to your own (created in
    // the Google Cast Developer Console), or optionally
    // use the chrome.cast.media.DEFAULT_MEDIA_RECEIVER_APP_ID
    options.receiverApplicationId = 'C0868879';

    // Auto join policy can be one of the following three:
    // ORIGIN_SCOPED - Auto connect from same appId and page origin
    // TAB_AND_ORIGIN_SCOPED - Auto connect from same appId, page origin, and tab
    // PAGE_SCOPED - No auto connect
    options.autoJoinPolicy = chrome.cast.AutoJoinPolicy.ORIGIN_SCOPED;

    cast.framework.CastContext.getInstance().setOptions(options);

    this.remotePlayer = new cast.framework.RemotePlayer();
    this.remotePlayerController = new cast.framework.RemotePlayerController(this.remotePlayer);
    this.remotePlayerController.addEventListener(
        cast.framework.RemotePlayerEventType.IS_CONNECTED_CHANGED,
        this.switchPlayer.bind(this)
    );
};
สุดท้าย เราต้องสร้างตัวแปรสำหรับ RemotePlayer และ RemotePlayerController ดังนี้
var CastPlayer = function() {
  //...
  /* Cast player variables */
  /** @type {cast.framework.RemotePlayer} */
  this.remotePlayer = null;
  /** @type {cast.framework.RemotePlayerController} */
  this.remotePlayerController = null;
  //...
};
ปุ่ม "แคสต์"
ตอนนี้เมื่อเริ่มต้น CastContext แล้ว เราต้องเพิ่มปุ่มแคสต์เพื่อให้ผู้ใช้เลือกอุปกรณ์แคสต์ได้ Cast SDK มีคอมโพเนนต์ปุ่มแคสต์ชื่อ google-cast-launcher ที่มีรหัส "castbutton" คุณเพิ่มคอมโพเนนต์นี้ลงในองค์ประกอบวิดีโอของแอปพลิเคชันได้โดยเพิ่ม button ในส่วน media_control
องค์ประกอบปุ่มจะมีลักษณะดังนี้
<google-cast-launcher id="castbutton"></google-cast-launcher>
เพิ่มโค้ดต่อไปนี้ลงใน index.html ในส่วน media_control
<div id="media_control">
  <div id="play"></div>
  <div id="pause"></div>
  <div id="progress_bg"></div>
  <div id="progress"></div>
  <div id="progress_indicator"></div>
  <div id="fullscreen_expand"></div>
  <div id="fullscreen_collapse"></div>
  <google-cast-launcher id="castbutton"></google-cast-launcher>
  <div id="audio_bg"></div>
  <div id="audio_bg_track"></div>
  <div id="audio_indicator"></div>
  <div id="audio_bg_level"></div>
  <div id="audio_on"></div>
  <div id="audio_off"></div>
  <div id="duration">00:00:00</div>
</div>
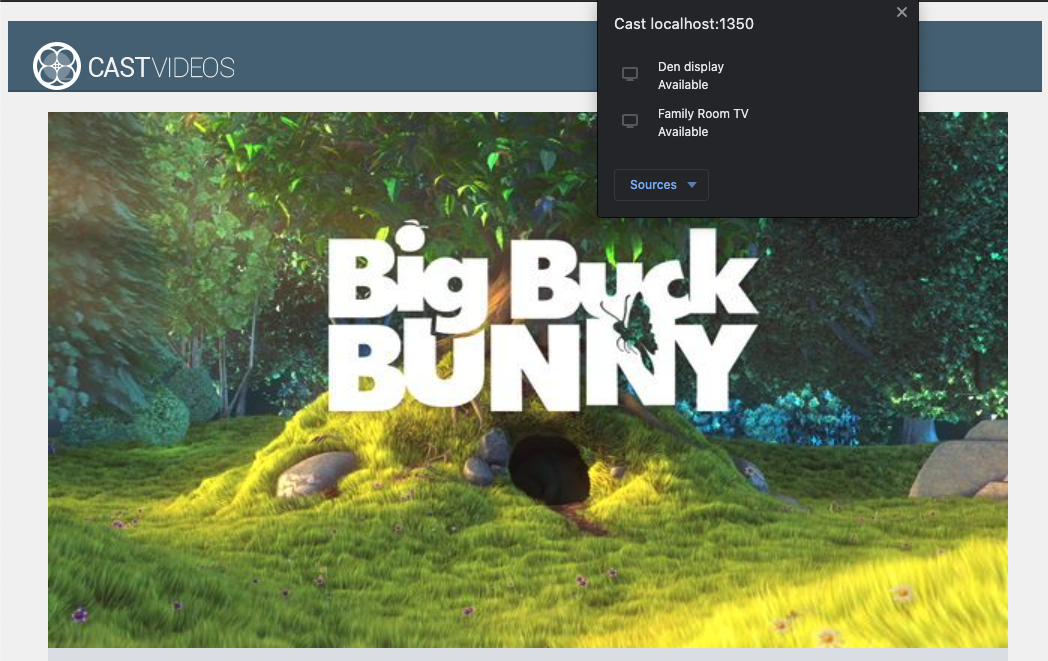
ตอนนี้ให้รีเฟรชหน้าเว็บในเบราว์เซอร์ Chrome คุณควรเห็นปุ่มแคสต์ในองค์ประกอบวิดีโอ และเมื่อคลิกปุ่มดังกล่าว ระบบจะแสดงรายการอุปกรณ์ที่พร้อมใช้งาน Cast ในเครือข่ายภายใน เบราว์เซอร์ Chrome จะจัดการการค้นพบอุปกรณ์โดยอัตโนมัติ เลือกอุปกรณ์แคสต์ แล้วแอปตัวอย่างตัวรับจะโหลดในอุปกรณ์แคสต์
เรายังไม่ได้เชื่อมต่อการรองรับการเล่นสื่อ คุณจึงยังเล่นวิดีโอบนอุปกรณ์ Cast ไม่ได้ คลิกปุ่มแคสต์เพื่อหยุดแคสต์
6. การแคสต์เนื้อหาวิดีโอ
เราจะขยายแอปตัวอย่างให้เล่นวิดีโอจากระยะไกลบนอุปกรณ์ Cast ได้ด้วย โดยเราต้องฟังเหตุการณ์ต่างๆ ที่เฟรมเวิร์ก Cast สร้างขึ้น
การแคสต์สื่อ
ในระดับสูง หากต้องการเล่นสื่อบนอุปกรณ์แคสต์ จะต้องมีสิ่งต่อไปนี้
- สร้างออบเจ็กต์
MediaInfoJSONจาก Cast SDK ที่จำลองรายการสื่อ - ผู้ใช้เชื่อมต่อกับอุปกรณ์แคสต์เพื่อเปิดแอปพลิเคชันตัวรับ
- โหลด
MediaInfoออบเจ็กต์ลงในตัวรับและเล่นเนื้อหา - ติดตามสถานะสื่อ
- ส่งคำสั่งการเล่นไปยังตัวรับสัญญาณตามการโต้ตอบของผู้ใช้
ขั้นตอนที่ 1 คือการแมปออบเจ็กต์หนึ่งกับอีกออบเจ็กต์หนึ่ง MediaInfo คือสิ่งที่ Cast SDK เข้าใจ และ mediaJSON คือการแคปซูลรายการสื่อของแอป เราสามารถแมป mediaJSON กับ MediaInfo ได้อย่างง่ายดาย เราได้ทำขั้นตอนที่ 2 ในส่วนก่อนหน้าแล้ว ขั้นตอนที่ 3 ทำได้ง่ายๆ ด้วย Cast SDK
แอปตัวอย่าง CastPlayer แยกความแตกต่างระหว่างการเล่นในเครื่องกับการเล่นจากระยะไกลในเมธอด switchPlayer อยู่แล้ว
if (cast && cast.framework) {
  if (this.remotePlayer.isConnected) {
    //...
คุณไม่จำเป็นต้องเข้าใจวิธีการทำงานของตรรกะผู้เล่นตัวอย่างทั้งหมดอย่างละเอียดใน Codelab นี้ อย่างไรก็ตาม คุณควรทราบว่าต้องแก้ไขมีเดียเพลเยอร์ของแอปเพื่อให้รับรู้ถึงการเล่นทั้งในเครื่องและจากระยะไกล
ปัจจุบันเพลเยอร์ในเครื่องจะอยู่ในสถานะการเล่นในเครื่องเสมอ เนื่องจากยังไม่ทราบสถานะการแคสต์ เราต้องอัปเดต UI ตามการเปลี่ยนสถานะที่เกิดขึ้นในเฟรมเวิร์ก Cast เช่น หากเริ่มแคสต์ เราจะต้องหยุดการเล่นในเครื่องและปิดใช้การควบคุมบางอย่าง ในทำนองเดียวกัน หากเราหยุดแคสต์เมื่ออยู่ในตัวควบคุมมุมมองนี้ เราต้องเปลี่ยนไปเล่นในเครื่อง หากต้องการจัดการกับเหตุการณ์ดังกล่าว เราต้องรับฟังเหตุการณ์ต่างๆ ที่เฟรมเวิร์ก Cast สร้างขึ้น
การจัดการเซสชันการแคสต์
สำหรับเฟรมเวิร์ก Cast เซสชัน Cast จะรวมขั้นตอนการเชื่อมต่อกับอุปกรณ์ การเปิด (หรือเข้าร่วมเซสชันที่มีอยู่) การเชื่อมต่อกับแอปพลิเคชันตัวรับ และการเริ่มต้นช่องควบคุมสื่อ (หากเหมาะสม) ช่องควบคุมสื่อคือวิธีที่เฟรมเวิร์ก Cast ใช้ส่งและรับข้อความที่เกี่ยวข้องกับการเล่นสื่อจากตัวรับ
ระบบจะเริ่มเซสชันการแคสต์โดยอัตโนมัติเมื่อผู้ใช้เลือกอุปกรณ์จากปุ่มแคสต์ และจะหยุดเซสชันโดยอัตโนมัติเมื่อผู้ใช้ยกเลิกการเชื่อมต่อ นอกจากนี้ เฟรมเวิร์ก Cast ยังจัดการการเชื่อมต่อเซสชันตัวรับสัญญาณอีกครั้งโดยอัตโนมัติเนื่องจากปัญหาเกี่ยวกับเครือข่าย
เซสชันการแคสต์ได้รับการจัดการโดย CastSession ซึ่งเข้าถึงได้ผ่าน cast.framework.CastContext.getInstance().getCurrentSession() EventListener Callback สามารถใช้เพื่อตรวจสอบเหตุการณ์เซสชัน เช่น การสร้าง การระงับ การกลับมาทำงานต่อ และการสิ้นสุด
ในแอปพลิเคชันปัจจุบันของเรา ระบบจะจัดการเซสชันและการจัดการสถานะทั้งหมดให้เราในเมธอด setupRemotePlayer มาเริ่มกำหนดค่าในแอปโดยเพิ่มโค้ดต่อไปนี้ลงใน CastVideos.js กัน
/**
 * Set the PlayerHandler target to use the remote player
 */
CastPlayer.prototype.setupRemotePlayer = function () {
    var castSession = cast.framework.CastContext.getInstance().getCurrentSession();

    this.playerHandler.setTarget(playerTarget);

    // Setup remote player volume right on setup
    // The remote player may have had a volume set from previous playback
    if (this.remotePlayer.isMuted) {
        this.playerHandler.mute();
    }
    var currentVolume = this.remotePlayer.volumeLevel * FULL_VOLUME_HEIGHT;
    var p = document.getElementById('audio_bg_level');
    p.style.height = currentVolume + 'px';
    p.style.marginTop = -currentVolume + 'px';

    this.hideFullscreenButton();

    this.playerHandler.play();
};
เรายังคงต้องเชื่อมโยงเหตุการณ์ทั้งหมดจากแฮนเดิลการเรียกกลับ และจัดการเหตุการณ์ทั้งหมดที่เข้ามา การดำเนินการนี้ค่อนข้างตรงไปตรงมา ดังนั้นมาจัดการกันเลย
/**
 * Set the PlayerHandler target to use the remote player
 */
CastPlayer.prototype.setupRemotePlayer = function () {
    var castSession = cast.framework.CastContext.getInstance().getCurrentSession();

    // Add event listeners for player changes which may occur outside sender app
    this.remotePlayerController.addEventListener(
        cast.framework.RemotePlayerEventType.IS_PAUSED_CHANGED,
        function() {
            if (this.remotePlayer.isPaused) {
                this.playerHandler.pause();
            } else {
                this.playerHandler.play();
            }
        }.bind(this)
    );

    this.remotePlayerController.addEventListener(
        cast.framework.RemotePlayerEventType.IS_MUTED_CHANGED,
        function() {
            if (this.remotePlayer.isMuted) {
                this.playerHandler.mute();
            } else {
                this.playerHandler.unMute();
            }
        }.bind(this)
    );

    this.remotePlayerController.addEventListener(
        cast.framework.RemotePlayerEventType.VOLUME_LEVEL_CHANGED,
        function() {
            var newVolume = this.remotePlayer.volumeLevel * FULL_VOLUME_HEIGHT;
            var p = document.getElementById('audio_bg_level');
            p.style.height = newVolume + 'px';
            p.style.marginTop = -newVolume + 'px';
        }.bind(this)
    );

    // This object will implement PlayerHandler callbacks with
    // remotePlayerController, and makes necessary UI updates specific
    // to remote playback
    var playerTarget = {};

    playerTarget.play = function () {
        if (this.remotePlayer.isPaused) {
            this.remotePlayerController.playOrPause();
        }

        var vi = document.getElementById('video_image');
        vi.style.display = 'block';
        var localPlayer = document.getElementById('video_element');
        localPlayer.style.display = 'none';
    }.bind(this);

    playerTarget.pause = function () {
        if (!this.remotePlayer.isPaused) {
            this.remotePlayerController.playOrPause();
        }
    }.bind(this);

    playerTarget.stop = function () {
         this.remotePlayerController.stop();
    }.bind(this);

    playerTarget.getCurrentMediaTime = function() {
        return this.remotePlayer.currentTime;
    }.bind(this);

    playerTarget.getMediaDuration = function() {
        return this.remotePlayer.duration;
    }.bind(this);

    playerTarget.updateDisplayMessage = function () {
        document.getElementById('playerstate').style.display = 'block';
        document.getElementById('playerstatebg').style.display = 'block';
        document.getElementById('video_image_overlay').style.display = 'block';
        document.getElementById('playerstate').innerHTML =
            this.mediaContents[ this.currentMediaIndex]['title'] + ' ' +
            this.playerState + ' on ' + castSession.getCastDevice().friendlyName;
    }.bind(this);

    playerTarget.setVolume = function (volumeSliderPosition) {
        // Add resistance to avoid loud volume
        var currentVolume = this.remotePlayer.volumeLevel;
        var p = document.getElementById('audio_bg_level');
        if (volumeSliderPosition < FULL_VOLUME_HEIGHT) {
            var vScale =  this.currentVolume * FULL_VOLUME_HEIGHT;
            if (volumeSliderPosition > vScale) {
                volumeSliderPosition = vScale + (pos - vScale) / 2;
            }
            p.style.height = volumeSliderPosition + 'px';
            p.style.marginTop = -volumeSliderPosition + 'px';
            currentVolume = volumeSliderPosition / FULL_VOLUME_HEIGHT;
        } else {
            currentVolume = 1;
        }
        this.remotePlayer.volumeLevel = currentVolume;
        this.remotePlayerController.setVolumeLevel();
    }.bind(this);

    playerTarget.mute = function () {
        if (!this.remotePlayer.isMuted) {
            this.remotePlayerController.muteOrUnmute();
        }
    }.bind(this);

    playerTarget.unMute = function () {
        if (this.remotePlayer.isMuted) {
            this.remotePlayerController.muteOrUnmute();
        }
    }.bind(this);

    playerTarget.isMuted = function() {
        return this.remotePlayer.isMuted;
    }.bind(this);

    playerTarget.seekTo = function (time) {
        this.remotePlayer.currentTime = time;
        this.remotePlayerController.seek();
    }.bind(this);

    this.playerHandler.setTarget(playerTarget);

    // Setup remote player volume right on setup
    // The remote player may have had a volume set from previous playback
    if (this.remotePlayer.isMuted) {
        this.playerHandler.mute();
    }
    var currentVolume = this.remotePlayer.volumeLevel * FULL_VOLUME_HEIGHT;
    var p = document.getElementById('audio_bg_level');
    p.style.height = currentVolume + 'px';
    p.style.marginTop = -currentVolume + 'px';

    this.hideFullscreenButton();

    this.playerHandler.play();
};
กำลังโหลดสื่อ
ใน Cast SDK RemotePlayer และ RemotePlayerController มีชุด API ที่สะดวกสำหรับการจัดการการเล่นสื่อจากระยะไกลบนตัวรับ สําหรับ CastSession ที่รองรับการเล่นสื่อ SDK จะสร้างอินสแตนซ์ของ RemotePlayer และ RemotePlayerController โดยอัตโนมัติ คุณเข้าถึงได้โดยการสร้างอินสแตนซ์ของ cast.framework.RemotePlayer และ cast.framework.RemotePlayerController ตามลำดับ ดังที่แสดงไว้ก่อนหน้านี้ใน Codelab
จากนั้นเราต้องโหลดวิดีโอที่เลือกอยู่ในปัจจุบันบนตัวรับโดยสร้างออบเจ็กต์ MediaInfo เพื่อให้ SDK ประมวลผลและส่งในคำขอ เพิ่มโค้ดต่อไปนี้ลงใน setupRemotePlayer เพื่อดำเนินการดังกล่าว
/**
 * Set the PlayerHandler target to use the remote player
 */
CastPlayer.prototype.setupRemotePlayer = function () {
    //...

    playerTarget.load = function (mediaIndex) {
        console.log('Loading...' + this.mediaContents[mediaIndex]['title']);
        var mediaInfo = new chrome.cast.media.MediaInfo(
            this.mediaContents[mediaIndex]['sources'][0], 'video/mp4');

        mediaInfo.metadata = new chrome.cast.media.GenericMediaMetadata();
        mediaInfo.metadata.metadataType = chrome.cast.media.MetadataType.GENERIC;
        mediaInfo.metadata.title = this.mediaContents[mediaIndex]['title'];
        mediaInfo.metadata.images = [
            {'url': MEDIA_SOURCE_ROOT + this.mediaContents[mediaIndex]['thumb']}];

        var request = new chrome.cast.media.LoadRequest(mediaInfo);
        castSession.loadMedia(request).then(
            this.playerHandler.loaded.bind(this.playerHandler),
            function (errorCode) {
                this.playerState = PLAYER_STATE.ERROR;
                console.log('Remote media load error: ' +
                    CastPlayer.getErrorMessage(errorCode));
            }.bind(this));
    }.bind(this);

    //...
};
ตอนนี้ให้เพิ่มวิธีสลับระหว่างการเล่นในเครื่องกับการเล่นจากระยะไกล
/**
 * This is a method for switching between the local and remote
 * players. If the local player is selected, setupLocalPlayer()
 * is run. If there is a cast device connected we run
 * setupRemotePlayer().
 */
CastPlayer.prototype.switchPlayer = function() {
    this.stopProgressTimer();
    this.resetVolumeSlider();
    this.playerHandler.stop();
    this.playerState = PLAYER_STATE.IDLE;
    if (cast && cast.framework) {
        if (this.remotePlayer.isConnected) {
            this.setupRemotePlayer();
            return;
        }
    }
    this.setupLocalPlayer();
};
สุดท้าย ให้เพิ่มเมธอดเพื่อจัดการข้อความแสดงข้อผิดพลาดของ Cast
/**
 * Makes human-readable message from chrome.cast.Error
 * @param {chrome.cast.Error} error
 * @return {string} error message
 */
CastPlayer.getErrorMessage = function(error) {
  switch (error.code) {
    case chrome.cast.ErrorCode.API_NOT_INITIALIZED:
      return 'The API is not initialized.' +
        (error.description ? ' :' + error.description : '');
    case chrome.cast.ErrorCode.CANCEL:
      return 'The operation was canceled by the user' +
        (error.description ? ' :' + error.description : '');
    case chrome.cast.ErrorCode.CHANNEL_ERROR:
      return 'A channel to the receiver is not available.' +
        (error.description ? ' :' + error.description : '');
    case chrome.cast.ErrorCode.EXTENSION_MISSING:
      return 'The Cast extension is not available.' +
        (error.description ? ' :' + error.description : '');
    case chrome.cast.ErrorCode.INVALID_PARAMETER:
      return 'The parameters to the operation were not valid.' +
        (error.description ? ' :' + error.description : '');
    case chrome.cast.ErrorCode.RECEIVER_UNAVAILABLE:
      return 'No receiver was compatible with the session request.' +
        (error.description ? ' :' + error.description : '');
    case chrome.cast.ErrorCode.SESSION_ERROR:
      return 'A session could not be created, or a session was invalid.' +
        (error.description ? ' :' + error.description : '');
    case chrome.cast.ErrorCode.TIMEOUT:
      return 'The operation timed out.' +
        (error.description ? ' :' + error.description : '');
  }
};
ตอนนี้ให้เรียกใช้แอป เชื่อมต่อกับอุปกรณ์ Cast แล้วเริ่มเล่นวิดีโอ คุณควรเห็นวิดีโอเล่นบนอุปกรณ์รับสัญญาณ
7. เพิ่มการรองรับ Cast Connect
คลัง Cast Connect ช่วยให้แอปพลิเคชันตัวส่งที่มีอยู่สื่อสารกับแอปพลิเคชัน Android TV ผ่านโปรโตคอล Cast ได้ Cast Connect สร้างขึ้นบนโครงสร้างพื้นฐานของ Cast โดยแอป Android TV จะทำหน้าที่เป็นตัวรับ
แท็กเริ่มการทำงาน
- เบราว์เซอร์ Chrome เวอร์ชัน M87 ขึ้นไป
ตั้งค่าเครื่องรับ Android ให้เข้ากันได้
หากต้องการเปิดตัวแอปพลิเคชัน Android TV หรือที่เรียกว่า Android Receiver เราต้องตั้งค่าแฟล็ก androidReceiverCompatible เป็น true ในออบเจ็กต์ CastOptions
เพิ่มโค้ดต่อไปนี้ลงใน CastVideos.js ในฟังก์ชัน initializeCastPlayer
var options = {};
...
options.androidReceiverCompatible = true;

cast.framework.CastContext.getInstance().setOptions(options);
ตั้งค่าข้อมูลเข้าสู่ระบบการเปิดตัว
ในฝั่งผู้ส่ง คุณสามารถระบุ CredentialsData เพื่อแสดงถึงผู้ที่เข้าร่วมเซสชันได้ credentials คือสตริงที่ผู้ใช้กำหนดได้ ตราบใดที่แอป ATV เข้าใจสตริงนั้น ระบบจะส่ง CredentialsData ไปยังแอป Android TV ของคุณในระหว่างการเปิดตัวหรือเวลาเข้าร่วมเท่านั้น หากคุณตั้งค่าอีกครั้งขณะที่เชื่อมต่ออยู่ ระบบจะไม่ส่งค่าดังกล่าวไปยังแอป Android TV
หากต้องการตั้งค่าข้อมูลเข้าสู่ระบบเพื่อเปิดตัว CredentialsData คุณต้องกำหนดค่าได้ทุกเมื่อหลังจากตั้งค่าตัวเลือกการเปิดตัวแล้ว
เพิ่มโค้ดต่อไปนี้ลงในคลาส CastVideos.js ในฟังก์ชัน initializeCastPlayer
cast.framework.CastContext.getInstance().setOptions(options);
...
let credentialsData = new chrome.cast.CredentialsData("{\"userId\": \"abc\"}");
cast.framework.CastContext.getInstance().setLaunchCredentialsData(credentialsData);
...
ตั้งค่าข้อมูลเข้าสู่ระบบในคำขอโหลด
ในกรณีที่แอป Web Receiver และแอป Android TV จัดการ credentials แตกต่างกัน คุณอาจต้องกำหนดข้อมูลเข้าสู่ระบบแยกกันสำหรับแต่ละแอป หากต้องการจัดการเรื่องนี้ ให้เพิ่มโค้ดต่อไปนี้ใน CastVideos.js ภายใน playerTarget.load ในฟังก์ชัน setupRemotePlayer
...
var request = new chrome.cast.media.LoadRequest(mediaInfo);
request.credentials = 'user-credentials';
request.atvCredentials = 'atv-user-credentials';
...
ตอนนี้ SDK จะจัดการข้อมูลเข้าสู่ระบบที่จะใช้สำหรับเซสชันปัจจุบันโดยอัตโนมัติ ทั้งนี้ขึ้นอยู่กับแอปตัวรับที่ผู้ส่งแคสต์
การทดสอบ Cast Connect
ขั้นตอนการติดตั้ง Android TV APK ใน Chromecast พร้อม Google TV มีดังนี้
- ค้นหาที่อยู่ IP ของอุปกรณ์ Android TV โดยปกติแล้ว คุณจะดูได้ที่การตั้งค่า > เครือข่ายและอินเทอร์เน็ต > (ชื่อเครือข่ายที่อุปกรณ์เชื่อมต่ออยู่) ทางด้านขวาจะแสดงรายละเอียดและ IP ของอุปกรณ์ในเครือข่าย
- ใช้ที่อยู่ IP ของอุปกรณ์เพื่อเชื่อมต่อผ่าน ADB โดยใช้เทอร์มินัล
$ adb connect <device_ip_address>:5555
- จากหน้าต่างเทอร์มินัล ให้ไปที่โฟลเดอร์ระดับบนสุดสำหรับตัวอย่าง Codelab ที่คุณดาวน์โหลดไว้ตอนต้นของ Codelab นี้ เช่น
$ cd Desktop/chrome_codelab_src
- ติดตั้งไฟล์ .apk ในโฟลเดอร์นี้ลงใน Android TV โดยเรียกใช้คำสั่งต่อไปนี้
$ adb -s <device_ip_address>:5555 install android-tv-app.apk
- ตอนนี้คุณควรจะเห็นแอปชื่อ Cast Videos ในเมนูแอปของคุณบนอุปกรณ์ Android TV
- เรียกใช้โค้ดตัวส่งเว็บที่อัปเดตแล้วและสร้างเซสชันการแคสต์กับอุปกรณ์ Android TV โดยใช้ไอคอนแคสต์หรือเลือก
Cast..จากเมนูแบบเลื่อนลงในเบราว์เซอร์ Chrome ตอนนี้การดำเนินการนี้ควรจะเปิดแอป Android TV ในเครื่องรับ Android และช่วยให้คุณควบคุมการเล่นโดยใช้รีโมต Android TV ได้
8. ขอแสดงความยินดี
ตอนนี้คุณทราบวิธีเปิดใช้การแคสต์ในแอปวิดีโอโดยใช้วิดเจ็ต Cast SDK ในเว็บแอป Chrome แล้ว
ดูรายละเอียดเพิ่มเติมได้ที่คู่มือสำหรับนักพัฒนาซอฟต์แวร์ Web Sender