このガイドでは、Cardboard SDK for iOS を使用して独自のバーチャル リアリティ(VR)体験。
Cardboard SDK を使用すれば、スマートフォンを VR プラットフォームに変えることができます。スマートフォン 立体画像レンダリングで 3D シーンを表示し、頭の動きを追跡して反応できます。 ユーザーがビューアのボタンを押したことを検出して、アプリを操作します。
最初に、HelloCardboard というコア機能のデモゲームを使用します ダウンロードしますこのゲームでは、ユーザーは仮想世界を見回して見つけて収集します 説明します。次の方法について説明します。
- 開発環境を設定する
- デモアプリをダウンロードしてビルドする
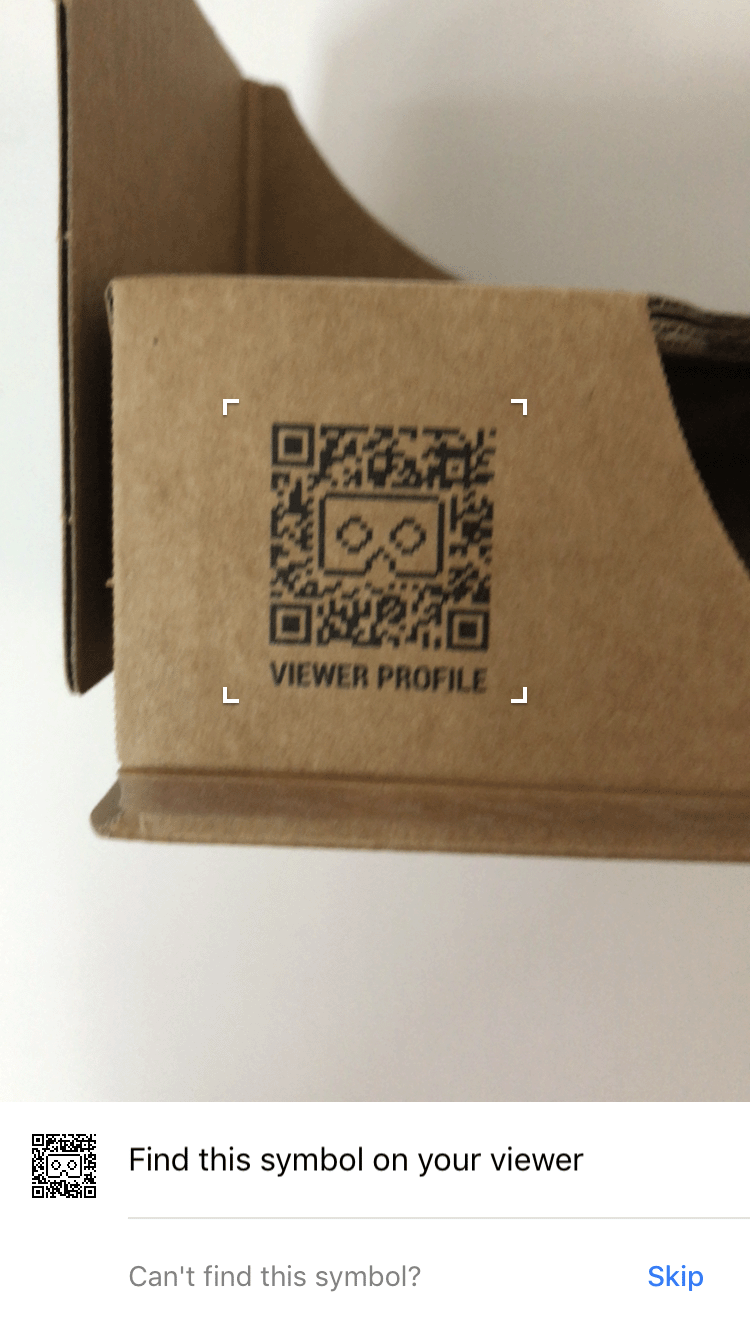
- Cardboard ビューアの QR コードをスキャンしてパラメータを保存します
- ユーザーの頭の動きをトラッキングする
- 左右の目のそれぞれに対して正しい歪みを設定して、立体画像をレンダリングできます
開発環境を設定する
ハードウェア要件:
- iOS 12.0 以降を搭載した iPhone
- Cardboard ビューア
ソフトウェア要件:
- Xcode 12.5 以降
- CocoaPods 1.9 以降
デモアプリをダウンロードしてビルドする
Cardboard SDK は、コンパイル済みのプロトコル バッファを使用してビルドされています。 C++ ソースファイル。ソースファイルをゼロからビルドする手順については、 こちらをご覧ください。
次のコマンドを実行して、GitHub から Cardboard SDK と Hello Cardboard デモアプリのクローンを作成します。 次のコマンドを実行します。
git clone https://github.com/googlevr/cardboard.git
リポジトリのルートで次のコマンドを実行して、プロトコル バッファの依存関係を Xcode プロジェクトにインストールします。
pod install
Xcode で Cardboard ワークスペース(
Cardboard.xcworkspace)を開きます。チームでアプリに署名できるように、アプリのバンドル ID を変更します。
[SDK] >ビルドフェーズ >バイナリをライブラリにリンクする
- リストから
libPods-sdk.aを削除するには、選択し [-] をクリックします] ボタンを離します。 - リストに
libProtobuf-C++.aを追加するには、[+] をクリックしますそれを選択します。XCFramework の使用を提案するメッセージがポップアップ表示された場合は、[Add Anyways] をクリックします。
- リストから
[実行] をクリックします。
QR コードをスキャンする
デバイスのパラメータを保存するには、Cardboard ビューアで QR コードをスキャンします。
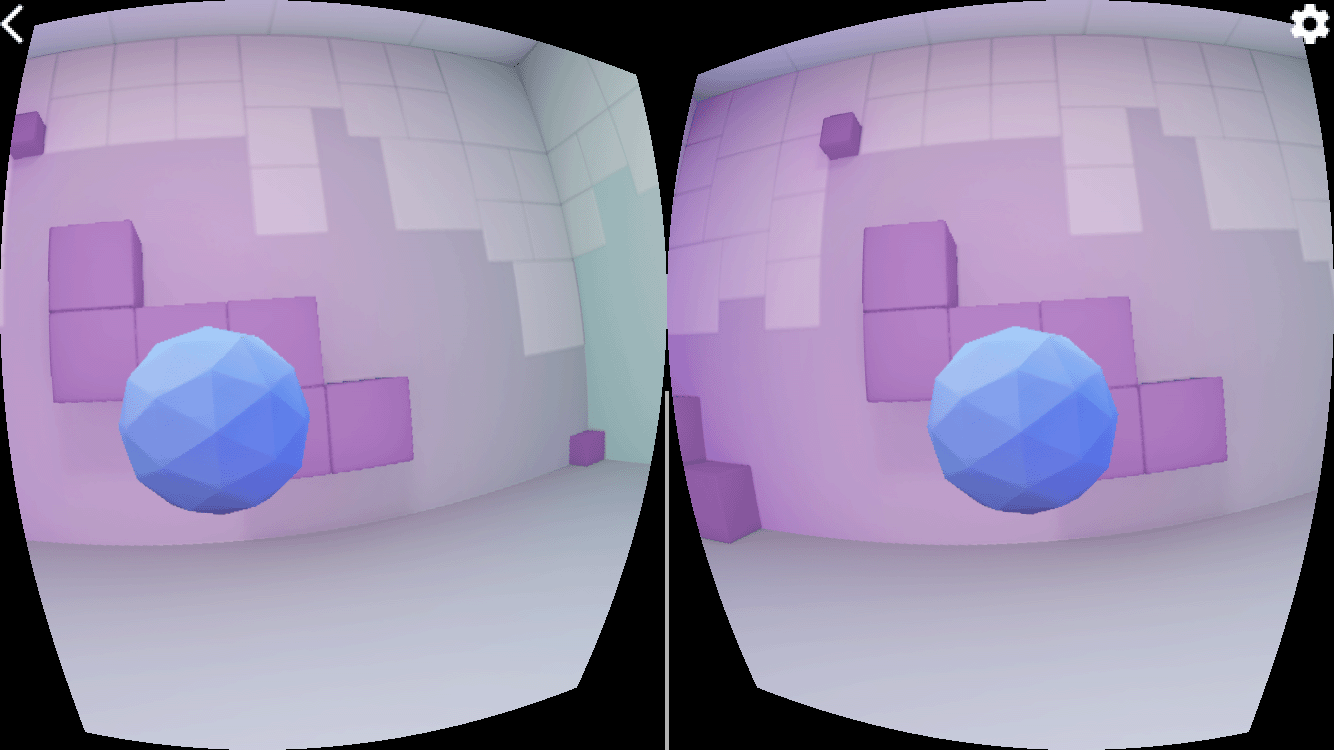
デモを試す
HelloCardboard では、3D 空間で測地線的な球体を見つけて収集します。
球体を見つけて収集するには:
球体が浮かび上がるまで、頭をいずれかの方向に動かします。
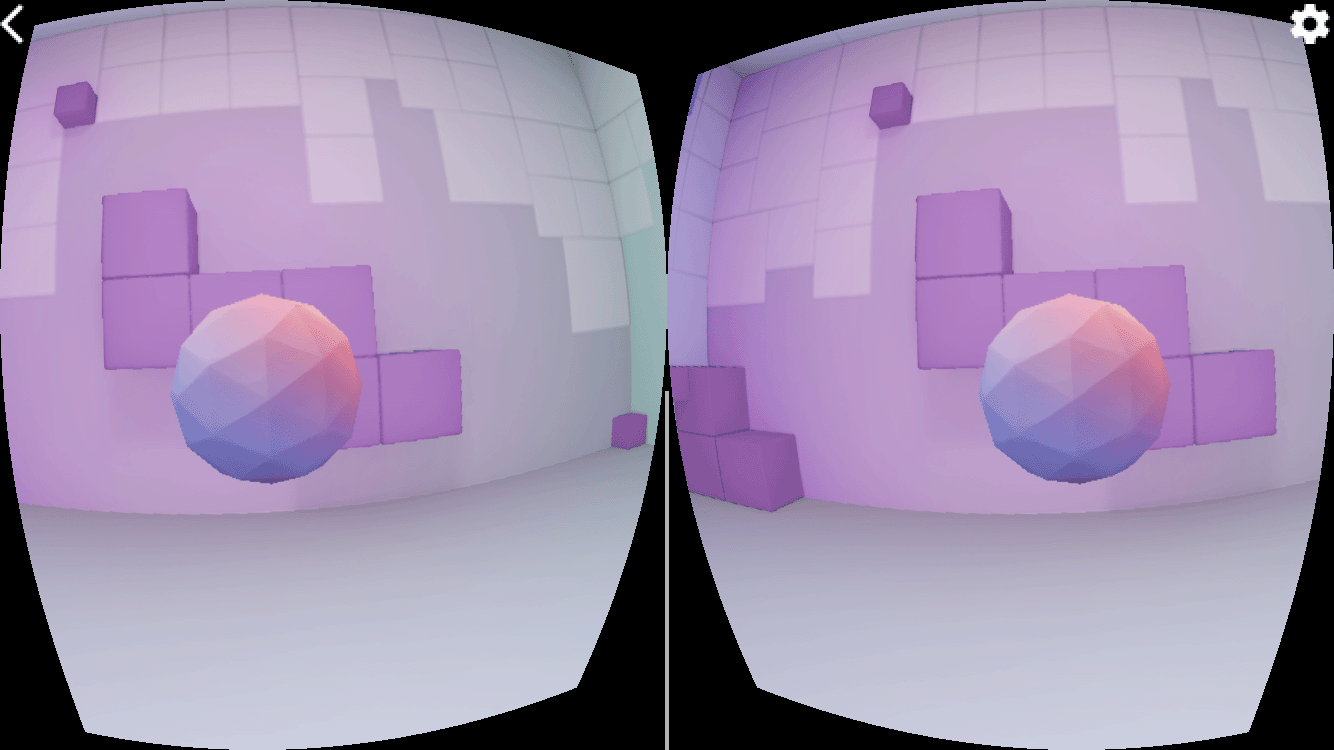
球体を正面から見てください。これにより、色が変化します。
Cardboard ビューアのボタンを押して「収集」してくださいあります。
デバイスを設定する
ユーザーが歯車アイコンをタップして Cardboard ビューアを切り替えると、didTapSwitchButton
メソッドが HelloCardboardOverlayView で呼び出されます。
- (void)didTapSwitchButton:(id)sender {
  if ([self.delegate respondsToSelector:@selector(didTapBackButton)]) {
    [self.delegate didChangeViewerProfile];
  }
  self.settingsBackgroundView.hidden = YES;
}
これにより CardboardQrCode_scanQrCodeAndSaveDeviceParams が呼び出され、
表示されるウィンドウで、閲覧者の QR コードをスキャンします。ユーザーが QR コードをスキャンすると、デバイスの
歪みパラメータが更新されます。
- (void)switchViewer {
  CardboardQrCode_scanQrCodeAndSaveDeviceParams();
}

- (void)didChangeViewerProfile {
  [self pauseCardboard];
  [self switchViewer];
  [self resumeCardboard];
}
ヘッド トラッキング
ヘッド トラッカーを作成
ヘッド トラッカーは、HelloCardboardViewController の viewDidLoad メソッドで一度作成します。
_cardboardHeadTracker = CardboardHeadTracker_create();
ヘッド トラッカーの一時停止と再開
pauseCardboard メソッドと resumeCardboard メソッドの
HelloCardboardViewController クラスはヘッド トラッカーを一時停止し、再開します。
できます。resumeCardboard は _updateParams フラグも設定するため、
次の描画呼び出しで更新されるデバイス パラメータ。
- (void)pauseCardboard {
  self.paused = true;
  CardboardHeadTracker_pause(_cardboardHeadTracker);
}

- (void)resumeCardboard {
  // Parameters may have changed.
  _updateParams = YES;

  // Check for device parameters existence in app storage. If they're missing,
  // we must scan a Cardboard QR code and save the obtained parameters.
  uint8_t *buffer;
  int size;
  CardboardQrCode_getSavedDeviceParams(&buffer, &size);
  if (size == 0) {
    [self switchViewer];
  }
  CardboardQrCode_destroy(buffer);

  CardboardHeadTracker_resume(_cardboardHeadTracker);
  self.paused = false;
}
レンズの歪み
Cardboard が新しい QR コードをスキャンするたびに、保存されたパラメータが以下のコードで読み取られます 適切なレンズ歪みを適用するレンズ歪みオブジェクトを作成します 追加します。
CardboardQrCode_getSavedDeviceParams(&encodedDeviceParams, &size);

// Create CardboardLensDistortion.
CardboardLensDistortion_destroy(_cardboardLensDistortion);
_cardboardLensDistortion =
    CardboardLensDistortion_create(encodedDeviceParams, size, width, height);

// Initialize HelloCardboardRenderer.
_renderer.reset(new cardboard::hello_cardboard::HelloCardboardRenderer(
      _cardboardLensDistortion, _cardboardHeadTracker, width, height));
レンダリング
Cardboard でコンテンツをレンダリングする手順は次のとおりです。
- テクスチャの作成
- 左右の目のビュー行列と投影行列の取得
- レンダラの作成と歪みメッシュの設定
- 各フレームのレンダリング
テクスチャを作成する
コンテンツはテクスチャ上に描画され、左目用と右目用のセクションに分割されます。
これらのセクションは、それぞれ _leftEyeTexture と _rightEyeTexture で初期化されます。
サンプルアプリでは両目に対して 1 つのテクスチャを使用しますが、別のテクスチャを作成することもできます。
それぞれの目に合ったテクスチャ
// Generate texture to render left and right eyes.
glGenTextures(1, &_eyeTexture);
glBindTexture(GL_TEXTURE_2D, _eyeTexture);
glTexParameteri(GL_TEXTURE_2D, GL_TEXTURE_MIN_FILTER, GL_LINEAR);
glTexParameteri(GL_TEXTURE_2D, GL_TEXTURE_MAG_FILTER, GL_LINEAR);
glTexParameteri(GL_TEXTURE_2D, GL_TEXTURE_WRAP_S, GL_CLAMP_TO_EDGE);
glTexParameteri(GL_TEXTURE_2D, GL_TEXTURE_WRAP_T, GL_CLAMP_TO_EDGE);

glTexImage2D(GL_TEXTURE_2D, 0, GL_RGB, _width, _height, 0, GL_RGB, GL_UNSIGNED_BYTE, 0);

_leftEyeTexture.texture = _eyeTexture;
_leftEyeTexture.left_u = 0;
_leftEyeTexture.right_u = 0.5;
_leftEyeTexture.top_v = 1;
_leftEyeTexture.bottom_v = 0;

_rightEyeTexture.texture = _eyeTexture;
_rightEyeTexture.left_u = 0.5;
_rightEyeTexture.right_u = 1;
_rightEyeTexture.top_v = 1;
_rightEyeTexture.bottom_v = 0;
CheckGLError("Create Eye textures");
これらのテクスチャは、パラメータとして CardboardDistortionRenderer_renderEyeToDisplay に渡されます。
左右の目のビュー行列と投影行列を取得する
まず、左右の目の行列を取得します。
CardboardLensDistortion_getEyeFromHeadMatrix(_lensDistortion, kLeft, _eyeMatrices[kLeft]);
CardboardLensDistortion_getEyeFromHeadMatrix(_lensDistortion, kRight, _eyeMatrices[kRight]);
CardboardLensDistortion_getProjectionMatrix(_lensDistortion, kLeft, kZNear, kZFar,
                                            _projMatrices[kLeft]);
CardboardLensDistortion_getProjectionMatrix(_lensDistortion, kRight, kZNear, kZFar,
                                            _projMatrices[kRight]);
次に、それぞれの目のディストーション メッシュを取得し、ディストーション レンダラに渡します。
CardboardLensDistortion_getDistortionMesh(_lensDistortion, kLeft, &leftMesh);
CardboardLensDistortion_getDistortionMesh(_lensDistortion, kRight, &rightMesh);
レンダラを作成して正しい歪みメッシュを設定する
レンダラの初期化は 1 回だけで済みます。レンダラを作成したら、新しい
から返されたメッシュ値に従って、左右の目の歪みメッシュが
CardboardLensDistortion_getDistortionMesh 関数を使用します。
_distortionRenderer = CardboardOpenGlEs2DistortionRenderer_create();
CardboardDistortionRenderer_setMesh(_distortionRenderer, &leftMesh, kLeft);
CardboardDistortionRenderer_setMesh(_distortionRenderer, &rightMesh, kRight);
コンテンツのレンダリング
CardboardHeadTracker_getPose から現在の頭の向きを取得します。
CardboardHeadTracker_getPose(_headTracker, targetTime, position, orientation);
_headView =
    GLKMatrix4Multiply(GLKMatrix4MakeTranslation(position[0], position[1], position[2]),
                       GLKMatrix4MakeWithQuaternion(GLKQuaternionMakeWithArray(orientation)));
現在の頭の向きをビュー行列と射影行列とともに使用してビューを作成する 投影行列を作成し、それらを使用してそれぞれの目のワールド コンテンツをレンダリングします。
// Draw left eye.
glViewport(0, 0, _width / 2.0, _height);
glScissor(0, 0, _width / 2.0, _height);
DrawWorld(_leftEyeViewPose, GLKMatrix4MakeWithArray(_projMatrices[kLeft]));

// Draw right eye.
glViewport(_width / 2.0, 0, _width / 2.0, _height);
glScissor(_width / 2.0, 0, _width / 2.0, _height);
DrawWorld(_rightEyeViewPose, GLKMatrix4MakeWithArray(_projMatrices[kRight]));
CardboardDistortionRenderer_renderEyeToDisplay を使用して歪みを適用する
画面にコンテンツをレンダリングします
CardboardDistortionRenderer_renderEyeToDisplay(_distortionRenderer, renderTarget, /*x=*/0,
                                               /*y=*/0, _width, _height, &_leftEyeTexture,
                                               &_rightEyeTexture);