
1. Introduction


Last Updated: 2021-09-13
Collecting payments!
Collecting payments on Business Messages opens you up to a whole new world of business opportunities within the conversational platform. Imagine a prospective customer sending you an inquiry about a product they want to learn more about. Once they have their questions answered, then you can close the deal with them by providing a payment gateway right within the conversation.

What makes a good payment experience?
A good payment experience is one where users can pay the way they are used to.
Users have preferences when it comes to how they pay and different payment methods are more common than others in different parts of the world. With Business Messages, you can integrate with more than one payment processor for the highest degree of convenience for users.
Once a user completes a payment flow, you want to let them know that you successfully received their payment. Most payment processors include a success or failure callback that sends an HTTP request to a URL of your choice upon completion of the payment flow.
What you'll build
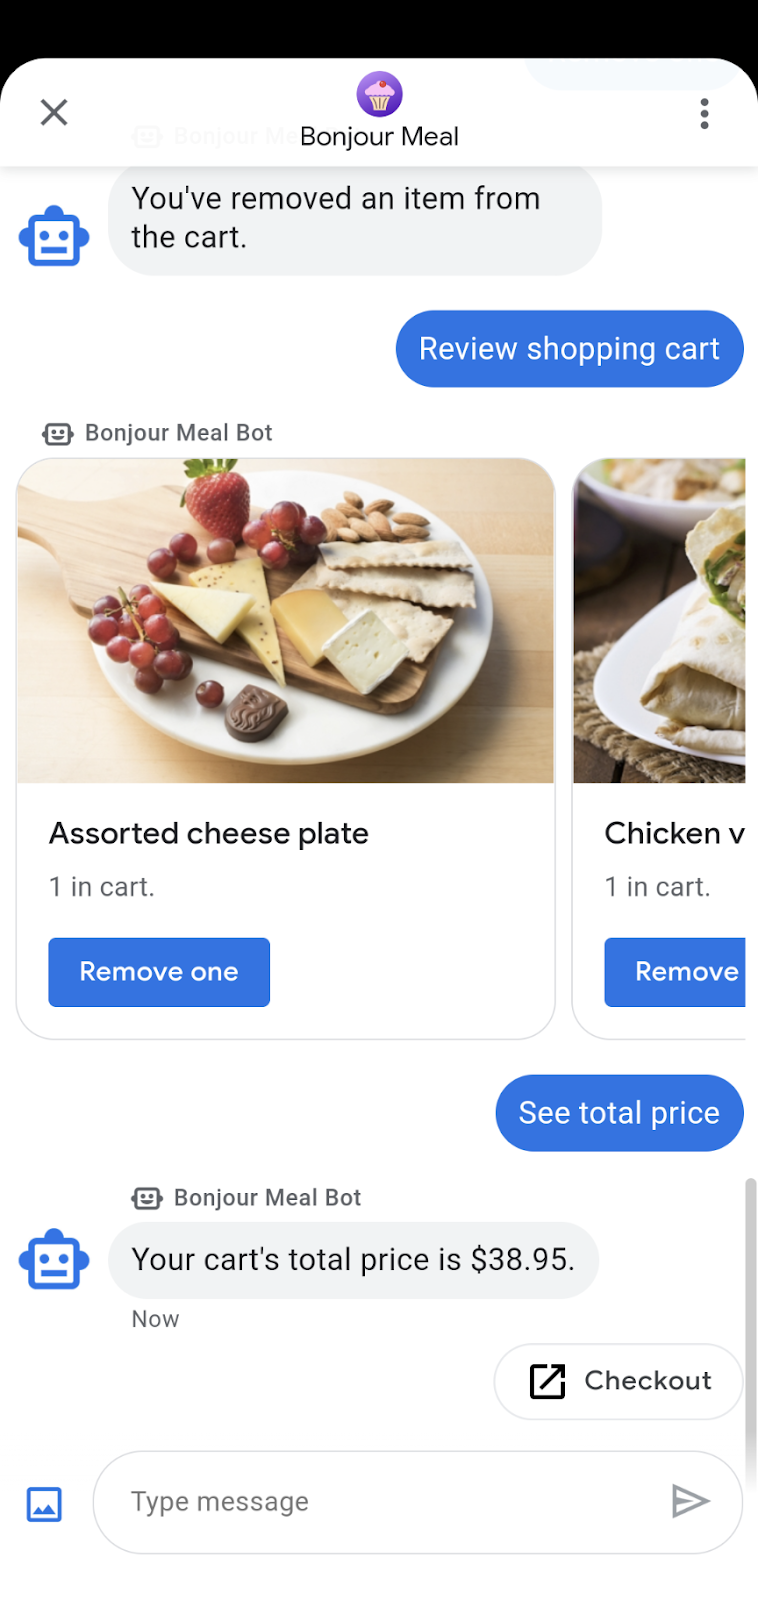
In the previous section of the codelab series, you extended the Bonjour Meal agent to present a catalog of items, created a shopping cart that allows users to add and remove items, and calculated the total price of the shopping cart. In this section, you're going to further extend the agent so that it can process payments based on the contents of the shopping cart.
In this codelab, your app will
- Integrate with the Stripe payment gateway
- Allow a user to complete the payment flow based on the price of the cart
- Send a notification back to the conversational surface to inform the user of the payment state
What you'll do
- Integrate with the Stripe payment processor.
- Send a request to Stripe to initiate a payment session.
- Handle payment success or failure responses from Stripe.
What you'll need
- A GCP project that is registered and approved for use with Business Messages
- Check out our developer site for instructions on how
- An Android device with version 5 or above OR an iOS device with the Google Maps app
- Experience with web application programming
- An Internet connection!
2. Adding dependencies
Updating requirements.txt
As we'll be integrating with the Stripe payment processor, we can use the Stripe Python client library. Add stripe to requirements.txt without a version to get the latest version of the dependency.
This is necessary for Google Cloud App Engine Python runtime to include the stripe Python module.
requirements.txt
...
stripe
...
Preparing bopis/views.py
At the top of the bopis/views.py, import render from django.shortcuts and JsonResponse from django.http. Additionally, we'll need to import stripe to support calls to the Stripe Python client library.
...
from django.shortcuts import render
from django.http import JsonResponse
import stripe
...
3. Working with Stripe
Create an account at Stripe.com
In this codelab, we just happened to be using Stripe, but you can integrate with any processor that supports web integration. Create an account on stripe.com. We'll use this profile for testing and educational purposes to learn how you can integrate directly with any third party payment processor.

Once you've created an account and logged in, you should see a dashboard that looks like this.
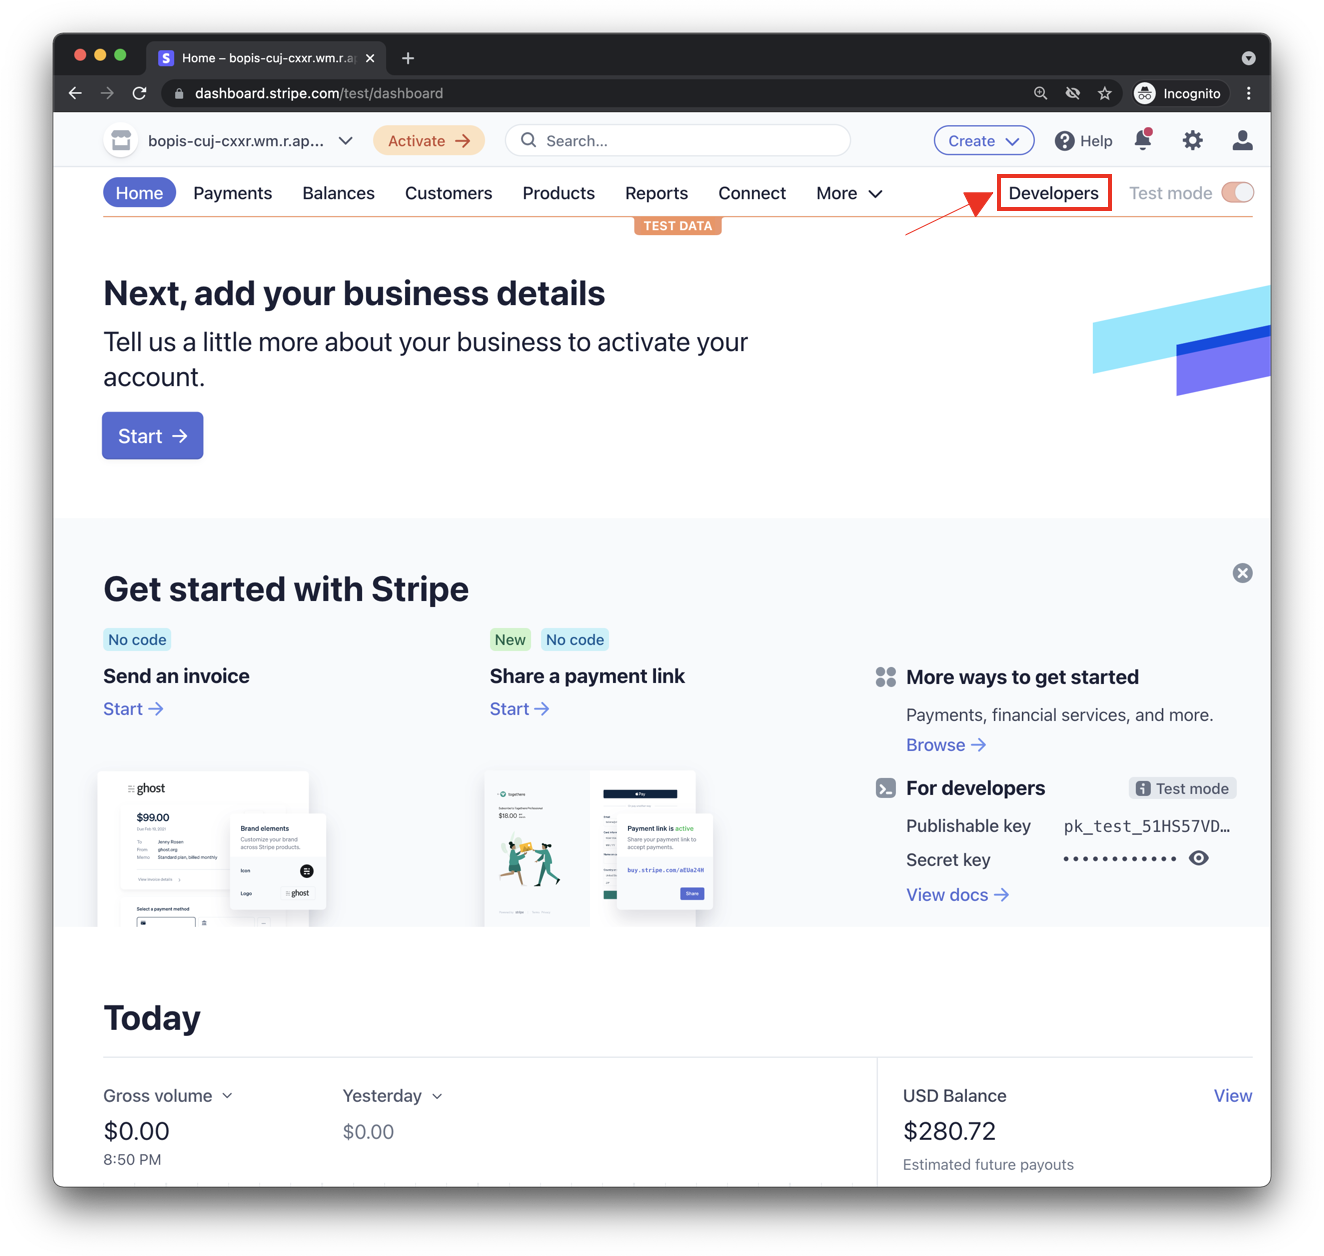
Ensure you are operating in "Test mode", and click on the Developers button as outlined in the screenshot above to look for your API keys. You should see two sets of API keys: a Publishable key and a Secret key. You'll need both of these keys to facilitate payment transactions with Stripe.
Update bopis/views.py
Your application needs both sets of keys, so update them in views.py.
You can set the secret key directly on the stripe.api_key property and assign it the value of the Secret Key found in the Stripe developer dashboard. Then create a global variable called STRIPE_PUBLIC_KEY and set it to the publishable key.
Additionally, Stripe needs to redirect back to a web page you manage, so let's create an additional global variable to include your application's publicly reachable domain.
At the end of these modifications, you'll have something like this:
stripe.api_key = 'sk_test_abcde-12345'
STRIPE_PUBLIC_KEY = 'pk_test_edcba-54321'
YOUR_DOMAIN = 'https://<GCP_PROJECT_ID>.appspot.com'
And that's all you need to do for the Stripe setup.
4. Checkout functionality
Update the shopping cart total price function
Currently, the send_shopping_cart_total_price function only sends a message specifying the price of the shopping cart. Let's add a suggested action to open a URL to the checkout page.
def send_shopping_cart_total_price(conversation_id):
  """Sends shopping cart price to the user through Business Messages.

  Args:
    conversation_id (str): The unique id for this user and agent.
  """
  cart_price = get_cart_price(conversation_id)

  message_obj = BusinessMessagesMessage(
      messageId=str(uuid.uuid4().int),
      representative=BOT_REPRESENTATIVE,
      text=f'Your cart\'s total price is ${cart_price}.',
      suggestions=[
          BusinessMessagesSuggestion(
              action=BusinessMessagesSuggestedAction(
                  text='Checkout',
                  postbackData='checkout',
                  openUrlAction=BusinessMessagesOpenUrlAction(
                      url=f'{YOUR_DOMAIN}/checkout/{conversation_id}'))),
      ]
    )

  send_message(message_obj, conversation_id)
When the user taps on this suggestedAction, they're directed to a webpage that shows their total price and a button to initiate payment with Stripe.
Let's build out a simple webpage that will support this flow.
In the project source code, find the directory named bopis. Create a new directory within bopis called templates, and within templates create another directory named bopis. This is a Django design pattern to specify the app name within the templates directory. It helps reduce confusion of templates between Django apps.
You should now have a directory with a path at bopis/templates/bopis/. You can create HTML files in this directory to serve web pages. Django refers to these as templates that are rendered to the browser. Let's start off with checkout.html.
In this directory create, checkout.html. The following code snippet displays a checkout button and the price of the cart. It also includes JavaScript to initiate the Stripe checkout.
{% load static %}

<!DOCTYPE html>
<html>
  <head>
    <title>Purchase from Bonjour Meal</title>

    <script src="https://js.stripe.com/v3/"></script>
    <style>
      .description{
        font-size: 4em;
      }
      button {
        color: red;
        padding: 40px;
        font-size: 4em;
      }
    </style>
  </head>
  <body>
    <section>
      <img
        src="https://www.google.com/images/branding/googlelogo/2x/googlelogo_color_272x92dp.png"
        alt="Bonjour Meal Restaurant"
      />
      <div class="product">
        <div class="description">
          <h3>Your Bonjour Meal Total</h3>
          <h5>${{cart_price}}</h5>
        </div>
      </div>
      <button type="button" id="checkout-button">Checkout</button>
    </section>
  </body>
  <script type="text/javascript">
    // Create an instance of the Stripe object with your publishable API key
    var stripe = Stripe("{{stripe_public_key}}");
    var checkoutButton = document.getElementById("checkout-button");

    checkoutButton.addEventListener("click", function () {
      fetch("/create-checkout-session/{{conversation_id}}", {
        method: "POST",
      })
        .then(function (response) {
          return response.json();
        })
        .then(function (session) {
          return stripe.redirectToCheckout({ sessionId: session.id });
        })
        .then(function (result) {
          // If redirectToCheckout fails due to a browser or network
          // error, you should display the localized error message to your
          // customer using error.message.
          if (result.error) {
            alert(result.error.message);
          }
        })
        .catch(function (error) {
          console.error("Error:", error);
        });
    });
  </script>
</html>
We need a route to this webpage when the URL is requested. The checkout suggestedAction has an openUrlAction value set to {YOUR_DOMAIN}/checkout/{conversation_id}. This translates into something like https://<GCP-Project-ID>.appspot.com/checkout/abc123-cba321-abc123-cba321. Before we create this route, let's review the JavaScript found within the HTML Template.
...
  <script type="text/javascript">
    // Create an instance of the Stripe object with your publishable API key
    var stripe = Stripe("{{stripe_public_key}}");
    var checkoutButton = document.getElementById("checkout-button");

    checkoutButton.addEventListener("click", function () {
      fetch("/create-checkout-session/{{conversation_id}}", {
        method: "POST",
      })
        .then(function (response) {
          return response.json();
        })
        .then(function (session) {
          return stripe.redirectToCheckout({ sessionId: session.id });
        })
        .then(function (result) {
          // If redirectToCheckout fails due to a browser or network
          // error, you should display the localized error message to your
          // customer using error.message.
          if (result.error) {
            alert(result.error.message);
          }
        })
        .catch(function (error) {
          console.error("Error:", error);
        });
    });
  </script>
...
Let's go through the above code snippet together.
- First it creates a Stripe entity with the public key that is passed in through the context from the view function, another Django paradigm.
- Then, the snippet looks for an element on the page with the id
checkout-button. - An event listener is added to that element.
This event listener will be triggered when a user clicks or taps on this button which initiates a POST request to the web server you specify through the URL: {YOUR_DOMAIN}/create-checkout-session/{conversation_id}.
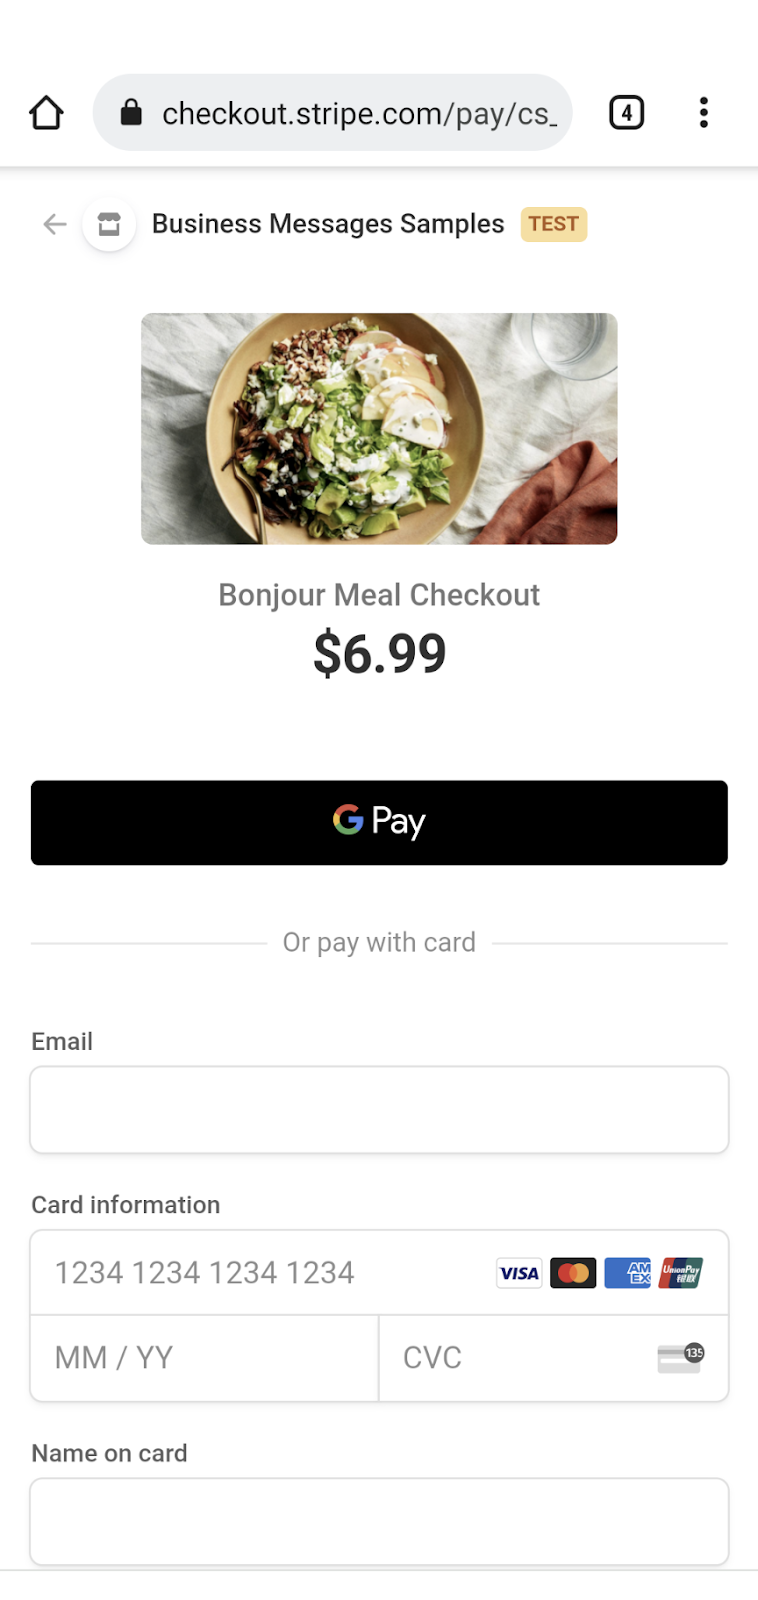
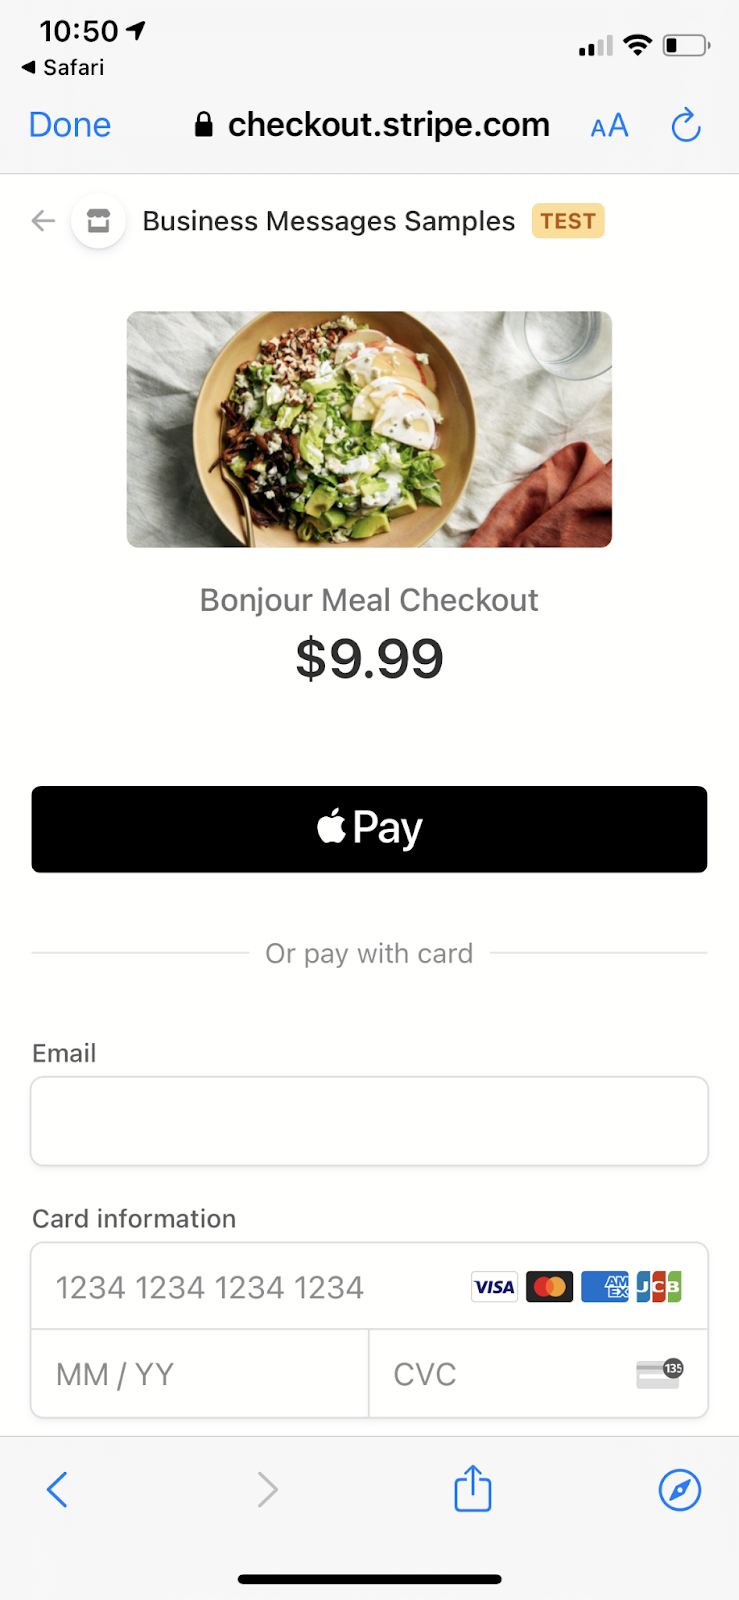
You can see the web server logic in the snippets below. When the user taps on the button with the id "checkout-button" we can expect it to return a Stripe Session ID which is created using the Stripe API specifying the price of the cart.
If your server was able to produce a valid Session ID, the application logic will redirect the user to a Stripe Checkout page, otherwise, it alerts the user with a standard JavaScript message that something has gone wrong.
Let's start with adding new paths to the urlpatterns array to support the checkout page and to generate the Session ID. Add the following to the urlpatterns array in urls.py.
...
path('checkout/<str:conversation_id>', bopis_views.payment_checkout),
path('create-checkout-session/<str:conversation_id>', bopis_views.create_checkout_session),
...
Then let's create the view functions in views.py to return the checkout.html template and to generate the Stripe checkout session.
...

def payment_checkout(request, conversation_id):
  """Sends the user to a payment confirmation page before the payment portal.

  Args:
    request (HttpRequest): Incoming Django request object
    conversation_id (str): The unique id for this user and agent.

  Returns:
    Obj (HttpResponse): Returns an HTTPResponse to the browser
  """

  cart_price = get_cart_price(conversation_id)
  context = {'conversation_id': conversation_id,
             'stripe_public_key': STRIPE_PUBLIC_KEY,
             'cart_price': cart_price
            }
  return render(request, 'bopis/checkout.html', context)


@csrf_exempt
def create_checkout_session(request, conversation_id):
  """Creates a Stripe session to start a payment from the conversation.

  Args:
    request (HttpRequest): Incoming Django request object
    conversation_id (str): The unique id for this user and agent.

  Returns:
    Obj (HttpResponse): Returns an HTTPResponse to the browser
  """
  cart_price = get_cart_price(conversation_id)
  try:
    checkout_session = stripe.checkout.Session.create(
        payment_method_types=['card'],
        line_items=[
            {
                'price_data': {
                    'currency': 'usd',
                    'unit_amount': int(cart_price*100),
                    'product_data': {
                        'name': 'Bonjour Meal Checkout',
                        'images': ['https://storage.googleapis.com/bonjour-rail.appspot.com/apple-walnut-salad.png'],
                    },
                },
                'quantity': 1,
            },
        ],
        mode='payment',
        success_url=YOUR_DOMAIN + '/success/' + conversation_id,
        cancel_url=YOUR_DOMAIN + '/cancel/' + conversation_id,
    )

    return JsonResponse({
        'id': checkout_session.id
    })

  except Exception as e:
    # Handle exceptions according to your payment processor's documentation
    # https://stripe.com/docs/api/errors/handling?lang=python
    return HttpResponse(e)

...
Both of these functions use the conversation_id to associate the shopping cart to the user and then to determine the price Stripe should charge the user.
These two methods make up the first half of the payment flow. If you deploy this and test the experience, you will see a Stripe checkout form where you can complete payment with a test credit card as advised in the Stripe developer documentation for testing Visa checkout.
The second half of the flow is how we bring the user back into the conversation once we receive the response from Stripe regarding the user's payment.
5. Stripe responses
When a user engages in your payment flow, they either succeeded or failed to complete the payment. In the create_checkout_session function, we defined a success_url and a cancel_url. Stripe will redirect to one of these two URLs depending on the state of the payment. Let's define these two routes in urls.py and then add two view functions to bopis/views.py to support these two possible flows.
Add these lines to the urls.py file.
...
    path('success/<str:conversation_id>', bopis_views.payment_success),
    path('cancel/<str:conversation_id>', bopis_views.payment_cancel),
...
And the corresponding views will look like this:
...

def payment_success(request, conversation_id):
  """Sends a notification to the user prompting them back into the conversation.

  Args:
    request (HttpRequest): Incoming Django request object
    conversation_id (str): The unique id for this user and agent.

  Returns:
    Obj (HttpResponse): Returns an HTTPResponse to the browser
  """
  message_obj = BusinessMessagesMessage(
      messageId=str(uuid.uuid4().int),
      representative=BOT_REPRESENTATIVE,
      suggestions=[
          BusinessMessagesSuggestion(
              reply=BusinessMessagesSuggestedReply(
                  text='Check on order', postbackData='check-order')),
      ],
      text='Awesome it looks like we\'ve received your payment.')

  send_message(message_obj, conversation_id)

  return render(request, 'bopis/success.html')


def payment_cancel(request, conversation_id):
  """Sends a notification to the user prompting them back into the conversation.

  Args:
    request (HttpRequest): Incoming Django request object
    conversation_id (str): The unique id for this user and agent.

  Returns:
    Obj (HttpResponse): Returns an HTTPResponse to the browser
  """
  message_obj = BusinessMessagesMessage(
      messageId=str(uuid.uuid4().int),
      representative=BOT_REPRESENTATIVE,
      suggestions=[
          BusinessMessagesSuggestion(
              action=BusinessMessagesSuggestedAction(
                  text='Checkout',
                  postbackData='checkout',
                  openUrlAction=BusinessMessagesOpenUrlAction(
                      url=f'{YOUR_DOMAIN}/checkout/{conversation_id}'))),
      ],
      text='It looks like there was a problem with checkout. Try again?')

  send_message(message_obj, conversation_id)

  return render(request, 'bopis/cancel.html')

...
Stripe redirects back to the domain as you specified in the DOMAIN constant, which means you need to render an HTML response through a template or the website will look very bare. Let's create two simple HTML files in the bopis/templates/bopis/ directory along with checkout.html.
bm-django-echo-bot/bopis/ templates/bopis/success.html
{% load static %}

<html>
<head>
  <title>Business Messages Payment Integration Sample!</title>
  <style>
    p{
      font-size: 4em;
    }
  </style>
</head>
<body>
  <section>

    <p>
      Checkout succeeded - We appreciate your business!
      <br/><br/>
      For support related questions, please email
      <a href="mailto:bm-support@google.com">bm-support@google.com</a>.

    </p>
  </section>
</body>
</html>
bm-django-echo-bot/bopis/ templates/bopis/cancel.html
{% load static %}

<html>
<head>
  <title>Checkout canceled</title>
  <style>
    p{
      font-size: 4em;
    }
    </style>
</head>
<body>
  <section>
    <p>Checkout canceled - Forgot to add something to your cart? Shop around then come back to pay!</p>
  </section>
</body>
</html>
With these two templates, a user who completes a payment flow with your Stripe integration, is redirected to the appropriate URLs and is presented with the respective templates. They will also receive a message via Business Messages allowing them to return to the conversation.
6. Receive payments!
Congratulations, you successfully integrated a payment processor into your Business Messages agent!
In this series, you deployed a web application to Google Cloud App Engine, set your webhook on the Business Communications Developer Console, extended the application to support inventory lookup through a static database, and created a shopping cart using Google Datastore. In the final part of the series, you integrated with Stripe, a payment processor that supports web integrations and with this experience. Now you can engage in integrations with other payment processors and more!
What's next?
When you're ready, checkout some of the following topics to learn about more complex interactions you can achieve in Business Messages:
- How Business Messages works?
- Best practices
- Logo guidelines
- Handoff to live agent
- Business Messages Codelabs
Reference docs
- SuggestedReply
- Business Messages Message reference doc
- JSON definition for RichCard