Page Summary
-
The Business Communications Developer Console is a web interface used to create, manage, and launch Business Messages agents.
-
This console is distinct from the Google Cloud Platform Console, which is used for managing GCP-specific settings and resources.
-
While the console is available, the Business Communications API can also be used for advanced agent creation and management scenarios.
-
The console allows you to configure webhooks and partner account settings, create and manage agents and locations, retrieve test URLs, integrate with Dialogflow, verify agents and locations, and launch agents and locations.
-
The console includes sections for managing account settings, brands, users, and service accounts, and provides detailed information about agents, locations, integrations, surveys, logs, verification, and launch status.
Business Messages provides a web user interface called the Business Communications Developer Console. You use this console to create, manage, and launch agents.
The Business Communications Developer Console is different from the Google Cloud Platform. (GCP) Console. You use the Business Communications Developer Console to manage Business Messages agents, while you use the GCP console to manage GCP-specific settings (for example, billing and APIs) and other GCP resources.
While you can use the Business Communications Developer Console to create and manage your agents, you can also use the Business Communications API to create and manage agents for advanced scenarios such as an integration into your own product.
The quickstart and how-to guides take you through the steps of using both the console and APIs. This page provides a high-level summary of the user interface layout and what the console is used for.
How the console is used
The console is used to create, manage, update, verify, and launch your agents. With it, you can
- Configure your webhook and other partner account settings.
- Create and manage agents, which contain all the properties and data that define the conversational representation of a brand.
- Configure non-local agent settings and message availability.
- Create and manage locations that represent the physical locations for a business.
- Retrieve your agent and location test URLs to see how a conversation with your agent appears to users.
- Integrate with Dialogflow to answer frequently asked questions.
- Verify your agent and locations.
- Launch your agent and locations.
Console home screen
When you initially load the console, you will see the agent selection screen. From this page, the Partner account settings link opens your partner account settings page.
Additionally, the home screen is used to:
- Select an existing agent.
- Create new agents.
- Sort agents.
- Filter agents by partner account.

By default, agents are displayed in a card view. Agents are ordered by when they were last updated. To change to a list view, use the View as options on the right. With the list view, agents are sortable by name, type, status, and last updated date.
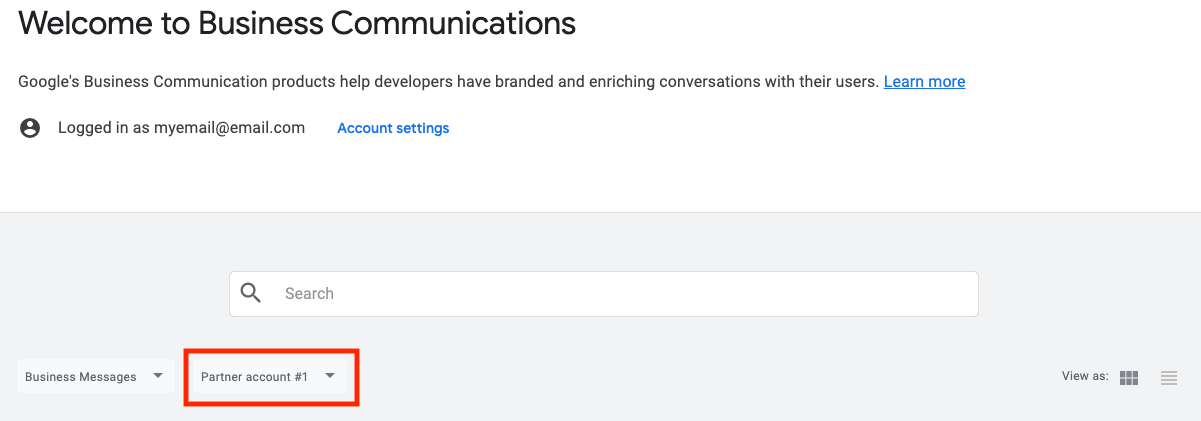
If you have multiple partner accounts, there is a partner account dropdown selector where you can filter agent selection by a partner account.
Account settings
From the Settings page, you can update your:
- Business name
- Display name
- Technical point of contact
- Webhook
In the side navigation panel, you can access brand and user management as well as your service accounts.
Brand management
A brand is a business, organization, or group. An agent is the conversational representation of a brand.
Use this page to add, edit, and remove brands. Removing a brand also deletes all associated agents. A brand can't be removed if it is associated with a launched agent.

User management
Use this page to add and remove access to your registered partner accounts. To switch accounts, use the dropdown in the top navigation bar.

Add a user
To add a user, enter their email address in the email address input field and select the role.
New users can have roles of Manager or Reader. A manager role has access to all functionality in the console while a reader role provides read-only access to agent and location information.
When you add a new user, the user will receive an email notifying them that they now have access to the partner account.
The email address that originally registered the partner account has a role of Owner.
Remove a user
To remove a user:
- Find the user you want to remove in the list.
- Click the button.
- Select Remove user.
- Confirm the removal.
The user you removed receives an email notification informing them that they no longer have access to the account.
You can't remove a user with an Owner role. To change or remove an owner, you need to reach out to support.
Change a user role
To update a user's role:
- Find the user you want to update.
- Click the button.
- Select Edit role.
- Choose a new role from the dropdown.
- Click Save.
Service accounts
When you make calls to the Business Communications and Business Messages APIs, you authenticate calls with a service account key. Service account keys allow you to create and manage brands, agents, and locations as well as send messages and requests as your agent.
To generate a service account key, select Service accounts from the side navigation. The GCP Console for the GCP project associated with the currently selected partner account opens.
To create a service account and key:
- Click Create service account.
- For Service account name, enter your agent's name, then click Create.
- Click Done.
- Locate the new service account in the table, then click > Create key.
- Choose JSON, then click Create.
Your browser downloads the service account key.
Agent selection
After selecting an agent, you will be taken to the Overview page for the selected agent.
The overview displays:
- Brand name
- Agent name
- The partner account the agent was created within
- The Brand ID
- The Agent ID
- Agent test URLs that let you see how a conversation with that agent appears to users and gives you the opportunity to verify your messaging infrastructure
- Agent verification status
- A preview of the agent
- Locations associated with the agent
- Links to relevant documentation
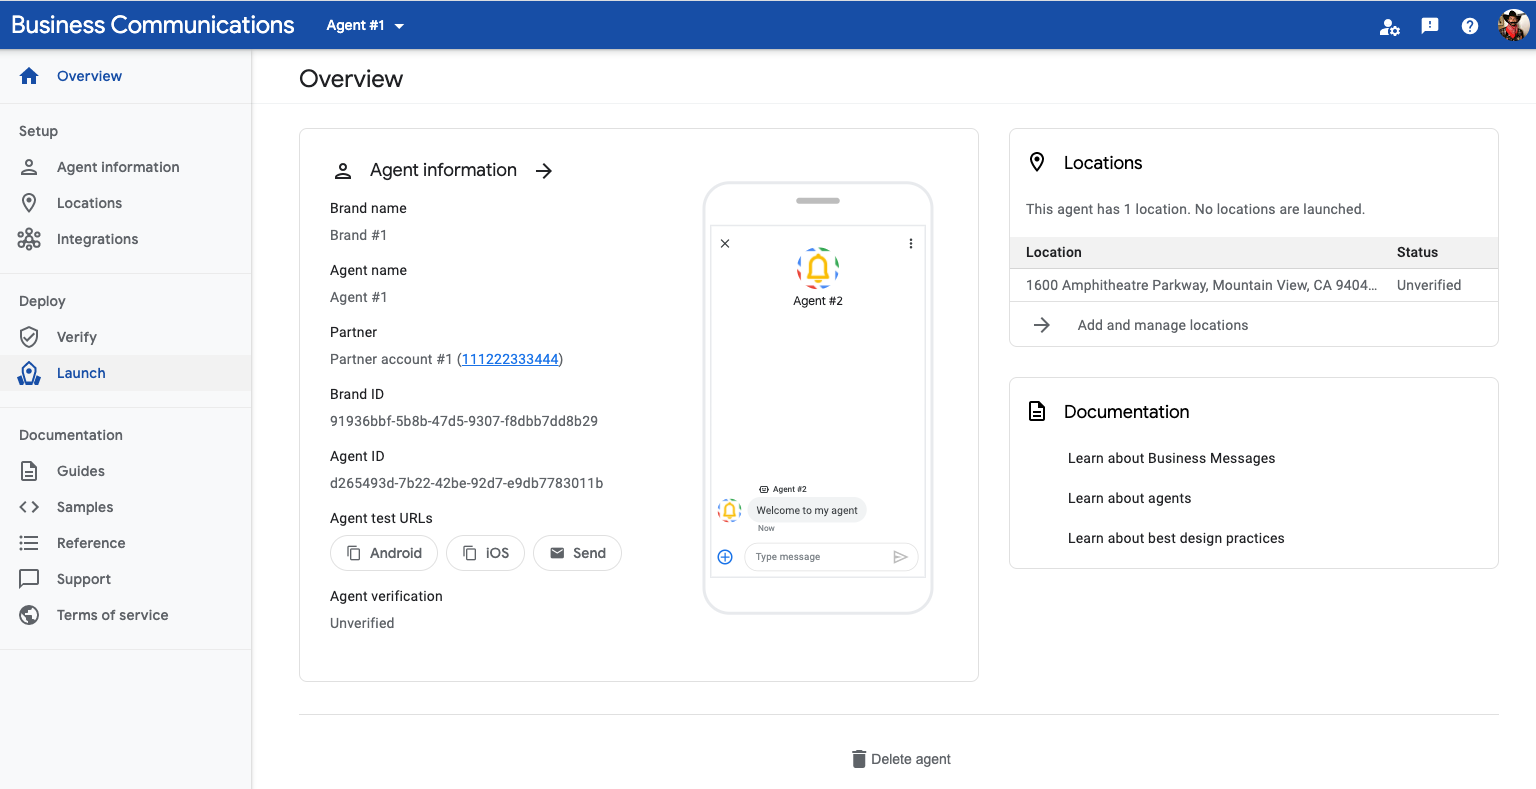
The left navigation lets you access the following:
- Agent information
- Locations
- Integrations
- Survey questions
- Debug logs
- Verification
- Launch
- Metrics dashboard
- Links to relevant documentation
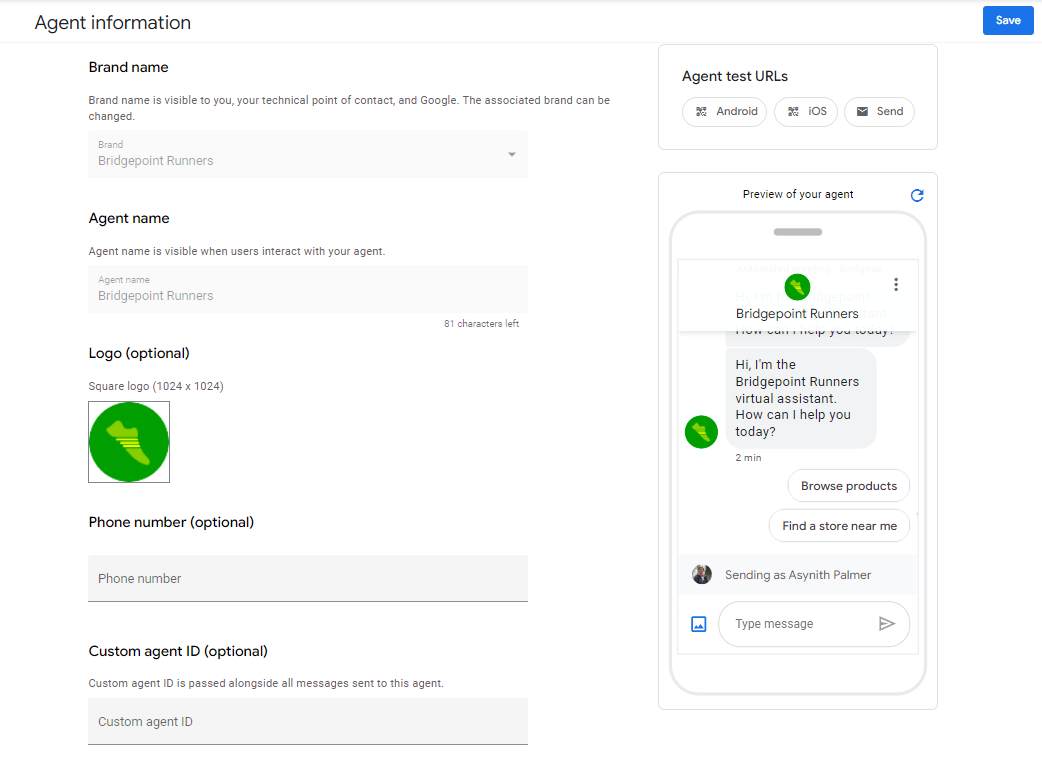
Agent information
Use the agent information page to update the properties of an agent.
The page is divided into two columns. Use the input fields in the left column to update agent fields such as agent name, logo, welcome message, conversation starters, and properties for location and non-local entry points. You can't update some fields, like Agent name and Logo, after you launch your agent.
Use the right column to get the test URLs for your agent and see a preview of what your agent looks like on a user's device.
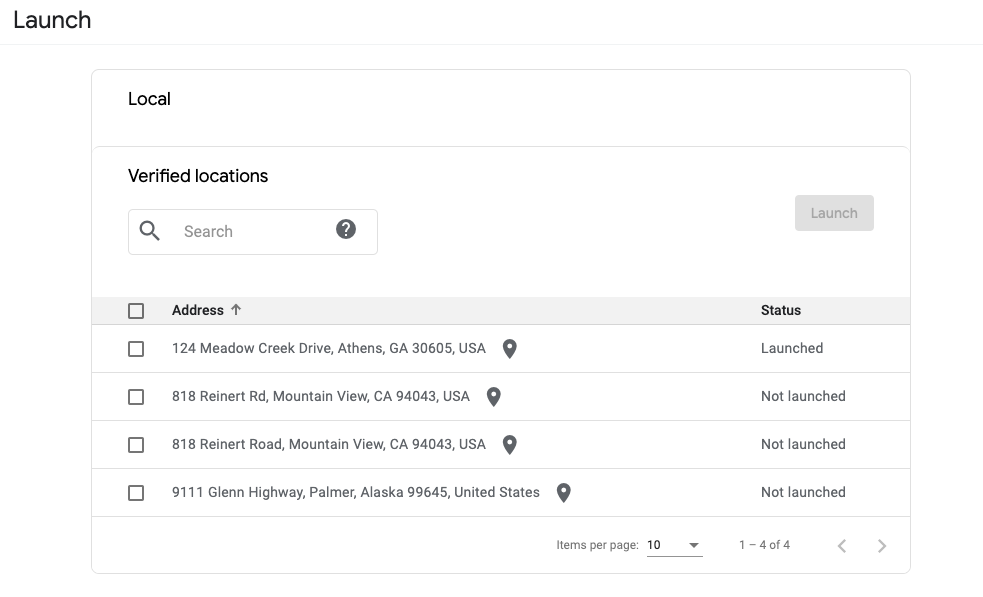
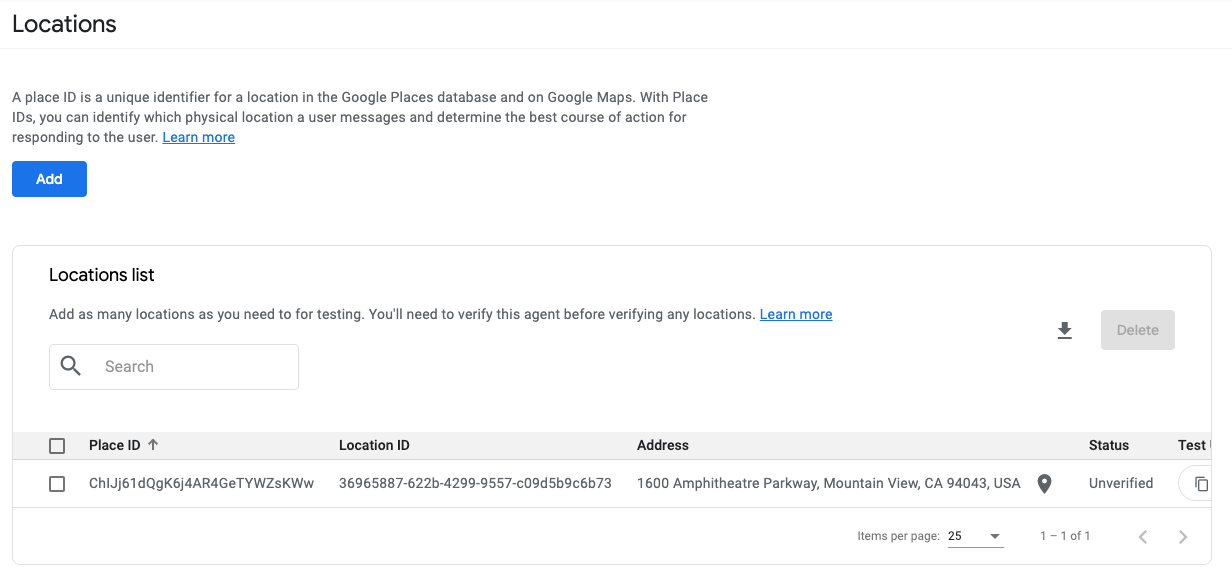
Location management
Use this page to add locations, retrieve test URLs for business locations, and verify locations once you've verified your agent.
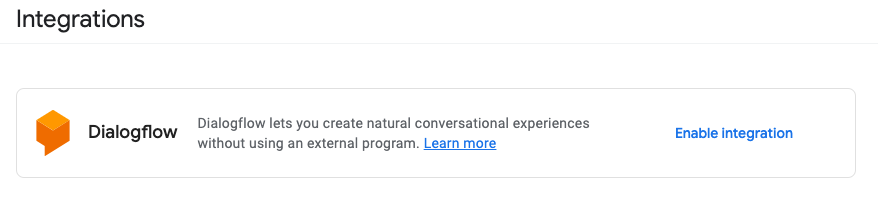
Integrations
Use this page to integrate with Dialogflow and set up a bot to answer frequently asked questions.
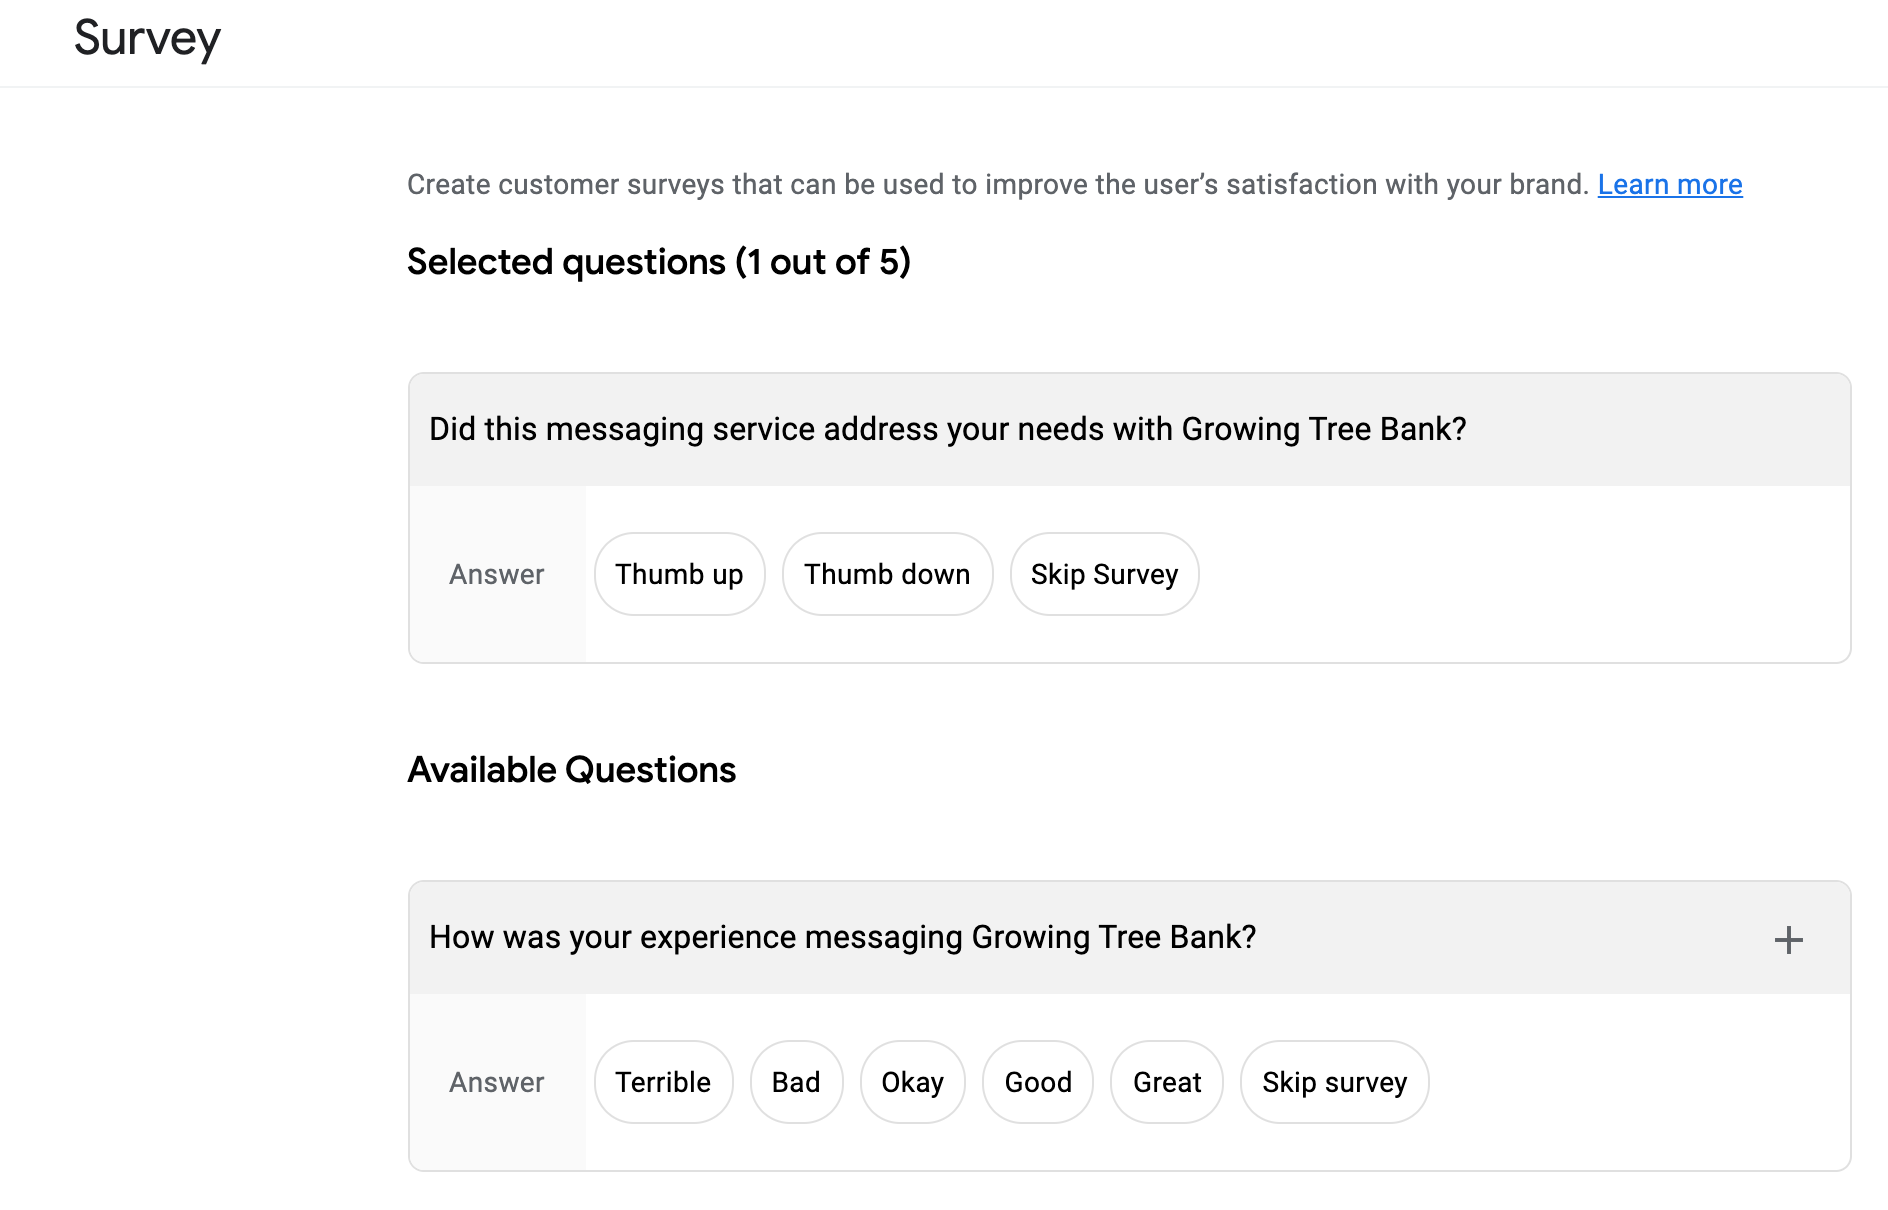
Surveys
Use this page to customize your agent's customer survey.
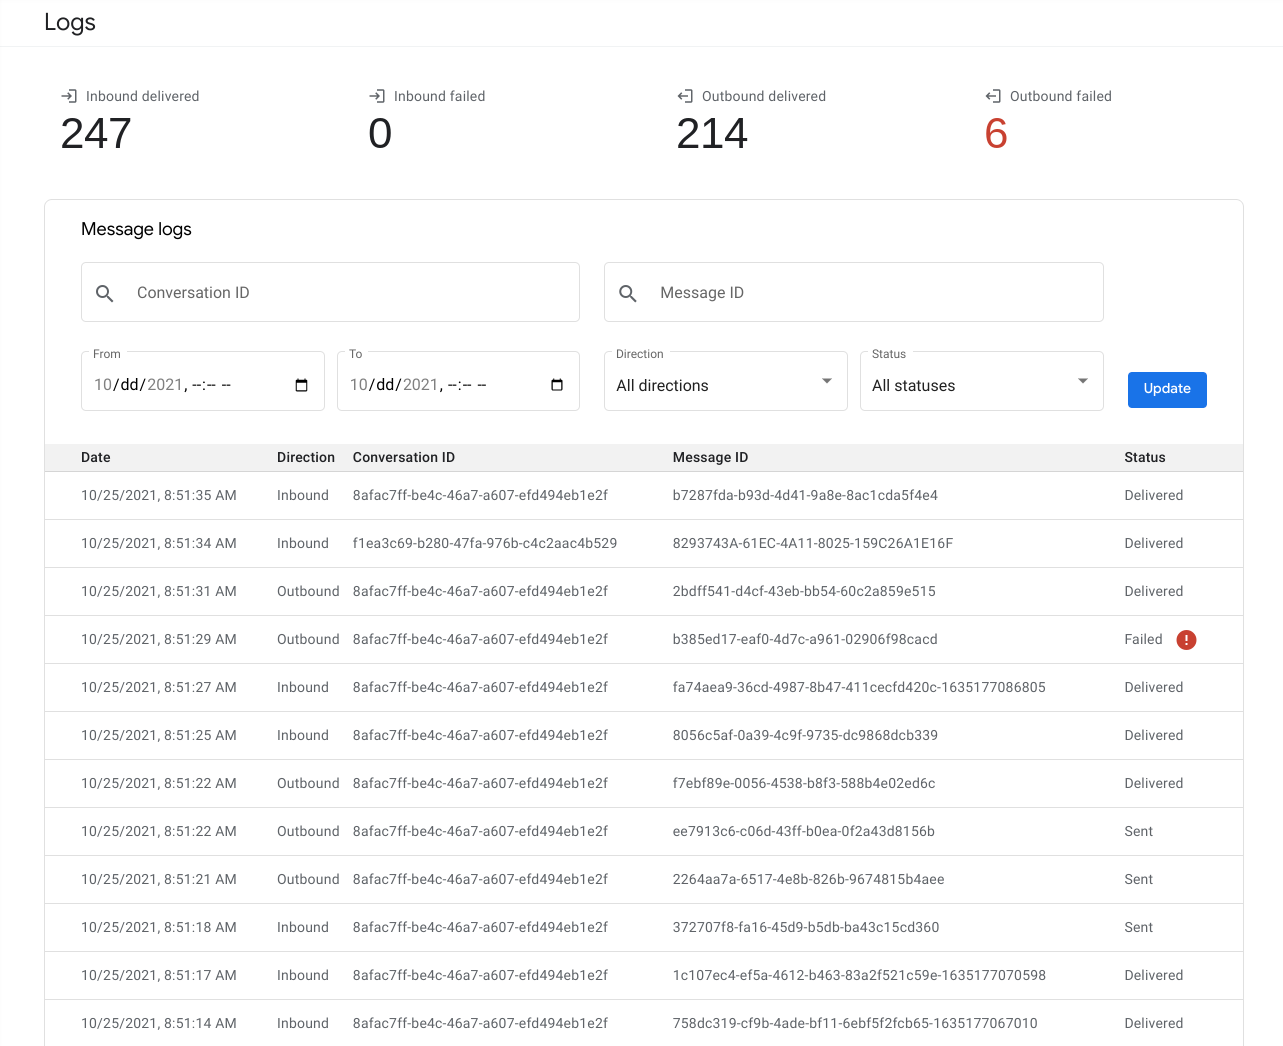
Logs
Use this page to debug message delivery issues. Logs are available for 14 days. Filter by conversation ID, message ID, timestamp, direction, or status to find the logs relevant to user issues. You can also check this page to verify you aren't unintentionally sending invalid messages.
Logs include the message payload except for redacted sensitive fields, like message text content. Failed and rejected messages have additional error details to help with debugging.
Some events, like typing indicators, don't have delivery receipts, and their status displays as "Sent."
Verification
Use this page to submit your agent for verification.

Launch
Use this page to launch your agent for location and non-local entry points as well as launch individual locations.