Google Ads के लिए वेबव्यू एपीआई को इंटिग्रेट करना
संग्रह की मदद से व्यवस्थित रहें
अपनी प्राथमिकताओं के आधार पर, कॉन्टेंट को सेव करें और कैटगरी में बांटें.
WebView API for Ads की मदद से, ऐप्लिकेशन में विज्ञापन दिखाकर कमाई की जा सकती है. इसके लिए, WebViewController
का इस्तेमाल किया जाता है.
अगर आपको अपने ऐप्लिकेशन में WebViewController
के ज़रिए ऐसा वेब कॉन्टेंट दिखाना है जिसमें AdSense कोड या Google पब्लिशर टैग का इस्तेमाल करके विज्ञापन दिखाए जाते हैं, तो आपको इस एपीआई का इस्तेमाल करना चाहिए. इससे विज्ञापनों से कमाई की जा सकेगी. ज़्यादा जानने के लिए, AdMob की नीतियां देखें.

- Google Mobile Ads SDK की मदद से विज्ञापन के अनुरोध करके कमाई करना
अपने ऐप्लिकेशन से कमाई करने के लिए, Google Mobile Ads SDK की मदद से AdMob को विज्ञापन अनुरोध भेजे जा सकते हैं. इसके लिए, आपको मोबाइल ऐप्लिकेशन के लिए विज्ञापन फ़ॉर्मैट लागू करने होंगे.
ज़्यादा जानें.
- WebView API for Ads का इस्तेमाल करके कमाई करना
अगर आपका ऐप्लिकेशन, वेब कॉन्टेंट दिखाने के लिए WebViewController
का इस्तेमाल करता है और यह कॉन्टेंट, Ad Manager या AdSense से विज्ञापन दिखाता है, तो विज्ञापनों के लिए WebView API का इस्तेमाल करके, WebViewController
ऑब्जेक्ट को Google Mobile Ads SDK के साथ रजिस्टर करें. AdSense कोड या Google पब्लिशर टैग में मौजूद JavaScript, विज्ञापन अनुरोधों को बनाती है और उन्हें भेजती है. इसलिए, आपको SDK की मदद से कोई विज्ञापन अनुरोध करने की ज़रूरत नहीं होती. ध्यान रखें कि इस एपीआई का इस्तेमाल करके, सिर्फ़ मोबाइल वेब और डेस्कटॉप वेब के इन्वेंट्री फ़ॉर्मैट उपलब्ध हैं.
अगर आपके पास WebViewController
में मौजूद वेब कॉन्टेंट का मालिकाना हक नहीं है, तो भी हमारा सुझाव है कि आप इस एपीआई का इस्तेमाल करें. इससे विज्ञापन देने वाले लोगों या कंपनियों को स्पैम से बचाने में मदद मिलेगी. साथ ही, वेब पब्लिशर के लिए कमाई करने के तरीके को बेहतर बनाया जा सकेगा.
ध्यान दें कि एक ही ऐप्लिकेशन में, दोनों में से कोई एक या दोनों विकल्प इस्तेमाल किए जा सकते हैं.
इस गाइड का मकसद, आपके iOS ऐप्लिकेशन में WebView API for Ads को इंटिग्रेट करने में आपकी मदद करना है.
शुरू करने से पहले
विज्ञापनों के लिए वेबव्यू एपीआई का इस्तेमाल शुरू करने से पहले, पक्का करें कि आपने ये काम कर लिए हों:
ऐप्लिकेशन आइडेंटिफ़ायर की जांच को बायपास करें
Android
APPLICATION_ID
की जांच को बायपास करने के लिए, अपनी AndroidManifest.xml
फ़ाइल में यह <meta-data>
टैग जोड़ें. अगर आपने यह चरण पूरा नहीं किया, तो हो सकता है कि Google Mobile Ads SDK टूल, ऐप्लिकेशन शुरू होने पर IllegalStateException
दिखाए.
<!-- Bypass APPLICATION_ID check for WebView API for Ads -->
<meta-data
android:name="com.google.android.gms.ads.INTEGRATION_MANAGER"
android:value="webview"/>
iOS
Runner/Info.plist
की जांच को बायपास करने के लिए, नीचे दी गई कुंजी और स्ट्रिंग वैल्यू के साथ Runner/Info.plist
फ़ाइल अपडेट करें.GADApplicationIdentifier
अगर आपने यह चरण पूरा नहीं किया, तो हो सकता है कि Google Mobile Ads SDK टूल, ऐप्लिकेशन शुरू होने पर GADInvalidInitializationException
दिखाए.
<!-- Bypass GADApplicationIdentifier check for WebView API for Ads -->
<key>GADIntegrationManager</key>
<string>webview</string>
WebViewController को रजिस्टर करना
WebViewController
में मौजूद विज्ञापनों से ऐप्लिकेशन में कमाई करने के लिए, AdSense कोड या Google पब्लिशर टैग का इस्तेमाल करें. इसके लिए, यहां दिया गया तरीका अपनाएं:
WebViewController
में JavaScript चालू करें. ऐसा न करने पर, विज्ञापन लोड नहीं हो सकते.
अपने उपयोगकर्ताओं को विज्ञापन का बेहतर अनुभव देने और Chrome की कुकी नीति का पालन करने के लिए, अपने AndroidWebViewController
इंस्टेंस पर तीसरे पक्ष की कुकी चालू करें.
Google Mobile Ads SDK की ओर से दिए गए registerWebView()
तरीके को कॉल करके, WebViewController
इंस्टेंस रजिस्टर करें.
import 'package:google_mobile_ads/google_mobile_ads.dart';
import 'package:webview_flutter/webview_flutter.dart';
import 'package:webview_flutter_android/webview_flutter_android.dart';
@override
class WebViewExampleState extends State<WebViewExample> {
late final WebViewController controller;
@override
void initState() {
super.initState();
createWebView();
}
void createWebView() async {
controller = WebViewController();
// 1. Enable JavaScript in the web view.
await controller.setJavaScriptMode(JavaScriptMode.unrestricted);
// 2. Enable third-party cookies for Android.
if (controller.platform is AndroidWebViewController) {
AndroidWebViewCookieManager cookieManager = AndroidWebViewCookieManager(
const PlatformWebViewCookieManagerCreationParams());
await cookieManager.setAcceptThirdPartyCookies(
controller.platform as AndroidWebViewController, true);
}
// 3. Register the web view.
await MobileAds.instance.registerWebView(controller);
}
}
यूआरएल लोड करें
अब यूआरएल लोड किया जा सकता है और WebViewController
की मदद से, अपना वेब कॉन्टेंट दिखाया जा सकता है.
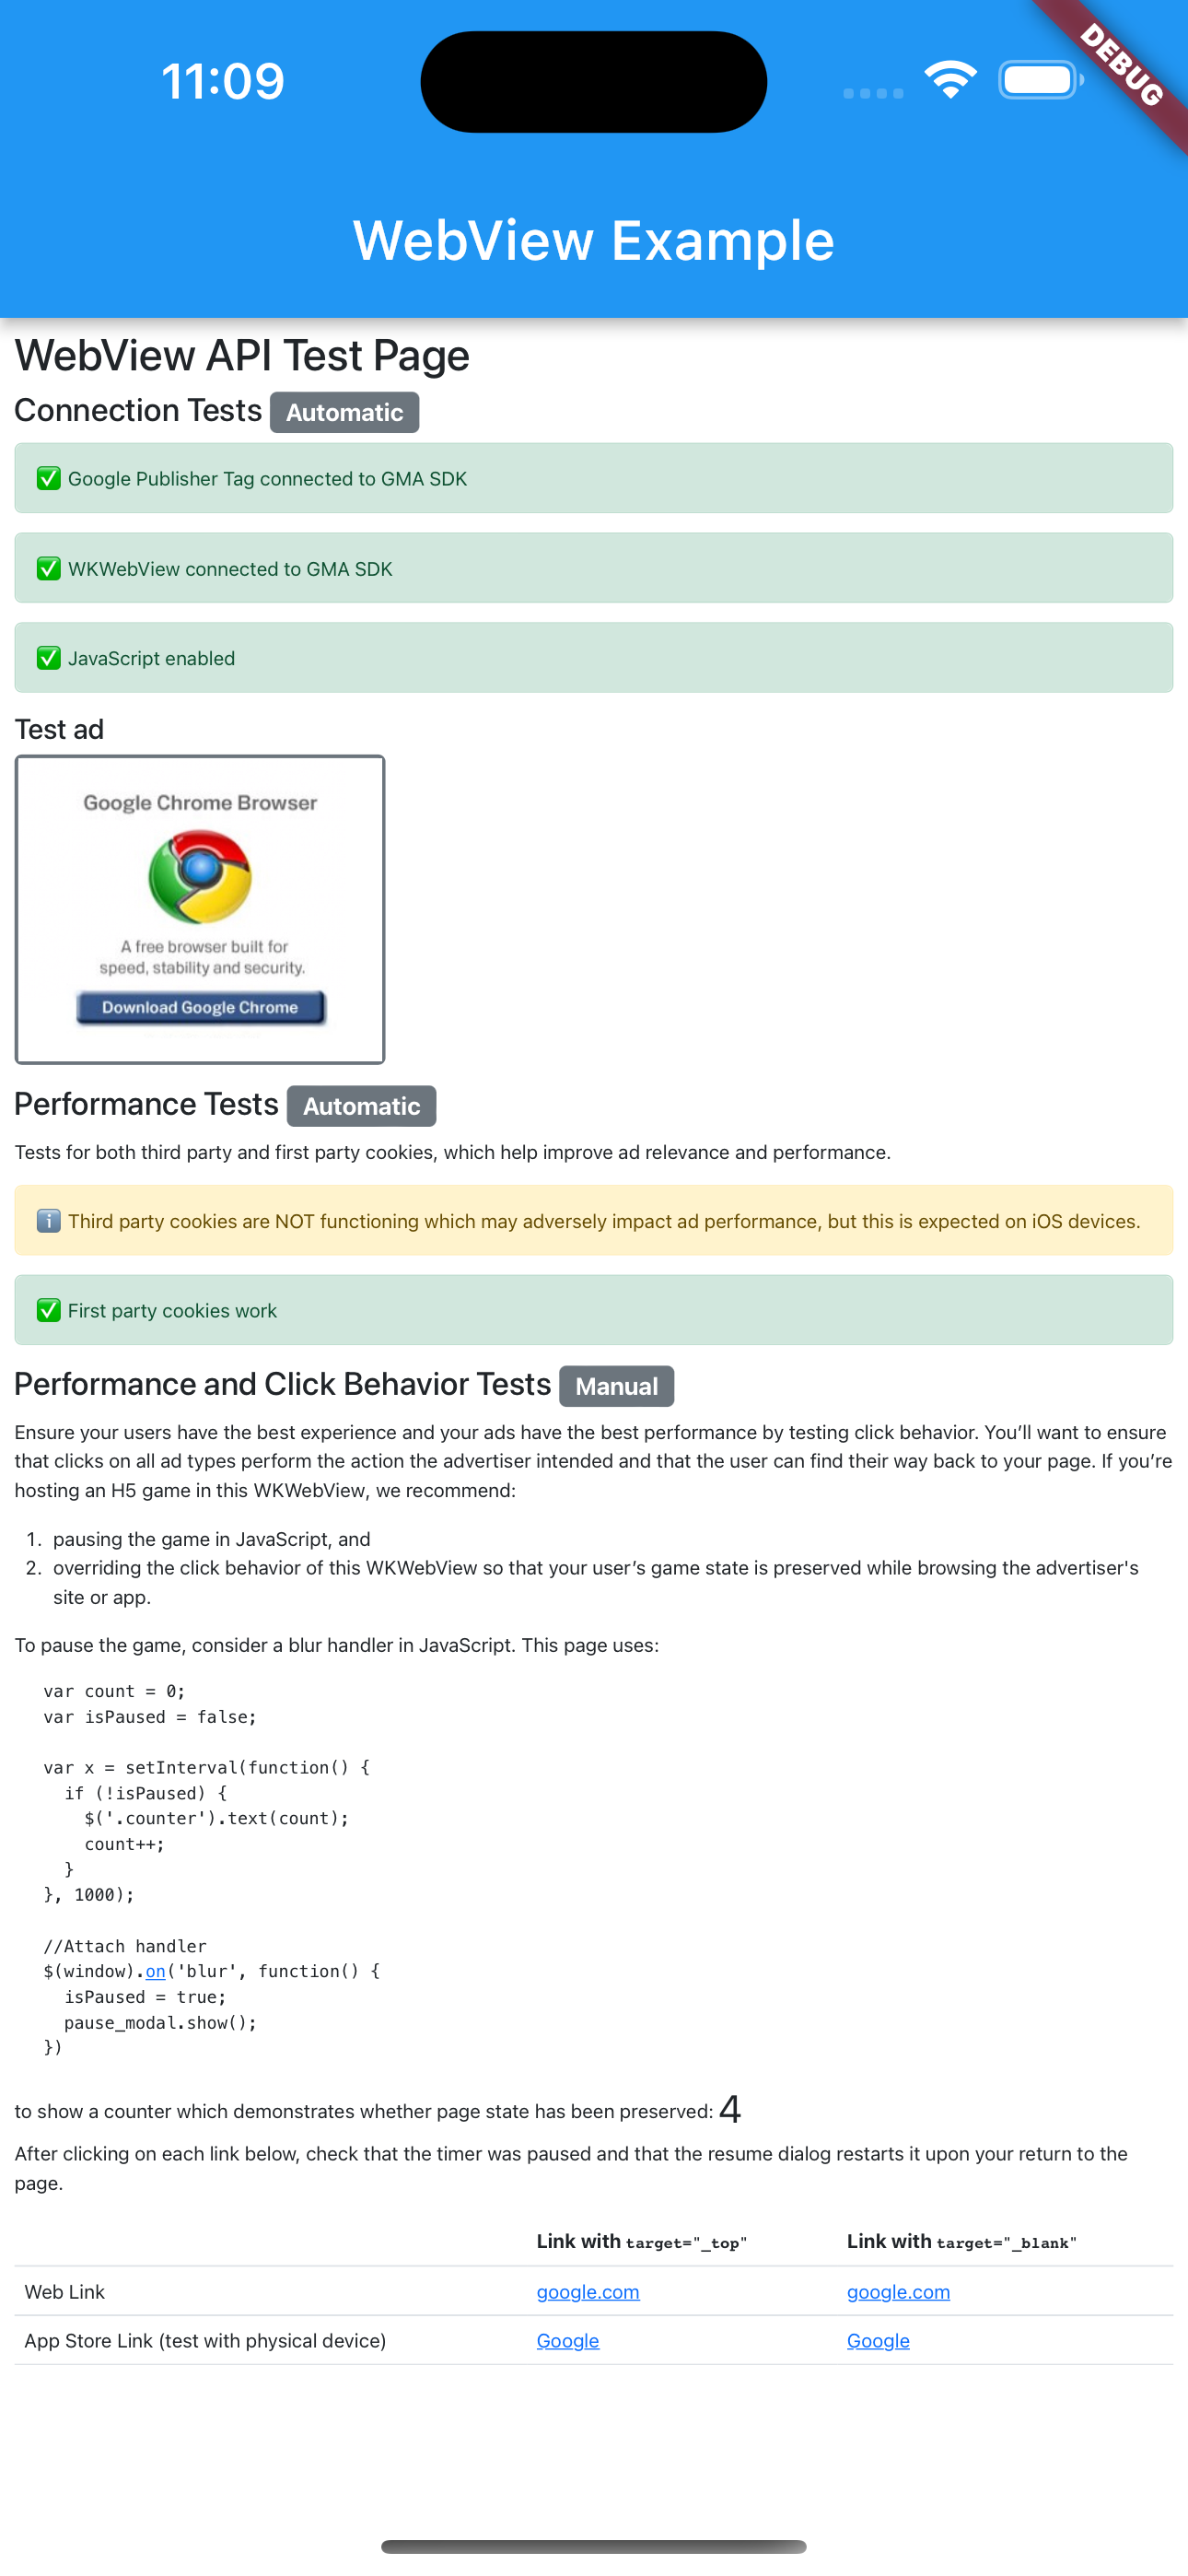
हमारा सुझाव है कि आप इस टेस्ट यूआरएल को लोड करें:
https://google.github.io/webview-ads/test/
ताकि अपने यूआरएल का इस्तेमाल करने से पहले, इंटिग्रेशन की जांच की जा सके. अगर JavaScript चालू नहीं है, तो वेब पेज पर गड़बड़ी दिखेगी.
import 'package:google_mobile_ads/google_mobile_ads.dart';
import 'package:webview_flutter/webview_flutter.dart';
import 'package:webview_flutter_android/webview_flutter_android.dart';
@override
class WebViewExampleState extends State<WebViewExample> {
late final WebViewController controller;
@override
void initState() {
super.initState();
createWebView();
}
void createWebView() async {
controller = WebViewController();
// 1. Enable JavaScript in the web view.
await controller.setJavaScriptMode(JavaScriptMode.unrestricted);
// 2. Enable third-party cookies for Android.
if (controller.platform is AndroidWebViewController) {
AndroidWebViewCookieManager cookieManager = AndroidWebViewCookieManager(
const PlatformWebViewCookieManagerCreationParams());
await cookieManager.setAcceptThirdPartyCookies(
controller.platform as AndroidWebViewController, true);
}
// 3. Register the web view.
await MobileAds.instance.registerWebView(controller);
// 4. Load the URL.
await controller.loadRequest(Uri.parse('https://google.github.io/webview-ads/test/'));
}
अगर ये शर्तें पूरी होती हैं, तो टेस्ट यूआरएल में इंटिग्रेशन के लिए हरे रंग के स्टेटस बार दिखते हैं:
WebView
Google Mobile Ads SDK से कनेक्ट किया गया हो
- JavaScript चालू है
- तीसरे पक्ष की कुकी काम करती हैं (iOS डिवाइसों पर ऐसा नहीं होना चाहिए)
- पहले-पक्ष की कुकी काम करती हैं
हमारे टेस्ट यूआरएल का सोर्स कोड देखें. इसके बाद, टेस्ट यूआरएल को अपने यूआरएल से बदला जा सकता है. &scar=
पैरामीटर के लिए विज्ञापन अनुरोधों की जांच करने के लिए, Charles जैसे प्रॉक्सी टूल का इस्तेमाल करके, अपने ऐप्लिकेशन के एचटीटीपीएस ट्रैफ़िक को कैप्चर किया जा सकता है.

जब तक कुछ अलग से न बताया जाए, तब तक इस पेज की सामग्री को Creative Commons Attribution 4.0 License के तहत और कोड के नमूनों को Apache 2.0 License के तहत लाइसेंस मिला है. ज़्यादा जानकारी के लिए, Google Developers साइट नीतियां देखें. Oracle और/या इससे जुड़ी हुई कंपनियों का, Java एक रजिस्टर किया हुआ ट्रेडमार्क है.
आखिरी बार 2025-09-10 (UTC) को अपडेट किया गया.
[[["समझने में आसान है","easyToUnderstand","thumb-up"],["मेरी समस्या हल हो गई","solvedMyProblem","thumb-up"],["अन्य","otherUp","thumb-up"]],[["वह जानकारी मौजूद नहीं है जो मुझे चाहिए","missingTheInformationINeed","thumb-down"],["बहुत मुश्किल है / बहुत सारे चरण हैं","tooComplicatedTooManySteps","thumb-down"],["पुराना","outOfDate","thumb-down"],["अनुवाद से जुड़ी समस्या","translationIssue","thumb-down"],["सैंपल / कोड से जुड़ी समस्या","samplesCodeIssue","thumb-down"],["अन्य","otherDown","thumb-down"]],["आखिरी बार 2025-09-10 (UTC) को अपडेट किया गया."],[[["\u003cp\u003eThe WebView API for Ads enables in-app ad monetization when displaying web content with AdSense or Google Publisher Tag ads through \u003ccode\u003eWebViewController\u003c/code\u003e.\u003c/p\u003e\n"],["\u003cp\u003eTo use this API, register your \u003ccode\u003eWebViewController\u003c/code\u003e objects with the Google Mobile Ads SDK, ensuring JavaScript and third-party cookies (for Android) are enabled.\u003c/p\u003e\n"],["\u003cp\u003eThis API simplifies ad serving by handling ad requests within the web content's JavaScript, eliminating the need for manual ad requests from your app.\u003c/p\u003e\n"],["\u003cp\u003eIt is recommended to use this API even for third-party web content to enhance ad monetization and protect against spam.\u003c/p\u003e\n"],["\u003cp\u003eBefore starting, ensure you're using the Google Mobile Ads SDK for Flutter plugin (v3.0.0+), \u003ccode\u003ewebview_flutter\u003c/code\u003e, and \u003ccode\u003ewebview_flutter_android\u003c/code\u003e (v3.7.0+) in your app.\u003c/p\u003e\n"]]],["The WebView API for Ads facilitates in-app ad monetization through `WebViewController`. To use this, register `WebViewController` objects with the Google Mobile Ads SDK. Enable JavaScript and third-party cookies in the `WebViewController` and then call `registerWebView()`. For Android, add a specific `\u003cmeta-data\u003e` tag in `AndroidManifest.xml`, and for iOS, update `Info.plist` to bypass checks. You can load web content that implements ads from AdSense or Google Publisher Tag via this API and use a test URL to verify integration.\n"],null,["The WebView API for Ads allows in-app ad monetization using\n[`WebViewController`](//pub.dev/documentation/webview_flutter/latest/webview_flutter/WebViewController-class.html).\nIf you display web content that implements ads with\n[AdSense code](//support.google.com/adsense/answer/9274634) or\n[Google Publisher Tag](//support.google.com/admanager/answer/181073)\nin your app through `WebViewController`, you should use this API to enable ads\nmonetization. To learn more, see the\n\n[AdMob policies](//support.google.com/admob/answer/48182#trs).\n\n\n1.\n\n Monetize by making ad requests with Google Mobile Ads SDK\n\n : You can monetize your app by making ad requests to\n\n AdMob with\n Google Mobile Ads SDK by implementing [ad formats for mobile\n app](//support.google.com/admob/answer/6128738).\n\n\n [Learn more](/admob/flutter/quick-start).\n2.\n\n Monetize by using the WebView API for Ads\n\n : If your app uses `WebViewController` to display web content that serves ads from\n [Ad Manager](//support.google.com/admanager) or\n [AdSense](//support.google.com/adsense), use the WebView API for Ads to register\n `WebViewController` objects with Google Mobile Ads SDK. The\n JavaScript in the [AdSense code](//support.google.com/adsense/answer/9274634)\n or [Google Publisher Tag](//support.google.com/admanager/answer/181073)\n builds and sends ad requests so you don't need to make any ad requests with\n the SDK. Keep in mind that only the mobile web and desktop web\n [inventory formats](//support.google.com/admanager/answer/9796545)\n are available using this API.\n\n If you don't own the web content in a `WebViewController`, you are still\n encouraged to use this API to help protect advertisers from spam and\n improve monetization for the web publishers that provided the content.\n\nNote that you can do either option, or even both, in the same app.\n\nThis guide is intended to help you integrate the WebView API for Ads into your\niOS app.\n\nBefore you begin\n\nBefore you start using the WebView API for Ads, make sure you do the following:\n\n- Use [Google Mobile Ads SDK for Flutter plugin](/admob/flutter/quick-start#import_the_mobile_ads_sdk) with version 3.0.0 or higher in your app.\n- Add [`webview_flutter`](//pub.dev/packages/webview_flutter) as a dependency in your `pubspec.yaml` file.\n- Add [`webview_flutter_android`](//pub.dev/packages/webview_flutter_android) with version 3.7.0 or higher in your app.\n\nBypass the check for application identifier \n\nAndroid\n\nAdd the following `\u003cmeta-data\u003e` tag in your `AndroidManifest.xml` file to\nbypass the check for the `APPLICATION_ID`. If you miss this step,\nGoogle Mobile Ads SDK might throw an\n[`IllegalStateException`](//developer.android.com/reference/java/lang/IllegalStateException)\non app start. \n\n \u003c!-- Bypass APPLICATION_ID check for WebView API for Ads --\u003e\n \u003cmeta-data\n android:name=\"com.google.android.gms.ads.INTEGRATION_MANAGER\"\n android:value=\"webview\"/\u003e\n\niOS\n\nUpdate the `Runner/Info.plist` file with the key and string value below to\nbypass a check for the `GADApplicationIdentifier`. If you miss this step,\nGoogle Mobile Ads SDK might throw a `GADInvalidInitializationException`\non app start. \n\n \u003c!-- Bypass GADApplicationIdentifier check for WebView API for Ads --\u003e\n \u003ckey\u003eGADIntegrationManager\u003c/key\u003e\n \u003cstring\u003ewebview\u003c/string\u003e\n\nRegister the WebViewController\n\nTo improve in-app ad monetization of ads within a\n`WebViewController` that uses [AdSense\ncode](//support.google.com/adsense/answer/9274634) or [Google Publisher\nTags](//support.google.com/admanager/answer/181073), follow the steps\nlisted below:\n\n1. Enable JavaScript in the `WebViewController`. Failure to do so can cause\n ads not to load.\n\n2. To improve your users' ad experience and be consistent with Chrome's\n [cookie policy](//policies.google.com/technologies/cookies), enable\n third-party cookies on your `AndroidWebViewController` instance.\n\n3. Register the `WebViewController` instance by calling the\n [`registerWebView()`](//pub.dev/documentation/google_mobile_ads/latest/google_mobile_ads/MobileAds/registerWebView.html)\n method provided by Google Mobile Ads SDK.\n\n import 'package:google_mobile_ads/google_mobile_ads.dart';\n import 'package:webview_flutter/webview_flutter.dart';\n import 'package:webview_flutter_android/webview_flutter_android.dart';\n\n @override\n class WebViewExampleState extends State\u003cWebViewExample\u003e {\n late final WebViewController controller;\n\n @override\n void initState() {\n super.initState();\n\n createWebView();\n }\n\n void createWebView() async {\n controller = WebViewController();\n // 1. Enable JavaScript in the web view.\n await controller.setJavaScriptMode(JavaScriptMode.unrestricted);\n // 2. Enable third-party cookies for Android.\n if (controller.platform is AndroidWebViewController) {\n AndroidWebViewCookieManager cookieManager = AndroidWebViewCookieManager(\n const PlatformWebViewCookieManagerCreationParams());\n await cookieManager.setAcceptThirdPartyCookies(\n controller.platform as AndroidWebViewController, true);\n }\n // 3. Register the web view.\n await MobileAds.instance.registerWebView(controller);\n }\n }\n\nLoad the URL\n\nYou can now load a URL and display your web content through `WebViewController`.\nWe recommend that you load this test URL:\n`https://google.github.io/webview-ads/test/` to test the integration prior to\nusing your own URL. The web page will show an error if JavaScript is not\nenabled. \n\n import 'package:google_mobile_ads/google_mobile_ads.dart';\n import 'package:webview_flutter/webview_flutter.dart';\n import 'package:webview_flutter_android/webview_flutter_android.dart';\n\n @override\n class WebViewExampleState extends State\u003cWebViewExample\u003e {\n late final WebViewController controller;\n\n @override\n void initState() {\n super.initState();\n\n createWebView();\n }\n\n void createWebView() async {\n controller = WebViewController();\n // 1. Enable JavaScript in the web view.\n await controller.setJavaScriptMode(JavaScriptMode.unrestricted);\n\n // 2. Enable third-party cookies for Android.\n if (controller.platform is AndroidWebViewController) {\n AndroidWebViewCookieManager cookieManager = AndroidWebViewCookieManager(\n const PlatformWebViewCookieManagerCreationParams());\n await cookieManager.setAcceptThirdPartyCookies(\n controller.platform as AndroidWebViewController, true);\n }\n\n // 3. Register the web view.\n await MobileAds.instance.registerWebView(controller);\n\n // 4. Load the URL.\n await controller.loadRequest(Uri.parse('https://google.github.io/webview-ads/test/'));\n }\n\nThe test URL shows green status bars for a successful integration if the\nfollowing conditions apply:\n\n- `WebView` connected to the Google Mobile Ads SDK\n- JavaScript enabled\n- Third-party cookies work (not expected on iOS devices)\n- First-party cookies work\n\nView the [source code](//github.com/google/webview-ads/blob/main/test/index.html)\nof our test URL. You can then replace the test URL with your URL. You can also\nuse a proxy tool such as [Charles](//www.charlesproxy.com/) to capture your\napp's HTTPS traffic and inspect the ad requests for a `&scar=` parameter."]]