Analyze images with a Gemini vision model
This tutorial shows you how to create a BigQuery ML
remote model
that is based on the
Vertex AI gemini-1.0-pro-vision model,
and then use that model with the
ML.GENERATE_TEXT function
functions to analyze a set of movie poster images.
This tutorial covers the following tasks:
- Creating a BigQuery object table over image data in a Cloud Storage bucket.
- Creating a BigQuery ML remote model that targets the
Vertex AI
gemini-1.0-pro-visionmodel (preview). - Using the remote model with the
ML.GENERATE_TEXTfunction to identify the movies associated with a set of movie posters.
The movie poster data is available from the public Cloud Storage bucket
gs://cloud-samples-data/vertex-ai/dataset-management/datasets/classic-movie-posters.
Required roles
To create a connection, you need the BigQuery Connection Admin (
roles/bigquery.connectionAdmin) role.To grant permissions to the connection's service account, you need the Project IAM Admin (
roles/resourcemanager.projectIamAdmin) role.To create datasets, models, and tables, you need the BigQuery Data Editor (
roles/bigquery.dataEditor) role.To run BigQuery jobs, you need the BigQuery User (
roles/bigquery.user) role.
Costs
In this document, you use the following billable components of Google Cloud:
- BigQuery ML: You incur costs for the data that you process in BigQuery.
- Vertex AI: You incur costs for calls to the Vertex AI model that is represented by the BigQuery remote model.
To generate a cost estimate based on your projected usage,
use the pricing calculator.
For more information about BigQuery pricing, see BigQuery pricing in the BigQuery documentation.
For more information about Vertex AI generative AI pricing, see the Vertex AI pricing page.
Before you begin
-
In the Google Cloud console, on the project selector page, select or create a Google Cloud project.
-
Make sure that billing is enabled for your Google Cloud project.
-
Enable the BigQuery, BigQuery Connection, and Vertex AI APIs.
Create a dataset
Create a BigQuery dataset to store your ML model:
In the Google Cloud console, go to the BigQuery page.
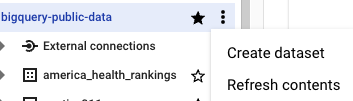
In the Explorer pane, click your project name.
Click View actions > Create dataset.
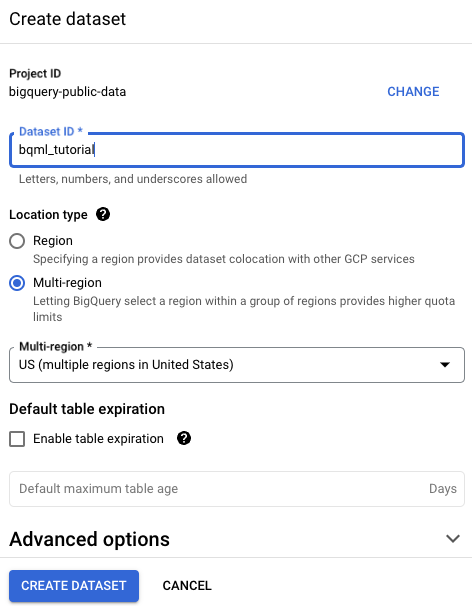
On the Create dataset page, do the following:
For Dataset ID, enter
bqml_tutorial.For Location type, select Multi-region, and then select US (multiple regions in United States).
The public datasets are stored in the
USmulti-region. For simplicity, store your dataset in the same location.Leave the remaining default settings as they are, and click Create dataset.
Create a connection
Create a Cloud resource connection and get the connection's service account.
Console
Go to the BigQuery page.
To create a connection, click Add, and then click Connections to external data sources.
In the Connection type list, select Vertex AI remote models, remote functions and BigLake (Cloud Resource).
In the Connection ID field, type
tutorial.Click Create connection.
Click Go to connection.
Copy the service account ID from the Connection info pane for use in a later step.
bq
In a command-line environment, create a connection:
bq mk --connection --location=us --project_id=PROJECT_ID \
    --connection_type=CLOUD_RESOURCE tutorial
The
--project_idparameter overrides the default project.Replace
PROJECT_IDwith your Google Cloud project ID.When you create a connection resource, BigQuery creates a unique system service account and associates it with the connection.
Troubleshooting: If you get the following connection error, update the Google Cloud SDK:
Flags parsing error: flag --connection_type=CLOUD_RESOURCE: value should be one of...
Retrieve and copy the service account ID for use in a later step:
bq show --connection PROJECT_ID.us.tutorial
The output is similar to the following:
name                properties
1234.us.tutorial    {"serviceAccountId": "connection-1234-9u56h9@gcp-sa-bigquery-condel.iam.gserviceaccount.com"}
Terraform
Append the following section into your main.tf file.
 ## This creates a Cloud Resource connection.
 ## Note: The cloud resource nested object has only one output only field - serviceAccountId.
 resource "google_bigquery_connection" "connection" {
    connection_id = "tutorial"
    project = "PROJECT_ID"
    location = "us"
    cloud_resource {}
}
Replace PROJECT_ID with your Google Cloud project
ID.
Grant permissions to the connection's service account
To grant the connection's service account appropriate roles to access the Cloud Storage and Vertex AI services, follow these steps:
Go to the IAM & Admin page.
Click Grant Access.
In the New principals field, enter the service account ID that you copied earlier.
In the Select a role field, choose Vertex AI, and then select Vertex AI User.
Click Add another role.
In the Select a role field, choose Cloud Storage, and then select Storage Object Viewer.
Click Save.
Create the object table
Create an object table over the movie poster images in the public Cloud Storage bucket. The object table makes it possible to analyze the images without moving them from Cloud Storage.
In the Google Cloud console, go to the BigQuery page.
In the query editor, run the following query to create the object table:
CREATE OR REPLACE EXTERNAL TABLE `bqml_tutorial.movie_posters`
  WITH CONNECTION `us.tutorial`
  OPTIONS (
    object_metadata = 'SIMPLE',
    uris =
      ['gs://cloud-samples-data/vertex-ai/dataset-management/datasets/classic-movie-posters/*']);
Create the remote model
Create a remote model that represents a Vertex AI
gemini-1.0-pro-vision model:
In the Google Cloud console, go to the BigQuery page.
In the query editor, run the following query to create the remote model:
CREATE OR REPLACE MODEL `bqml_tutorial.gemini-pro-vision`
  REMOTE WITH CONNECTION `us.tutorial`
  OPTIONS (ENDPOINT = 'gemini-pro-vision');
The query takes several seconds to complete, after which the
gemini-pro-visionmodel appears in thebqml_tutorialdataset in the Explorer pane. Because the query uses aCREATE MODELstatement to create a model, there are no query results.
Analyze the movie posters
Use the remote model to analyze the movie posters and determine what movie each poster represents, and then write this data to a table.
In the Google Cloud console, go to the BigQuery page.
In the query editor, run the following query to analyze the movie poster images:
CREATE OR REPLACE TABLE
  `bqml_tutorial.movie_posters_results` AS (
  SELECT
    uri,
    ml_generate_text_llm_result
  FROM
    ML.GENERATE_TEXT( MODEL `bqml_tutorial.gemini-pro-vision`,
      TABLE `bqml_tutorial.movie_posters`,
      STRUCT( 0.2 AS temperature,
        'For the movie represented by this poster, what is the movie title and year of release? Answer in JSON format with two keys: title, year. title should be string, year should be integer.' AS PROMPT,
        TRUE AS FLATTEN_JSON_OUTPUT)));
In the query editor, run the following statement to view the table data:
SELECT * FROM `bqml_tutorial.movie_posters_results`;
The output is similar to the following:
+--------------------------------------------+----------------------------------+
| uri                                        | ml_generate_text_llm_result      |
+--------------------------------------------+----------------------------------+
| gs://cloud-samples-data/vertex-ai/dataset- | ```json                          |
| management/datasets/classic-movie-         | {                                |
| posters/little_annie_rooney.jpg            |  "title": "Little Annie Rooney", |
|                                            |  "year": 1912                    |
|                                            | }                                |
|                                            | ```                              |
+--------------------------------------------+----------------------------------+
| gs://cloud-samples-data/vertex-ai/dataset- | ```json                          |
| management/datasets/classic-movie-         | {                                |
| posters/mighty_like_a_mouse.jpg            |  "title": "Mighty Like a Moose", |
|                                            |  "year": 1926                    |
|                                            | }                                |
|                                            | ```                              |
+--------------------------------------------+----------------------------------+
| gs://cloud-samples-data/vertex-ai/dataset- | ```json                          |
| management/datasets/classic-movie-         | {                                |
| posters/brown_of_harvard.jpeg              |  "title": "Brown of Harvard",    |
|                                            |  "year": 1926                    |
|                                            | }                                |
|                                            | ```                              |
+--------------------------------------------+----------------------------------+
Format the model output
Format the movie analysis data returned by the model to make the movie title and year data more readable.
In the Google Cloud console, go to the BigQuery page.
In the query editor, run the following query to format the data:
CREATE OR REPLACE TABLE
  `bqml_tutorial.movie_posters_results_formatted` AS (
  SELECT
    uri,
    JSON_QUERY(RTRIM(LTRIM(results.ml_generate_text_llm_result, " ```json"), "```"), "$.title") AS title,
    JSON_QUERY(RTRIM(LTRIM(results.ml_generate_text_llm_result, " ```json"), "```"), "$.year") AS year
  FROM
    `bqml_tutorial.movie_posters_results` results );
In the query editor, run the following statement to view the table data:
SELECT * FROM `bqml_tutorial.movie_posters_results_formatted`;
The output is similar to the following:
+--------------------------------------------+----------------------------+------+
| uri                                        | title                      | year |
+--------------------------------------------+----------------------------+------+
| gs://cloud-samples-data/vertex-ai/dataset- | "Barque sortant du port"   | 1895 |
| management/datasets/classic-movie-         |                            |      |
| posters/barque_sortant_du_port.jpeg        |                            |      |
+--------------------------------------------+----------------------------+------+
| gs://cloud-samples-data/vertex-ai/dataset- | "The Great Train Robbery"  | 1903 |
| management/datasets/classic-movie-         |                            |      |
| posters/the_great_train_robbery.jpg        |                            |      |
+--------------------------------------------+----------------------------+------+
| gs://cloud-samples-data/vertex-ai/dataset- | "Little Annie Rooney"      | 1912 |
| management/datasets/classic-movie-         |                            |      |
| posters/little_annie_rooney.jpg            |                            |      |
+--------------------------------------------+----------------------------+------+
Clean up
- In the Google Cloud console, go to the Manage resources page.
- In the project list, select the project that you want to delete, and then click Delete.
- In the dialog, type the project ID, and then click Shut down to delete the project.