

本頁說明的步驟將引導您快速建立簡易的 iOS 應用程式,向 YouTube Data API 發出要求。這個範例說明如何擷取 GoogleDevelopers YouTube 頻道的資料。程式碼也包含註解,說明如何修改查詢,擷取目前使用者的 YouTube 頻道資料。
必要條件
如要執行這項快速入門導覽課程,請務必符合以下條件:
步驟 1:啟用 YouTube Data API
-
使用這個精靈在 Google Developers Console 中建立或選取專案,並自動開啟 API。依序點選「繼續」和「前往憑證」。
-
在「Create credentials」(建立憑證) 頁面中,按一下「Cancel」(取消) 按鈕。
-
選取頁面頂端的「OAuth 同意畫面」分頁標籤。 選取「電子郵件地址」,輸入「產品名稱」 (如尚未設定),然後按一下「儲存」按鈕。
-
選取「憑證」分頁標籤,按一下「建立憑證」按鈕,然後選取「OAuth 用戶端 ID」。
- 選取應用程式類型「iOS」,輸入名稱「YouTube Data API Quickstart」和軟體包 ID
com.example.QuickstartApp,然後按一下「Create」按鈕。
步驟 2:準備工作區
- 開啟 Xcode 並建立新專案:
- 依序點選「File」>「New」>「Project」,選取「iOS」>「Application」>「Single View Application」範本,然後點選「Next」。
- 將「產品名稱」設為「QuickstartApp」,「Organization Identifier」設為「com.example」,「Language」則設為「Objective-C」。在組織 ID 下方,您應該會看到產生的軟體包 ID,與您在步驟 1.b 輸入的 iOS 軟體包 ID (
com.example.QuickstartApp) 相符。 - 點選 [下一步]。
- 選取專案的目的地目錄,然後按一下「Create」。
- 依序點選「File」>「Close Project」,關閉專案。
- 開啟終端機視窗,並前往您剛建立的
QuickstartApp.xcodeproj檔案所在目錄。 執行下列指令來建立 Podfile、安裝程式庫,並開啟產生的 Xcode 專案:
cat << EOF > Podfile &&
platform :ios, '8.0'
target 'QuickstartApp' do
    pod 'GoogleAPIClientForREST/YouTube', '~> 1.2.1'
    pod 'Google/SignIn', '~> 3.0.3'
end
EOF
pod install &&
open QuickstartApp.xcworkspace
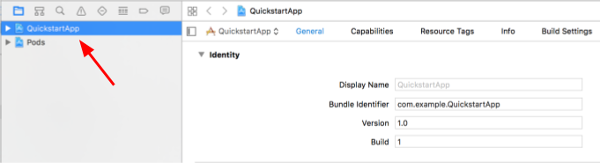
在 XCode 專案導覽器中,選取「QuickstartApp」專案節點。 然後依序點選選單項目「File」>「Add files to "QuickstartApp"」。
找出先前下載的
GoogleService-Info.plist檔案,然後選取該檔案。按一下「選項」按鈕。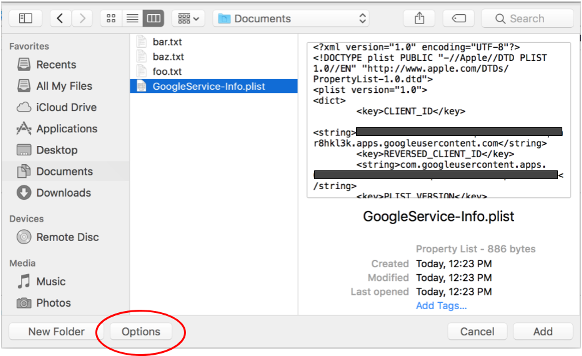
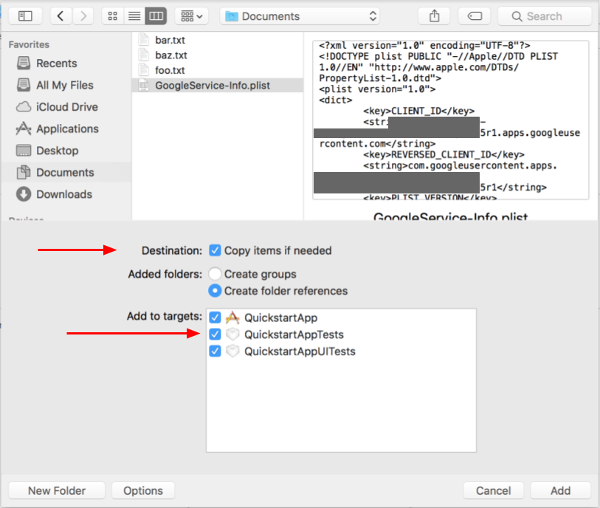
在選項視窗中選取下列項目,然後按一下「新增」按鈕:
- 勾選「Copy items if needed」核取方塊。
- 查看「新增至目標」部分列出的所有目標。
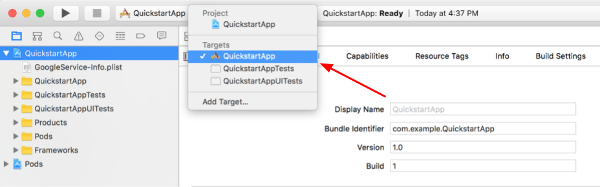
在仍選取專案節點的情況下,選取「TARGETS」部分中的「QuickstartApp」,如下方兩張圖片所示:
按一下這張螢幕截圖中顯示的區域:
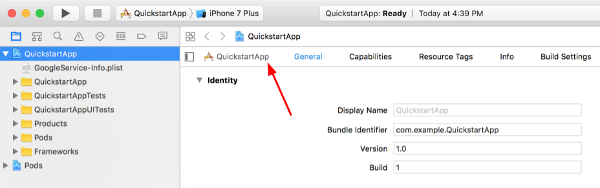
然後選取適當的目標:
選取「Info」分頁標籤,然後展開「URL Types」部分。
按一下「+」按鈕,然後為反向用戶端 ID 新增網址配置。如要找出這個值,請開啟您在步驟 2.f 中選取的
GoogleService-Info.plist設定檔。尋找 REVERSED_CLIENT_ID 鍵。複製該鍵的值,並貼到設定頁面的「URL Schemes」(網址配置) 方塊中。將其他欄位留空。重建專案:
- 按住 Option 鍵,然後依序點按「Product」>「Clean Build Folder」。
- 依序點選「Product」>「Build」。
步驟 3:設定範例
將下列檔案的內容替換為提供的程式碼:#import <UIKit/UIKit.h> @import GoogleSignIn; @interface AppDelegate : UIResponder <UIApplicationDelegate> @property (strong, nonatomic) UIWindow *window; @end
#import "AppDelegate.h"

@implementation AppDelegate

- (BOOL)application:(UIApplication *)application
didFinishLaunchingWithOptions:(NSDictionary *)launchOptions {
    // Initialize Google sign-in.
    [GIDSignIn sharedInstance].clientID = @"<YOUR_CLIENT_ID>";

    return YES;
}

- (BOOL)application:(UIApplication *)application
            openURL:(NSURL *)url
  sourceApplication:(NSString *)sourceApplication
         annotation:(id)annotation {
    return [[GIDSignIn sharedInstance] handleURL:url
                               sourceApplication:sourceApplication
                                      annotation:annotation];
}


@end
#import <UIKit/UIKit.h>
@import GoogleSignIn;
#import <GTLRYouTube.h>

@interface ViewController : UIViewController <GIDSignInDelegate, GIDSignInUIDelegate>

@property (nonatomic, strong) IBOutlet GIDSignInButton *signInButton;
@property (nonatomic, strong) UITextView *output;
@property (nonatomic, strong) GTLRYouTubeService *service;


@end
#import "ViewController.h"

@implementation ViewController

- (void)viewDidLoad {
    [super viewDidLoad];
    // Configure Google Sign-in.
    GIDSignIn* signIn = [GIDSignIn sharedInstance];
    signIn.delegate = self;
    signIn.uiDelegate = self;
    signIn.scopes = [NSArray arrayWithObjects:kGTLRAuthScopeYouTubeReadonly, nil];
    [signIn signInSilently];

    // Add the sign-in button.
    self.signInButton = [[GIDSignInButton alloc] init];
    [self.view addSubview:self.signInButton];

    // Create a UITextView to display output.
    self.output = [[UITextView alloc] initWithFrame:self.view.bounds];
    self.output.editable = false;
    self.output.contentInset = UIEdgeInsetsMake(20.0, 0.0, 20.0, 0.0);
    self.output.autoresizingMask = UIViewAutoresizingFlexibleHeight | UIViewAutoresizingFlexibleWidth;
    self.output.hidden = true;
    [self.view addSubview:self.output];

    // Initialize the service object.
    self.service = [[GTLRYouTubeService alloc] init];
}

- (void)signIn:(GIDSignIn *)signIn
didSignInForUser:(GIDGoogleUser *)user
     withError:(NSError *)error {
    if (error != nil) {
        [self showAlert:@"Authentication Error" message:error.localizedDescription];
        self.service.authorizer = nil;
    } else {
        self.signInButton.hidden = true;
        self.output.hidden = false;
        self.service.authorizer = user.authentication.fetcherAuthorizer;
        [self fetchChannelResource];
    }
}


// Construct a query and retrieve the channel resource for the GoogleDevelopers
// YouTube channel. Display the channel title, description, and view count.
- (void)fetchChannelResource {
    GTLRYouTubeQuery_ChannelsList *query =
    [GTLRYouTubeQuery_ChannelsList queryWithPart:@"snippet,statistics"];
  query.identifier = @"UC_x5XG1OV2P6uZZ5FSM9Ttw";
  // To retrieve data for the current user's channel, comment out the previous
  // line (query.identifier ...) and uncomment the next line (query.mine ...).
  // query.mine = true;

  [self.service executeQuery:query
                    delegate:self
           didFinishSelector:@selector(displayResultWithTicket:finishedWithObject:error:)];
}

// Process the response and display output
- (void)displayResultWithTicket:(GTLRServiceTicket *)ticket
             finishedWithObject:(GTLRYouTube_ChannelListResponse *)channels
                          error:(NSError *)error {
  if (error == nil) {
    NSMutableString *output = [[NSMutableString alloc] init];
    if (channels.items.count > 0) {
      [output appendString:@"Channel information:\n"];
      for (GTLRYouTube_Channel *channel in channels) {
        NSString *title = channel.snippet.title;
        NSString *description = channel.snippet.description;
        NSNumber *viewCount = channel.statistics.viewCount;
        [output appendFormat:@"Title: %@\nDescription: %@\nViewCount: %@\n", title, description, viewCount];
      }
    } else {
      [output appendString:@"Channel not found."];
    }
    self.output.text = output;
  } else {
    [self showAlert:@"Error" message:error.localizedDescription];
  }
}


// Helper for showing an alert
- (void)showAlert:(NSString *)title message:(NSString *)message {
    UIAlertController *alert =
    [UIAlertController alertControllerWithTitle:title
                                        message:message
                                 preferredStyle:UIAlertControllerStyleAlert];
    UIAlertAction *ok =
    [UIAlertAction actionWithTitle:@"OK"
                             style:UIAlertActionStyleDefault
                           handler:^(UIAlertAction * action)
     {
         [alert dismissViewControllerAnimated:YES completion:nil];
     }];
    [alert addAction:ok];
    [self presentViewController:alert animated:YES completion:nil];
}


@end
步驟 4:執行範例
依序點選「Product」>「Scheme」>「QuickstartApp」,切換至 QuickstartApp 配置,然後使用裝置模擬器或已設定的裝置執行範例 (Cmd+R)。首次執行範例時,系統會提示您登入 Google 帳戶並授權存取權。
附註
- 授權資訊會儲存在 Keychain 中,因此後續執行時不會提示授權。