

Bu sayfada açıklanan adımlarda, YouTube Data API'ye istek gönderen basit bir iOS uygulamasının nasıl hızlıca oluşturulacağı açıklanmaktadır. Bu örnekte, GoogleDevelopers YouTube kanalıyla ilgili verilerin nasıl alınacağı gösterilmektedir. Kodda, sorguyu mevcut kullanıcının YouTube kanalıyla ilgili verileri alacak şekilde nasıl değiştireceğinizi açıklayan yorumlar da yer alır.
Ön koşullar
Bu hızlı başlangıcı çalıştırmak için ihtiyacınız olanlar:
- Xcode 8.0 veya daha yeni bir sürüm.
- CocoaPods bağımlılık yöneticisi.
- İnternet erişimi ve web tarayıcısı
- Google Hesabı
1. adım: YouTube Data API'yi etkinleştirin
-
Google Developers Console'da bir proje oluşturmak veya seçmek ve API'yi otomatik olarak etkinleştirmek için bu sihirbazı kullanın. Devam'ı, ardından Kimlik bilgilerine git'i tıklayın.
-
Kimlik bilgileri oluştur sayfasında İptal düğmesini tıklayın.
-
Sayfanın üst kısmında OAuth kullanıcı rızası ekranı sekmesini seçin. Bir e-posta adresi seçin, henüz ayarlanmadıysa ürün adını girin ve Kaydet düğmesini tıklayın.
-
Kimlik bilgileri sekmesini seçin, Kimlik bilgileri oluştur düğmesini tıklayın ve OAuth istemci kimliği'ni seçin.
- Uygulama türü olarak iOS'i seçin, "YouTube Data API Quickstart" adını ve
com.example.QuickstartApppaket kimliğini girip Create (Oluştur) düğmesini tıklayın.
2. adım: Çalışma alanını hazırlayın
- Xcode'u açın ve yeni bir proje oluşturun:
- Dosya > Yeni > Proje'yi tıklayın, iOS > Uygulama > Tek Görünümlü Uygulama şablonunu seçin ve İleri'yi tıklayın.
- Product Name'i (Ürün Adı) "QuickstartApp", Organization Identifier'ı (Kuruluş Tanımlayıcısı) "com.example" ve Language'i (Dil)Objective-Colarak ayarlayın.
Kuruluş tanımlayıcısının altında, 1.b adımında girdiğiniz iOS paket kimliği (
com.example.QuickstartApp) ile eşleşen, oluşturulmuş bir paket kimliği görürsünüz. - İleri'yi tıklayın.
- Proje için bir hedef dizin seçin ve Create'i (Oluştur) tıklayın.
- File > Close Project'i (Dosya > Projeyi Kapat) tıklayarak projeyi kapatın.
- Bir terminal penceresi açın ve yeni oluşturduğunuz
QuickstartApp.xcodeprojdosyasını içeren dizine gidin. Podfile'ı oluşturmak, kitaplığı yüklemek ve elde edilen XCode projesini açmak için aşağıdaki komutları çalıştırın:
cat << EOF > Podfile &&
platform :ios, '8.0'
target 'QuickstartApp' do
    pod 'GoogleAPIClientForREST/YouTube', '~> 1.2.1'
    pod 'Google/SignIn', '~> 3.0.3'
end
EOF
pod install &&
open QuickstartApp.xcworkspace
XCode Proje Gezgini'nde "QuickstartApp" proje düğümünü seçin. Ardından File > Add files to "QuickstartApp" (Dosya > "QuickstartApp"e dosya ekle) menü öğesini tıklayın.
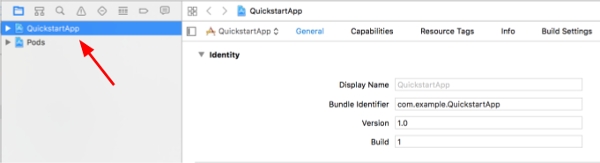
Daha önce indirilen
GoogleService-Info.plistdosyasını bulup seçin. Seçenekler düğmesini tıklayın.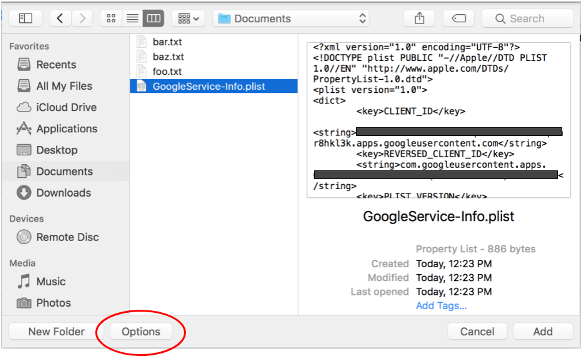
Seçenekler penceresinde aşağıdaki seçimleri yapın ve Ekle düğmesini tıklayın:
- Gerekirse öğeleri kopyala onay kutusunu işaretleyin.
- Hedeflere ekle bölümünde listelenen tüm hedefleri işaretleyin.

Proje düğümü seçiliyken aşağıdaki iki resimde gösterildiği gibi TARGETS (HEDEFLER) bölümünde "QuickstartApp"i seçin:
Bu ekran görüntüsünde gösterilen alanı tıklayın:

Ardından uygun hedefi seçin:
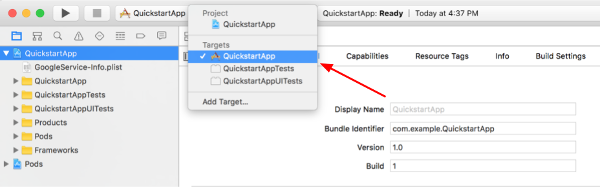
Bilgi sekmesini seçin ve URL Türleri bölümünü genişletin.
+ düğmesini tıklayın ve ters çevrilmiş istemci kimliğiniz için bir URL şeması ekleyin. Bu değeri bulmak için 2.f adımında seçtiğiniz
GoogleService-Info.plistyapılandırma dosyasını açın. REVERSED_CLIENT_ID anahtarını bulun. Bu anahtarın değerini kopyalayın ve yapılandırma sayfasındaki URL Şemaları kutusuna yapıştırın. Diğer alanları boş bırakın.Projeyi yeniden derleyin:
- Product > Clean Build Folder'ı (option tuşunu basılı tutarak) tıklayın.
- Ürün > Derle'yi tıklayın.
3. adım: Örneği ayarlayın
Aşağıdaki dosyaların içeriğini, sağlanan kodla değiştirin:#import <UIKit/UIKit.h> @import GoogleSignIn; @interface AppDelegate : UIResponder <UIApplicationDelegate> @property (strong, nonatomic) UIWindow *window; @end
#import "AppDelegate.h"

@implementation AppDelegate

- (BOOL)application:(UIApplication *)application
didFinishLaunchingWithOptions:(NSDictionary *)launchOptions {
    // Initialize Google sign-in.
    [GIDSignIn sharedInstance].clientID = @"<YOUR_CLIENT_ID>";

    return YES;
}

- (BOOL)application:(UIApplication *)application
            openURL:(NSURL *)url
  sourceApplication:(NSString *)sourceApplication
         annotation:(id)annotation {
    return [[GIDSignIn sharedInstance] handleURL:url
                               sourceApplication:sourceApplication
                                      annotation:annotation];
}


@end
#import <UIKit/UIKit.h>
@import GoogleSignIn;
#import <GTLRYouTube.h>

@interface ViewController : UIViewController <GIDSignInDelegate, GIDSignInUIDelegate>

@property (nonatomic, strong) IBOutlet GIDSignInButton *signInButton;
@property (nonatomic, strong) UITextView *output;
@property (nonatomic, strong) GTLRYouTubeService *service;


@end
#import "ViewController.h"

@implementation ViewController

- (void)viewDidLoad {
    [super viewDidLoad];
    // Configure Google Sign-in.
    GIDSignIn* signIn = [GIDSignIn sharedInstance];
    signIn.delegate = self;
    signIn.uiDelegate = self;
    signIn.scopes = [NSArray arrayWithObjects:kGTLRAuthScopeYouTubeReadonly, nil];
    [signIn signInSilently];

    // Add the sign-in button.
    self.signInButton = [[GIDSignInButton alloc] init];
    [self.view addSubview:self.signInButton];

    // Create a UITextView to display output.
    self.output = [[UITextView alloc] initWithFrame:self.view.bounds];
    self.output.editable = false;
    self.output.contentInset = UIEdgeInsetsMake(20.0, 0.0, 20.0, 0.0);
    self.output.autoresizingMask = UIViewAutoresizingFlexibleHeight | UIViewAutoresizingFlexibleWidth;
    self.output.hidden = true;
    [self.view addSubview:self.output];

    // Initialize the service object.
    self.service = [[GTLRYouTubeService alloc] init];
}

- (void)signIn:(GIDSignIn *)signIn
didSignInForUser:(GIDGoogleUser *)user
     withError:(NSError *)error {
    if (error != nil) {
        [self showAlert:@"Authentication Error" message:error.localizedDescription];
        self.service.authorizer = nil;
    } else {
        self.signInButton.hidden = true;
        self.output.hidden = false;
        self.service.authorizer = user.authentication.fetcherAuthorizer;
        [self fetchChannelResource];
    }
}


// Construct a query and retrieve the channel resource for the GoogleDevelopers
// YouTube channel. Display the channel title, description, and view count.
- (void)fetchChannelResource {
    GTLRYouTubeQuery_ChannelsList *query =
    [GTLRYouTubeQuery_ChannelsList queryWithPart:@"snippet,statistics"];
  query.identifier = @"UC_x5XG1OV2P6uZZ5FSM9Ttw";
  // To retrieve data for the current user's channel, comment out the previous
  // line (query.identifier ...) and uncomment the next line (query.mine ...).
  // query.mine = true;

  [self.service executeQuery:query
                    delegate:self
           didFinishSelector:@selector(displayResultWithTicket:finishedWithObject:error:)];
}

// Process the response and display output
- (void)displayResultWithTicket:(GTLRServiceTicket *)ticket
             finishedWithObject:(GTLRYouTube_ChannelListResponse *)channels
                          error:(NSError *)error {
  if (error == nil) {
    NSMutableString *output = [[NSMutableString alloc] init];
    if (channels.items.count > 0) {
      [output appendString:@"Channel information:\n"];
      for (GTLRYouTube_Channel *channel in channels) {
        NSString *title = channel.snippet.title;
        NSString *description = channel.snippet.description;
        NSNumber *viewCount = channel.statistics.viewCount;
        [output appendFormat:@"Title: %@\nDescription: %@\nViewCount: %@\n", title, description, viewCount];
      }
    } else {
      [output appendString:@"Channel not found."];
    }
    self.output.text = output;
  } else {
    [self showAlert:@"Error" message:error.localizedDescription];
  }
}


// Helper for showing an alert
- (void)showAlert:(NSString *)title message:(NSString *)message {
    UIAlertController *alert =
    [UIAlertController alertControllerWithTitle:title
                                        message:message
                                 preferredStyle:UIAlertControllerStyleAlert];
    UIAlertAction *ok =
    [UIAlertAction actionWithTitle:@"OK"
                             style:UIAlertActionStyleDefault
                           handler:^(UIAlertAction * action)
     {
         [alert dismissViewControllerAnimated:YES completion:nil];
     }];
    [alert addAction:ok];
    [self presentViewController:alert animated:YES completion:nil];
}


@end
4. adım: Örneği çalıştırın
Product > Scheme > QuickstartApp'i (Ürün > Şema > QuickstartApp) tıklayarak QuickstartApp şemasına geçin ve cihaz simülatörünü veya yapılandırılmış bir cihazı kullanarak örneği çalıştırın (Cmd+R). Örneği ilk kez çalıştırdığınızda Google Hesabınıza giriş yapmanız ve erişim yetkisi vermeniz istenir.
Notlar
- Yetkilendirme bilgileri Anahtar Zinciri'nizde depolanır. Bu nedenle, sonraki yürütme işlemlerinde yetkilendirme istenmez.