

ขั้นตอนที่อธิบายไว้ในหน้านี้จะอธิบายวิธีสร้างแอปพลิเคชัน iOS อย่างง่ายที่ส่งคำขอไปยัง YouTube Data API อย่างรวดเร็ว ตัวอย่างนี้แสดงวิธีดึงข้อมูลเกี่ยวกับช่อง YouTube ของ GoogleDevelopers นอกจากนี้ โค้ดยังมีคำอธิบายวิธีแก้ไขคําค้นหาเพื่อดึงข้อมูลเกี่ยวกับช่อง YouTube ของผู้ใช้ปัจจุบันด้วย
ข้อกำหนดเบื้องต้น
คุณต้องมีสิ่งต่อไปนี้จึงจะเรียกใช้ Quickstart นี้ได้
- Xcode 8.0 ขึ้นไป
- CocoaPods เครื่องมือจัดการการพึ่งพา
- การเข้าถึงอินเทอร์เน็ตและเว็บเบราว์เซอร์
- บัญชี Google
ขั้นตอนที่ 1: เปิดใช้ YouTube Data API
-
ใช้ วิซาร์ดนี้ เพื่อสร้างหรือเลือกโปรเจ็กต์ใน Google Developers Console และ เปิดใช้ API โดยอัตโนมัติ คลิกต่อไป แล้ว ไปที่ข้อมูลเข้าสู่ระบบ
-
ในหน้าสร้างข้อมูลเข้าสู่ระบบ ให้คลิกปุ่ม ยกเลิก
-
เลือกแท็บหน้าจอขอความยินยอม OAuth ที่ด้านบนของหน้า เลือกอีเมล ป้อนชื่อสินค้า หากยังไม่ได้ตั้งค่า แล้วคลิกปุ่มบันทึก
-
เลือกแท็บข้อมูลเข้าสู่ระบบ คลิกปุ่มสร้างข้อมูลเข้าสู่ระบบ แล้วเลือกรหัสไคลเอ็นต์ OAuth
- เลือกประเภทแอปพลิเคชัน iOS ป้อนชื่อ "YouTube Data API
Quickstart" รหัสชุด
com.example.QuickstartAppแล้วคลิกปุ่มสร้าง
ขั้นตอนที่ 2: เตรียมพื้นที่ทำงาน
- เปิด Xcode แล้วสร้างโปรเจ็กต์ใหม่โดยทำดังนี้
- คลิกไฟล์ > ใหม่ > โปรเจ็กต์ เลือกเทมเพลต iOS > แอปพลิเคชัน > แอปพลิเคชันมุมมองเดียว แล้วคลิกถัดไป
- ตั้งค่าชื่อผลิตภัณฑ์ เป็น "QuickstartApp" ตัวระบุองค์กร
เป็น "com.example" และ ภาษา เป็น
Objective-C
คุณควรเห็น
รหัสชุดซอฟต์แวร์ ที่สร้างขึ้นซึ่งตรงกับ รหัสชุด iOS
(
com.example.QuickstartApp) ที่คุณป้อนใน ขั้นตอนที่ 1.b ด้านล่างตัวระบุองค์กร - คลิกถัดไป
- เลือกไดเรกทอรีปลายทางสำหรับโปรเจ็กต์ แล้วคลิกสร้าง
- ปิดโปรเจ็กต์โดยคลิกไฟล์ > ปิดโปรเจ็กต์
- เปิดหน้าต่างเทอร์มินัลและไปที่ไดเรกทอรีที่มีไฟล์
QuickstartApp.xcodeprojที่คุณเพิ่งสร้าง เรียกใช้คำสั่งต่อไปนี้เพื่อสร้าง Podfile, ติดตั้งไลบรารี และเปิดโปรเจ็กต์ XCode ที่ได้
cat << EOF > Podfile &&
platform :ios, '8.0'
target 'QuickstartApp' do
    pod 'GoogleAPIClientForREST/YouTube', '~> 1.2.1'
    pod 'Google/SignIn', '~> 3.0.3'
end
EOF
pod install &&
open QuickstartApp.xcworkspace
ในแถบนำทางของโปรเจ็กต์ XCode ให้เลือกโหนดโปรเจ็กต์ "QuickstartApp" จากนั้นคลิกรายการเมนูไฟล์ > เพิ่มไฟล์ลงใน "QuickstartApp"
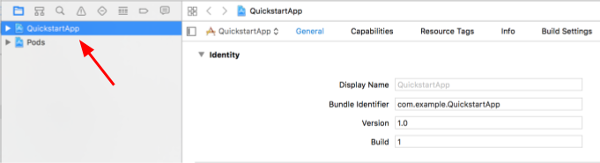
ค้นหาไฟล์
GoogleService-Info.plistที่ดาวน์โหลดไว้ก่อนหน้านี้ แล้วเลือกไฟล์ดังกล่าว คลิกปุ่มตัวเลือก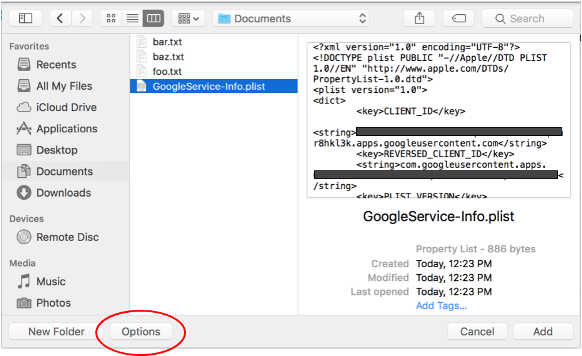
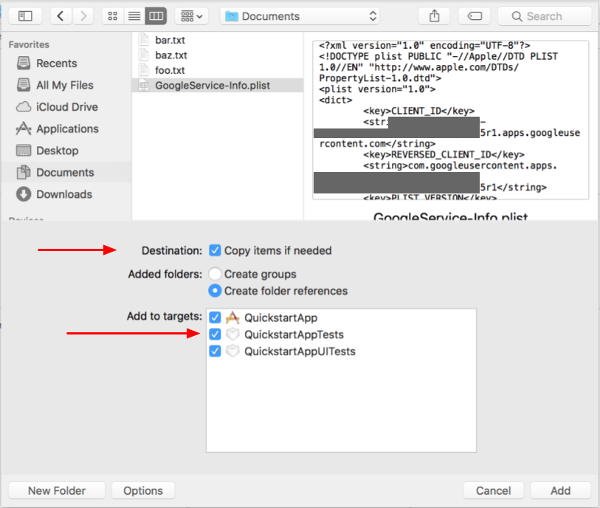
เลือกตัวเลือกต่อไปนี้ในหน้าต่างตัวเลือก แล้วคลิกปุ่มเพิ่ม
- เลือกช่องทำเครื่องหมายคัดลอกรายการหากจำเป็น
- เลือกเป้าหมายทั้งหมดที่แสดงในส่วนเพิ่มลงในเป้าหมาย
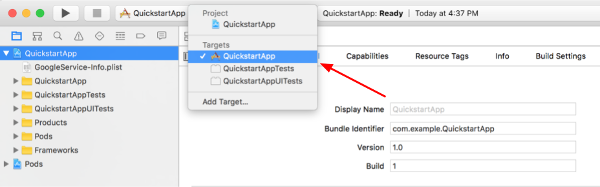
เมื่อเลือกโหนดโปรเจ็กต์อยู่ ให้เลือก "QuickstartApp" ในส่วนเป้าหมาย ดังที่แสดงในรูปภาพ 2 รูปด้านล่าง
คลิกพื้นที่ที่แสดงในภาพหน้าจอนี้:
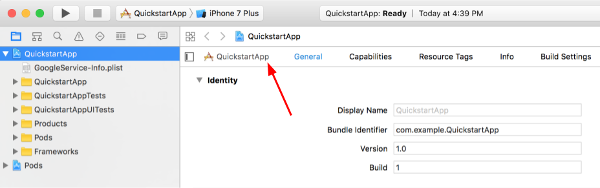
จากนั้นเลือกเป้าหมายที่เหมาะสม:
เลือกแท็บข้อมูล แล้วขยายส่วนประเภท URL
คลิกปุ่ม + แล้วเพิ่มURL Scheme สำหรับรหัสไคลเอ็นต์แบบย้อนกลับ หากต้องการค้นหาค่านี้ ให้เปิดไฟล์การกำหนดค่า
GoogleService-Info.plistที่คุณเลือกในขั้นตอนที่ 2.f มองหาคีย์ REVERSED_CLIENT_ID คัดลอกค่าของคีย์ดังกล่าว แล้ววางลงในช่องรูปแบบ URL ในหน้าการกำหนดค่า เว้นช่องอื่นๆ ว่างไว้สร้างโปรเจ็กต์ใหม่โดยทำดังนี้
- คลิกผลิตภัณฑ์ > ล้างโฟลเดอร์บิลด์ (ขณะกดปุ่ม Option ค้างไว้)
- คลิกผลิตภัณฑ์ > บิลด์
ขั้นตอนที่ 3: ตั้งค่าตัวอย่าง
แทนที่เนื้อหาของไฟล์ต่อไปนี้ด้วยโค้ดที่ให้ไว้#import <UIKit/UIKit.h> @import GoogleSignIn; @interface AppDelegate : UIResponder <UIApplicationDelegate> @property (strong, nonatomic) UIWindow *window; @end
#import "AppDelegate.h"

@implementation AppDelegate

- (BOOL)application:(UIApplication *)application
didFinishLaunchingWithOptions:(NSDictionary *)launchOptions {
    // Initialize Google sign-in.
    [GIDSignIn sharedInstance].clientID = @"<YOUR_CLIENT_ID>";

    return YES;
}

- (BOOL)application:(UIApplication *)application
            openURL:(NSURL *)url
  sourceApplication:(NSString *)sourceApplication
         annotation:(id)annotation {
    return [[GIDSignIn sharedInstance] handleURL:url
                               sourceApplication:sourceApplication
                                      annotation:annotation];
}


@end
#import <UIKit/UIKit.h>
@import GoogleSignIn;
#import <GTLRYouTube.h>

@interface ViewController : UIViewController <GIDSignInDelegate, GIDSignInUIDelegate>

@property (nonatomic, strong) IBOutlet GIDSignInButton *signInButton;
@property (nonatomic, strong) UITextView *output;
@property (nonatomic, strong) GTLRYouTubeService *service;


@end
#import "ViewController.h"

@implementation ViewController

- (void)viewDidLoad {
    [super viewDidLoad];
    // Configure Google Sign-in.
    GIDSignIn* signIn = [GIDSignIn sharedInstance];
    signIn.delegate = self;
    signIn.uiDelegate = self;
    signIn.scopes = [NSArray arrayWithObjects:kGTLRAuthScopeYouTubeReadonly, nil];
    [signIn signInSilently];

    // Add the sign-in button.
    self.signInButton = [[GIDSignInButton alloc] init];
    [self.view addSubview:self.signInButton];

    // Create a UITextView to display output.
    self.output = [[UITextView alloc] initWithFrame:self.view.bounds];
    self.output.editable = false;
    self.output.contentInset = UIEdgeInsetsMake(20.0, 0.0, 20.0, 0.0);
    self.output.autoresizingMask = UIViewAutoresizingFlexibleHeight | UIViewAutoresizingFlexibleWidth;
    self.output.hidden = true;
    [self.view addSubview:self.output];

    // Initialize the service object.
    self.service = [[GTLRYouTubeService alloc] init];
}

- (void)signIn:(GIDSignIn *)signIn
didSignInForUser:(GIDGoogleUser *)user
     withError:(NSError *)error {
    if (error != nil) {
        [self showAlert:@"Authentication Error" message:error.localizedDescription];
        self.service.authorizer = nil;
    } else {
        self.signInButton.hidden = true;
        self.output.hidden = false;
        self.service.authorizer = user.authentication.fetcherAuthorizer;
        [self fetchChannelResource];
    }
}


// Construct a query and retrieve the channel resource for the GoogleDevelopers
// YouTube channel. Display the channel title, description, and view count.
- (void)fetchChannelResource {
    GTLRYouTubeQuery_ChannelsList *query =
    [GTLRYouTubeQuery_ChannelsList queryWithPart:@"snippet,statistics"];
  query.identifier = @"UC_x5XG1OV2P6uZZ5FSM9Ttw";
  // To retrieve data for the current user's channel, comment out the previous
  // line (query.identifier ...) and uncomment the next line (query.mine ...).
  // query.mine = true;

  [self.service executeQuery:query
                    delegate:self
           didFinishSelector:@selector(displayResultWithTicket:finishedWithObject:error:)];
}

// Process the response and display output
- (void)displayResultWithTicket:(GTLRServiceTicket *)ticket
             finishedWithObject:(GTLRYouTube_ChannelListResponse *)channels
                          error:(NSError *)error {
  if (error == nil) {
    NSMutableString *output = [[NSMutableString alloc] init];
    if (channels.items.count > 0) {
      [output appendString:@"Channel information:\n"];
      for (GTLRYouTube_Channel *channel in channels) {
        NSString *title = channel.snippet.title;
        NSString *description = channel.snippet.description;
        NSNumber *viewCount = channel.statistics.viewCount;
        [output appendFormat:@"Title: %@\nDescription: %@\nViewCount: %@\n", title, description, viewCount];
      }
    } else {
      [output appendString:@"Channel not found."];
    }
    self.output.text = output;
  } else {
    [self showAlert:@"Error" message:error.localizedDescription];
  }
}


// Helper for showing an alert
- (void)showAlert:(NSString *)title message:(NSString *)message {
    UIAlertController *alert =
    [UIAlertController alertControllerWithTitle:title
                                        message:message
                                 preferredStyle:UIAlertControllerStyleAlert];
    UIAlertAction *ok =
    [UIAlertAction actionWithTitle:@"OK"
                             style:UIAlertActionStyleDefault
                           handler:^(UIAlertAction * action)
     {
         [alert dismissViewControllerAnimated:YES completion:nil];
     }];
    [alert addAction:ok];
    [self presentViewController:alert animated:YES completion:nil];
}


@end
ขั้นตอนที่ 4: เรียกใช้ตัวอย่าง
เปลี่ยนไปใช้สคีมา QuickstartApp โดยคลิกผลิตภัณฑ์ > สคีมา > QuickstartApp แล้วเรียกใช้ตัวอย่าง (Cmd+R) โดยใช้โปรแกรมจำลองอุปกรณ์หรืออุปกรณ์ที่กำหนดค่าไว้ เมื่อเรียกใช้ตัวอย่างเป็นครั้งแรก ระบบจะขอให้คุณเข้าสู่ระบบบัญชี Google และให้สิทธิ์เข้าถึง
หมายเหตุ
- ระบบจะจัดเก็บข้อมูลการให้สิทธิ์ไว้ในพวงกุญแจ ดังนั้นการดำเนินการในครั้งต่อๆ ไปจะไม่ขอให้คุณให้สิทธิ์