
इस दस्तावेज़ में, एक सैंपल वेब ऐप्लिकेशन की मदद से Java सर्वलेट का इस्तेमाल करके OAuth 2.0 ऑथराइज़ेशन कॉलबैक हैंडलर को लागू करने का तरीका बताया गया है. यह वेब ऐप्लिकेशन, Google Tasks API का इस्तेमाल करके, उपयोगकर्ता के टास्क दिखाएगा. नमूना ऐप्लिकेशन, सबसे पहले उपयोगकर्ता के Google Tasks को ऐक्सेस करने की अनुमति का अनुरोध करेगा और फिर उपयोगकर्ता के टास्क, डिफ़ॉल्ट टास्क की सूची में दिखाएगा.
दर्शक
यह दस्तावेज़ उन लोगों के लिए बनाया गया है जो Java और J2EE वेब ऐप्लिकेशन आर्किटेक्चर के बारे में जानते हैं. हम OAuth 2.0 के ऑथराइज़ेशन फ़्लो के बारे में जानकारी होने का सुझाव देते हैं.
विषय सूची
सैंपल को पूरी तरह से काम करने के लिए, आपको कई चरण पूरे करने होंगे:
- web.xml फ़ाइल में सर्वलेट मैपिंग का एलान करें
- अपने सिस्टम के उपयोगकर्ताओं की पुष्टि करें और Tasks को ऐक्सेस करने के लिए अनुमति देने का अनुरोध करें
- Google के ऑथराइज़ेशन एंडपॉइंट से मिला ऑथराइज़ेशन कोड सुनें
- रीफ़्रेश और ऐक्सेस टोकन के लिए ऑथराइज़ेशन कोड को बदलना
- उपयोगकर्ता के टास्क देखे जा सकते हैं और उन्हें दिखाया जा सकता है
web.xml फ़ाइल में सर्वलेट मैपिंग का एलान करें
हम अपने ऐप्लिकेशन में दो सर्वलेट का इस्तेमाल करेंगे:
- PrintTasksTitlesServlet (/ पर मैप किया गया): ऐप्लिकेशन का एंट्री पॉइंट जो उपयोगकर्ता की पुष्टि को मैनेज करेगा और उपयोगकर्ता के टास्क दिखाएगा
- OAuthCodeCallbackHandlerServlet (/oauth2callback पर मैप किया गया): OAuth 2.0 कॉलबैक, जो OAuth ऑथराइज़ेशन एंडपॉइंट से मिलने वाले रिस्पॉन्स को मैनेज करता है
नीचे web.xml फ़ाइल दी गई है, जो इन दो सर्वलेट को हमारे ऐप्लिकेशन में मौजूद यूआरएल पर मैप करती है:
<?xml version="1.0" encoding="UTF-8"?>
<web-app version="2.5" xmlns="http://java.sun.com/xml/ns/javaee"
    xmlns:xsi="http://www.w3.org/2001/XMLSchema-instance"
    xsi:schemaLocation="http://java.sun.com/xml/ns/javaee http://java.sun.com/xml/ns/javaee/web-app_2_5.xsd">

 <servlet>
   <servlet-name>PrintTasksTitles</servlet-name>
   <servlet-class>com.google.oauthsample.PrintTasksTitlesServlet</servlet-class>
 </servlet>

 <servlet-mapping>
   <servlet-name>PrintTasksTitles</servlet-name>
   <url-pattern>/</url-pattern>
 </servlet-mapping>

 <servlet>
   <servlet-name>OAuthCodeCallbackHandlerServlet</servlet-name>
   <servlet-class>com.google.oauthsample.OAuthCodeCallbackHandlerServlet</servlet-class>
 </servlet>

 <servlet-mapping>
   <servlet-name>OAuthCodeCallbackHandlerServlet</servlet-name>
   <url-pattern>/oauth2callback</url-pattern>
 </servlet-mapping>

</web-app>
अपने सिस्टम के उपयोगकर्ताओं की पुष्टि करें और इसके टास्क ऐक्सेस करने के लिए अनुमति का अनुरोध करें
उपयोगकर्ता, रूट '/' यूआरएल के ज़रिए ऐप्लिकेशन में पहुंचता है, जिसे PrintTaskListsTitlesServlet सर्वलेट से मैप किया जाता है. उस सर्वलेट में ये काम किए जाते हैं:
- यह जांच करता है कि सिस्टम पर उपयोगकर्ता की पुष्टि हुई है या नहीं
- अगर उपयोगकर्ता की पहचान की पुष्टि नहीं की गई है, तो उसे पुष्टि करने वाले पेज पर रीडायरेक्ट कर दिया जाता है
- अगर उपयोगकर्ता की पुष्टि हो गई है, तो हम जांच करते हैं कि हमारे डेटा स्टोरेज में पहले से ही रीफ़्रेश टोकन मौजूद है या नहीं. इसे नीचे दिए गए OAuthTokenDao के ज़रिए मैनेज किया जाता है. अगर उपयोगकर्ता के लिए स्टोर में रीफ़्रेश टोकन नहीं है, तो इसका मतलब है कि उपयोगकर्ता ने अभी तक ऐप्लिकेशन को टास्क ऐक्सेस करने की अनुमति नहीं दी है. ऐसे में, उपयोगकर्ता को Google के OAuth 2.0 ऑथराइज़ेशन एंडपॉइंट पर रीडायरेक्ट कर दिया जाता है.
package com.google.oauthsample;

import ...

/**
 * Simple sample Servlet which will display the tasks in the default task list of the user.
 */
@SuppressWarnings("serial")
public class PrintTasksTitlesServlet extends HttpServlet {

  /**
   * The OAuth Token DAO implementation, used to persist the OAuth refresh token.
   * Consider injecting it instead of using a static initialization. Also we are
   * using a simple memory implementation as a mock. Change the implementation to
   * using your database system.
   */
  public static OAuthTokenDao oauthTokenDao = new OAuthTokenDaoMemoryImpl();

  public void doGet(HttpServletRequest req, HttpServletResponse resp) throws IOException {
    // Getting the current user
    // This is using App Engine's User Service but you should replace this to
    // your own user/login implementation
    UserService userService = UserServiceFactory.getUserService();
    User user = userService.getCurrentUser();

    // If the user is not logged-in it is redirected to the login service, then back to this page
    if (user == null) {
      resp.sendRedirect(userService.createLoginURL(getFullRequestUrl(req)));
      return;
    }

    // Checking if we already have tokens for this user in store
    AccessTokenResponse accessTokenResponse = oauthTokenDao.getKeys(user.getEmail());

    // If we don't have tokens for this user
    if (accessTokenResponse == null) {
      OAuthProperties oauthProperties = new OAuthProperties();
      // Redirect to the Google OAuth 2.0 authorization endpoint
      resp.sendRedirect(new GoogleAuthorizationRequestUrl(oauthProperties.getClientId(),
          OAuthCodeCallbackHandlerServlet.getOAuthCodeCallbackHandlerUrl(req), oauthProperties
              .getScopesAsString()).build());
      return;
    }
  }

  /**
   * Construct the request's URL without the parameter part.
   *
   * @param req the HttpRequest object
   * @return The constructed request's URL
   */
  public static String getFullRequestUrl(HttpServletRequest req) {
    String scheme = req.getScheme() + "://";
    String serverName = req.getServerName();
    String serverPort = (req.getServerPort() == 80) ? "" : ":" + req.getServerPort();
    String contextPath = req.getContextPath();
    String servletPath = req.getServletPath();
    String pathInfo = (req.getPathInfo() == null) ? "" : req.getPathInfo();
    String queryString = (req.getQueryString() == null) ? "" : "?" + req.getQueryString();
    return scheme + serverName + serverPort + contextPath + servletPath + pathInfo + queryString;
  }
}
ध्यान दें: ऊपर बताए गए तरीके से, कुछ App Engine लाइब्रेरी का इस्तेमाल किया जाता है. इनका इस्तेमाल आसान बनाने के लिए किया जाता है. अगर आपको किसी दूसरे प्लैटफ़ॉर्म के लिए डेवलप करना है, तो UserService इंटरफ़ेस को फिर से लागू करें. यह इंटरफ़ेस, उपयोगकर्ता की पुष्टि को मैनेज करता है.
ऐप्लिकेशन, उपयोगकर्ता की अनुमति वाले टोकन को बनाए रखने और उन्हें ऐक्सेस करने के लिए, डीएओ का इस्तेमाल करता है. नीचे इंटरफ़ेस दिया गया है - OAuthTokenDao - और मॉक (इन-मेमोरी) को लागू करना - OAuthTokenDaoMemoryImpl - जिनका इस्तेमाल इस सैंपल में किया गया है:
package com.google.oauthsample;

import com.google.api.client.auth.oauth2.draft10.AccessTokenResponse;

/**
 * Allows easy storage and access of authorization tokens.
 */
public interface OAuthTokenDao {

  /**
   * Stores the given AccessTokenResponse using the {@code username}, the OAuth
   * {@code clientID} and the tokens scopes as keys.
   *
   * @param tokens The AccessTokenResponse to store
   * @param userName The userName associated wit the token
   */
  public void saveKeys(AccessTokenResponse tokens, String userName);

  /**
   * Returns the AccessTokenResponse stored for the given username, clientId and
   * scopes. Returns {@code null} if there is no AccessTokenResponse for this
   * user and scopes.
   *
   * @param userName The username of which to get the stored AccessTokenResponse
   * @return The AccessTokenResponse of the given username
   */
  public AccessTokenResponse getKeys(String userName);
}
package com.google.oauthsample;

import com.google.api.client.auth.oauth2.draft10.AccessTokenResponse;
...

/**
 * Quick and Dirty memory implementation of {@link OAuthTokenDao} based on
 * HashMaps.
 */
public class OAuthTokenDaoMemoryImpl implements OAuthTokenDao {

  /** Object where all the Tokens will be stored */
  private static Map tokenPersistance = new HashMap();

  public void saveKeys(AccessTokenResponse tokens, String userName) {
    tokenPersistance.put(userName, tokens);
  }

  public AccessTokenResponse getKeys(String userName) {
    return tokenPersistance.get(userName);
  }
}
साथ ही, ऐप्लिकेशन के लिए OAuth 2.0 क्रेडेंशियल, प्रॉपर्टी फ़ाइल में स्टोर किए जाते हैं. इसके अलावा, अपने JavaScript में किसी एक क्लास में उन्हें एक स्थायी जगह के तौर पर रखा जा सकता है. हालांकि, यहां OAuthProperties क्लास और oauth.properties फ़ाइल फ़ॉर्मैट की जानकारी दी गई है, जिनका इस्तेमाल सैंपल में किया जा रहा है:
package com.google.oauthsample;

import ...

/**
 * Object representation of an OAuth properties file.
 */
public class OAuthProperties {

  public static final String DEFAULT_OAUTH_PROPERTIES_FILE_NAME = "oauth.properties";

  /** The OAuth 2.0 Client ID */
  private String clientId;

  /** The OAuth 2.0 Client Secret */
  private String clientSecret;

  /** The Google APIs scopes to access */
  private String scopes;

  /**
   * Instantiates a new OauthProperties object reading its values from the
   * {@code OAUTH_PROPERTIES_FILE_NAME} properties file.
   *
   * @throws IOException IF there is an issue reading the {@code propertiesFile}
   * @throws OauthPropertiesFormatException If the given {@code propertiesFile}
   *           is not of the right format (does not contains the keys {@code
   *           clientId}, {@code clientSecret} and {@code scopes})
   */
  public OAuthProperties() throws IOException {
    this(OAuthProperties.class.getResourceAsStream(DEFAULT_OAUTH_PROPERTIES_FILE_NAME));
  }

  /**
   * Instantiates a new OauthProperties object reading its values from the given
   * properties file.
   *
   * @param propertiesFile the InputStream to read an OAuth Properties file. The
   *          file should contain the keys {@code clientId}, {@code
   *          clientSecret} and {@code scopes}
   * @throws IOException IF there is an issue reading the {@code propertiesFile}
   * @throws OAuthPropertiesFormatException If the given {@code propertiesFile}
   *           is not of the right format (does not contains the keys {@code
   *           clientId}, {@code clientSecret} and {@code scopes})
   */
  public OAuthProperties(InputStream propertiesFile) throws IOException {
    Properties oauthProperties = new Properties();
    oauthProperties.load(propertiesFile);
    clientId = oauthProperties.getProperty("clientId");
    clientSecret = oauthProperties.getProperty("clientSecret");
    scopes = oauthProperties.getProperty("scopes");
    if ((clientId == null) || (clientSecret == null) || (scopes == null)) {
      throw new OAuthPropertiesFormatException();
    }
  }

  /**
   * @return the clientId
   */
  public String getClientId() {
    return clientId;
  }

  /**
   * @return the clientSecret
   */
  public String getClientSecret() {
    return clientSecret;
  }

  /**
   * @return the scopes
   */
  public String getScopesAsString() {
    return scopes;
  }

  /**
   * Thrown when the OAuth properties file was not at the right format, i.e not
   * having the right properties names.
   */
  @SuppressWarnings("serial")
  public class OAuthPropertiesFormatException extends RuntimeException {
  }
}
नीचे oauth.properties फ़ाइल दी गई है जिसमें आपके ऐप्लिकेशन के OAuth 2.0 क्रेडेंशियल शामिल हैं. आपको नीचे दी गई वैल्यू को खुद ही बदलना होगा.
# Client ID and secret. They can be found in the APIs console.
clientId=1234567890.apps.googleusercontent.com
clientSecret=aBcDeFgHiJkLmNoPqRsTuVwXyZ
# API scopes. Space separated.
scopes=https://www.googleapis.com/auth/tasks
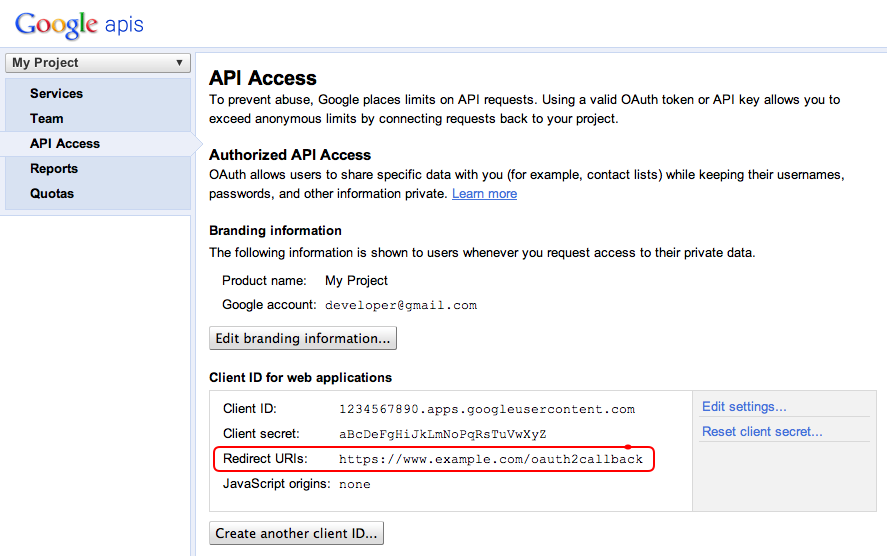
OAuth 2.0 क्लाइंट आईडी और क्लाइंट सीक्रेट आपके ऐप्लिकेशन की पहचान करता है. साथ ही, Tasks API को आपके ऐप्लिकेशन के लिए तय फ़िल्टर और कोटा के नियम लागू करने की अनुमति देता है. क्लाइंट आईडी और सीक्रेट, Google API कंसोल में देखे जा सकते हैं. कंसोल पर साइन इन करने के बाद, आपको ये काम करने होंगे:
- कोई प्रोजेक्ट बनाएं या चुनें.
- सेवाओं की सूची में Tasks API की स्थिति को चालू पर टॉगल करके, Tasks API को चालू करें.
- अगर अब तक कोई क्लाइंट आईडी नहीं बनाया गया है, तो एपीआई ऐक्सेस में जाकर OAuth 2.0 क्लाइंट आईडी बनाएं.
- पक्का करें कि प्रोजेक्ट का OAuth 2.0 कोड कॉलबैक हैंडलर यूआरएल, रीडायरेक्ट यूआरआई में रजिस्टर/व्हाइटलिस्ट में हो. उदाहरण के लिए, इस सैंपल प्रोजेक्ट में, अगर आपका वेब ऐप्लिकेशन https://www.example.com डोमेन से दिखाया जाता है, तो आपको https://www.example.com/oauth2callback रजिस्टर करना होगा.
Google के ऑथराइज़ेशन एंडपॉइंट से मिला ऑथराइज़ेशन कोड सुनें
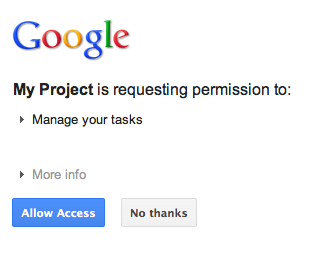
इस मामले में, जहां उपयोगकर्ता ने अभी तक ऐप्लिकेशन को टास्क ऐक्सेस करने की अनुमति नहीं दी है और इसलिए उसे Google के OAuth 2.0 ऑथराइज़ेशन एंडपॉइंट पर रीडायरेक्ट किया गया है, वहां उपयोगकर्ता को Google से एक अनुमति वाला डायलॉग दिखता है. यह डायलॉग, उपयोगकर्ता से आपके ऐप्लिकेशन को उसके टास्क का ऐक्सेस देने के लिए कहता है:
ऐक्सेस देने या न देने के बाद, उपयोगकर्ता को OAuth 2.0 कोड कॉलबैक हैंडलर पर वापस रीडायरेक्ट किया जाएगा. Google की अनुमति वाला यूआरएल बनाते समय, इसे रीडायरेक्ट/कॉलबैक के तौर पर तय किया गया है:
new GoogleAuthorizationRequestUrl(oauthProperties.getClientId(),
      OAuthCodeCallbackHandlerServlet.getOAuthCodeCallbackHandlerUrl(req), oauthProperties
          .getScopesAsString()).build()
OAuth 2.0 कोड कॉलबैक हैंडलर - OAuthCodeCallbackHandlerServlet - Google OAuth 2.0 एंडपॉइंट से मिलने वाले रीडायरेक्ट को हैंडल करता है. हैंडल करने के लिए ये दो केस हैं:
- उपयोगकर्ता ने ऐक्सेस दिया है: यूआरएल पैरामीटर से OAuth 2.0 कोड पाने के लिए, अनुरोध को पार्स करता है
- उपयोगकर्ता ने ऐक्सेस नहीं दिया है: इससे उपयोगकर्ता को कोई मैसेज दिखता है
package com.google.oauthsample;

import ...

/**
 * Servlet handling the OAuth callback from the authentication service. We are
 * retrieving the OAuth code, then exchanging it for a refresh and an access
 * token and saving it.
 */
@SuppressWarnings("serial")
public class OAuthCodeCallbackHandlerServlet extends HttpServlet {

  /** The name of the Oauth code URL parameter */
  public static final String CODE_URL_PARAM_NAME = "code";

  /** The name of the OAuth error URL parameter */
  public static final String ERROR_URL_PARAM_NAME = "error";

  /** The URL suffix of the servlet */
  public static final String URL_MAPPING = "/oauth2callback";

  public void doGet(HttpServletRequest req, HttpServletResponse resp) throws IOException {
    // Getting the "error" URL parameter
    String[] error = req.getParameterValues(ERROR_URL_PARAM_NAME);

    // Checking if there was an error such as the user denied access
    if (error != null && error.length > 0) {
      resp.sendError(HttpServletResponse.SC_NOT_ACCEPTABLE, "There was an error: \""+error[0]+"\".");
      return;
    }
    // Getting the "code" URL parameter
    String[] code = req.getParameterValues(CODE_URL_PARAM_NAME);

    // Checking conditions on the "code" URL parameter
    if (code == null || code.length == 0) {
      resp.sendError(HttpServletResponse.SC_BAD_REQUEST, "The \"code\" URL parameter is missing");
      return;
    }
  }

  /**
   * Construct the OAuth code callback handler URL.
   *
   * @param req the HttpRequest object
   * @return The constructed request's URL
   */
  public static String getOAuthCodeCallbackHandlerUrl(HttpServletRequest req) {
    String scheme = req.getScheme() + "://";
    String serverName = req.getServerName();
    String serverPort = (req.getServerPort() == 80) ? "" : ":" + req.getServerPort();
    String contextPath = req.getContextPath();
    String servletPath = URL_MAPPING;
    String pathInfo = (req.getPathInfo() == null) ? "" : req.getPathInfo();
    return scheme + serverName + serverPort + contextPath + servletPath + pathInfo;
  }
}
रीफ़्रेश और ऐक्सेस टोकन के लिए ऑथराइज़ेशन कोड को एक्सचेंज करें
इसके बाद, OAuthCodeCallbackHandlerServlet, रीफ़्रेश और ऐक्सेस टोकन के लिए Auth 2.0 कोड को एक्सचेंज करता है. साथ ही, यह डेटा स्टोर में बना रहता है और उपयोगकर्ता को वापस PrintTaskListsTitlesServlet यूआरएल पर रीडायरेक्ट करता है:
नीचे दी गई फ़ाइल में जोड़ा गया कोड हाइलाइट किया गया है. पहले से मौजूद कोड धूसर कर दिया गया है.
package com.google.oauthsample; import ... /** * Servlet handling the OAuth callback from the authentication service. We are * retrieving the OAuth code, then exchanging it for a refresh and an access * token and saving it. */ @SuppressWarnings("serial") public class OAuthCodeCallbackHandlerServlet extends HttpServlet { /** The name of the Oauth code URL parameter */ public static final String CODE_URL_PARAM_NAME = "code"; /** The name of the OAuth error URL parameter */ public static final String ERROR_URL_PARAM_NAME = "error"; /** The URL suffix of the servlet */ public static final String URL_MAPPING = "/oauth2callback";/** वह यूआरएल जो कॉलबैक को हैंडल करने के बाद, उपयोगकर्ता को रीडायरेक्ट करता है. अगर आपके पास लोगों को रीडायरेक्ट करने के लिए कई संभावित यूआरएल हैं, तो * उपयोगकर्ताओं को Google पर रीडायरेक्ट करने से पहले, इसे कुकी में सेव करें * अनुमति देने वाले यूआरएल का इस्तेमाल करें. */ सार्वजनिक स्टैटिक फ़ाइनल स्ट्रिंग रीडायरेक्ट_URL = "/"; /** OAuth टोकन डीएओ लागू करना. * स्टैटिक शुरू करने की सुविधा का इस्तेमाल करने के बजाय, इसे इंजेक्ट करें. साथ ही, हम मॉक के तौर पर, * को लागू करने का एक आसान तरीका इस्तेमाल कर रहे हैं. इसे लागू करने की प्रोसेस को बदलकर, अपने डेटाबेस सिस्टम का इस्तेमाल करें. */ सार्वजनिक स्थिर OAuthTokenDao oauthTokenDao = new OAuthTokenDaoMemoryImpl();public void doGet(HttpServletRequest req, HttpServletResponse resp) throws IOException { // Getting the "error" URL parameter String[] error = req.getParameterValues(ERROR_URL_PARAM_NAME); // Checking if there was an error such as the user denied access if (error != null && error.length > 0) { resp.sendError(HttpServletResponse.SC_NOT_ACCEPTABLE, "There was an error: \""+error[0]+"\"."); return; } // Getting the "code" URL parameter String[] code = req.getParameterValues(CODE_URL_PARAM_NAME); // Checking conditions on the "code" URL parameter if (code == null || code.length == 0) { resp.sendError(HttpServletResponse.SC_BAD_REQUEST, "The \"code\" URL parameter is missing"); return; }// इनकमिंग अनुरोध यूआरएल बनाएं String requestUrl = getOAuthCodeCallbackHandlerUrl(req); // Exchange के लिए कोड को बदलें ऐक्सेस रिडेंप्शन. ऐक्सेस री सहयोगी/** * Construct the OAuth code callback handler URL. * * @param req the HttpRequest object * @return The constructed request's URL */ public static String getOAuthCodeCallbackHandlerUrl(HttpServletRequest req) { String scheme = req.getScheme() + "://"; String serverName = req.getServerName(); String serverPort = (req.getServerPort() == 80) ? "" : ":" + req.getServerPort(); String contextPath = req.getContextPath(); String servletPath = URL_MAPPING; String pathInfo = (req.getPathInfo() == null) ? "" : req.getPathInfo(); return scheme + serverName + serverPort + contextPath + servletPath + pathInfo; }OAuthCodeCallbackHandlerServlet.java फ़ाइलध्यान दें: ऊपर बताए गए तरीके से, कुछ App Engine लाइब्रेरी का इस्तेमाल किया जाता है. इनका इस्तेमाल आसान बनाने के लिए किया जाता है. अगर आपको किसी दूसरे प्लैटफ़ॉर्म के लिए डेवलप करना है, तो UserService इंटरफ़ेस को फिर से लागू करें. यह इंटरफ़ेस, उपयोगकर्ता की पुष्टि को मैनेज करता है.
उपयोगकर्ता के टास्क पढ़ें और उन्हें दिखाएं
उपयोगकर्ता ने ऐप्लिकेशन को इसके टास्क का ऐक्सेस दिया है. ऐप्लिकेशन में रीफ़्रेश टोकन होता है. इसे OAuthTokenDao से ऐक्सेस किए जा सकने वाले डेटास्टोर में सेव किया जाता है. PrintTaskListsTitlesServlet सुविधा की मदद से, उपयोगकर्ता के टास्क ऐक्सेस करने और उन्हें दिखाने के लिए, इन टोकन का इस्तेमाल किया जा सकता है:
नीचे दी गई फ़ाइल में जोड़ा गया कोड हाइलाइट किया गया है. पहले से मौजूद कोड धूसर कर दिया गया है.
package com.google.oauthsample; import ... /** * Simple sample Servlet which will display the tasks in the default task list of the user. */ @SuppressWarnings("serial") public class PrintTasksTitlesServlet extends HttpServlet { /** * The OAuth Token DAO implementation, used to persist the OAuth refresh token. * Consider injecting it instead of using a static initialization. Also we are * using a simple memory implementation as a mock. Change the implementation to * using your database system. */ public static OAuthTokenDao oauthTokenDao = new OAuthTokenDaoMemoryImpl(); public void doGet(HttpServletRequest req, HttpServletResponse resp) throws IOException { // Getting the current user // This is using App Engine's User Service but you should replace this to // your own user/login implementation UserService userService = UserServiceFactory.getUserService(); User user = userService.getCurrentUser(); // If the user is not logged-in it is redirected to the login service, then back to this page if (user == null) { resp.sendRedirect(userService.createLoginURL(getFullRequestUrl(req))); return; } // Checking if we already have tokens for this user in store AccessTokenResponse accessTokenResponse = oauthTokenDao.getKeys(user.getEmail()); // If we don't have tokens for this user if (accessTokenResponse == null) { OAuthProperties oauthProperties = new OAuthProperties(); // Redirect to the Google OAuth 2.0 authorization endpoint resp.sendRedirect(new GoogleAuthorizationRequestUrl(oauthProperties.getClientId(), OAuthCodeCallbackHandlerServlet.getOAuthCodeCallbackHandlerUrl(req), oauthProperties .getScopesAsString()).build()); return; }// जवाब में उपयोगकर्ता के टास्क की सूचियों के टाइटल प्रिंट करना resp.setContentType("text/plain"); resp.getWriter().append("उपयोगकर्ता के लिए टास्क सूची के शीर्षक " + user.getEmail() + ":\n\n"); PrintTasksTitles(accessTokenResponse, resp.getr());} /** * Construct the request's URL without the parameter part. * * @param req the HttpRequest object * @return The constructed request's URL */ public static String getFullRequestUrl(HttpServletRequest req) { String scheme = req.getScheme() + "://"; String serverName = req.getServerName(); String serverPort = (req.getServerPort() == 80) ? "" : ":" + req.getServerPort(); String contextPath = req.getContextPath(); String servletPath = req.getServletPath(); String pathInfo = (req.getPathInfo() == null) ? "" : req.getPathInfo(); String queryString = (req.getQueryString() == null) ? "" : "?" + req.getQueryString(); return scheme + serverName + serverPort + contextPath + servletPath + pathInfo + queryString; }Google टास्क की डिफ़ॉल्ट सूची लिखें. * * * @param accessTokenResponse, OAuth 2.0 AccessTokenResponse ऑब्जेक्ट * जिसमें ऐक्सेस टोकन और रीफ़्रेश टोकन होता है. * @param आउटपुट स्ट्रीम राइटर को आउटपुट करता है, जहां टास्क की सूचियों के टाइटल को रिस्टार्ट करना होता है * @return, डिफ़ॉल्ट टास्क सूची में मौजूद उपयोगकर्ताओं के टास्क के टाइटल की सूची होती है. * @throws IOअपवाद */ Public void प्रिंटTasksTitles(AccessTokenResponse accessTokenResponse, Writer checkout) IOअपवाद { // Tasks सेवा को शुरू करना HttpTransport ट्रांसपोर्ट = नया, जैकसनPrintTasksTitlesServlet.java फ़ाइलउपयोगकर्ता को उसके टास्क दिखेंगे:
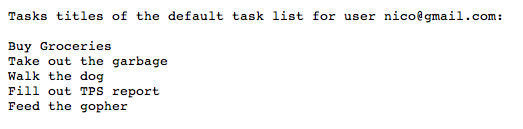 उपयोगकर्ता के टास्क
ऐप्लिकेशन का नमूना
इस सैंपल ऐप्लिकेशन का कोड यहां डाउनलोड किया जा सकता है. बेझिझक इसे देखें.