このガイドでは、Android 向け Google タグ マネージャー SDK を使ってユニバーサル アナリティクスの拡張 e コマース機能を実装する方法について説明します。
概要
Google アナリティクスの拡張 e コマースでは、Google アナリティクスのスクリーンビューやイベントとともに、商品のインプレッション、プロモーション、販売に関するデータを送信できます。
始める前に
実装の計画を立てる際は、Google アナリティクス拡張 e コマースのデベロッパー ガイド(ウェブ)の拡張 e コマースデータの種類と操作を参照することをおすすめします。このガイドでは、測定する各 e コマース インタラクションの必須フィールドと省略可能なフィールドについて説明します。
実装
以下のセクションでは、データレイヤーを使用して、以下の拡張 e コマース アクティビティを測定する方法を説明します。
商品インプレッションを測定する
- e コマース測定:
impressions - 使用可能データ:
impressionFieldObjectsの配列
商品のインプレッションを測定するには、impression アクションと 1 つ以上の impressionFieldObjects を使用します。次の例では、画面が表示された時点で商品の詳細がわかっていることを前提とします。
// Product impressions are sent by pushing an impressions object
// containing one or more impressionFieldObjects.
dataLayer.push("ecommerce",
    DataLayer.mapOf(
        "currencyCode", "EUR",                                  // Local currency is optional.
        "impressions", DataLayer.listOf(
            DataLayer.mapOf(
                "name", "Triblend Android T-Shirt",             // Name or ID is required.
                "id", "12345",
                "price", "15.25",
                "brand", "Google",
                "category", "Apparel",
                "variant", "Gray",
                "list", "Search Results",
                "position", 1),
            DataLayer.mapOf(
                "name", "Donut Friday Scented T-Shirt",
                "id", "67890",
                "price", "33.75",
                "brand", "Google",
                "category", "Apparel",
                "variant", "Black",
                "list", "Search Results",
                "position", 2))));
商品のクリック/選択を測定する
- e コマース測定:
click - 使用可能データ:
list、productFieldObjectsの配列
商品の選択を測定するには、選択された商品を表す productFieldObject とともに、click アクションをデータレイヤーにプッシュします。
dataLayer.pushEvent("productClick",
    DataLayer.mapOf(
        "ecommerce", DataLayer.mapOf(
            "click", DataLayer.mapOf(
                "actionField", DataLayer.mapOf(
                    "list", "Search Results"),                    // Optional list property.
                "products", DataLayer.listOf(
                    DataLayer.mapOf(
                        "name", "Triblend Android T-Shirt",       // Name or ID is required.
                        "id", "12345",
                        "price", "15.25",
                        "brand", "Google",
                        "category", "Apparel",
                        "variant", "Gray"))))));
商品の詳細の表示を測定する
- e コマース測定:
detail - 使用可能データ:
list、productFieldObjectsの配列
商品の詳細の表示を測定するには、表示されている商品を表す 1 つ以上の productFieldObjects とともに、detail アクションをデータレイヤーにプッシュします。
// Measure a view of product details.
dataLayer.push("ecommerce",
    DataLayer.mapOf(
        "detail", DataLayer.mapOf(
            "actionField", DataLayer.mapOf(
                "list", "Apparel Gallery"),               // detail actions have an optional list property.
            "products", DataLayer.listOf(
                DataLayer.mapOf(
                    "name", "Triblend Android T-Shirt",   // Name or ID is required.
                    "id", "12345",
                    "price", "15.25",
                    "brand", "Google",
                    "category", "Apparel",
                    "variant", "Gray")))));
ショッピング カートへの追加またはショッピング カートからの削除を測定する
- e コマース測定:
add、remove - 使用可能データ:
list、productFieldObjectsの配列
ショッピング カートへの追加またはショッピング カートからの削除を測定するには、次のように add または remove actionFieldObject と productFieldObjects のリストを使用します。
ショッピング カートに商品を追加する
// Measure adding a product to a shopping cart by using an "add"
// actionFieldObject and a list of productFieldObjects.
dataLayer.pushEvent("addToCart",
    DataLayer.mapOf(
        "ecommerce", DataLayer.mapOf(
            "currencyCode", "EUR",
            "add", DataLayer.mapOf(                             // 'add' actionFieldObject measures.
                "products", DataLayer.listOf(
                    DataLayer.mapOf(
                        "name", "Triblend Android T-Shirt",
                        "id", "12345",
                        "price", "15.25",
                        "brand", "Google",
                        "category", "Apparel",
                        "variant", "Gray",
                        "quantity", 1))))));
ショッピング カートから商品を削除する
// Measure the removal of a product from a shopping cart.
dataLayer.pushEvent("removeFromCart",
    DataLayer.mapOf(
        "ecommerce", DataLayer.mapOf(
            "remove", DataLayer.mapOf(                      // 'remove' actionFieldObject measures.
                "products", DataLayer.listOf(
                    DataLayer.mapOf(
                        "name", "Triblend Android T-Shirt",
                        "id", "12345",
                        "price", "15.25",
                        "brand", "Google",
                        "category", "Apparel",
                        "variant", "Gray",
                        "quantity", 1))))));
プロモーションを測定する
内部アプリ プロモーションのインプレッションと選択項目の両方を測定できます。たとえば、特定の商品群のセールを宣伝するためにアプリに表示されるバナーや、送料無料の特典などです。
プロモーションのインプレッションを測定する
- e コマース測定:
promoView - 使用可能データ:
promoFieldObjectsの配列
プロモーションのインプレッションを測定するには、e コマース データレイヤの promoView キーを、画面に表示されるプロモーションを記述する promoFieldObject に設定します。
// An example of measuring promotion views. This example assumes that
// information about the promotions displayed is available when the screen is
// displayed.
dataLayer.push("ecommerce",
    DataLayer.mapOf(
        "promoView", DataLayer.mapOf(
            "promotions", DataLayer.listOf(         // List of promoFieldObjects.
                DataLayer.mapOf(
                    "id", "JUNE_PROMO13",           // ID or Name is required.
                    "name", "June Sale",
                    "creative", "banner1",
                    "position", "slot1"),
                DataLayer.mapOf(
                    "id", "FREE_SHIP13",
                    "name", "Free Shipping Promo",
                    "creative", "skyscraper1",
                    "position", "slot2")))));
プロモーションのクリック/選択を測定する
プロモーションの選択を測定するには、選択したプロモーションを表す promoFieldObject を含む配列を使用して、promoClick アクションをデータレイヤーにプッシュします。
dataLayer.pushEvent("promotionClick",
    DataLayer.mapOf(
        "ecommerce", DataLayer.mapOf(
            "promoClick", DataLayer.mapOf(
                "promotions", DataLayer.listOf(
                    DataLayer.mapOf(
                        "id", "JUNE_PROMO13",          // Name or ID is required.
                        "name", "June Sale",
                        "creative", "banner1",
                        "position", "slot1"))))));
決済を測定する
決済プロセスの各ステップを測定する手順は次のとおりです。
checkoutアクションを使用して、決済プロセスの各ステップを測定します。- 必要に応じて、
checkout_optionアクションを使用して決済オプションを測定します。 - (省略可)管理画面の [アナリティクス設定] にある [e コマースの設定] で、決済の目標到達プロセス レポートに表示するわかりやすいステップ名を設定します。
1. 決済ステップを測定する
- e コマース測定:
checkout - 使用可能データ:
step、productFieldObjectsの配列
購入手続き(購入手続きボタンと、ユーザーが送料や支払い情報を入力する 1 つ以上の購入手続き画面を含む)を測定するには、checkout アクションと step フィールドを使用して、購入手続きのどの段階が測定されているかを示します。option フィールドを使用して、ユーザーが選択したお支払い方法など、決済プロセスに関する追加データを指定することもできます。
dataLayer.pushEvent("checkout",
    DataLayer.mapOf(
        "ecommerce", DataLayer.mapOf(
            "checkout", DataLayer.mapOf(
                "actionField", DataLayer.mapOf(
                    "step", 1,
                    "option", "Visa"),
                "products", DataLayer.listOf(
                    DataLayer.mapOf(
                        "name", "Triblend Android T-Shirt",
                        "id", "12345",
                        "price", "15.25",
                        "brand", "Google",
                        "category", "Apparel",
                        "variant", "Gray",
                        "quantity", 1))))));
2. 決済オプションを測定する
- e コマース測定:
checkout_option - 使用可能データ:
step、option
決済オプションを使用すると、決済ステップを測定した後で、そのステップに関する追加情報(たとえば、ユーザーが選択した配送方法の情報)を取得できます。
決済オプションを測定するには、checkout_option アクションを step および option フィールドとともに使用します。
dataLayer.pushEvent("checkoutOption",
    DataLayer.mapOf(
        "ecommerce", DataLayer.mapOf(
            "checkout_option", DataLayer.mapOf(
                "products", DataLayer.listOf(),     // checkout_option expects a list of products. The workaround is to provide an empty list.
                "actionField", DataLayer.mapOf(
                    "step", 1,
                    "option", "Express")))));
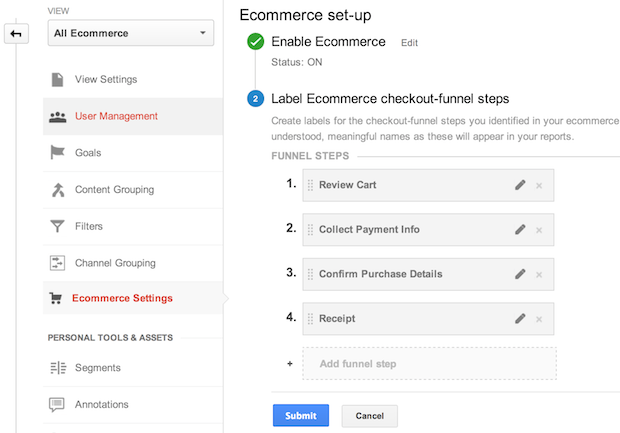
3. 決済目標到達プロセスの設定を行う
必要に応じて、決済プロセスのステップごとに、レポートで使用するわかりやすい名前を設定できます。こうした名前を設定するには、Google アナリティクスの管理画面の [アナリティクス設定] で対象のビュー(旧プロファイル)を選択して [e コマースの設定] をクリックします。表示される e コマースの設定手順に沿って、測定する個々の決済ステップに名前を設定します。
購入を測定する
- e コマース測定:
purchase - 利用可能:
id(トランザクション ID)、productFieldObjectsの配列
拡張 e コマース対応タグを配信する event とともに purchase アクションを使用して、トランザクションの詳細をデータレイヤーにプッシュします。この例では、画面が表示された時点で取引明細を確認できます。
// Send transaction data with a screenview if possible.
// Otherwise, use an event when the transaction data becomes available.
dataLayer.push("ecommerce",
    DataLayer.mapOf(
        "purchase", DataLayer.mapOf(
            "actionField", DataLayer.mapOf(
                "id", "T12345",                             // Transaction ID. Required for purchases and refunds.
                "affiliation", "Online Store",
                "revenue", "35.43",                         // Total transaction value (incl. tax and shipping)
                "tax", "4.90",
                "shipping", "5.99",
                "coupon", "SUMMER_SALE"),
            "products", DataLayer.listOf(                   // List of productFieldObjects.
                DataLayer.mapOf(
                    "name", "Triblend Android T-Shirt",     // Name or ID is required.
                    "id", "12345",
                    "price", "15.25",
                    "brand", "Google",
                    "category", "Apparel",
                    "variant", "Gray",
                    "quantity", 1,
                    "coupon", ""),                          // Optional fields may be omitted or set to empty string.
                DataLayer.mapOf(
                    "name", "Donut Friday Scented T-Shirt",
                    "id", "67890",
                    "price", "33.75",
                    "brand", "Google",
                    "category", "Apparel",
                    "variant", "Black",
                    "quantity", 1)))));
払い戻しの測定
- e コマース測定:
refund - 利用可能:
id(トランザクション ID)、productFieldObjectsの配列
トランザクションの全額払い戻しを測定するには、払い戻し対象のトランザクションのトランザクション ID とともに refund actionFieldObject をプッシュします。
// Refund an entire transaction by providing the transaction ID. This example
// assumes the details of the completed refund are available when the screen
// is displayed.
dataLayer.push("ecommerce",
    DataLayer.mapOf(
        "refund", DataLayer.mapOf(
            "products", DataLayer.listOf(),     // refund expects a list of products. The workaround is to provide an empty list.
            "actionField", DataLayer.mapOf(
                "id", "T12345"))));             // Transaction ID. Required for refunds.
一部払い戻しを測定するには、払い戻し対象の商品 ID と数量を含む productFieldObjects のリストを追加します。
// Measure a partial refund by providing an array of productFieldObjects and
// specifying the ID and quantity of each product being returned. This example
// assumes the partial refund details are known at the time the screen is
// displayed:
dataLayer.push("ecommerce",
    DataLayer.mapOf(
        "refund", DataLayer.mapOf(
            "products", DataLayer.listOf(
                DataLayer.mapOf(
                    "id", "P4567",
                    "quantity", 1),                 // Product ID & quantity. Required for partial refunds.
                DataLayer.mapOf(
                    "id", "P8901",
                    "quantity", 2)),
            "actionField", DataLayer.mapOf(
                "id", "T12345"))));                 // Transaction ID.
インプレッションとアクションの併合
商品のインプレッションとアクションの両方が発生する場面では、1 回のヒットで 2 つをまとめて測定することが可能です。
次のサンプルコードは、商品の詳細を表示するアクションを、関連商品セクションの商品インプレッションとともに測定する方法を示しています。
dataLayer.push("ecommerce",
    DataLayer.mapOf(
        "impressions", DataLayer.listOf(
            DataLayer.mapOf(
                "name", "Triblend Android T-Shirt",       // Name or ID is required.
                "id", "12345",
                "price", "15.25",
                "brand", "Google",
                "category", "Apparel",
                "variant", "Gray",
                "list", "Related Products",
                "position", 1),
            DataLayer.mapOf(
                "name", "Donut Friday Scented T-Shirt",
                "id", "67890",
                "price", "33.75",
                "brand", "Google",
                "category", "Apparel",
                "variant", "Black",
                "list", "Related Products",
                "position", 2)),
        "detail", DataLayer.mapOf(
            "actionField", DataLayer.mapOf(
                "list", "Apparel Gallery"),              // 'detail' actions have an optional list property.
            "products", DataLayer.listOf(
                DataLayer.mapOf(
                    "name", "Triblend Android T-Shirt",   // Name or ID is required.
                    "id", "12345",
                    "price", "15.25",
                    "brand", "Google",
                    "category", "Apparel",
                    "variant", "Gray")))));