This guide describes how to implement Universal Analytics Enhanced Ecommerce features using the Google Tag Manager SDK for Android.
Overview
Google Analytics Enhanced Ecommerce enables product impression, promotion, and sales data to be sent with any of your Google Analytics screenviews and events.
Before you Begin
We recommend reviewing the Enhanced Ecommerce Data Types and Actions section of the Google Analytics Enhanced Ecommerce Dev Guide (Web) to help you plan your implementation. The guide will help you understand which fields are required and optional for each of the ecommerce interactions you want to measure.
Implementation
The following sections will show you how to use the data layer to measure the following enhanced ecommerce activities:
- Product Impressions
- Product Clicks/Selections
- Product Detail Impressions
- Add / Remove from Cart
- Promotion Impressions
- Promotion Clicks/Selections
- Checkout
- Purchases
- Refunds
Measuring Product Impressions
- Ecommerce Measurement:
impressions - Accepts Data: array of
impressionFieldObjects
Measure product impressions by using the impression action and
one or more impressionFieldObjects. The following example assumes
details about the products displayed are known at the time the screen is
displayed:
// Product impressions are sent by pushing an impressions object
// containing one or more impressionFieldObjects.
dataLayer.push("ecommerce",
    DataLayer.mapOf(
        "currencyCode", "EUR",                                  // Local currency is optional.
        "impressions", DataLayer.listOf(
            DataLayer.mapOf(
                "name", "Triblend Android T-Shirt",             // Name or ID is required.
                "id", "12345",
                "price", "15.25",
                "brand", "Google",
                "category", "Apparel",
                "variant", "Gray",
                "list", "Search Results",
                "position", 1),
            DataLayer.mapOf(
                "name", "Donut Friday Scented T-Shirt",
                "id", "67890",
                "price", "33.75",
                "brand", "Google",
                "category", "Apparel",
                "variant", "Black",
                "list", "Search Results",
                "position", 2))));
Measuring Product Clicks/Selections
- Ecommerce Measurement:
click - Accepts Data:
list, array ofproductFieldObjects
Measure product selections by pushing a click action to the data
layer, along with a productFieldObject to represent the selected
product:
dataLayer.pushEvent("productClick",
    DataLayer.mapOf(
        "ecommerce", DataLayer.mapOf(
            "click", DataLayer.mapOf(
                "actionField", DataLayer.mapOf(
                    "list", "Search Results"),                    // Optional list property.
                "products", DataLayer.listOf(
                    DataLayer.mapOf(
                        "name", "Triblend Android T-Shirt",       // Name or ID is required.
                        "id", "12345",
                        "price", "15.25",
                        "brand", "Google",
                        "category", "Apparel",
                        "variant", "Gray"))))));
Measuring Views of Product Details
- Ecommerce Measurement:
detail - Accepts Data:
list, array ofproductFieldObjects
Measure a view of product details by pushing a detail action to
the data layer, along with one or more productFieldObjects
representing the products being viewed:
// Measure a view of product details.
dataLayer.push("ecommerce",
    DataLayer.mapOf(
        "detail", DataLayer.mapOf(
            "actionField", DataLayer.mapOf(
                "list", "Apparel Gallery"),               // detail actions have an optional list property.
            "products", DataLayer.listOf(
                DataLayer.mapOf(
                    "name", "Triblend Android T-Shirt",   // Name or ID is required.
                    "id", "12345",
                    "price", "15.25",
                    "brand", "Google",
                    "category", "Apparel",
                    "variant", "Gray")))));
Measuring Additions or Removals from a Shopping Cart
- Ecommerce Measurement:
add,remove - Accepts Data:
list, array ofproductFieldObjects
Measure additions or removals from a shopping cart using
an add or remove actionFieldObject and
a list of productFieldObjects:
Adding a Product to a Shopping Cart
// Measure adding a product to a shopping cart by using an "add"
// actionFieldObject and a list of productFieldObjects.
dataLayer.pushEvent("addToCart",
    DataLayer.mapOf(
        "ecommerce", DataLayer.mapOf(
            "currencyCode", "EUR",
            "add", DataLayer.mapOf(                             // 'add' actionFieldObject measures.
                "products", DataLayer.listOf(
                    DataLayer.mapOf(
                        "name", "Triblend Android T-Shirt",
                        "id", "12345",
                        "price", "15.25",
                        "brand", "Google",
                        "category", "Apparel",
                        "variant", "Gray",
                        "quantity", 1))))));
Removing a Product from a Shopping Cart
// Measure the removal of a product from a shopping cart.
dataLayer.pushEvent("removeFromCart",
    DataLayer.mapOf(
        "ecommerce", DataLayer.mapOf(
            "remove", DataLayer.mapOf(                      // 'remove' actionFieldObject measures.
                "products", DataLayer.listOf(
                    DataLayer.mapOf(
                        "name", "Triblend Android T-Shirt",
                        "id", "12345",
                        "price", "15.25",
                        "brand", "Google",
                        "category", "Apparel",
                        "variant", "Gray",
                        "quantity", 1))))));
Measuring Promotions
You can measure both impressions and selections on internal app promotions, such as banners displayed in the app to advertise a sale on a particular subset of products, or an offer for free shipping.
Measuring Promotion Impressions
- Ecommerce Measurement:
promoView - Accepts Data: array of
promoFieldObjects
To measure a promotion impression, set the promoView key in the
ecommerce data layer to a promoFieldObject that describes the
promotions displayed to users on the screen:
// An example of measuring promotion views. This example assumes that
// information about the promotions displayed is available when the screen is
// displayed.
dataLayer.push("ecommerce",
    DataLayer.mapOf(
        "promoView", DataLayer.mapOf(
            "promotions", DataLayer.listOf(         // List of promoFieldObjects.
                DataLayer.mapOf(
                    "id", "JUNE_PROMO13",           // ID or Name is required.
                    "name", "June Sale",
                    "creative", "banner1",
                    "position", "slot1"),
                DataLayer.mapOf(
                    "id", "FREE_SHIP13",
                    "name", "Free Shipping Promo",
                    "creative", "skyscraper1",
                    "position", "slot2")))));
Measuring Promotion Clicks/Selections
To measure a promotion selection, push the promoClick action to
the data layer with an array containing a promoFieldObject
describing the selected promotion:
dataLayer.pushEvent("promotionClick",
    DataLayer.mapOf(
        "ecommerce", DataLayer.mapOf(
            "promoClick", DataLayer.mapOf(
                "promotions", DataLayer.listOf(
                    DataLayer.mapOf(
                        "id", "JUNE_PROMO13",          // Name or ID is required.
                        "name", "June Sale",
                        "creative", "banner1",
                        "position", "slot1"))))));
Measuring a Checkout
To measure each step in a checkout process you need to:
- Measure each step of the checkout process using the
checkoutaction. - If applicable, measure checkout options using the
checkout_optionaction. - Optionally set user-friendly step names for the checkout funnel report by configuring Ecommerce Settings in the Admin section of the web interface.
1. Measuring Checkout Steps
- Ecommerce Measurement:
checkout - Accepts Data:
step, array ofproductFieldObjects
To measure the checkout process, which might include a checkout button and
one or more checkout screens where users enter shipping and payment
information, use the checkout action and the step
field to indicate which stage of the checkout process is being measured.
You can also use the option field to provide a piece of
additional data about the checkout process, such as the payment type that was
selected by the user.
dataLayer.pushEvent("checkout",
    DataLayer.mapOf(
        "ecommerce", DataLayer.mapOf(
            "checkout", DataLayer.mapOf(
                "actionField", DataLayer.mapOf(
                    "step", 1,
                    "option", "Visa"),
                "products", DataLayer.listOf(
                    DataLayer.mapOf(
                        "name", "Triblend Android T-Shirt",
                        "id", "12345",
                        "price", "15.25",
                        "brand", "Google",
                        "category", "Apparel",
                        "variant", "Gray",
                        "quantity", 1))))));
2. Measuring Checkout Options
- Ecommerce Measurement:
checkout_option - Accepts Data:
step,option
The checkout option is useful in cases where you've already measured a
checkout step but you want to capture additional information about the same
checkout step. For example, the shipping method selected by a user.
To measure this use the checkout_option action
along with the step and option fields.
dataLayer.pushEvent("checkoutOption",
    DataLayer.mapOf(
        "ecommerce", DataLayer.mapOf(
            "checkout_option", DataLayer.mapOf(
                "products", DataLayer.listOf(),     // checkout_option expects a list of products. The workaround is to provide an empty list.
                "actionField", DataLayer.mapOf(
                    "step", 1,
                    "option", "Express")))));
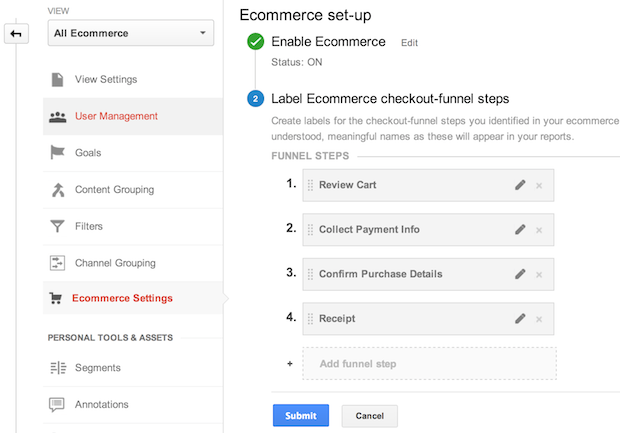
3. Checkout Funnel Configuration
Optionally, each step in your checkout process can be given a descriptive name that will be used in reports. To configure these names, visit the Admin section of the Google Analytics Web Interface, select the view (profile) and click on Ecommerce Settings. Follow the Ecommerce set-up instructions to label each checkout step you intend to track.
Measuring Purchases
- Ecommerce Measurement:
purchase - Accepts Data:
id(Transaction ID), array ofproductFieldObjects
Push your transaction details into the data layer using the
purchase action, along with an event that will fire
an enhanced ecommerce-enabled tag. In this example, the transaction details
are known at the time the screen is displayed:
// Send transaction data with a screenview if possible.
// Otherwise, use an event when the transaction data becomes available.
dataLayer.push("ecommerce",
    DataLayer.mapOf(
        "purchase", DataLayer.mapOf(
            "actionField", DataLayer.mapOf(
                "id", "T12345",                             // Transaction ID. Required for purchases and refunds.
                "affiliation", "Online Store",
                "revenue", "35.43",                         // Total transaction value (incl. tax and shipping)
                "tax", "4.90",
                "shipping", "5.99",
                "coupon", "SUMMER_SALE"),
            "products", DataLayer.listOf(                   // List of productFieldObjects.
                DataLayer.mapOf(
                    "name", "Triblend Android T-Shirt",     // Name or ID is required.
                    "id", "12345",
                    "price", "15.25",
                    "brand", "Google",
                    "category", "Apparel",
                    "variant", "Gray",
                    "quantity", 1,
                    "coupon", ""),                          // Optional fields may be omitted or set to empty string.
                DataLayer.mapOf(
                    "name", "Donut Friday Scented T-Shirt",
                    "id", "67890",
                    "price", "33.75",
                    "brand", "Google",
                    "category", "Apparel",
                    "variant", "Black",
                    "quantity", 1)))));
Measuring Refunds
- Ecommerce Measurement:
refund - Accepts Data:
id(Transaction ID), array ofproductFieldObjects
To measure a full refund of a transaction, push a
refund actionFieldObject along with the transaction
ID of the transaction being refunded:
// Refund an entire transaction by providing the transaction ID. This example
// assumes the details of the completed refund are available when the screen
// is displayed.
dataLayer.push("ecommerce",
    DataLayer.mapOf(
        "refund", DataLayer.mapOf(
            "products", DataLayer.listOf(),     // refund expects a list of products. The workaround is to provide an empty list.
            "actionField", DataLayer.mapOf(
                "id", "T12345"))));             // Transaction ID. Required for refunds.
To measure a partial refund, add a list of
productFieldObjects, including product IDs and quantities being
refunded:
// Measure a partial refund by providing an array of productFieldObjects and
// specifying the ID and quantity of each product being returned. This example
// assumes the partial refund details are known at the time the screen is
// displayed:
dataLayer.push("ecommerce",
    DataLayer.mapOf(
        "refund", DataLayer.mapOf(
            "products", DataLayer.listOf(
                DataLayer.mapOf(
                    "id", "P4567",
                    "quantity", 1),                 // Product ID & quantity. Required for partial refunds.
                DataLayer.mapOf(
                    "id", "P8901",
                    "quantity", 2)),
            "actionField", DataLayer.mapOf(
                "id", "T12345"))));                 // Transaction ID.
Combining Impressions and Actions
In cases where you have both product impressions and an action, it is possible to combine and measure this in a single hit.
The example below shows how to measure a product detail view with product impressions from a related products section:
dataLayer.push("ecommerce",
    DataLayer.mapOf(
        "impressions", DataLayer.listOf(
            DataLayer.mapOf(
                "name", "Triblend Android T-Shirt",       // Name or ID is required.
                "id", "12345",
                "price", "15.25",
                "brand", "Google",
                "category", "Apparel",
                "variant", "Gray",
                "list", "Related Products",
                "position", 1),
            DataLayer.mapOf(
                "name", "Donut Friday Scented T-Shirt",
                "id", "67890",
                "price", "33.75",
                "brand", "Google",
                "category", "Apparel",
                "variant", "Black",
                "list", "Related Products",
                "position", 2)),
        "detail", DataLayer.mapOf(
            "actionField", DataLayer.mapOf(
                "list", "Apparel Gallery"),              // 'detail' actions have an optional list property.
            "products", DataLayer.listOf(
                DataLayer.mapOf(
                    "name", "Triblend Android T-Shirt",   // Name or ID is required.
                    "id", "12345",
                    "price", "15.25",
                    "brand", "Google",
                    "category", "Apparel",
                    "variant", "Gray")))));