
1. Prerequisites
To perform this Codelab, a few prerequisites are required. Each requirement is marked accordingly whether it is required for "Local Testing" or "Aggregation Service".
1.1. Download the Local Testing Tool (Local Testing)
Local Testing will require the download of the Local Testing Tool. The tool will generate summary reports from the unencrypted debug reports.
Local Testing tool is available for download in the Lambda JAR Archives in Github. It should be named as LocalTestingTool_{version}.jar.
1.2. Ensure JAVA JRE is installed (Local Testing and Aggregation Service)
Open "Terminal" and use java --version to check if your machine has Java or openJDK installed.

If it is not installed, you can download and install from the Java site or the openJDK site.
1.3. Download Aggregatable Report Converter (Local Testing and Aggregation Service)
You can download a copy of the aggregatable report converter from the Privacy Sandbox Demos Github repository.
1.4. Enable Ad Privacy APIs (Local Testing and Aggregation Service)
On your browser, go to chrome://settings/adPrivacy and enable all the Ad Privacy APIs.
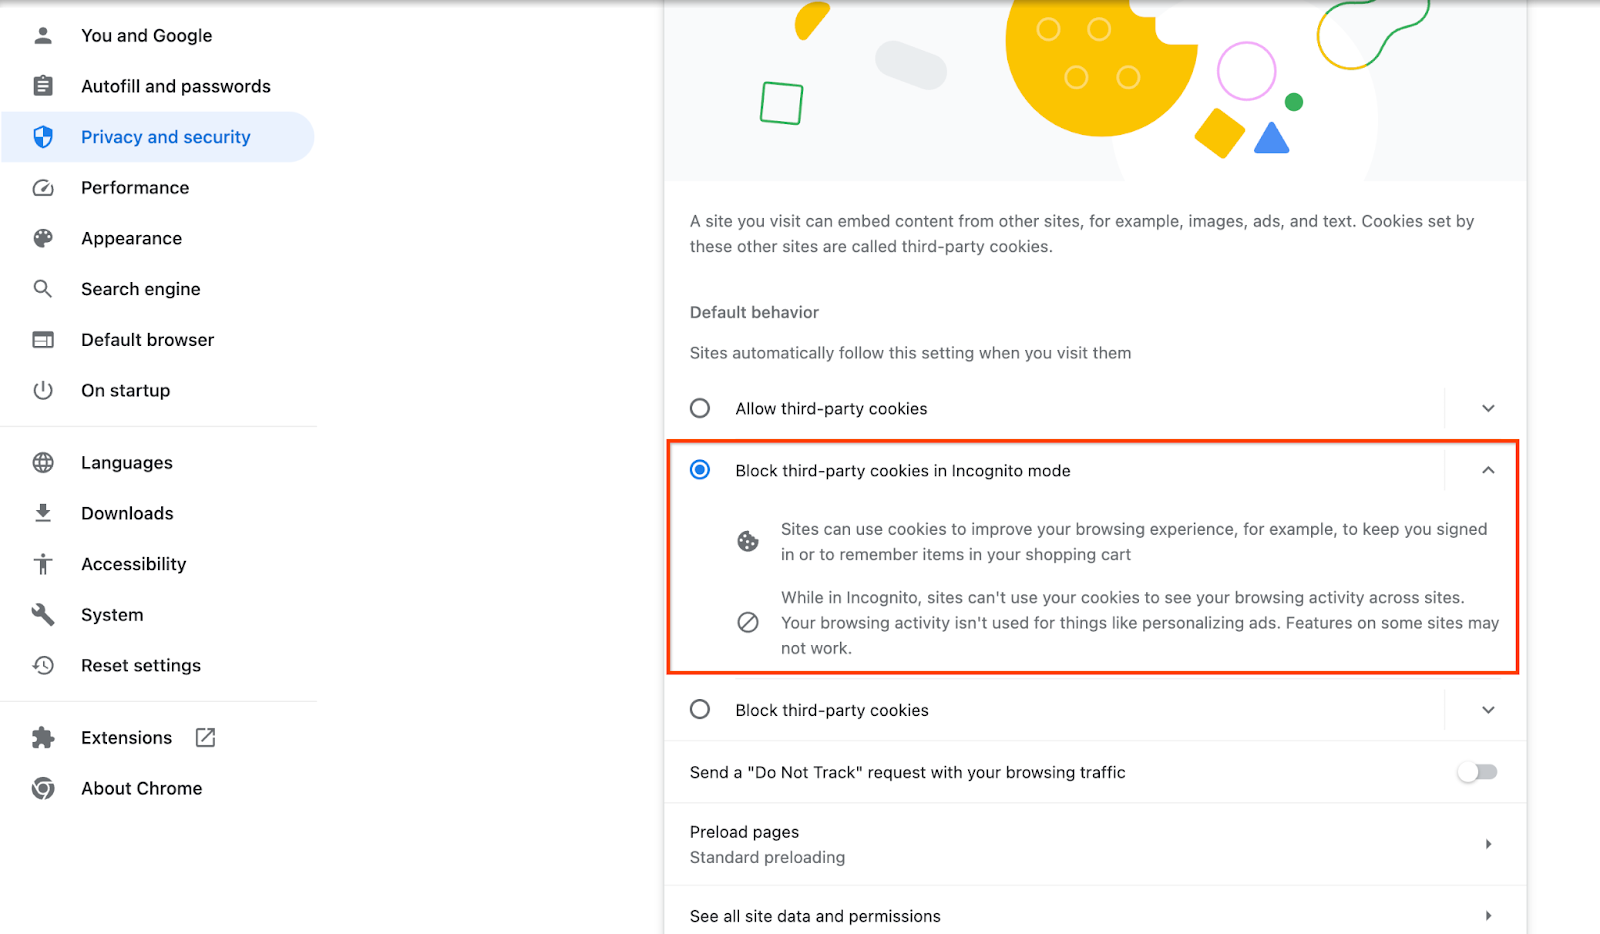
Ensure that third-party cookies are enabled.
On your browser, go to chrome://settings/cookies, and select "Block third-party cookies in Incognito mode".
1.5. Web and Android enrollment (Aggregation Service)
To use Privacy Sandbox APIs in a production environment, ensure that you have completed the enrollment and attestation for both Chrome and Android.
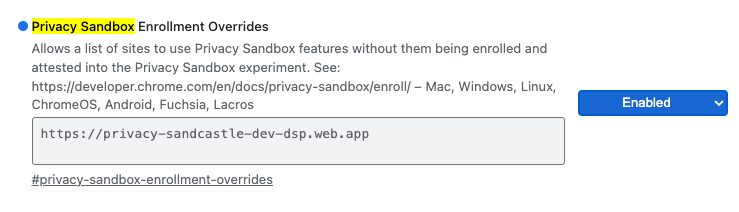
For local testing, enrollment can be disabled using a chrome flag and CLI switch.
To use the Chrome flag for our demo, go to chrome://flags/#privacy-sandbox-enrollment-overrides and update the override with your site or if you will be using our demo site, no update is required.
1.6. Aggregation Service onboarding (Aggregation Service)
Aggregation Service requires onboarding to coordinators to be able to use the service. Complete the Aggregation Service Onboarding form by providing your reporting site address, AWS Account ID, and other information.
1.7. Cloud provider (Aggregation Service)
Aggregation Service requires the use of a Trusted Execution Environment which uses a cloud environment. Aggregation service is supported on Amazon Web Services (AWS) and Google Cloud (GCP). This Codelab will only cover AWS integration.
AWS provides a Trusted Execution Environment called Nitro Enclaves. Ensure you have an AWS account and follow the AWS CLI installation and update instructions to setup your AWS CLI environment.
If your AWS CLI is new, you can configure your AWS CLI using the CLI Configuration instructions.
1.7.1. Create AWS S3 bucket
Create an AWS S3 Bucket to store Terraform state, and another S3 bucket to store your reports and summary reports. You can use the CLI command provided. Replace field in <> to proper variables.
aws s3api create-bucket --bucket <tf_bucket_name> --region us-east-1
aws s3api create-bucket --bucket <report_bucket_name> --region us-east-1
1.7.2. Create user access key
Create user access keys using the AWS guide. This will be used to call the createJob and getJob API endpoints created on AWS.
1.7.3. AWS user and group permissions
To deploy Aggregation Service on AWS, you will need to provide certain permissions to the user used for deploying the service. For this Codelab, ensure the user has Administrator Access to ensure full permissions in deployment.
1.8. Terraform (Aggregation Service)
This Codelab uses Terraform to deploy Aggregation Service. Ensure that the Terraform binary is installed into your local environment.
Download the Terraform binary into your local environment.
Once the Terraform binary is downloaded, extract the file and move the Terraform binary into /usr/local/bin.
cp <directory>/terraform /usr/local/bin
Check to make sure that Terraform is available on classpath.
terraform -v
1.9. Postman (For Aggregation Service AWS)
For this Codelab, use Postman for request management.
Create a workspace by going to "Workspaces" top navigation item and select "Create Workspace".
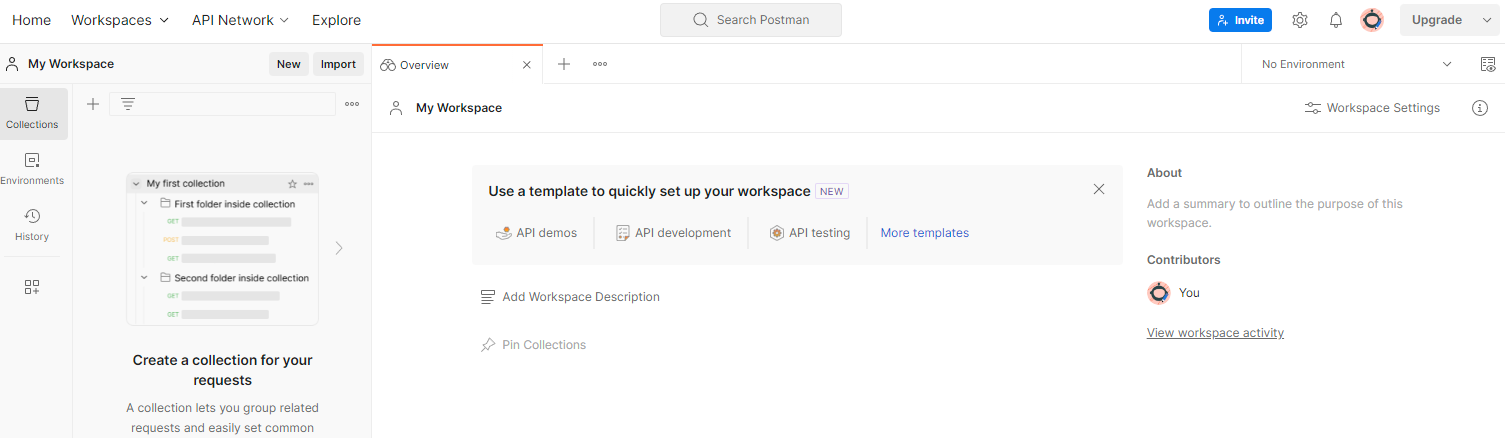
Select "Blank workspace", click next and name it "Privacy Sandbox". Select "Personal" and click "Create".
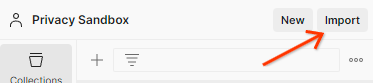
Download the pre-configured workspace JSON configuration and Global Environment files.
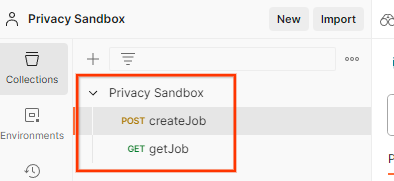
Import the JSON files into "My Workspace" using the "Import" button.
This will create the Privacy Sandbox collection for you along with the createJob and getJob HTTP requests.
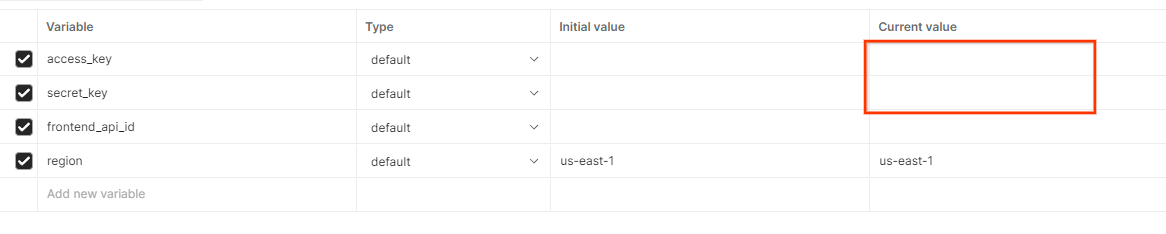
Update the AWS "Access Key" and "Secret Key" through "Environment quick look".
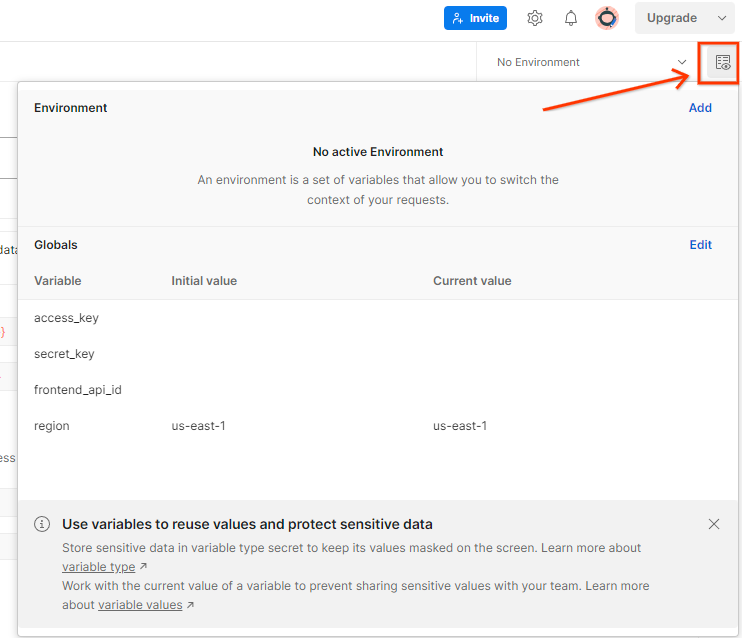
Click "Edit" and update the "Current Value" of both "access_key" and "secret_key". Note that frontend_api_id will be provided in section 3.1.4 of this document. And we do advise to use the us-east-1 region. However, if you would like to deploy in a different region, do ensure you copy the released AMI into your account or perform a self-build using provided scripts.

2. Local Testing Codelab
You can use the local testing tool on your machine to perform aggregation and generate summary reports using the unencrypted debug reports.
Codelab Steps
Step 2.1. Trigger report: Trigger Private Aggregation reporting to be able to collect the report.
Step 2.2. Create debug aggregatable report: Convert the collected JSON report to an AVRO formatted report.
This step will be similar to when ad techs collect the reports from the API reporting endpoints and convert the JSON reports to AVRO formatted reports.
Step 2.3. Parse the bucket key from the debug report: Bucket keys are designed by ad techs. In this codelab, since the buckets are predefined, retrieve the bucket keys as provided.
Step 2.4. Create the output domain AVRO: Once the bucket keys are retrieved, create the Output Domain AVRO file.
Step 2.5. Create summary reports using Local Testing Tool: Use the Local Testing Tool to be able to create Summary Reports in the Local Environment.
Step 2.6. Review the summary report: Review the Summary Report that is created by the Local Testing Tool.
2.1. Trigger report
Go to the privacy sandbox demo site. This triggers a private aggregation report. You can view the report at chrome://private-aggregation-internals.
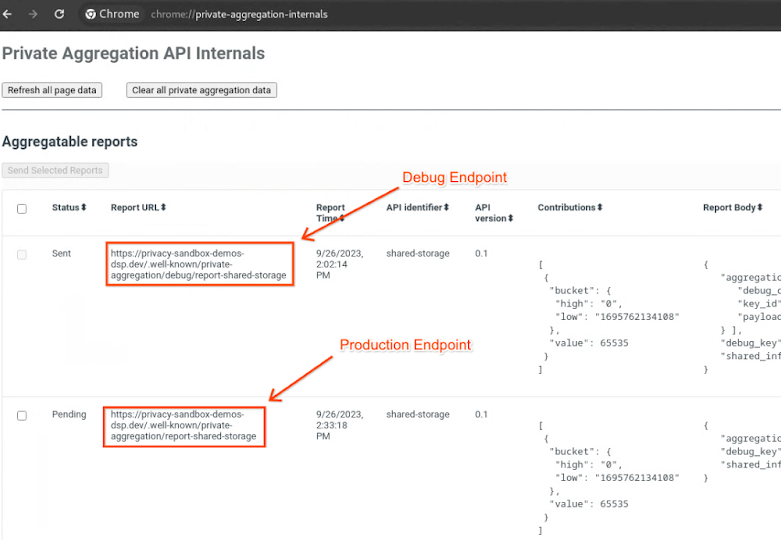
If your report is in "Pending" status, you can select the report and click "Send Selected Reports".

2.2. Create debug aggregatable report
In chrome://private-aggregation-internals, copy the "Report Body" received in the [reporting-origin]/.well-known/private-aggregation/report-shared-storage endpoint.
Make sure that in the "Report Body", the aggregation_coordinator_origin contains https://publickeyservice.msmt.aws.privacysandboxservices.com which means the report is an AWS aggregatable report.
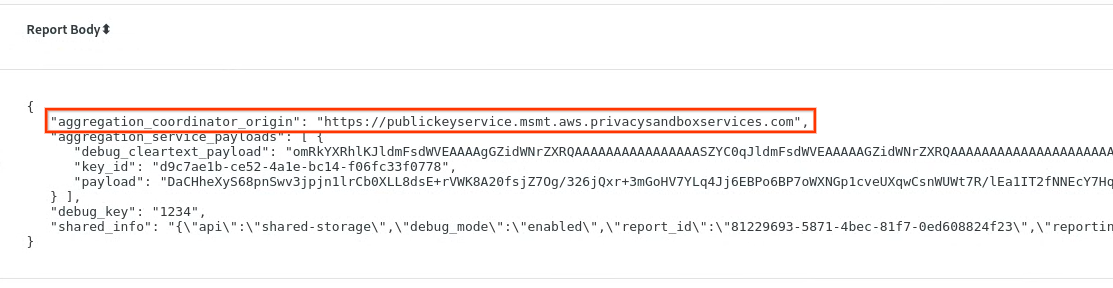
Place the JSON "Report Body" in a JSON file. In this example, you can use vim. But you can use any text editor you want.
vim report.json
Paste the report into report.json and save your file.

Once you have that, navigate to your report folder and use aggregatable_report_converter.jar to help create the debug aggregatable report. This creates an aggregatable report called report.avro in your current directory.
java -jar aggregatable_report_converter.jar \
 --request_type convertToAvro \
 --input_file report.json \
 --debug
2.3. Parse the bucket key from the debug report
Aggregation Service requires two files when batching. The aggregatable report and the output domain file. The output domain file contains the keys you would like to retrieve from the aggregatable reports. To create the output_domain.avro file, you need the bucket keys that can be retrieved from the reports.
Bucket keys are designed by the caller of the API, and the demo contains pre-constructed example bucket keys. Since the demo has enabled the debug mode for Private Aggregation, you can parse the debug cleartext payload from the "Report Body" to retrieve the bucket key.. However, in this case, the site privacy sandbox demo creates the bucket keys. Since private aggregation for this site is in debug mode, you can use the debug_cleartext_payload from the "Report Body" to get the bucket key.
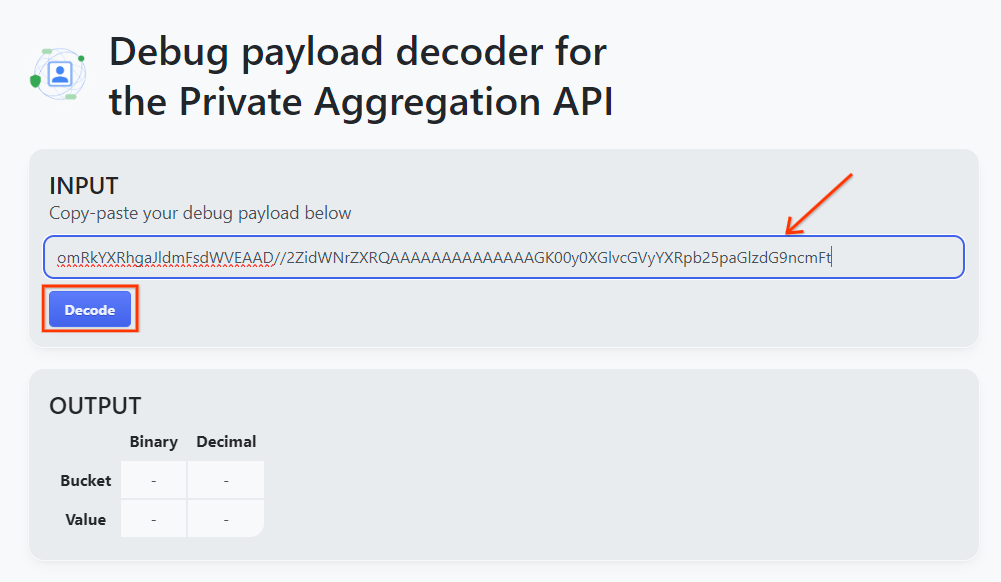
Copy the debug_cleartext_payload from the report body.

Open Debug payload decoder for Private Aggregation tool and paste your debug_cleartext_payloadin the "INPUT" box and click "Decode".
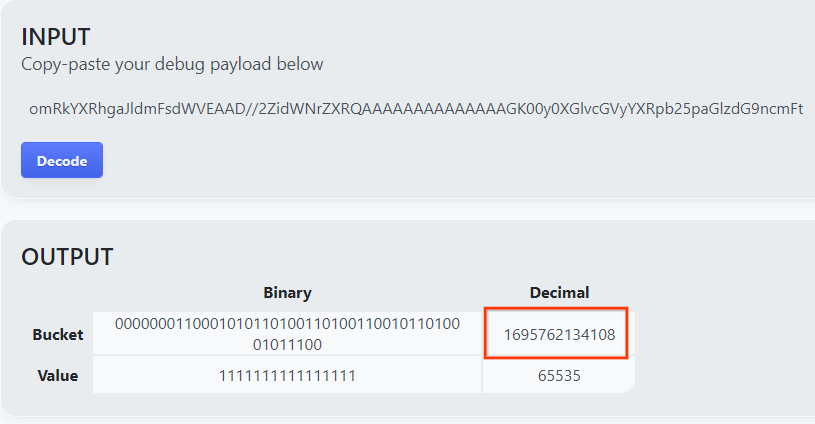
The page returns the decimal value of the bucket key. The following is a sample bucket key.
2.4. Create the output domain AVRO
Now that we have the bucket key, go ahead and copy the decimal value of the bucket key. Proceed to create the output_domain.avro using the bucket key. Ensure that you replace
java -jar aggregatable_report_converter.jar \
 --request_type createDomainAvro \
 --bucket_key <bucket key>
The script creates the output_domain.avro file in your current folder.
2.5. Create summary reports using Local Testing Tool
We'll use LocalTestingTool_{version}.jar that was downloaded in Section 1.1 to create the summary reports. Use the following command. You should replace LocalTestingTool_{version}.jar with the version downloaded for LocalTestingTool.
Run the following command to generate a summary report in your local development environment:
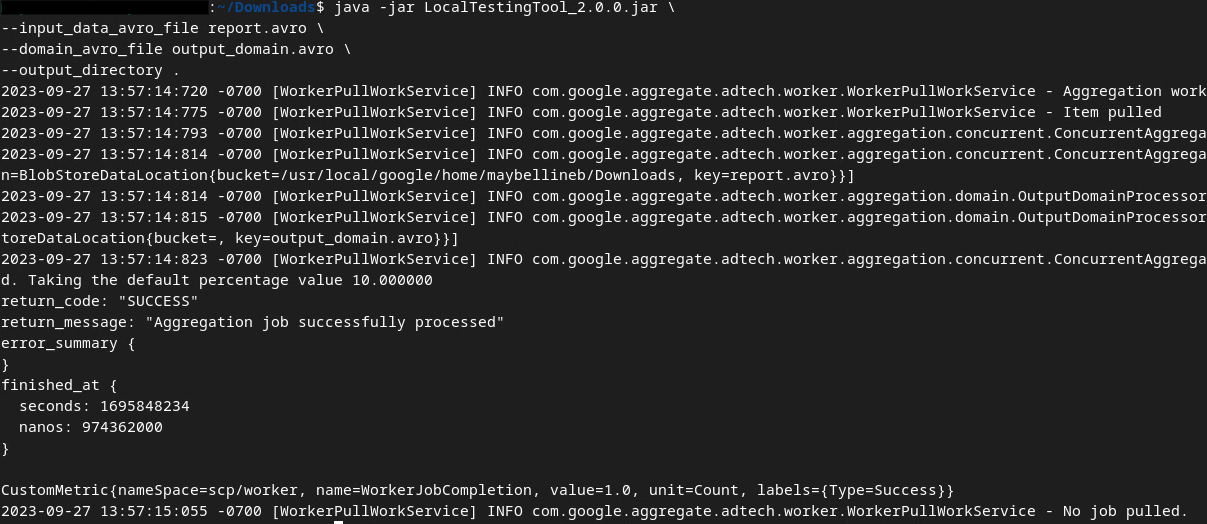
java -jar LocalTestingTool_{version}.jar \
--input_data_avro_file report.avro \
--domain_avro_file output_domain.avro \
--output_directory .
You should see something similar to the following image once the command is run. A report output.avro is created once this is completed.
2.6. Review the summary report
The summary report that is created is in AVRO format. To be able to read this, you need to convert this from AVRO to a JSON format. Ideally, ad tech should code to convert AVRO reports back to JSON.
For our Codelab, we'll use the provided aggregatable_report_converter.jar tool to convert the AVRO report back to JSON.
java -jar aggregatable_report_converter.jar \
--request_type convertToJson \
--input_file output.avro
This returns a report similar to the following image. Along with a report output.json created in the same directory.

Open the JSON file in an editor of your choice to review the summary report.
3. Aggregation Service deployment
To deploy Aggregation Service, use the following steps:
Step 3. Aggregation Service Deployment: Deploy Aggregation Service on AWS
Step 3.1. Clone the Aggregation Service Repository
Step 3.2. Download prebuilt dependencies
Step 3.3. Create a development environment
Step 3.4. Deploy Aggregation Service
3.1. Clone the Aggregation Service repository
In your local environment, clone the Aggregation Service Github repository.
git clone https://github.com/privacysandbox/aggregation-service.git
3.2. Download prebuilt dependencies
Once you've cloned the Aggregation Service repository, go to the repository's Terraform folder and to the corresponding cloud folder. If your cloud_provider is AWS, you can proceed to
cd <repository_root>/terraform/aws
In download_prebuilt_dependencies.sh.
bash download_prebuilt_dependencies.sh
3.3. Create a development environment
Create a dev environment in dev.
mkdir dev
Copy the demo folder contents into the dev folder.
cp -R demo/* dev
Move into your dev folder.
cd dev
Update your main.tf file and press i for input to edit the file.
vim main.tf
Uncomment the code in red box by removing the # and updating the bucket and key names.
For AWS main.tf:
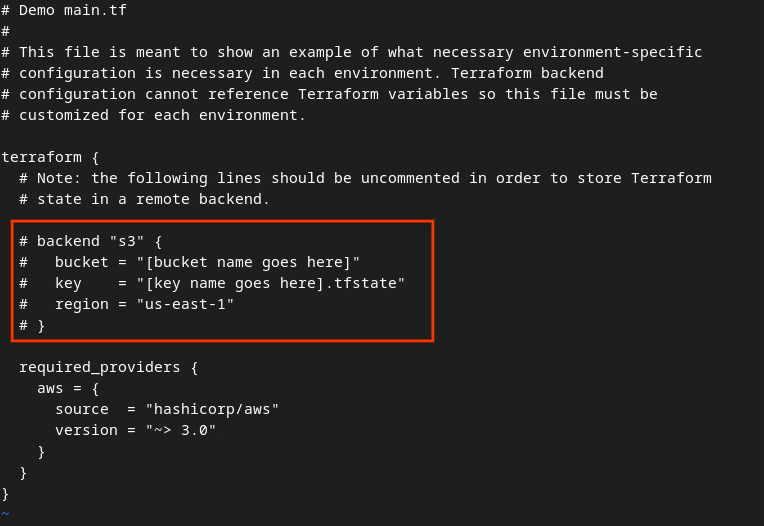
The uncommented code should look like the following.
backend "s3" {
  bucket = "<tf_state_bucket_name>"
  key    = "<environment_name>.tfstate"
  region = "us-east-1"
}
Once the updates are complete, save the updates and quit the editor by pressing esc -> :wq!. This saves the updates on main.tf.
Next, rename the example.auto.tfvars to dev.auto.tfvars.
mv example.auto.tfvars dev.auto.tfvars
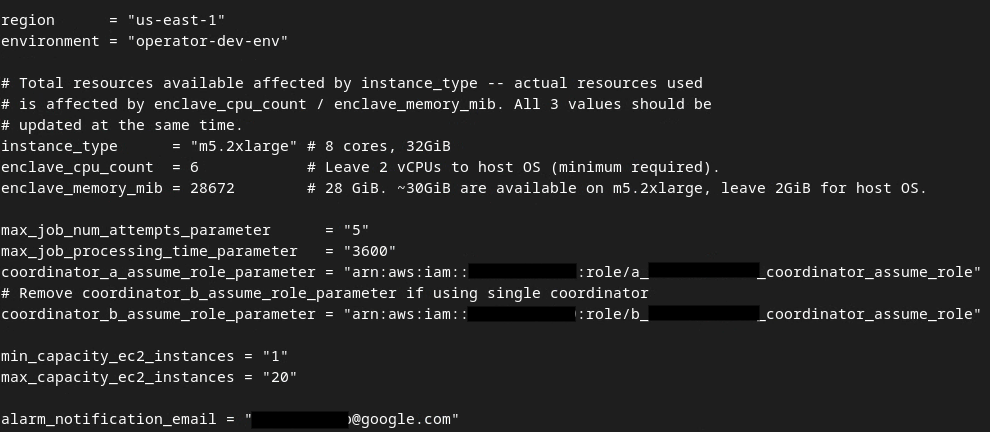
Update dev.auto.tfvars and press i for input to edit the file.
vim dev.auto.tfvars
Update the fields in the red box following image with the correct AWS ARN parameters that are provided during the Aggregation Service onboarding, environment and notification email.
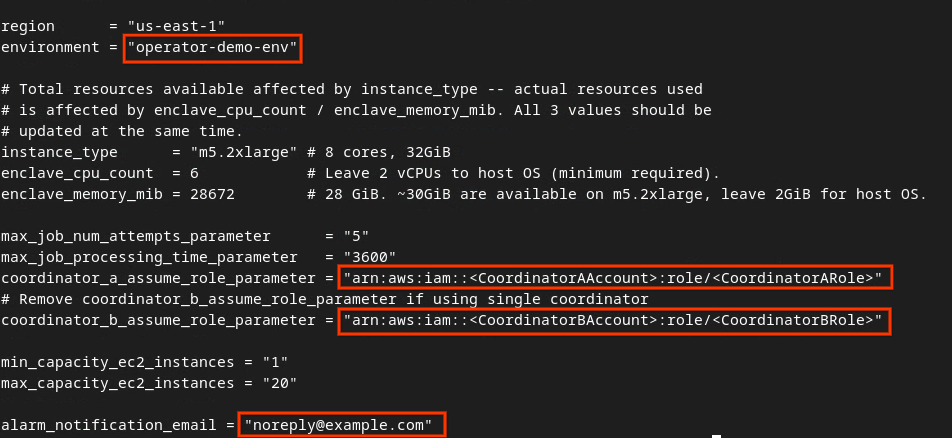
Once the updates are done, press esc -> :wq!. This saves the dev.auto.tfvars file and it should look something like the following image.
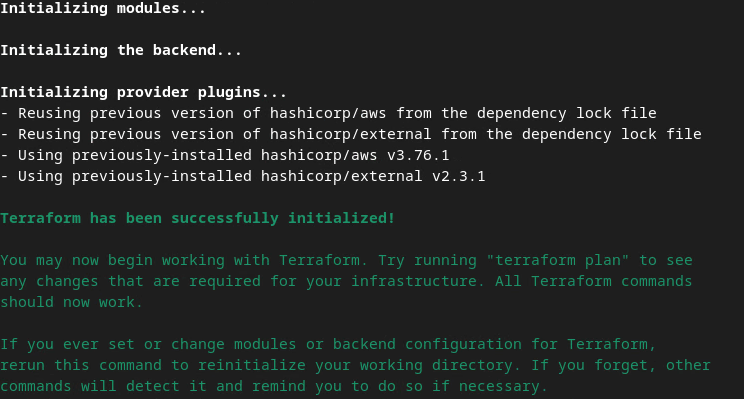
3.4. Deploy Aggregation Service
To deploy Aggregation Service, in the same folder
terraform init
This should return something similar to the following image:
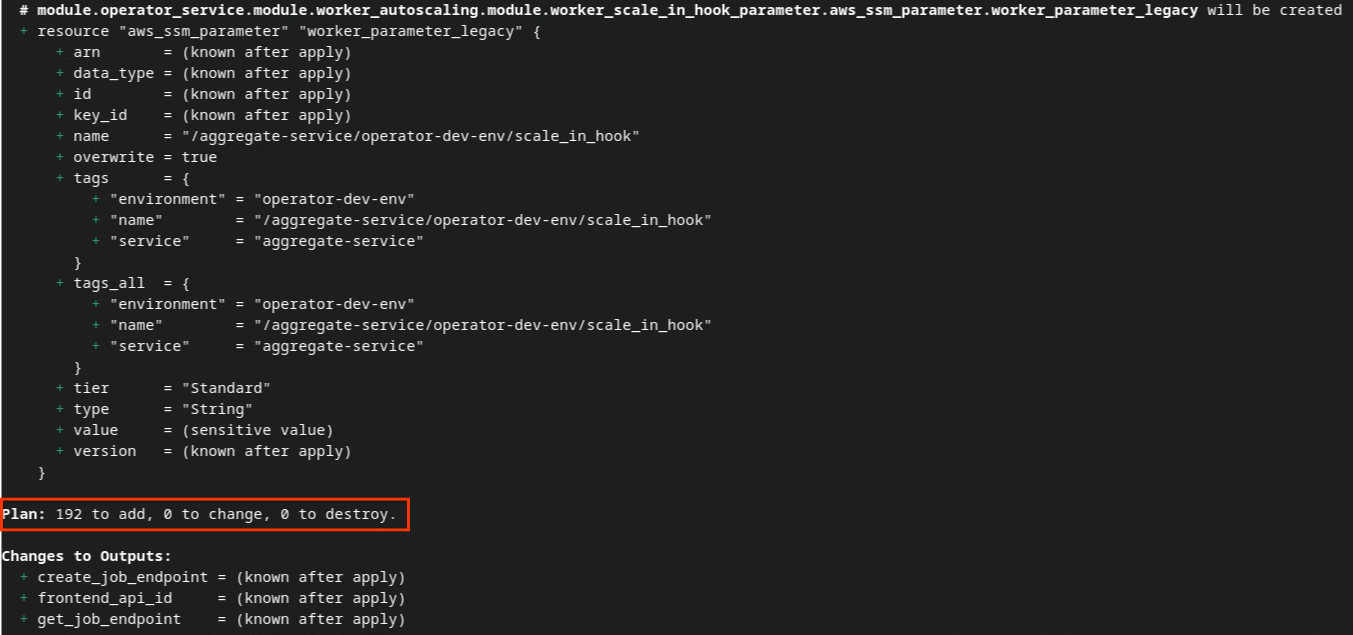
Once Terraform is initialized, create the Terraform execution plan. Where it returns the number of resources to be added and other additional information similar to the following image.
terraform plan
You can see in the following the "Plan" summary. If this is a fresh deployment, you should see the number of resources that will be added with 0 to change and 0 to destroy.
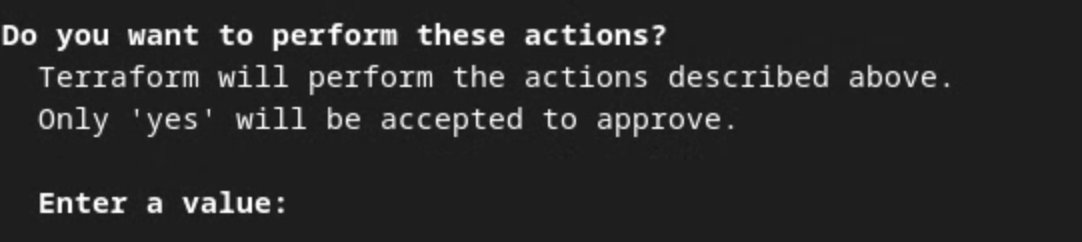
Once you complete this, you can then proceed to apply Terraform.
terraform apply
Once prompted to confirm on performing the actions by Terraform, input a yes into the value.
Once terraform apply finishes, the following endpoints for createJob and getJob are returned. The frontend_api_id that you need to update in Postman in section 1.9 is also returned.

4. Aggregation Service input creation
Proceed to create the AVRO reports for batching in Aggregation Service.
Step 4. Aggregation Service Input Creation: Create the Aggregation Service reports that are batched for Aggregation Service.
Step 4.1. Trigger Report
Step 4.2. Collect aggregatable reports
Step 4.3. Convert reports to AVRO
Step 4.4. Create the output domain AVRO
4.1. Trigger report
Go to the Privacy Sandbox demo site. This triggers a private aggregation report. You can view the report at chrome://private-aggregation-internals.
If your report is in "Pending" status, you can select the report and click "Send Selected Reports".
4.2. Collect aggregatable reports
Collect your aggregatable reports from the .well-known endpoints of your corresponding API.
- Private Aggregation
[reporting-origin] /.well-known/private-aggregation/report-shared-storage - Attribution Reporting - Summary Report
[reporting-origin] /.well-known/attribution-reporting/report-aggregate-attribution
For this Codelab, you will perform the report collection manually. In production, ad techs are expected to programmatically collect and convert the reports.
In chrome://private-aggregation-internals, copy the "Report Body" received in the [reporting-origin]/.well-known/private-aggregation/report-shared-storage endpoint.
Make sure that in the "Report Body", the aggregation_coordinator_origin contains https://publickeyservice.msmt.aws.privacysandboxservices.com which means the report is an AWS aggregatable report.
Place the JSON "Report Body" in a JSON file. In this example, you can use vim. But you can use any text editor you want.
vim report.json
Paste the report into report.json and save your file.
4.3. Convert reports to AVRO
Reports received from the .well-known endpoints are in JSON format and need to be converted into AVRO report format. Once you have the JSON report, navigate to your report folder and use aggregatable_report_converter.jar to help create the debug aggregatable report. This creates an aggregatable report called report.avro in your current directory.
java -jar aggregatable_report_converter.jar \
 --request_type convertToAvro \
 --input_file report.json
4.4. Create the output domain AVRO
To create the output_domain.avro file, you need the bucket keys that can be retrieved from the reports.
Bucket keys are designed by the ad tech. However, in this case, the site Privacy Sandbox demo creates the bucket keys. Since private aggregation for this site is in debug mode, you can use the debug_cleartext_payload from the "Report Body" to get the bucket key.
Go ahead and copy the debug_cleartext_payload from the report body.
Open goo.gle/ags-payload-decoder and paste your debug_cleartext_payloadin the "INPUT" box and click "Decode".
The page returns the decimal value of the bucket key. The following is a sample bucket key.
Now that we have the bucket key, go ahead and create the output_domain.avro. Ensure that you replace
java -jar aggregatable_report_converter.jar \
 --request_type createDomainAvro \
 --bucket_key <bucket key>
The script creates the output_domain.avro file in your current folder.
4.5. Move reports to AWS bucket
Once the AVRO reports (from section 3.2.3) and output domain (from section 3.2.4) are created, proceed to move the reports and output domain into the reporting S3 buckets.
Should you have the AWS CLI setup on your local environment, use the following commands to copy the reports to the corresponding S3 bucket and report folder.
aws s3 cp report.avro s3://<report_bucket_name>/<report_folder>/
aws s3 cp output_domain.avro s3://<report_bucket_name>/<output_domain_folder>/
5. Aggregation Service usage
From the terraform apply, you are returned the create_job_endpoint, get_job_endpoint and the frontend_api_id. Copy the frontend_api_id and place this into the postman global variable frontend_api_id that you setup in the prerequisite section 1.9.
Step 5. Aggregation Service Usage: Use the Aggregation Service API to create summary reports and review the summary reports.
Step 5.1. Using createJob Endpoint to batch
Step 5.2. Using getJob Endpoint to retrieve batch status
Step 5.3. Reviewing the Summary Report
5.1. Using createJob endpoint to batch
In Postman, open the "Privacy Sandbox" collection and select "createJob".
Select "Body" and select "raw" to place your request payload.
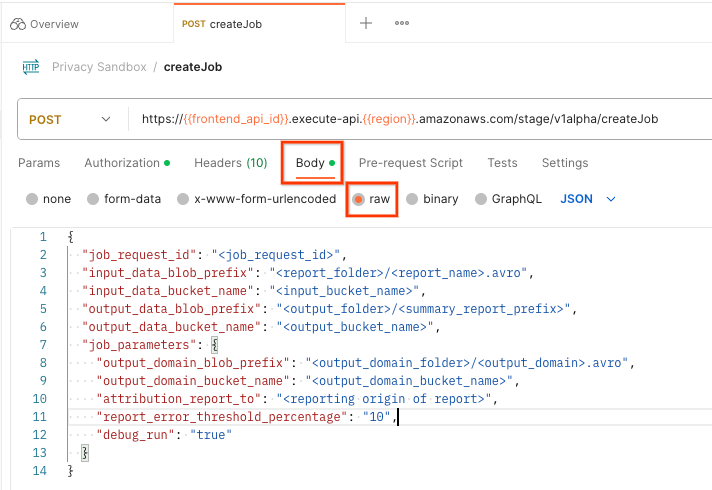
The createJob payload schema is available in github and looks similar to the following. Replace the <> with the appropriate fields.
{
  "job_request_id": "<job_request_id>",
  "input_data_blob_prefix": "<report_folder>/<report_name>.avro",
  "input_data_bucket_name": "<input_bucket_name>",
  "output_data_blob_prefix": "<output_folder>/<summary_report_prefix>",
  "output_data_bucket_name": "<output_bucket_name>",
  "job_parameters": {
    "output_domain_blob_prefix": "<output_domain_folder>/<output_domain>.avro",
    "output_domain_bucket_name": "<output_domain_bucket_name>",
    "attribution_report_to": "<reporting origin of report>",
    "report_error_threshold_percentage": "10",
    "debug_run": "true"
  }
}
Once you click "Send", this creates the job with the job_request_id. You should receive a HTTP 202 response once the request is accepted by the Aggregation Service. Other possible return code can be found in HTTP response codes

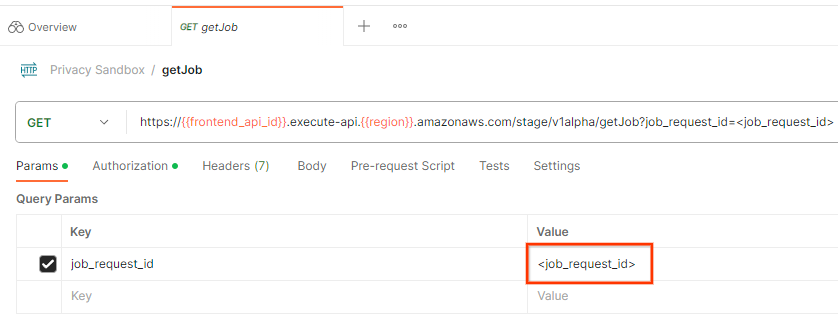
5.2. Using getJob Endpoint to retrieve batch status
To check the status of the job request, you can use the getJob endpoint. Select "getJob" in the "Privacy Sandbox" collection.
In the "Params", update the job_request_id value to the job_request_id that was sent in the createJob request.
The result of the getJob should return the status of your job request with a HTTP status of 200. The request "Body" contains the necessary information like job_status, return_message and error_messages (if the job has errored out).
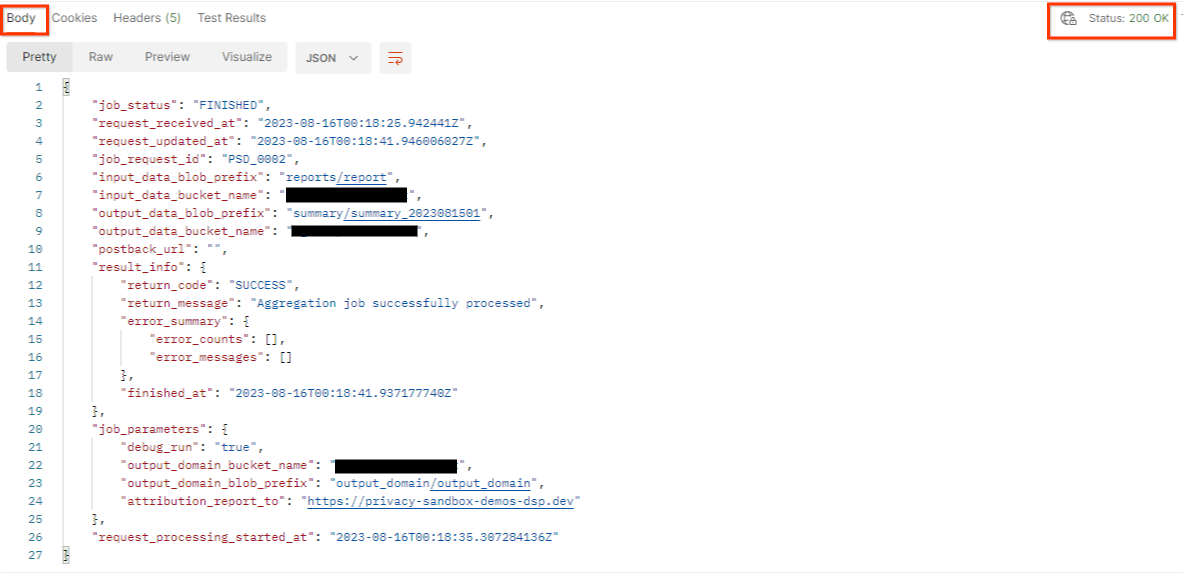
Since the generated demo report's reporting site is different from your onboarded site on your AWS ID, you may receive a response with PRIVACY_BUDGET_AUTHORIZATION_ERROR return_code. This is normal since the reports' reporting origin's site does not match the reporting site onboarded for the AWS ID.
{
    "job_status": "FINISHED",
    "request_received_at": "2023-12-07T22:50:58.830956Z",
    "request_updated_at": "2023-12-07T22:51:10.526326456Z",
    "job_request_id": "<job_request_id>",
    "input_data_blob_prefix": "<report_folder>/<report_name>.avro",
    "input_data_bucket_name": "<input_bucket_name>",
    "output_data_blob_prefix": "<output_folder>/<summary_report_prefix>",
    "output_data_bucket_name": "<output_bucket_name>",
    "postback_url": "",
    "result_info": {
        "return_code": "PRIVACY_BUDGET_AUTHORIZATION_ERROR",
        "return_message": "Aggregation job successfully processed",
        "error_summary": {
            "error_counts": [],
            "error_messages": []
        },
        "finished_at": "2023-12-07T22:51:10.517730898Z"
    },
    "job_parameters": {
        "debug_run": "true",
        "output_domain_bucket_name": "<output_domain_bucket_name>",
        "output_domain_blob_prefix": "<output_domain_folder>/<output_domain>.avro",
        "attribution_report_to": "https://privacy-sandbox-demos-dsp.dev"
    },
    "request_processing_started_at": "2023-12-07T22:51:06.034472697Z"
}
5.3. Reviewing the Summary Report
Once you receive your summary report in your output S3 Bucket, you can download this to your local environment. Summary reports are in AVRO format and can be converted back to a JSON. You can use aggregatable_report_converter.jar to read your report using the following command.
java -jar aggregatable_report_converter.jar \
--request_type convertToJson \
--input_file <summary_report_avro>
This returns a JSON of aggregated values of each bucket key that looks similar to the following image.

Should your createJob request include debug_run as true, then you can receive your summary report in the debug folder that is located in the output_data_blob_prefix. The report is in AVRO format and can be converted using the previous command to a JSON.
The report contains the bucket key, unnoised metric and the noise that is added to the unnoised metric to form the summary report. The report is similar to the following image.

The annotations also contain in_reports and in_domain which means:
- in_reports - the bucket key is available inside the aggregatable reports.
- in_domain - the bucket key is available inside the output_domain AVRO file.