本文档概述了如何将 Outline SDK 集成到移动应用中,并重点讲解如何使用 MobileProxy 库简化本地代理管理。
MobileProxy 是一个基于 Go 的库,旨在简化将代理服务器功能集成到移动应用中的流程。该库利用 Go Mobile 生成移动端库,让您能够配置应用的网络库,将流量通过本地代理进行传输。
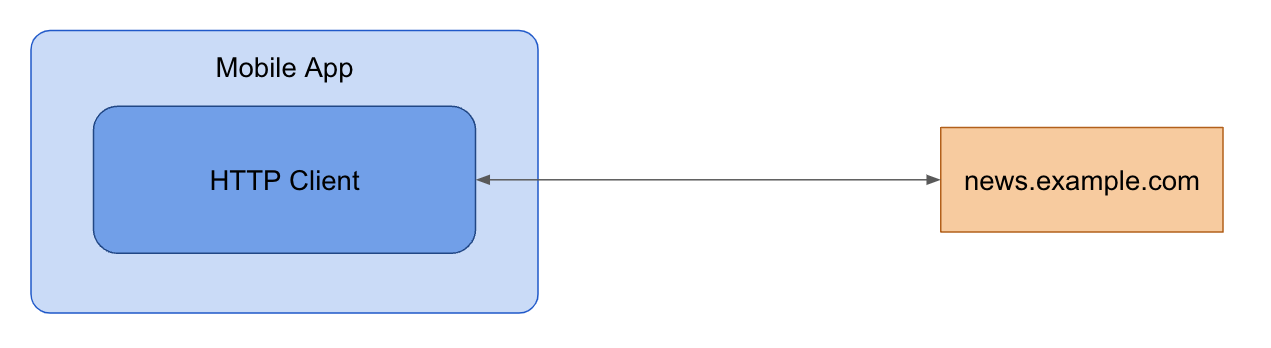
不使用 MobileProxy 的应用
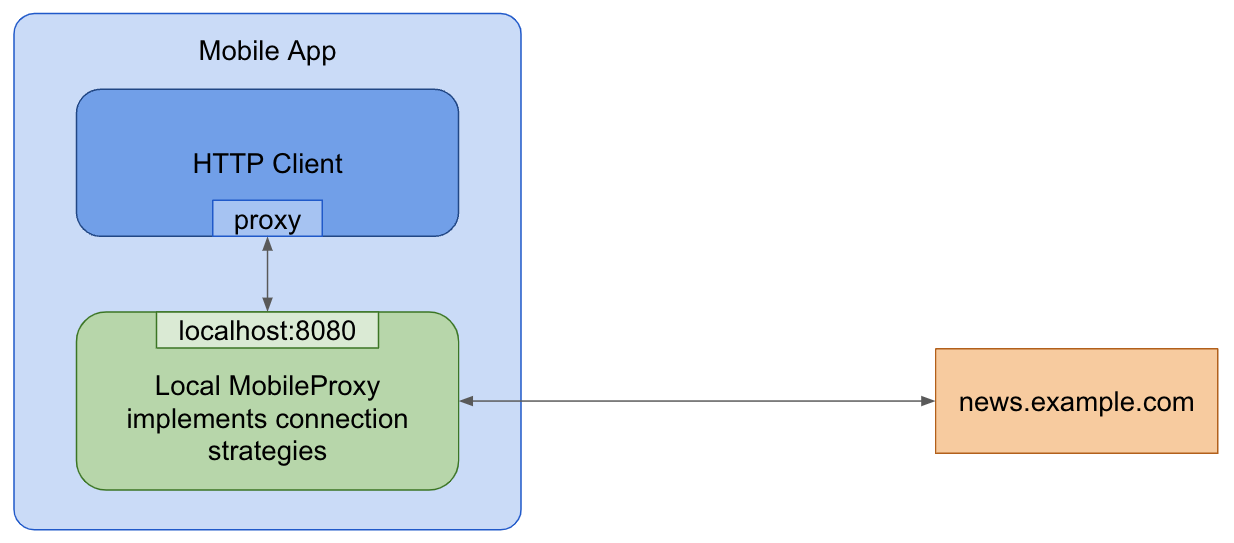
使用 MobileProxy 的应用
第 1 步:构建 MobileProxy 移动端库
使用 gomobile 将 Go 代码编译为 Android 和 iOS 库。
克隆 Outline SDK 仓库:
git clone https://github.com/Jigsaw-Code/outline-sdk.git
cd outline-sdk/x
使用
go
build
构建 Go Mobile 二进制文件:go build -o "$(pwd)/out/" golang.org/x/mobile/cmd/gomobile golang.org/x/mobile/cmd/gobind添加 Psiphon 支持
要想让应用支持使用 Psiphon 网络,请按以下额外步骤操作:
- 与 Psiphon 团队联系,获取用于访问其网络的配置,可能需要签订合同。
- 将获得的 Psiphon 配置添加到
SmartDialer配置的fallback部分。 使用
-tags psiphon标记构建 MobileProxy:go build -tags psiphon -o "$(pwd)/out/" golang.org/x/mobile/cmd/gomobile golang.org/x/mobile/cmd/gobind
由于 Psiphon 代码库基于 GPL 协议授予许可,可能会对您的代码施加许可限制,因此需要使用
-tags psiphon标记。您可能需要考虑申请特殊许可。生成移动端库并将其添加到项目中:
Android
PATH="$(pwd)/out:$PATH" gomobile bind -ldflags='-s -w' -target=android -androidapi=21 -o "$(pwd)/out/mobileproxy.aar" github.com/Jigsaw-Code/outline-sdk/x/mobileproxy在 Android Studio 中,依次选择文件 > 导入项目…,导入生成的
out/mobileproxy.aar软件包。如需获取更多帮助,请参阅 Go Mobile 的构建并部署到 Android。iOS
PATH="$(pwd)/out:$PATH" gomobile bind -ldflags='-s -w' -target=ios -iosversion=11.0 -o "out/mobileproxy.xcframework" github.com/Jigsaw-Code/outline-sdk/x/mobileproxy将
out/mobileproxy.xcframework软件包拖放到 Xcode 项目中。如需获取更多帮助,请参阅 Go Mobile 的构建并部署到 iOS。
第 2 步:运行 MobileProxy
在应用的运行时内初始化并启动 MobileProxy 本地代理服务器。您可以使用静态传输配置,或通过 Smart Proxy 实现动态策略选择。
静态传输配置:将
RunProxy函数与本地地址和传输配置结合使用。Android
import mobileproxy.*

val dialer = StreamDialer("split:3")

// Use port zero to let the system pick an open port for you.
val proxy = Mobileproxy.runProxy("localhost:0", dialer)
// Configure your networking library using proxy.host() and proxy.port() or proxy.address().
// ...
// Stop running the proxy.
proxy.stop()
iOS
import Mobileproxy

let dialer = MobileproxyStreamDialer("split:3")

// Use port zero to let the system pick an open port for you.
let proxy = MobileproxyRunProxy("localhost:0", dialer)
// Configure your networking library using proxy.host() and proxy.port() or proxy.address().
// ...
// Stop running the proxy.
proxy.stop()
Smart Proxy:Smart Proxy 可根据指定的测试网域动态选择 DNS 和 TLS 策略。您需要以 YAML 格式指定配置策略(示例)。
Android
val testDomains = Mobileproxy.newListFromLines("www.youtube.com\ni.ytimg.com")
val strategiesConfig = "..."  // Config YAML.
val dialer = Mobileproxy.newSmartStreamDialer(testDomains, strategiesConfig, Mobileproxy.newStderrLogWriter())

// Use port zero to let the system pick an open port for you.
val proxy = Mobileproxy.runProxy("localhost:0", dialer)
// Configure your networking library using proxy.host() and proxy.port() or proxy.address().
// ...
// Stop running the proxy.
proxy.stop()
iOS
import Mobileproxy

var dialerError: NSError?
let testDomains = MobileproxyNewListFromLines("www.youtube.com\ni.ytimg.com")
let strategiesConfig = "..."  // Config YAML.
let dialer = MobileproxyNewSmartStreamDialer(
    testDomains,
    strategiesConfig,
    MobileproxyNewStderrLogWriter(),
    &dialerError
)

var proxyError: NSError?
// Use port zero to let the system pick an open port for you.
MobileproxyRunProxy("localhost:0", dialer, &proxyError)
// Configure your networking library using proxy.host() and proxy.port() or proxy.address().
// ...
// Stop running the proxy.
proxy.stop()
第 3 步:配置 HTTP 客户端和网络库
配置网络库以使用本地代理服务器地址和端口。
Dart/Flutter HttpClient
通过 HttpClient.findProxy 设置代理服务器。
HttpClient client = HttpClient();
client.findProxy = (Uri uri) {
  return "PROXY " + proxy.address();
};
OkHttp (Android)
通过 OkHttpClient.Builder.proxy 设置代理服务器。
val proxyConfig = Proxy(Proxy.Type.HTTP, InetSocketAddress(proxy.host(), proxy.port()))
val client = OkHttpClient.Builder().proxy(proxyConfig).build()
JVM(Java、Kotlin)
使用系统属性配置要使用的代理服务器:
System.setProperty("http.proxyHost", proxy.host())
System.setProperty("http.proxyPort", String.valueOf(proxy.port()))
System.setProperty("https.proxyHost", proxy.host())
System.setProperty("https.proxyPort", String.valueOf(proxy.port()))
Android WebView
通过 androidx.webview 库将代理服务器配置应用于应用中的所有 WebView:
ProxyController.getInstance()
    .setProxyOverride(
        ProxyConfig.Builder()
            .addProxyRule(this.proxy!!.address())
            .build(),
        {}, // execution context for the following callback - do anything needed here once the proxy is applied, like refreshing web views
        {} // callback to be called once the ProxyConfig is applied
    )
iOS WebView
从 iOS 17 开始,您可以使用 WKWebsiteDataStore 属性将代理服务器配置添加到 WKWebView:
let configuration = WKWebViewConfiguration()
let endpoint = NWEndpoint.hostPort(host: NWEndpoint.Host(proxyHost), port: NWEndpoint.Port(proxyPort)!)
let proxyConfig = ProxyConfiguration.init(httpCONNECTProxy: endpoint)
let websiteDataStore = WKWebsiteDataStore.default()
websiteDataStore.proxyConfigurations = [proxyConfig]
let webview = WKWebView(configuration: configuration)
高级:生成自定义移动端库
对于高级应用场景,您可以生成自己的移动端库:
- 创建 Go 库:开发一个封装了所需 SDK 功能的 Go 库。
- 生成移动端库:使用
gomobile bind生成 Android Archive (AAR) 和 Apple 框架。示例: - 集成到应用中:将生成的库添加到移动应用中。