
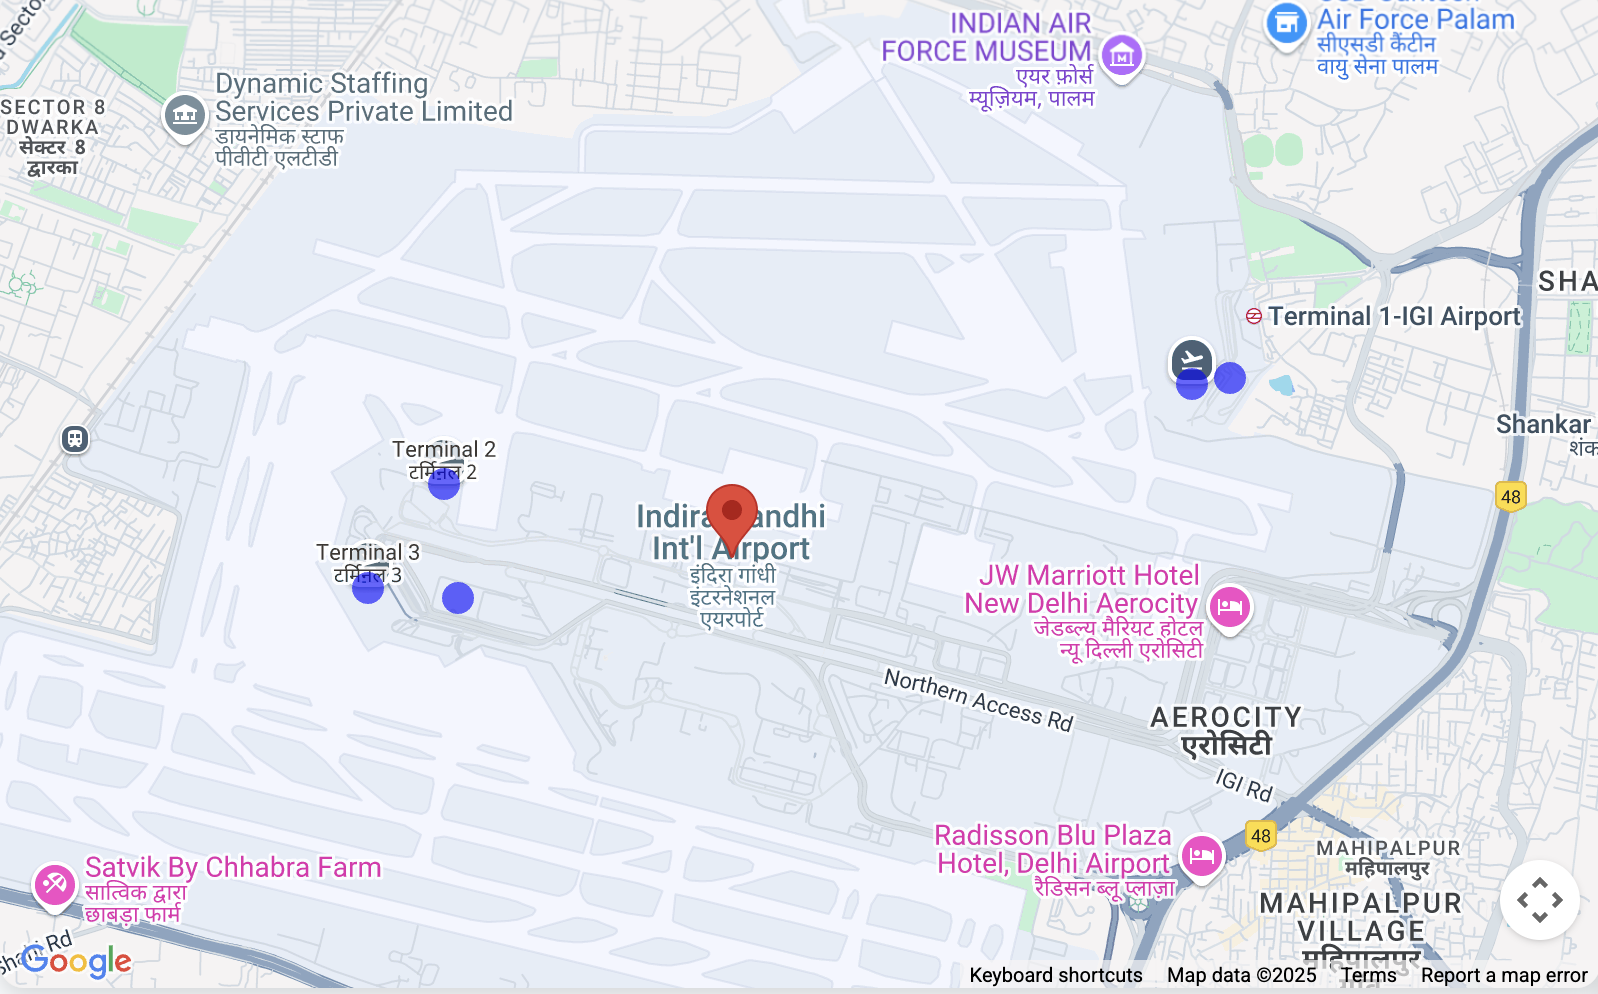
機場是大型綜合體,有多個航廈,因此精確的導航功能對於準時抵達和出發至關重要。Google Maps Geocoding API 通常會傳回座標 (經緯度),在大多數情況下,這會是大型機場綜合體的質心。這款應用程式是互動式工具,專門協助使用者在大型複雜場所 (例如機場內的特定航廈或接送地點) 中,找出並查看精確位置。
具體做法如下:
機場/場地搜尋:使用者先使用 Google Places Autocomplete 輸入內容,搜尋主要地點 (例如「英迪拉甘地國際機場」),這項功能僅限印度使用。
子位置探索: 選取主要位置後,指令碼會使用 Google Places API 擷取詳細資料,包括與該地點相關聯的任何「子目的地」(例如第 1 航廈、第 3 航廈、特定登機門等,前提是 Google 資料中提供這類資訊)。
視覺化地圖: 指令碼會使用 Geocoding API 找出主要地點和子目的地的座標。
接著,地圖會顯示主要地點,並為每個識別出的子目的地加上可點選的標記 (藍色圓圈)。
精確識別:按一下子目的地標記,系統會醒目顯示該標記 (變成綠色),並開啟資訊視窗,顯示名稱和其他可用詳細資料 (例如地址或類型),讓使用者確認已選取正確的特定點。情境式檢視:地圖會自動調整檢視畫面 (fitBounds),確保所有相關標記 (主要地點 + 子目的地) 都清楚可見。
機場導航應用程式中的 Google 地圖平台 API
本文說明「Navigate to Airport」示範應用程式中使用的主要 Google 地圖平台 API 及其參數。這個應用程式會運用多項服務,提供地圖顯示、地點搜尋、詳細地點資訊和進階地區數據分析。
1. 地圖初始化和顯示
應用程式的基礎就是互動式地圖本身。
- 使用的 API:
google.maps.Map(來自 Maps JavaScript API) - 用途:在網頁上建立及顯示互動式地圖。
- 主要參數:
center:定義地圖的初始地理中心。在這個應用程式中,初始設定為德里的座標 ({ lat: 28.461835685621395, lng: 77.05004035761647 })。zoom:設定地圖的初始縮放等級。DEFAULT_ZOOM_LEVEL(15) 用於特寫檢視畫面。mapId:在 Google Cloud 控制台中設定的地圖樣式專屬 ID。
2. Place Search 和 Autocomplete
搜尋列功能採用 Places API 技術。
- 使用的 API:
google.maps.places.Autocomplete(來自 Maps JavaScript API 的 Places Library) - 用途:在使用者輸入地理位置搜尋內容時,提供預測文字完成功能,建議相關地點 (例如機場)。
- 主要參數:
input:HTML 輸入元素 (#search-input),使用者可在其中輸入查詢。componentRestrictions:將搜尋結果篩選為特定國家/地區。這裡的{ country: 'in' }會將結果限制在印度。fields:指定要為所選地點傳回的資料欄位。['place_id']最初只會用於擷取地點的專屬 ID,以最佳化資料轉移作業。
- 如何使用自動完成功能
    // Initialize Autocomplete
    const autocomplete = new google.maps.places.Autocomplete(input, {
      componentRestrictions: { country: 'in' },
      fields: ['place_id'],
    });

    // Add listener to the Autocomplete
    autocomplete.addListener('place_changed', async () => {
      const place = autocomplete.getPlace();
      if (!place.place_id) {
        return;
      }
      // Once a place is selected, fetch details
      await getPlaceDetails(place.place_id);
    });
3. 擷取詳細地點資訊及處理子目的地
從自動完成建議中選取地點後,系統會擷取更詳盡的詳細資料。
- 使用的 API:Places API (透過直接
fetch呼叫https://places.googleapis.com/v1/places/{placeId}) - 用途:擷取特定地點的詳細資訊,包括顯示名稱、地址、類型,以及最重要的
subDestinations(例如機場內個別航廈或重要區域)。 - 網址中的重要參數:
{placeId}:所選地點的專屬 ID。fields:指定要擷取的確切資料欄位。應用程式會要求id、displayName、subDestinations、types和formattedAddress。這對於控管費用和只接收必要資料至關重要。
- 如何根據位置資訊取得
subDestinations
async function getPlaceDetails(placeId) {
  // Construct the URL for the Places API (v1) details endpoint
  // The 'fields' parameter is crucial for requesting subDestinations
  const url = `https://places.googleapis.com/v1/places/${placeId}?key=YOUR_API_KEY&fields=id,displayName,subDestinations,types,formattedAddress`;

  const response = await fetch(url);
  const data = await response.json();

  // Accessing subDestinations from the Places API response
  if (data.subDestinations && data.subDestinations.length > 0) {
    for (const subDestination of data.subDestinations) {
      // Each subDestination object contains an 'id' and 'displayName'
      console.log(`Sub-destination ID: ${subDestination.id}`);
      console.log(`Sub-destination Name: ${subDestination.displayName?.text}`);
      // This subDestination.id is then used in a geocoding call (as shown in section 4)
    }
  }
}
**Handling `subDestinations`:** When the Places API returns
`subDestinations`, the application initiates a process for each one:
1.  **Geocoding:** It uses the `google.maps.Geocoder` to convert
    each `subDestination.id` into its precise geographical coordinates
    (`lat`, `lng`).
1.  **Marker Placement:** A distinct marker is added to the map for
    each sub-destination. These markers are styled with a blue circle icon
    to differentiate them.
1.  **Map Bounds Adjustment:** The `google.maps.LatLngBounds` object
    is used to dynamically expand the map's view to encompass all retrieved
    sub-destinations, verifying they are all visible within the current map
    frame.
1.  **Interactive Information Window:** A `click` listener is
    attached to each sub-destination marker. When clicked, the marker's
    icon changes to green, and an `InfoWindow` appears, displaying the
    sub-destination's name, address, and types. This provides immediate,
    detailed context to the user.
4. 地理編碼和反向地理編碼:擷取子目的地詳細資料
應用程式使用地理編碼主要有兩個用途:將地點 ID 轉換為座標,以及將座標轉換回地點詳細資料。本節特別說明如何使用地理編碼取得子目的地的詳細資訊。
- 使用的 API:
google.maps.Geocoder(來自 Maps JavaScript API) 和 Geocoding API (透過直接fetch呼叫https://maps.googleapis.com/maps/api/geocode/json) - 目的:
google.maps.Geocoder:用於將placeId(從 Autocomplete 或 Places API 取得) 轉換為地理座標 (lat、lng) 和可視區域,讓地圖正確地以所選地點及其子目的地為中心並縮放。- Geocoding API (
fetch):用於反向地理編碼 (將經緯度轉換為人類可解讀的地址),以及擷取建築物外框和導航點等進階位置資料。
- 主要參數:
google.maps.Geocoder.geocode():placeId:要進行地理編碼的地點 ID。location:用於反向地理編碼的LatLng物件。
- Geocoding API
fetch呼叫:latlng:用於反向地理編碼的經緯度座標。extra_computations=BUILDING_AND_ENTRANCES:這項重要參數會要求提供額外資料,特別是建築物足跡和入口資訊,然後用於顯示建築物外框和導航點。
如何使用 subDestination ID 擷取更多詳細資料 (例如位置、格式化地址、類型)
function geocodeAndAddMarker(subDestination, bounds) {
  return new Promise((resolve, reject) => {
    const geocoder = new google.maps.Geocoder();
    // Using the subDestination.id to geocode and get location details
    geocoder.geocode({ placeId: subDestination.id }, (results, status) => {
      if (status === "OK" && results[0]) {
        const location = results[0].geometry.location;
        const displayName = subDestination.displayName?.text || "Sub-destination";
        const formattedAddress = results[0].formatted_address; // Further detail from Geocoding
        const types = results[0].types; // Further detail from Geocoding

        const marker = new google.maps.Marker({
          map: map,
          position: location,
          title: displayName,
          icon: {
            path: google.maps.SymbolPath.CIRCLE,
            fillColor: 'blue',
            fillOpacity: 0.6,
            strokeWeight: 0,
            scale: 8
          }
        });

        marker.addListener('click', () => {
          marker.setIcon({
            path: google.maps.SymbolPath.CIRCLE,
            fillColor: 'green',
            fillOpacity: 0.6,
            strokeWeight: 0,
            scale: 8
          });
          const infowindow = new google.maps.InfoWindow({
            content: `<b>${displayName}</b><br><p>Address: ${formattedAddress}</p><p>Types: ${types.join(', ')}</p>`,
          });
          infowindow.open(map, marker);
        });
        bounds.extend(location);
        resolve(true);
      } else {
        reject(new Error(`Geocoding failed for placeId: ${subDestination.id}`));
      }
    });
  });
}
5. 顯示標記
標記用於在地圖上醒目顯示特定位置。
- 使用的 API:
google.maps.Marker(來自 Maps JavaScript API) 和google.maps.marker.AdvancedMarkerElement,搭配google.maps.marker.PinElement(來自 Maps JavaScript API 的標記程式庫) - 目的:
google.maps.Marker:用於初始可拖曳的標記 (雖然提供的程式碼中draggable設為false,但這是其功能的一部分),以及第 3 節所述的基本子目的地標記。AdvancedMarkerElement和PinElement:用於更明顯的導覽點標記,可自訂標記的圖釘樣式。
- 主要參數:
position:標記的放置位置座標LatLng。map:要顯示標記的地圖例項。title:將滑鼠游標懸停在標記上時顯示的文字。icon:允許google.maps.Marker的自訂圖示 (例如,google.maps.SymbolPath.CIRCLE搭配自訂顏色)。content:適用於AdvancedMarkerElement,可嵌入自訂 HTML 內容,包括預先設定樣式的圖釘PinElement。PinElement參數:background、borderColor、glyphColor、scale,用於自訂視覺效果。
6. 顯示建築物外框
應用程式可以視覺化呈現建築物的足跡。
- 使用的 API:
google.maps.Data(來自 Maps JavaScript API) - 用途:顯示地理資料,例如建築物外框 (以 GeoJSON
display_polygon形式從 Geocoding API 的extra_computations傳回)。 - 主要參數:
map:要套用資料層的地圖例項。style:定義 GeoJSON 特徵的視覺外觀 (例如strokeColor、fillColor、fillOpacity)。addGeoJson():將 GeoJSON 資料新增至圖層的方法。
7. 地圖範圍和縮放功能
確認地圖檢視畫面涵蓋所有相關位置。
- 使用的 API:
google.maps.LatLngBounds(來自 Maps JavaScript API) - 用途:動態調整地圖的可視區域,以配合地理點集合 (例如主要地點和所有子目的地)。
- 主要方法:
extend(location):在邊界中新增LatLng點,並視需要擴展邊界。fitBounds(bounds):調整地圖的中心和縮放等級,顯示LatLngBounds物件定義的整個區域。
結合使用這些 Google 地圖平台 API,應用程式就能提供全面且互動式的體驗,讓使用者搜尋地點、查看詳細資料,以及顯示相關地理資訊,例如子目的地和建築物輪廓。
實作注意事項 請注意,這項功能不適用於所有機場區域,且須視 (機場航廈) 資料是否可用而定。
資源 Geocoding API Places API Maps Javascript API
作者: