ภาพรวม
การลงชื่อเข้าใช้ด้วย Google ที่ใช้ OAuth พร้อมการลิงก์ที่คล่องตัวจะเพิ่มการลงชื่อเข้าใช้ด้วย Google ไว้ด้านบนของการลิงก์ OAuth ซึ่งจะมอบประสบการณ์การลิงก์ที่ราบรื่นสำหรับผู้ใช้ Google และยังช่วยให้สร้างบัญชีได้ด้วย ซึ่งจะช่วยให้ผู้ใช้สร้างบัญชีใหม่ในบริการของคุณโดยใช้บัญชี Google ได้
หากต้องการลิงก์บัญชีด้วย OAuth และลงชื่อเข้าใช้ด้วย Google ให้ทำตามขั้นตอนทั่วไปต่อไปนี้
- ก่อนอื่น ให้ขอความยินยอมจากผู้ใช้เพื่อเข้าถึงโปรไฟล์ Google
- ใช้ข้อมูลในโปรไฟล์เพื่อตรวจสอบว่ามีบัญชีผู้ใช้หรือไม่
- สำหรับผู้ใช้เดิม ให้ลิงก์บัญชี
- หากไม่พบผู้ใช้ Google ที่ตรงกันในระบบการตรวจสอบสิทธิ์ ให้ ตรวจสอบโทเค็นรหัสที่ได้รับจาก Google จากนั้นคุณจะสร้างผู้ใช้โดยอิงตามข้อมูลโปรไฟล์ที่มีอยู่ในโทเค็นรหัสได้
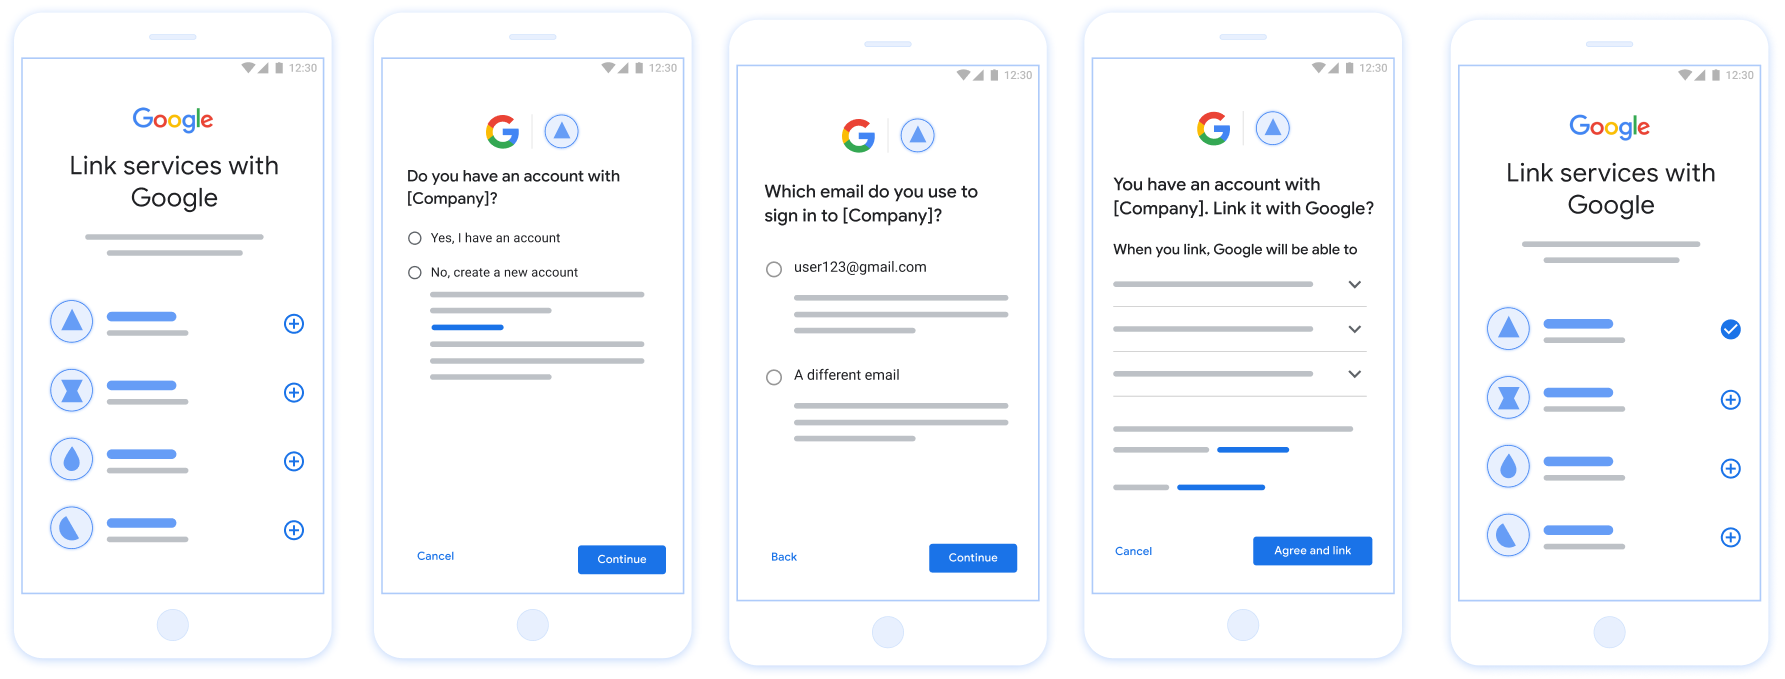
รูปที่ 1 การลิงก์บัญชีในโทรศัพท์ของผู้ใช้ด้วยการลิงก์ที่ปรับปรุงแล้ว
ข้อกำหนดสำหรับการลิงก์ที่ง่ายขึ้น
- ใช้โฟลว์การลิงก์ OAuth บนเว็บพื้นฐาน บริการของคุณต้องรองรับปลายทางการให้สิทธิ์และการแลกเปลี่ยนโทเค็นที่สอดคล้องกับ OAuth 2.0
- ปลายทางการแลกเปลี่ยนโทเค็นต้องรองรับการยืนยัน JSON Web Token (JWT) และใช้ Intent
check,createและget
ติดตั้งใช้งานเซิร์ฟเวอร์ OAuth
ปลายทางการแลกเปลี่ยนโทเค็นต้องรองรับเจตนา check, create, get
ทำตามขั้นตอนต่อไปนี้เพื่อทําขั้นตอนการลิงก์บัญชีให้เสร็จสมบูรณ์และดูว่าเมื่อใดที่ระบบใช้
เจตนาต่างๆ
- ผู้ใช้มีบัญชีในระบบการตรวจสอบสิทธิ์ของคุณไหม (ผู้ใช้ตัดสินใจโดยเลือกใช่หรือไม่)
- ใช่ : ผู้ใช้ใช้อีเมลที่เชื่อมโยงกับบัญชี Google เพื่อลงชื่อเข้าใช้แพลตฟอร์มของคุณหรือไม่ (ผู้ใช้ตัดสินใจโดยเลือกใช่หรือไม่)
- ใช่ : ผู้ใช้มีบัญชีที่ตรงกันในระบบการตรวจสอบสิทธิ์ของคุณไหม (โทรหา
check intentเพื่อยืนยัน)- ใช่ : ระบบจะเรียกใช้
get intentและลิงก์บัญชีหากการรับ Intent สำเร็จ - ไม่ : สร้างบัญชีใหม่ใช่ไหม (ผู้ใช้ตัดสินใจโดยเลือกใช่หรือไม่)
- ใช่ : ระบบจะเรียกใช้
create intentและลิงก์บัญชีหากการสร้างความตั้งใจสำเร็จ - ไม่ : ระบบจะทริกเกอร์ขั้นตอน OAuth บนเว็บ จากนั้นจะนำผู้ใช้ไปยังเบราว์เซอร์ และให้ตัวเลือกแก่ผู้ใช้ในการลิงก์กับอีเมลอื่น
- ใช่ : ระบบจะเรียกใช้
- ใช่ : ระบบจะเรียกใช้
- ไม่ : ระบบจะทริกเกอร์โฟลว์ OAuth ของเว็บ โดยจะนำผู้ใช้ไปยังเบราว์เซอร์ และให้ตัวเลือกแก่ผู้ใช้ในการลิงก์กับอีเมลอื่น
- ใช่ : ผู้ใช้มีบัญชีที่ตรงกันในระบบการตรวจสอบสิทธิ์ของคุณไหม (โทรหา
- ไม่ : ผู้ใช้มีบัญชีที่ตรงกันในระบบการตรวจสอบสิทธิ์ของคุณหรือไม่ (โทรหา
check intentเพื่อยืนยัน)- ใช่ : ระบบจะเรียกใช้
get intentและลิงก์บัญชีหากการรับ Intent สำเร็จ - NO :
create intentจะได้รับการเรียกใช้และระบบจะลิงก์บัญชีหาก Intent การสร้างแสดงผลสำเร็จ
- ใช่ : ระบบจะเรียกใช้
- ใช่ : ผู้ใช้ใช้อีเมลที่เชื่อมโยงกับบัญชี Google เพื่อลงชื่อเข้าใช้แพลตฟอร์มของคุณหรือไม่ (ผู้ใช้ตัดสินใจโดยเลือกใช่หรือไม่)
Check for an existing user account (check intent)
After the user gives consent to access their Google profile, Google sends a request that contains a signed assertion of the Google user's identity. The assertion contains information that includes the user's Google Account ID, name, and email address. The token exchange endpoint configured for your project handles that request.
If the corresponding Google account is already present in your authentication
system, your token exchange endpoint responds with account_found=true. If the
Google account doesn't match an existing user, your token exchange endpoint
returns an HTTP 404 Not Found error with account_found=false.
The request has the following form:
POST /token HTTP/1.1
Host: oauth2.example.com
Content-Type: application/x-www-form-urlencoded

grant_type=urn:ietf:params:oauth:grant-type:jwt-bearer&intent=check&assertion=JWT&scope=SCOPES&client_id=GOOGLE_CLIENT_ID&client_secret=GOOGLE_CLIENT_SECRET
Your token exchange endpoint must be able to handle the following parameters:
| Token endpoint parameters | |
|---|---|
intent |
For these requests, the value of this parameter is
check. |
grant_type |
The type of token being exchanged. For these requests, this
parameter has the value urn:ietf:params:oauth:grant-type:jwt-bearer. |
assertion |
A JSON Web Token (JWT) that provides a signed assertion of the Google user's identity. The JWT contains information that includes the user's Google Account ID, name, and email address. |
client_id |
The client ID you assigned to Google. |
client_secret |
The client secret you assigned to Google. |
To respond to the check intent requests, your token exchange endpoint must perform the following steps:
- Validate and decode the JWT assertion.
- Check if the Google account is already present in your authentication system.
ตรวจสอบและถอดรหัสการยืนยัน JWT
คุณสามารถตรวจสอบและถอดรหัสการยืนยัน JWT ได้โดยใช้ ไลบรารีการถอดรหัส JWT สำหรับภาษาของคุณ ใช้ คีย์สาธารณะของ Google มีอยู่ใน JWK หรือ PEM เพื่อยืนยัน ลายเซ็นของโทเค็น
เมื่อถอดรหัสแล้ว การยืนยัน JWT จะมีลักษณะดังตัวอย่างต่อไปนี้
{
  "sub": "1234567890",      // The unique ID of the user's Google Account
  "iss": "https://accounts.google.com",        // The assertion's issuer
  "aud": "123-abc.apps.googleusercontent.com", // Your server's client ID
  "iat": 233366400,         // Unix timestamp of the assertion's creation time
  "exp": 233370000,         // Unix timestamp of the assertion's expiration time
  "name": "Jan Jansen",
  "given_name": "Jan",
  "family_name": "Jansen",
  "email": "jan@gmail.com", // If present, the user's email address
  "email_verified": true,   // true, if Google has verified the email address
  "hd": "example.com",      // If present, the host domain of the user's GSuite email address
                            // If present, a URL to user's profile picture
  "picture": "https://lh3.googleusercontent.com/a-/AOh14GjlTnZKHAeb94A-FmEbwZv7uJD986VOF1mJGb2YYQ",
  "locale": "en_US"         // User's locale, from browser or phone settings
}
นอกจากการยืนยันลายเซ็นของโทเค็นแล้ว ให้ตรวจสอบว่าการยืนยัน
ผู้ออกใบรับรอง (ช่อง iss) คือ https://accounts.google.com ซึ่งกลุ่มเป้าหมาย
(ช่อง aud) คือรหัสไคลเอ็นต์ที่กําหนด และโทเค็นยังไม่หมดอายุ
(ช่อง exp)
เมื่อใช้ช่อง email, email_verified และ hd คุณจะทราบได้ว่า
Google โฮสต์และมีสิทธิ์สำหรับอีเมล ในกรณีที่ Google
เชื่อถือได้ ซึ่งผู้ใช้ปัจจุบันเป็นเจ้าของบัญชีที่ถูกต้อง
และคุณก็สามารถข้ามการใช้รหัสผ่านหรือวิธีการพิสูจน์อื่นๆ ได้ มิเช่นนั้น วิธีการเหล่านี้
สามารถใช้ยืนยันบัญชีก่อนลิงก์ได้
กรณีที่ Google เชื่อถือได้
emailมีส่วนต่อท้าย@gmail.comนี่คือบัญชี Gmailemail_verifiedเป็นจริงและตั้งค่าhdแล้ว นี่คือบัญชี G Suite
ผู้ใช้อาจลงทะเบียนบัญชี Google โดยไม่ใช้ Gmail หรือ G Suite ได้ วันและเวลา
email ไม่มีคำต่อท้าย @gmail.com และ hd ไม่มี Google ไม่มี
แนะนำให้ใช้รหัสผ่านหรือวิธีการอื่นๆ ในการพิสูจน์ยืนยัน
ผู้ใช้รายนั้น email_verified ก็อาจเป็นจริงได้ เนื่องจาก Google ได้ยืนยัน
ผู้ใช้เมื่อมีการสร้างบัญชี Google แต่การเป็นเจ้าของของบุคคลที่สาม
บัญชีอีเมลของคุณอาจมีการเปลี่ยนแปลง
Check if the Google account is already present in your authentication system
Check whether either of the following conditions are true:
- The Google Account ID, found in the assertion's
subfield, is in your user database. - The email address in the assertion matches a user in your user database.
If either condition is true, the user has already signed up. In that case, return a response like the following:
HTTP/1.1 200 Success
Content-Type: application/json;charset=UTF-8

{
  "account_found":"true",
}
If neither the Google Account ID nor the email address specified in the
assertion matches a user in your database, the user hasn't signed up yet. In
this case, your token exchange endpoint needs to reply with a HTTP 404 error
that specifies "account_found": "false", as in the following example:
HTTP/1.1 404 Not found
Content-Type: application/json;charset=UTF-8

{
  "account_found":"false",
}
Handle automatic linking (get intent)
After the user gives consent to access their Google profile, Google sends a request that contains a signed assertion of the Google user's identity. The assertion contains information that includes the user's Google Account ID, name, and email address. The token exchange endpoint configured for your project handles that request.
If the corresponding Google Account is already present in your authentication
system, your token exchange endpoint returns a token for the user. If the
Google Account doesn't match an existing user, your token exchange endpoint
returns a linking_error error and optional login_hint.
The request has the following form:
POST /token HTTP/1.1
Host: oauth2.example.com
Content-Type: application/x-www-form-urlencoded

grant_type=urn:ietf:params:oauth:grant-type:jwt-bearer&intent=get&assertion=JWT&scope=SCOPES&client_id=GOOGLE_CLIENT_ID&client_secret=GOOGLE_CLIENT_SECRET
Your token exchange endpoint must be able to handle the following parameters:
| Token endpoint parameters | |
|---|---|
intent |
For these requests, the value of this parameter is get. |
grant_type |
The type of token being exchanged. For these requests, this
parameter has the value urn:ietf:params:oauth:grant-type:jwt-bearer. |
assertion |
A JSON Web Token (JWT) that provides a signed assertion of the Google user's identity. The JWT contains information that includes the user's Google Account ID, name, and email address. |
scope |
Optional: Any scopes that you've configured Google to request from users. |
client_id |
The client ID you assigned to Google. |
client_secret |
The client secret you assigned to Google. |
To respond to the get intent requests, your token exchange endpoint must perform the following steps:
- Validate and decode the JWT assertion.
- Check if the Google account is already present in your authentication system.
ตรวจสอบและถอดรหัสการยืนยัน JWT
คุณสามารถตรวจสอบและถอดรหัสการยืนยัน JWT ได้โดยใช้ ไลบรารีการถอดรหัส JWT สำหรับภาษาของคุณ ใช้ คีย์สาธารณะของ Google มีอยู่ใน JWK หรือ PEM เพื่อยืนยัน ลายเซ็นของโทเค็น
เมื่อถอดรหัสแล้ว การยืนยัน JWT จะมีลักษณะดังตัวอย่างต่อไปนี้
{
  "sub": "1234567890",      // The unique ID of the user's Google Account
  "iss": "https://accounts.google.com",        // The assertion's issuer
  "aud": "123-abc.apps.googleusercontent.com", // Your server's client ID
  "iat": 233366400,         // Unix timestamp of the assertion's creation time
  "exp": 233370000,         // Unix timestamp of the assertion's expiration time
  "name": "Jan Jansen",
  "given_name": "Jan",
  "family_name": "Jansen",
  "email": "jan@gmail.com", // If present, the user's email address
  "email_verified": true,   // true, if Google has verified the email address
  "hd": "example.com",      // If present, the host domain of the user's GSuite email address
                            // If present, a URL to user's profile picture
  "picture": "https://lh3.googleusercontent.com/a-/AOh14GjlTnZKHAeb94A-FmEbwZv7uJD986VOF1mJGb2YYQ",
  "locale": "en_US"         // User's locale, from browser or phone settings
}
นอกจากการยืนยันลายเซ็นของโทเค็นแล้ว ให้ตรวจสอบว่าการยืนยัน
ผู้ออกใบรับรอง (ช่อง iss) คือ https://accounts.google.com ซึ่งกลุ่มเป้าหมาย
(ช่อง aud) คือรหัสไคลเอ็นต์ที่กําหนด และโทเค็นยังไม่หมดอายุ
(ช่อง exp)
เมื่อใช้ช่อง email, email_verified และ hd คุณจะทราบได้ว่า
Google โฮสต์และมีสิทธิ์สำหรับอีเมล ในกรณีที่ Google
เชื่อถือได้ ซึ่งผู้ใช้ปัจจุบันเป็นเจ้าของบัญชีที่ถูกต้อง
และคุณก็สามารถข้ามการใช้รหัสผ่านหรือวิธีการพิสูจน์อื่นๆ ได้ มิเช่นนั้น วิธีการเหล่านี้
สามารถใช้ยืนยันบัญชีก่อนลิงก์ได้
กรณีที่ Google เชื่อถือได้
emailมีส่วนต่อท้าย@gmail.comนี่คือบัญชี Gmailemail_verifiedเป็นจริงและตั้งค่าhdแล้ว นี่คือบัญชี G Suite
ผู้ใช้อาจลงทะเบียนบัญชี Google โดยไม่ใช้ Gmail หรือ G Suite ได้ วันและเวลา
email ไม่มีคำต่อท้าย @gmail.com และ hd ไม่มี Google ไม่มี
แนะนำให้ใช้รหัสผ่านหรือวิธีการอื่นๆ ในการพิสูจน์ยืนยัน
ผู้ใช้รายนั้น email_verified ก็อาจเป็นจริงได้ เนื่องจาก Google ได้ยืนยัน
ผู้ใช้เมื่อมีการสร้างบัญชี Google แต่การเป็นเจ้าของของบุคคลที่สาม
บัญชีอีเมลของคุณอาจมีการเปลี่ยนแปลง
Check if the Google account is already present in your authentication system
Check whether either of the following conditions are true:
- The Google Account ID, found in the assertion's
subfield, is in your user database. - The email address in the assertion matches a user in your user database.
If an account is found for the user, issue an access token and return the values in a JSON object in the body of your HTTPS response, like in the following example:
{
  "token_type": "Bearer",
  "access_token": "ACCESS_TOKEN",
  "refresh_token": "REFRESH_TOKEN",
  "expires_in": SECONDS_TO_EXPIRATION
}
In some cases, account linking based on ID token might fail for the user. If it
does so for any reason, your token exchange endpoint needs to reply with a HTTP
401 error that specifies error=linking_error, as the following example shows:
HTTP/1.1 401 Unauthorized
Content-Type: application/json;charset=UTF-8

{
  "error":"linking_error",
  "login_hint":"foo@bar.com"
}
When Google receives a 401 error response with linking_error, Google sends
the user to your authorization endpoint with login_hint as a parameter. The
user completes account linking using the OAuth linking flow in their browser.
Handle account creation using Sign in with Google (create intent)
When a user needs to create an account on your service, Google makes a request
to your token exchange endpoint that specifies intent=create.
The request has the following form:
POST /token HTTP/1.1
Host: oauth2.example.com
Content-Type: application/x-www-form-urlencoded

response_type=token&grant_type=urn:ietf:params:oauth:grant-type:jwt-bearer&scope=SCOPES&intent=create&assertion=JWT&client_id=GOOGLE_CLIENT_ID&client_secret=GOOGLE_CLIENT_SECRET
Your token exchange endpoint must able to handle the following parameters:
| Token endpoint parameters | |
|---|---|
intent |
For these requests, the value of this parameter is create. |
grant_type |
The type of token being exchanged. For these requests, this
parameter has the value urn:ietf:params:oauth:grant-type:jwt-bearer. |
assertion |
A JSON Web Token (JWT) that provides a signed assertion of the Google user's identity. The JWT contains information that includes the user's Google Account ID, name, and email address. |
client_id |
The client ID you assigned to Google. |
client_secret |
The client secret you assigned to Google. |
The JWT within the assertion parameter contains the user's Google Account ID,
name, and email address, which you can use to create a new account on your
service.
To respond to the create intent requests, your token exchange endpoint must perform the following steps:
- Validate and decode the JWT assertion.
- Validate user information and create new account.
ตรวจสอบและถอดรหัสการยืนยัน JWT
คุณสามารถตรวจสอบและถอดรหัสการยืนยัน JWT ได้โดยใช้ ไลบรารีการถอดรหัส JWT สำหรับภาษาของคุณ ใช้ คีย์สาธารณะของ Google มีอยู่ใน JWK หรือ PEM เพื่อยืนยัน ลายเซ็นของโทเค็น
เมื่อถอดรหัสแล้ว การยืนยัน JWT จะมีลักษณะดังตัวอย่างต่อไปนี้
{
  "sub": "1234567890",      // The unique ID of the user's Google Account
  "iss": "https://accounts.google.com",        // The assertion's issuer
  "aud": "123-abc.apps.googleusercontent.com", // Your server's client ID
  "iat": 233366400,         // Unix timestamp of the assertion's creation time
  "exp": 233370000,         // Unix timestamp of the assertion's expiration time
  "name": "Jan Jansen",
  "given_name": "Jan",
  "family_name": "Jansen",
  "email": "jan@gmail.com", // If present, the user's email address
  "email_verified": true,   // true, if Google has verified the email address
  "hd": "example.com",      // If present, the host domain of the user's GSuite email address
                            // If present, a URL to user's profile picture
  "picture": "https://lh3.googleusercontent.com/a-/AOh14GjlTnZKHAeb94A-FmEbwZv7uJD986VOF1mJGb2YYQ",
  "locale": "en_US"         // User's locale, from browser or phone settings
}
นอกจากการยืนยันลายเซ็นของโทเค็นแล้ว ให้ตรวจสอบว่าการยืนยัน
ผู้ออกใบรับรอง (ช่อง iss) คือ https://accounts.google.com ซึ่งกลุ่มเป้าหมาย
(ช่อง aud) คือรหัสไคลเอ็นต์ที่กําหนด และโทเค็นยังไม่หมดอายุ
(ช่อง exp)
เมื่อใช้ช่อง email, email_verified และ hd คุณจะทราบได้ว่า
Google โฮสต์และมีสิทธิ์สำหรับอีเมล ในกรณีที่ Google
เชื่อถือได้ ซึ่งผู้ใช้ปัจจุบันเป็นเจ้าของบัญชีที่ถูกต้อง
และคุณก็สามารถข้ามการใช้รหัสผ่านหรือวิธีการพิสูจน์อื่นๆ ได้ มิเช่นนั้น วิธีการเหล่านี้
สามารถใช้ยืนยันบัญชีก่อนลิงก์ได้
กรณีที่ Google เชื่อถือได้
emailมีส่วนต่อท้าย@gmail.comนี่คือบัญชี Gmailemail_verifiedเป็นจริงและตั้งค่าhdแล้ว นี่คือบัญชี G Suite
ผู้ใช้อาจลงทะเบียนบัญชี Google โดยไม่ใช้ Gmail หรือ G Suite ได้ วันและเวลา
email ไม่มีคำต่อท้าย @gmail.com และ hd ไม่มี Google ไม่มี
แนะนำให้ใช้รหัสผ่านหรือวิธีการอื่นๆ ในการพิสูจน์ยืนยัน
ผู้ใช้รายนั้น email_verified ก็อาจเป็นจริงได้ เนื่องจาก Google ได้ยืนยัน
ผู้ใช้เมื่อมีการสร้างบัญชี Google แต่การเป็นเจ้าของของบุคคลที่สาม
บัญชีอีเมลของคุณอาจมีการเปลี่ยนแปลง
Validate user information and create new account
Check whether either of the following conditions are true:
- The Google Account ID, found in the assertion's
subfield, is in your user database. - The email address in the assertion matches a user in your user database.
If either condition is true, prompt the user to link their existing account
with their Google Account. To do so, respond to the request with an HTTP 401 error
that specifies error=linking_error and gives the user's email address as the
login_hint. The following is a sample response:
HTTP/1.1 401 Unauthorized
Content-Type: application/json;charset=UTF-8

{
  "error":"linking_error",
  "login_hint":"foo@bar.com"
}
When Google receives a 401 error response with linking_error, Google sends
the user to your authorization endpoint with login_hint as a parameter. The
user completes account linking using the OAuth linking flow in their browser.
If neither condition is true, create a new user account with the information provided in the JWT. New accounts don't typically have a password set. It's recommended that you add Sign in with Google to other platforms to enable users to sign in with Google across the surfaces of your application. Alternatively, you can email the user a link that starts your password recovery flow to allow the user to set a password to sign in on other platforms.
When the creation is completed, issue an access token and return the values in a JSON object in the body of your HTTPS response, like in the following example:
{
  "token_type": "Bearer",
  "access_token": "ACCESS_TOKEN",
  "refresh_token": "REFRESH_TOKEN",
  "expires_in": SECONDS_TO_EXPIRATION
}
รับรหัสไคลเอ็นต์ Google API
คุณจะต้องระบุรหัสไคลเอ็นต์ Google API ในระหว่างกระบวนการลงทะเบียนการลิงก์บัญชี
หากต้องการรับรหัสไคลเอ็นต์ API โดยใช้โปรเจ็กต์ที่คุณสร้างขณะทำตามขั้นตอนการลิงก์ OAuth โดยทำตามขั้นตอนต่อไปนี้
- ไปที่หน้าไคลเอ็นต์
สร้างหรือเลือกโปรเจ็กต์ Google API
หากโปรเจ็กต์ไม่มีรหัสไคลเอ็นต์สำหรับประเภทเว็บแอปพลิเคชัน ให้คลิกสร้างไคลเอ็นต์เพื่อสร้าง อย่าลืมระบุโดเมนของเว็บไซต์ในช่องต้นทางของ JavaScript ที่ได้รับอนุญาต เมื่อทำการทดสอบหรือพัฒนาในเครื่อง คุณต้องเพิ่มทั้ง
http://localhostและhttp://localhost:<port_number>ลงในช่องต้นทาง JavaScript ที่ได้รับอนุญาต
ตรวจสอบการติดตั้งใช้งาน
คุณสามารถตรวจสอบการติดตั้งใช้งานได้โดยใช้เครื่องมือ OAuth 2.0 Playground
ในเครื่องมือ ให้ทำตามขั้นตอนต่อไปนี้
- คลิกการกำหนดค่า เพื่อเปิดหน้าต่างการกำหนดค่า OAuth 2.0
- ในช่องโฟลว์ OAuth ให้เลือกฝั่งไคลเอ็นต์
- ในช่องปลายทาง OAuth ให้เลือกกำหนดเอง
- ระบุปลายทาง OAuth 2.0 และรหัสไคลเอ็นต์ที่คุณกำหนดให้กับ Google ในช่องที่เกี่ยวข้อง
- ในส่วนขั้นตอนที่ 1 ไม่ต้องเลือกขอบเขตของ Google แต่ให้เว้นช่องนี้ว่างไว้หรือพิมพ์ขอบเขตที่ใช้ได้กับเซิร์ฟเวอร์ (หรือสตริงที่กำหนดเองหากคุณไม่ได้ใช้ขอบเขต OAuth) เมื่อเสร็จแล้ว ให้คลิกให้สิทธิ์ API
- ในส่วนขั้นตอนที่ 2 และขั้นตอนที่ 3 ให้ทำตามโฟลว์ OAuth 2.0 และตรวจสอบว่าแต่ละขั้นตอนทำงานตามที่ตั้งใจไว้
คุณสามารถตรวจสอบการติดตั้งใช้งานได้โดยใช้เครื่องมือสาธิตการลิงก์บัญชี Google
ในเครื่องมือ ให้ทำตามขั้นตอนต่อไปนี้
- คลิกปุ่มลงชื่อเข้าใช้ด้วย Google
- เลือกบัญชีที่ต้องการลิงก์
- ป้อนรหัสบริการ
- ป้อนขอบเขตอย่างน้อย 1 รายการที่คุณจะขอสิทธิ์เข้าถึง (ไม่บังคับ)
- คลิกเริ่มการสาธิต
- เมื่อได้รับข้อความแจ้ง ให้ยืนยันว่าคุณอาจให้ความยินยอมและปฏิเสธคำขอลิงก์
- ยืนยันว่าระบบจะนำคุณไปยังแพลตฟอร์มของคุณ