खास जानकारी
OAuth पर आधारित, 'Google से साइन इन करें' सुविधा के साथ आसानी से खाता लिंक करने की सुविधा, OAuth की मदद से खाता लिंक करने की सुविधा के साथ-साथ 'Google से साइन इन करें' सुविधा भी जोड़ती है. इससे Google उपयोगकर्ताओं को खाता लिंक करने का बेहतर अनुभव मिलता है. साथ ही, इससे खाता बनाने की सुविधा भी चालू होती है. इसकी मदद से, उपयोगकर्ता अपने Google खाते का इस्तेमाल करके आपकी सेवा पर नया खाता बना सकता है.
OAuth और 'Google से साइन इन करें' सुविधा का इस्तेमाल करके खाता लिंक करने के लिए, यह सामान्य तरीका अपनाएं:
- सबसे पहले, उपयोगकर्ता से उसकी Google प्रोफ़ाइल को ऐक्सेस करने की अनुमति माँगें.
- उनकी प्रोफ़ाइल में मौजूद जानकारी का इस्तेमाल करके, यह पता लगाएं कि उपयोगकर्ता का खाता मौजूद है या नहीं.
- मौजूदा उपयोगकर्ताओं के लिए, खातों को लिंक करें.
- अगर आपको अपने पुष्टि करने वाले सिस्टम में Google उपयोगकर्ता का कोई मैच नहीं मिलता है, तो Google से मिले आईडी टोकन की पुष्टि करें. इसके बाद, आईडी टोकन में मौजूद प्रोफ़ाइल की जानकारी के आधार पर उपयोगकर्ता बनाया जा सकता है.
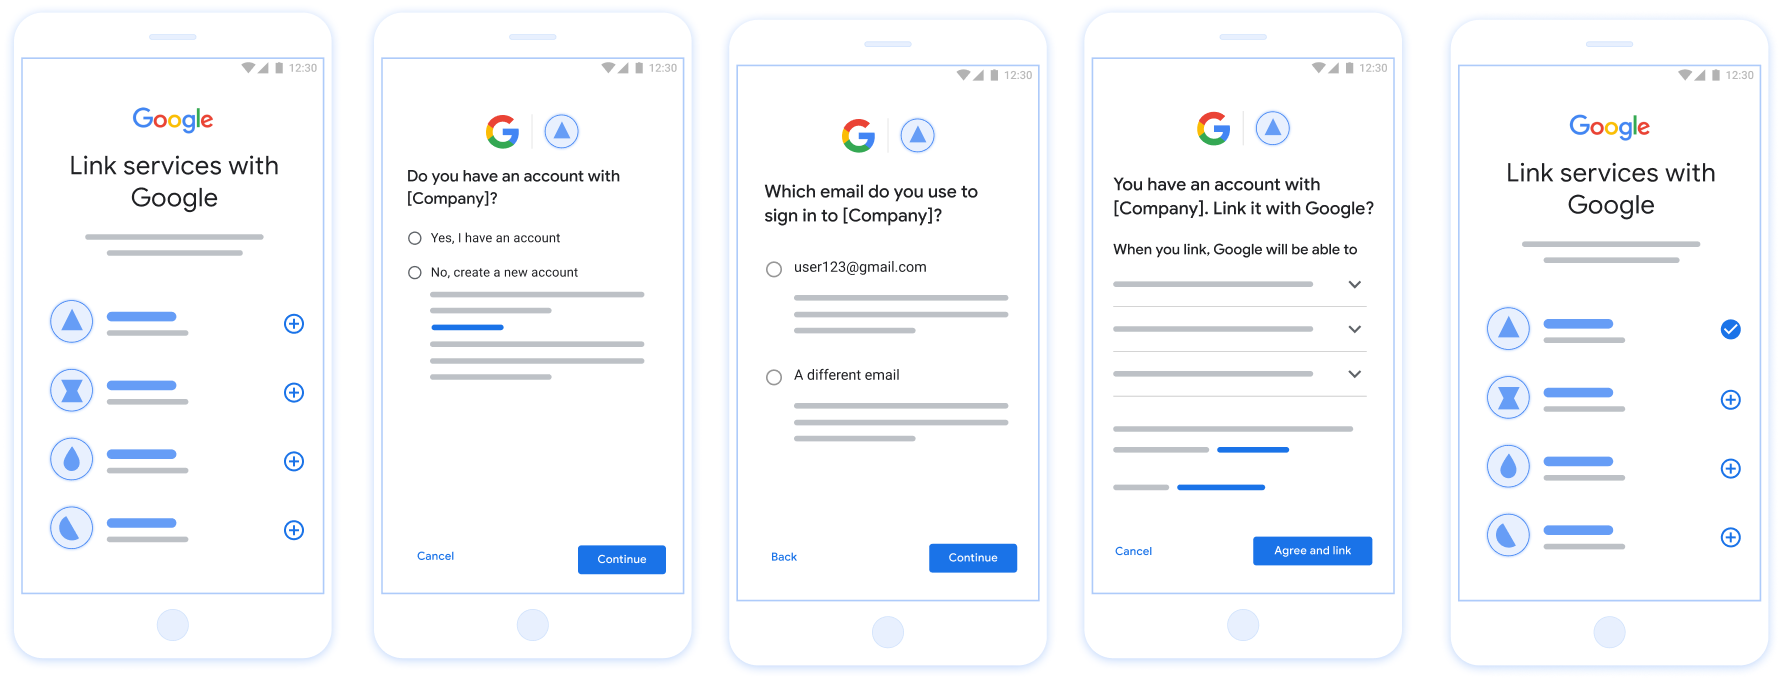
पहली इमेज. उपयोगकर्ता के फ़ोन पर, आसानी से खाता लिंक करने की सुविधा का इस्तेमाल करके खाता लिंक करना
आसानी से लिंक करने की सुविधा के लिए ज़रूरी शर्तें
- वेब पर OAuth के ज़रिए खाता लिंक करने की बुनियादी सुविधा लागू करें. आपकी सेवा में, OAuth 2.0 के मुताबिक अनुमति और टोकन एक्सचेंज एंडपॉइंट काम करने चाहिए.
- आपके टोकन एक्सचेंज एंडपॉइंट को JSON Web Token (JWT) के दावे स्वीकार करने चाहिए. साथ ही,
check,create, औरgetइंटेंट लागू करने चाहिए.
अपना OAuth सर्वर लागू करना
आपके टोकन एक्सचेंज एंडपॉइंट को check, create, get इंटेंट के साथ काम करना चाहिए.
खाता लिंक करने की प्रोसेस पूरी करने के लिए, यह तरीका अपनाएं. साथ ही, यह जानें कि अलग-अलग इंटेंट का इस्तेमाल कब किया जाता है:
- क्या उपयोगकर्ता का खाता आपके पुष्टि करने वाले सिस्टम में है? (उपयोगकर्ता, हां या नहीं चुनकर फ़ैसला लेता है)
- हां : क्या उपयोगकर्ता, आपके प्लैटफ़ॉर्म में साइन इन करने के लिए, अपने Google खाते से जुड़े ईमेल पते का इस्तेमाल करता है? (उपयोगकर्ता, हां या नहीं चुनकर फ़ैसला लेता है)
- हां : क्या उपयोगकर्ता का खाता, आपके पुष्टि करने वाले सिस्टम में मौजूद है? (पुष्टि करने के लिए,
check intentको कॉल किया गया)- हां : अगर इंटेंट का जवाब सही मिलता है, तो
get intentको कॉल किया जाता है और खाते को लिंक कर दिया जाता है. - NO : Create New Account? (उपयोगकर्ता, हां या नहीं चुनकर फ़ैसला लेता है)
- हां :
create intentको कॉल किया जाता है. अगर क्रिएट इंटेंट का जवाब 'सफल' के तौर पर मिलता है, तो खाता लिंक हो जाता है. - नहीं : वेब OAuth फ़्लो ट्रिगर होता है. उपयोगकर्ता को उसके ब्राउज़र पर रीडायरेक्ट किया जाता है. साथ ही, उसे किसी दूसरे ईमेल से लिंक करने का विकल्प दिया जाता है.
- हां :
- हां : अगर इंटेंट का जवाब सही मिलता है, तो
- नहीं : वेब OAuth फ़्लो ट्रिगर होता है. उपयोगकर्ता को उसके ब्राउज़र पर रीडायरेक्ट किया जाता है. साथ ही, उसे किसी दूसरे ईमेल से लिंक करने का विकल्प दिया जाता है.
- हां : क्या उपयोगकर्ता का खाता, आपके पुष्टि करने वाले सिस्टम में मौजूद है? (पुष्टि करने के लिए,
- नहीं : क्या उपयोगकर्ता का खाता, पुष्टि करने वाले आपके सिस्टम में मौजूद है? (पुष्टि करने के लिए,
check intentको कॉल किया गया)- हां : अगर इंटेंट का जवाब सही मिलता है, तो
get intentको कॉल किया जाता है और खाते को लिंक कर दिया जाता है. - नहीं :
create intentको कॉल किया जाता है. अगर खाता बनाने का अनुरोध पूरा हो जाता है, तो खाता लिंक हो जाता है.
- हां : अगर इंटेंट का जवाब सही मिलता है, तो
- हां : क्या उपयोगकर्ता, आपके प्लैटफ़ॉर्म में साइन इन करने के लिए, अपने Google खाते से जुड़े ईमेल पते का इस्तेमाल करता है? (उपयोगकर्ता, हां या नहीं चुनकर फ़ैसला लेता है)
मौजूदा उपयोगकर्ता खाते की जांच करें (इंटेंट देखें)
जब उपयोगकर्ता अपनी Google प्रोफ़ाइल को ऐक्सेस करने की सहमति देता है, तो Google अनुरोध जिसमें Google उपयोगकर्ता की पहचान का हस्ताक्षर किया गया दावा शामिल हो. कॉन्टेंट बनाने दावे में ऐसी जानकारी शामिल है जिसमें उपयोगकर्ता का Google खाता आईडी शामिल है, आपका नाम और ईमेल पता. आपके लिए कॉन्फ़िगर किया गया टोकन एक्सचेंज एंडपॉइंट प्रोजेक्ट हैंडल करता है.
अगर संबंधित Google खाता पहले से ही आपकी पुष्टि में मौजूद है
सिस्टम, तो आपका टोकन एक्सचेंज एंडपॉइंट account_found=true के साथ जवाब देता है. अगर
Google खाता किसी मौजूदा उपयोगकर्ता और आपके टोकन एक्सचेंज एंडपॉइंट से मैच नहीं करता
account_found=false के साथ एचटीटीपी 404 नहीं मिला गड़बड़ी दिखाता है.
अनुरोध में यह फ़ॉर्म मौजूद है:
POST /token HTTP/1.1
Host: oauth2.example.com
Content-Type: application/x-www-form-urlencoded

grant_type=urn:ietf:params:oauth:grant-type:jwt-bearer&intent=check&assertion=JWT&scope=SCOPES&client_id=GOOGLE_CLIENT_ID&client_secret=GOOGLE_CLIENT_SECRET
यह ज़रूरी है कि आपका टोकन एक्सचेंज एंडपॉइंट इन पैरामीटर को मैनेज कर सके:
| टोकन एंडपॉइंट पैरामीटर | |
|---|---|
intent |
इन अनुरोधों के लिए, इस पैरामीटर का मान है
check. |
grant_type |
किस टाइप के टोकन की अदला-बदली की जा रही है. इन अनुरोधों के लिए, यह
पैरामीटर की वैल्यू urn:ietf:params:oauth:grant-type:jwt-bearer है. |
assertion |
JSON Web Token (JWT), जो Google का हस्ताक्षर किया गया दावा उपलब्ध कराता है उपयोगकर्ता की पहचान होती है. JWT में ऐसी जानकारी होती है जिसमें उपयोगकर्ता Google खाता आईडी, नाम, और ईमेल पता. |
client_id |
वह क्लाइंट आईडी जिसे आपने Google को असाइन किया है. |
client_secret |
वह क्लाइंट सीक्रेट जिसे आपने Google को असाइन किया है. |
check इंटेंट के अनुरोधों का जवाब देने के लिए, आपके टोकन एक्सचेंज एंडपॉइंट को ये चरण पूरे करने होंगे:
- JWT के दावे की पुष्टि करें और उन्हें डिकोड करें.
- देखें कि आपके पुष्टि करने वाले सिस्टम में Google खाता पहले से मौजूद है या नहीं.
Validate and decode the JWT assertion
You can validate and decode the JWT assertion by using a JWT-decoding library for your language. Use Google's public keys, available in JWK or PEM formats, to verify the token's signature.
When decoded, the JWT assertion looks like the following example:
{
  "sub": "1234567890",      // The unique ID of the user's Google Account
  "iss": "https://accounts.google.com",        // The assertion's issuer
  "aud": "123-abc.apps.googleusercontent.com", // Your server's client ID
  "iat": 233366400,         // Unix timestamp of the assertion's creation time
  "exp": 233370000,         // Unix timestamp of the assertion's expiration time
  "name": "Jan Jansen",
  "given_name": "Jan",
  "family_name": "Jansen",
  "email": "jan@gmail.com", // If present, the user's email address
  "email_verified": true,   // true, if Google has verified the email address
  "hd": "example.com",      // If present, the host domain of the user's GSuite email address
                            // If present, a URL to user's profile picture
  "picture": "https://lh3.googleusercontent.com/a-/AOh14GjlTnZKHAeb94A-FmEbwZv7uJD986VOF1mJGb2YYQ",
  "locale": "en_US"         // User's locale, from browser or phone settings
}
In addition to verifying the token's signature, verify that the assertion's
issuer (iss field) is https://accounts.google.com, that the audience
(aud field) is your assigned client ID, and that the token has not expired
(exp field).
Using the email, email_verified and hd fields you can determine if
Google hosts and is authoritative for an email address. In cases where Google is
authoritative the user is currently known to be the legitimate account owner
and you may skip password or other challenges methods. Otherwise, these methods
can be used to verify the account prior to linking.
Cases where Google is authoritative:
emailhas a@gmail.comsuffix, this is a Gmail account.email_verifiedis true andhdis set, this is a G Suite account.
Users may register for Google Accounts without using Gmail or G Suite. When
email does not contain a @gmail.com suffix and hd is absent Google is not
authoritative and password or other challenge methods are recommended to verify
the user. email_verified can also be true as Google initially verified the
user when the Google account was created, however ownership of the third party
email account may have since changed.
देखें कि आपके पुष्टि करने वाले सिस्टम में Google खाता पहले से मौजूद है या नहीं
देखें कि इनमें से कोई एक शर्त सही है या नहीं:
- दावे के
subफ़ील्ड में मौजूद Google खाता आईडी, आपके उपयोगकर्ता का है डेटाबेस. - दावे में दिया गया ईमेल पता, आपके उपयोगकर्ता डेटाबेस के किसी उपयोगकर्ता से मेल खाता है.
अगर दोनों में से कोई भी शर्त सही है, तो इसका मतलब है कि उपयोगकर्ता ने पहले ही साइन अप कर लिया है. ऐसी स्थिति में, इस तरह से जवाब दें:
HTTP/1.1 200 Success
Content-Type: application/json;charset=UTF-8

{
  "account_found":"true",
}
अगर Google खाता आईडी और ईमेल पता,
दावा आपके डेटाबेस के किसी उपयोगकर्ता से मेल खाता है, तो उपयोगकर्ता ने अभी तक साइन अप नहीं किया है. तय सीमा में
इस मामले में, आपके टोकन एक्सचेंज एंडपॉइंट को एचटीटीपी 404 वाली गड़बड़ी का जवाब देना होगा
जो "account_found": "false" के बारे में बताता है, जैसा कि इस उदाहरण में दिखाया गया है:
HTTP/1.1 404 Not found
Content-Type: application/json;charset=UTF-8

{
  "account_found":"false",
}
अपने-आप लिंक होने की सुविधा मैनेज करना (इंटेंट पाएं)
जब उपयोगकर्ता अपनी Google प्रोफ़ाइल को ऐक्सेस करने की सहमति देता है, तो Google ऐसा अनुरोध जिसमें Google उपयोगकर्ता की पहचान का हस्ताक्षर किया गया दावा शामिल हो. कॉन्टेंट बनाने दावे में ऐसी जानकारी शामिल है जिसमें उपयोगकर्ता का Google खाता आईडी शामिल है, आपका नाम और ईमेल पता. आपके लिए कॉन्फ़िगर किया गया टोकन एक्सचेंज एंडपॉइंट प्रोजेक्ट हैंडल करता है.
अगर इससे जुड़ा Google खाता, पुष्टि करने के लिए पहले से मौजूद है
सिस्टम का इस्तेमाल करता है, तो आपका टोकन एक्सचेंज एंडपॉइंट, उपयोगकर्ता के लिए टोकन दिखाता है. अगर
Google खाता किसी मौजूदा उपयोगकर्ता और आपके टोकन एक्सचेंज एंडपॉइंट से मैच नहीं करता
यह linking_error गड़बड़ी और वैकल्पिक login_hint दिखाता है.
अनुरोध में यह फ़ॉर्म मौजूद है:
POST /token HTTP/1.1
Host: oauth2.example.com
Content-Type: application/x-www-form-urlencoded

grant_type=urn:ietf:params:oauth:grant-type:jwt-bearer&intent=get&assertion=JWT&scope=SCOPES&client_id=GOOGLE_CLIENT_ID&client_secret=GOOGLE_CLIENT_SECRET
यह ज़रूरी है कि आपका टोकन एक्सचेंज एंडपॉइंट इन पैरामीटर को मैनेज कर सके:
| टोकन एंडपॉइंट पैरामीटर | |
|---|---|
intent |
इन अनुरोधों के लिए, इस पैरामीटर की वैल्यू get है. |
grant_type |
किस टाइप के टोकन की अदला-बदली की जा रही है. इन अनुरोधों के लिए, यह
पैरामीटर की वैल्यू urn:ietf:params:oauth:grant-type:jwt-bearer है. |
assertion |
JSON Web Token (JWT), जो Google का हस्ताक्षर किया गया दावा उपलब्ध कराता है उपयोगकर्ता की पहचान होती है. JWT में ऐसी जानकारी होती है जिसमें उपयोगकर्ता Google खाता आईडी, नाम, और ईमेल पता. |
scope |
ज़रूरी नहीं: ऐसे कोई भी दायरे जिन्हें आपने Google को, अनुरोध करने के लिए कॉन्फ़िगर किया है उपयोगकर्ता. |
client_id |
वह क्लाइंट आईडी जिसे आपने Google को असाइन किया है. |
client_secret |
वह क्लाइंट सीक्रेट जिसे आपने Google को असाइन किया है. |
get इंटेंट के अनुरोधों का जवाब देने के लिए, आपके टोकन एक्सचेंज एंडपॉइंट को ये चरण पूरे करने होंगे:
- JWT के दावे की पुष्टि करें और उन्हें डिकोड करें.
- देखें कि आपके पुष्टि करने वाले सिस्टम में Google खाता पहले से मौजूद है या नहीं.
Validate and decode the JWT assertion
You can validate and decode the JWT assertion by using a JWT-decoding library for your language. Use Google's public keys, available in JWK or PEM formats, to verify the token's signature.
When decoded, the JWT assertion looks like the following example:
{
  "sub": "1234567890",      // The unique ID of the user's Google Account
  "iss": "https://accounts.google.com",        // The assertion's issuer
  "aud": "123-abc.apps.googleusercontent.com", // Your server's client ID
  "iat": 233366400,         // Unix timestamp of the assertion's creation time
  "exp": 233370000,         // Unix timestamp of the assertion's expiration time
  "name": "Jan Jansen",
  "given_name": "Jan",
  "family_name": "Jansen",
  "email": "jan@gmail.com", // If present, the user's email address
  "email_verified": true,   // true, if Google has verified the email address
  "hd": "example.com",      // If present, the host domain of the user's GSuite email address
                            // If present, a URL to user's profile picture
  "picture": "https://lh3.googleusercontent.com/a-/AOh14GjlTnZKHAeb94A-FmEbwZv7uJD986VOF1mJGb2YYQ",
  "locale": "en_US"         // User's locale, from browser or phone settings
}
In addition to verifying the token's signature, verify that the assertion's
issuer (iss field) is https://accounts.google.com, that the audience
(aud field) is your assigned client ID, and that the token has not expired
(exp field).
Using the email, email_verified and hd fields you can determine if
Google hosts and is authoritative for an email address. In cases where Google is
authoritative the user is currently known to be the legitimate account owner
and you may skip password or other challenges methods. Otherwise, these methods
can be used to verify the account prior to linking.
Cases where Google is authoritative:
emailhas a@gmail.comsuffix, this is a Gmail account.email_verifiedis true andhdis set, this is a G Suite account.
Users may register for Google Accounts without using Gmail or G Suite. When
email does not contain a @gmail.com suffix and hd is absent Google is not
authoritative and password or other challenge methods are recommended to verify
the user. email_verified can also be true as Google initially verified the
user when the Google account was created, however ownership of the third party
email account may have since changed.
देखें कि आपके पुष्टि करने वाले सिस्टम में Google खाता पहले से मौजूद है या नहीं
देखें कि इनमें से कोई एक शर्त सही है या नहीं:
- दावे के
subफ़ील्ड में मौजूद Google खाता आईडी, आपके उपयोगकर्ता का है डेटाबेस. - दावे में दिया गया ईमेल पता, आपके उपयोगकर्ता डेटाबेस के किसी उपयोगकर्ता से मेल खाता है.
अगर उपयोगकर्ता का कोई खाता मिल जाता है, तो ऐक्सेस टोकन जारी करें और अपने एचटीटीपीएस रिस्पॉन्स के मुख्य हिस्से में, JSON ऑब्जेक्ट में वैल्यू दिखाएं, जैसा कि इस उदाहरण में दिखाया गया है:
{
  "token_type": "Bearer",
  "access_token": "ACCESS_TOKEN",
  "refresh_token": "REFRESH_TOKEN",
  "expires_in": SECONDS_TO_EXPIRATION
}
कुछ मामलों में, हो सकता है कि आईडी टोकन के आधार पर खाता लिंक न किया जा सके. अगर यह
किसी भी वजह से ऐसा करता है, तो आपके टोकन एक्सचेंज एंडपॉइंट को एचटीटीपी के साथ जवाब देना होगा
401 वाली गड़बड़ी, जो error=linking_error के बारे में बताती है, जैसा कि नीचे दिए गए उदाहरण में बताया गया है:
HTTP/1.1 401 Unauthorized
Content-Type: application/json;charset=UTF-8

{
  "error":"linking_error",
  "login_hint":"foo@bar.com"
}
जब Google को linking_error के साथ 401 वाली गड़बड़ी का जवाब मिलता है, तो Google
उपयोगकर्ता को आपके ऑथराइज़ेशन एंडपॉइंट पर भेजने के लिए, पैरामीटर के तौर पर login_hint का इस्तेमाल करता है. कॉन्टेंट बनाने
उपयोगकर्ता अपने ब्राउज़र में OAuth लिंक करने के फ़्लो का इस्तेमाल करके, खाता लिंक करता है.
'Google से साइन इन करें' सुविधा का इस्तेमाल करके खाता बनाने की प्रोसेस मैनेज करना (खाता बनाने का इरादा)
जब किसी व्यक्ति को आपकी सेवा पर खाता बनाना होता है, तो Google आपके टोकन एक्सचेंज एंडपॉइंट को एक अनुरोध भेजता है. इसमें intent=create की जानकारी होती है.
अनुरोध इस तरह का होता है:
POST /token HTTP/1.1
Host: oauth2.example.com
Content-Type: application/x-www-form-urlencoded

response_type=token&grant_type=urn:ietf:params:oauth:grant-type:jwt-bearer&scope=SCOPES&intent=create&assertion=JWT&client_id=GOOGLE_CLIENT_ID&client_secret=GOOGLE_CLIENT_SECRET
आपका टोकन एक्सचेंज एंडपॉइंट, इन पैरामीटर को मैनेज कर सकता हो:
| टोकन एंडपॉइंट पैरामीटर | |
|---|---|
intent |
इन अनुरोधों के लिए, इस पैरामीटर की वैल्यू create है. |
grant_type |
एक्सचेंज किया जा रहा टोकन किस तरह का है. इन अनुरोधों के लिए, इस पैरामीटर की वैल्यू urn:ietf:params:oauth:grant-type:jwt-bearer होती है. |
assertion |
JSON Web Token (JWT), जो Google उपयोगकर्ता की पहचान के बारे में हस्ताक्षर किया गया दावा दिखाता है. JWT में ऐसी जानकारी होती है जिसमें उपयोगकर्ता का Google खाता आईडी, नाम, और ईमेल पता शामिल होता है. |
client_id |
Google को असाइन किया गया क्लाइंट आईडी. |
client_secret |
वह क्लाइंट सीक्रेट जिसे आपने Google को असाइन किया है. |
assertion पैरामीटर में मौजूद JWT में उपयोगकर्ता का Google खाता आईडी, नाम, और ईमेल पता होता है. इसका इस्तेमाल, अपनी सेवा पर नया खाता बनाने के लिए किया जा सकता है.
create के इंटेंट अनुरोधों का जवाब देने के लिए, आपके टोकन एक्सचेंज एंडपॉइंट को यह तरीका अपनाना होगा:
- JWT दावे की पुष्टि करें और उसे डिकोड करें.
- उपयोगकर्ता की जानकारी की पुष्टि करना और नया खाता बनाना.
Validate and decode the JWT assertion
You can validate and decode the JWT assertion by using a JWT-decoding library for your language. Use Google's public keys, available in JWK or PEM formats, to verify the token's signature.
When decoded, the JWT assertion looks like the following example:
{
  "sub": "1234567890",      // The unique ID of the user's Google Account
  "iss": "https://accounts.google.com",        // The assertion's issuer
  "aud": "123-abc.apps.googleusercontent.com", // Your server's client ID
  "iat": 233366400,         // Unix timestamp of the assertion's creation time
  "exp": 233370000,         // Unix timestamp of the assertion's expiration time
  "name": "Jan Jansen",
  "given_name": "Jan",
  "family_name": "Jansen",
  "email": "jan@gmail.com", // If present, the user's email address
  "email_verified": true,   // true, if Google has verified the email address
  "hd": "example.com",      // If present, the host domain of the user's GSuite email address
                            // If present, a URL to user's profile picture
  "picture": "https://lh3.googleusercontent.com/a-/AOh14GjlTnZKHAeb94A-FmEbwZv7uJD986VOF1mJGb2YYQ",
  "locale": "en_US"         // User's locale, from browser or phone settings
}
In addition to verifying the token's signature, verify that the assertion's
issuer (iss field) is https://accounts.google.com, that the audience
(aud field) is your assigned client ID, and that the token has not expired
(exp field).
Using the email, email_verified and hd fields you can determine if
Google hosts and is authoritative for an email address. In cases where Google is
authoritative the user is currently known to be the legitimate account owner
and you may skip password or other challenges methods. Otherwise, these methods
can be used to verify the account prior to linking.
Cases where Google is authoritative:
emailhas a@gmail.comsuffix, this is a Gmail account.email_verifiedis true andhdis set, this is a G Suite account.
Users may register for Google Accounts without using Gmail or G Suite. When
email does not contain a @gmail.com suffix and hd is absent Google is not
authoritative and password or other challenge methods are recommended to verify
the user. email_verified can also be true as Google initially verified the
user when the Google account was created, however ownership of the third party
email account may have since changed.
उपयोगकर्ता की जानकारी की पुष्टि करना और नया खाता बनाना
देखें कि इनमें से कोई शर्त पूरी होती है या नहीं:
- अशन के
subफ़ील्ड में मौजूद Google खाता आईडी, आपके उपयोगकर्ता डेटाबेस में मौजूद है. - असर्शन में दिया गया ईमेल पता, आपकी उपयोगकर्ता डेटाबेस में मौजूद किसी उपयोगकर्ता से मेल खाता हो.
अगर इनमें से कोई भी शर्त पूरी होती है, तो उपयोगकर्ता को अपने मौजूदा खाते को Google खाते से लिंक करने के लिए कहें. इसके लिए, अनुरोध का जवाब एचटीटीपी 401 गड़बड़ी के साथ दें. इसमें error=linking_error की जानकारी दें और उपयोगकर्ता का ईमेल पता login_hint के तौर पर दें. यहां जवाब का एक नमूना दिया गया है:
HTTP/1.1 401 Unauthorized
Content-Type: application/json;charset=UTF-8

{
  "error":"linking_error",
  "login_hint":"foo@bar.com"
}
जब Google को linking_error के साथ 401 गड़बड़ी का रिस्पॉन्स मिलता है, तो Google उपयोगकर्ता को login_hint पैरामीटर के साथ, मंज़ूरी वाले एंडपॉइंट पर भेजता है. उपयोगकर्ता, अपने ब्राउज़र में OAuth लिंकिंग फ़्लो का इस्तेमाल करके खाता लिंक करने की प्रोसेस पूरी करता है.
अगर इनमें से कोई भी शर्त पूरी नहीं होती है, तो JWT में दी गई जानकारी का इस्तेमाल करके, नया उपयोगकर्ता खाता बनाएं. आम तौर पर, नए खातों के लिए पासवर्ड सेट नहीं होता. हमारा सुझाव है कि आप अन्य प्लैटफ़ॉर्म पर 'Google से साइन इन करें' सुविधा जोड़ें, ताकि उपयोगकर्ता आपके ऐप्लिकेशन के सभी प्लैटफ़ॉर्म पर Google से साइन इन कर सकें. इसके अलावा, उपयोगकर्ता को एक लिंक ईमेल किया जा सकता है. इससे पासवर्ड वापस पाने की प्रोसेस शुरू हो जाएगी. इससे उपयोगकर्ता, अन्य प्लैटफ़ॉर्म पर साइन इन करने के लिए पासवर्ड सेट कर पाएगा.
खाता बन जाने के बाद, ऐक्सेस टोकन जारी करें. साथ ही, एचटीटीपीएस रिस्पॉन्स के मुख्य हिस्से में JSON ऑब्जेक्ट के तौर पर वैल्यू दिखाएं. जैसे, यहां दिए गए उदाहरण में दिखाया गया है:
{
  "token_type": "Bearer",
  "access_token": "ACCESS_TOKEN",
  "refresh_token": "REFRESH_TOKEN",
  "expires_in": SECONDS_TO_EXPIRATION
}
अपना Google API क्लाइंट आईडी पाना
खाता लिंक करने की रजिस्ट्रेशन प्रोसेस के दौरान, आपको अपना Google API क्लाइंट आईडी देना होगा.
OAuth लिंक करने के चरणों को पूरा करते समय बनाए गए प्रोजेक्ट का इस्तेमाल करके, अपना एपीआई क्लाइंट आईडी पाने के लिए. इसके लिए, यह तरीका अपनाएं:
- क्लाइंट पेज पर जाएं.
Google APIs प्रोजेक्ट बनाएं या कोई मौजूदा प्रोजेक्ट चुनें.
अगर आपके प्रोजेक्ट में वेब ऐप्लिकेशन टाइप के लिए क्लाइंट आईडी नहीं है, तो इसे बनाने के लिए क्लाइंट बनाएं पर क्लिक करें. अनुमति वाले JavaScript ऑरिजिन बॉक्स में, अपनी साइट का डोमेन शामिल करना न भूलें. स्थानीय टेस्ट या डेवलपमेंट करते समय, आपको अनुमति वाले JavaScript ऑरिजिन फ़ील्ड में
http://localhostऔरhttp://localhost:<port_number>, दोनों को जोड़ना होगा.
लागू करने की पुष्टि करें
OAuth 2.0 Playground टूल का इस्तेमाल करके, लागू करने की पुष्टि की जा सकती है.
टूल में, यह तरीका अपनाएं:
- OAuth 2.0 कॉन्फ़िगरेशन विंडो खोलने के लिए, कॉन्फ़िगरेशन पर क्लिक करें.
- OAuth फ़्लो फ़ील्ड में, क्लाइंट-साइड चुनें.
- OAuth एंडपॉइंट फ़ील्ड में, कस्टम चुनें.
- अपने OAuth 2.0 एंडपॉइंट और Google को असाइन किया गया क्लाइंट आईडी, उससे जुड़े फ़ील्ड में डालें.
- पहला चरण सेक्शन में, कोई भी Google स्कोप न चुनें. इसके बजाय, इस फ़ील्ड को खाली छोड़ दें या अपने सर्वर के लिए मान्य स्कोप टाइप करें. अगर OAuth स्कोप का इस्तेमाल नहीं किया जाता है, तो कोई भी स्ट्रिंग टाइप करें. जब आपका काम पूरा हो जाए, तो एपीआई को अनुमति दें पर क्लिक करें.
- दूसरे चरण और तीसरे चरण सेक्शन में, OAuth 2.0 फ़्लो देखें. साथ ही, यह पुष्टि करें कि हर चरण उम्मीद के मुताबिक काम कर रहा है.
Google खाता लिंक करने की सुविधा का डेमो टूल का इस्तेमाल करके, लागू की गई सुविधा की पुष्टि की जा सकती है.
टूल में, यह तरीका अपनाएं:
- Google से साइन इन करें बटन पर क्लिक करें.
- वह खाता चुनें जिसे आपको लिंक करना है.
- सेवा आईडी डालें.
- विकल्प के तौर पर, एक या उससे ज़्यादा ऐसे स्कोप डालें जिनके लिए आपको ऐक्सेस का अनुरोध करना है.
- डेमो शुरू करें पर क्लिक करें.
- जब कहा जाए, तब पुष्टि करें कि आपके पास खाते को लिंक करने के अनुरोध को स्वीकार या अस्वीकार करने का विकल्प है.
- पुष्टि करें कि आपको अपने प्लैटफ़ॉर्म पर रीडायरेक्ट किया गया हो.