ภาพรวม
การลิงก์ที่ปรับปรุงให้ง่ายขึ้นด้วยการลงชื่อเข้าใช้ด้วย Google ที่อิงตาม OAuthจะเพิ่มการลงชื่อเข้าใช้ด้วย Google นอกเหนือจาก การลิงก์ OAuth ซึ่งจะมอบประสบการณ์การลิงก์ที่ราบรื่นให้แก่ผู้ใช้ Google รวมถึงเปิดใช้การสร้างบัญชี ซึ่งช่วยให้ผู้ใช้สร้างบัญชีใหม่ในบริการของคุณโดยใช้บัญชี Google ได้
หากต้องการลิงก์บัญชีด้วย OAuth และลงชื่อเข้าใช้ด้วย Google ให้ทำตามขั้นตอนทั่วไปต่อไปนี้
- ขั้นแรก ให้ขอความยินยอมจากผู้ใช้ในการเข้าถึงโปรไฟล์ Google
- ใช้ข้อมูลในโปรไฟล์เพื่อตรวจสอบว่าบัญชีผู้ใช้มีอยู่หรือไม่
- สำหรับผู้ใช้ที่มีอยู่ ให้ลิงก์บัญชี
- หากไม่พบผู้ใช้ Google ที่ตรงกันในระบบการตรวจสอบสิทธิ์ ให้ตรวจสอบโทเค็นรหัสที่ได้รับจาก Google จากนั้นคุณจะสร้างผู้ใช้ตามข้อมูลโปรไฟล์ที่อยู่ในโทเค็นรหัสได้
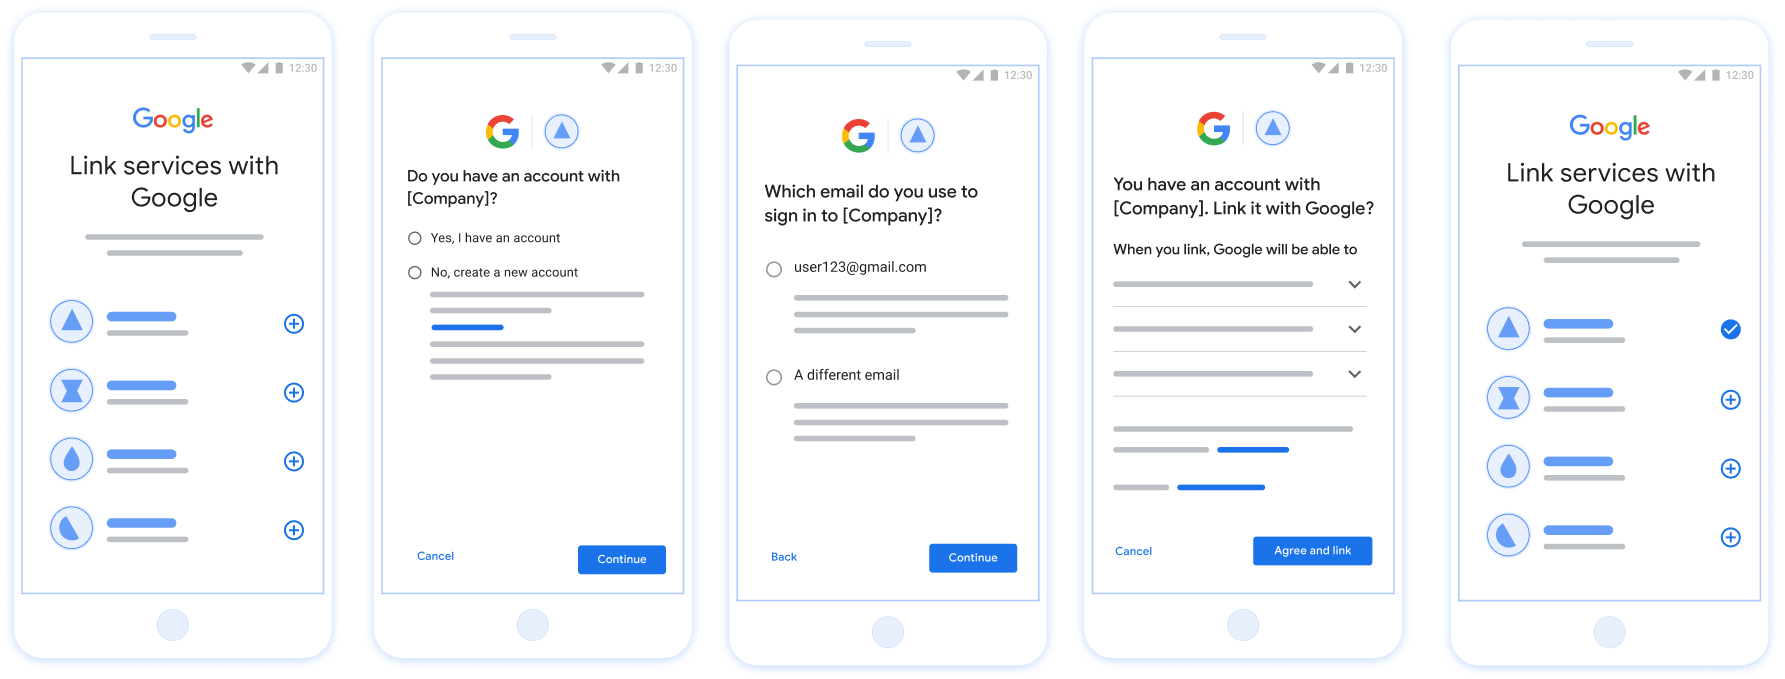
รูปที่ 1 การลิงก์บัญชีในโทรศัพท์ของผู้ใช้ด้วยการลิงก์ที่ปรับปรุงให้ง่ายขึ้น
การลิงก์ที่ปรับปรุงให้ง่ายขึ้น: ขั้นตอนการทำงานของ OAuth + การลงชื่อเข้าใช้ด้วย Google
แผนภาพลำดับต่อไปนี้แสดงรายละเอียดการโต้ตอบระหว่างผู้ใช้ Google และปลายทางการแลกเปลี่ยนโทเค็นสำหรับการลิงก์ที่ปรับปรุงให้ง่ายขึ้น
บทบาทและความรับผิดชอบ
ตารางต่อไปนี้กำหนดบทบาทและความรับผิดชอบของผู้มีส่วนร่วมในขั้นตอนการทำงานของการลิงก์ที่ปรับปรุงให้ง่ายขึ้น
| Actor / Component | GAL Role | Responsibilities |
|---|---|---|
| Google App / Server | ไคลเอ็นต์ OAuth | ขอความยินยอมของผู้ใช้สำหรับการลงชื่อเข้าใช้ด้วย Google, ส่งการยืนยันตัวตน (JWT) ไปยังเซิร์ฟเวอร์ และจัดเก็บโทเค็นที่ได้มาอย่างปลอดภัย |
| Your Token Exchange Endpoint | ผู้ให้บริการข้อมูลประจำตัว / เซิร์ฟเวอร์การให้สิทธิ์ | ตรวจสอบการยืนยันตัวตน, ตรวจสอบบัญชีที่มีอยู่, จัดการ
Intent การลิงก์บัญชี (check, get,
create) และออกโทเค็นตาม
Intent ที่ขอ |
| Your Service API | เซิร์ฟเวอร์ทรัพยากร | ให้สิทธิ์เข้าถึงข้อมูลผู้ใช้เมื่อได้รับโทเค็นเพื่อการเข้าถึงที่ถูกต้อง |
ข้อกำหนดสำหรับการลิงก์ที่ปรับปรุงให้ง่ายขึ้น
- ติดตั้งใช้งานขั้นตอนการทำงานของการลิงก์ OAuth ขั้นพื้นฐาน บริการของคุณต้องรองรับปลายทาง การให้สิทธิ์และ การแลกเปลี่ยนโทเค็นที่เป็นไปตามข้อกำหนดของ OAuth 2.0
- ปลายทาง การแลกเปลี่ยนโทเค็น ต้องรองรับการยืนยัน โทเค็นเว็บ JSON (JWT) และติดตั้งใช้งาน Intent
check,createและget
ติดตั้งใช้งานเซิร์ฟเวอร์ OAuth
ปลายทาง การแลกเปลี่ยนโทเค็นต้องรองรับ Intent check, create และ get
ทำตามขั้นตอนต่อไปนี้เพื่อดำเนินการขั้นตอนการทำงานของการลิงก์บัญชีให้เสร็จสมบูรณ์และดูว่าเมื่อใดที่ระบบจะใช้ Intent ต่างๆ
- ผู้ใช้มีบัญชีในระบบการตรวจสอบสิทธิ์ของคุณหรือไม่ (ผู้ใช้ตัดสินใจโดยเลือก "ใช่" หรือ "ไม่")
- ใช่ : ผู้ใช้ใช้ที่อยู่อีเมลที่เชื่อมโยงกับบัญชี Google เพื่อลงชื่อเข้าใช้แพลตฟอร์มของคุณหรือไม่ (ผู้ใช้ตัดสินใจโดยเลือก "ใช่" หรือ "ไม่")
- ใช่ : ผู้ใช้มีบัญชีที่ตรงกันในระบบการตรวจสอบสิทธิ์ของคุณหรือไม่ (
check intentระบบจะเรียกใช้ เพื่อยืนยัน)- ใช่ : ระบบจะเรียกใช้
get intentและลิงก์บัญชีหาก get intent แสดงผลสำเร็จ - ไม่ : สร้างบัญชีใหม่หรือไม่ (ผู้ใช้ตัดสินใจโดยเลือก "ใช่" หรือ "ไม่")
- ใช่ : ระบบจะเรียกใช้
create intentและลิงก์บัญชีหาก create intent แสดงผลสำเร็จ - ไม่ : ระบบจะทริกเกอร์ขั้นตอนการทำงานของการลิงก์ OAuth, นำผู้ใช้ไปยังเบราว์เซอร์ และให้ตัวเลือกแก่ผู้ใช้ในการลิงก์ด้วยอีเมลอื่น
- ใช่ : ระบบจะเรียกใช้
- ใช่ : ระบบจะเรียกใช้
- ไม่ : ระบบจะทริกเกอร์ขั้นตอนการทำงานของการลิงก์ OAuth, นำผู้ใช้ไปยังเบราว์เซอร์ และให้ตัวเลือกแก่ผู้ใช้ในการลิงก์ด้วยอีเมลอื่น
- ใช่ : ผู้ใช้มีบัญชีที่ตรงกันในระบบการตรวจสอบสิทธิ์ของคุณหรือไม่ (
- ไม่ : ผู้ใช้มีบัญชีที่ตรงกันในระบบการตรวจสอบสิทธิ์ของคุณหรือไม่ (
check intentระบบจะเรียกใช้ เพื่อยืนยัน)- ใช่ : ระบบจะเรียกใช้
get intentและลิงก์บัญชีหาก get intent แสดงผลสำเร็จ - ไม่ : ระบบจะเรียกใช้
create intentและลิงก์บัญชีหาก create intent แสดงผลสำเร็จ
- ใช่ : ระบบจะเรียกใช้
- ใช่ : ผู้ใช้ใช้ที่อยู่อีเมลที่เชื่อมโยงกับบัญชี Google เพื่อลงชื่อเข้าใช้แพลตฟอร์มของคุณหรือไม่ (ผู้ใช้ตัดสินใจโดยเลือก "ใช่" หรือ "ไม่")
ตรวจสอบบัญชีผู้ใช้ที่มีอยู่ (ตรวจสอบ Intent)
หลังจากที่ผู้ใช้ให้ความยินยอมในการเข้าถึงโปรไฟล์ Google แล้ว Google จะส่ง คำขอที่มีการยืนยันข้อมูลประจำตัวของผู้ใช้ Google ที่ลงชื่อ การยืนยันจะมีข้อมูลที่มีรหัสบัญชี Google ของผู้ใช้ ชื่อ และที่อยู่อีเมล ปลายทางการแลกเปลี่ยนโทเค็นที่กำหนดค่าไว้สำหรับ โปรเจ็กต์จะจัดการคำขอนั้น
หากมีบัญชี Google ที่เกี่ยวข้องอยู่ในการตรวจสอบสิทธิ์อยู่แล้ว
ปลายทางการแลกเปลี่ยนโทเค็นจะตอบสนองด้วย account_found=true หาก
บัญชี Google ไม่ตรงกับผู้ใช้ที่มีอยู่, ปลายทางการแลกเปลี่ยนโทเค็น
แสดงผลข้อผิดพลาด HTTP 404 Not Found กับ account_found=false
คำขอมีแบบฟอร์มต่อไปนี้
POST /token HTTP/1.1
Host: oauth2.example.com
Content-Type: application/x-www-form-urlencoded

grant_type=urn:ietf:params:oauth:grant-type:jwt-bearer&intent=check&assertion=JWT&scope=SCOPES&client_id=GOOGLE_CLIENT_ID&client_secret=GOOGLE_CLIENT_SECRET
ปลายทางการแลกเปลี่ยนโทเค็นต้องจัดการพารามิเตอร์ต่อไปนี้ได้
| พารามิเตอร์ปลายทางของโทเค็น | |
|---|---|
intent |
สำหรับคำขอเหล่านี้ ค่าของพารามิเตอร์นี้คือ
check |
grant_type |
ประเภทของโทเค็นที่แลกเปลี่ยน สำหรับคำขอเหล่านี้ พารามิเตอร์นี้
มีค่า urn:ietf:params:oauth:grant-type:jwt-bearer |
assertion |
JSON Web Token (JWT) ที่แสดงการยืนยันของ Google ข้อมูลประจำตัวของผู้ใช้ JWT มีข้อมูลที่ประกอบด้วย รหัส ชื่อ และอีเมลของบัญชี Google |
client_id |
รหัสไคลเอ็นต์ที่คุณกำหนดให้กับ Google |
client_secret |
รหัสลับไคลเอ็นต์ที่คุณกำหนดให้กับ Google |
หากต้องการตอบกลับคำขอ Intent check ปลายทางการแลกเปลี่ยนโทเค็นต้องทำตามขั้นตอนต่อไปนี้
- ตรวจสอบและถอดรหัสการยืนยัน JWT
- ตรวจสอบว่ามีบัญชี Google อยู่ในระบบการตรวจสอบสิทธิ์ของคุณแล้วหรือยัง
Validate and decode the JWT assertion
You can validate and decode the JWT assertion by using a JWT-decoding library for your language. Use Google's public keys, available in JWK or PEM formats, to verify the token's signature.
When decoded, the JWT assertion looks like the following example:
{
  "sub": "1234567890",      // The unique ID of the user's Google Account
  "iss": "https://accounts.google.com",        // The assertion's issuer
  "aud": "123-abc.apps.googleusercontent.com", // Your server's client ID
  "iat": 233366400,         // Unix timestamp of the assertion's creation time
  "exp": 233370000,         // Unix timestamp of the assertion's expiration time
  "name": "Jan Jansen",
  "given_name": "Jan",
  "family_name": "Jansen",
  "email": "jan@gmail.com", // If present, the user's email address
  "email_verified": true,   // true, if Google has verified the email address
  "hd": "example.com",      // If present, the host domain of the user's GSuite email address
                            // If present, a URL to user's profile picture
  "picture": "https://lh3.googleusercontent.com/a-/AOh14GjlTnZKHAeb94A-FmEbwZv7uJD986VOF1mJGb2YYQ",
  "locale": "en_US"         // User's locale, from browser or phone settings
}
In addition to verifying the token's signature, verify that the assertion's
issuer (iss field) is https://accounts.google.com, that the audience
(aud field) is your assigned client ID, and that the token has not expired
(exp field).
Using the email, email_verified and hd fields you can determine if
Google hosts and is authoritative for an email address. In cases where Google is
authoritative the user is currently known to be the legitimate account owner
and you may skip password or other challenges methods. Otherwise, these methods
can be used to verify the account prior to linking.
Cases where Google is authoritative:
emailhas a@gmail.comsuffix, this is a Gmail account.email_verifiedis true andhdis set, this is a G Suite account.
Users may register for Google Accounts without using Gmail or G Suite. When
email does not contain a @gmail.com suffix and hd is absent Google is not
authoritative and password or other challenge methods are recommended to verify
the user. email_verified can also be true as Google initially verified the
user when the Google account was created, however ownership of the third party
email account may have since changed.
ตรวจสอบว่ามีบัญชี Google อยู่ในระบบการตรวจสอบสิทธิ์ของคุณแล้วหรือยัง
ตรวจสอบว่าเงื่อนไขใดเงื่อนไขหนึ่งต่อไปนี้เป็นจริง
- รหัสบัญชี Google ที่พบในช่อง
subของการยืนยันนั้นอยู่ในผู้ใช้ของคุณ ฐานข้อมูล - อีเมลในการยืนยันตรงกับผู้ใช้ในฐานข้อมูลผู้ใช้
หากเงื่อนไขใดเงื่อนไขหนึ่งเป็นจริง แสดงว่าผู้ใช้ได้ลงชื่อสมัครใช้แล้ว ในกรณีดังกล่าว จะแสดงการตอบกลับดังตัวอย่างต่อไปนี้
HTTP/1.1 200 Success
Content-Type: application/json;charset=UTF-8

{
  "account_found":"true",
}
หากทั้งรหัสบัญชี Google และอีเมลที่ระบุไว้ใน
การยืนยันตรงกับผู้ใช้ในฐานข้อมูลของคุณ ซึ่งผู้ใช้ยังไม่ได้ลงชื่อสมัครใช้ ใน
ในกรณีนี้ ปลายทางการแลกเปลี่ยนโทเค็นจะต้องตอบกลับพร้อมข้อผิดพลาด HTTP 404
ที่ระบุ "account_found": "false" ตามตัวอย่างต่อไปนี้
HTTP/1.1 404 Not found
Content-Type: application/json;charset=UTF-8

{
  "account_found":"false",
}
จัดการการลิงก์อัตโนมัติ (รับ Intent)
หลังจากที่ผู้ใช้ให้ความยินยอมในการเข้าถึงโปรไฟล์ Google แล้ว Google จะส่ง คำขอที่มีการยืนยันข้อมูลประจำตัวของผู้ใช้ Google ที่ลงชื่อ การยืนยันจะมีข้อมูลที่มีรหัสบัญชี Google ของผู้ใช้ ชื่อ และที่อยู่อีเมล ปลายทางการแลกเปลี่ยนโทเค็นที่กำหนดค่าไว้สำหรับ โปรเจ็กต์จะจัดการคำขอนั้น
หากมีบัญชี Google ที่เกี่ยวข้องอยู่ในการตรวจสอบสิทธิ์อยู่แล้ว
ปลายทางการแลกเปลี่ยนโทเค็นจะส่งคืนโทเค็นสำหรับผู้ใช้ หาก
บัญชี Google ไม่ตรงกับผู้ใช้ที่มีอยู่, ปลายทางการแลกเปลี่ยนโทเค็น
แสดงผลข้อผิดพลาด linking_error และเลือก login_hint หรือไม่ก็ได้
คำขอมีแบบฟอร์มต่อไปนี้
POST /token HTTP/1.1
Host: oauth2.example.com
Content-Type: application/x-www-form-urlencoded

grant_type=urn:ietf:params:oauth:grant-type:jwt-bearer&intent=get&assertion=JWT&scope=SCOPES&client_id=GOOGLE_CLIENT_ID&client_secret=GOOGLE_CLIENT_SECRET
ปลายทางการแลกเปลี่ยนโทเค็นต้องจัดการพารามิเตอร์ต่อไปนี้ได้
| พารามิเตอร์ปลายทางของโทเค็น | |
|---|---|
intent |
สำหรับคำขอเหล่านี้ ค่าของพารามิเตอร์นี้คือ get |
grant_type |
ประเภทของโทเค็นที่แลกเปลี่ยน สำหรับคำขอเหล่านี้ พารามิเตอร์นี้
มีค่า urn:ietf:params:oauth:grant-type:jwt-bearer |
assertion |
JSON Web Token (JWT) ที่แสดงการยืนยันของ Google ข้อมูลประจำตัวของผู้ใช้ JWT มีข้อมูลที่ประกอบด้วย รหัส ชื่อ และอีเมลของบัญชี Google |
scope |
ไม่บังคับ: ขอบเขตที่คุณกำหนดค่าให้ Google ส่งคำขอ ผู้ใช้ |
client_id |
รหัสไคลเอ็นต์ที่คุณกำหนดให้กับ Google |
client_secret |
รหัสลับไคลเอ็นต์ที่คุณกำหนดให้กับ Google |
หากต้องการตอบกลับคำขอ Intent get ปลายทางการแลกเปลี่ยนโทเค็นต้องทำตามขั้นตอนต่อไปนี้
- ตรวจสอบและถอดรหัสการยืนยัน JWT
- ตรวจสอบว่ามีบัญชี Google อยู่ในระบบการตรวจสอบสิทธิ์ของคุณแล้วหรือยัง
Validate and decode the JWT assertion
You can validate and decode the JWT assertion by using a JWT-decoding library for your language. Use Google's public keys, available in JWK or PEM formats, to verify the token's signature.
When decoded, the JWT assertion looks like the following example:
{
  "sub": "1234567890",      // The unique ID of the user's Google Account
  "iss": "https://accounts.google.com",        // The assertion's issuer
  "aud": "123-abc.apps.googleusercontent.com", // Your server's client ID
  "iat": 233366400,         // Unix timestamp of the assertion's creation time
  "exp": 233370000,         // Unix timestamp of the assertion's expiration time
  "name": "Jan Jansen",
  "given_name": "Jan",
  "family_name": "Jansen",
  "email": "jan@gmail.com", // If present, the user's email address
  "email_verified": true,   // true, if Google has verified the email address
  "hd": "example.com",      // If present, the host domain of the user's GSuite email address
                            // If present, a URL to user's profile picture
  "picture": "https://lh3.googleusercontent.com/a-/AOh14GjlTnZKHAeb94A-FmEbwZv7uJD986VOF1mJGb2YYQ",
  "locale": "en_US"         // User's locale, from browser or phone settings
}
In addition to verifying the token's signature, verify that the assertion's
issuer (iss field) is https://accounts.google.com, that the audience
(aud field) is your assigned client ID, and that the token has not expired
(exp field).
Using the email, email_verified and hd fields you can determine if
Google hosts and is authoritative for an email address. In cases where Google is
authoritative the user is currently known to be the legitimate account owner
and you may skip password or other challenges methods. Otherwise, these methods
can be used to verify the account prior to linking.
Cases where Google is authoritative:
emailhas a@gmail.comsuffix, this is a Gmail account.email_verifiedis true andhdis set, this is a G Suite account.
Users may register for Google Accounts without using Gmail or G Suite. When
email does not contain a @gmail.com suffix and hd is absent Google is not
authoritative and password or other challenge methods are recommended to verify
the user. email_verified can also be true as Google initially verified the
user when the Google account was created, however ownership of the third party
email account may have since changed.
ตรวจสอบว่ามีบัญชี Google อยู่ในระบบการตรวจสอบสิทธิ์ของคุณแล้วหรือยัง
ตรวจสอบว่าเงื่อนไขใดเงื่อนไขหนึ่งต่อไปนี้เป็นจริง
- รหัสบัญชี Google ที่พบในช่อง
subของการยืนยันนั้นอยู่ในผู้ใช้ของคุณ ฐานข้อมูล - อีเมลในการยืนยันตรงกับผู้ใช้ในฐานข้อมูลผู้ใช้
หากพบบัญชีสำหรับผู้ใช้ ให้ออกโทเค็นเพื่อการเข้าถึงและแสดงผลค่าในออบเจ็กต์ JSON ในส่วนเนื้อหาของการตอบกลับ HTTPS ดังตัวอย่างต่อไปนี้
{
  "token_type": "Bearer",
  "access_token": "ACCESS_TOKEN",
  "refresh_token": "REFRESH_TOKEN",
  "expires_in": SECONDS_TO_EXPIRATION
}
ในบางกรณี การลิงก์บัญชีตามโทเค็นรหัสอาจล้มเหลวสำหรับผู้ใช้ หาก
ไม่ว่าจะด้วยเหตุผลใดก็ตาม ปลายทางการแลกเปลี่ยนโทเค็นของคุณต้องตอบกลับด้วย HTTP
ข้อผิดพลาด 401 ที่ระบุ error=linking_error ตามตัวอย่างต่อไปนี้
HTTP/1.1 401 Unauthorized
Content-Type: application/json;charset=UTF-8

{
  "error":"linking_error",
  "login_hint":"foo@bar.com"
}
เมื่อ Google ได้รับการตอบกลับข้อผิดพลาด 401 ด้วย linking_error ทาง Google จะส่ง
ผู้ใช้ไปยังปลายทางการให้สิทธิ์โดยมี login_hint เป็นพารามิเตอร์
ผู้ใช้ลิงก์บัญชีให้เสร็จสมบูรณ์โดยใช้ขั้นตอนการลิงก์ OAuth ในเบราว์เซอร์
จัดการการสร้างบัญชีโดยใช้ฟีเจอร์ลงชื่อเข้าใช้ด้วย Google (สร้าง Intent)
เมื่อผู้ใช้ต้องการสร้างบัญชีในบริการของคุณ Google จะส่งคำขอไปยังปลายทางการแลกเปลี่ยนโทเค็นของคุณซึ่งระบุ intent=create
คำขอมีรูปแบบดังนี้
POST /token HTTP/1.1
Host: oauth2.example.com
Content-Type: application/x-www-form-urlencoded

response_type=token&grant_type=urn:ietf:params:oauth:grant-type:jwt-bearer&scope=SCOPES&intent=create&assertion=JWT&client_id=GOOGLE_CLIENT_ID&client_secret=GOOGLE_CLIENT_SECRET
ปลายทางการแลกเปลี่ยนโทเค็นต้องจัดการพารามิเตอร์ต่อไปนี้ได้
| พารามิเตอร์ปลายทางของโทเค็น | |
|---|---|
intent |
สำหรับคำขอเหล่านี้ ค่าของพารามิเตอร์นี้คือ create |
grant_type |
ประเภทของโทเค็นที่จะแลกเปลี่ยน สำหรับคำขอเหล่านี้ พารามิเตอร์นี้
จะมีค่าเป็น urn:ietf:params:oauth:grant-type:jwt-bearer |
assertion |
โทเค็นเว็บ JSON (JWT) ที่ให้การยืนยันที่ลงนามแล้วเกี่ยวกับตัวตนของผู้ใช้ Google JWT มีข้อมูลซึ่งรวมถึงรหัสบัญชี Google, ชื่อ และอีเมลของผู้ใช้ |
client_id |
รหัสไคลเอ็นต์ที่คุณกำหนดให้กับ Google |
client_secret |
รหัสลับไคลเอ็นต์ที่คุณกำหนดให้กับ Google |
JWT ภายในพารามิเตอร์ assertion มีรหัสบัญชี Google ของผู้ใช้ ชื่อ และอีเมล ซึ่งคุณสามารถใช้เพื่อสร้างบัญชีใหม่ใน บริการของคุณได้
หากต้องการตอบกลับคำขอที่มีเจตนา create ปลายทางแลกเปลี่ยนโทเค็นของคุณต้องทำตามขั้นตอนต่อไปนี้
- ตรวจสอบและถอดรหัสการยืนยัน JWT
- ตรวจสอบข้อมูลผู้ใช้และสร้างบัญชีใหม่
Validate and decode the JWT assertion
You can validate and decode the JWT assertion by using a JWT-decoding library for your language. Use Google's public keys, available in JWK or PEM formats, to verify the token's signature.
When decoded, the JWT assertion looks like the following example:
{
  "sub": "1234567890",      // The unique ID of the user's Google Account
  "iss": "https://accounts.google.com",        // The assertion's issuer
  "aud": "123-abc.apps.googleusercontent.com", // Your server's client ID
  "iat": 233366400,         // Unix timestamp of the assertion's creation time
  "exp": 233370000,         // Unix timestamp of the assertion's expiration time
  "name": "Jan Jansen",
  "given_name": "Jan",
  "family_name": "Jansen",
  "email": "jan@gmail.com", // If present, the user's email address
  "email_verified": true,   // true, if Google has verified the email address
  "hd": "example.com",      // If present, the host domain of the user's GSuite email address
                            // If present, a URL to user's profile picture
  "picture": "https://lh3.googleusercontent.com/a-/AOh14GjlTnZKHAeb94A-FmEbwZv7uJD986VOF1mJGb2YYQ",
  "locale": "en_US"         // User's locale, from browser or phone settings
}
In addition to verifying the token's signature, verify that the assertion's
issuer (iss field) is https://accounts.google.com, that the audience
(aud field) is your assigned client ID, and that the token has not expired
(exp field).
Using the email, email_verified and hd fields you can determine if
Google hosts and is authoritative for an email address. In cases where Google is
authoritative the user is currently known to be the legitimate account owner
and you may skip password or other challenges methods. Otherwise, these methods
can be used to verify the account prior to linking.
Cases where Google is authoritative:
emailhas a@gmail.comsuffix, this is a Gmail account.email_verifiedis true andhdis set, this is a G Suite account.
Users may register for Google Accounts without using Gmail or G Suite. When
email does not contain a @gmail.com suffix and hd is absent Google is not
authoritative and password or other challenge methods are recommended to verify
the user. email_verified can also be true as Google initially verified the
user when the Google account was created, however ownership of the third party
email account may have since changed.
ตรวจสอบข้อมูลผู้ใช้และสร้างบัญชีใหม่
ตรวจสอบว่าเงื่อนไขใดเงื่อนไขหนึ่งต่อไปนี้เป็นจริง
- รหัสบัญชี Google ซึ่งอยู่ในฟิลด์
subของการยืนยันอยู่ในฐานข้อมูลผู้ใช้ - อีเมลในการยืนยันตรงกับผู้ใช้ในฐานข้อมูลผู้ใช้
หากเงื่อนไขใดเงื่อนไขหนึ่งเป็นจริง ให้แจ้งให้ผู้ใช้ลิงก์บัญชีที่มีอยู่กับบัญชี Google โดยตอบกลับคำขอด้วยข้อผิดพลาด HTTP 401 ที่ระบุ error=linking_error และระบุอีเมลของผู้ใช้เป็น login_hint ตัวอย่างการตอบกลับมีดังนี้
HTTP/1.1 401 Unauthorized
Content-Type: application/json;charset=UTF-8

{
  "error":"linking_error",
  "login_hint":"foo@bar.com"
}
เมื่อ Google ได้รับการตอบกลับข้อผิดพลาด 401 พร้อม linking_error Google จะส่งผู้ใช้ไปยังปลายทางการให้สิทธิ์ของคุณพร้อม login_hint เป็นพารามิเตอร์
ผู้ใช้ทำการลิงก์บัญชีให้เสร็จสมบูรณ์โดยใช้ขั้นตอนการลิงก์ OAuth ในเบราว์เซอร์
หากไม่มีเงื่อนไขใดเป็นจริง ให้สร้างบัญชีผู้ใช้ใหม่ด้วยข้อมูล ที่ระบุไว้ใน JWT โดยปกติแล้วบัญชีใหม่จะไม่มีการตั้งรหัสผ่าน เราขอแนะนำให้คุณเพิ่มการลงชื่อเข้าใช้ด้วย Google ลงในแพลตฟอร์มอื่นๆ เพื่อให้ผู้ใช้ลงชื่อเข้าใช้ด้วย Google ในแพลตฟอร์มต่างๆ ของแอปพลิเคชันได้ หรือคุณจะส่งอีเมลลิงก์ที่เริ่มขั้นตอนการกู้คืนรหัสผ่านให้ผู้ใช้เพื่ออนุญาตให้ผู้ใช้ตั้งรหัสผ่านสำหรับลงชื่อเข้าใช้ในแพลตฟอร์มอื่นๆ ก็ได้
เมื่อสร้างเสร็จแล้ว ให้ออกโทเค็นเพื่อการเข้าถึง แล้วส่งคืนค่าในออบเจ็กต์ JSON ในเนื้อหาของการตอบกลับ HTTPS เช่น ในตัวอย่างต่อไปนี้
{
  "token_type": "Bearer",
  "access_token": "ACCESS_TOKEN",
  "refresh_token": "REFRESH_TOKEN",
  "expires_in": SECONDS_TO_EXPIRATION
}
รับรหัสไคลเอ็นต์ของ Google API
คุณจะต้องระบุรหัสไคลเอ็นต์ของ Google API ในระหว่างกระบวนการลงทะเบียนการลิงก์บัญชี หากต้องการรับรหัสไคลเอ็นต์ API ให้ใช้โปรเจ็กต์ที่สร้างขึ้นขณะทำตามขั้นตอนการลิงก์ OAuth โดยทำตามขั้นตอนต่อไปนี้
- ไปที่หน้า ไคลเอ็นต์
สร้างหรือเลือกโปรเจ็กต์ Google APIs
หากโปรเจ็กต์ไม่มีรหัสไคลเอ็นต์สำหรับประเภทเว็บแอปพลิเคชัน ให้คลิกสร้างไคลเอ็นต์ เพื่อสร้าง อย่าลืมใส่โดเมนของเว็บไซต์ในช่องต้นทางของ JavaScript ที่ได้รับอนุญาต เมื่อทำการทดสอบหรือพัฒนาในเครื่อง คุณต้องเพิ่มทั้ง
http://localhostและhttp://localhost:<port_number>ลงในช่องต้นทางของ JavaScript ที่ได้รับอนุญาต
ตรวจสอบการติดตั้งใช้งาน
คุณสามารถตรวจสอบการติดตั้งใช้งานได้โดยใช้เครื่องมือ OAuth 2.0 Playground
ในเครื่องมือ ให้ทำตามขั้นตอนต่อไปนี้
- คลิกการกำหนดค่า เพื่อเปิดหน้าต่างการกำหนดค่า OAuth 2.0
- ในช่องโฟลว์ OAuth ให้เลือกฝั่งไคลเอ็นต์
- ในช่องปลายทาง OAuth ให้เลือกกำหนดเอง
- ระบุปลายทาง OAuth 2.0 และรหัสไคลเอ็นต์ที่คุณกำหนดให้กับ Google ในช่องที่เกี่ยวข้อง
- ในส่วนขั้นตอนที่ 1 ไม่ต้องเลือกขอบเขตของ Google แต่ให้เว้นช่องนี้ว่างไว้หรือพิมพ์ขอบเขตที่ใช้ได้กับเซิร์ฟเวอร์ (หรือสตริงที่กำหนดเองหากคุณไม่ได้ใช้ขอบเขต OAuth) เมื่อเสร็จแล้ว ให้คลิกให้สิทธิ์ API
- ในส่วนขั้นตอนที่ 2 และขั้นตอนที่ 3 ให้ทำตามโฟลว์ OAuth 2.0 และตรวจสอบว่าแต่ละขั้นตอนทำงานตามที่ตั้งใจไว้
คุณสามารถตรวจสอบการติดตั้งใช้งานได้โดยใช้เครื่องมือสาธิตการลิงก์บัญชี Google
ในเครื่องมือ ให้ทำตามขั้นตอนต่อไปนี้
- คลิกปุ่มลงชื่อเข้าใช้ด้วย Google
- เลือกบัญชีที่ต้องการลิงก์
- ป้อนรหัสบริการ
- ป้อนขอบเขตอย่างน้อย 1 รายการที่คุณจะขอสิทธิ์เข้าถึง (ไม่บังคับ)
- คลิกเริ่มการสาธิต
- เมื่อได้รับข้อความแจ้ง ให้ยืนยันว่าคุณอาจให้ความยินยอมและปฏิเสธคำขอลิงก์
- ยืนยันว่าระบบจะนำคุณไปยังแพลตฟอร์มของคุณ