I collegamenti degli account vengono eseguiti utilizzando i flussi implicito e codice di autorizzazione OAuth 2.0 standard del settore.
Il tuo servizio deve supportare gli endpoint di autorizzazione e scambio di token conformi a OAuth 2.0.In the implicit flow, Google opens your authorization endpoint in the user's browser. After successful sign in, you return a long-lived access token to Google. This access token is now included in every request sent from Google.
In the authorization code flow, you need two endpoints:
The authorization endpoint, which presents the sign-in UI to your users that aren't already signed in. The authorization endpoint also creates a short-lived authorization code to record users' consent to the requested access.
The token exchange endpoint, which is responsible for two types of exchanges:
- Exchanges an authorization code for a long-lived refresh token and a short-lived access token. This exchange happens when the user goes through the account linking flow.
- Exchanges a long-lived refresh token for a short-lived access token. This exchange happens when Google needs a new access token because the one it had expired.
Choose an OAuth 2.0 flow
Although the implicit flow is simpler to implement, Google recommends that access tokens issued by the implicit flow never expire. This is because the user is forced to link their account again after a token expires with the implicit flow. If you need token expiration for security reasons, we strongly recommend that you use the authorization code flow instead.
Design guidelines
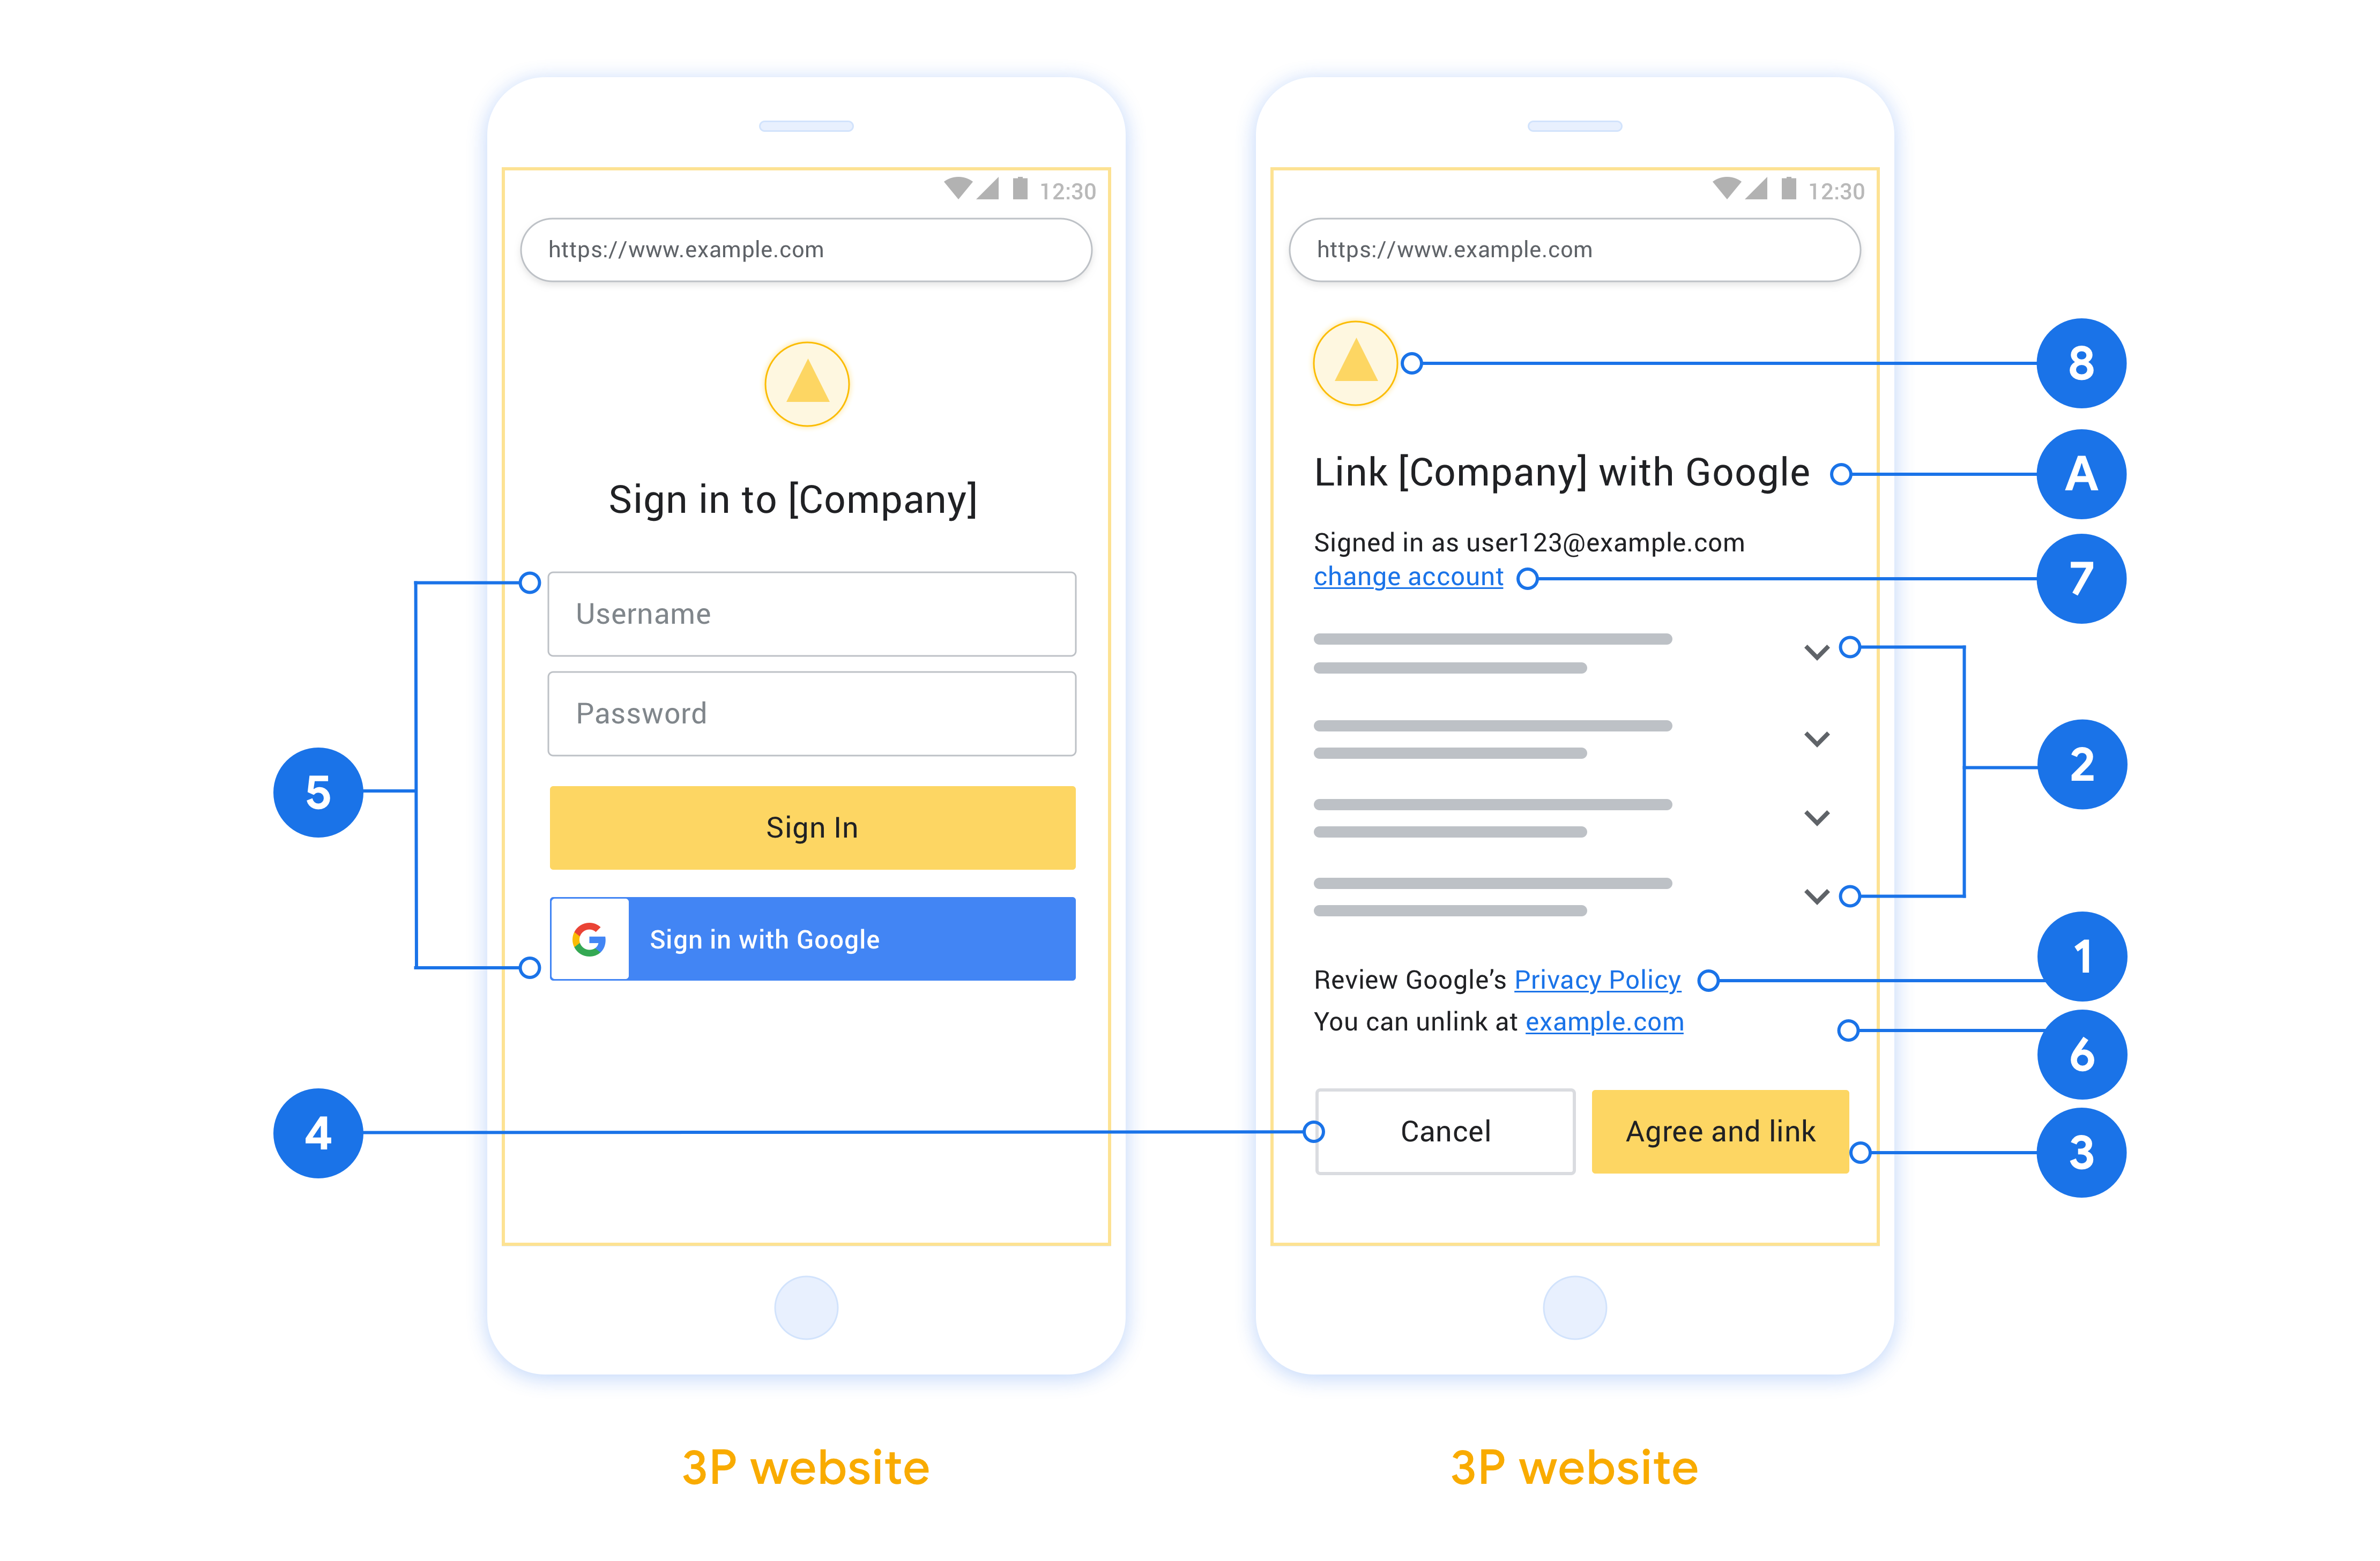
This section describes the design requirements and recommendations for the user screen that you host for OAuth linking flows. After it's called by Google's app, your platform displays a sign in to Google page and account linking consent screen to the user. The user is directed back to Google's app after giving their consent to link accounts.

Requirements
- You must communicate that the user’s account will be linked to Google, not a specific Google product like Google Home or Google Assistant.
Recommendations
We recommend that you do the following:
Display Google's Privacy Policy. Include a link to Google’s Privacy Policy on the consent screen.
Data to be shared. Use clear and concise language to tell the user what data of theirs Google requires and why.
Clear call-to-action. State a clear call-to-action on your consent screen, such as “Agree and link.” This is because users need to understand what data they're required to share with Google to link their accounts.
Ability to cancel. Provide a way for users to go back or cancel, if they choose not to link.
Clear sign-in process. Ensure that users have clear method for signing in to their Google account, such as fields for their username and password or Sign in with Google.
Ability to unlink. Offer a mechanism for users to unlink, such as a URL to their account settings on your platform. Alternatively, you can include a link to Google Account where users can manage their linked account.
Ability to change user account. Suggest a method for users to switch their account(s). This is especially beneficial if users tend to have multiple accounts.
- If a user must close the consent screen to switch accounts, send a recoverable error to Google so the user can sign in to the desired account with OAuth linking and the implicit flow.
Include your logo. Display your company logo on the consent screen. Use your style guidelines to place your logo. If you wish to also display Google's logo, see Logos and trademarks.
Creare il progetto
Per creare il progetto da utilizzare per il collegamento dell'account:
- Vai alla console dell'API di Google.
- Fai clic su Crea progetto.
- Inserisci un nome o accetta il suggerimento generato.
- Conferma o modifica i campi rimanenti.
- Fai clic su Crea.
Per visualizzare l'ID progetto:
- Vai alla console dell'API di Google.
- Trova il tuo progetto nella tabella della pagina di destinazione. L'ID progetto viene visualizzato nella ID colonna.
Configurare la schermata per il consenso OAuth
La procedura di collegamento dell'Account Google include una schermata per il consenso che indica agli utenti l'applicazione che richiede l'accesso ai loro dati, il tipo di dati richiesti e i termini applicabili. Prima di generare un ID client dell'API Google, devi configurare la schermata per il consenso OAuth.
- Apri la pagina della schermata per il consenso OAuth della console API di Google.
- Se ti viene richiesto, seleziona il progetto che hai appena creato.
Nella pagina "Schermata per il consenso OAuth", compila il modulo e fai clic sul pulsante "Salva".
Nome dell'applicazione: il nome dell'applicazione che richiede il consenso. Il nome deve riflettere con precisione l'applicazione ed essere coerente con il nome dell'applicazione visualizzato dagli utenti altrove. Il nome dell'applicazione verrà mostrato nella schermata per il consenso del collegamento dell'account.
Logo dell'applicazione: un'immagine nella schermata per il consenso che aiuterà gli utenti a riconoscere la tua app. Il logo viene mostrato nella schermata per il consenso del collegamento dell'account e nelle impostazioni dell'account.
Email di assistenza: gli utenti possono contattarti per domande sul loro consenso.
Ambiti per le API Google: gli ambiti consentono alla tua applicazione di accedere ai dati privati di Google dell'utente. Per il caso d'uso del collegamento dell'Account Google, l'ambito predefinito (email, profilo, openid) è sufficiente, non devi aggiungere ambiti sensibili. In genere, è una best practice richiedere gli ambiti in modo incrementale, nel momento in cui è necessario l'accesso, anziché in anticipo. Scopri di più.
Domini autorizzati: per proteggere te e i tuoi utenti, Google consente l'utilizzo dei domini autorizzati alle sole applicazioni che eseguono l'autenticazione tramite OAuth. I link delle tue applicazioni devono essere ospitati su domini autorizzati. Scopri di più.
Link alla home page dell'applicazione: la home page della tua applicazione. Deve essere ospitata su un dominio autorizzato.
Link alle norme sulla privacy dell'applicazione: viene mostrato nella schermata per il consenso del collegamento dell'Account Google. Deve essere ospitata su un dominio autorizzato.
(Facoltativo) Link ai Termini di servizio dell'applicazione: deve essere ospitato su un dominio autorizzato.
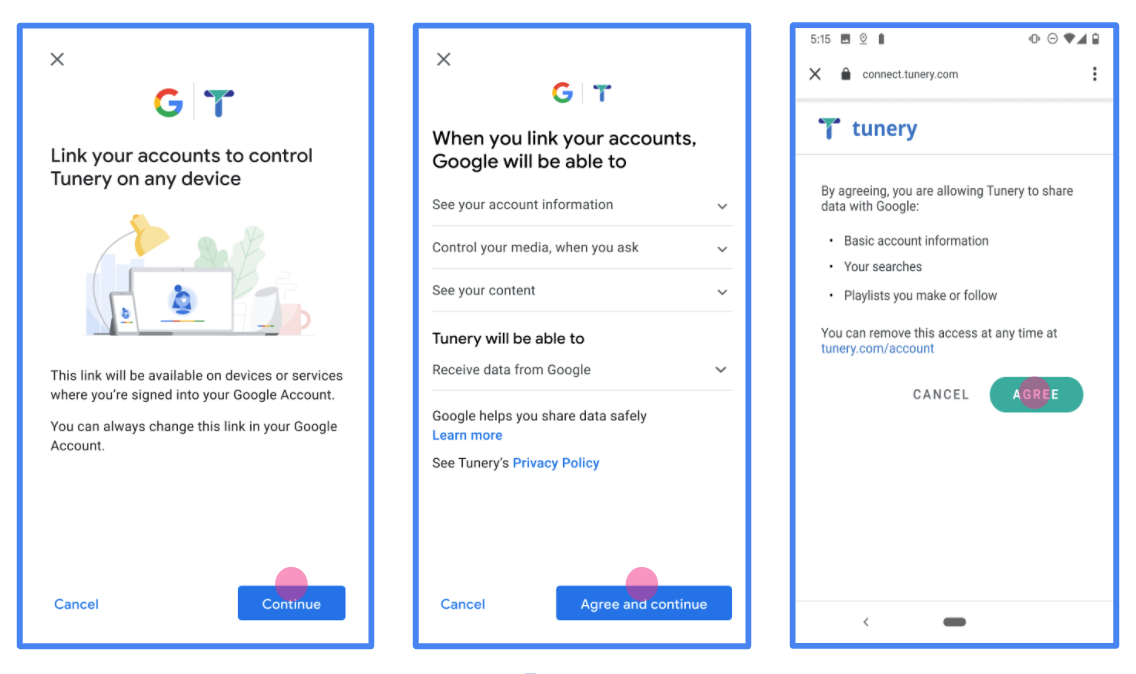
Figura 1. Schermata per il consenso del collegamento dell'Account Google per un'applicazione fittizia, Tunery
Controlla lo "Stato della verifica". Se la tua applicazione richiede la verifica, fai clic sul pulsante "Invia per la verifica" per inviarla. Per i dettagli, consulta i requisiti di verifica OAuth.
Implementare il server OAuth
n
Per supportare il flusso implicito OAuth 2.0, il tuo servizio rende disponibile un endpoint di autorizzazione tramite HTTPS. Questo endpoint è responsabile dell'autenticazione e dell'ottenimento del consenso degli utenti per l'accesso ai dati. L'endpoint di autorizzazione presenta un'interfaccia utente di accesso agli utenti che non hanno ancora eseguito l'accesso e registra il consenso all'accesso richiesto.
Quando un'applicazione Google deve chiamare una delle API autorizzate del tuo servizio, Google utilizza questo endpoint per ottenere l'autorizzazione dagli utenti a chiamare queste API per loro conto.
Collegamento dell'Account Google: flusso implicito OAuth
Il seguente diagramma di sequenza descrive in dettaglio le interazioni tra l'utente, Google e gli endpoint del tuo servizio.
Ruoli e responsabilità
La tabella seguente definisce i ruoli e le responsabilità degli attori nel flusso implicito OAuth di collegamento dell'Account Google (GAL). Tieni presente che in GAL Google funge da client OAuth, mentre il tuo servizio funge da provider di identità/servizi.
| Attore / componente | Ruolo GAL | Responsabilità |
|---|---|---|
| App / server Google | Client OAuth | Avvia il flusso, riceve il token di accesso utilizzando un reindirizzamento del browser, e lo archivia in modo sicuro per accedere alle API del tuo servizio. |
| Endpoint di autorizzazione | Server di autorizzazione | Autentica gli utenti, ottiene il loro consenso ed emette token di accesso di lunga durata accesso direttamente a Google. |
| URI di reindirizzamento di Google | Endpoint di richiamata | Riceve il reindirizzamento dell'utente dal tuo servizio di autorizzazione con i
access_token e state valori nel frammento dell'URL. |
Una sessione tipica del flusso implicito OAuth 2.0 avviata da Google ha il seguente flusso:
- Google apre l'endpoint di autorizzazione nel browser dell'utente. L'utente esegue l'accesso, se non l'ha già fatto, e concede a Google l'autorizzazione ad accedere ai suoi dati con la tua API, se non l'ha già fatto.
- Il tuo servizio crea un token di accesso e lo restituisce a Google. Per farlo, reindirizza il browser dell'utente a Google con il token di accesso allegato alla richiesta.
- Google chiama le API del tuo servizio e allega il token di accesso a ogni richiesta. Il tuo servizio verifica che il token di accesso conceda a Google l'autorizzazione ad accedere all'API e completa la chiamata API.
Gestire le richieste di autorizzazione
Quando un'applicazione Google deve eseguire il collegamento dell'account utilizzando un flusso implicito OAuth 2.0, Google invia l'utente all'endpoint di autorizzazione con una richiesta che include i seguenti parametri:
| Parametri dell'endpoint di autorizzazione | |
|---|---|
client_id |
L'ID client che hai assegnato a Google. |
redirect_uri |
L'URL a cui invii la risposta a questa richiesta. |
state |
Un valore di riferimento che viene restituito a Google senza modifiche nell' URI di reindirizzamento. |
response_type |
Il tipo di valore da restituire nella risposta. Per il flusso implicito OAuth 2.0
il tipo di risposta è sempre token. |
user_locale |
L'impostazione della lingua dell'Account Google in RFC5646 formato utilizzata per localizzare i contenuti nella lingua preferita dell'utente. |
Ad esempio, se l'endpoint di autorizzazione è disponibile all'indirizzo https://myservice.example.com/auth, una richiesta potrebbe avere il seguente aspetto:
GET https://myservice.example.com/auth?client_id=GOOGLE_CLIENT_ID&redirect_uri=REDIRECT_URI&state=STATE_STRING&response_type=token&user_locale=LOCALE
Per consentire all'endpoint di autorizzazione di gestire le richieste di accesso:
Verifica i valori
client_ideredirect_uriper impedire la concessione dell'accesso ad app client non intenzionali o configurate in modo errato:- Verifica che
client_idcorrisponda all'ID client che hai assegnato a Google. - Verifica che l'URL specificato dal parametro
redirect_uriabbia il seguente formato:https://oauth-redirect.googleusercontent.com/r/YOUR_PROJECT_ID https://oauth-redirect-sandbox.googleusercontent.com/r/YOUR_PROJECT_ID
- Verifica che
Controlla se l'utente ha eseguito l'accesso al tuo servizio. Se l'utente non ha eseguito l'accesso, completa il flusso di accesso o registrazione del tuo servizio.
Genera un token di accesso che Google possa utilizzare per accedere alla tua API. Il token di accesso può essere qualsiasi valore stringa, ma deve rappresentare in modo univoco l' utente e il client per cui è destinato e non deve essere intuibile.
Invia una risposta HTTP che reindirizza il browser dell'utente all'URL specificato dal parametro
redirect_uri. Includi tutti i seguenti parametri nel frammento di URL:access_token: il token di accesso appena generatotoken_type: la stringabearerstate: il valore dello stato non modificato della richiesta originale
Di seguito è riportato un esempio dell'URL risultante:
https://oauth-redirect.googleusercontent.com/r/YOUR_PROJECT_ID#access_token=ACCESS_TOKEN&token_type=bearer&state=STATE_STRING
Il gestore di reindirizzamento OAuth 2.0 di Google riceve il token di accesso e conferma che il valore state non è cambiato. Dopo che Google ha ottenuto un token di accesso per il tuo servizio, lo allega alle chiamate successive alle API del tuo servizio.
Handle userinfo requests
The userinfo endpoint is an OAuth 2.0 protected resource that return claims about the linked user. Implementing and hosting the userinfo endpoint is optional, except for the following use cases:
- Linked Account Sign-In with Google One Tap.
- Frictionless subscription on AndroidTV.
After the access token has been successfully retrieved from your token endpoint, Google sends a request to your userinfo endpoint to retrieve basic profile information about the linked user.
| userinfo endpoint request headers | |
|---|---|
Authorization header |
The access token of type Bearer. |
For example, if your userinfo endpoint is available at
https://myservice.example.com/userinfo, a request might look like the following:
GET /userinfo HTTP/1.1
Host: myservice.example.com
Authorization: Bearer ACCESS_TOKEN
For your userinfo endpoint to handle requests, do the following steps:
- Extract access token from the Authorization header and return information for the user associated with the access token.
- If the access token is invalid, return an HTTP 401 Unauthorized error with using the
WWW-AuthenticateResponse Header. Below is an example of a userinfo error response:HTTP/1.1 401 Unauthorized WWW-Authenticate: error="invalid_token", error_description="The Access Token expired"
If the access token is valid, return and HTTP 200 response with the following JSON object in the body of the HTTPS response:
{ "sub": "USER_UUID", "email": "EMAIL_ADDRESS", "given_name": "FIRST_NAME", "family_name": "LAST_NAME", "name": "FULL_NAME", "picture": "PROFILE_PICTURE", }userinfo endpoint response subA unique ID that identifies the user in your system. emailEmail address of the user. given_nameOptional: First name of the user. family_nameOptional: Last name of the user. nameOptional: Full name of the user. pictureOptional: Profile picture of the user.
Convalidare l'implementazione
You can validate your implementation by using the OAuth 2.0 Playground tool.
In the tool, do the following steps:
- Click Configuration to open the OAuth 2.0 Configuration window.
- In the OAuth flow field, select Client-side.
- In the OAuth Endpoints field, select Custom.
- Specify your OAuth 2.0 endpoint and the client ID you assigned to Google in the corresponding fields.
- In the Step 1 section, don't select any Google scopes. Instead, leave this field blank or type a scope valid for your server (or an arbitrary string if you don't use OAuth scopes). When you're done, click Authorize APIs.
- In the Step 2 and Step 3 sections, go through the OAuth 2.0 flow and verify that each step works as intended.
You can validate your implementation by using the Google Account Linking Demo tool.
In the tool, do the following steps:
- Click the Sign in with Google button.
- Choose the account you'd like to link.
- Enter the service ID.
- Optionally enter one or more scopes that you will request access for.
- Click Start Demo.
- When prompted, confirm that you may consent and deny the linking request.
- Confirm that you are redirected to your platform.