يتم ربط الحسابات باستخدام مسار رمز التفويض المتوافق مع معيار OAuth 2.0 المتّبع في المجال.
بروتوكول OAuth 2.1 وPKCE للوكلاء
بالنسبة إلى وكلاء الذكاء الاصطناعي غير الاحتفاظي الحالة ومسارات العرض المتعدّد، يُنصح بفرض استخدام OAuth 2.1.
- مفتاح الحماية لتبادل الرموز (PKCE): يجب استخدامه لتأمين مسار رمز التفويض، ما يمنع هجمات الاعتراض.
- بدون تدفق ضمني: يعرض التدفق الضمني رموز الدخول في عنوان URL، ما يشكّل خطرًا أمنيًا على بيئات الوكيل.
يجب أن تتيح خدمتك نقاط نهاية الترخيص وتبادل الرموز المميزة المتوافقة مع OAuth 2.0/2.1.
إنشاء المشروع
لإنشاء مشروعك لاستخدام ميزة ربط الحسابات، اتّبِع الخطوات التالية:
- انتقِل إلى وحدة التحكم في واجهة Google API.
- انقر على إنشاء مشروع.
- أدخِل اسمًا أو اقبل الاقتراح الذي تم إنشاؤه.
- أكِّد أي حقول متبقية أو عدِّلها.
- انقر على إنشاء.
للاطّلاع على رقم تعريف مشروعك، اتّبِع الخطوات التالية:
- انتقِل إلى وحدة التحكم في واجهة Google API.
- ابحث عن مشروعك في الجدول على الصفحة المقصودة. يظهر رقم تعريف المشروع في العمود المعرّف.
ضبط شاشة طلب الموافقة المتعلّقة ببروتوكول OAuth
تتضمّن عملية ربط حساب Google شاشة طلب الموافقة التي تُطلع المستخدمين على التطبيق الذي يطلب الوصول إلى بياناتهم، ونوع البيانات التي يطلبها، والبنود السارية. عليك ضبط شاشة طلب الموافقة المتعلّقة ببروتوكول OAuth قبل إنشاء معرّف عميل لواجهة Google API.
- افتح صفحة شاشة طلب الموافقة المتعلّقة ببروتوكول OAuth في وحدة تحكّم Google APIs.
- إذا طُلب منك ذلك، اختَر المشروع الذي أنشأته للتو.
في صفحة "شاشة طلب الموافقة المتعلّقة ببروتوكول OAuth"، املأ النموذج وانقر على الزر "حفظ".
اسم التطبيق: اسم التطبيق الذي يطلب الموافقة. يجب أن يوضّح الاسم تطبيقك بدقة وأن يكون متوافقًا مع اسم التطبيق الذي يظهر للمستخدمين في أماكن أخرى. سيظهر اسم التطبيق على شاشة طلب الموافقة على ربط الحساب.
شعار التطبيق: صورة تظهر على شاشة طلب الموافقة وتساعد المستخدمين في التعرّف على تطبيقك. يظهر الشعار على شاشة طلب الموافقة على ربط الحساب وعلى إعدادات الحساب.
عنوان البريد الإلكتروني المخصّص للدعم: يمكن للمستخدمين التواصل معك من خلاله لطرح أسئلة حول موافقتهم.
نطاقات واجهات Google API: تتيح النطاقات لتطبيقك الوصول إلى بيانات المستخدم على Google الخاصة بالمستخدم. بالنسبة إلى حالة استخدام ربط حساب Google، يكون النطاق التلقائي (البريد الإلكتروني، والملف الشخصي، وopenid) كافيًا، ولا تحتاج إلى إضافة أي نطاقات حساسة. من أفضل الممارسات عمومًا طلب النطاقات بشكل تدريجي، عند الحاجة إلى إذن الوصول، بدلاً من طلبها مسبقًا. مزيد من المعلومات
النطاقات المعتمَدة: لحمايتك وحماية المستخدمين، لا تسمح Google إلا للتطبيقات التي تتم مصادقتها باستخدام OAuth باستخدام النطاقات المعتمَدة. يجب أن تكون روابط تطبيقاتك مستضافة على نطاقات معتمَدة. مزيد من المعلومات
رابط الصفحة الرئيسية للتطبيق: الصفحة الرئيسية لتطبيقك يجب أن تتم استضافته على نطاق معتمَد.
رابط سياسة الخصوصية للتطبيق: يظهر على شاشة طلب الموافقة على ربط حساب Google. يجب أن تتم استضافته على نطاق معتمَد.
رابط بنود خدمة التطبيق (اختياري): يجب أن تتم استضافته على نطاق معتمَد.
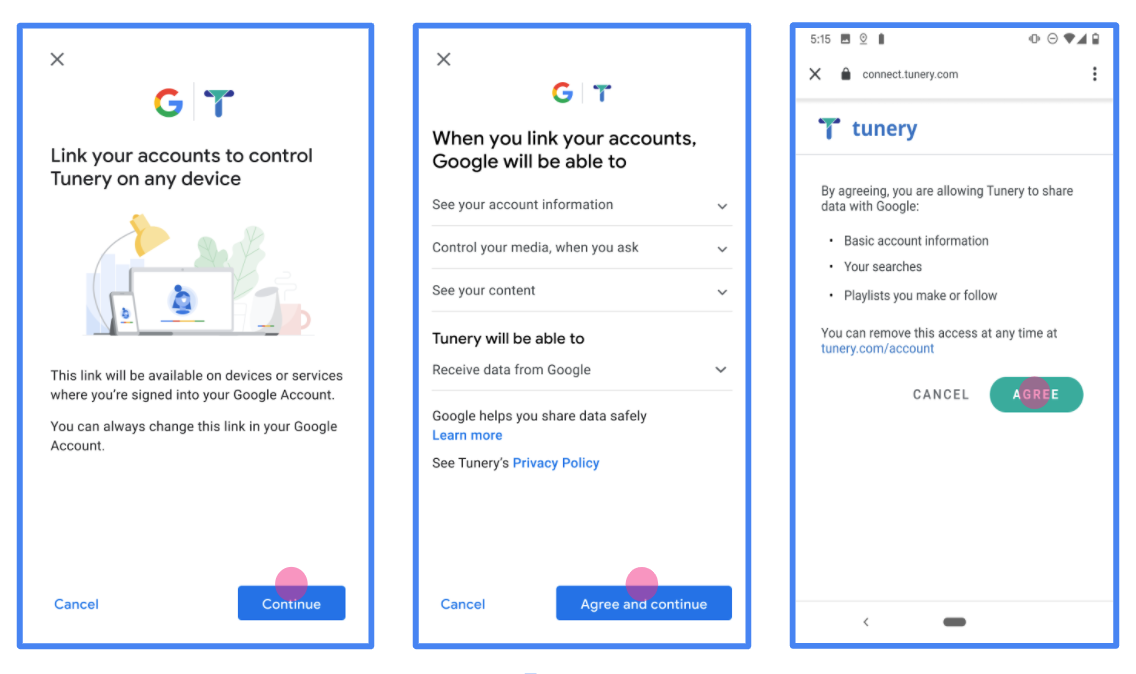
الشكل 1 شاشة الموافقة على ربط حساب Google بتطبيق وهمي، Tunery
تحقَّق من "حالة التحقّق"، وإذا كان طلبك بحاجة إلى التحقّق، انقر على الزر "إرسال طلب التحقّق" لإرسال طلبك. يُرجى الاطّلاع على متطلبات إثبات الأهلية في OAuth للحصول على التفاصيل.
تنفيذ خادم OAuth
يتألف تنفيذ خادم OAuth 2.0 لمسار رمز التفويض من نقطتَي نهاية، يتيحهما خادمك من خلال بروتوكول HTTPS. نقطة النهاية الأولى هي نقطة نهاية التفويض، وهي مسؤولة عن العثور على موافقة المستخدمين أو الحصول عليها للوصول إلى البيانات. تعرض نقطة نهاية التفويض واجهة مستخدم لتسجيل الدخول للمستخدمين الذين لم يسبق لهم تسجيل الدخول، وتسجّل الموافقة على الوصول المطلوب. نقطة النهاية الثانية هي نقطة نهاية تبادل الرموز المميّزة، وتُستخدَم للحصول على سلاسل مشفّرة، تُعرف باسم الرموز المميّزة، التي تمنح المستخدم إذن الوصول إلى خدمتك.
عندما يحتاج أحد تطبيقات Google إلى طلب إحدى واجهات برمجة التطبيقات في خدمتك، تستخدم Google نقطتَي النهاية هاتَين معًا للحصول على إذن من المستخدمين لطلب واجهات برمجة التطبيقات هذه نيابةً عنهم.
ربط حساب Google: مسار رمز تفويض OAuth
يوضّح مخطط التسلسل التالي التفاعلات بين المستخدم وGoogle ونقطتَي نهاية خدمتك.
الأدوار والمسؤوليات
يحدّد الجدول التالي أدوار ومسؤوليات الجهات الفاعلة في مسار OAuth لربط حساب Google. يُرجى العِلم أنّه في عملية ربط حساب Google، تعمل Google بصفتها عميل OAuth، بينما تعمل خدمتك بصفتها مزوّد الهوية/الخدمة.
| Actor / Component | GAL Role | Responsibilities |
|---|---|---|
| Google App / Server | OAuth Client | يبدأ المسار ويتلقّى رمز التفويض ويستبدله بـ رموز مميّزة ويخزّنها بشكل آمن للوصول إلى واجهات برمجة التطبيقات في خدمتك. |
| Your Authorization Endpoint | Authorization Server | يصادق على المستخدمين ويحصل على موافقتهم على مشاركة إذن الوصول إلى بياناتهم مع Google. |
| Your Token Exchange Endpoint | Authorization Server | يتحقّق من صحة رموز التفويض ورموز إعادة التحميل، ويصدر رموز الدخول إلى خادم Google. |
| Google Redirect URI | Callback Endpoint | يتلقّى عملية إعادة توجيه المستخدم من خدمة التفويض مع القيمتَين
code وstate. |
تتّبع جلسة مسار رمز تفويض OAuth 2.0 التي تبدأها Google المسار التالي:
- تفتح Google نقطة نهاية التفويض في متصفّح المستخدم. إذا بدأ المسار على جهاز صوتي فقط لتنفيذ إجراء، تنقل Google التنفيذ إلى هاتف.
- يسجّل المستخدم الدخول، إذا لم يسبق له تسجيل الدخول، ويمنح Google إذن الوصول إلى بياناته باستخدام واجهة برمجة التطبيقات، إذا لم يسبق له منح الإذن.
- تنشئ خدمتك رمز تفويض وتعيده إلى Google. لإجراء ذلك، أعِد توجيه متصفّح المستخدم إلى Google مع إرفاق رمز التفويض بالطلب.
- ترسل Google رمز التفويض إلى نقطة نهاية تبادل الرموز المميّزة، التي تتحقّق من صحة الرمز وتعرض رمز دخول والرمز المميز لإعادة التحميل. رمز الدخول هو رمز قصير الأمد تقبله خدمتك كبيانات اعتماد للوصول إلى واجهات برمجة التطبيقات. الرمز المميز لإعادة التحميل هو رمز طويل الأمد يمكن لـ Google تخزينه واستخدامه للحصول على رموز دخول جديدة عند انتهاء صلاحيتها.
- بعد أن يكمل المستخدم مسار ربط الحساب، يحتوي كل طلب لاحق يتم إرساله من Google على رمز دخول.
وصفة التنفيذ
اتّبِع الخطوات التالية لتنفيذ مسار رمز التفويض.
الخطوة 1: معالجة طلبات التفويض
عندما تبدأ Google عملية ربط الحساب، تعيد توجيه المستخدم إلى نقطة نهاية التفويض. للحصول على تفاصيل حول عقود البروتوكول ومتطلبات المَعلمات، يُرجى الاطّلاع على نقطة نهاية التفويض.
لمعالجة الطلب، نفِّذ الإجراءات التالية:
التحقّق من صحة الطلب:
- تأكَّد من أنّ
client_idيتطابق مع رقم تعريف العميل المخصّص لـ Google. - تأكَّد من أنّ
redirect_uriيتطابق مع عنوان URL المتوقّع لإعادة التوجيه من Google:none https://oauth-redirect.googleusercontent.com/r/YOUR_PROJECT_ID https://oauth-redirect-sandbox.googleusercontent.com/r/YOUR_PROJECT_ID - تأكَّد من أنّ
response_typeهوcode.
- تأكَّد من أنّ
مصادقة المستخدم:
- تحقَّق مما إذا كان المستخدم قد سجّل الدخول إلى خدمتك.
- إذا لم يكن المستخدم قد سجّل الدخول، اطلب منه إكمال مسار تسجيل الدخول أو الاشتراك.
إنشاء رمز تفويض:
- أنشئ رمز تفويض فريدًا لا يمكن تخمينه مرتبطًا بالمستخدم والعميل.
- اضبط الرمز على انتهاء الصلاحية بعد 10 دقائق تقريبًا.
إعادة التوجيه إلى Google:
- أعِد توجيه المتصفّح إلى عنوان URL المقدَّم في
redirect_uri. - أضِف مَعلمات طلب البحث التالية:
code: رمز التفويض الذي أنشأته.state: قيمة الحالة غير المعدَّلة التي تم تلقّيها من Google.
- أعِد توجيه المتصفّح إلى عنوان URL المقدَّم في
الخطوة 2: معالجة طلبات تبادل الرموز المميّزة
تعالج نقطة نهاية تبادل الرموز المميّزة نوعَين من الطلبات: تبادل الرموز المميّزة مقابل الرموز، وتجديد رموز الدخول المنتهية الصلاحية. للحصول على تفاصيل حول عقود البروتوكول ومتطلبات المَعلمات، يُرجى الاطّلاع على نقطة نهاية تبادل الرموز المميّزة.
أ. تبادل رموز التفويض مقابل الرموز المميّزة
عندما تتلقّى Google رمز التفويض، تطلب نقطة نهاية تبادل الرموز المميّزة (POST) لاسترداد الرموز المميّزة.
التحقّق من صحة الطلب:
- تحقَّق من
client_idوclient_secret. - تأكَّد من أنّ رمز التفويض صالح ولم تنتهِ صلاحيته.
- تأكَّد من أنّ
redirect_uriيتطابق مع القيمة المستخدَمة في الخطوة 1. - إذا تعذّر التحقّق من الصحة، أعِد رمز HTTP
400 Bad Requestمع{"error": "invalid_grant"}.
- تحقَّق من
إصدار الرموز المميّزة:
- أنشئ
refresh_tokenطويل الأمد وaccess_tokenقصير الأمد (عادةً ساعة واحدة). - أعِد رمز HTTP
200 OKمع استجابة الرمز المميّز بتنسيق JSON القياسي.
- أنشئ
ب. تجديد رموز الدخول
عند انتهاء صلاحية رمز الدخول، تطلب Google رمزًا جديدًا باستخدام رمز إعادة التحميل.
التحقّق من صحة الطلب:
- تحقَّق من
client_idوclient_secretوrefresh_token. - إذا تعذّر التحقّق من الصحة، أعِد رمز HTTP
400 Bad Requestمع{"error": "invalid_grant"}.
- تحقَّق من
إصدار رمز دخول جديد:
- أنشئ
access_tokenجديدًا قصير الأمد. - أعِد رمز HTTP
200 OKمع استجابة الرمز المميّز بتنسيق JSON (بما في ذلك الرمز المميز لإعادة التحميل الجديد اختياريًا).
- أنشئ
التعامل مع طلبات معلومات المستخدم
نقطة نهاية userinfo هي مورد OAuth 2.0 محمي يعرض مطالبات بشأن المستخدم المرتبط. يُعد تنفيذ نقطة نهاية userinfo واستضافتها اختياريًا، باستثناء حالات الاستخدام التالية:
- تسجيل الدخول إلى حساب مرتبط باستخدام Google One Tap.
- اشتراك سلس على AndroidTV.
بعد استرداد رمز الدخول بنجاح من نقطة نهاية الرمز المميّز، ترسل Google طلبًا إلى نقطة نهاية معلومات المستخدم لاسترداد معلومات الملف الشخصي الأساسية عن المستخدم المرتبط.
| عناوين طلبات نقطة نهاية userinfo | |
|---|---|
Authorization header |
رمز الدخول من النوع "الحامل". |
على سبيل المثال، إذا كانت نقطة نهاية userinfo متاحة على
https://myservice.example.com/userinfo، قد يظهر الطلب على النحو التالي:
GET /userinfo HTTP/1.1
Host: myservice.example.com
Authorization: Bearer ACCESS_TOKEN
لتتمكّن نقطة نهاية معلومات المستخدم من معالجة الطلبات، عليك اتّباع الخطوات التالية:
- يمكنك استخراج رمز الدخول من عنوان التفويض ومعلومات الإرجاع للمستخدم المرتبط برمز الدخول.
- إذا كان رمز الدخول غير صالح، يمكنك عرض الخطأ HTTP 401 "غير مصرح به" مع استخدام عنوان الاستجابة
WWW-Authenticate. في ما يلي مثال على استجابة خطأ في معلومات المستخدم:HTTP/1.1 401 Unauthorized WWW-Authenticate: error="invalid_token", error_description="The Access Token expired"
إذا كان رمز الدخول صالحًا، يتم عرض الاستجابة HTTP 200 مع كائن JSON التالي في نص HTTPS. الرد:
{ "sub": "USER_UUID", "email": "EMAIL_ADDRESS", "given_name": "FIRST_NAME", "family_name": "LAST_NAME", "name": "FULL_NAME", "picture": "PROFILE_PICTURE", }استجابة نقطة نهاية لمعلومات المستخدم subمعرّف فريد يعرّف المستخدِم في نظامك. emailعنوان البريد الإلكتروني للمستخدم. given_nameاختياري: الاسم الأول للمستخدم. family_nameاختياري: اسم العائلة للمستخدم. nameاختياري: اسم المستخدم الكامل. pictureاختياري: صورة الملف الشخصي للمستخدم.
التحقّق من صحة عملية التنفيذ
يمكنك التحقّق من صحة التنفيذ باستخدام أداة مساحة بروتوكول OAuth 2.0.
في الأداة، اتّبِع الخطوات التالية:
- انقر على الإعداد لفتح نافذة "إعدادات OAuth 2.0".
- في حقل مسار OAuth، اختَر من جهة العميل.
- في حقل نقاط نهاية OAuth، اختَر مخصّص.
- حدِّد نقطة نهاية OAuth 2.0 ومعرّف العميل الذي خصّصته لـ Google في الحقلَين المناسبَين.
- في قسم الخطوة 1، لا تحدّد أي نطاقات Google. بدلاً من ذلك، اترك هذا الحقل فارغًا أو اكتب نطاقًا صالحًا لخادمك (أو سلسلة عشوائية إذا كنت لا تستخدم نطاقات OAuth). عند الانتهاء، انقر على تفويض واجهات برمجة التطبيقات.
- في القسمَين الخطوة 2 والخطوة 3، اتّبِع مسار OAuth 2.0 وتأكَّد من أنّ كل خطوة تعمل على النحو المطلوب.
يمكنك التحقّق من صحة عملية التنفيذ باستخدام أداة عرض توضيحي لربط حساب Google.
في الأداة، اتّبِع الخطوات التالية:
- انقر على الزر تسجيل الدخول باستخدام حساب Google.
- اختَر الحساب الذي تريد ربطه.
- أدخِل رقم تعريف الخدمة.
- يمكنك اختياريًا إدخال نطاق واحد أو أكثر ستطلب الوصول إليه.
- انقر على بدء العرض التوضيحي.
- أكِّد أنّه يمكنك الموافقة على طلب ربط الحساب ورفضه عندما يُطلب منك ذلك.
- تأكَّد من إعادة توجيهك إلى منصتك.