Konten werden über den Branchenstandard-OAuth 2.0-Vorgang mit Autorisierungscode verknüpft.
OAuth 2.1 und PKCE für Agents
Für zustandslose KI-Agents und multimodale Pipelines wird die OAuth 2.1-Durchsetzung empfohlen.
- PKCE (Proof Key for Code Exchange): Muss verwendet werden, um den Autorisierungscode-Vorgang zu schützen und Abfangangriffe zu verhindern.
- Kein impliziter Ablauf: Beim impliziten Ablauf werden Zugriffstokens in der URL verfügbar gemacht, was ein Sicherheitsrisiko für Agent-Umgebungen darstellt.
Ihr Dienst muss OAuth 2.0-/2.1-konforme Autorisierungs- und Tokenaustausch-Endpunkte unterstützen.
Projekt erstellen
So erstellen Sie Ihr Projekt für die Kontoverknüpfung:
- Gehen Sie zur Google API Console.
- Klicken Sie auf Projekt erstellen.
- Geben Sie einen Namen ein oder übernehmen Sie den generierten Vorschlag.
- Bestätigen oder bearbeiten Sie die verbleibenden Felder.
- Klicken Sie auf Erstellen.
So rufen Sie Ihre Projekt-ID auf:
- Gehen Sie zur Google API Console.
- Suchen Sie in der Tabelle auf der Landingpage nach Ihrem Projekt. Die Projekt-ID wird in der Spalte ID angezeigt.
OAuth-Zustimmungsbildschirm konfigurieren
Der Prozess zur Verknüpfung von Google-Konten umfasst einen Zustimmungsbildschirm, auf dem Nutzer darüber informiert werden, welche Anwendung Zugriff auf ihre Daten anfordert, welche Art von Daten angefordert werden und welche Nutzungsbedingungen gelten. Sie müssen den OAuth-Zustimmungsbildschirm konfigurieren, bevor Sie eine Google API-Client-ID generieren.
- Öffnen Sie in der Google APIs Console die Seite OAuth-Zustimmungsbildschirm.
- Wählen Sie bei Aufforderung das Projekt aus, das Sie gerade erstellt haben.
Füllen Sie auf der Seite „OAuth-Zustimmungsbildschirm“ das Formular aus und klicken Sie auf die Schaltfläche „Speichern“.
Anwendungsname:Der Name der Anwendung, die um Einwilligung bittet. Der Name sollte Ihre Anwendung korrekt widerspiegeln und mit dem Anwendungsnamen übereinstimmen, den Nutzer an anderer Stelle sehen. Der Anwendungsname wird auf dem Zustimmungsbildschirm für die Kontoverknüpfung angezeigt.
App-Logo:Ein Bild auf dem Zustimmungsbildschirm, das Nutzern hilft, Ihre App zu erkennen. Das Logo wird auf dem Zustimmungsbildschirm für die Kontoverknüpfung und in den Kontoeinstellungen angezeigt.
Support-E-Mail-Adresse:Für Nutzer, die Sie wegen Fragen zu ihrer Einwilligung kontaktieren möchten.
Bereiche für Google-APIs:Mit Bereichen kann Ihre Anwendung auf die privaten Google-Daten Ihrer Nutzer zugreifen. Für die Verknüpfung von Google-Konten reicht der Standardbereich („email“, „profile“, „openid“) aus. Sie müssen keine sensiblen Bereiche hinzufügen. Es empfiehlt sich, Bereiche inkrementell anzufordern, wenn der Zugriff erforderlich ist, und nicht im Voraus. Weitere Informationen
Autorisierte Domains:Um Sie und Ihre Nutzer zu schützen, erlaubt Google die Nutzung autorisierter Domains nur Anwendungen, die sich mit OAuth authentifizieren. Die Links Ihrer Anwendungen müssen auf autorisierten Domains gehostet werden. Weitere Informationen
Link zur Startseite der Anwendung:Startseite Ihrer Anwendung. Muss auf einer autorisierten Domain gehostet werden.
Link zur Datenschutzerklärung der Anwendung:Wird auf dem Zustimmungsbildschirm für die Verknüpfung von Google-Konten angezeigt. Muss auf einer autorisierten Domain gehostet werden.
Link zu den Nutzungsbedingungen der Anwendung (optional): Muss auf einer autorisierten Domain gehostet werden.
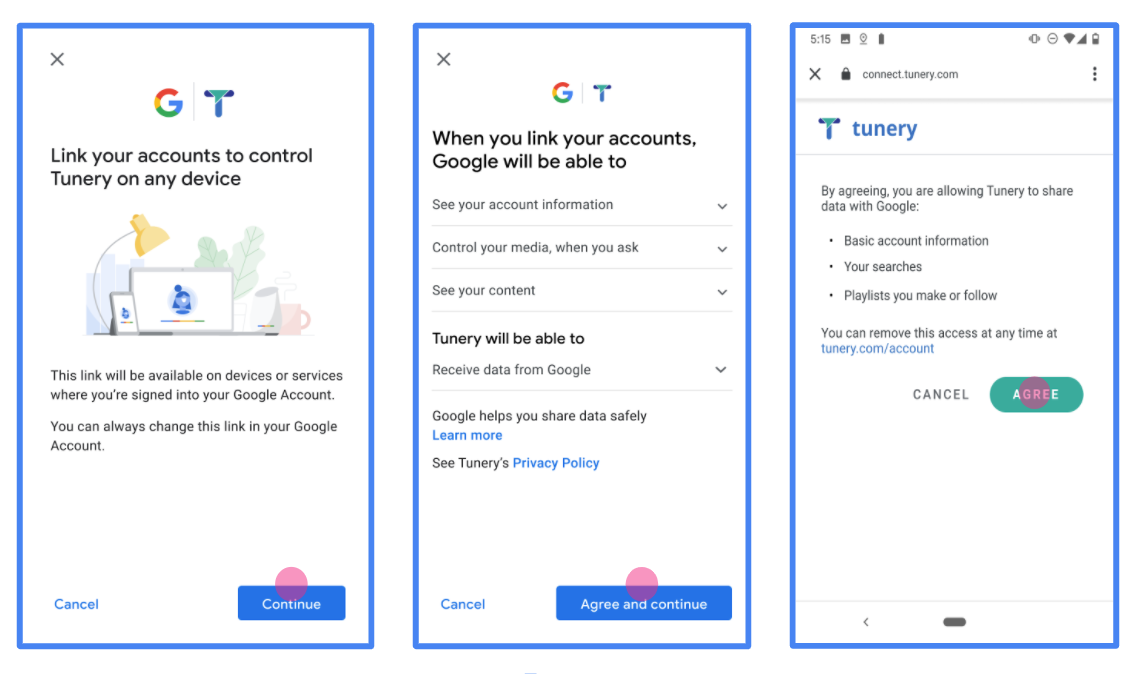
Abbildung 1. Zustimmungsbildschirm für die Google-Kontoverknüpfung für die fiktive App „Tunery“
Prüfen Sie den „Überprüfungsstatus“. Wenn Ihre Anwendung überprüft werden muss, klicken Sie auf die Schaltfläche „Zur Überprüfung einreichen“, um sie zur Überprüfung einzureichen. Weitere Informationen finden Sie unter Voraussetzungen für die OAuth-Überprüfung.
OAuth-Server implementieren
Eine OAuth 2.0-Serverimplementierung des Autorisierungscode-Ablaufs besteht aus zwei Endpunkten, die Ihr Dienst über HTTPS zur Verfügung stellt. Der erste Endpunkt ist der Autorisierungsendpunkt, der dafür zuständig ist, die Einwilligung von Nutzern für den Datenzugriff zu finden oder einzuholen. Der Autorisierungsendpunkt präsentiert Nutzern, die noch nicht angemeldet sind, eine Anmeldeoberfläche und erfasst die Einwilligung für den angeforderten Zugriff. Der zweite Endpunkt ist der Tokenaustausch-Endpunkt, der verwendet wird, um verschlüsselte Strings (Tokens) zu erhalten, die einen Nutzer zum Zugriff auf Ihren Dienst autorisieren.
Wenn eine Google-Anwendung eine der APIs Ihres Dienstes aufrufen muss, verwendet Google diese Endpunkte zusammen, um die Erlaubnis Ihrer Nutzer zu erhalten, diese APIs in ihrem Namen aufzurufen.
Google-Kontoverknüpfung: OAuth-Ablauf mit Autorisierungscode
Das folgende Sequenzdiagramm zeigt die Interaktionen zwischen dem Nutzer, Google und den Endpunkten Ihres Dienstes.
Rollen und Verantwortlichkeiten
In der folgenden Tabelle sind die Rollen und Verantwortlichkeiten der Akteure im OAuth-Ablauf für die Google-Kontoverknüpfung (GAL) definiert. Beachten Sie, dass in der GAL Google als der OAuth Client fungiert, während Ihr Dienst als der Identitäts-/Dienstanbieter fungiert.
| Akteur / Komponente | GAL-Rolle | Zuständigkeiten |
|---|---|---|
| Google-App / Server | OAuth-Client | Leitet den Ablauf ein, empfängt den Autorisierungscode, tauscht ihn gegen Tokens ein und speichert sie sicher, um auf die APIs Ihres Dienstes zuzugreifen. |
| Ihr Autorisierungsendpunkt | Autorisierungsserver | Authentifiziert Ihre Nutzer und holt ihre Einwilligung ein, den Zugriff auf ihre Daten für Google freizugeben. |
| Ihr Tokenaustausch-Endpunkt | Autorisierungsserver | Validiert Autorisierungscodes und Aktualisierungstokens und stellt dem Google-Server Zugriffstokens aus. |
| Google-Weiterleitungs-URI | Callback-Endpunkt | Empfängt die Nutzerweiterleitung von Ihrem Autorisierungsdienst mit den
code und state Werten. |
Eine von Google initiierte OAuth 2.0-Sitzung mit Autorisierungscode hat folgenden Ablauf:
- Google öffnet Ihren Autorisierungsendpunkt im Browser des Nutzers. Wenn der Ablauf auf einem reinen Sprachgerät für eine Aktion gestartet wurde, überträgt Google die Ausführung auf ein Smartphone.
- Der Nutzer meldet sich an, falls er noch nicht angemeldet ist, und gewährt Google die Berechtigung, mit Ihrer API auf seine Daten zuzugreifen, falls er die Berechtigung noch nicht erteilt hat.
- Ihr Dienst erstellt einen Autorisierungscode und gibt ihn an Google zurück. Dazu leiten Sie den Browser des Nutzers mit dem Autorisierungscode, der an die Anfrage angehängt ist, zurück zu Google.
- Google sendet den Autorisierungscode an Ihren Tokenaustausch-Endpunkt, der die Authentizität des Codes überprüft und ein Zugriffstoken und ein Aktualisierungstoken zurückgibt. Das Zugriffstoken ist ein kurzlebiges Token, das Ihr Dienst als Anmeldedaten für den Zugriff auf APIs akzeptiert. Das Aktualisierungstoken ist ein langlebiges Token, das Google speichern und verwenden kann, um neue Zugriffstokens zu erhalten, wenn sie ablaufen.
- Nachdem der Nutzer den Ablauf für die Kontoverknüpfung abgeschlossen hat, enthält jede nachfolgende Anfrage von Google ein Zugriffstoken.
Implementierungsrezept
Folgen Sie dieser Anleitung, um den Autorisierungscode-Vorgang zu implementieren.
Schritt 1: Autorisierungsanfragen verarbeiten
Wenn Google die Kontoverknüpfung initiiert, wird der Nutzer zu Ihrem Autorisierungsendpunkt weitergeleitet. Ausführliche Protokollverträge und Parameteranforderungen finden Sie unter dem Autorisierungsendpunkt.
So verarbeiten Sie die Anfrage:
Anfrage validieren:
- Prüfen Sie, ob die
client_idmit der Google zugewiesenen Client-ID übereinstimmt. - Prüfen Sie, ob die
redirect_urimit der erwarteten Google-Weiterleitungs URL:none https://oauth-redirect.googleusercontent.com/r/YOUR_PROJECT_ID https://oauth-redirect-sandbox.googleusercontent.com/r/YOUR_PROJECT_IDübereinstimmt - Prüfen Sie, ob
response_typegleichcodeist.
- Prüfen Sie, ob die
Nutzer authentifizieren:
- Prüfen Sie, ob der Nutzer in Ihrem Dienst angemeldet ist.
- Wenn der Nutzer nicht angemeldet ist, fordern Sie ihn auf, den Anmelde- oder Registrierungsablauf zu durchlaufen.
Autorisierungscode generieren:
- Erstellen Sie einen eindeutigen, nicht erratbaren Autorisierungscode, der mit dem Nutzer und dem Client verknüpft ist.
- Legen Sie fest, dass der Code in etwa 10 Minuten abläuft.
Zurück zu Google weiterleiten:
- Leiten Sie den Browser zur URL weiter, die in
redirect_uriangegeben ist. - Hängen Sie die folgenden Suchparameter an:
code: Der von Ihnen generierte Autorisierungscode.state: Der unveränderte Statuswert, der von Google empfangen wurde.
- Leiten Sie den Browser zur URL weiter, die in
Schritt 2: Tokenaustauschanfragen verarbeiten
Ihr Tokenaustausch-Endpunkt verarbeitet zwei Arten von Anfragen: Austausch von Codes gegen Tokens und Aktualisierung abgelaufener Zugriffstokens. Ausführliche Protokollverträge und Parameteranforderungen finden Sie unter dem Tokenaustausch-Endpunkt.
A. Autorisierungscodes gegen Tokens austauschen
Wenn Google den Autorisierungscode empfängt, ruft es Ihren Tokenaustausch-Endpunkt (POST) auf, um Tokens abzurufen.
Anfrage validieren:
- Prüfen Sie
client_idundclient_secret. - Prüfen Sie, ob der Autorisierungscode gültig und nicht abgelaufen ist.
- Prüfen Sie, ob
redirect_urimit dem in Schritt 1 verwendeten Wert übereinstimmt. - Wenn die Validierung fehlschlägt, geben Sie eine HTTP-Antwort
400 Bad Requestmit{"error": "invalid_grant"}zurück.
- Prüfen Sie
Tokens ausstellen:
- Generieren Sie ein langlebiges
refresh_tokenund ein kurzlebigesaccess_token(in der Regel 1 Stunde). - Geben Sie eine HTTP-Antwort
200 OKmit der Standard-JSON-Tokenantwort zurück.
- Generieren Sie ein langlebiges
B. Zugriffstokens aktualisieren
Wenn das Zugriffstoken abläuft, fordert Google mit dem Aktualisierungstoken ein neues an.
Anfrage validieren:
- Prüfen Sie
client_id,client_secretundrefresh_token. - Wenn die Validierung fehlschlägt, geben Sie eine HTTP-Antwort
400 Bad Requestmit{"error": "invalid_grant"}zurück.
- Prüfen Sie
Neues Zugriffstoken ausstellen:
- Generieren Sie ein neues kurzlebiges
access_token. - Geben Sie eine HTTP-Antwort
200 OKmit der JSON-Tokenantwort zurück (optional mit einem neuen Aktualisierungstoken).
- Generieren Sie ein neues kurzlebiges
userinfo-Anfragen verarbeiten
Der userinfo-Endpunkt ist eine geschützte OAuth 2.0-Ressource, die Ansprüche über den verknüpften Nutzer zurückgibt. Die Implementierung und das Hosten des userinfo-Endpunkts sind mit Ausnahme der folgenden Anwendungsfälle optional:
- Anmeldung in einem verknüpften Konto über Google One Tap.
- Reibungsloses Abo auf Android TV
Nachdem das Zugriffstoken erfolgreich von Ihrem Tokenendpunkt abgerufen wurde, sendet Google eine Anfrage an Ihren userinfo-Endpunkt, um grundlegende Profilinformationen über den verknüpften Nutzer abzurufen.
| Anfrageheader für userinfo-Endpunkt | |
|---|---|
Authorization header |
Das Zugriffstoken vom Typ „Bearer“. |
Wenn Ihr userinfo-Endpunkt beispielsweise unter
https://myservice.example.com/userinfo, kann eine Anfrage so aussehen:
GET /userinfo HTTP/1.1
Host: myservice.example.com
Authorization: Bearer ACCESS_TOKEN
Führen Sie die folgenden Schritte aus, damit der userinfo-Endpunkt Anfragen verarbeiten kann:
- Extrahieren Sie das Zugriffstoken aus dem Autorisierungs-Header und geben Sie Informationen für den Nutzer zurück, der mit dem Zugriffstoken verknüpft ist.
- Wenn das Zugriffstoken ungültig ist, gib den Fehler „HTTP 401 Unauthorized“ mit dem Antwortheader
WWW-Authenticatezurück. Hier ist ein Beispiel für eine Userinfo-Fehlerantwort:HTTP/1.1 401 Unauthorized WWW-Authenticate: error="invalid_token", error_description="The Access Token expired"
Wenn das Zugriffstoken gültig ist, geben Sie eine HTTP 200-Antwort mit dem folgenden JSON-Objekt im Text des HTTPS-Objekts zurück. Antwort:
{ "sub": "USER_UUID", "email": "EMAIL_ADDRESS", "given_name": "FIRST_NAME", "family_name": "LAST_NAME", "name": "FULL_NAME", "picture": "PROFILE_PICTURE", }Userinfo-Endpunktantwort subEine eindeutige ID, die den Nutzer in Ihrem System identifiziert. emailE-Mail-Adresse des Nutzers given_nameOptional:Vorname des Nutzers. family_nameOptional:Nachname des Nutzers. nameOptional:Vollständiger Name des Nutzers. pictureOptional:Profilbild des Nutzers.
Implementierung validieren
Sie können Ihre Implementierung mit dem OAuth 2.0 Playground Tool validieren.
Führen Sie im Tool die folgenden Schritte aus:
- Klicken Sie auf die Konfigurationseinstellungen , um das Fenster „OAuth 2.0-Konfiguration“ zu öffnen.
- Wählen Sie im Feld OAuth-Ablauf die Option Clientseitig aus.
- Wählen Sie im Feld OAuth-Endpunkte die Option Benutzerdefiniert aus.
- Geben Sie in den entsprechenden Feldern Ihren OAuth 2.0-Endpunkt und die Client-ID an, die Sie Google zugewiesen haben.
- Wählen Sie im Abschnitt Schritt 1 keine Google-Bereiche aus. Lassen Sie dieses Feld stattdessen leer oder geben Sie einen für Ihren Server gültigen Bereich ein (oder eine beliebige Zeichenfolge, wenn Sie keine OAuth-Bereiche verwenden). Klicken Sie anschließend auf APIs autorisieren.
- Führen Sie in den Abschnitten Schritt 2 und Schritt 3 den OAuth 2.0-Ablauf durch und prüfen Sie, ob jeder Schritt wie vorgesehen funktioniert.
Sie können Ihre Implementierung mit dem Tool „Google-Kontoverknüpfung – Demo“ validieren.
Führen Sie im Tool die folgenden Schritte aus:
- Klicken Sie auf die Schaltfläche Mit Google anmelden.
- Wählen Sie das Konto aus, das Sie verknüpfen möchten.
- Geben Sie die Dienst-ID ein.
- Optional können Sie einen oder mehrere Bereiche eingeben, für die Sie Zugriff anfordern möchten.
- Klicken Sie auf Demo starten.
- Bestätigen Sie bei Aufforderung, dass Sie der Verknüpfungsanfrage zustimmen und sie ablehnen können.
- Bestätigen Sie, dass Sie zu Ihrer Plattform weitergeleitet werden.