Связывание учетных записей осуществляется с использованием стандартного для отрасли протокола авторизации OAuth 2.0.
OAuth 2.1 & PKCE for Agents
Для агентов ИИ без сохранения состояния и многомодальных конвейеров рекомендуется принудительное использование OAuth 2.1 .
- PKCE (Proof Key for Code Exchange) : Должен использоваться для защиты потока авторизационного кода и предотвращения атак перехвата.
- Отсутствие неявного потока : Неявный поток раскрывает токены доступа в URL-адресе, что представляет собой риск безопасности для агентских сред.
Ваш сервис должен поддерживать авторизацию и точки обмена токенами , соответствующие стандартам OAuth 2.0/2.1.
Создайте проект
Для создания проекта с использованием привязки учетных записей:
- Перейдите в консоль Google API .
- Нажмите «Создать проект» .
- Введите имя или примите предложенное имя.
- Подтвердите или отредактируйте оставшиеся поля.
- Нажмите «Создать» .
Чтобы просмотреть идентификатор вашего проекта:
- Go to the Google API Console .
- Найдите свой проект в таблице на главной странице. Идентификатор проекта указан в столбце ID .
Настройте экран согласия OAuth.
Процесс привязки учетной записи Google включает в себя экран согласия, который информирует пользователей о приложении, запрашивающем доступ к их данным, о типе запрашиваемых данных и применимых условиях. Вам потребуется настроить экран согласия OAuth перед генерацией идентификатора клиента Google API.
- Откройте страницу согласия OAuth в консоли Google API.
- Если появится запрос, выберите только что созданный вами проект.
На странице «Экран согласия OAuth» заполните форму и нажмите кнопку «Сохранить».
Название приложения: Название приложения, запрашивающего согласие. Название должно точно отражать ваше приложение и соответствовать названию приложения, которое пользователи видят в других местах. Название приложения будет отображаться на экране подтверждения привязки учетной записи.
Логотип приложения: изображение на экране согласия, которое поможет пользователям узнать ваше приложение. Логотип отображается на экране согласия при привязке учетной записи и в настройках учетной записи.
Адрес электронной почты службы поддержки: Для связи с пользователями по вопросам, касающимся их согласия.
Области действия для API Google: Области действия позволяют вашему приложению получать доступ к личным данным пользователей Google. Для сценария использования привязки учетной записи Google достаточно области действия по умолчанию (электронная почта, профиль, OpenID), добавлять какие-либо конфиденциальные области действия не требуется. Как правило, рекомендуется запрашивать области действия постепенно, по мере необходимости доступа, а не сразу. Подробнее .
Авторизованные домены: Для вашей защиты и защиты ваших пользователей Google разрешает использовать авторизованные домены только приложениям, аутентифицирующимся с помощью OAuth. Ссылки на ваши приложения должны размещаться на авторизованных доменах. Подробнее .
Ссылка на главную страницу приложения: Домашняя страница вашего приложения. Должна размещаться на авторизованном домене.
Application Privacy Policy link: Shown on Google Account Linking consent screen. Must be hosted on an Authorized Domain.
Ссылка на Условия использования приложения (необязательно): Приложение должно размещаться на авторизованном домене.
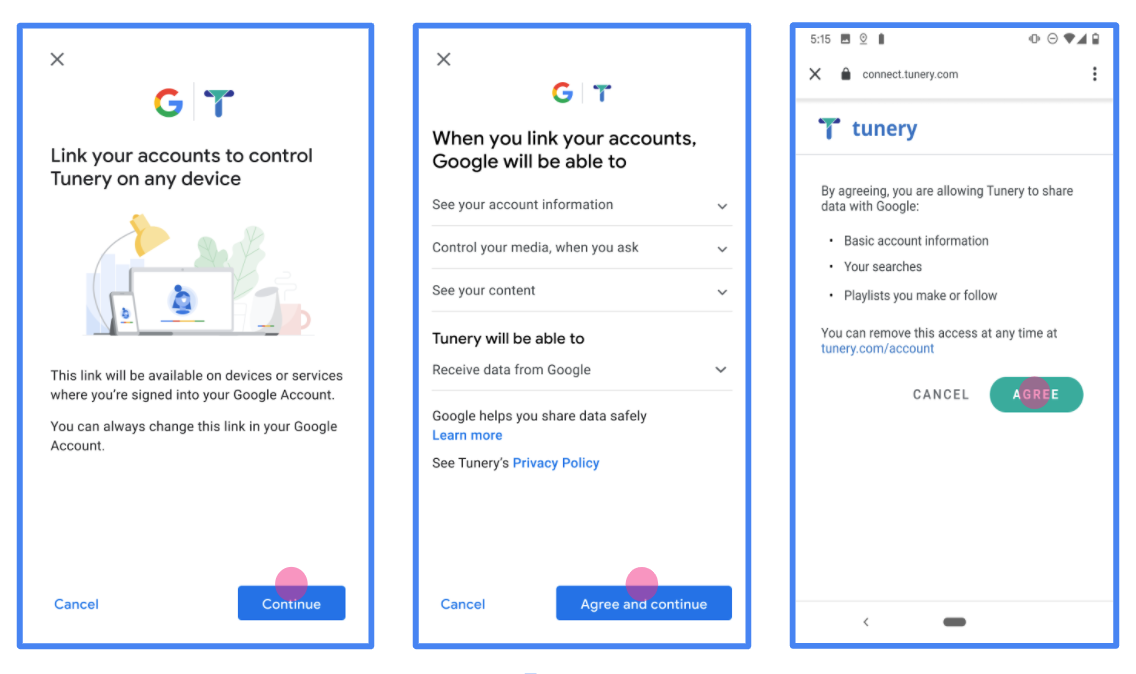
Рисунок 1. Экран согласия на привязку учетной записи Google для вымышленного приложения Tunery.
Проверьте «Статус проверки». Если ваше приложение нуждается в проверке, нажмите кнопку «Отправить на проверку», чтобы отправить приложение на проверку. Подробную информацию см. в требованиях к проверке OAuth .
Implement your OAuth server
An OAuth 2.0 server implementation of the authorization code flow consists of two endpoints, which your service makes available by HTTPS. The first endpoint is the authorization endpoint, which is responsible for finding or obtaining consent from users for data access. The authorization endpoint presents a sign-in UI to your users that aren't already signed in and records consent to the requested access. The second endpoint is the token exchange endpoint, which is used to obtain encrypted strings, called tokens, that authorize a user to access your service.
When a Google application needs to call one of your service's APIs, Google uses these endpoints together to get permission from your users to call these APIs on their behalf.
Google Account Linking: OAuth Authorization Code Flow
The following sequence diagram details interactions between the User, Google, and your service's endpoints.
Roles and responsibilities
The following table defines the roles and responsibilities of the actors in the Google Account Linking (GAL) OAuth flow. Note that in GAL, Google acts as the OAuth Client, while your service acts as the Identity/Service Provider.
| Actor / Component | GAL Role | Responsibilities |
|---|---|---|
| Google App / Server | OAuth Client | Initiates the flow, receives the authorization code, exchanges it for tokens, and securely stores them to access your service's APIs. |
| Your Authorization Endpoint | Authorization Server | Authenticates your users and obtains their consent to share access to their data with Google. |
| Your Token Exchange Endpoint | Authorization Server | Validates authorization codes and refresh tokens, and issues access tokens to the Google Server. |
| Google Redirect URI | Callback Endpoint | Receives the user redirect from your authorization service with the
code and state values. |
An OAuth 2.0 authorization code flow session initiated by Google has the following flow:
- Google opens your authorization endpoint in the user's browser. If the flow started on a voice-only device for an Action, Google transfers the execution to a phone.
- The user signs in, if not signed in already, and grants Google permission to access their data with your API, if they haven't already granted permission.
- Your service creates an authorization code and returns it to Google. To do so, redirect the user's browser back to Google with the authorization code attached to the request.
- Google sends the authorization code to your token exchange endpoint, which verifies the authenticity of the code and returns an access token and a refresh token. The access token is a short-lived token that your service accepts as credentials to access APIs. The refresh token is a long-lived token that Google can store and use to acquire new access tokens when they expire.
- After the user has completed the account linking flow, every subsequent request sent from Google contains an access token.
Implementation Recipe
Follow these steps to implement the Authorization Code flow.
Step 1: Handle authorization requests
When Google initiates account linking, it redirects the user to your authorization endpoint. For detailed protocol contracts and parameter requirements, see the Authorization Endpoint.
To handle the request, perform the following actions:
Validate the request:
- Confirm that the
client_idmatches the Client ID assigned to Google. - Confirm that the
redirect_urimatches the expected Google redirect URL:none https://oauth-redirect.googleusercontent.com/r/YOUR_PROJECT_ID https://oauth-redirect-sandbox.googleusercontent.com/r/YOUR_PROJECT_ID - Verify that
response_typeiscode.
- Confirm that the
Authenticate the user:
- Check if the user is signed in to your service.
- If the user is not signed in, prompt them to complete your sign-in or sign-up flow.
Generate authorization code:
- Create a unique, non-guessable authorization code associated with the user and client.
- Set the code to expire in approximately 10 minutes.
Redirect back to Google:
- Redirect the browser to the URL provided in
redirect_uri. - Append the following query parameters:
code: The authorization code you generated.state: The unmodified state value received from Google.
- Redirect the browser to the URL provided in
Step 2: Handle token exchange requests
Your token exchange endpoint processes two types of requests: exchanging codes for tokens, and refreshing expired access tokens. For detailed protocol contracts and parameter requirements, see the Token Exchange Endpoint.
A. Exchange authorization codes for tokens
When Google receives the authorization code, it calls your token exchange endpoint (POST) to retrieve tokens.
Validate the request:
- Verify
client_idandclient_secret. - Verify the authorization code is valid and not expired.
- Confirm
redirect_urimatches the value used in Step 1. - If validation fails, return an HTTP
400 Bad Requestwith{"error": "invalid_grant"}.
- Verify
Issue tokens:
- Generate a long-lived
refresh_tokenand a short-livedaccess_token(typically 1 hour). - Return an HTTP
200 OKwith the standard JSON token response.
- Generate a long-lived
B. Refresh access tokens
When the access token expires, Google requests a new one using the refresh token.
Validate the request:
- Verify
client_id,client_secret, andrefresh_token. - If validation fails, return an HTTP
400 Bad Requestwith{"error": "invalid_grant"}.
- Verify
Issue new access token:
- Generate a new short-lived
access_token. - Return an HTTP
200 OKwith the JSON token response (optionally including a new refresh token).
- Generate a new short-lived
Handle userinfo requests
The userinfo endpoint is an OAuth 2.0 protected resource that return claims about the linked user. Implementing and hosting the userinfo endpoint is optional, except for the following use cases:
- Linked Account Sign-In with Google One Tap.
- Frictionless subscription on AndroidTV.
After the access token has been successfully retrieved from your token endpoint, Google sends a request to your userinfo endpoint to retrieve basic profile information about the linked user.
| userinfo endpoint request headers | |
|---|---|
Authorization header |
The access token of type Bearer. |
For example, if your userinfo endpoint is available at
https://myservice.example.com/userinfo, a request might look like the following:
GET /userinfo HTTP/1.1
Host: myservice.example.com
Authorization: Bearer ACCESS_TOKEN
For your userinfo endpoint to handle requests, do the following steps:
- Extract access token from the Authorization header and return information for the user associated with the access token.
- If the access token is invalid, return an HTTP 401 Unauthorized error with using the
WWW-AuthenticateResponse Header. Below is an example of a userinfo error response:HTTP/1.1 401 Unauthorized WWW-Authenticate: error="invalid_token", error_description="The Access Token expired"
If the access token is valid, return and HTTP 200 response with the following JSON object in the body of the HTTPS response:
{ "sub": "USER_UUID", "email": "EMAIL_ADDRESS", "given_name": "FIRST_NAME", "family_name": "LAST_NAME", "name": "FULL_NAME", "picture": "PROFILE_PICTURE", }userinfo endpoint response subA unique ID that identifies the user in your system. emailEmail address of the user. given_nameOptional: First name of the user. family_nameOptional: Last name of the user. nameOptional: Full name of the user. pictureOptional: Profile picture of the user.
Validating your implementation
You can validate your implementation by using the OAuth 2.0 Playground tool.
In the tool, do the following steps:
- Click Configuration to open the OAuth 2.0 Configuration window.
- In the OAuth flow field, select Client-side.
- In the OAuth Endpoints field, select Custom.
- Specify your OAuth 2.0 endpoint and the client ID you assigned to Google in the corresponding fields.
- In the Step 1 section, don't select any Google scopes. Instead, leave this field blank or type a scope valid for your server (or an arbitrary string if you don't use OAuth scopes). When you're done, click Authorize APIs.
- In the Step 2 and Step 3 sections, go through the OAuth 2.0 flow and verify that each step works as intended.
You can validate your implementation by using the Google Account Linking Demo tool.
In the tool, do the following steps:
- Click the Sign in with Google button.
- Choose the account you'd like to link.
- Enter the service ID.
- Optionally enter one or more scopes that you will request access for.
- Click Start Demo.
- When prompted, confirm that you may consent and deny the linking request.
- Confirm that you are redirected to your platform.