As contas são vinculadas usando fluxos implícitos e de código de autorização do OAuth 2.0, que são padrões do setor.
Seu serviço precisa oferecer suporte a endpoints de autorização e troca de tokens compatíveis com o OAuth 2.0.No fluxo implícito, o Google abre seu endpoint de autorização no navegador do usuário. Depois de fazer login, retorne um token de acesso de longa duração para o Google. Esse token de acesso agora está incluído em todas as solicitações enviadas pelo Google.
No fluxo do código de autorização, você precisa de dois endpoints:
O endpoint de autorização, que apresenta a interface de login aos usuários que ainda não fizeram login. O endpoint de autorização também cria um código de autorização de curta duração para registrar o consentimento dos usuários ao acesso solicitado.
O endpoint de troca de tokens, responsável por dois tipos de trocas:
- Troca um código de autorização por um token de atualização de longa duração e um token de acesso de curta duração. Essa troca acontece quando o usuário passa pelo fluxo de vinculação de contas.
- Troca um token de atualização de longa duração por um token de acesso de curta duração. Essa troca acontece quando o Google precisa de um novo token de acesso porque o que ele tinha expirou.
Escolher um fluxo do OAuth 2.0
Embora o fluxo implícito seja mais simples de implementar, o Google recomenda que os tokens de acesso emitidos por ele nunca expirem. Isso acontece porque o usuário é forçado a vincular a conta novamente depois que um token expira com o fluxo implícito. Se você precisar de expiração de token por motivos de segurança, recomendamos usar o fluxo de código de autorização.
Diretrizes de design
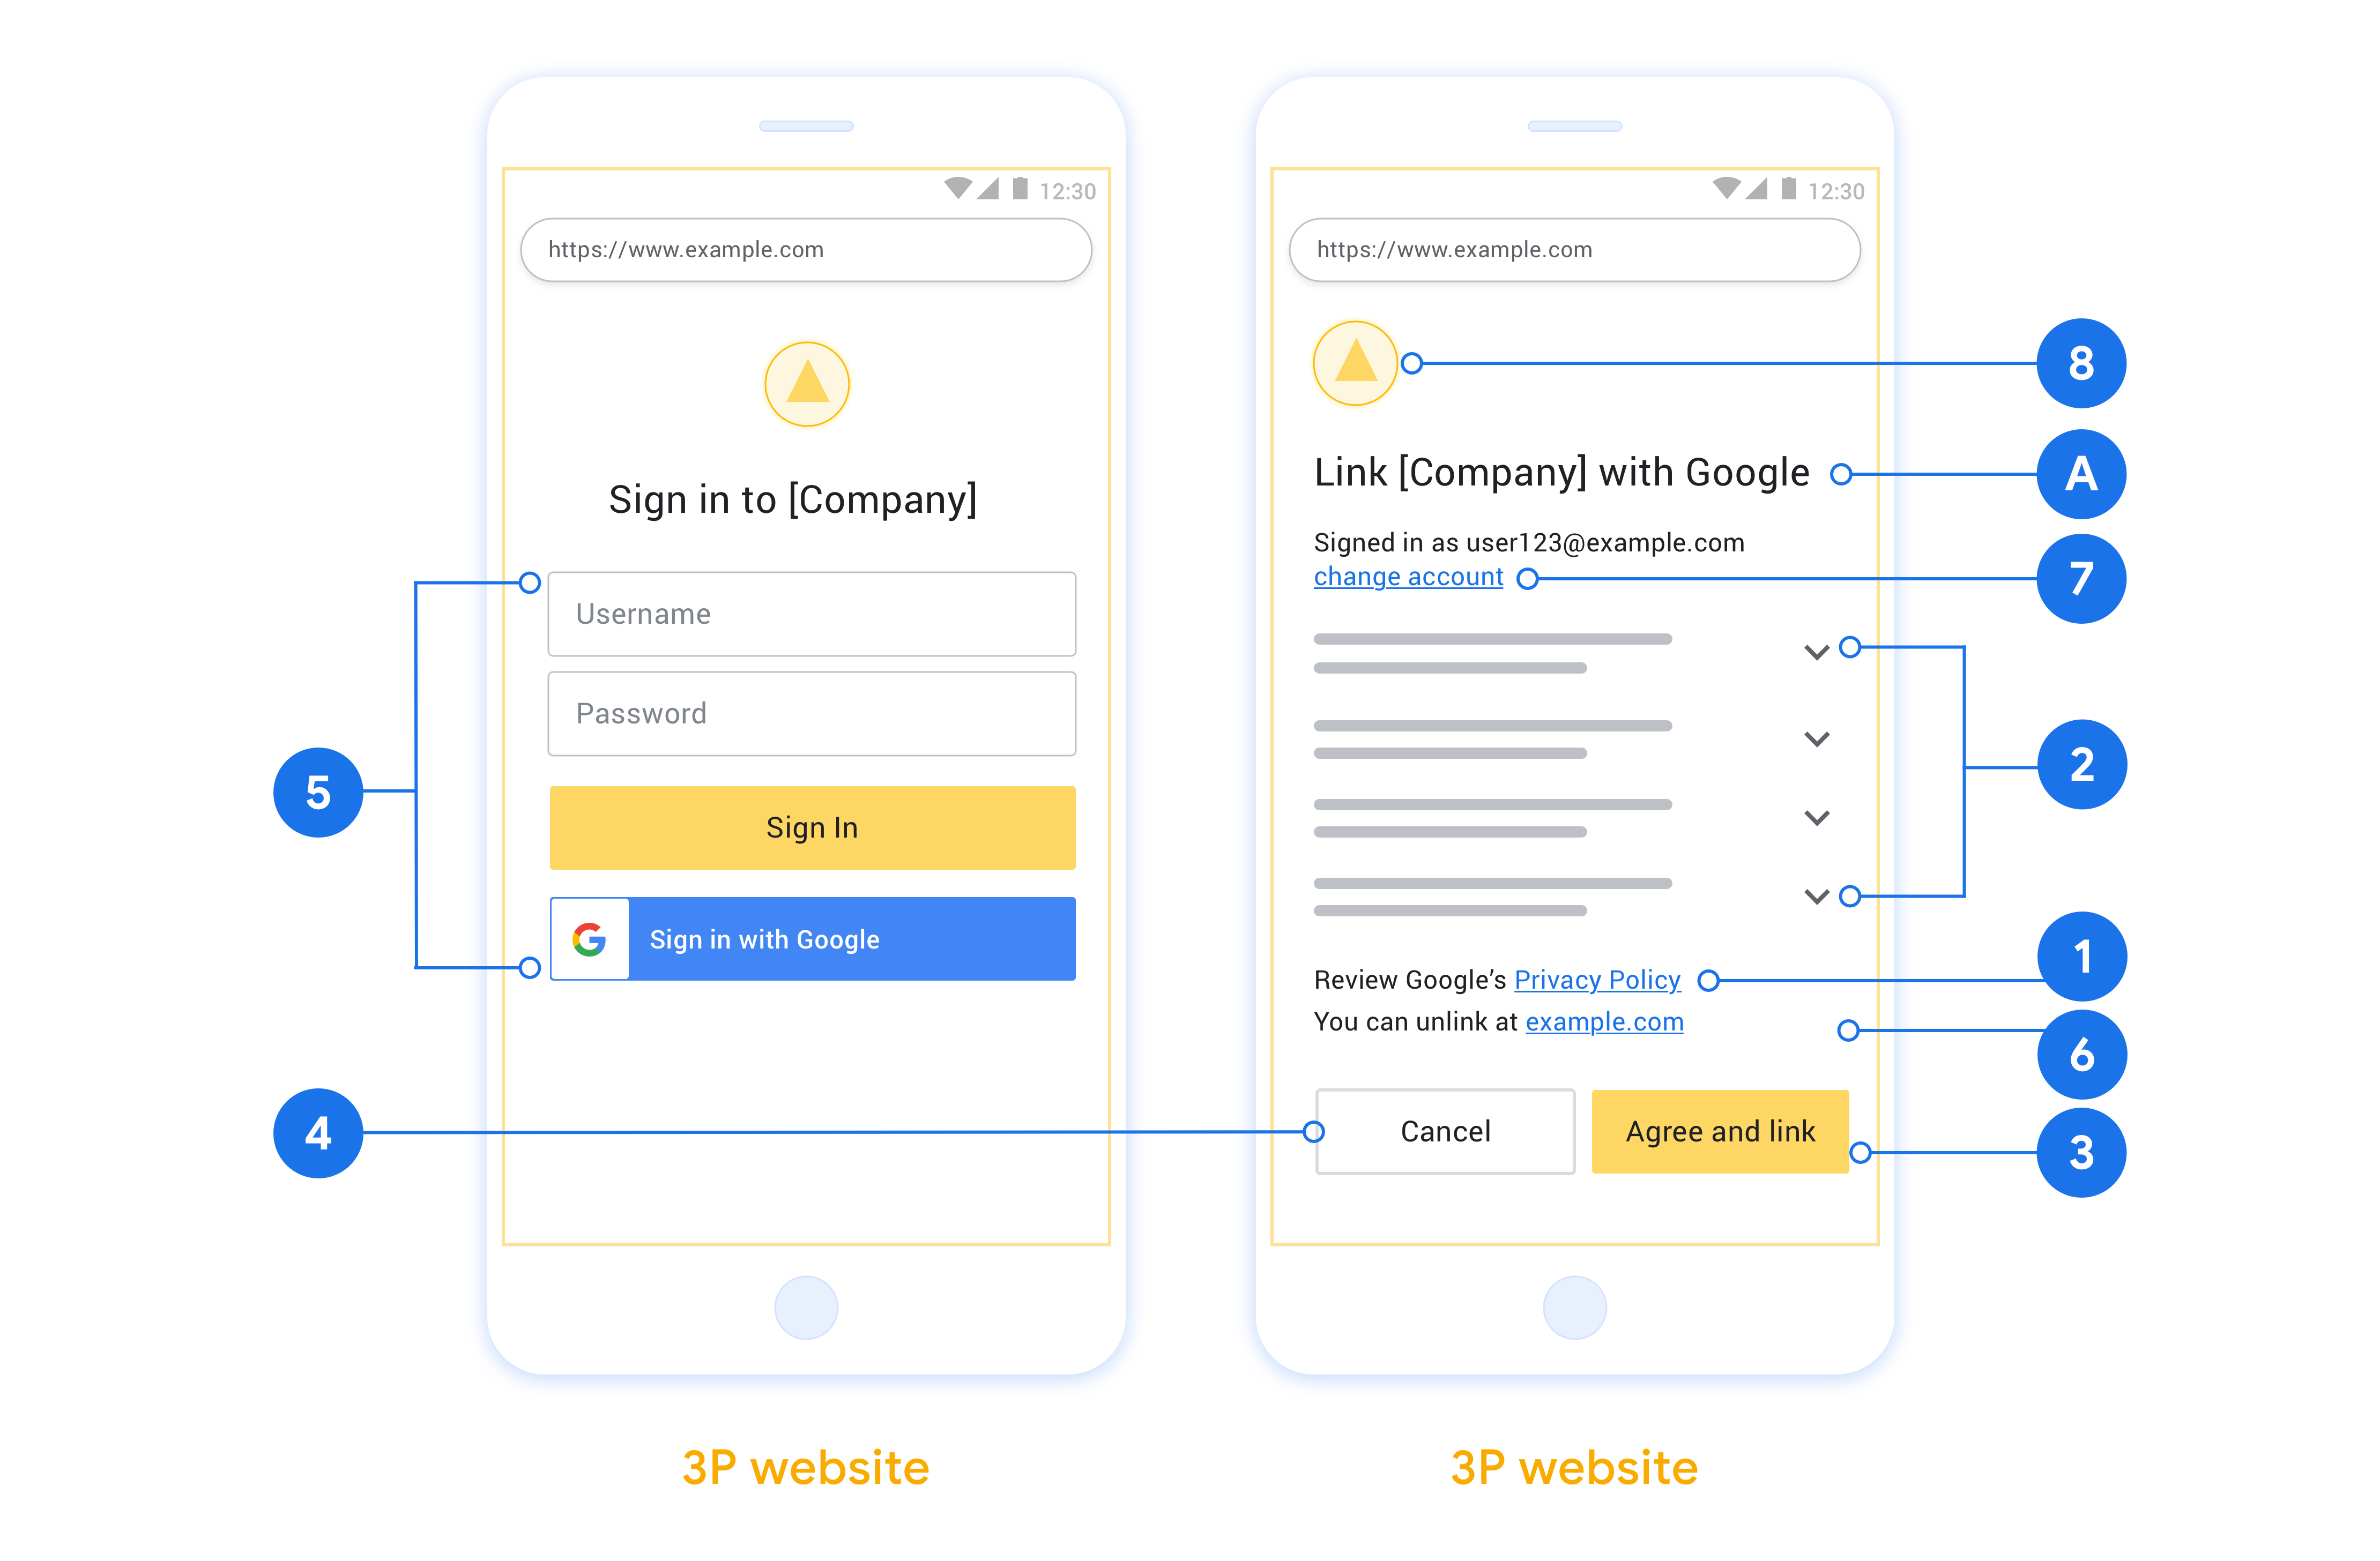
Esta seção descreve os requisitos e as recomendações de design para a tela do usuário que você hospeda para fluxos de vinculação do OAuth. Depois que ele é chamado pelo app do Google, sua plataforma mostra uma página de login no Google e uma tela de consentimento para vinculação de contas ao usuário. O usuário é redirecionado de volta para o app do Google depois de dar o consentimento para vincular as contas.
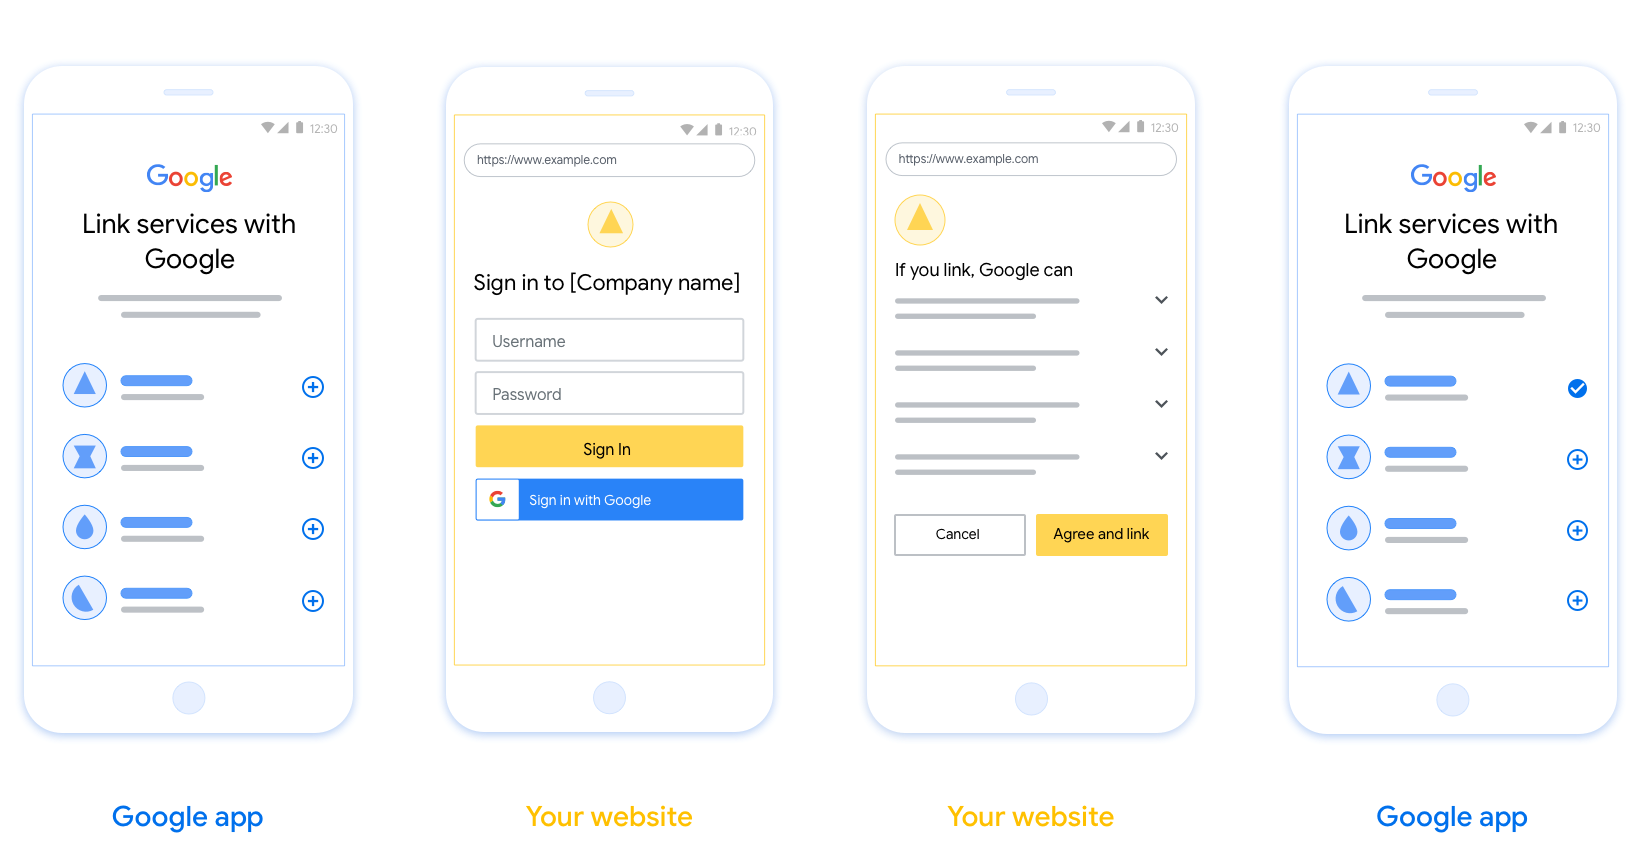
Requisitos
- Você precisa informar que a conta do usuário será vinculada ao Google, não a um produto específico do Google, como o Google Home ou o Google Assistente.
Recomendações
Portanto, recomendamos que você faça o seguinte:
Mostrar a Política de Privacidade do Google. Inclua um link para a Política de Privacidade do Google na tela de permissão.
Dados que serão compartilhados. Use uma linguagem clara e concisa para informar ao usuário quais dados dele o Google exige e por quê.
Call-to-action clara. Inclua uma call-to-action clara na tela de consentimento, como "Concordar e vincular". Isso porque os usuários precisam entender quais dados são obrigatórios para compartilhar com o Google e vincular as contas.
Opção de cancelamento. Ofereça uma maneira para os usuários voltarem ou cancelarem, caso não queiram vincular.
Processo de login claro. Verifique se os usuários têm um método claro para fazer login na Conta do Google, como campos para nome de usuário e senha ou Fazer login com o Google.
Capacidade de desvincular. Ofereça um mecanismo para os usuários desvincularem, como um URL para as configurações da conta na sua plataforma. Como alternativa, inclua um link para a Conta do Google, onde os usuários podem gerenciar a conta vinculada.
Capacidade de mudar a conta de usuário. Sugira um método para os usuários trocarem de conta. Isso é especialmente útil se os usuários costumam ter várias contas.
- Se um usuário precisar fechar a tela de permissão para trocar de conta, envie um erro recuperável ao Google para que ele possa fazer login na conta desejada com a vinculação do OAuth e o fluxo implícito.
Inclua seu logotipo. Mostre o logotipo da sua empresa na tela de permissão. Use as diretrizes de estilo para posicionar seu logotipo. Se você também quiser mostrar o logotipo do Google, consulte Logotipos e marcas registradas.
Create the project
To create your project to use account linking:
- Go to the Google API Console.
- Click Create project.
- Enter a name or accept the generated suggestion.
- Confirm or edit any remaining fields.
- Click Create.
To view your project ID:
- Go to the Google API Console.
- Find your project in the table on the landing page. The project ID appears in the ID column.
Configure your OAuth Consent Screen
The Google Account Linking process includes a consent screen which tells users the application requesting access to their data, what kind of data they are asking for and the terms that apply. You will need to configure your OAuth consent screen before generating a Google API client ID.
- Open the OAuth consent screen page of the Google APIs console.
- If prompted, select the project you just created.
On the "OAuth consent screen" page, fill out the form and click the “Save” button.
Application name: The name of the application asking for consent. The name should accurately reflect your application and be consistent with the application name users see elsewhere. The application name will be shown on the Account Linking consent screen.
Application logo: An image on the consent screen that will help users recognize your app. The logo is shown on Account linking consent screen and on account settings
Support email: For users to contact you with questions about their consent.
Scopes for Google APIs: Scopes allow your application to access your user's private Google data. For the Google Account Linking use case, default scope (email, profile, openid) is sufficient, you don’t need to add any sensitive scopes. It is generally a best practice to request scopes incrementally, at the time access is required, rather than up front. Learn more.
Authorized domains: To protect you and your users, Google only allows applications that authenticate using OAuth to use Authorized Domains. Your applications' links must be hosted on Authorized Domains. Learn more.
Application Homepage link: Home page for your application. Must be hosted on an Authorized Domain.
Application Privacy Policy link: Shown on Google Account Linking consent screen. Must be hosted on an Authorized Domain.
Application Terms of Service link (Optional): Must be hosted on an Authorized Domain.
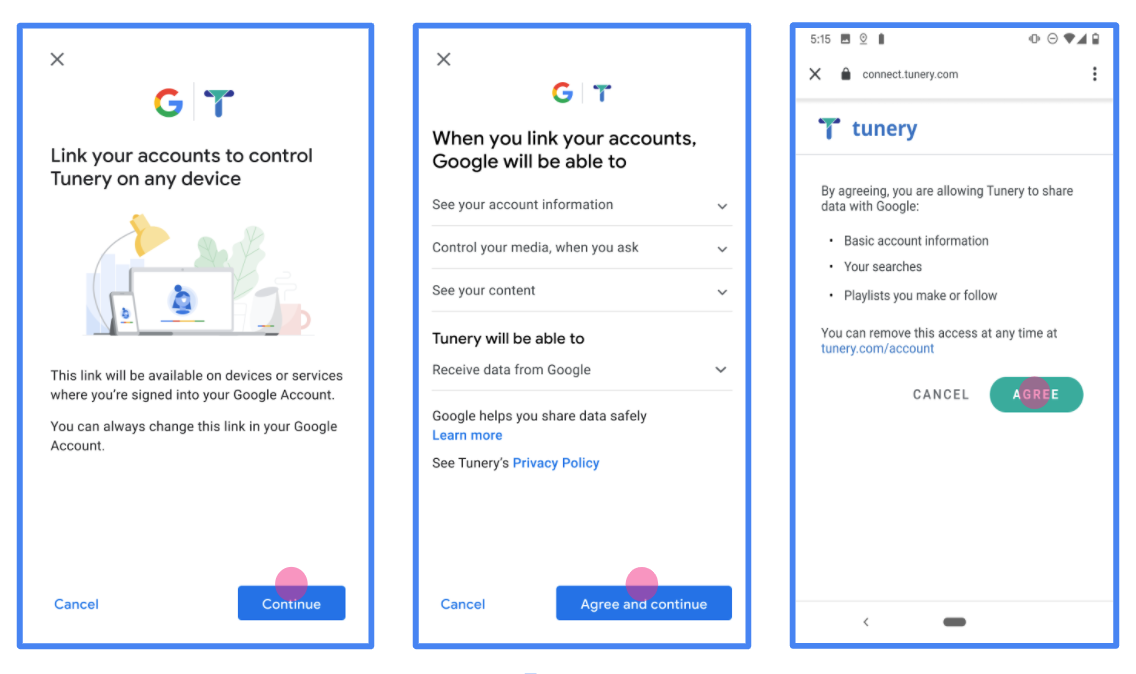
Figure 1. Google Account Linking Consent Screen for a fictitious Application, Tunery
Check "Verification Status", if your application needs verification then click the "Submit For Verification" button to submit your application for verification. Refer to OAuth verification requirements for details.
Implementar o servidor OAuth
n
To support the OAuth 2.0 implicit flow, your service makes an authorization endpoint available by HTTPS. This endpoint is responsible for authentication and obtaining consent from users for data access. The authorization endpoint presents a sign-in UI to your users that aren't already signed in and records consent to the requested access.
When a Google application needs to call one of your service's authorized APIs, Google uses this endpoint to get permission from your users to call these APIs on their behalf.
Google Account Linking: OAuth Implicit Flow
The following sequence diagram details interactions between the User, Google, and your service's endpoints.
Roles and responsibilities
The following table defines the roles and responsibilities of actors in the Google Account Linking (GAL) OAuth Implicit flow. Note that in GAL, Google acts as the OAuth Client, while your service acts as the Identity/Service Provider.
| Actor / Component | GAL Role | Responsibilities |
|---|---|---|
| Google App / Server | OAuth Client | Initiates the flow, receives the access token using a browser redirect, and securely stores it to access your service's APIs. |
| Your Authorization Endpoint | Authorization Server | Authenticates your users, obtains their consent, and issues long-lived access tokens directly to Google. |
| Google Redirect URI | Callback Endpoint | Receives the user redirect from your authorization service with the
access_token and state values in the URL
fragment. |
A typical OAuth 2.0 implicit flow session initiated by Google has the following flow:
- Google opens your authorization endpoint in the user's browser. The user signs in, if not signed in already, and grants Google permission to access their data with your API, if they haven't already granted permission.
- Your service creates an access token and returns it to Google. To do so, redirect the user's browser back to Google with the access token attached to the request.
- Google calls your service's APIs and attaches the access token with each request. Your service verifies that the access token grants Google authorization to access the API and then completes the API call.
Handle authorization requests
When a Google application needs to perform account linking using an OAuth 2.0 implicit flow, Google sends the user to your authorization endpoint with a request that includes the following parameters:
| Authorization endpoint parameters | |
|---|---|
client_id |
The client ID you assigned to Google. |
redirect_uri |
The URL to which you send the response to this request. |
state |
A bookkeeping value that is passed back to Google unchanged in the redirect URI. |
response_type |
The type of value to return in the response. For the OAuth 2.0 implicit
flow, the response type is always token. |
user_locale |
The Google Account language setting in RFC5646 format used to localize your content in the user's preferred language. |
For example, if your authorization endpoint is available at
https://myservice.example.com/auth, a request might look like the following:
GET https://myservice.example.com/auth?client_id=GOOGLE_CLIENT_ID&redirect_uri=REDIRECT_URI&state=STATE_STRING&response_type=token&user_locale=LOCALE
For your authorization endpoint to handle sign-in requests, do the following steps:
Verify the
client_idandredirect_urivalues to prevent granting access to unintended or misconfigured client apps:- Confirm that the
client_idmatches the client ID you assigned to Google. - Confirm that the URL specified by the
redirect_uriparameter has the following form:https://oauth-redirect.googleusercontent.com/r/YOUR_PROJECT_ID https://oauth-redirect-sandbox.googleusercontent.com/r/YOUR_PROJECT_ID
- Confirm that the
Check if the user is signed in to your service. If the user isn't signed in, complete your service's sign-in or sign-up flow.
Generate an access token for Google to use to access your API. The access token can be any string value, but it must uniquely represent the user and the client the token is for and must not be guessable.
Send an HTTP response that redirects the user's browser to the URL specified by the
redirect_uriparameter. Include all of the following parameters in the URL fragment:access_token: The access token you just generatedtoken_type: The stringbearerstate: The unmodified state value from the original request
The following is an example of the resulting URL:
https://oauth-redirect.googleusercontent.com/r/YOUR_PROJECT_ID#access_token=ACCESS_TOKEN&token_type=bearer&state=STATE_STRING
Google's OAuth 2.0 redirect handler receives the access token and confirms
that the state value hasn't changed. After Google has obtained an
access token for your service, Google attaches the token to subsequent calls
to your service APIs.
Handle userinfo requests
The userinfo endpoint is an OAuth 2.0 protected resource that return claims about the linked user. Implementing and hosting the userinfo endpoint is optional, except for the following use cases:
- Linked Account Sign-In with Google One Tap.
- Frictionless subscription on AndroidTV.
After the access token has been successfully retrieved from your token endpoint, Google sends a request to your userinfo endpoint to retrieve basic profile information about the linked user.
| userinfo endpoint request headers | |
|---|---|
Authorization header |
The access token of type Bearer. |
For example, if your userinfo endpoint is available at
https://myservice.example.com/userinfo, a request might look like the following:
GET /userinfo HTTP/1.1
Host: myservice.example.com
Authorization: Bearer ACCESS_TOKEN
For your userinfo endpoint to handle requests, do the following steps:
- Extract access token from the Authorization header and return information for the user associated with the access token.
- If the access token is invalid, return an HTTP 401 Unauthorized error with using the
WWW-AuthenticateResponse Header. Below is an example of a userinfo error response:HTTP/1.1 401 Unauthorized WWW-Authenticate: error="invalid_token", error_description="The Access Token expired"
If the access token is valid, return and HTTP 200 response with the following JSON object in the body of the HTTPS response:
{ "sub": "USER_UUID", "email": "EMAIL_ADDRESS", "given_name": "FIRST_NAME", "family_name": "LAST_NAME", "name": "FULL_NAME", "picture": "PROFILE_PICTURE", }userinfo endpoint response subA unique ID that identifies the user in your system. emailEmail address of the user. given_nameOptional: First name of the user. family_nameOptional: Last name of the user. nameOptional: Full name of the user. pictureOptional: Profile picture of the user.
Como validar a implementação
You can validate your implementation by using the OAuth 2.0 Playground tool.
In the tool, do the following steps:
- Click Configuration to open the OAuth 2.0 Configuration window.
- In the OAuth flow field, select Client-side.
- In the OAuth Endpoints field, select Custom.
- Specify your OAuth 2.0 endpoint and the client ID you assigned to Google in the corresponding fields.
- In the Step 1 section, don't select any Google scopes. Instead, leave this field blank or type a scope valid for your server (or an arbitrary string if you don't use OAuth scopes). When you're done, click Authorize APIs.
- In the Step 2 and Step 3 sections, go through the OAuth 2.0 flow and verify that each step works as intended.
You can validate your implementation by using the Google Account Linking Demo tool.
In the tool, do the following steps:
- Click the Sign in with Google button.
- Choose the account you'd like to link.
- Enter the service ID.
- Optionally enter one or more scopes that you will request access for.
- Click Start Demo.
- When prompted, confirm that you may consent and deny the linking request.
- Confirm that you are redirected to your platform.