ระบบจะลิงก์บัญชีโดยใช้ขั้นตอน รหัสการให้สิทธิ์ OAuth 2.0 ซึ่งเป็นมาตรฐานอุตสาหกรรม
OAuth 2.1 และ PKCE สำหรับ Agent
เราขอแนะนำให้บังคับใช้ OAuth 2.1 สำหรับ AI Agent แบบไม่เก็บสถานะและไปป์ไลน์แบบมัลติโมดัล
- PKCE (Proof Key for Code Exchange): ต้องใช้เพื่อรักษาความปลอดภัย ขั้นตอนรหัสการให้สิทธิ์ ซึ่งจะป้องกันการโจมตีแบบดักรับ
- ไม่มีขั้นตอนการให้สิทธิ์โดยนัย: ขั้นตอนการให้สิทธิ์โดยนัยจะเปิดเผยโทเค็นเพื่อการเข้าถึงใน URL, ซึ่งเป็นความเสี่ยงด้านความปลอดภัยสำหรับสภาพแวดล้อมของ Agent
บริการของคุณต้องรองรับปลายทาง การให้สิทธิ์ และ การแลกเปลี่ยนโทเค็น ที่เป็นไปตามข้อกำหนด OAuth 2.0/2.1
สร้างโปรเจ็กต์
วิธีสร้างโปรเจ็กต์เพื่อใช้การลิงก์บัญชี
- ไปที่คอนโซล Google API
- คลิกสร้างโปรเจ็กต์
- ป้อนชื่อหรือยอมรับคำแนะนำที่สร้างขึ้น
- ยืนยันหรือแก้ไขช่องที่เหลือ
- คลิกสร้าง
วิธีดูรหัสโปรเจ็กต์
- ไปที่คอนโซล Google API
- ค้นหาโปรเจ็กต์ในตารางบนหน้า Landing Page รหัสโปรเจ็กต์จะปรากฏในคอลัมน์รหัส
กำหนดค่าหน้าจอขอความยินยอม OAuth
กระบวนการลิงก์บัญชี Google มีหน้าจอขอความยินยอมซึ่งจะแจ้งให้ผู้ใช้ทราบว่าแอปพลิเคชันใดขอสิทธิ์เข้าถึงข้อมูลของผู้ใช้ ข้อมูลประเภทใดที่แอปพลิเคชันขอ และข้อกำหนดที่เกี่ยวข้อง คุณจะต้องกำหนดค่าหน้าจอขอความยินยอม OAuth ก่อนที่จะสร้างรหัสไคลเอ็นต์ Google API
- เปิดหน้าหน้าจอขอความยินยอม OAuth ของคอนโซล Google APIs
- หากได้รับข้อความแจ้ง ให้เลือกโปรเจ็กต์ที่คุณเพิ่งสร้าง
ในหน้า "หน้าจอขอความยินยอม OAuth" ให้กรอกแบบฟอร์มแล้วคลิกปุ่ม "บันทึก"
ชื่อแอปพลิเคชัน: ชื่อของแอปพลิเคชันที่ขอความยินยอม ชื่อควรแสดงถึงแอปพลิเคชันของคุณอย่างถูกต้องและสอดคล้องกับชื่อแอปพลิเคชันที่ผู้ใช้เห็นในที่อื่นๆ ชื่อแอปพลิเคชันจะแสดงในหน้าจอขอความยินยอมในการลิงก์บัญชี
โลโก้แอปพลิเคชัน: รูปภาพในหน้าจอขอความยินยอมที่จะช่วยให้ผู้ใช้จดจำแอปของคุณได้ โลโก้จะแสดงในหน้าจอขอความยินยอมในการลิงก์บัญชีและในการตั้งค่าบัญชี
อีเมลสนับสนุน: เพื่อให้ผู้ใช้ติดต่อคุณพร้อมคำถามเกี่ยวกับการยินยอม
ขอบเขตสำหรับ Google APIs: ขอบเขตช่วยให้แอปพลิเคชันเข้าถึงข้อมูล Google ส่วนตัวของผู้ใช้ได้ สำหรับกรณีการใช้งานการลิงก์บัญชี Google ขอบเขตเริ่มต้น (อีเมล โปรไฟล์ openid) ก็เพียงพอแล้ว คุณไม่จำเป็นต้องเพิ่มขอบเขตที่มีความละเอียดอ่อน โดยทั่วไปแล้ว แนวทางปฏิบัติแนะนำคือการขอขอบเขตทีละรายการเมื่อจำเป็นต้องเข้าถึง แทนที่จะขอตั้งแต่แรก ดูข้อมูลเพิ่มเติม
โดเมนที่ได้รับอนุญาต: Google อนุญาตเฉพาะแอปพลิเคชันที่ตรวจสอบสิทธิ์โดยใช้ OAuth ในการใช้โดเมนที่ได้รับอนุญาตเท่านั้นเพื่อเป็นการปกป้องคุณและผู้ใช้ ลิงก์ของแอปพลิเคชันต้องโฮสต์อยู่ในโดเมนที่ได้รับอนุญาต ดูข้อมูลเพิ่มเติม
ลิงก์หน้าแรกของแอปพลิเคชัน: หน้าแรกของแอปพลิเคชัน ต้องโฮสต์ในโดเมนที่ได้รับอนุญาต
ลิงก์นโยบายความเป็นส่วนตัวของแอปพลิเคชัน: แสดงในหน้าจอขอความยินยอมในการลิงก์บัญชี Google ต้องโฮสต์ในโดเมนที่ได้รับอนุญาต
ลิงก์ข้อกำหนดในการให้บริการของแอปพลิเคชัน (ไม่บังคับ): ต้องโฮสต์ในโดเมนที่ได้รับอนุญาต
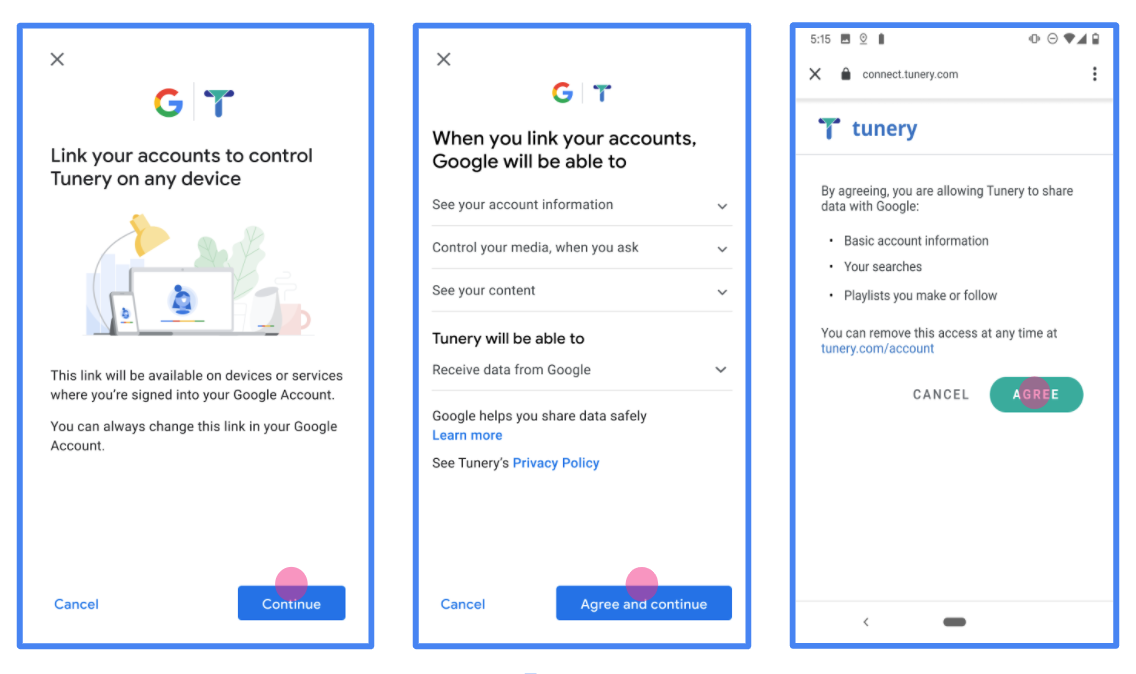
รูปที่ 1 หน้าจอความยินยอมในการลิงก์บัญชี Google สำหรับแอปพลิเคชันสมมติ Tunery
ตรวจสอบ "สถานะการยืนยัน" หากแอปพลิเคชันของคุณต้องได้รับการยืนยัน ให้คลิกปุ่ม "ส่งเพื่อรับการยืนยัน" เพื่อส่งแอปพลิเคชันเพื่อรับการยืนยัน ดูรายละเอียดได้ที่ข้อกำหนดในการยืนยัน OAuth
ติดตั้งใช้งานเซิร์ฟเวอร์ OAuth
การใช้งานเซิร์ฟเวอร์ OAuth 2.0 ของโฟลว์ รหัสการให้สิทธิ์ประกอบด้วยปลายทาง 2 รายการ ซึ่งบริการของคุณจะให้บริการผ่าน HTTPS ปลายทางแรกคือปลายทางการให้สิทธิ์ ซึ่งมีหน้าที่ค้นหาหรือขอความยินยอมจากผู้ใช้ในการเข้าถึงข้อมูล ปลายทางการให้สิทธิ์จะแสดง UI การลงชื่อเข้าใช้แก่ผู้ใช้ที่ยังไม่ได้ลงชื่อเข้าใช้ และบันทึกความยินยอมในการเข้าถึงที่ขอ ปลายทางที่ 2 คือปลายทางการแลกเปลี่ยนโทเค็น ซึ่งใช้เพื่อรับสตริงที่เข้ารหัสที่เรียกว่าโทเค็น ซึ่งอนุญาตให้ผู้ใช้เข้าถึงบริการของคุณ
เมื่อแอปพลิเคชันของ Google ต้องการเรียกใช้ API ของบริการของคุณ Google จะใช้ปลายทางเหล่านี้ร่วมกันเพื่อขอสิทธิ์จากผู้ใช้ในการเรียกใช้ API เหล่านี้ในนามของผู้ใช้
การลิงก์บัญชี Google: ขั้นตอนรหัสการให้สิทธิ์ OAuth
แผนภาพลำดับเหตุการณ์ต่อไปนี้แสดงรายละเอียดการโต้ตอบระหว่างผู้ใช้ Google และปลายทางของบริการ
บทบาทและความรับผิดชอบ
ตารางต่อไปนี้กำหนดบทบาทและความรับผิดชอบของผู้มีส่วนร่วมในโฟลว์ OAuth ของการลิงก์บัญชี Google (GAL) โปรดทราบว่าใน GAL นั้น Google จะทำหน้าที่เป็น ไคลเอ็นต์ OAuth ขณะที่บริการของคุณจะทำหน้าที่เป็น ผู้ให้บริการข้อมูลประจำตัว/บริการ
| Actor / Component | GAL Role | Responsibilities |
|---|---|---|
| Google App / Server | OAuth Client | เริ่มต้นโฟลว์ รับรหัสการให้สิทธิ์ แลกเปลี่ยนรหัสเป็น โทเค็น และจัดเก็บโทเค็นอย่างปลอดภัยเพื่อเข้าถึง API ของบริการ |
| Your Authorization Endpoint | Authorization Server | ตรวจสอบสิทธิ์ผู้ใช้และขอความยินยอมจากผู้ใช้ในการแชร์สิทธิ์เข้าถึง ข้อมูลกับ Google |
| Your Token Exchange Endpoint | Authorization Server | ตรวจสอบรหัสการให้สิทธิ์และโทเค็นการรีเฟรช และออกโทเค็นเพื่อการเข้าถึงให้กับเซิร์ฟเวอร์ของ Google |
| Google Redirect URI | Callback Endpoint | รับการเปลี่ยนเส้นทางของผู้ใช้จากบริการการให้สิทธิ์พร้อมค่า
code และ state |
เซสชันขั้นตอนรหัสการให้สิทธิ์ OAuth 2.0 ที่ Google เริ่มต้นจะมีโฟลว์ดังนี้
- Google จะเปิดปลายทางการให้สิทธิ์ในเบราว์เซอร์ของผู้ใช้ หากโฟลว์เริ่มต้นในอุปกรณ์ที่ใช้เสียงเท่านั้นสำหรับ Action Google จะโอนการดำเนินการไปยังโทรศัพท์
- ผู้ใช้ลงชื่อเข้าใช้ (หากยังไม่ได้ลงชื่อเข้าใช้) และให้สิทธิ์ Google ในการเข้าถึงข้อมูลด้วย API ของคุณ (หากยังไม่ได้ให้สิทธิ์)
- บริการของคุณจะสร้าง รหัสการให้สิทธิ์และส่งกลับไปยัง Google โดยเปลี่ยนเส้นทางเบราว์เซอร์ของผู้ใช้กลับไปที่ Google พร้อมรหัสการให้สิทธิ์ที่แนบมากับคำขอ
- Google จะส่งรหัสการให้สิทธิ์ไปยังปลายทางการแลกเปลี่ยนโทเค็น ซึ่งจะตรวจสอบความถูกต้องของรหัสและส่งกลับ โทเค็นเพื่อการเข้าถึงและ โทเค็นการรีเฟรช โทเค็นเพื่อการเข้าถึงเป็นโทเค็นที่ใช้ได้ในระยะสั้น ซึ่งบริการของคุณยอมรับเป็นข้อมูลเข้าสู่ระบบเพื่อเข้าถึง API โทเค็นการรีเฟรชเป็นโทเค็นที่ใช้ได้นาน ซึ่ง Google สามารถจัดเก็บและใช้เพื่อรับโทเค็นเพื่อการเข้าถึงใหม่เมื่อโทเค็นเดิมหมดอายุ
- หลังจากที่ผู้ใช้ทำตามขั้นตอนการลิงก์บัญชีเสร็จสมบูรณ์แล้ว คำขอที่ส่งจาก Google ทุกครั้งจะมีโทเค็นเพื่อการเข้าถึง
สูตรการใช้งาน
ทำตามขั้นตอนต่อไปนี้เพื่อใช้โฟลว์รหัสการให้สิทธิ์
ขั้นตอนที่ 1: จัดการคำขอการให้สิทธิ์
เมื่อ Google เริ่มต้นการลิงก์บัญชี ระบบจะเปลี่ยนเส้นทางผู้ใช้ไปยังปลายทางการให้สิทธิ์ โปรดดูข้อตกลงโปรโตคอลโดยละเอียดและข้อกำหนดของพารามิเตอร์ได้ที่ปลายทางการให้สิทธิ์
หากต้องการจัดการคำขอ ให้ทำดังนี้
ตรวจสอบคำขอ:
- ยืนยันว่า
client_idตรงกับรหัสไคลเอ็นต์ที่กำหนดให้กับ Google - ยืนยันว่า
redirect_uriตรงกับ URL การเปลี่ยนเส้นทางที่คาดไว้ของ Google:none https://oauth-redirect.googleusercontent.com/r/YOUR_PROJECT_ID https://oauth-redirect-sandbox.googleusercontent.com/r/YOUR_PROJECT_ID - ตรวจสอบว่า
response_typeคือcode
- ยืนยันว่า
ตรวจสอบสิทธิ์ผู้ใช้:
- ตรวจสอบว่าผู้ใช้ลงชื่อเข้าใช้บริการของคุณหรือไม่
- หากผู้ใช้ไม่ได้ลงชื่อเข้าใช้ ให้แจ้งให้ผู้ใช้ทำตามขั้นตอนการลงชื่อเข้าใช้หรือลงชื่อสมัครใช้
สร้างรหัสการให้สิทธิ์:
- สร้างรหัสการให้สิทธิ์ที่ไม่ซ้ำกันและคาดเดาได้ยาก ซึ่งเชื่อมโยงกับผู้ใช้และไคลเอ็นต์
- ตั้งค่าให้รหัสหมดอายุในเวลาประมาณ 10 นาที
เปลี่ยนเส้นทางกลับไปที่ Google:
- เปลี่ยนเส้นทางเบราว์เซอร์ไปยัง URL ที่ระบุไว้ใน
redirect_uri - แนบพารามิเตอร์การค้นหาต่อไปนี้
code: รหัสการให้สิทธิ์ที่คุณสร้างขึ้นstate: ค่าสถานะที่ได้รับจาก Google โดยไม่มีการแก้ไข
- เปลี่ยนเส้นทางเบราว์เซอร์ไปยัง URL ที่ระบุไว้ใน
ขั้นตอนที่ 2: จัดการคำขอแลกเปลี่ยนโทเค็น
ปลายทางการแลกเปลี่ยนโทเค็นจะประมวลผลคำขอ 2 ประเภท ได้แก่ การแลกรหัสเป็นโทเค็น และการรีเฟรชโทเค็นเพื่อการเข้าถึงที่หมดอายุ โปรดดูข้อตกลงโปรโตคอลโดยละเอียดและข้อกำหนดของพารามิเตอร์ได้ที่ปลายทางการแลกเปลี่ยนโทเค็น
ก. แลกรหัสการให้สิทธิ์เป็นโทเค็น
เมื่อ Google ได้รับรหัสการให้สิทธิ์ ระบบจะเรียกใช้ปลายทางการแลกเปลี่ยนโทเค็น (POST) เพื่อดึงโทเค็น
ตรวจสอบคำขอ:
- ตรวจสอบ
client_idและclient_secret - ตรวจสอบว่ารหัสการให้สิทธิ์ถูกต้องและไม่หมดอายุ
- ยืนยันว่า
redirect_uriตรงกับค่าที่ใช้ในขั้นตอนที่ 1 - หากการตรวจสอบไม่สำเร็จ ให้ส่งกลับ HTTP
400 Bad Requestพร้อม{"error": "invalid_grant"}
- ตรวจสอบ
ออกโทเค็น:
- สร้าง
refresh_tokenที่ใช้ได้นานและaccess_tokenที่ใช้ได้ในระยะสั้น (โดยปกติคือ 1 ชั่วโมง) - ส่งกลับ HTTP
200 OKพร้อมการตอบกลับโทเค็น JSON มาตรฐาน
- สร้าง
ข. รีเฟรชโทเค็นเพื่อการเข้าถึง
เมื่อโทเค็นเพื่อการเข้าถึงหมดอายุ Google จะขอโทเค็นใหม่โดยใช้โทเค็นการรีเฟรช
ตรวจสอบคำขอ:
- ตรวจสอบ
client_id,client_secretและrefresh_token - หากการตรวจสอบไม่สำเร็จ ให้ส่งกลับ HTTP
400 Bad Requestพร้อม{"error": "invalid_grant"}
- ตรวจสอบ
ออกโทเค็นเพื่อการเข้าถึงใหม่:
- สร้าง
access_tokenใหม่ที่ใช้ได้ในระยะสั้น - ส่งกลับ HTTP
200 OKพร้อมการตอบกลับโทเค็น JSON (ซึ่งอาจรวมถึงโทเค็นการรีเฟรชใหม่)
- สร้าง
จัดการคำขอ Userinfo
ปลายทาง userinfo เป็นทรัพยากรที่มีการป้องกันด้วย OAuth 2.0 ซึ่งส่งกลับการอ้างสิทธิ์เกี่ยวกับผู้ใช้ที่ลิงก์ การติดตั้งใช้งานและการโฮสต์ปลายทาง userinfo เป็นตัวเลือกที่ไม่บังคับ ยกเว้นกรณีการใช้งานต่อไปนี้
- ลงชื่อเข้าใช้บัญชีที่ลิงก์ด้วย Google One Tap
- การติดตามที่ราบรื่นบน AndroidTV
หลังจากเรียกโทเค็นเพื่อการเข้าถึงจากปลายทางของโทเค็นเรียบร้อยแล้ว Google จะส่งคำขอไปยังปลายทาง userinfo เพื่อดึงข้อมูลโปรไฟล์พื้นฐานเกี่ยวกับผู้ใช้ที่ลิงก์
| ส่วนหัวของคำขอปลายทางของ userinfo | |
|---|---|
Authorization header |
โทเค็นเพื่อการเข้าถึงของประเภท Bearer |
ตัวอย่างเช่น หากปลายทาง userinfo พร้อมใช้งานที่
https://myservice.example.com/userinfo คำขออาจมีลักษณะดังต่อไปนี้
GET /userinfo HTTP/1.1
Host: myservice.example.com
Authorization: Bearer ACCESS_TOKEN
หากต้องการให้ปลายทาง userinfo จัดการคำขอ ให้ทำตามขั้นตอนต่อไปนี้
- แยกโทเค็นเพื่อการเข้าถึงจากส่วนหัวการให้สิทธิ์ แล้วแสดงผลข้อมูลสำหรับผู้ใช้ที่เชื่อมโยงกับโทเค็นเพื่อการเข้าถึง
- หากโทเค็นเพื่อการเข้าถึงไม่ถูกต้อง ให้แสดงข้อผิดพลาด HTTP 401 Unauthorized ด้วยการใช้ส่วนหัวการตอบกลับ
WWW-Authenticateตัวอย่างการตอบกลับข้อผิดพลาดเกี่ยวกับ Userinfo มีดังนี้HTTP/1.1 401 Unauthorized WWW-Authenticate: error="invalid_token", error_description="The Access Token expired"
หากโทเค็นเพื่อการเข้าถึงถูกต้อง ให้แสดงผลและการตอบสนอง HTTP 200 ด้วยออบเจ็กต์ JSON ต่อไปนี้ในเนื้อหาของ HTTPS การตอบกลับ:
{ "sub": "USER_UUID", "email": "EMAIL_ADDRESS", "given_name": "FIRST_NAME", "family_name": "LAST_NAME", "name": "FULL_NAME", "picture": "PROFILE_PICTURE", }การตอบสนองของปลายทาง userinfo subรหัสที่ไม่ซ้ำกันที่ระบุผู้ใช้ในระบบ emailอีเมลของผู้ใช้ given_nameไม่บังคับ: ชื่อของผู้ใช้ family_nameไม่บังคับ: นามสกุลของผู้ใช้ nameไม่บังคับ: ชื่อเต็มของผู้ใช้ pictureไม่บังคับ: รูปโปรไฟล์ของผู้ใช้
การตรวจสอบการติดตั้งใช้งาน
คุณสามารถตรวจสอบการติดตั้งใช้งานได้โดยใช้เครื่องมือ OAuth 2.0 Playground
ในเครื่องมือ ให้ทำตามขั้นตอนต่อไปนี้
- คลิกการกำหนดค่า เพื่อเปิดหน้าต่างการกำหนดค่า OAuth 2.0
- ในช่องโฟลว์ OAuth ให้เลือกฝั่งไคลเอ็นต์
- ในช่องปลายทาง OAuth ให้เลือกกำหนดเอง
- ระบุปลายทาง OAuth 2.0 และรหัสไคลเอ็นต์ที่คุณกำหนดให้กับ Google ในช่องที่เกี่ยวข้อง
- ในส่วนขั้นตอนที่ 1 ไม่ต้องเลือกขอบเขตของ Google แต่ให้เว้นช่องนี้ว่างไว้หรือพิมพ์ขอบเขตที่ใช้ได้กับเซิร์ฟเวอร์ (หรือสตริงที่กำหนดเองหากคุณไม่ได้ใช้ขอบเขต OAuth) เมื่อเสร็จแล้ว ให้คลิกให้สิทธิ์ API
- ในส่วนขั้นตอนที่ 2 และขั้นตอนที่ 3 ให้ทำตามโฟลว์ OAuth 2.0 และตรวจสอบว่าแต่ละขั้นตอนทำงานตามที่ตั้งใจไว้
คุณสามารถตรวจสอบการติดตั้งใช้งานได้โดยใช้เครื่องมือสาธิตการลิงก์บัญชี Google
ในเครื่องมือ ให้ทำตามขั้นตอนต่อไปนี้
- คลิกปุ่มลงชื่อเข้าใช้ด้วย Google
- เลือกบัญชีที่ต้องการลิงก์
- ป้อนรหัสบริการ
- ป้อนขอบเขตอย่างน้อย 1 รายการที่คุณจะขอสิทธิ์เข้าถึง (ไม่บังคับ)
- คลิกเริ่มการสาธิต
- เมื่อได้รับข้อความแจ้ง ให้ยืนยันว่าคุณอาจให้ความยินยอมและปฏิเสธคำขอลิงก์
- ยืนยันว่าระบบจะนำคุณไปยังแพลตฟอร์มของคุณ