खातों को इंडस्ट्री स्टैंडर्ड OAuth 2.0 के इंप्लिसिट और ऑथराइज़ेशन कोड फ़्लो का इस्तेमाल करके लिंक किया जाता है. आपकी सेवा, OAuth 2.0 के मुताबिक काम करने वाले ऑथराइज़ेशन और टोकन एक्सचेंज एंडपॉइंट के साथ काम करनी चाहिए.
इंप्लिसिट फ़्लो में, Google उपयोगकर्ता के ब्राउज़र में आपका ऑथराइज़ेशन एंडपॉइंट खोलता है. साइन इन करने के बाद, आपको Google को लंबे समय तक चलने वाला ऐक्सेस टोकन देना होगा. यह ऐक्सेस टोकन, अब Google से भेजे जाने वाले हर अनुरोध में शामिल होता है.
ऑथराइज़ेशन कोड फ़्लो में, आपको दो एंडपॉइंट की ज़रूरत होती है:
अनुमति एंडपॉइंट, जो आपके उन उपयोगकर्ताओं को साइन-इन यूज़र इंटरफ़ेस दिखाता है जो पहले से साइन इन नहीं हैं. ऑथराइज़ेशन एंडपॉइंट, अनुरोध किए गए ऐक्सेस के लिए उपयोगकर्ताओं की सहमति रिकॉर्ड करने के लिए, कुछ समय के लिए मान्य ऑथराइज़ेशन कोड भी बनाता है.
टोकन एक्सचेंज एंडपॉइंट, जो दो तरह के एक्सचेंज के लिए ज़िम्मेदार होता है:
- यह लंबे समय तक सक्रिय रहने वाले रीफ़्रेश टोकन और कम समय तक चलने वाले ऐक्सेस टोकन के लिए ऑथराइज़ेशन कोड का इस्तेमाल करता है. यह एक्सचेंज तब होता है, जब उपयोगकर्ता खाता लिंक करने के फ़्लो से गुज़रता है.
- यह नीति, कुछ समय के लिए उपलब्ध ऐक्सेस टोकन के लिए, लंबे समय तक चलने वाले रीफ़्रेश टोकन का लेन-देन करती है. यह एक्सचेंज तब होता है, जब Google को नया ऐक्सेस टोकन चाहिए, क्योंकि उसका मौजूदा टोकन खत्म हो गया है.
OAuth 2.0 फ़्लो चुनना
इंप्लिसिट फ़्लो को लागू करना आसान है. हालांकि, Google का सुझाव है कि इंप्लिसिट फ़्लो से जारी किए गए ऐक्सेस टोकन की समयसीमा कभी खत्म न हो. इसकी वजह यह है कि उपयोगकर्ता को अपने खाते को फिर से लिंक करना पड़ता है. ऐसा तब होता है, जब इंप्लिसिट फ़्लो के साथ टोकन की समयसीमा खत्म हो जाती है. अगर आपको सुरक्षा से जुड़ी वजहों से टोकन की समयसीमा तय करनी है, तो हमारा सुझाव है कि आप इसके बजाय ऑथराइज़ेशन कोड फ़्लो का इस्तेमाल करें.
डिज़ाइन से जुड़े दिशा-निर्देश
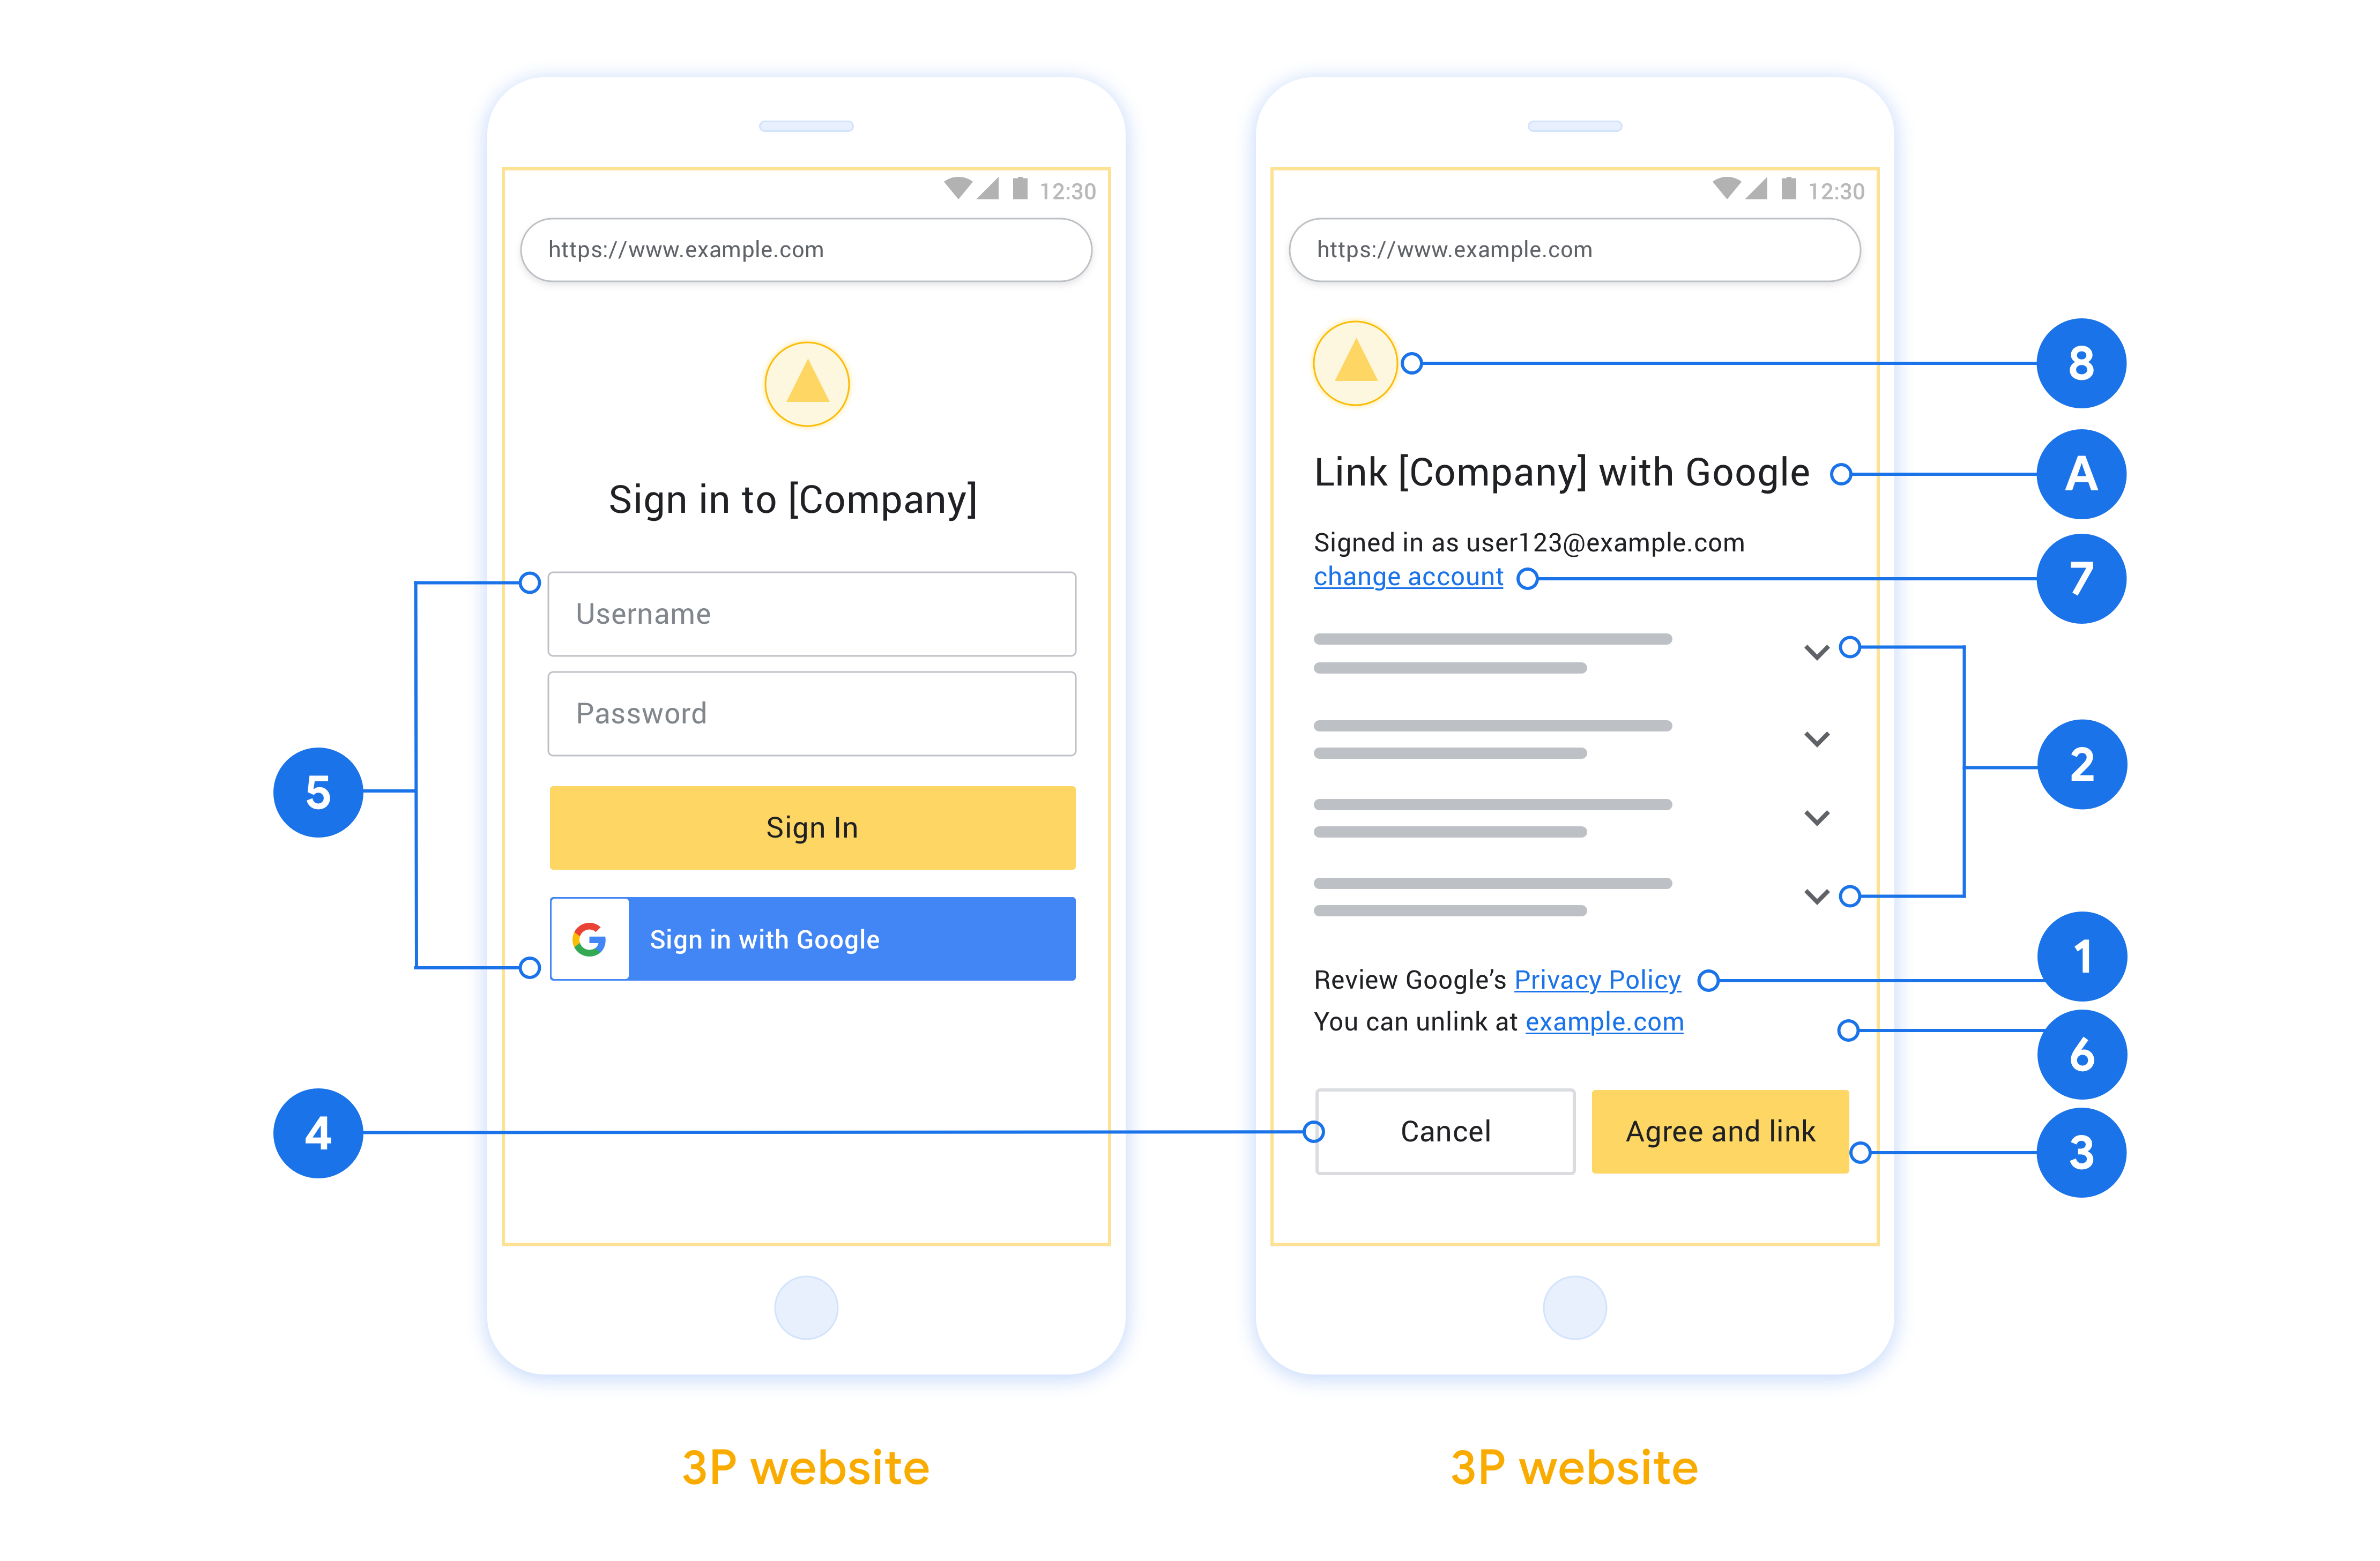
इस सेक्शन में, उपयोगकर्ता की उस स्क्रीन के डिज़ाइन से जुड़ी ज़रूरी शर्तों और सुझावों के बारे में बताया गया है जिसे OAuth लिंक करने के फ़्लो के लिए होस्ट किया जाता है. Google के ऐप्लिकेशन से कॉल करने के बाद, आपका प्लैटफ़ॉर्म उपयोगकर्ता को'Google में साइन इन करें' पेज और खाता लिंक करने की सहमति वाली स्क्रीन दिखाता है. खातों को लिंक करने की सहमति देने के बाद, उपयोगकर्ता को वापस Google के ऐप्लिकेशन पर भेज दिया जाता है.
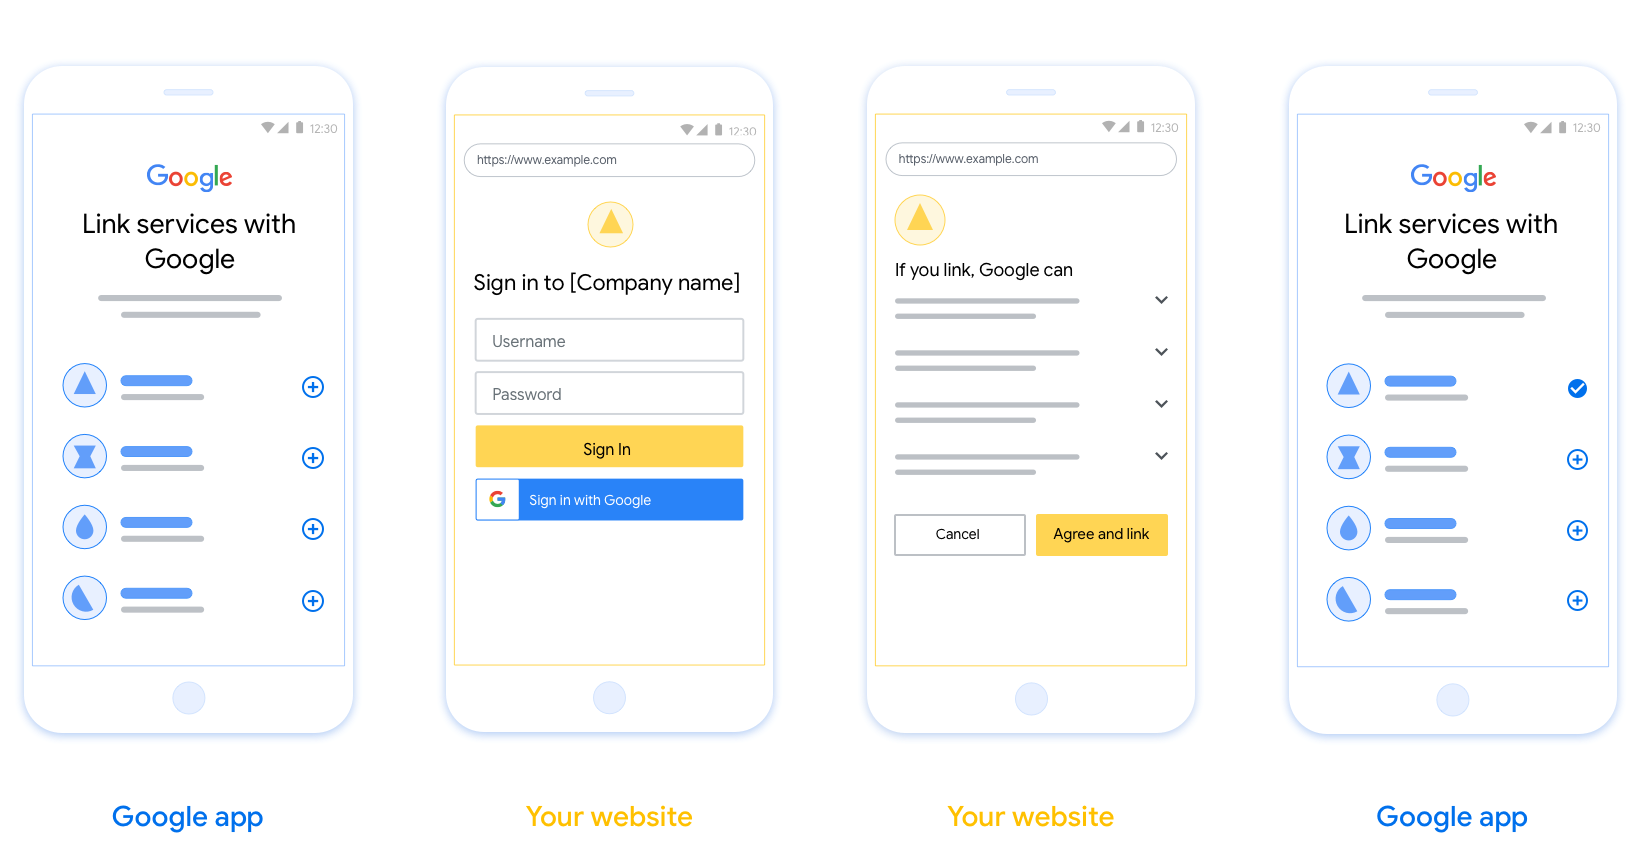
ज़रूरी शर्तें
- आपको यह बताना होगा कि उपयोगकर्ता का खाता Google से लिंक किया जाएगा, न कि Google के किसी प्रॉडक्ट से, जैसे कि Google Home या Google Assistant.
सुझाव
हमारा सुझाव है कि आप ये काम करें:
Google की निजता नीति दिखाएं. सहमति वाली स्क्रीन पर, Google की निजता नीति का लिंक शामिल करें.
शेयर किया जाने वाला डेटा. साफ़ और कम शब्दों में उपयोगकर्ता को बताएं कि Google को उनके लिए कौनसे डेटा की ज़रूरत है और क्यों.
साफ़ तौर पर कॉल-टू-ऐक्शन दें. सहमति वाली स्क्रीन पर, साफ़ तौर पर कॉल-टू-ऐक्शन दें, जैसे कि “सहमति दें और लिंक करें.” ऐसा इसलिए है, क्योंकि उपयोगकर्ताओं को यह समझना ज़रूरी है कि अपने खाते लिंक करने के लिए, उन्हें Google के साथ कौनसा डेटा शेयर करना होगा.
सदस्यता रद्द करने की सुविधा. अगर उपयोगकर्ता खाता लिंक नहीं करना चाहता है, तो उसे वापस जाने या रद्द करने का विकल्प दें.
साइन इन करने की प्रोसेस साफ़ करें. पक्का करें कि उपयोगकर्ताओं को अपने Google खाते में साइन इन करने का तरीका साफ़ तौर पर पता हो. जैसे, उपयोगकर्ता नाम और पासवर्ड के लिए फ़ील्ड या Google से साइन इन करें.
अनलिंक करने की सुविधा. उपयोगकर्ताओं को अनलिंक करने का तरीका उपलब्ध कराएं, जैसे कि आपके प्लैटफ़ॉर्म पर उनकी खाता सेटिंग का यूआरएल. इसके अलावा, Google खाते का लिंक भी शामिल किया जा सकता है, जहां उपयोगकर्ता अपने लिंक किए गए खाते को मैनेज कर सकते हैं.
उपयोगकर्ता खाता बदलने की सुविधा. उपयोगकर्ताओं को अपने खाते स्विच करने का तरीका बताएं. यह सुविधा खास तौर पर तब फ़ायदेमंद होती है, जब उपयोगकर्ताओं के पास एक से ज़्यादा खाते हों.
- अगर किसी उपयोगकर्ता को खाता स्विच करने के लिए, सहमति वाली स्क्रीन बंद करनी पड़ती है, तो Google को ऐसी गड़बड़ी भेजें जिसे ठीक किया जा सके. इससे उपयोगकर्ता, OAuth लिंकिंग और अनिमिट फ़्लो की मदद से, अपने पसंदीदा खाते में साइन इन कर सकता है.
अपना लोगो शामिल करें. सहमति वाली स्क्रीन पर अपनी कंपनी का लोगो दिखाएं. लोगो डालने के लिए, स्टाइल के दिशा-निर्देशों का इस्तेमाल करें. अगर आपको Google का लोगो भी दिखाना है, तो लोगो और ट्रेडमार्क देखें.
प्रोजेक्ट बनाना
खाता जोड़ने की सुविधा का इस्तेमाल करने के लिए, अपना प्रोजेक्ट बनाने के लिए:
- Google API Console पर जाएं.
- प्रोजेक्ट बनाएं पर क्लिक करें.
- कोई नाम डालें या जनरेट किए गए सुझाव को स्वीकार करें.
- बाकी बचे फ़ील्ड की पुष्टि करें या उनमें बदलाव करें.
- बनाएं पर क्लिक करें.
अपना प्रोजेक्ट आईडी देखने के लिए:
- Google API Console पर जाएं.
- लैंडिंग पेज पर मौजूद टेबल में, अपना प्रोजेक्ट ढूंढें. प्रोजेक्ट आईडी, आईडी कॉलम में दिखता है.
उस स्क्रीन को कॉन्फ़िगर करना जहां OAuth के लिए सहमति दी जाती है
Google खाता जोड़ने की प्रोसेस में, सहमति वाली स्क्रीन शामिल होती है. इस स्क्रीन पर उपयोगकर्ताओं को यह जानकारी मिलती है कि कौनसे ऐप्लिकेशन उनके डेटा को ऐक्सेस करने का अनुरोध कर रहे हैं, वे किस तरह का डेटा मांग रहे हैं, और उन पर कौनसी शर्तें लागू होती हैं. Google API क्लाइंट आईडी जनरेट करने से पहले, आपको उस स्क्रीन को कॉन्फ़िगर करना होगा जहां OAuth के लिए सहमति दी जाती है.
- Google APIs कंसोल के, उस स्क्रीन वाले पेज को खोलें जहां OAuth के लिए सहमति दी जाती है.
- अगर आपसे पूछा जाए, तो वह प्रोजेक्ट चुनें जिसे आपने अभी बनाया है.
"OAuth के लिए सहमति वाली स्क्रीन" पेज पर, फ़ॉर्म भरें और “सेव करें” बटन पर क्लिक करें.
ऐप्लिकेशन का नाम: सहमति का अनुरोध करने वाले ऐप्लिकेशन का नाम. नाम से आपके ऐप्लिकेशन की सही जानकारी मिलनी चाहिए. साथ ही, यह नाम उपयोगकर्ताओं को अन्य जगहों पर दिखने वाले ऐप्लिकेशन के नाम से मेल खाना चाहिए. ऐप्लिकेशन का नाम, खाता जोड़ने के लिए सहमति वाली स्क्रीन पर दिखेगा.
ऐप्लिकेशन का लोगो: सहमति वाली स्क्रीन पर दिखने वाली इमेज. इससे उपयोगकर्ताओं को आपके ऐप्लिकेशन को पहचानने में मदद मिलेगी. लोगो, खाता जोड़ने के लिए सहमति वाली स्क्रीन और खाते की सेटिंग में दिखता है
सहायता के लिए ईमेल पता: ताकि उपयोगकर्ता, सहमति से जुड़े सवालों के लिए आपसे संपर्क कर सकें.
Google APIs के लिए स्कोप: स्कोप की मदद से, आपका ऐप्लिकेशन उपयोगकर्ता के निजी Google डेटा को ऐक्सेस कर सकता है. Google खाता जोड़ने के इस्तेमाल के मामले में, डिफ़ॉल्ट स्कोप (ईमेल, प्रोफ़ाइल, openid) काफ़ी है. आपको संवेदनशील स्कोप जोड़ने की ज़रूरत नहीं है. आम तौर पर, स्कोप के लिए अनुरोध, ऐक्सेस की ज़रूरत पड़ने पर ही करना चाहिए. पहले से अनुरोध करके रखना सही नहीं है. ज़्यादा जानें.
अनुमति वाले डोमेन: Google, आपको और आपके उपयोगकर्ताओं को सुरक्षित रखने के लिए, सिर्फ़ उन ऐप्लिकेशन को अनुमति वाले डोमेन का इस्तेमाल करने की अनुमति देता है जो OAuth का इस्तेमाल करके पुष्टि करते हैं. आपके ऐप्लिकेशन के लिंक, अनुमति वाले डोमेन पर होस्ट किए जाने चाहिए. ज़्यादा जानें.
ऐप्लिकेशन के होम पेज का लिंक: आपके ऐप्लिकेशन का होम पेज. यह अनुमति वाले डोमेन पर होस्ट किया जाना चाहिए.
ऐप्लिकेशन की निजता नीति का लिंक: यह Google खाता जोड़ने के लिए सहमति वाली स्क्रीन पर दिखता है. यह अनुमति वाले डोमेन पर होस्ट किया जाना चाहिए.
ऐप्लिकेशन की सेवा की शर्तों का लिंक (ज़रूरी नहीं): यह अनुमति वाले डोमेन पर होस्ट किया जाना चाहिए.
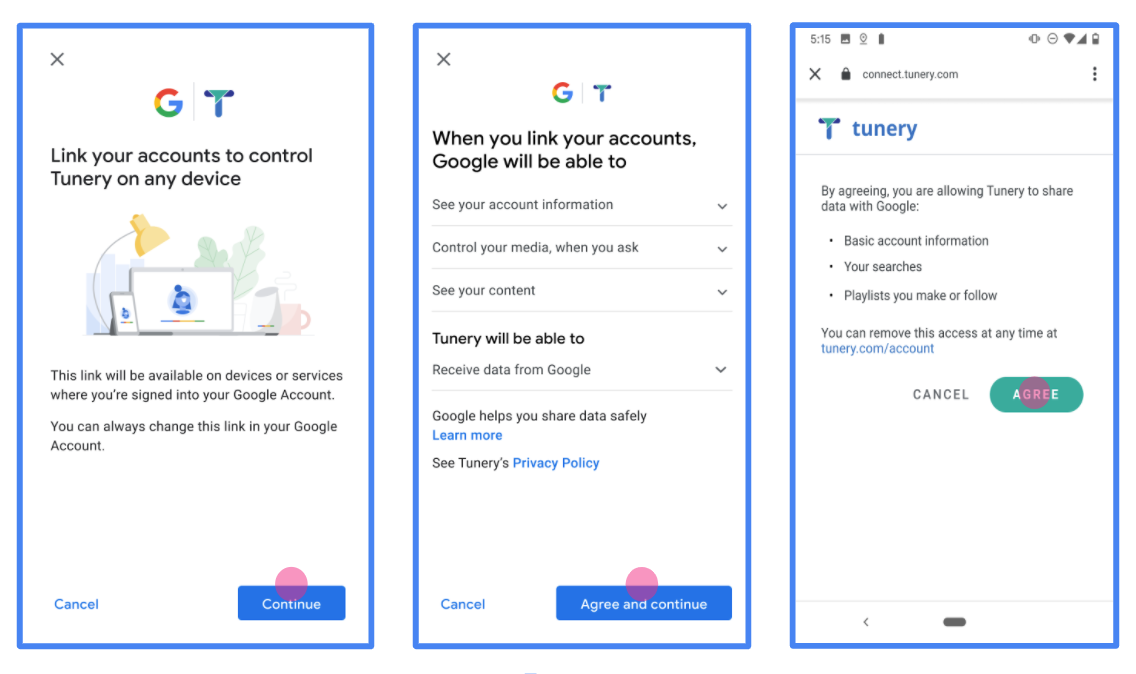
पहली इमेज. Tunery नाम के काल्पनिक ऐप्लिकेशन के लिए, Google खाता जोड़ने के लिए सहमति वाली स्क्रीन
"पुष्टि की स्थिति" देखें. अगर आपके ऐप्लिकेशन की पुष्टि की जानी है, तो "पुष्टि के लिए सबमिट करें" बटन पर क्लिक करके, अपने ऐप्लिकेशन को पुष्टि के लिए सबमिट करें. ज़्यादा जानकारी के लिए, OAuth की पुष्टि से जुड़ी ज़रूरी शर्तें देखें.
अपना OAuth सर्वर लागू करना
To support the OAuth 2.0 implicit flow, your service makes an authorization endpoint available by HTTPS. This endpoint is responsible for authentication and obtaining consent from users for data access. The authorization endpoint presents a sign-in UI to your users that aren't already signed in and records consent to the requested access.
When a Google application needs to call one of your service's authorized APIs, Google uses this endpoint to get permission from your users to call these APIs on their behalf.
A typical OAuth 2.0 implicit flow session initiated by Google has the following flow:
- Google opens your authorization endpoint in the user's browser. The user signs in, if not signed in already, and grants Google permission to access their data with your API, if they haven't already granted permission.
- Your service creates an access token and returns it to Google. To do so, redirect the user's browser back to Google with the access token attached to the request.
- Google calls your service's APIs and attaches the access token with each request. Your service verifies that the access token grants Google authorization to access the API and then completes the API call.
Handle authorization requests
When a Google application needs to perform account linking via an OAuth 2.0 implicit flow, Google sends the user to your authorization endpoint with a request that includes the following parameters:
| Authorization endpoint parameters | |
|---|---|
client_id |
The client ID you assigned to Google. |
redirect_uri |
The URL to which you send the response to this request. |
state |
A bookkeeping value that is passed back to Google unchanged in the redirect URI. |
response_type |
The type of value to return in the response. For the OAuth 2.0 implicit
flow, the response type is always token. |
user_locale |
The Google Account language setting in RFC5646 format used to localize your content in the user's preferred language. |
For example, if your authorization endpoint is available at
https://myservice.example.com/auth, a request might look like the following:
GET https://myservice.example.com/auth?client_id=GOOGLE_CLIENT_ID&redirect_uri=REDIRECT_URI&state=STATE_STRING&response_type=token&user_locale=LOCALE
For your authorization endpoint to handle sign-in requests, do the following steps:
Verify the
client_idandredirect_urivalues to prevent granting access to unintended or misconfigured client apps:- Confirm that the
client_idmatches the client ID you assigned to Google. - Confirm that the URL specified by the
redirect_uriparameter has the following form:https://oauth-redirect.googleusercontent.com/r/YOUR_PROJECT_ID https://oauth-redirect-sandbox.googleusercontent.com/r/YOUR_PROJECT_ID
- Confirm that the
Check if the user is signed in to your service. If the user isn't signed in, complete your service's sign-in or sign-up flow.
Generate an access token for Google to use to access your API. The access token can be any string value, but it must uniquely represent the user and the client the token is for and must not be guessable.
Send an HTTP response that redirects the user's browser to the URL specified by the
redirect_uriparameter. Include all of the following parameters in the URL fragment:access_token: The access token you just generatedtoken_type: The stringbearerstate: The unmodified state value from the original request
The following is an example of the resulting URL:
https://oauth-redirect.googleusercontent.com/r/YOUR_PROJECT_ID#access_token=ACCESS_TOKEN&token_type=bearer&state=STATE_STRING
Google's OAuth 2.0 redirect handler receives the access token and confirms
that the state value hasn't changed. After Google has obtained an
access token for your service, Google attaches the token to subsequent calls
to your service APIs.
Handle userinfo requests
The userinfo endpoint is an OAuth 2.0 protected resource that return claims about the linked user. Implementing and hosting the userinfo endpoint is optional, except for the following use cases:
- Linked Account Sign-In with Google One Tap.
- Frictionless subscription on AndroidTV.
After the access token has been successfully retrieved from your token endpoint, Google sends a request to your userinfo endpoint to retrieve basic profile information about the linked user.
| userinfo endpoint request headers | |
|---|---|
Authorization header |
The access token of type Bearer. |
For example, if your userinfo endpoint is available at
https://myservice.example.com/userinfo, a request might look like the following:
GET /userinfo HTTP/1.1
Host: myservice.example.com
Authorization: Bearer ACCESS_TOKEN
For your userinfo endpoint to handle requests, do the following steps:
- Extract access token from the Authorization header and return information for the user associated with the access token.
- If the access token is invalid, return an HTTP 401 Unauthorized error with using the
WWW-AuthenticateResponse Header. Below is an example of a userinfo error response:HTTP/1.1 401 Unauthorized WWW-Authenticate: error="invalid_token", error_description="The Access Token expired"
If the access token is valid, return and HTTP 200 response with the following JSON object in the body of the HTTPS response:
{ "sub": "USER_UUID", "email": "EMAIL_ADDRESS", "given_name": "FIRST_NAME", "family_name": "LAST_NAME", "name": "FULL_NAME", "picture": "PROFILE_PICTURE", }userinfo endpoint response subA unique ID that identifies the user in your system. emailEmail address of the user. given_nameOptional: First name of the user. family_nameOptional: Last name of the user. nameOptional: Full name of the user. pictureOptional: Profile picture of the user.
लागू करने की पुष्टि करना
You can validate your implementation by using the OAuth 2.0 Playground tool.
In the tool, do the following steps:
- Click Configuration to open the OAuth 2.0 Configuration window.
- In the OAuth flow field, select Client-side.
- In the OAuth Endpoints field, select Custom.
- Specify your OAuth 2.0 endpoint and the client ID you assigned to Google in the corresponding fields.
- In the Step 1 section, don't select any Google scopes. Instead, leave this field blank or type a scope valid for your server (or an arbitrary string if you don't use OAuth scopes). When you're done, click Authorize APIs.
- In the Step 2 and Step 3 sections, go through the OAuth 2.0 flow and verify that each step works as intended.
You can validate your implementation by using the Google Account Linking Demo tool.
In the tool, do the following steps:
- Click the Sign in with Google button.
- Choose the account you'd like to link.
- Enter the service ID.
- Optionally enter one or more scopes that you will request access for.
- Click Start Demo.
- When prompted, confirm that you may consent and deny the linking request.
- Confirm that you are redirected to your platform.