
このドキュメントでは、Google Tasks API を使用してユーザーのタスクを表示するサンプル ウェブ アプリケーションを介して、Java サーブレットを使用して OAuth 2.0 認可コールバック ハンドラを実装する方法について説明します。このサンプル アプリケーションは、まずユーザーの Google ToDo リストへのアクセス承認をリクエストしてから、デフォルトのタスクリストにユーザーのタスクを表示します。
対象
このドキュメントは、Java および J2EE ウェブ アプリケーション アーキテクチャに精通している方を対象としています。OAuth 2.0 認可フローについてある程度の知識が求められます。
目次
このように完全に機能するサンプルを作成するには、以下の手順を行う必要があります。
- web.xml ファイルでサーブレットのマッピングを宣言する
- システム上のユーザーを認証し、そのタスクへのアクセス承認をリクエストする
- Google 認可エンドポイントから認可コードをリッスンする
- 認証コードを更新およびアクセス トークンと交換する
- ユーザーのタスクを読み取って表示する
web.xml ファイルでサーブレットのマッピングを宣言する
このアプリケーションでは、次の 2 つのサーブレットを使用します。
- PrintTasksTitlesServlet(/ にマッピング): ユーザー認証を処理するアプリケーションのエントリ ポイント。ユーザーのタスクを表示します。
- OAuthCodeCallbackHandlerServlet(/oauth2callback にマッピング): OAuth 認可エンドポイントからのレスポンスを処理する OAuth 2.0 コールバックです。
次に示す web.xml ファイルでは、これら 2 つのサーブレットをアプリケーションの URL にマッピングしています。
<?xml version="1.0" encoding="UTF-8"?>
<web-app version="2.5" xmlns="http://java.sun.com/xml/ns/javaee"
    xmlns:xsi="http://www.w3.org/2001/XMLSchema-instance"
    xsi:schemaLocation="http://java.sun.com/xml/ns/javaee http://java.sun.com/xml/ns/javaee/web-app_2_5.xsd">

 <servlet>
   <servlet-name>PrintTasksTitles</servlet-name>
   <servlet-class>com.google.oauthsample.PrintTasksTitlesServlet</servlet-class>
 </servlet>

 <servlet-mapping>
   <servlet-name>PrintTasksTitles</servlet-name>
   <url-pattern>/</url-pattern>
 </servlet-mapping>

 <servlet>
   <servlet-name>OAuthCodeCallbackHandlerServlet</servlet-name>
   <servlet-class>com.google.oauthsample.OAuthCodeCallbackHandlerServlet</servlet-class>
 </servlet>

 <servlet-mapping>
   <servlet-name>OAuthCodeCallbackHandlerServlet</servlet-name>
   <url-pattern>/oauth2callback</url-pattern>
 </servlet-mapping>

</web-app>
システム上のユーザーを認証し、そのタスクにアクセスするための承認をリクエストする
ユーザーはルート URL「/」からアプリケーションにアクセスします。この URL は、PrintTaskListsTitlesServlet サーブレットにマッピングされています。そのサーブレットでは、次のタスクが実行されます。
- ユーザーがシステムで認証されているかどうかを確認する
- 認証されていないユーザーは、認証ページにリダイレクトされる
- ユーザーが認証されている場合は、更新トークンがすでにデータ ストレージにあるかどうかを確認します。更新トークンは、後述の OAuthTokenDao によって処理されます。ユーザーの更新トークンがストアにない場合、ユーザーはそのタスクにアクセスするための承認をアプリケーションにまだ付与していないことを意味します。その場合、ユーザーは Google の OAuth 2.0 認可エンドポイントにリダイレクトされます。
package com.google.oauthsample;

import ...

/**
 * Simple sample Servlet which will display the tasks in the default task list of the user.
 */
@SuppressWarnings("serial")
public class PrintTasksTitlesServlet extends HttpServlet {

  /**
   * The OAuth Token DAO implementation, used to persist the OAuth refresh token.
   * Consider injecting it instead of using a static initialization. Also we are
   * using a simple memory implementation as a mock. Change the implementation to
   * using your database system.
   */
  public static OAuthTokenDao oauthTokenDao = new OAuthTokenDaoMemoryImpl();

  public void doGet(HttpServletRequest req, HttpServletResponse resp) throws IOException {
    // Getting the current user
    // This is using App Engine's User Service but you should replace this to
    // your own user/login implementation
    UserService userService = UserServiceFactory.getUserService();
    User user = userService.getCurrentUser();

    // If the user is not logged-in it is redirected to the login service, then back to this page
    if (user == null) {
      resp.sendRedirect(userService.createLoginURL(getFullRequestUrl(req)));
      return;
    }

    // Checking if we already have tokens for this user in store
    AccessTokenResponse accessTokenResponse = oauthTokenDao.getKeys(user.getEmail());

    // If we don't have tokens for this user
    if (accessTokenResponse == null) {
      OAuthProperties oauthProperties = new OAuthProperties();
      // Redirect to the Google OAuth 2.0 authorization endpoint
      resp.sendRedirect(new GoogleAuthorizationRequestUrl(oauthProperties.getClientId(),
          OAuthCodeCallbackHandlerServlet.getOAuthCodeCallbackHandlerUrl(req), oauthProperties
              .getScopesAsString()).build());
      return;
    }
  }

  /**
   * Construct the request's URL without the parameter part.
   *
   * @param req the HttpRequest object
   * @return The constructed request's URL
   */
  public static String getFullRequestUrl(HttpServletRequest req) {
    String scheme = req.getScheme() + "://";
    String serverName = req.getServerName();
    String serverPort = (req.getServerPort() == 80) ? "" : ":" + req.getServerPort();
    String contextPath = req.getContextPath();
    String servletPath = req.getServletPath();
    String pathInfo = (req.getPathInfo() == null) ? "" : req.getPathInfo();
    String queryString = (req.getQueryString() == null) ? "" : "?" + req.getQueryString();
    return scheme + serverName + serverPort + contextPath + servletPath + pathInfo + queryString;
  }
}
注: 上記の実装では一部の App Engine ライブラリを使用していますが、これらは単純に使用しています。別のプラットフォーム向けに開発している場合は、ユーザー認証を処理する UserService インターフェースを自由に再実装してください。
アプリケーションは DAO を使用して、ユーザーの認証トークンを永続化し、アクセスします。このサンプルで使用されているインターフェース(OAuthTokenDao)とモック(メモリ内)実装(OAuthTokenDaoMemoryImpl)は次のとおりです。
package com.google.oauthsample;

import com.google.api.client.auth.oauth2.draft10.AccessTokenResponse;

/**
 * Allows easy storage and access of authorization tokens.
 */
public interface OAuthTokenDao {

  /**
   * Stores the given AccessTokenResponse using the {@code username}, the OAuth
   * {@code clientID} and the tokens scopes as keys.
   *
   * @param tokens The AccessTokenResponse to store
   * @param userName The userName associated wit the token
   */
  public void saveKeys(AccessTokenResponse tokens, String userName);

  /**
   * Returns the AccessTokenResponse stored for the given username, clientId and
   * scopes. Returns {@code null} if there is no AccessTokenResponse for this
   * user and scopes.
   *
   * @param userName The username of which to get the stored AccessTokenResponse
   * @return The AccessTokenResponse of the given username
   */
  public AccessTokenResponse getKeys(String userName);
}
package com.google.oauthsample;

import com.google.api.client.auth.oauth2.draft10.AccessTokenResponse;
...

/**
 * Quick and Dirty memory implementation of {@link OAuthTokenDao} based on
 * HashMaps.
 */
public class OAuthTokenDaoMemoryImpl implements OAuthTokenDao {

  /** Object where all the Tokens will be stored */
  private static Map tokenPersistance = new HashMap();

  public void saveKeys(AccessTokenResponse tokens, String userName) {
    tokenPersistance.put(userName, tokens);
  }

  public AccessTokenResponse getKeys(String userName) {
    return tokenPersistance.get(userName);
  }
}
アプリケーションの OAuth 2.0 認証情報もプロパティ ファイルに保存されます。または、これらのクラスをいずれかの Java クラスの定数として単純に使用することもできますが、ここでは OAuthProperties クラスと oauth.properties ファイルがサンプルで使用されています。
package com.google.oauthsample;

import ...

/**
 * Object representation of an OAuth properties file.
 */
public class OAuthProperties {

  public static final String DEFAULT_OAUTH_PROPERTIES_FILE_NAME = "oauth.properties";

  /** The OAuth 2.0 Client ID */
  private String clientId;

  /** The OAuth 2.0 Client Secret */
  private String clientSecret;

  /** The Google APIs scopes to access */
  private String scopes;

  /**
   * Instantiates a new OauthProperties object reading its values from the
   * {@code OAUTH_PROPERTIES_FILE_NAME} properties file.
   *
   * @throws IOException IF there is an issue reading the {@code propertiesFile}
   * @throws OauthPropertiesFormatException If the given {@code propertiesFile}
   *           is not of the right format (does not contains the keys {@code
   *           clientId}, {@code clientSecret} and {@code scopes})
   */
  public OAuthProperties() throws IOException {
    this(OAuthProperties.class.getResourceAsStream(DEFAULT_OAUTH_PROPERTIES_FILE_NAME));
  }

  /**
   * Instantiates a new OauthProperties object reading its values from the given
   * properties file.
   *
   * @param propertiesFile the InputStream to read an OAuth Properties file. The
   *          file should contain the keys {@code clientId}, {@code
   *          clientSecret} and {@code scopes}
   * @throws IOException IF there is an issue reading the {@code propertiesFile}
   * @throws OAuthPropertiesFormatException If the given {@code propertiesFile}
   *           is not of the right format (does not contains the keys {@code
   *           clientId}, {@code clientSecret} and {@code scopes})
   */
  public OAuthProperties(InputStream propertiesFile) throws IOException {
    Properties oauthProperties = new Properties();
    oauthProperties.load(propertiesFile);
    clientId = oauthProperties.getProperty("clientId");
    clientSecret = oauthProperties.getProperty("clientSecret");
    scopes = oauthProperties.getProperty("scopes");
    if ((clientId == null) || (clientSecret == null) || (scopes == null)) {
      throw new OAuthPropertiesFormatException();
    }
  }

  /**
   * @return the clientId
   */
  public String getClientId() {
    return clientId;
  }

  /**
   * @return the clientSecret
   */
  public String getClientSecret() {
    return clientSecret;
  }

  /**
   * @return the scopes
   */
  public String getScopesAsString() {
    return scopes;
  }

  /**
   * Thrown when the OAuth properties file was not at the right format, i.e not
   * having the right properties names.
   */
  @SuppressWarnings("serial")
  public class OAuthPropertiesFormatException extends RuntimeException {
  }
}
以下は、oauth.properties ファイルです。このファイルには、アプリケーションの OAuth 2.0 認証情報が含まれています。以下の値はご自身で変更する必要があります。
# Client ID and secret. They can be found in the APIs console.
clientId=1234567890.apps.googleusercontent.com
clientSecret=aBcDeFgHiJkLmNoPqRsTuVwXyZ
# API scopes. Space separated.
scopes=https://www.googleapis.com/auth/tasks
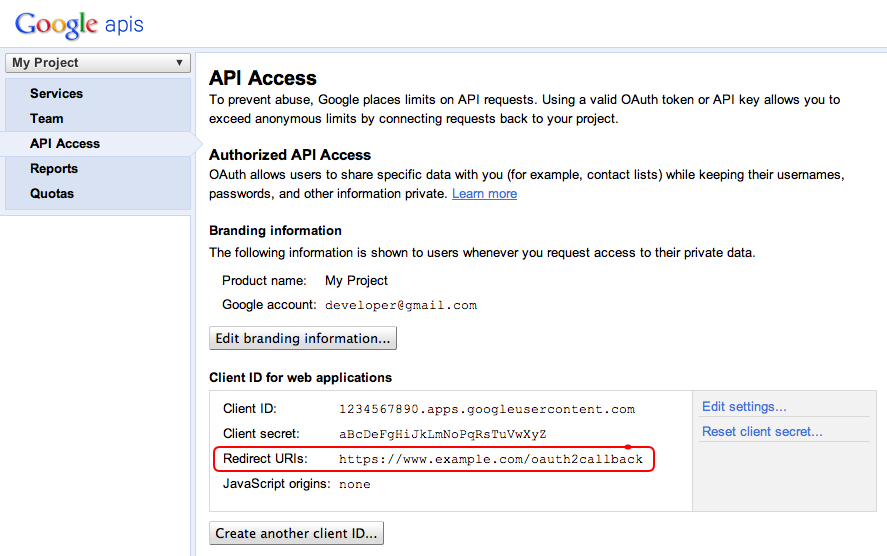
OAuth 2.0 のクライアント ID とクライアント シークレットはアプリケーションを識別し、そのアプリケーションで定義されたフィルタと割り当てルールを Tasks API に適用できるようにします。クライアント ID とシークレットは Google API コンソールで確認できます。コンソールで以下を行う必要があります。
- プロジェクトを作成または選択します。
- サービスのリストで Tasks API のステータスを [オン] に切り替えて、Tasks API を有効にします。
- OAuth 2.0 クライアント ID をまだ作成していない場合は、[API アクセス] で作成します。
- プロジェクトの OAuth 2.0 コード コールバック ハンドラ URL が [リダイレクト URI] で登録またはホワイトリストに登録されていることを確認します。たとえば、このサンプル プロジェクトでは、ウェブ アプリケーションが https://www.example.com ドメインから提供される場合、https://www.example.com/oauth2callback を登録する必要があります。
Google 認可エンドポイントから認証コードをリッスンする
ユーザーが、アプリケーションにタスクへのアクセスをまだ承認しておらず、したがって Google の OAuth 2.0 認可エンドポイントにリダイレクトされた場合、ユーザーには Google からの承認ダイアログが表示され、アプリケーションにタスクへのアクセス権限を付与するように求められます。
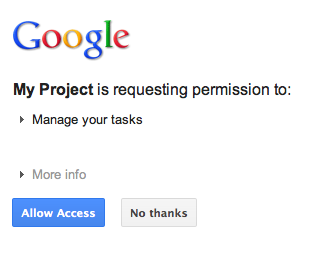
アクセスを許可または拒否すると、ユーザーは OAuth 2.0 コードのコールバック ハンドラにリダイレクトされます。このハンドラは、Google の承認 URL の作成時にリダイレクトまたはコールバックとして指定されます。
new GoogleAuthorizationRequestUrl(oauthProperties.getClientId(),
      OAuthCodeCallbackHandlerServlet.getOAuthCodeCallbackHandlerUrl(req), oauthProperties
          .getScopesAsString()).build()
Google OAuth 2.0 エンドポイントからのリダイレクトは、OAuth 2.0 コード コールバック ハンドラ(OAuthCodeCallbackHandlerServlet)によって処理されます。次の 2 つのケースを処理します。
- ユーザーがアクセスを許可しました: リクエストを解析して URL パラメータから OAuth 2.0 コードを取得します
- ユーザーがアクセスを拒否しました: ユーザーにメッセージが表示されます
package com.google.oauthsample;

import ...

/**
 * Servlet handling the OAuth callback from the authentication service. We are
 * retrieving the OAuth code, then exchanging it for a refresh and an access
 * token and saving it.
 */
@SuppressWarnings("serial")
public class OAuthCodeCallbackHandlerServlet extends HttpServlet {

  /** The name of the Oauth code URL parameter */
  public static final String CODE_URL_PARAM_NAME = "code";

  /** The name of the OAuth error URL parameter */
  public static final String ERROR_URL_PARAM_NAME = "error";

  /** The URL suffix of the servlet */
  public static final String URL_MAPPING = "/oauth2callback";

  public void doGet(HttpServletRequest req, HttpServletResponse resp) throws IOException {
    // Getting the "error" URL parameter
    String[] error = req.getParameterValues(ERROR_URL_PARAM_NAME);

    // Checking if there was an error such as the user denied access
    if (error != null && error.length > 0) {
      resp.sendError(HttpServletResponse.SC_NOT_ACCEPTABLE, "There was an error: \""+error[0]+"\".");
      return;
    }
    // Getting the "code" URL parameter
    String[] code = req.getParameterValues(CODE_URL_PARAM_NAME);

    // Checking conditions on the "code" URL parameter
    if (code == null || code.length == 0) {
      resp.sendError(HttpServletResponse.SC_BAD_REQUEST, "The \"code\" URL parameter is missing");
      return;
    }
  }

  /**
   * Construct the OAuth code callback handler URL.
   *
   * @param req the HttpRequest object
   * @return The constructed request's URL
   */
  public static String getOAuthCodeCallbackHandlerUrl(HttpServletRequest req) {
    String scheme = req.getScheme() + "://";
    String serverName = req.getServerName();
    String serverPort = (req.getServerPort() == 80) ? "" : ":" + req.getServerPort();
    String contextPath = req.getContextPath();
    String servletPath = URL_MAPPING;
    String pathInfo = (req.getPathInfo() == null) ? "" : req.getPathInfo();
    return scheme + serverName + serverPort + contextPath + servletPath + pathInfo;
  }
}
認証コードを更新トークンとアクセス トークンと交換する
次に、OAuthCodeCallbackHandlerServlet は Auth 2.0 コードを更新トークンとアクセス トークンと交換してデータストアに保持し、ユーザーを OAuthCodeCallbackHandlerServlet URL にリダイレクトします。
以下のファイルに追加されたコードは、構文がハイライト表示されます。既存のコードはグレー表示されます。
package com.google.oauthsample; import ... /** * Servlet handling the OAuth callback from the authentication service. We are * retrieving the OAuth code, then exchanging it for a refresh and an access * token and saving it. */ @SuppressWarnings("serial") public class OAuthCodeCallbackHandlerServlet extends HttpServlet { /** The name of the Oauth code URL parameter */ public static final String CODE_URL_PARAM_NAME = "code"; /** The name of the OAuth error URL parameter */ public static final String ERROR_URL_PARAM_NAME = "error"; /** The URL suffix of the servlet */ public static final String URL_MAPPING = "/oauth2callback";/** コールバックの処理後にユーザーをリダイレクトする URL。ユーザーのリダイレクト先にできる URL が複数ある場合は、 * ユーザーを Google の認可 URL にリダイレクトする前に、これを Cookie に保存することを検討してください。 **/ public static final String REDIRECT_URL = "/"; /** OAuth トークンの DAO 実装。静的初期化 * を使用するのではなく、挿入することを検討してください。また、モックとして * 単純なメモリ実装を使用しています。独自のデータベース システムを使用するように実装を変更します。*/ public static OAuthTokenDao oauthTokenDao = new OAuthTokenDaoMemoryImpl);public void doGet(HttpServletRequest req, HttpServletResponse resp) throws IOException { // Getting the "error" URL parameter String[] error = req.getParameterValues(ERROR_URL_PARAM_NAME); // Checking if there was an error such as the user denied access if (error != null && error.length > 0) { resp.sendError(HttpServletResponse.SC_NOT_ACCEPTABLE, "There was an error: \""+error[0]+"\"."); return; } // Getting the "code" URL parameter String[] code = req.getParameterValues(CODE_URL_PARAM_NAME); // Checking conditions on the "code" URL parameter if (code == null || code.length == 0) { resp.sendError(HttpServletResponse.SC_BAD_REQUEST, "The \"code\" URL parameter is missing"); return; }// 受信リクエスト URL を構築 String requestUrl = getOAuthCodeCallbackUrl(req); // OAuth トークンのコードを交換する AccessTokenResponse accessTokenResponse = exchangeCodeForAccessAndRefreshTokens(code[0], request the Url); ///** * Construct the OAuth code callback handler URL. * * @param req the HttpRequest object * @return The constructed request's URL */ public static String getOAuthCodeCallbackHandlerUrl(HttpServletRequest req) { String scheme = req.getScheme() + "://"; String serverName = req.getServerName(); String serverPort = (req.getServerPort() == 80) ? "" : ":" + req.getServerPort(); String contextPath = req.getContextPath(); String servletPath = URL_MAPPING; String pathInfo = (req.getPathInfo() == null) ? "" : req.getPathInfo(); return scheme + serverName + serverPort + contextPath + servletPath + pathInfo; }* * @param code 認可サービスから返されたコード * @param currentUrl コールバックの URL * @param oauthProperties OAuth 構成を含むオブジェクト * @return アクセストークンと更新トークンの両方を含むオブジェクト * @throws IOException, */ public AccessTokenResponse exchangeCodeForAccessAndRefreshTokens(String code, currentString RefreshToken) throws IOOAuthCodeCallbackHandler サーブレット.java ファイル注: 上記の実装では一部の App Engine ライブラリを使用していますが、これらは単純に使用しています。別のプラットフォーム向けに開発している場合は、ユーザー認証を処理する UserService インターフェースを自由に再実装してください。
ユーザーのタスクを読み取って表示する
ユーザーが、アプリにタスクへのアクセスを許可しています。アプリケーションには更新トークンがあり、このトークンは OAuthTokenDao を介してアクセスできるデータストアに保存されます。PrintTaskListsTitlesServlet は、これらのトークンを使用してユーザーのタスクにアクセスし、表示できるようになりました。
以下のファイルに追加されたコードは、構文がハイライト表示されます。既存のコードはグレー表示されます。
package com.google.oauthsample; import ... /** * Simple sample Servlet which will display the tasks in the default task list of the user. */ @SuppressWarnings("serial") public class PrintTasksTitlesServlet extends HttpServlet { /** * The OAuth Token DAO implementation, used to persist the OAuth refresh token. * Consider injecting it instead of using a static initialization. Also we are * using a simple memory implementation as a mock. Change the implementation to * using your database system. */ public static OAuthTokenDao oauthTokenDao = new OAuthTokenDaoMemoryImpl(); public void doGet(HttpServletRequest req, HttpServletResponse resp) throws IOException { // Getting the current user // This is using App Engine's User Service but you should replace this to // your own user/login implementation UserService userService = UserServiceFactory.getUserService(); User user = userService.getCurrentUser(); // If the user is not logged-in it is redirected to the login service, then back to this page if (user == null) { resp.sendRedirect(userService.createLoginURL(getFullRequestUrl(req))); return; } // Checking if we already have tokens for this user in store AccessTokenResponse accessTokenResponse = oauthTokenDao.getKeys(user.getEmail()); // If we don't have tokens for this user if (accessTokenResponse == null) { OAuthProperties oauthProperties = new OAuthProperties(); // Redirect to the Google OAuth 2.0 authorization endpoint resp.sendRedirect(new GoogleAuthorizationRequestUrl(oauthProperties.getClientId(), OAuthCodeCallbackHandlerServlet.getOAuthCodeCallbackHandlerUrl(req), oauthProperties .getScopesAsString()).build()); return; }// レスポンス内のユーザーのタスクリストのタイトルを出力 resp.setContentType("text/plain"); resp.getWriter().append("Task lists title for user " + user.getEmail() + ":\n\n"); printTasksTitles(accessTokenResponse, resp.getWriter()); タスクのタスクのリストを Google Tasks API で取得します。 *Google Tasks API のリストを使用します} /** * Construct the request's URL without the parameter part. * * @param req the HttpRequest object * @return The constructed request's URL */ public static String getFullRequestUrl(HttpServletRequest req) { String scheme = req.getScheme() + "://"; String serverName = req.getServerName(); String serverPort = (req.getServerPort() == 80) ? "" : ":" + req.getServerPort(); String contextPath = req.getContextPath(); String servletPath = req.getServletPath(); String pathInfo = (req.getPathInfo() == null) ? "" : req.getPathInfo(); String queryString = (req.getQueryString() == null) ? "" : "?" + req.getQueryString(); return scheme + serverName + serverPort + contextPath + servletPath + pathInfo + queryString; }* * @param accessTokenResponse アクセス トークンと更新トークンを含む * OAuth 2.0 AccessTokenResponse オブジェクト。 * @param は、タスクリストのタイトルを修飾する出力ストリーム ライターを出力します * @return デフォルトのタスクリストにあるユーザーのタスクタイトルのリスト。 {PrintTasksTitles サーブレット.java ファイルユーザーにはタスクが表示されます。
 ユーザーのタスク
サンプル アプリケーション
このサンプル アプリケーションのコードはこちらからダウンロードできます。ぜひご覧ください。