
1. Before you begin
This codelab teaches you how to use the WebGL-powered features of the Maps JavaScript API to control and render on the vector map in three dimensions.
Prerequisites
This codelab assumes you have intermediate knowledge of JavaScript and the Maps JavaScript API. To learn the basics of using the Maps JS API, try the Add a map to your website (JavaScript) codelab.
What you'll learn
- Generating a Map ID with the vector map for JavaScript enabled.
- Controlling the map with programmatic tilt and rotation.
- Rendering 3D objects on the map with
WebGLOverlayViewand Three.js. - Animating camera movements with
moveCamera.
What you'll need
- A Google Cloud Platform account with billing enabled
- A Google Maps Platform API key with the Maps JavaScript API enabled
- Intermediate knowledge of JavaScript, HTML, and CSS
- A text editor or IDE of your choice
- Node.js
2. Get set up
For the enablement step below, you'll need to enable the Maps JavaScript API.
Set up Google Maps Platform
If you do not already have a Google Cloud Platform account and a project with billing enabled, please see the Getting Started with Google Maps Platform guide to create a billing account and a project.
- In the Cloud Console, click the project drop-down menu and select the project that you want to use for this codelab.

- Enable the Google Maps Platform APIs and SDKs required for this codelab in the Google Cloud Marketplace. To do so, follow the steps in this video or this documentation.
- Generate an API key in the Credentials page of Cloud Console. You can follow the steps in this video or this documentation. All requests to Google Maps Platform require an API key.
Node.js setup
If you don't already have it, go to https://nodejs.org/ to download and install the Node.js runtime on your computer.
Node.js comes with the npm package manager, which you need to install dependencies for this codelab.
Download the project starter template
Before you begin this codelab, do the following to download the starter project template, as well as the complete solution code:
- Download or fork the GitHub repo for this codelab at https://github.com/googlecodelabs/maps-platform-101-webgl/. The starter project is located in the
/starterdirectory and includes the basic file structure you need to complete the codelab. Everything you need to work with is located in the/starter/srcdirectory. - Once you download the starter project, run
npm installin the/starterdirectory. This installs all of the needed dependencies listed inpackage.json. - Once your dependencies are installed, run
npm startin the directory.
The starter project has been set up for you to use webpack-dev-server, which compiles and runs the code you write locally. webpack-dev-server also automatically reloads your app in the browser any time you make code changes.
If you'd like to see the full solution code running, you can complete the setup steps above in the /solution directory.
Add your API key
The starter app includes all the code needed to load the map with the JS API Loader, so that all you need to do is provide your API key and Map ID. The JS API Loader is a simple library that abstracts the traditional method of loading the Maps JS API inline in the HTML template with a script tag, allowing you to handle everything in JavaScript code.
To add your API key, do the following in the starter project:
- Open
app.js. - In the
apiOptionsobject, set your API key as the value ofapiOptions.apiKey.
3. Generate and use a Map ID
To use the WebGL-based features of the Maps JavaScript API, you need a Map ID with the vector map enabled.
Generating a Map ID
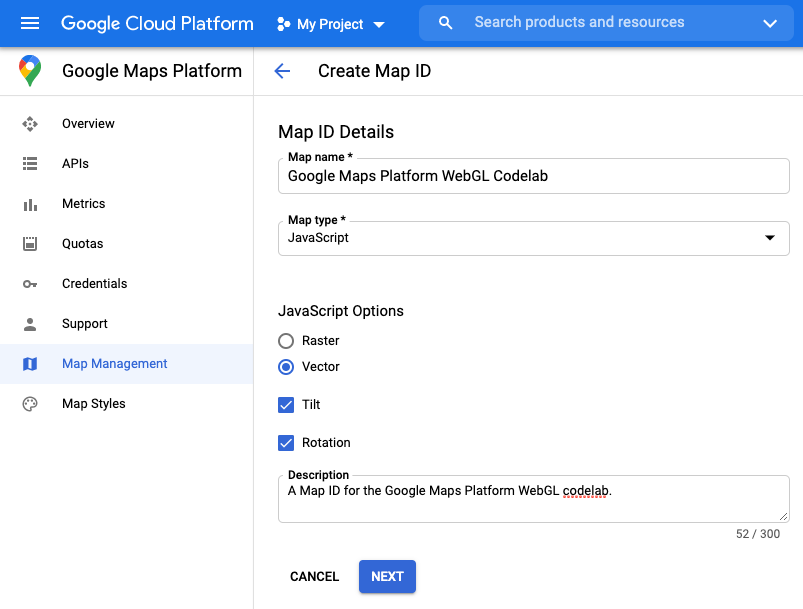
- In the Google Cloud console, go to ‘Google Maps Platform' > ‘Map Management'.
- Click ‘CREATE NEW MAP ID'.
- In the ‘Map name' field, input a name for your Map ID.
- In the ‘Map type' dropdown, select ‘JavaScript'. ‘JavaScript Options' will appear.
- Under ‘JavaScript Options', select the ‘Vector' radio button, the ‘Tilt' checkbox, and the ‘Rotation' checkbox.
- Optional. In the ‘Description' field, enter a description for your API key.
- Click the ‘Next' button. The ‘Map ID Details' page will appear.
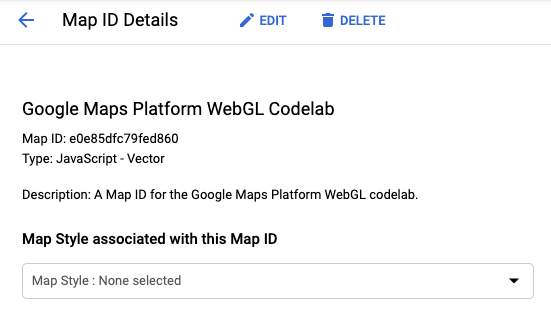
- Copy the Map ID. You will use this in the next step to the load the Map.
Using a Map ID
To load the vector map, you must provide a Map ID as a property in the options when you instantiate the Map. Optionally, you may also provide the same Map ID when you load the Maps JavaScript API.
To load the map with your Map ID, do the following:
- Set your Map ID as the value of
mapOptions.mapId.
Providing the Map ID when you instantiate the map tells Google Maps Platform which of your maps to load for a particular instance. You may reuse the same Map ID across multiple apps or multiple views within the same app.const mapOptions = { "tilt": 0, "heading": 0, "zoom": 18, "center": { lat: 35.6594945, lng: 139.6999859 }, "mapId": "YOUR_MAP_ID" };
Check the app running in your browser. The vector map with tilt and rotation enabled should load successfully. To check whether tilt and rotation are enabled, hold the shift key and either drag with your mouse or use the arrow keys on your keyboard.
If the map does not load, check that you have provided a valid API key in apiOptions. If the map does not tilt and rotate, check that you have provided a Map ID with tilt and rotation enabled in apiOptions and mapOptions.

Your app.js file should now look like this:
    import { Loader } from '@googlemaps/js-api-loader';

    const apiOptions = {
      "apiKey": 'YOUR_API_KEY',
    };

    const mapOptions = {
      "tilt": 0,
      "heading": 0,
      "zoom": 18,
      "center": { lat: 35.6594945, lng: 139.6999859 },
      "mapId": "YOUR_MAP_ID"
    }

    async function initMap() {
      const mapDiv = document.getElementById("map");
      const apiLoader = new Loader(apiOptions);
      await apiLoader.load();
      return new google.maps.Map(mapDiv, mapOptions);
    }

    function initWebGLOverlayView (map) {
      let scene, renderer, camera, loader;
      // WebGLOverlayView code goes here
    }

    (async () => {
      const map = await initMap();
    })();
4. Implement WebGLOverlayView
WebGLOverlayView gives you direct access to the same WebGL rendering context used to render the vector basemap. This means you can render 2D and 3D objects directly on the map using WebGL, as well as popular WebGL-based graphics libraries.
WebGLOverlayView exposes five hooks into the lifecycle of the WebGL rendering context of the map that you can use. Here's a quick description of each hook and what you should it them for:
onAdd(): Called when the overlay is added to a map by callingsetMapon aWebGLOverlayViewinstance. This is where you should do any work related to WebGL that does not require direct access to the WebGL context.onContextRestored(): Called when the WebGL context becomes available but before anything is rendered. This is where you should initialize objects, bind state, and do anything else that needs access to the WebGL context but can be performed outside theonDraw()call. This allows you to set up everything you need without adding excess overhead to the actual rendering of the map, which is already GPU-intensive.onDraw(): Called once per frame once WebGL begins rendering the map and anything else you've requested. You should do as little work as possible inonDraw()to avoid causing performance issue in the rendering of the map.onContextLost(): Called when the WebGL rendering context is lost for any reason.onRemove(): Called when the overlay is removed from the map by callingsetMap(null)on aWebGLOverlayViewinstance.
In this step, you'll create an instance of WebGLOverlayView and implement three of its lifecycle hooks: onAdd, onContextRestored, and onDraw. To keep things clean and easier to follow, all the code for the overlay will be handled in the initWebGLOverlayView() function provided in the starter template for this codelab.
- Create a
WebGLOverlayView()instance.
The overlay is provided by the Maps JS API ingoogle.maps.WebGLOverlayView. To begin, create an instance by apending the following toinitWebGLOverlayView():const webGLOverlayView = new google.maps.WebGLOverlayView(); - Implement lifecycle hooks.
To implement the lifecycle hooks, append the following toinitWebGLOverlayView():webGLOverlayView.onAdd = () => {}; webGLOverlayView.onContextRestored = ({gl}) => {}; webGLOverlayView.onDraw = ({gl, transformer}) => {}; - Add the overlay instance to the map.
Now callsetMap()on the overlay instance and pass in the map by appending the following toinitWebGLOverlayView():webGLOverlayView.setMap(map) - Call
initWebGLOverlayView.
The last step is to executeinitWebGLOverlayView()by adding the following to the immediately invoked function at the bottom ofapp.js:initWebGLOverlayView(map);
Your initWebGLOverlayView and immediately invoked function should now look like this:
    async function initWebGLOverlayView (map) {
      let scene, renderer, camera, loader;
      const webGLOverlayView = new google.maps.WebGLOverlayView();

      webGLOverlayView.onAdd = () => {}
      webGLOverlayView.onContextRestored = ({gl}) => {}
      webGLOverlayView.onDraw = ({gl, transformer}) => {}
      webGLOverlayView.setMap(map);
    }

    (async () => {
      const map = await initMap();
      initWebGLOverlayView(map);
    })();
That's all you need to implement WebGLOverlayView. Next, you'll set up everything you need to render a 3D object on the map using Three.js.
5. Set up a three.js scene
Using WebGL can be very complicated because it requires you to define all of the aspects of every object manually and then some. To make things much easier, for this codelab you'll use Three.js, a popular graphics library that provides a simplified abstraction layer on top of WebGL. Three.js comes with a wide variety of convenience functions that do everything from creating a WebGL renderer to drawing common 2D and 3D object shapes to controlling cameras, object transformations, and much more.
There are three basic object types in Three.js that are required to display anything:
- Scene: A "container" where all objects, light sources, textures, etc. are rendered and displayed.
- Camera: A camera that represents the viewpoint of the scene. Multiple camera types are available, and one or more cameras may be added to a single scene.
- Renderer: A renderer that handles the processing and displaying of all objects in the scene. In Three.js,
WebGLRendereris the most commonly used, but a few others are available as fallbacks in the event that the client does not support WebGL.
In this step, you'll load all the dependencies needed for Three.js and set up a basic scene.
- Load three.js
You'll need two dependencies for this codelab: the Three.js library and the GLTF Loader, a class that allows you to load 3D objects in the GL Trasmission Format (gLTF). Three.js offers specialized loaders for many different 3D object formats but using gLTF is recommended.
In the code below, the entire Three.js library is imported. In a production app you would likely want to import just the classes you need, but for this codelab, import the entire library to keep things simple. Notice also that the GLTF Loader is not included in the default library, and needs to be imported from a separate path in the dependency - this is the path where you can access all of the loaders provided by Three.js.
To import Three.js and the GLTF Loader, add the following to the top ofapp.js:import * as THREE from 'three'; import {GLTFLoader} from 'three/examples/jsm/loaders/GLTFLoader.js'; - Create a three.js scene.
To create a scene, instantiate the Three.jsSceneclass by appending the following to theonAddhook:scene = new THREE.Scene(); - Add a camera to the scene.
As mentioned earlier, the camera represents the viewing perspective of the scene, and determines how Three.js handles the visual rendering of objects within a scene. Without a camera, the scene is effectively not "seen", meaning that objects won't be appear because they won't be renderered.
Three.js offers a variety of different cameras that effect how the renderer treats objects with respect to things like perspective and depth. In this scene, you'll use thePerspectiveCamera, the most commonly used camera type in Three.js, which is designed to emulate the way the human eye would perceive the scene. This means objects farther away from the camera will appear smaller than objects that are closer, the scene will have a vanishing point, and more.
To add a perspective camera to the scene, append the following to theonAddhook:camera = new THREE.PerspectiveCamera();PerspectiveCamera, you are also able to configure the attributes that make up the viewpoint, including the near and far planes, aspect ratio, and field of vision (fov). Collectively, these attributes make up what is known as the viewing frustum, an important concept to undertand when working in 3D, but outside the scope of this codelab. The defaultPerspectiveCameraconfiguration will suffice just fine. - Add light sources to the scene.
By default, objects rendered in a Three.js scene will appear black, regardless of the textures applied to them. This is because a Three.js scene mimics how objects act in the real world, where the visibility of color depends on light reflecting off an object. In short, no light, no color.
Three.js provides a variety of different types of lights of which you'll use two: AmbientLight: Provides a diffuse light source that evenly lights all objects in the scehe from all angles. This will give the scene a baseline amount of light to ensure the textures on all objects are visible.DirectionalLight: Provides a light originating from a direction in the scene. Unlike how a positioned light would operate in the real world, the light rays that eminate fromDirectionalLightare all parallel and do not spread and diffuse as they get farther from the light source.
You may configure the color and intensity of each light to create aggregate lighting effects. For example, in the code below, the ambient light provides a soft white light for the entire scene, while the directional light provides a secondary light that hits objects at a downward angle. In the case of the directional light, the angle is set usingposition.set(x, y ,z), where each value is relative to the respective axis. So, for example,position.set(0,1,0)would position the light directly above the scene on the y-axis pointing straight down.
To add the light sources to the scene, append the following to theonAddhook:const ambientLight = new THREE.AmbientLight( 0xffffff, 0.75 ); scene.add(ambientLight); const directionalLight = new THREE.DirectionalLight(0xffffff, 0.25); directionalLight.position.set(0.5, -1, 0.5); scene.add(directionalLight);
Your onAdd hook should now look like this:
webGLOverlayView.onAdd = () => {
scene = new THREE.Scene();
camera = new THREE.PerspectiveCamera();
const ambientLight = new THREE.AmbientLight( 0xffffff, 0.75 );
scene.add(ambientLight);
const directionalLight = new THREE.DirectionalLight(0xffffff, 0.25);
directionalLight.position.set(0.5, -1, 0.5);
scene.add(directionalLight);
}
Your scene is now set up and ready to render. Next, you'll configure the WebGL renderer and render the scene.
6. Render the scene
Time to render your scene. Up to this point, everything you've created with Three.js is initialized in code, but is essentially non-existent because it hasn't yet been rendered into the WebGL rendering context. WebGL renders 2D and 3D content in the browser using the canvas API. If you've used the Canvas API before, you're probably familiar with the context of an HTML canvas, which is where everything is rendered. What you may not know is that this is an interface that exposes the OpenGL graphics rendering context via the WebGLRenderingContext API in the browser.
To make dealing with the WebGL renderer easier, Three.js provides WebGLRenderer, a wrapper that makes it relatively easy to configure the WebGL rendering context so that Three.js can render scenes in the browser. In the case of the map, however, it's not enough to just render the Three.js scene in the browser alongside the map. Three.js must render into the exact same rendering context as the map, so that both the map and any objects from the Three.js scene are rendered into the same world space. This makes it possible for the renderer to handle interactions between objects on the map and objects in the scene, such as occlusion, which is a fancy way of saying an object will hide objects behind it from view.
Sounds pretty complicated, right? Luckily, Three.js comes to the rescue again.
- Set up the WebGL renderer.
When you create a new instance of the Three.jsWebGLRenderer, you may provide it the specific WebGL rendering context you want it to render your scene into. Remember theglargument that gets passed into theonContextRestoredhook? Thatglobject is the WebGL rendering context of the map. All you need to do is provide the context, its canvas, and its attributes to theWebGLRendererinstance, all of which are available via theglobject. In this code, theautoClearproperty of the renderer is also set tofalseso that the renderer does not clear its output every frame.
To configure the renderer, append the following to theonContextRestoredhook:renderer = new THREE.WebGLRenderer({ canvas: gl.canvas, context: gl, ...gl.getContextAttributes(), }); renderer.autoClear = false; - Render the scene.
Once the renderer is configured, callrequestRedrawon theWebGLOverlayViewinstance to tell the overlay that a redraw is needed when the next frame renders, then callrenderon the renderer and pass it the Three.js scene and camera to render. Lastly, clear the state of the WebGL rendering context. This is an important step to avoid GL state conflicts, since usage of WebGL Overlay View relies on shared GL state. If the state is not reset at the end of every draw call, GL state conflicts may cause the renderer to fail.
To do this, append the following to theonDrawhook so that it is executed each frame:webGLOverlayView.requestRedraw(); renderer.render(scene, camera); renderer.resetState();
Your onContextRestored and onDraw hooks should now look like this:
webGLOverlayView.onContextRestored = ({gl}) => {
renderer = new THREE.WebGLRenderer({
  canvas: gl.canvas,
  context: gl,
  ...gl.getContextAttributes(),
});
renderer.autoClear = false;
}
webGLOverlayView.onDraw = ({gl, transformer}) => {
webGLOverlayView.requestRedraw();
renderer.render(scene, camera);
renderer.resetState();
}
7. Render a 3D model on the map
Ok, you've got all the pieces in place. You've set up WebGl Overlay View and created a Three.js scene, but there's one problem: there's nothing in it. So next, it's time to render a 3D object in the scene. To do this, you'll use the GLTF Loader you imported earlier.
3D models come in many different formats, but for Three.js the gLTF format is the preferred format due to its size and runtime performance. In this codelab, a model for you to render in the scene is already provided for you in /src/pin.gltf.
- Create a model loader instance.
Append the following toonAdd:loader = new GLTFLoader(); - Load a 3D model.
Model loaders are asynchronous and execute a callback once the model has fully loaded. To loadpin.gltf, append the following toonAdd:const source = "pin.gltf"; loader.load( source, gltf => {} ); - Add the model to the scene.
Now you can add the model to the scene by appending the following to theloadercallback. Note thatgltf.sceneis being added, notgltf:scene.add(gltf.scene); - Configure the camera projection matrix.
The last thing you need to make the model render properly on the map is to set the projection matrix of the camera in the Three.js scene. The projection matrix is specified as a Three.jsMatrix4array, which defines a point in three dimensional space along with transformations, such as rotations, shear, scale, and more.
In the case ofWebGLOverlayView, the projection matrix is used to tell the renderer where and how to render the Three.js scene relative to the basemap. But there's a problem. Locations on the map are specified as latitude and longitude coordinate pairs, whereas locations in the Three.js scene areVector3coordinates. As you might have guessed, calculating the conversion between the two systems is not trivial. To solve this,WebGLOverlayViewpasses acoordinateTransformerobject to theOnDrawlifecycle hook that contains a function calledfromLatLngAltitude.fromLatLngAltitudetakes aLatLngAltitudeorLatLngAltitudeLiteralobject, and optionally a set of arguments that define a transformation for the scene, then coverts them to a model view projection (MVP) matrix for you. All you have to do is specify where on the map you want the Three.js scene to be rendered, as well as how you want it transformed, andWebGLOverlayViewdoes the rest. You may then convert the MVP matrix to a Three.jsMatrix4array and set the camera projection matrix to it.
In the code below, the second argument tells WebGl Overlay View to set the altitude of the Three.js scene 120 meters above the ground, which will make the model appear to float.
To set the camera projection matrix, append the following to theonDrawhook:const latLngAltitudeLiteral = { lat: mapOptions.center.lat, lng: mapOptions.center.lng, altitude: 120 } const matrix = transformer.fromLatLngAltitude(latLngAltitudeLiteral); camera.projectionMatrix = new THREE.Matrix4().fromArray(matrix); - Transform the model.
You'll notice that the pin is not sitting perpendicular to the map. In 3D graphics, in addition to the world space having its own x, y, and z axes that determine orientation, each object also has its own object space with an independent set of axes.
In the case of this model, it was not created with what we would normally consider the ‘top' of the pin facing up the y-axis, so you need to transform the object to orient it the desired way relative to the world space by callingrotation.seton it. Note that in Three.js, rotation is specified in radians, not degrees. It's generally easier to think in degrees, so the appropriate conversion needs to be made using the formuladegrees * Math.PI/180.
In addition, the model is a bit small, so you'll also scale it evenly on all axes by callingscale.set(x, y ,z).
To rotate and scale the model, add the following in theloadercallback ofonAddbeforescene.add(gltf.scene)which adds the gLTF to the scene:gltf.scene.scale.set(25,25,25); gltf.scene.rotation.x = 180 * Math.PI/180;
Now the pin sits upright relative to the map.
Your onAdd and onDraw hooks should now look like this:
webGLOverlayView.onAdd = () => {
scene = new THREE.Scene();
camera = new THREE.PerspectiveCamera();
const ambientLight = new THREE.AmbientLight( 0xffffff, 0.75 ); // soft white light
scene.add( ambientLight );
const directionalLight = new THREE.DirectionalLight(0xffffff, 0.25);
directionalLight.position.set(0.5, -1, 0.5);
scene.add(directionalLight);
loader = new GLTFLoader();
const source = 'pin.gltf';
loader.load(
source,
gltf => {
gltf.scene.scale.set(25,25,25);
gltf.scene.rotation.x = 180 * Math.PI/180;
scene.add(gltf.scene);
}
);
}
webGLOverlayView.onDraw = ({gl, transformer}) => {
const latLngAltitudeLiteral = {
lat: mapOptions.center.lat,
lng: mapOptions.center.lng,
altitude: 100
}
const matrix = transformer.fromLatLngAltitude(latLngAltitudeLiteral);
camera.projectionMatrix = new THREE.Matrix4().fromArray(matrix);
webGLOverlayView.requestRedraw();
renderer.render(scene, camera);
renderer.resetState();
}
Next up is camera animations!
8. Animate the camera
Now that you've rendered a model on the map and can move everything three dimensionally, the next thing you're likely to want to do is control that movement programmatically. The moveCamera function allows you to set the center, zoom, tilt, and heading properties of the map simultaneously, giving you fine grain control over the user experience. In addition, moveCamera can be called in an animation loop to create fluid transitions between frames at a framerate of nearly 60 frames per second.
- Wait for the model to load.
To create a seamless user experience, you'll want to wait to start moving the camera until after the gLTF model is loaded. To do this, append the loader'sonLoadevent handler to theonContextRestoredhook:loader.manager.onLoad = () => {} - Create an animation loop.
There's more than one way to create an animation loop, such as usingsetIntervalorrequestAnimationFrame. In this case, you'll use thesetAnimationLoopfunction of the Three.js renderer, which will automatically call any code you declare in its callback each time Three.js renders a new frame. To create the animation loop, add the following to theonLoadevent handler in the previous step:renderer.setAnimationLoop(() => {}); - Set the camera position in the animation loop.
Next, callmoveCamerato update the map. Here, properties from themapOptionsobject that was used to load the map are used to define the camera position:map.moveCamera({ "tilt": mapOptions.tilt, "heading": mapOptions.heading, "zoom": mapOptions.zoom }); - Update the camera each frame.
Last step! Update themapOptionsobject at the end of each frame to set the camera position for the next frame. In this code, anifstatement is used to increment the tilt until the maximum tilt value of 67.5 is reached, then the heading is changed a bit each frame until the camera has completed a full 360 degree rotation. Once the desired animation is complete,nullis passed tosetAnimationLoopto cancel the animation so that it doesn't run forever.if (mapOptions.tilt < 67.5) { mapOptions.tilt += 0.5 } else if (mapOptions.heading <= 360) { mapOptions.heading += 0.2; } else { renderer.setAnimationLoop(null) }
Your onContextRestored hook should now look like this:
webGLOverlayView.onContextRestored = ({gl}) => {
renderer = new THREE.WebGLRenderer({
canvas: gl.canvas,
context: gl,
...gl.getContextAttributes(),
});
renderer.autoClear = false;
loader.manager.onLoad = () => {
renderer.setAnimationLoop(() => {
map.moveCamera({
  "tilt": mapOptions.tilt,
  "heading": mapOptions.heading,
  "zoom": mapOptions.zoom
});
if (mapOptions.tilt < 67.5) {
  mapOptions.tilt += 0.5
} else if (mapOptions.heading <= 360) {
  mapOptions.heading += 0.2;
} else {
  renderer.setAnimationLoop(null)
}
});
}
}
9. Congratulations
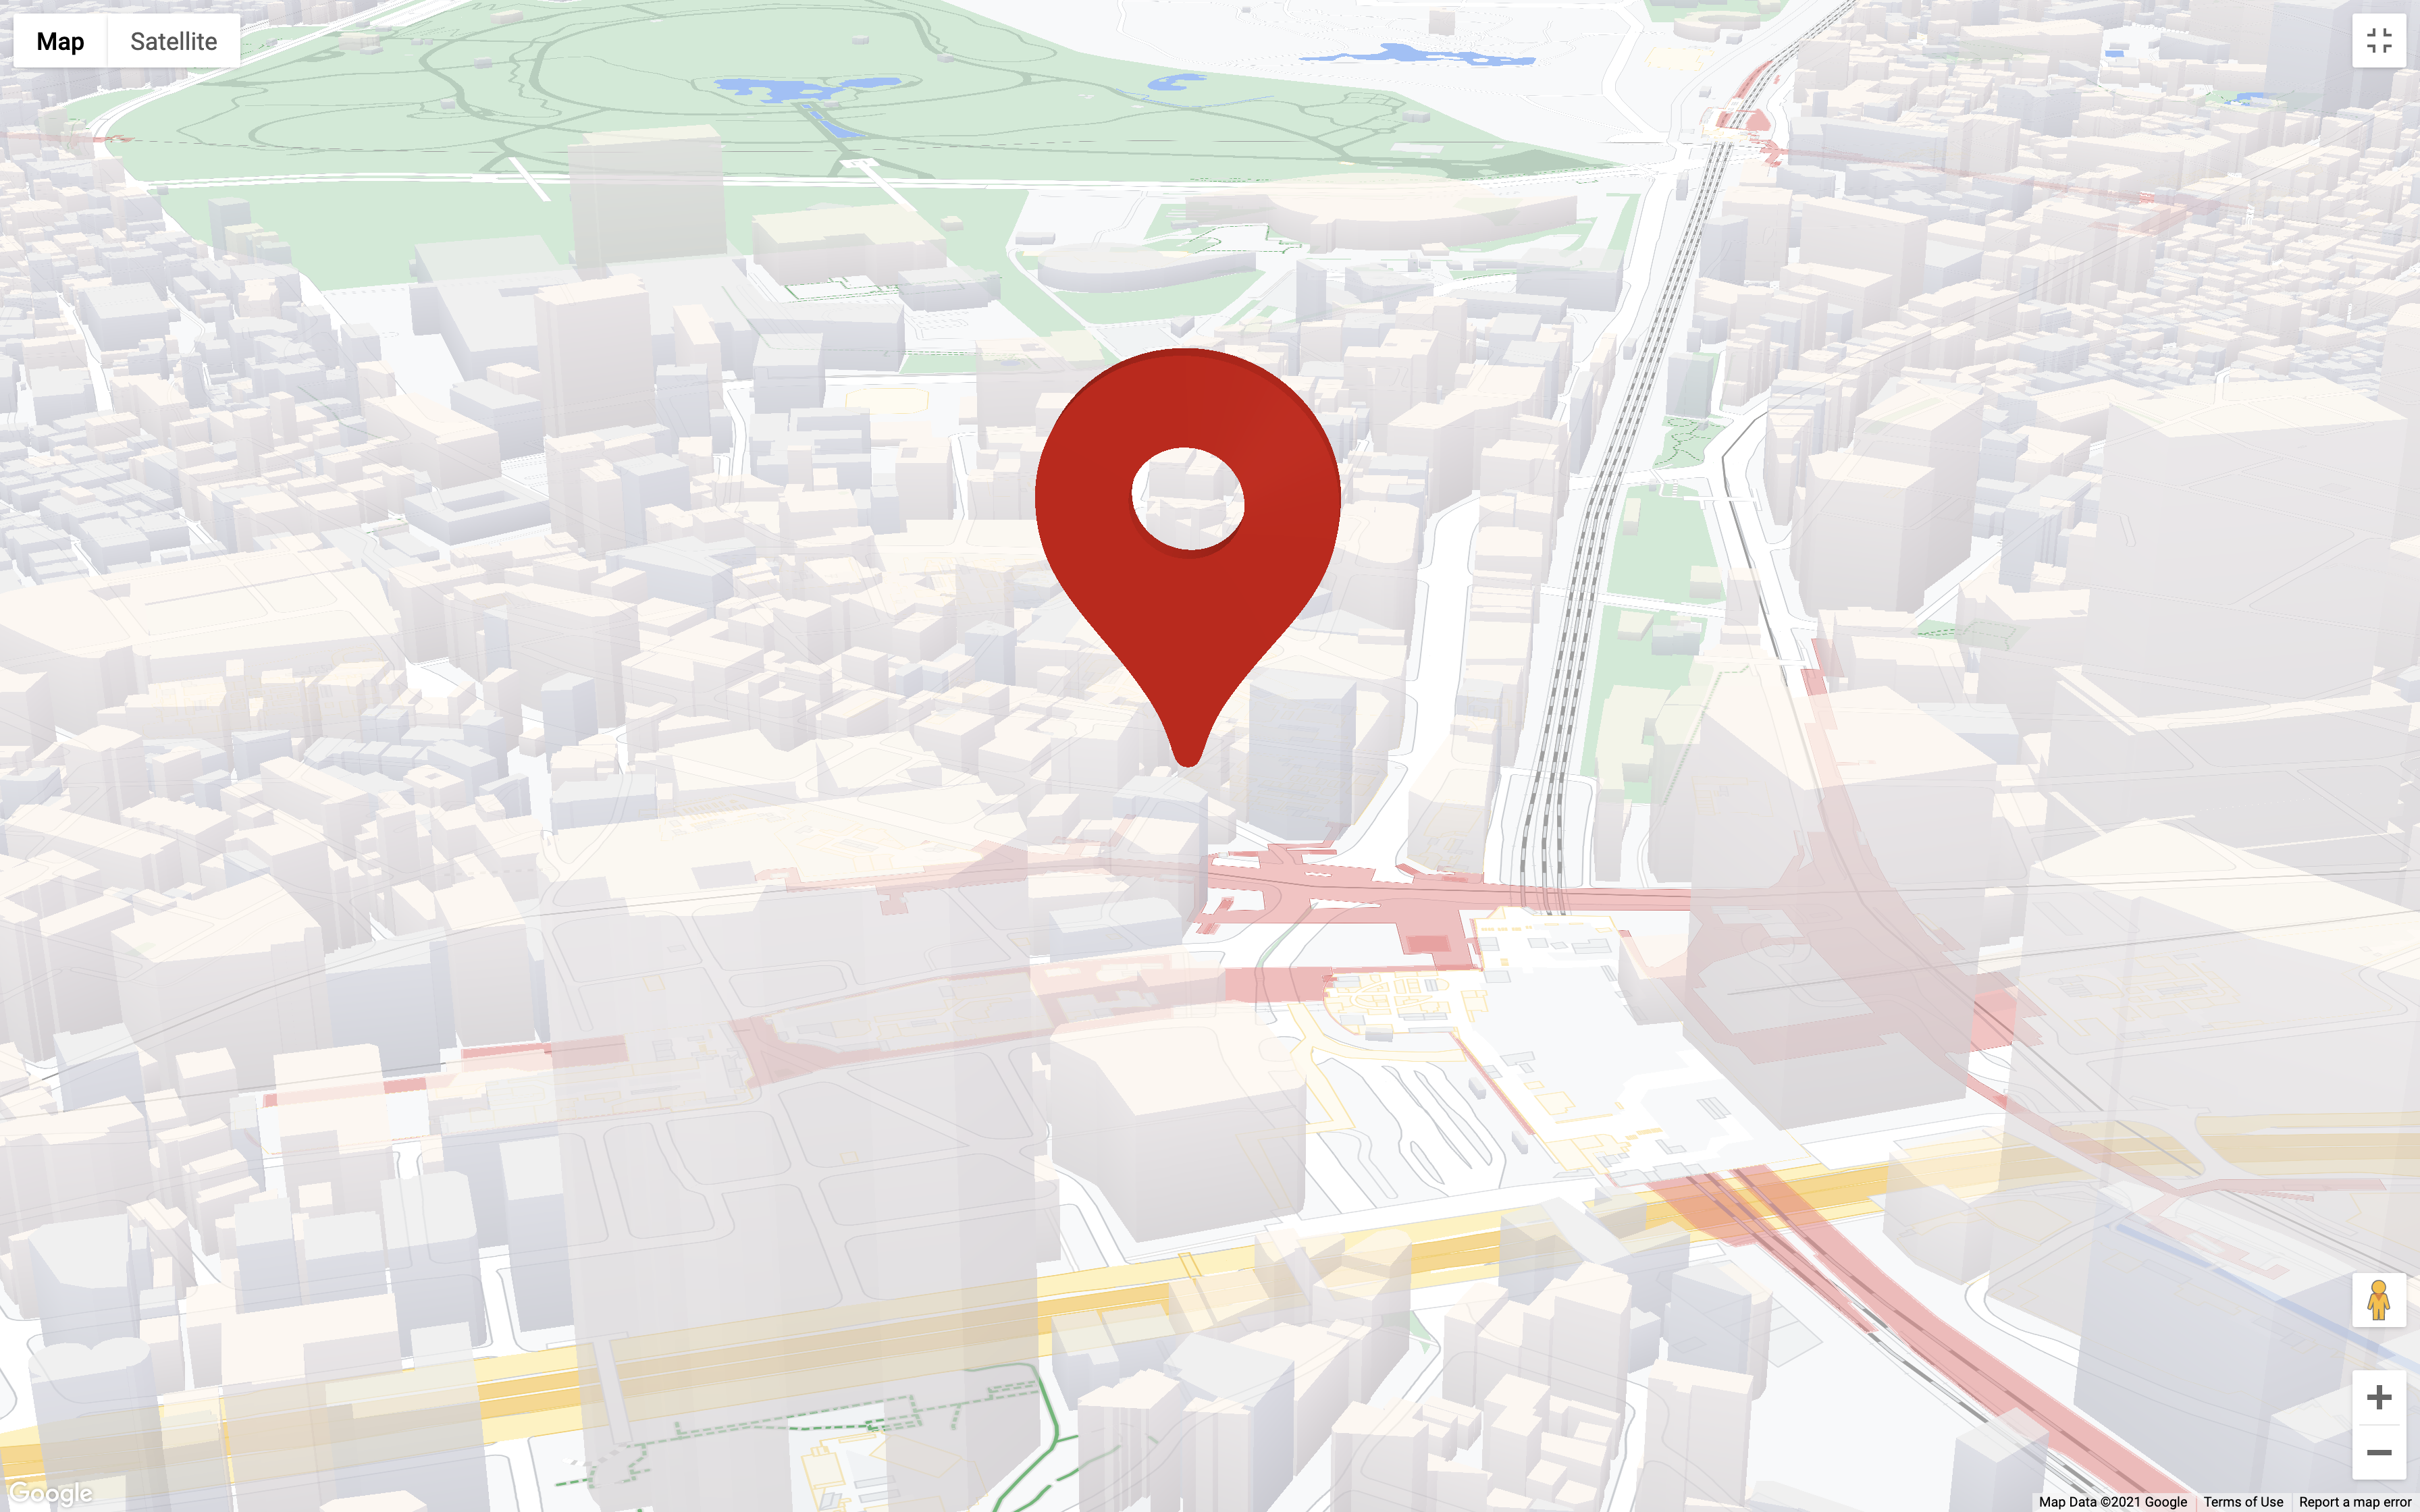
If everything went according to plan, you should now have a map with a large 3D pin that looks like this:
What you learned
In this codelab you've learned a bunch of stuff; here are the highlights:
- Implementing
WebGLOverlayViewand its lifecycle hooks. - Integrating Three.js into the map.
- The basics of creating a Three.js scene, including cameras and lighting.
- Loading and manipulating 3D models using Three.js.
- Controlling and animating the camera for the map using
moveCamera.
What's next?
WebGL, and computer graphics in general, is a complex topic, so there's always lots to learn. Here are a few resources to get you started:
- WebGL Overlay View documentation
- Getting started with WebGL.
- Three.js documentation
- Help us create the content that you would find most useful by answering the question below: «codelabs/maps-platform/shared/_next-lab-survey.lab.md» Is the codelab you want not listed above? Request it with a new issue here.