
1. ก่อนเริ่มต้น
ในโค้ดแล็บนี้ คุณจะได้เรียนรู้วิธีเรียกใช้การอนุมานการตรวจหาออบเจ็กต์จากแอป Android โดยใช้ TensorFlow Serving กับ REST และ gRPC
ข้อกำหนดเบื้องต้น
- มีความรู้พื้นฐานเกี่ยวกับการพัฒนาแอป Android ด้วย Java
- ความรู้พื้นฐานเกี่ยวกับแมชชีนเลิร์นนิงด้วย TensorFlow เช่น การฝึกและการติดตั้งใช้งาน
- ความรู้พื้นฐานเกี่ยวกับเทอร์มินัลและ Docker
สิ่งที่คุณจะได้เรียนรู้
- วิธีค้นหาโมเดลการตรวจหาวัตถุที่ฝึกไว้ล่วงหน้าใน TensorFlow Hub
- วิธีสร้างแอป Android อย่างง่ายและทำการคาดคะเนด้วยโมเดลการตรวจหาออบเจ็กต์ที่ดาวน์โหลดผ่าน TensorFlow Serving (REST และ gRPC)
- วิธีแสดงผลการตรวจจับใน UI
สิ่งที่คุณต้องมี
- Android Studio เวอร์ชันล่าสุด
- Docker
- Bash
2. ตั้งค่า
วิธีดาวน์โหลดโค้ดสำหรับ Codelab นี้
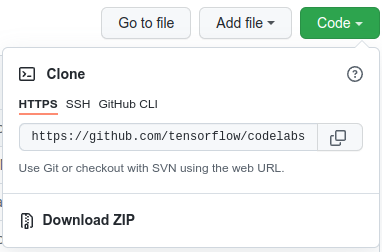
- ไปที่ที่เก็บ GitHub สำหรับ Codelab นี้
- คลิกโค้ด > ดาวน์โหลด ZIP เพื่อดาวน์โหลดโค้ดทั้งหมดสำหรับ Codelab นี้
- แตกไฟล์ ZIP ที่ดาวน์โหลดเพื่อคลายโฟลเดอร์รูท
codelabsที่มีทรัพยากรทั้งหมดที่คุณต้องการ
สำหรับโค้ดแล็บนี้ คุณจะต้องใช้เฉพาะไฟล์ในไดเรกทอรีย่อย TFServing/ObjectDetectionAndroid ในที่เก็บ ซึ่งมี 2 โฟลเดอร์ ได้แก่
- โฟลเดอร์
starterมีโค้ดเริ่มต้นที่คุณจะใช้ต่อยอดสำหรับโค้ดแล็บนี้ - โฟลเดอร์
finishedมีโค้ดที่เสร็จสมบูรณ์สำหรับแอปตัวอย่างที่เสร็จแล้ว
3. เพิ่มการขึ้นต่อกันลงในโปรเจ็กต์
นำเข้าแอปเริ่มต้นไปยัง Android Studio
- ใน Android Studio ให้คลิกไฟล์ > ใหม่ > นำเข้าโปรเจ็กต์ แล้วเลือกโฟลเดอร์
starterจากซอร์สโค้ดที่คุณดาวน์โหลดไว้ก่อนหน้านี้
เพิ่มการอ้างอิงสำหรับ OkHttp และ gRPC
- ในไฟล์
app/build.gradleของโปรเจ็กต์ ให้ยืนยันว่ามีทรัพยากร Dependency
dependencies {
  // ...
    implementation 'com.squareup.okhttp3:okhttp:4.9.0'
    implementation 'javax.annotation:javax.annotation-api:1.3.2'
    implementation 'io.grpc:grpc-okhttp:1.29.0'
    implementation 'io.grpc:grpc-protobuf-lite:1.29.0'
    implementation 'io.grpc:grpc-stub:1.29.0'
}
ซิงค์โปรเจ็กต์กับไฟล์ Gradle
- เลือก
 Sync Project with Gradle Files จากเมนูการนำทาง
4. เรียกใช้แอปเริ่มต้น
- เริ่มโปรแกรมจำลอง Android แล้วคลิก
 Run ‘app' ในเมนูการนำทาง
เรียกใช้และสำรวจแอป
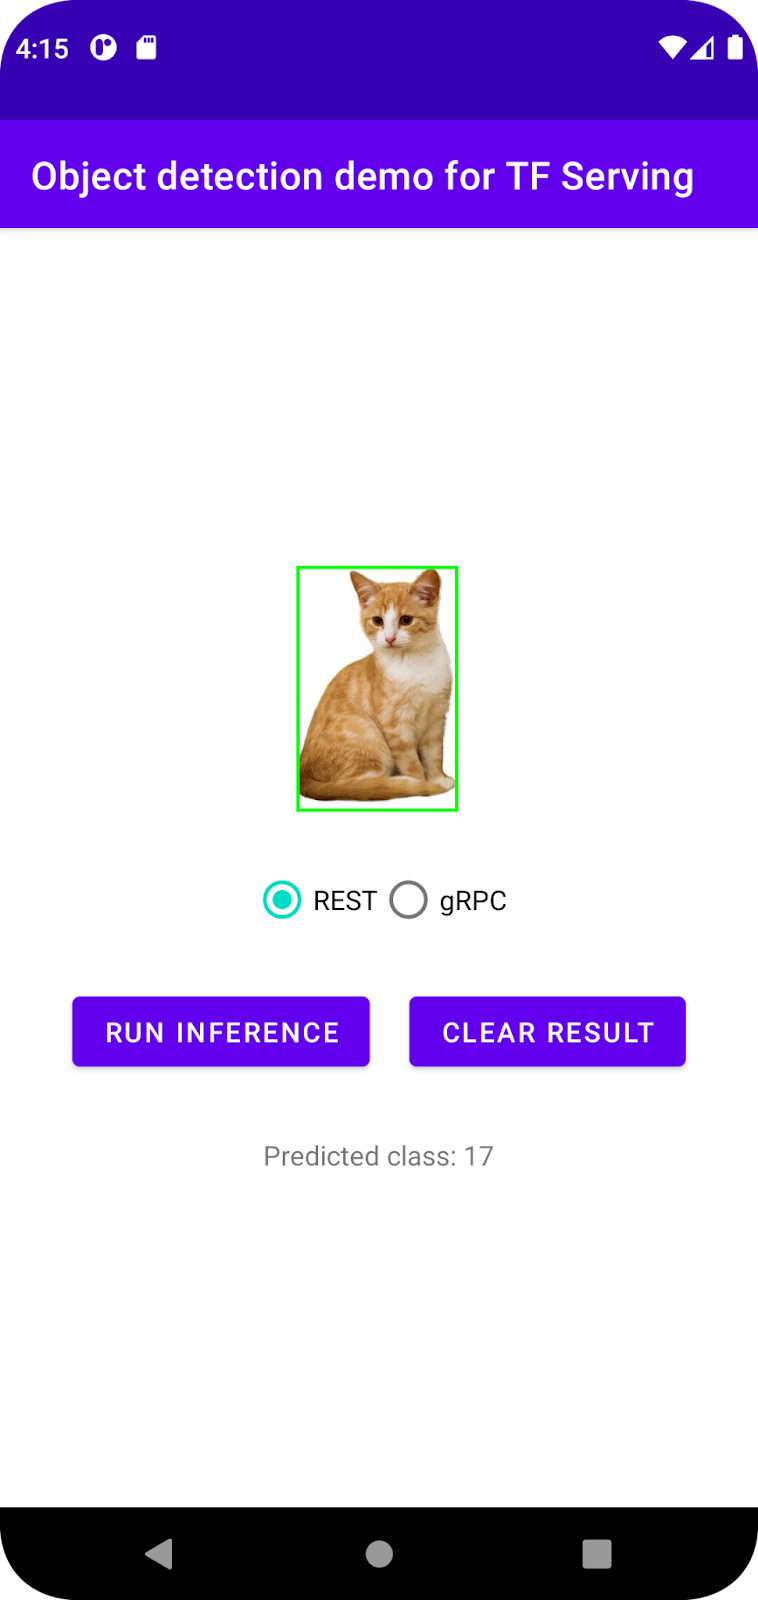
แอปควรเปิดขึ้นในอุปกรณ์ Android UI นั้นตรงไปตรงมามาก มีรูปภาพแมวที่คุณต้องการตรวจหาออบเจ็กต์ และผู้ใช้สามารถเลือกวิธีส่งข้อมูลไปยังแบ็กเอนด์ด้วย REST หรือ gRPC แบ็กเอนด์จะตรวจหาออบเจ็กต์ในรูปภาพและแสดงผลการตรวจหาไปยังแอปไคลเอ็นต์ ซึ่งจะแสดงผล UI อีกครั้ง

ตอนนี้หากคุณคลิกเรียกใช้การอนุมาน จะไม่มีอะไรเกิดขึ้น เนื่องจากยังสื่อสารกับแบ็กเอนด์ไม่ได้
5. ติดตั้งใช้งานโมเดลการตรวจหาออบเจ็กต์ด้วย TensorFlow Serving
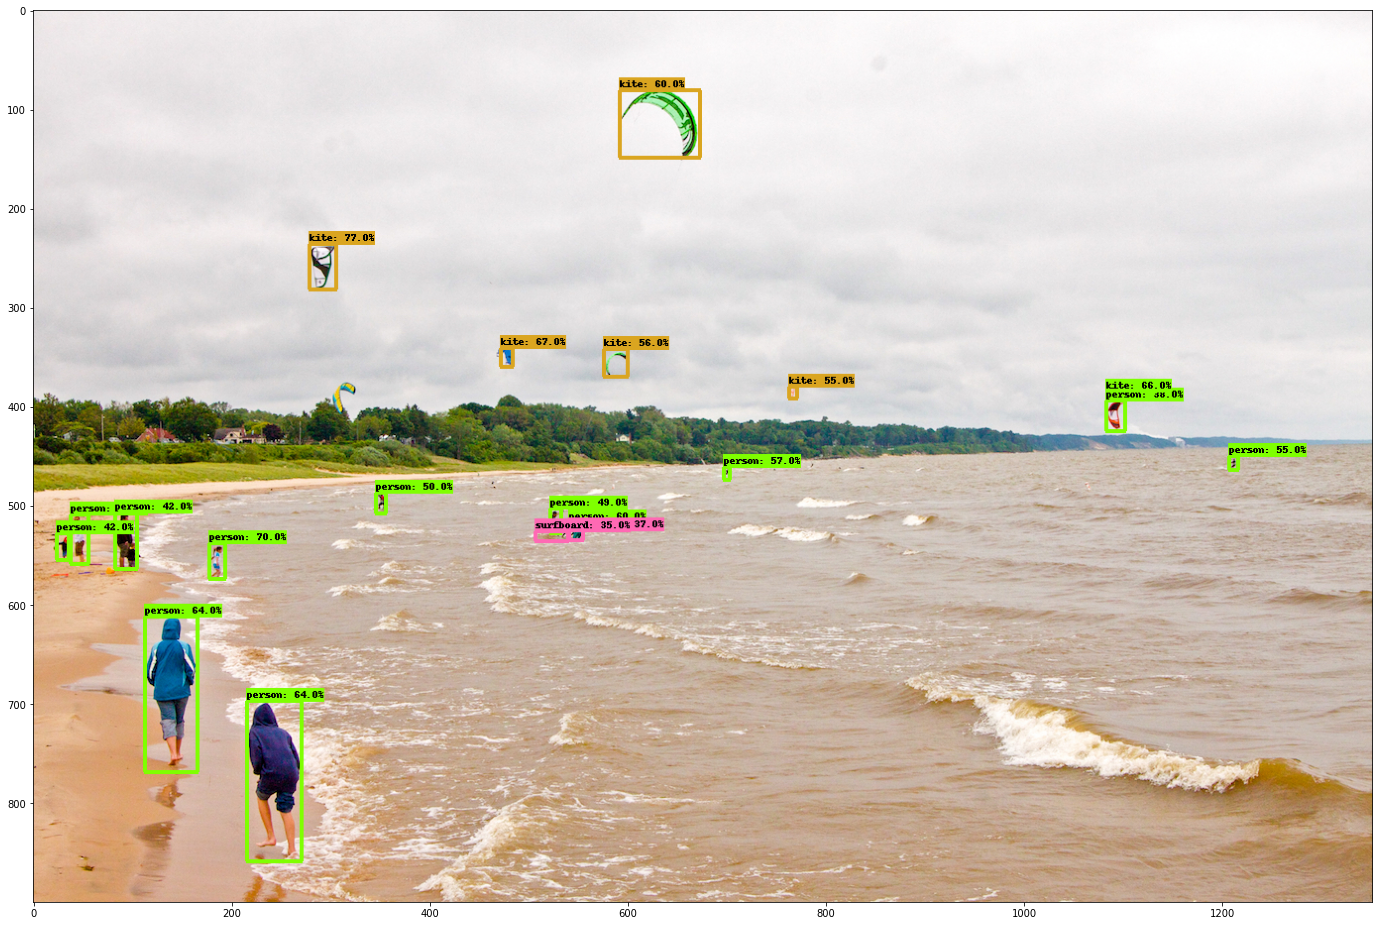
การตรวจหาวัตถุเป็นงาน ML ที่พบได้บ่อยมาก โดยมีเป้าหมายเพื่อตรวจหาวัตถุภายในรูปภาพ กล่าวคือ เพื่อคาดการณ์หมวดหมู่ที่เป็นไปได้ของวัตถุและกรอบล้อมรอบวัตถุ ตัวอย่างผลการตรวจหา
Google ได้เผยแพร่โมเดลที่ผ่านการฝึกมาก่อนจำนวนหนึ่งใน TensorFlow Hub หากต้องการดูรายการทั้งหมด โปรดไปที่หน้า object_detection คุณใช้โมเดล SSD MobileNet V2 FPNLite 320x320 ที่มีน้ำหนักเบาพอสมควรสำหรับโค้ดแล็บนี้ เพื่อให้คุณไม่จำเป็นต้องใช้ GPU ในการเรียกใช้
หากต้องการติดตั้งใช้งานโมเดลตรวจจับออบเจ็กต์ด้วย TensorFlow Serving ให้ทำดังนี้
- ดาวน์โหลดไฟล์โมเดล
- คลายการบีบอัดไฟล์
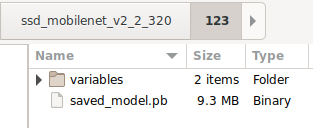
.tar.gzที่ดาวน์โหลดด้วยเครื่องมือคลายการบีบอัด เช่น 7-Zip - สร้าง
ssd_mobilenet_v2_2_320โฟลเดอร์ แล้วสร้าง123โฟลเดอร์ย่อยภายใน - วางโฟลเดอร์
variablesและไฟล์saved_model.pbที่แยกออกมาไว้ในโฟลเดอร์ย่อย123
คุณอ้างอิงโฟลเดอร์ ssd_mobilenet_v2_2_320 เป็นโฟลเดอร์ SavedModel ได้ 123 เป็นตัวอย่างหมายเลขเวอร์ชัน หากต้องการ คุณเลือกหมายเลขอื่นได้
โครงสร้างโฟลเดอร์ควรมีลักษณะดังรูปภาพนี้
เริ่ม TensorFlow Serving
- ในเทอร์มินัล ให้เริ่ม TensorFlow Serving ด้วย Docker แต่แทนที่ตัวยึดตำแหน่ง
PATH/TO/SAVEDMODELด้วยเส้นทางแบบสัมบูรณ์ของโฟลเดอร์ssd_mobilenet_v2_2_320ในคอมพิวเตอร์
docker pull tensorflow/serving

docker run -it --rm -p 8500:8500 -p 8501:8501 -v "PATH/TO/SAVEDMODEL:/models/ssd_mobilenet_v2_2" -e MODEL_NAME=ssd_mobilenet_v2_2 tensorflow/serving
Docker จะดาวน์โหลดอิมเมจ TensorFlow Serving โดยอัตโนมัติก่อน ซึ่งจะใช้เวลา 1 นาที หลังจากนั้น TensorFlow Serving ควรจะเริ่มทำงาน โดยบันทึกควรมีลักษณะดังข้อมูลโค้ดต่อไปนี้
2022-02-25 06:01:12.513231: I external/org_tensorflow/tensorflow/cc/saved_model/loader.cc:206] Restoring SavedModel bundle.
2022-02-25 06:01:12.585012: I external/org_tensorflow/tensorflow/core/platform/profile_utils/cpu_utils.cc:114] CPU Frequency: 3000000000 Hz
2022-02-25 06:01:13.395083: I external/org_tensorflow/tensorflow/cc/saved_model/loader.cc:190] Running initialization op on SavedModel bundle at path: /models/ssd_mobilenet_v2_2/123
2022-02-25 06:01:13.837562: I external/org_tensorflow/tensorflow/cc/saved_model/loader.cc:277] SavedModel load for tags { serve }; Status: success: OK. Took 1928700 microseconds.
2022-02-25 06:01:13.877848: I tensorflow_serving/servables/tensorflow/saved_model_warmup_util.cc:59] No warmup data file found at /models/ssd_mobilenet_v2_2/123/assets.extra/tf_serving_warmup_requests
2022-02-25 06:01:13.929844: I tensorflow_serving/core/loader_harness.cc:87] Successfully loaded servable version {name: ssd_mobilenet_v2_2 version: 123}
2022-02-25 06:01:13.985848: I tensorflow_serving/model_servers/server_core.cc:486] Finished adding/updating models
2022-02-25 06:01:13.985987: I tensorflow_serving/model_servers/server.cc:367] Profiler service is enabled
2022-02-25 06:01:13.988994: I tensorflow_serving/model_servers/server.cc:393] Running gRPC ModelServer at 0.0.0.0:8500 ...
[warn] getaddrinfo: address family for nodename not supported
2022-02-25 06:01:14.033872: I tensorflow_serving/model_servers/server.cc:414] Exporting HTTP/REST API at:localhost:8501 ...
[evhttp_server.cc : 245] NET_LOG: Entering the event loop ...
6. เชื่อมต่อแอป Android กับ TensorFlow Serving ผ่าน REST
ตอนนี้แบ็กเอนด์พร้อมแล้ว คุณจึงส่งคำขอของไคลเอ็นต์ไปยัง TensorFlow Serving เพื่อตรวจหาออบเจ็กต์ภายในรูปภาพได้ คุณส่งคำขอไปยัง TensorFlow Serving ได้ 2 วิธีดังนี้
- REST
- gRPC
ส่งคำขอและรับการตอบกลับผ่าน REST
โดยมี 3 ขั้นตอนง่ายๆ ดังนี้
- สร้างคำขอ REST
- ส่งคำขอ REST ไปยัง TensorFlow Serving
- ดึงผลลัพธ์ที่คาดการณ์ไว้จากการตอบกลับ REST และแสดงผล UI
คุณจะทำสิ่งเหล่านี้ได้ใน MainActivity.java.
สร้างคำขอ REST
ตอนนี้มีฟังก์ชัน createRESTRequest() ว่างเปล่าในไฟล์ MainActivity.java คุณใช้ฟังก์ชันนี้เพื่อสร้างคำขอ REST
private Request createRESTRequest() {
}
TensorFlow Serving คาดหวังคำขอ POST ที่มีเทนเซอร์รูปภาพสำหรับโมเดล SSD MobileNet ที่คุณใช้ ดังนั้นคุณจึงต้องดึงค่า RGB จากแต่ละพิกเซลของรูปภาพลงในอาร์เรย์ แล้วห่ออาร์เรย์ใน JSON ซึ่งเป็นเพย์โหลดของคำขอ
- เพิ่มโค้ดนี้ลงในฟังก์ชัน
createRESTRequest()
//Create the REST request.
int[] inputImg = new int[INPUT_IMG_HEIGHT * INPUT_IMG_WIDTH];
int[][][][] inputImgRGB = new int[1][INPUT_IMG_HEIGHT][INPUT_IMG_WIDTH][3];
inputImgBitmap.getPixels(inputImg, 0, INPUT_IMG_WIDTH, 0, 0, INPUT_IMG_WIDTH, INPUT_IMG_HEIGHT);
int pixel;
for (int i = 0; i < INPUT_IMG_HEIGHT; i++) {
    for (int j = 0; j < INPUT_IMG_WIDTH; j++) {
    // Extract RBG values from each pixel; alpha is ignored
    pixel = inputImg[i * INPUT_IMG_WIDTH + j];
    inputImgRGB[0][i][j][0] = ((pixel >> 16) & 0xff);
    inputImgRGB[0][i][j][1] = ((pixel >> 8) & 0xff);
    inputImgRGB[0][i][j][2] = ((pixel) & 0xff);
    }
}

RequestBody requestBody =
    RequestBody.create("{\"instances\": " + Arrays.deepToString(inputImgRGB) + "}", JSON);

Request request =
    new Request.Builder()
        .url("http://" + SERVER + ":" + REST_PORT + "/v1/models/" + MODEL_NAME + ":predict")
        .post(requestBody)
        .build();

return request;
ส่งคำขอ REST ไปยัง TensorFlow Serving
แอปนี้ช่วยให้ผู้ใช้เลือก REST หรือ gRPC เพื่อสื่อสารกับ TensorFlow Serving ได้ จึงมี 2 สาขาในเครื่องฟัง onClick(View view)
predictButton.setOnClickListener(
    new View.OnClickListener() {
        @Override
        public void onClick(View view) {
            if (requestRadioGroup.getCheckedRadioButtonId() == R.id.rest) {
                // TODO: REST request
            }
            else {

            }
        }
    }
)
- เพิ่มโค้ดนี้ลงในกิ่ง REST ของ
onClick(View view)Listener เพื่อใช้ OkHttp ในการส่งคำขอไปยัง TensorFlow Serving
// Send the REST request.
Request request = createRESTRequest();
try {
    client =
        new OkHttpClient.Builder()
            .connectTimeout(20, TimeUnit.SECONDS)
            .writeTimeout(20, TimeUnit.SECONDS)
            .readTimeout(20, TimeUnit.SECONDS)
            .callTimeout(20, TimeUnit.SECONDS)
            .build();
    Response response = client.newCall(request).execute();
    JSONObject responseObject = new JSONObject(response.body().string());
    postprocessRESTResponse(responseObject);
} catch (IOException | JSONException e) {
    Log.e(TAG, e.getMessage());
    responseTextView.setText(e.getMessage());
    return;
}
ประมวลผลการตอบกลับ REST จาก TensorFlow Serving
โมเดล SSD MobileNet จะแสดงผลลัพธ์จำนวนหนึ่ง ซึ่งรวมถึง
num_detections: จำนวนการตรวจหาdetection_scores: คะแนนการตรวจหาdetection_classes: ดัชนีคลาสการตรวจหาdetection_boxes: พิกัดกรอบล้อมรอบ
คุณใช้ฟังก์ชัน postprocessRESTResponse() เพื่อจัดการการตอบกลับ
private void postprocessRESTResponse(Predict.PredictResponse response) {

}
- เพิ่มโค้ดนี้ลงในฟังก์ชัน
postprocessRESTResponse()
// Process the REST response.
JSONArray predictionsArray = responseObject.getJSONArray("predictions");
//You only send one image, so you directly extract the first element.
JSONObject predictions = predictionsArray.getJSONObject(0);
// Argmax
int maxIndex = 0;
JSONArray detectionScores = predictions.getJSONArray("detection_scores");
for (int j = 0; j < predictions.getInt("num_detections"); j++) {
    maxIndex =
        detectionScores.getDouble(j) > detectionScores.getDouble(maxIndex + 1) ? j : maxIndex;
}
int detectionClass = predictions.getJSONArray("detection_classes").getInt(maxIndex);
JSONArray boundingBox = predictions.getJSONArray("detection_boxes").getJSONArray(maxIndex);
double ymin = boundingBox.getDouble(0);
double xmin = boundingBox.getDouble(1);
double ymax = boundingBox.getDouble(2);
double xmax = boundingBox.getDouble(3);
displayResult(detectionClass, (float) ymin, (float) xmin, (float) ymax, (float) xmax);
ตอนนี้ฟังก์ชันหลังการประมวลผลจะดึงค่าที่คาดการณ์ไว้จากการตอบกลับ ระบุหมวดหมู่ของออบเจ็กต์ที่มีแนวโน้มมากที่สุดและพิกัดของจุดยอดของกรอบล้อมรอบ และสุดท้ายคือแสดงผลกรอบล้อมรอบการตรวจหาใน UI
เรียกใช้
- คลิก เรียกใช้ "แอป" ในเมนูการนำทาง แล้วรอให้แอปโหลด
- เลือก REST > เรียกใช้การอนุมาน
แอปจะใช้เวลา 2-3 วินาทีก่อนที่จะแสดงกล่องขอบเขตของแมวและแสดง 17 เป็นหมวดหมู่ของออบเจ็กต์ ซึ่งแมปกับออบเจ็กต์ cat ในชุดข้อมูล COCO
7. เชื่อมต่อแอป Android กับ TensorFlow Serving ผ่าน gRPC
นอกจาก REST แล้ว TensorFlow Serving ยังรองรับ gRPC ด้วย
gRPC เป็นเฟรมเวิร์กการเรียกกระบวนการระยะไกล (RPC) ที่ทันสมัย โอเพนซอร์ส และมีประสิทธิภาพสูง ซึ่งสามารถทำงานได้ในทุกสภาพแวดล้อม โดยจะเชื่อมต่อบริการในและทั่วทั้งศูนย์ข้อมูลได้อย่างมีประสิทธิภาพ พร้อมรองรับการเสียบปลั๊กสำหรับ Load Balancing, การติดตาม, การตรวจสอบสถานะ และการตรวจสอบสิทธิ์ เราพบว่าในทางปฏิบัติ gRPC มีประสิทธิภาพมากกว่า REST
ส่งคำขอและรับการตอบกลับด้วย gRPC
โดยมี 4 ขั้นตอนง่ายๆ ดังนี้
- [ไม่บังคับ] สร้างโค้ดสตับไคลเอ็นต์ gRPC
- สร้างคำขอ gRPC
- ส่งคำขอ gRPC ไปยัง TensorFlow Serving
- ดึงผลลัพธ์ที่คาดการณ์จากการตอบกลับของ gRPC และแสดงผล UI
คุณจะทำสิ่งเหล่านี้ได้ใน MainActivity.java.
ไม่บังคับ: สร้างโค้ดสตับไคลเอ็นต์ gRPC
หากต้องการใช้ gRPC กับ TensorFlow Serving คุณต้องทำตามเวิร์กโฟลว์ gRPC ดูรายละเอียดเพิ่มเติมได้ในเอกสารประกอบของ gRPC
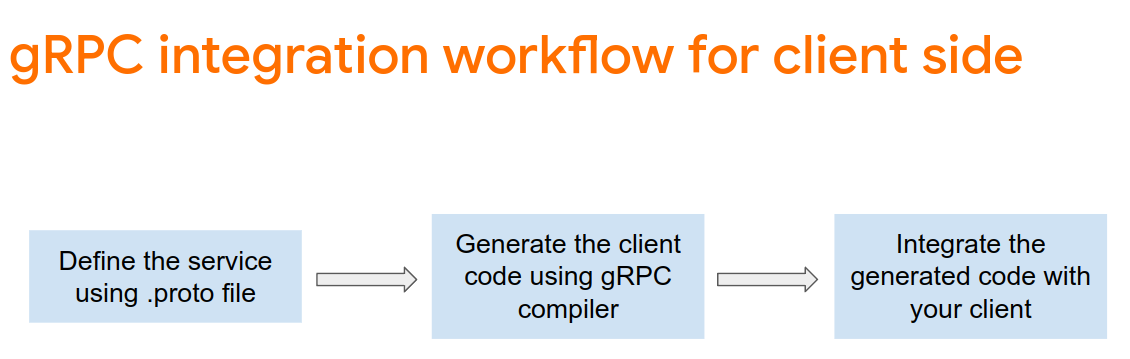
TensorFlow Serving และ TensorFlow จะกำหนด.protoไฟล์ให้คุณ ตั้งแต่ TensorFlow และ TensorFlow Serving 2.8 เป็นต้นไป .protoไฟล์ต่อไปนี้คือไฟล์ที่จำเป็น
tensorflow/core/example/example.proto
tensorflow/core/example/feature.proto
tensorflow/core/protobuf/struct.proto
tensorflow/core/protobuf/saved_object_graph.proto
tensorflow/core/protobuf/saver.proto
tensorflow/core/protobuf/trackable_object_graph.proto
tensorflow/core/protobuf/meta_graph.proto
tensorflow/core/framework/node_def.proto
tensorflow/core/framework/attr_value.proto
tensorflow/core/framework/function.proto
tensorflow/core/framework/types.proto
tensorflow/core/framework/tensor_shape.proto
tensorflow/core/framework/full_type.proto
tensorflow/core/framework/versions.proto
tensorflow/core/framework/op_def.proto
tensorflow/core/framework/graph.proto
tensorflow/core/framework/tensor.proto
tensorflow/core/framework/resource_handle.proto
tensorflow/core/framework/variable.proto

tensorflow_serving/apis/inference.proto
tensorflow_serving/apis/classification.proto
tensorflow_serving/apis/predict.proto
tensorflow_serving/apis/regression.proto
tensorflow_serving/apis/get_model_metadata.proto
tensorflow_serving/apis/input.proto
tensorflow_serving/apis/prediction_service.proto
tensorflow_serving/apis/model.proto
- หากต้องการสร้าง Stub ให้เพิ่มโค้ดนี้ลงในไฟล์
app/build.gradle
apply plugin: 'com.google.protobuf'

protobuf {
    protoc { artifact = 'com.google.protobuf:protoc:3.11.0' }
    plugins {
        grpc { artifact = 'io.grpc:protoc-gen-grpc-java:1.29.0'
        }
    }
    generateProtoTasks {
        all().each { task ->
            task.builtins {
                java { option 'lite' }
            }
            task.plugins {
                grpc { option 'lite' }
            }
        }
    }
}
สร้างคำขอ gRPC
คุณสร้างคำขอ gRPC ในฟังก์ชัน createGRPCRequest() เช่นเดียวกับคำขอ REST
private Request createGRPCRequest() {

}
- เพิ่มโค้ดนี้ลงในฟังก์ชัน
createGRPCRequest()
if (stub == null) {
  channel = ManagedChannelBuilder.forAddress(SERVER, GRPC_PORT).usePlaintext().build();
  stub = PredictionServiceGrpc.newBlockingStub(channel);
}

Model.ModelSpec.Builder modelSpecBuilder = Model.ModelSpec.newBuilder();
modelSpecBuilder.setName(MODEL_NAME);
modelSpecBuilder.setVersion(Int64Value.of(MODEL_VERSION));
modelSpecBuilder.setSignatureName(SIGNATURE_NAME);

Predict.PredictRequest.Builder builder = Predict.PredictRequest.newBuilder();
builder.setModelSpec(modelSpecBuilder);

TensorProto.Builder tensorProtoBuilder = TensorProto.newBuilder();
tensorProtoBuilder.setDtype(DataType.DT_UINT8);
TensorShapeProto.Builder tensorShapeBuilder = TensorShapeProto.newBuilder();
tensorShapeBuilder.addDim(TensorShapeProto.Dim.newBuilder().setSize(1));
tensorShapeBuilder.addDim(TensorShapeProto.Dim.newBuilder().setSize(INPUT_IMG_HEIGHT));
tensorShapeBuilder.addDim(TensorShapeProto.Dim.newBuilder().setSize(INPUT_IMG_WIDTH));
tensorShapeBuilder.addDim(TensorShapeProto.Dim.newBuilder().setSize(3));
tensorProtoBuilder.setTensorShape(tensorShapeBuilder.build());
int[] inputImg = new int[INPUT_IMG_HEIGHT * INPUT_IMG_WIDTH];
inputImgBitmap.getPixels(inputImg, 0, INPUT_IMG_WIDTH, 0, 0, INPUT_IMG_WIDTH, INPUT_IMG_HEIGHT);
int pixel;
for (int i = 0; i < INPUT_IMG_HEIGHT; i++) {
    for (int j = 0; j < INPUT_IMG_WIDTH; j++) {
    // Extract RBG values from each pixel; alpha is ignored.
    pixel = inputImg[i * INPUT_IMG_WIDTH + j];
    tensorProtoBuilder.addIntVal((pixel >> 16) & 0xff);
    tensorProtoBuilder.addIntVal((pixel >> 8) & 0xff);
    tensorProtoBuilder.addIntVal((pixel) & 0xff);
    }
}
TensorProto tensorProto = tensorProtoBuilder.build();

builder.putInputs("input_tensor", tensorProto);

builder.addOutputFilter("num_detections");
builder.addOutputFilter("detection_boxes");
builder.addOutputFilter("detection_classes");
builder.addOutputFilter("detection_scores");

return builder.build();
ส่งคำขอ gRPC ไปยัง TensorFlow Serving
ตอนนี้คุณสามารถทำonClick(View view)ให้เสร็จสมบูรณ์ได้แล้ว
predictButton.setOnClickListener(
    new View.OnClickListener() {
        @Override
        public void onClick(View view) {
            if (requestRadioGroup.getCheckedRadioButtonId() == R.id.rest) {

            }
            else {
                // TODO: gRPC request
            }
        }
    }
)
- เพิ่มโค้ดนี้ลงในสาขา gRPC
try {
    Predict.PredictRequest request = createGRPCRequest();
    Predict.PredictResponse response = stub.predict(request);
    postprocessGRPCResponse(response);
} catch (Exception e) {
    Log.e(TAG, e.getMessage());
    responseTextView.setText(e.getMessage());
    return;
}
ประมวลผลการตอบกลับ gRPC จาก TensorFlow Serving
คุณจะใช้ฟังก์ชัน postprocessGRPCResponse() เพื่อจัดการการตอบกลับได้เช่นเดียวกับ gRPC
private void postprocessGRPCResponse(Predict.PredictResponse response) {

}
- เพิ่มโค้ดนี้ลงในฟังก์ชัน
postprocessGRPCResponse()
// Process the response.
float numDetections = response.getOutputsMap().get("num_detections").getFloatValList().get(0);
List<Float> detectionScores =    response.getOutputsMap().get("detection_scores").getFloatValList();
int maxIndex = 0;
for (int j = 0; j < numDetections; j++) {
    maxIndex = detectionScores.get(j) > detectionScores.get(maxIndex + 1) ? j : maxIndex;
}
Float detectionClass =    response.getOutputsMap().get("detection_classes").getFloatValList().get(maxIndex);
List<Float> boundingBoxValues =    response.getOutputsMap().get("detection_boxes").getFloatValList();
float ymin = boundingBoxValues.get(maxIndex * 4);
float xmin = boundingBoxValues.get(maxIndex * 4 + 1);
float ymax = boundingBoxValues.get(maxIndex * 4 + 2);
float xmax = boundingBoxValues.get(maxIndex * 4 + 3);
displayResult(detectionClass.intValue(), ymin, xmin, ymax, xmax);
ตอนนี้ฟังก์ชันการประมวลผลภายหลังสามารถดึงค่าที่คาดการณ์จากคำตอบและแสดงกล่องขอบเขตการตรวจหาใน UI ได้แล้ว
เรียกใช้
- คลิก เรียกใช้ "แอป" ในเมนูการนำทาง แล้วรอให้แอปโหลด
- เลือก gRPC > เรียกใช้การอนุมาน
แอปจะใช้เวลา 2-3 วินาทีก่อนที่จะแสดงกล่องขอบเขตของแมวและแสดง 17 เป็นหมวดหมู่ของออบเจ็กต์ ซึ่งแมปกับหมวดหมู่ cat ในชุดข้อมูล COCO
8. ขอแสดงความยินดี
คุณใช้ TensorFlow Serving เพื่อเพิ่มความสามารถในการตรวจหาออบเจ็กต์ลงในแอป