
1. Introduction


Last Updated: 2021-08-23
Live agent transfer with Business Messages
Business Messages's live agent transfer feature allows your agent to start a conversation as a bot and switch mid-conversation to a live agent (human representative). Your bot can handle common questions, like opening hours, while your live agent can provide a customized experience with more access to the user's context. When the transition between these two experiences is seamless, users get their questions answered quickly and accurately, resulting in higher return engagement rate and increased customer satisfaction.
This codelab teaches you how to make full use of the live agent transfer feature.
What you'll build
In this codelab, you're going to build a webhook for your agent that can send and receive live agent transfer events. You'll use a basic UI provided by the starter code to test out what you've built.
What you'll learn
- How to store and manage conversation state.
- How to use Business Messages to send live agent transfer events.
- How to set up a webhook and basic UI for joining conversations as an agent.
- Best practices for using the Business Messages API.
This codelab is focused on using the Business Message API to implement live agent transfer. You can read over the starter code for each stage, but you only need to implement code related to Business Messages.
What you'll need
- A Business Messages agent, including your service account key. You can create an agent by following the Create an agent guide.
- A working Cloud Datastore configuration linked to your agent's GCP project. You can use the Cloud Datastore quickstart to set this up. You don't need to know how to use Cloud Datastore.
- A computer with Google Cloud SDK and Node.js (version 10 or above) installed.
- An Android device (with version 5 or above) or an iOS device for testing the user experience.
- Experience with web application programming. You will write a small amount of Javascript code and may need to debug what you write.
2. Create an echo bot
In this step, you'll deploy a basic bot representative called an "Echo bot." This bot takes user messages, logs them to a conversation thread in Cloud Datastore, and then "echoes" the user's message by responding with the same content. Once you have a basic bot and logging infrastructure, you can add onto that to create a full live agent transfer implementation in the later steps.
Get the starter code
In a terminal, clone the Live Agent Transfer starter code to your project's working directory with the following command:
git clone https://github.com/google-business-communications/bm-nodejs-live-agent-transfer
Understand the starter code
Let's take a look at the starter code structure that you'll work with throughout the codelab.
Navigate to the step-1 directory and view its contents. It contains the following elements:
- bin: This directory contains the www starter script which sets up and configures the server.
- libs: This directory contains
datastore_util.js, which contains convenience methods for reading to and writing from Cloud Datastore. You don't need to understand how this file works. Just note the available methods and what they do. - resources: This contains your service account key as a file called
credentials.json. - routes: The
index.jsfile contains the webhook and all its helper methods. This is the main file you will work with and add to. - views: This directory contains EJS template files for UI elements. It will contain more files in later steps.
- app.js, app.yaml, package.json: These files configure the application and its dependencies.
Before deploying, download your GCP service account key and copy the JSON credentials file into each resources directory in the sample code. Do this for every step of the codelab.
cp credentials.json bm-nodejs-live-agent-transfer/step-<step number>/resources/credentials.json
Deploying the starter code
In a terminal, navigate to the sample's step-1 directory. Then, set the gcloud tool to use your Google Cloud project, by setting the project ID you used to register with the APIs.
gcloud config set project <PROJECT_ID>
To deploy the application, run the following command:
gcloud app deploy
Note the URL of the deployed application in the output of the last command:
Deployed service [default] to [https://PROJECT_ID.appspot.com]
The starter code that you just deployed contains a web application with a webhook to receive messages from Business Messages. The application echoes messages back to the user and logs message threads to Cloud Datastore.
Configure your agent
Navigate to your Account settings page in the Business Communications Developer Console and set your webhook to the URL of your deployed application. For example, https://PROJECT_ID.appspot.com/callback/.
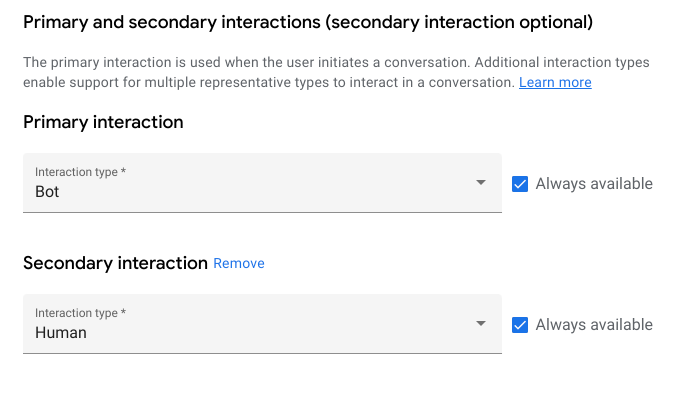
Then on your Agent information page, configure your primary and secondary interaction types to be Bot and Human respectively.
Having a conversation with the echo bot
Open your agent in the Developer Console. You'll see the Overview page that allows you to review details of your agent. Copy the agent test URL that matches your mobile test device. Use this URL on your mobile device to launch your agent's conversational surface.
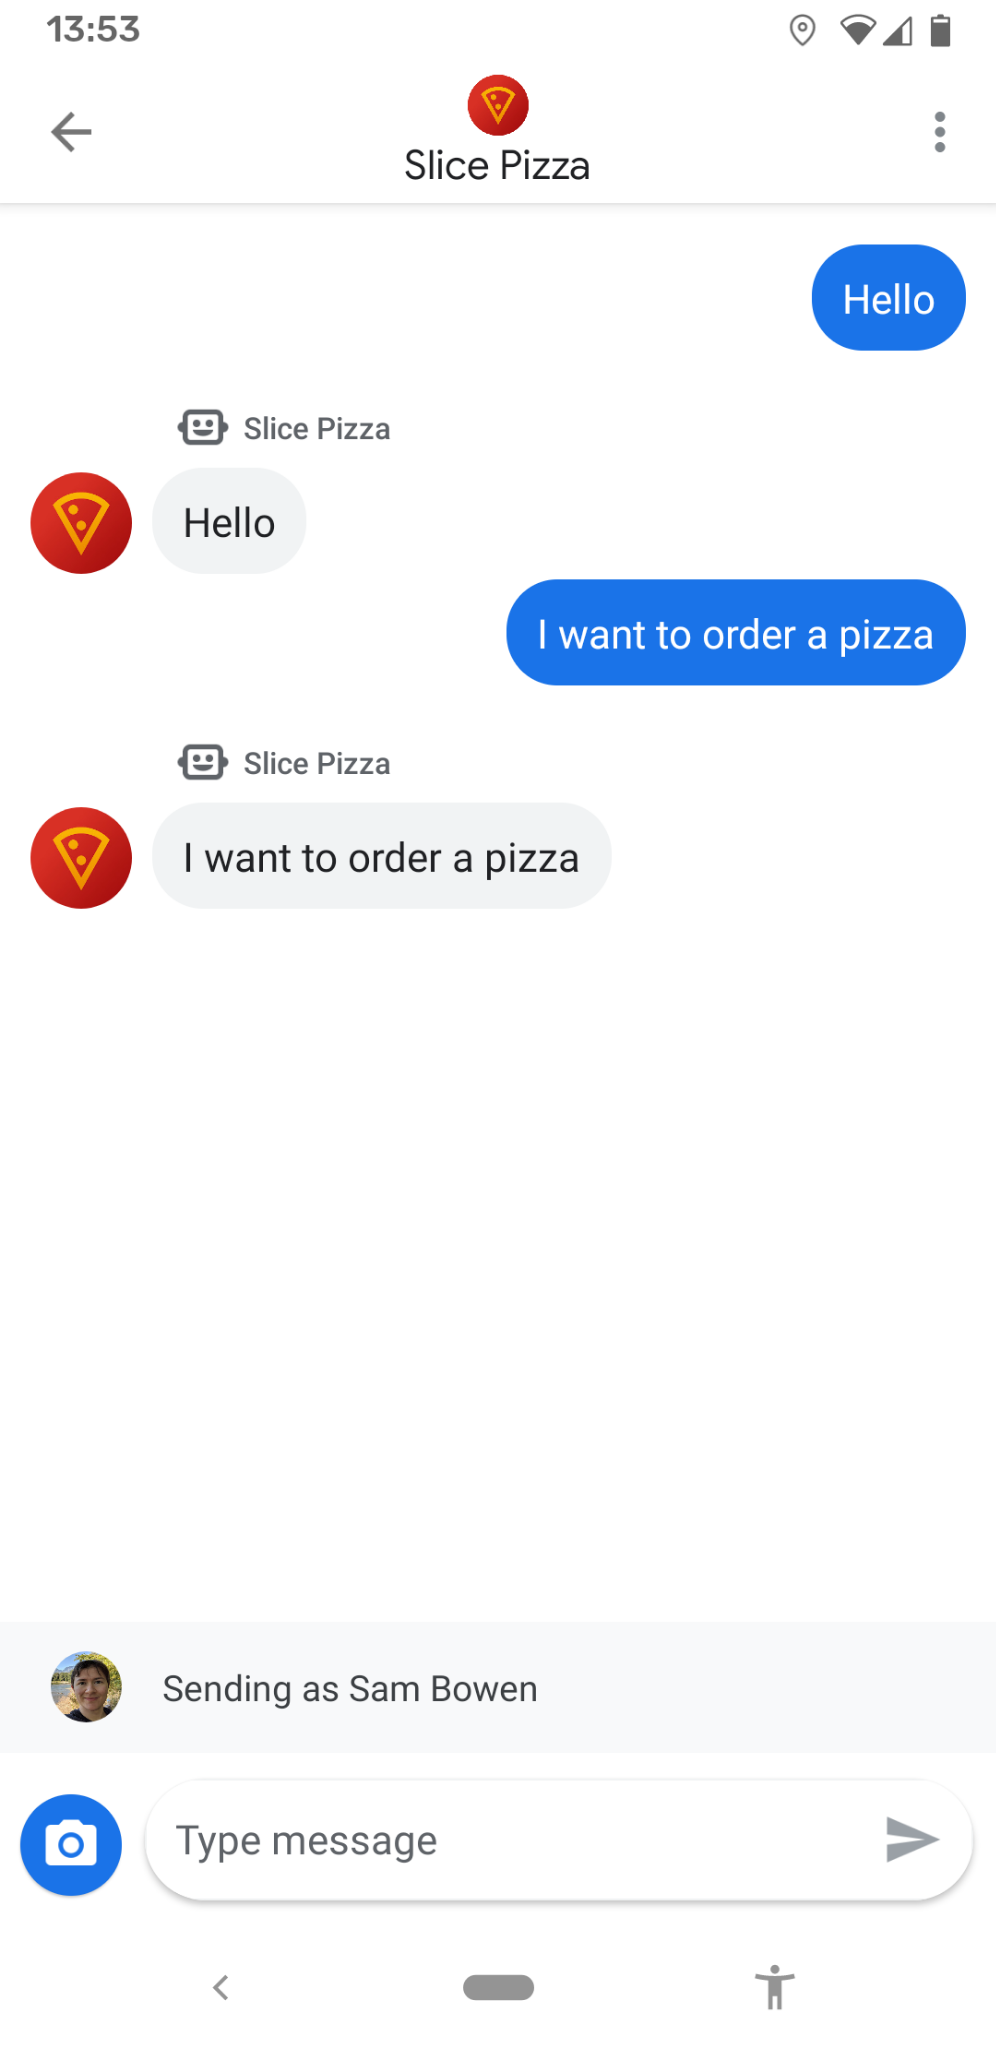
Interact with the agent by sending a few messages. The conversational surface only copies what you say—not a very useful user experience. If only there were some way to talk to a real person!
3. Joining the conversation
Now let's look at the conversation from your live agent's perspective. As a live agent, you need to know some things about the conversation before you join, such as the conversation ID. It's also helpful to know whether the user has requested to speak with a live agent. In this step, you'll use a basic CRM (Customer Relationship Management) page to view this information and join the conversation as a live agent.
The starter code for this step adds a basic CRM which lists all ongoing conversational threads for the agent. Let's take a look at that CRM to see what conversations might require a live agent's attention.
Navigate to the step-2 directory and deploy the app again as you did in the previous step.
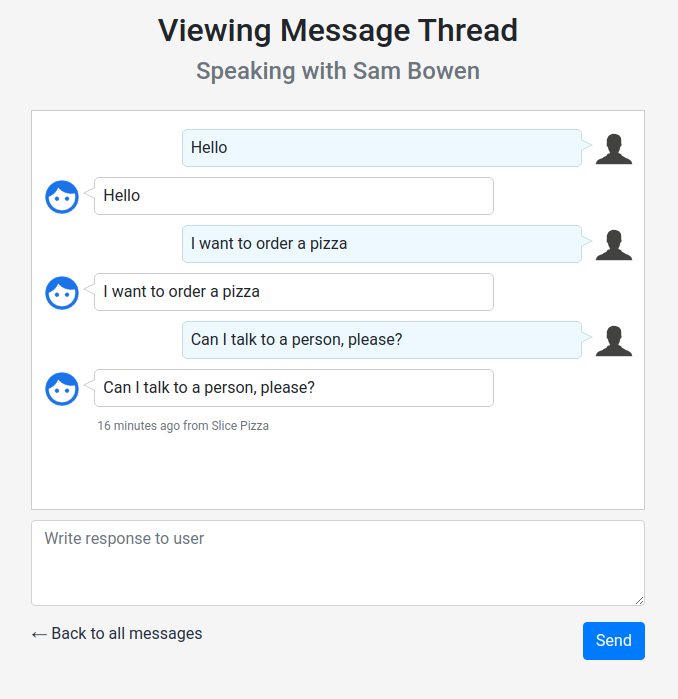
When you deploy the app, you see a target URL. Navigate to this URL in a browser to see a listing with the conversational thread you began in the previous step. The state for the conversation is currently "Bot-managed" because the echo bot is acting as the representative for our agent in this conversation.

The Join chat button appears but doesn't do anything yet. You also can't tell from this interface whether the user wants to speak to a live agent.
Business Messages provides a live agent requested event that indicates when the user wants to speak to a live agent. You need to keep track of that state to list it in the UI.
Take a look at the callback method in index.js. A TODO comment indicates where you need to catch the user's request for a live agent and update the thread state.
step-2/routes/index.js
/**
 * The webhook callback method.
 */
router.post('/callback', async function(req, res, next) {
  ...
    } else if (requestBody.userStatus !== undefined) {
      if (requestBody.userStatus.requestedLiveAgent !== undefined) {
  ...
        // TODO: Update the thread state to QUEUED_THREAD_STATE.
      }
    }
  });
...
});
You need to use the methods in libs/datastore_utils.js to load the current conversation thread and update its state to QUEUED_THREAD_STATE.
If you're not sure what to do, take a peek at the solutions. The starter code includes a solutions directory under every step where you need to complete some code. These directories contain a copy of the entire app with the complete implementation for the given step.
Once you complete your implementation and redeploy the app, use the overflow menu in the conversation on your mobile device to request a live agent.

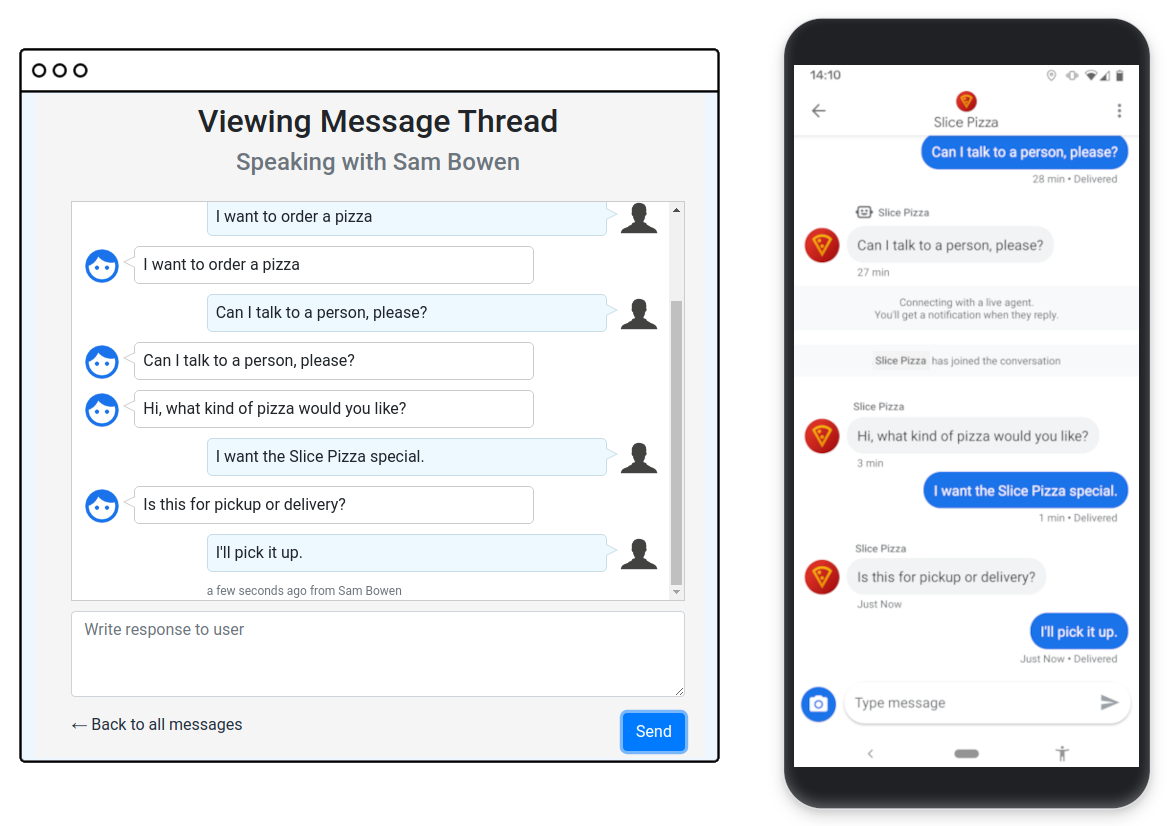
Now, if you navigate back to the CRM, you should see a note on your conversation thread that says "Live agent requested." This user needs some help from a human! You need to implement the joinConversation endpoint to make the button work.
Find the other TODO comment in the stubbed method for /joinConversation.
step-2/routes/index.js
/**
 * Updates the thread state and sends a representative join signal to the user.
 */
router.post('/joinConversation', async function(req, res, next) {
  let conversationId = req.body.conversationId;

  // TODO: Update the thread state to LIVE_AGENT_THREAD_STATE and post a REPRESENTATIVE_JOINED event.

  res.json({
    'result': 'ok',
  });
});
You need to update the thread state again, this time to LIVE_AGENT_THREAD_STATE. In addition, you need to use the Business Messages API's conversations.events.create method to post a REPRESENTATIVE_JOINED event.
To create the request payload, you need to set the fields outlined in the following table:
Field name | Hint |
| Set this to 'conversations/{conversationId}'. |
| Generate your own random ID for the event. |
| Use the provided |
| This is the event body itself. You should set the eventType and representative. |
Have a look at the reference page for the create method or the events reference page for help.
When you're done with your implementation, redeploy the app and click the Join chat button. A Joined conversation dialog appears, and the chat status changes to "Live chat." If you look at the conversation on your mobile device, you'll see a note in the chat that your live agent has joined.
Congratulations! In the next step, we'll look at how to get your live agent talking to your user.
4. Messaging as a live agent
Now that you've joined the conversation, it's time to send some messages as the live agent.
Navigate to the step-3 directory and redeploy the app. In the CRM, click on your conversation thread from the previous step. You should now see a basic chat interface. From here, you can see the user's messages in real-time.
However, sending a message as the agent is still unimplemented. You need to complete that in this step.
Open the routes/index.js file and look at the three newly added endpoints:
/messages: Gets themessages.ejsview file and renders it in the browser. When you click on a conversation thread from the index, you navigate to one of these pages./retrieveMessages: Gets the message contents of a thread and returns a formatted list of all messages in the conversation. The messages page periodically calls this endpoint to display the latest messages./sendMessage: Sends a message from the live agent representative to the user. The messages page calls this when you click Send. It's currently unimplemented.
Now, take a look at the existing storeAndSendResponse method:
step-3/routes/index.js
/**
 * Updates the thread, adds a new message and sends a response to the user.
 *
 * @param {string} message The message content that was received.
 * @param {string} conversationId The unique id for this user and agent.
 * @param {string} threadState Represents who is managing the conversation for the CRM.
 * @param {string} representativeType The representative sending the message, BOT or HUMAN.
 */
async function storeAndSendResponse(message, conversationId, threadState, representativeType) {
...
}
The webhook already uses this method to send responses from the echo bot. The method first stores the incoming message data in the Cloud Datastore object for the conversation. Then, it sends the response message. Take a close look at the message object it creates, particularly at the representative type.
Now, implement the /sendMessage endpoint yourself. You can use the existing storeAndSendResponse method here to do most of the work. The important thing is to remember to set the correct representative.
Once you have this working, redeploy the app, and go back to your conversation in the CRM. You can now see your messages appear in the chat history. You can also see your agent's messages appear on your mobile testing device.
Before moving on, make sure you understand how the new endpoints work. In the next step, you'll add your own endpoint to leave the conversation.
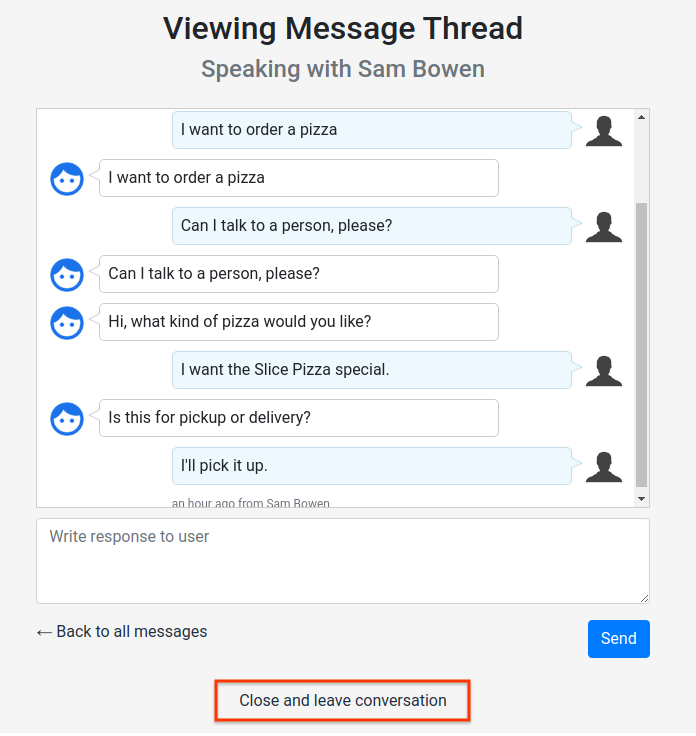
5. Leaving the conversation
After you help the user with their questions, you may want to leave the conversation and let the user talk to the bot again. In Business Messages, this change is signaled by a REPRESENTATIVE_LEFT event.
Navigate to the step-4 directory, redeploy the app, and return to your conversation thread. There is now a Close and leave the conversation link at the bottom of the thread. This link doesn't work just yet because the leaveConversation endpoint is unimplemented.
Look at the index.js file. There is a TODO comment instructing you to create a new leaveConversation endpoint.
step-4/routes/index.js
/*
 * TODO: Create a '/leaveConversation' endpoint that does the following:
 * - Updates the thread to BOT_THREAD_STATE.
 * - Sends a REPRESENTATIVE_LEFT event.
 * - Sends a message to the thread informing the user that they are speaking to the echo bot again.
 *
 * Hint: You can use the same methods that '/joinConversation' uses.
 */
To implement this, you need to put together everything you've learned from the codelab so far. This endpoint should do the following:
- Update the thread to the
BOT_THREAD_STATE. - Send a
REPRESENTATIVE_LEFTevent. - Send a message in the conversation to tell the user they are speaking to the echo bot. Use the
storeAndSendResponsemethod. Remember that the representative has changed back toBOT.
The last step clarifies the state of the conversation for the user. The user sees an event when a representative leaves the chat, but they won't necessarily know they're speaking with the echo bot again. By sending a message directly from the bot, you reduce user confusion and improve the experience.
Now that the bot is handling things, your live agent is free to join another conversation. Try playing with the sample code and CRM as much as you like. Test out some different ideas you have for your business's live agent transfer experience, and see what you come up with.
6. Wrapping up
Congratulations on completing the live agent transfer codelab!
You've created an agent that can handle live agent transfers start to finish. You've also learned one way to track the state of the conversation with Cloud Datastore.
With live agent transfer, you'll get to leave the common requests to your bot, while your live agents handle more complex inquiries. Your users will be more satisfied with the new customized and useful experience, increasing their likelihood of returning and recommending your business to friends.
What's next?
Check out some of these codelabs:
Further reading
- Review the fundamentals of live agent transfer with the Handoff from bot to live agent guide.
- Upgrade your echo bot to an FAQ bot with the Dialogflow guide.