
1. Introduction


Last Updated: 2022-05-11
Welcome to Business Messages!
This codelab is an introduction to integrating with Business Messages, which allows customers to connect with businesses you manage through Google Search and Maps. You may be a business wanting to integrate with Business Messages directly, or perhaps you're working at an independent software vendor building messaging solutions for the businesses that you work with, or maybe you just stumbled onto Business Messages and you want to tinker on the platform.
Regardless of what brought you here, this codelab is a fantastic way to get started. By the end of it, you'll have your first digital agent that users can interact with. When you're ready to launch on Business Messages after a bit more polish, you'll have the potential to reach millions of customers.
What makes a good digital agent?
Business Messages is a conversational surface, providing an app-like experience on mobile devices that allows consumers to connect with businesses without installing an additional app. A digital agent is the piece of logic that your customers interact with. The logic is managed by a web application deployed in the cloud or in your infrastructure. It's entirely up to you how you respond to the user. The best agents provide context to set expectations, keep their customers engaged, and provide functionality to support users' needs.
What you'll build
In this codelab, you're going to build a digital agent on Business Messages for a fictitious company called Bonjour Meal. This digital agent will respond to a few simple questions like "What time do you close?" or "Can I purchase online?".
In this codelab, your users will be able to buy items through the digital agent, point the user to a payment processor to collect money, and then schedule a pick up of their fictitious items in store.
In this codelab, your app will
- Respond to questions through a Suggestion Chip
- Guide the user to ask questions that your digital agent can answer
- Provide rich conversational features to keep the user engaged in the conversation
What you'll learn
- How to deploy a web application on App Engine on Google Cloud Platform. Alternatively, you can use ngrok to test your local application publicly.
- How to configure your Business Messages account with a web application webhook to receive messages from users
- How to send rich features like cards, carousels, and conversational suggestions with the Business Messages API
- How Business Messages sends your messages
This codelab is focused on building your first digital agent.
What you'll need
- Register for a free Business Communications developer account
- Check out our developer site for instructions on how
- An Android device with version 5 or above OR an iOS device with the Google Maps app
- Experience with web application programming
- An Internet connection!
2. Getting set up
Enable the APIs
For this codelab, since we'll be working with a Django application, we'll rely on the Cloud Build API to deploy the application to App Engine. Alternatively, if you are using ngrok, there is no need to enable the Cloud Build API.
To enable the Cloud Build API:
- Open the Cloud Build API in the Google Cloud Console.
- Click Enable.
Create a service account
You need to create a service account to access the Business Communications and the Business Messages APIs. Follow along the steps in the documentation to create a service account within the Business Communications Developer Console.
Deploy the Django Python EchoBot Starter Code
In a terminal, clone the Django Echo Bot Sample to your project's working directory with the following command:
$ git clone https://github.com/google-business-communications/bm-bonjour-meal-django-starter-code
Copy your JSON credentials file created for the service account into the sample's resources folder and rename the credentials to "bm-agent-service-account-credentials.json".
bm-bonjour-meal-django-starter-code/bonjourmeal-codelab/step-1/resources/bm-agent-service-account-credentials.json
In a terminal, navigate to the sample's step-1 directory.
Run the following commands in a terminal to deploy the sample:
$ gcloud config set project PROJECT_ID*
$ gcloud app create
$ gcloud app deploy
- PROJECT_ID is the project ID for the project you used to register with the APIs.
Note the URL of the deployed application in the output of the last command:
Deployed service [default] to [https://PROJECT_ID.appspot.com]
The starter code that you just deployed contains a web application with a webhook to receive messages from Business Messages. The application echoes messages back to the user and can showcase some of the rich features available in the conversational surface.
Configure your webook
Now that your service is deployed, you'll use the application's URL to set your webhook URL in the Account settings page in the Business Communications Developer Console.
The webhook URL will be the application's URL + "/callback/". For example, it might be something like this: https://PROJECT_ID.appspot.com/callback/
Head over to the Business Communications Console Account settings page. In the top right corner under the navigation bar, you should see your GCP project name. If you see a dropdown, make sure to select your GCP project.
Fill out the Technical point of contact details, and then update Webhook with the webhook URL for your deployed application.
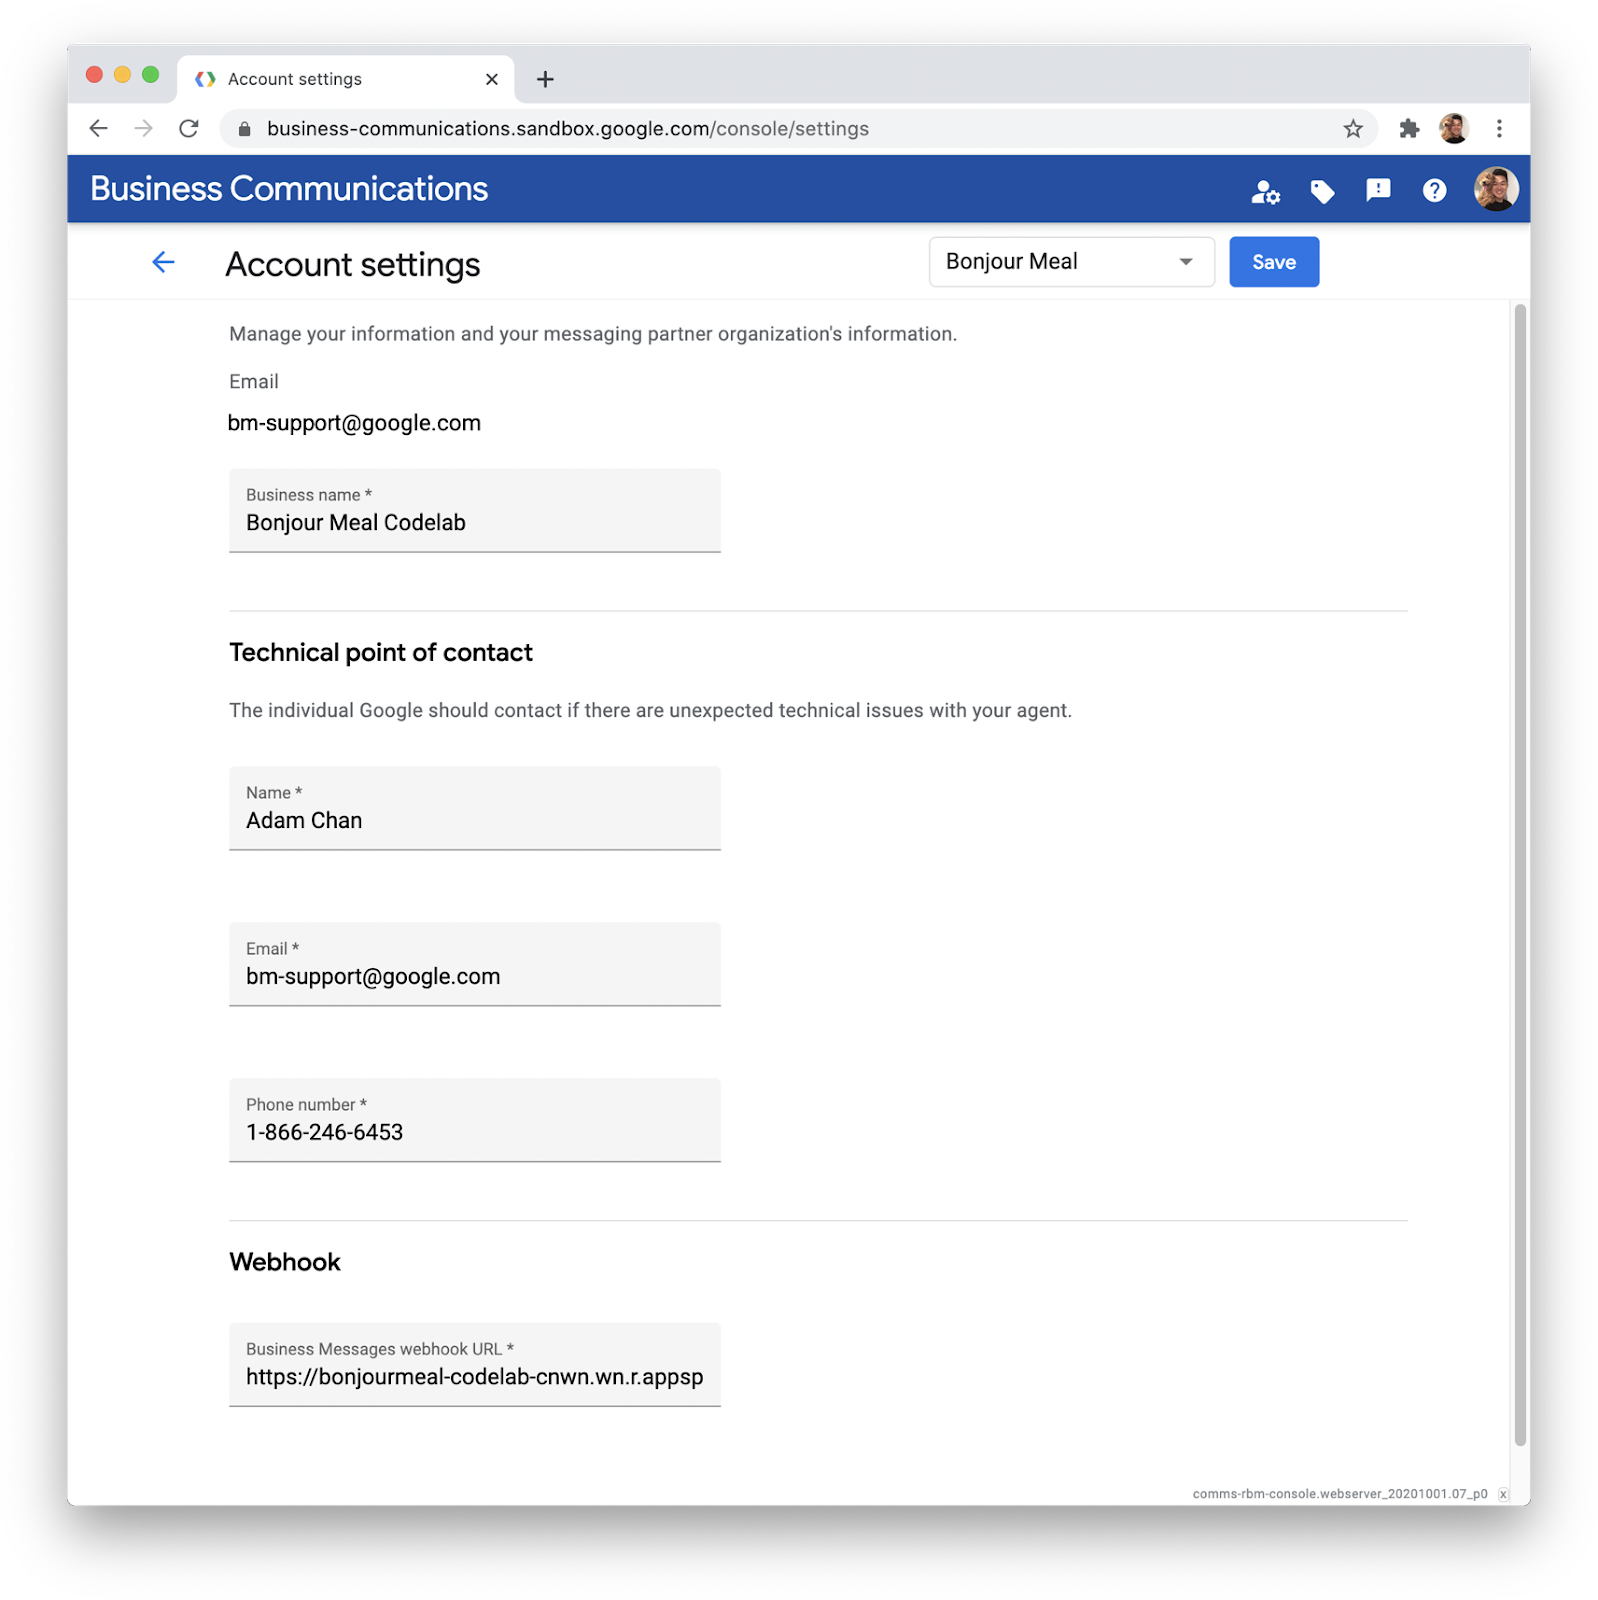
Click Save next to the reference of your GCP project.
3. Creating your first Agent
Using the Business Communications Developer Console
In the Business Communications Console, click on the logo at the top left to be brought back to the console dashboard, then click Create agent. You create a brand at the same time that you create your agent. Select Business Messages for Agent type and make sure that Partner information is correct.
In Brand, type in the name of the brand you are creating.The brand is the business you are working with and consumers can interact conversationally with the agent. In the Agent name, specify what you want the users to see in the Business Messages conversation. In the case of the fictitious Bonjour Meal, Bonjour Rail is the railway company that manages the Bonjour Meal restaurants. So I'll specify Bonjour Rail as the brand and Bonjour Meal as the agent.
The agent is the conversational entity that represents the brand.
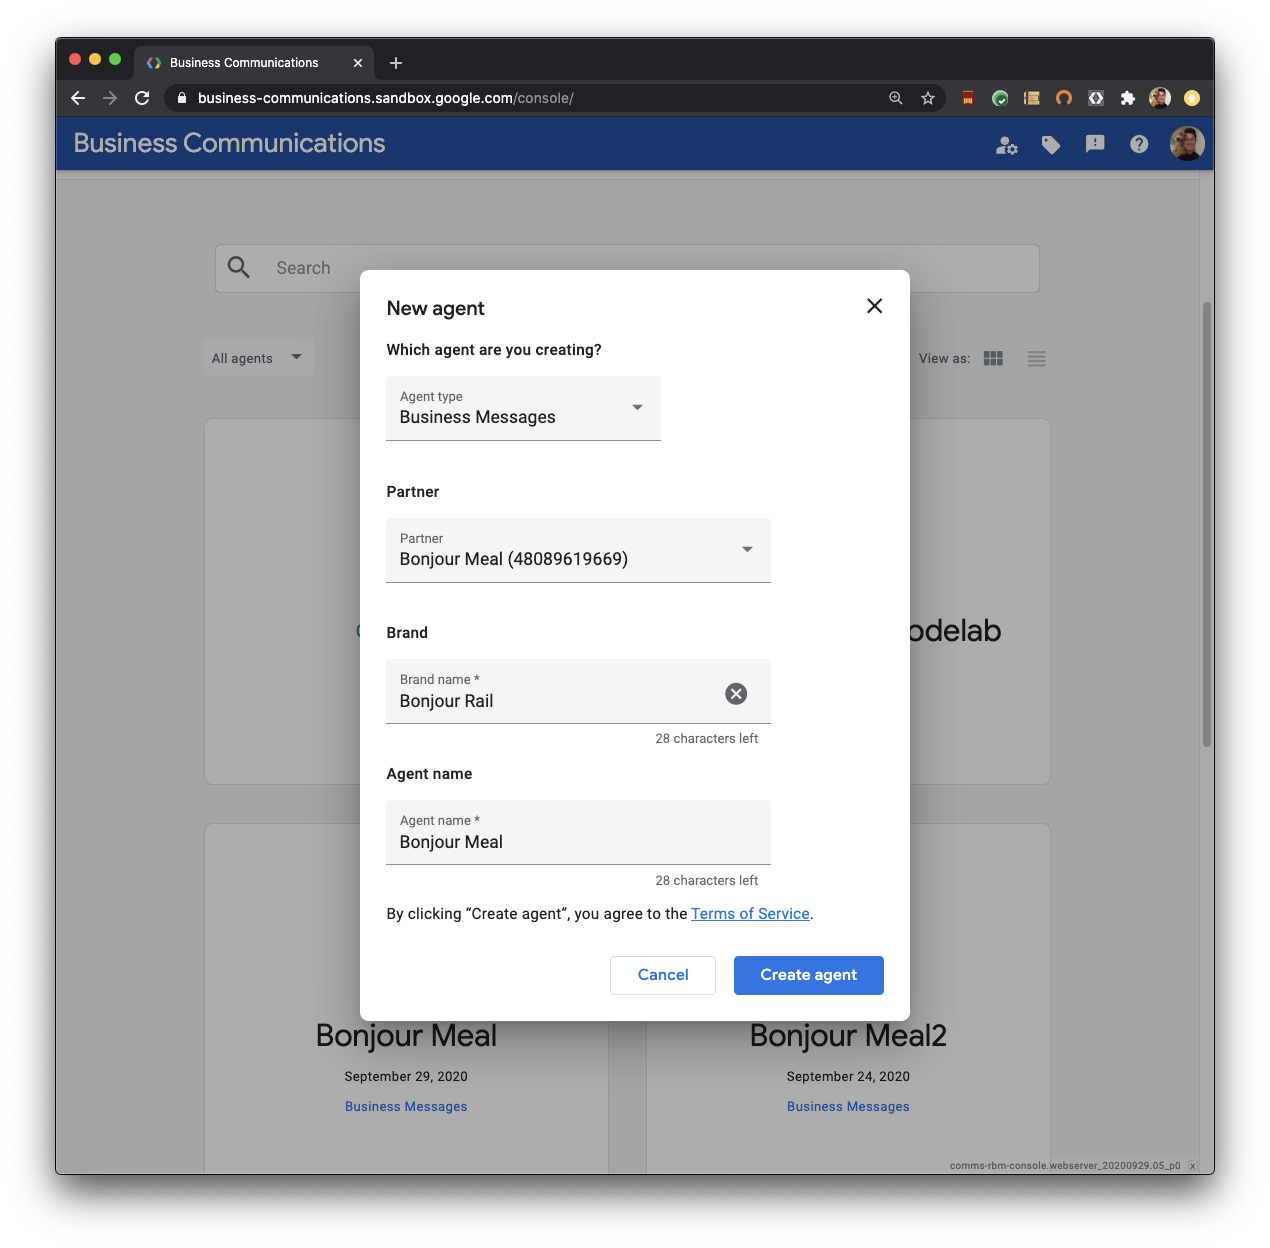
Click Create agent and let the console do some magic. This request takes a few seconds to make several requests to the Business Communications API to create the brand and agent. You can use the Business Communications API directly to create an agent and to create a brand. Check out the documentation to see how a curl request would look to do the same things the console is doing.
Having your first conversation
Open the agent that you just created, you'll be presented with an Overview page that allows you to begin reviewing details of your agent. Take a look at the Agent test URLs. These URLs are used to invoke the conversational surface on your device.
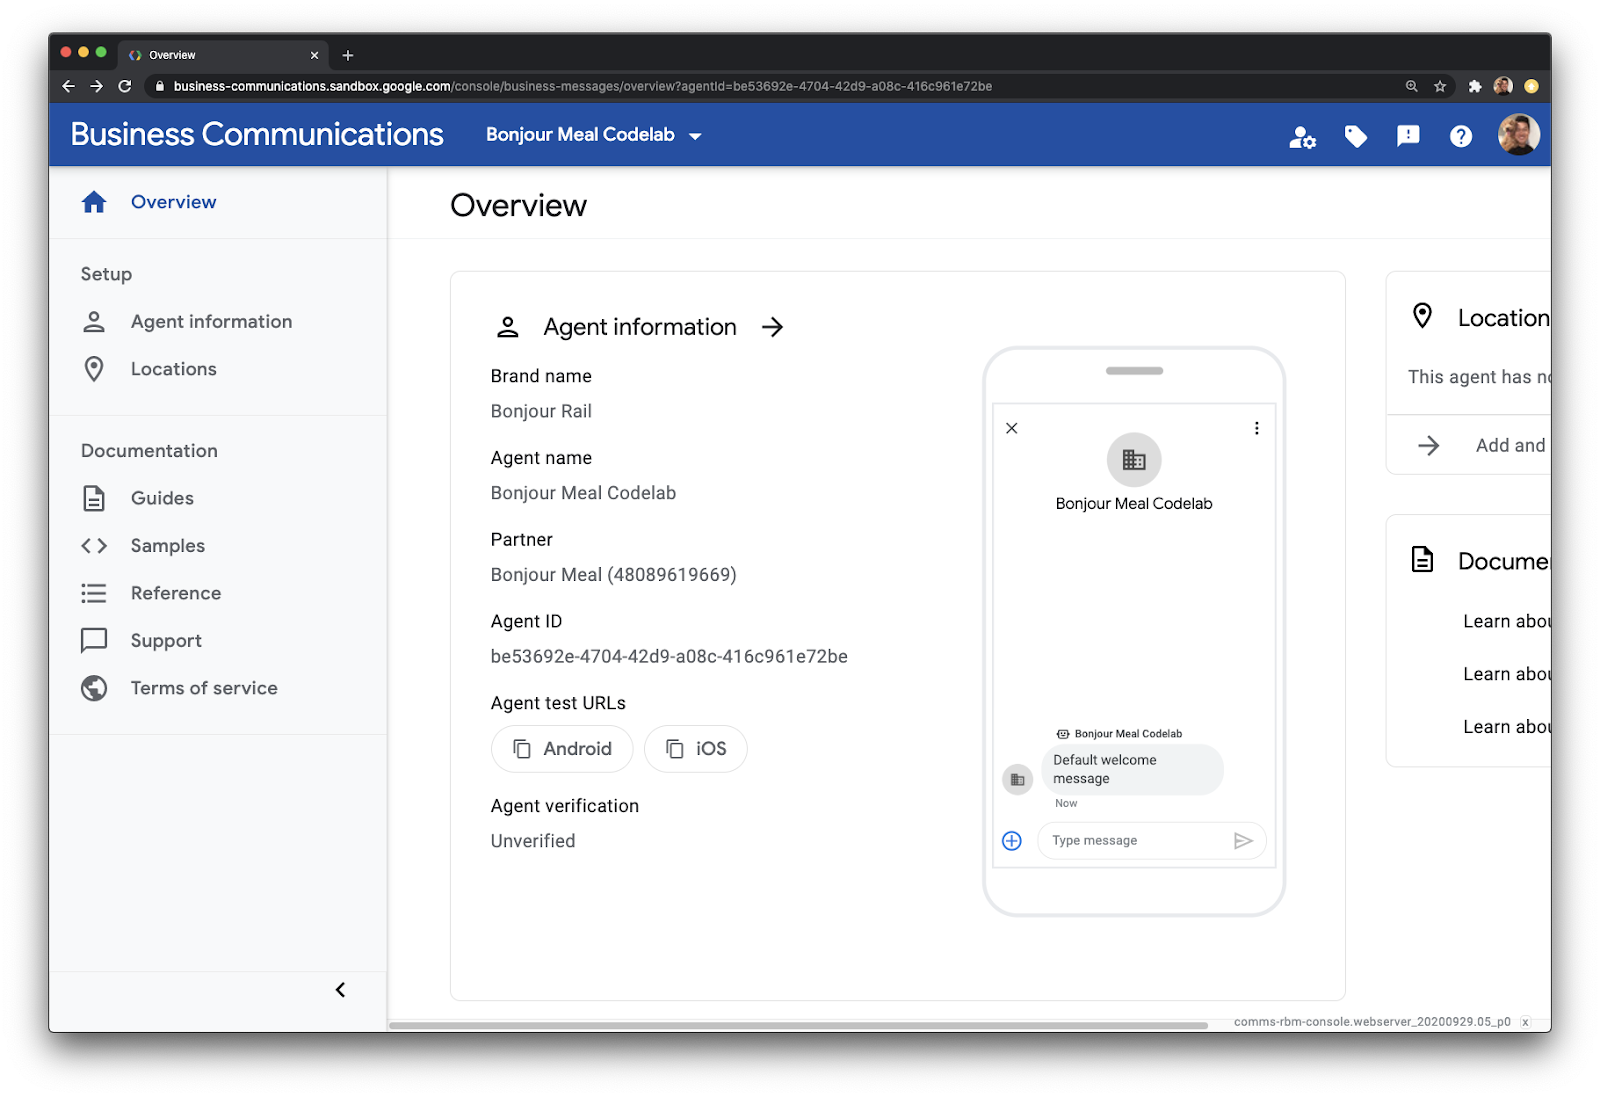
You can copy the test URL by clicking on either of the chips. Of course, copy the test URL for the device you have on hand to test with. Send this copied message to your device any way you'd like.
Once on your mobile device, tapping the link invokes the Business Messages Agent Launcher with your agent test URL prepopulated.
Tap Launch to invoke your agent's conversational surface.
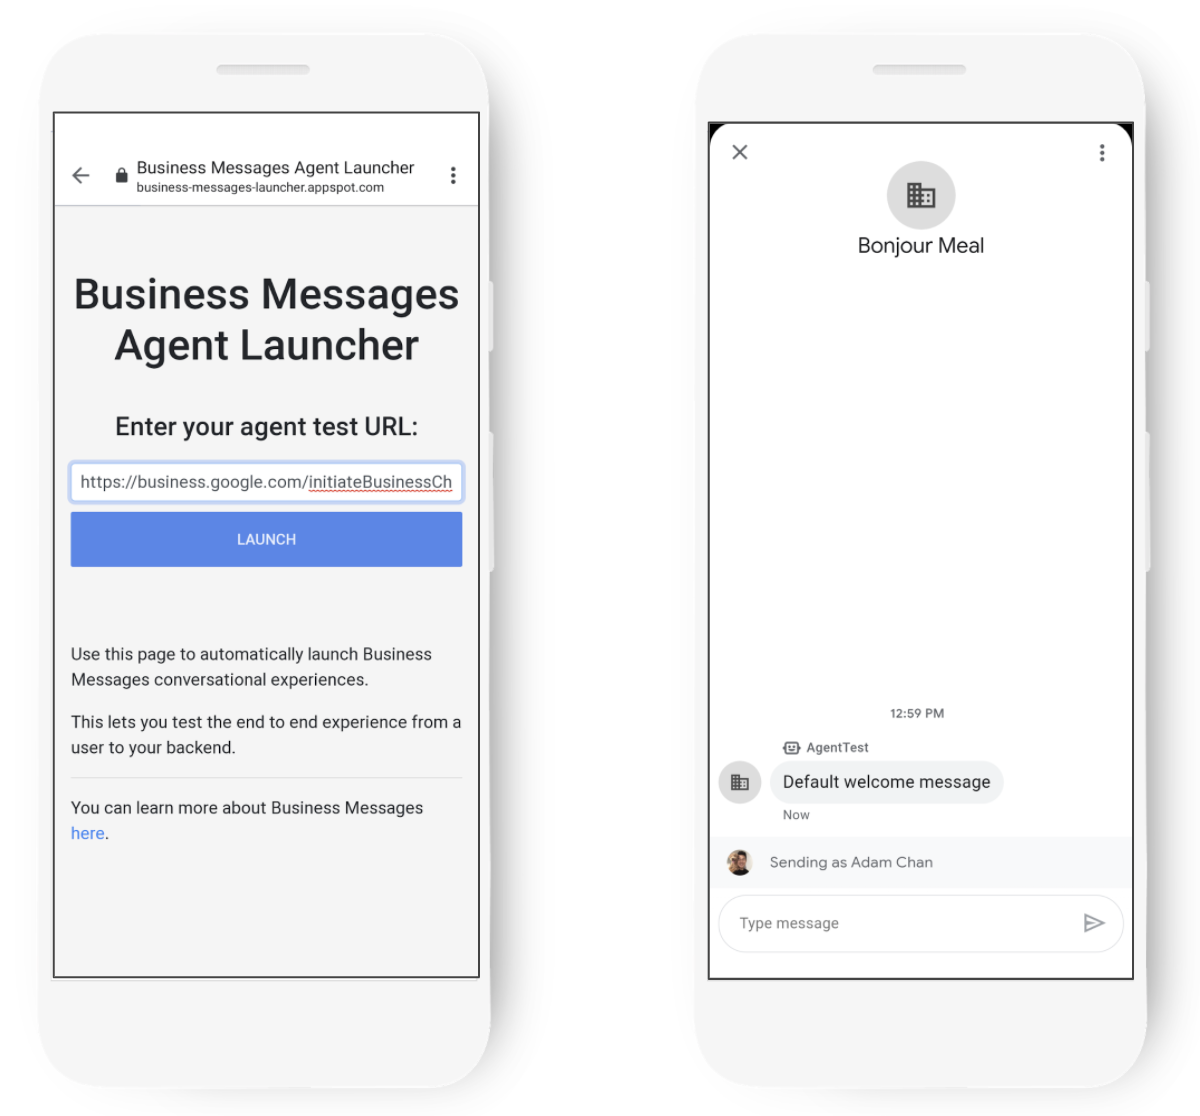
Interact with the agent and get a feel for what it's capable of. For the most part, you should find that the conversational surface will only echo your messages. Send it something like "Hello, World!" and you'll see that the agent will send that same message back to you.
The deployed application also contains some logic to showcase the rich features available on Business Messages.
- If you send "card", you'll invoke a rich card
- If you send "chips", you'll invoke suggestion chips
- If you send "carousel", you'll invoke the a carousel of rich cards
Congratulations! This is your agent's inaugural conversation, with you!
Each of the rich features can be used to provide better context to the person communicating with your agent. Send graphical assets in rich cards to better communicate ideas, or use suggestion chips to guide the conversation.
Updating the welcome message and using conversation chips
Let's get some practice with the Developer Console, see how to edit the agent's welcome message and leverage suggestion chips to help the user communicate.
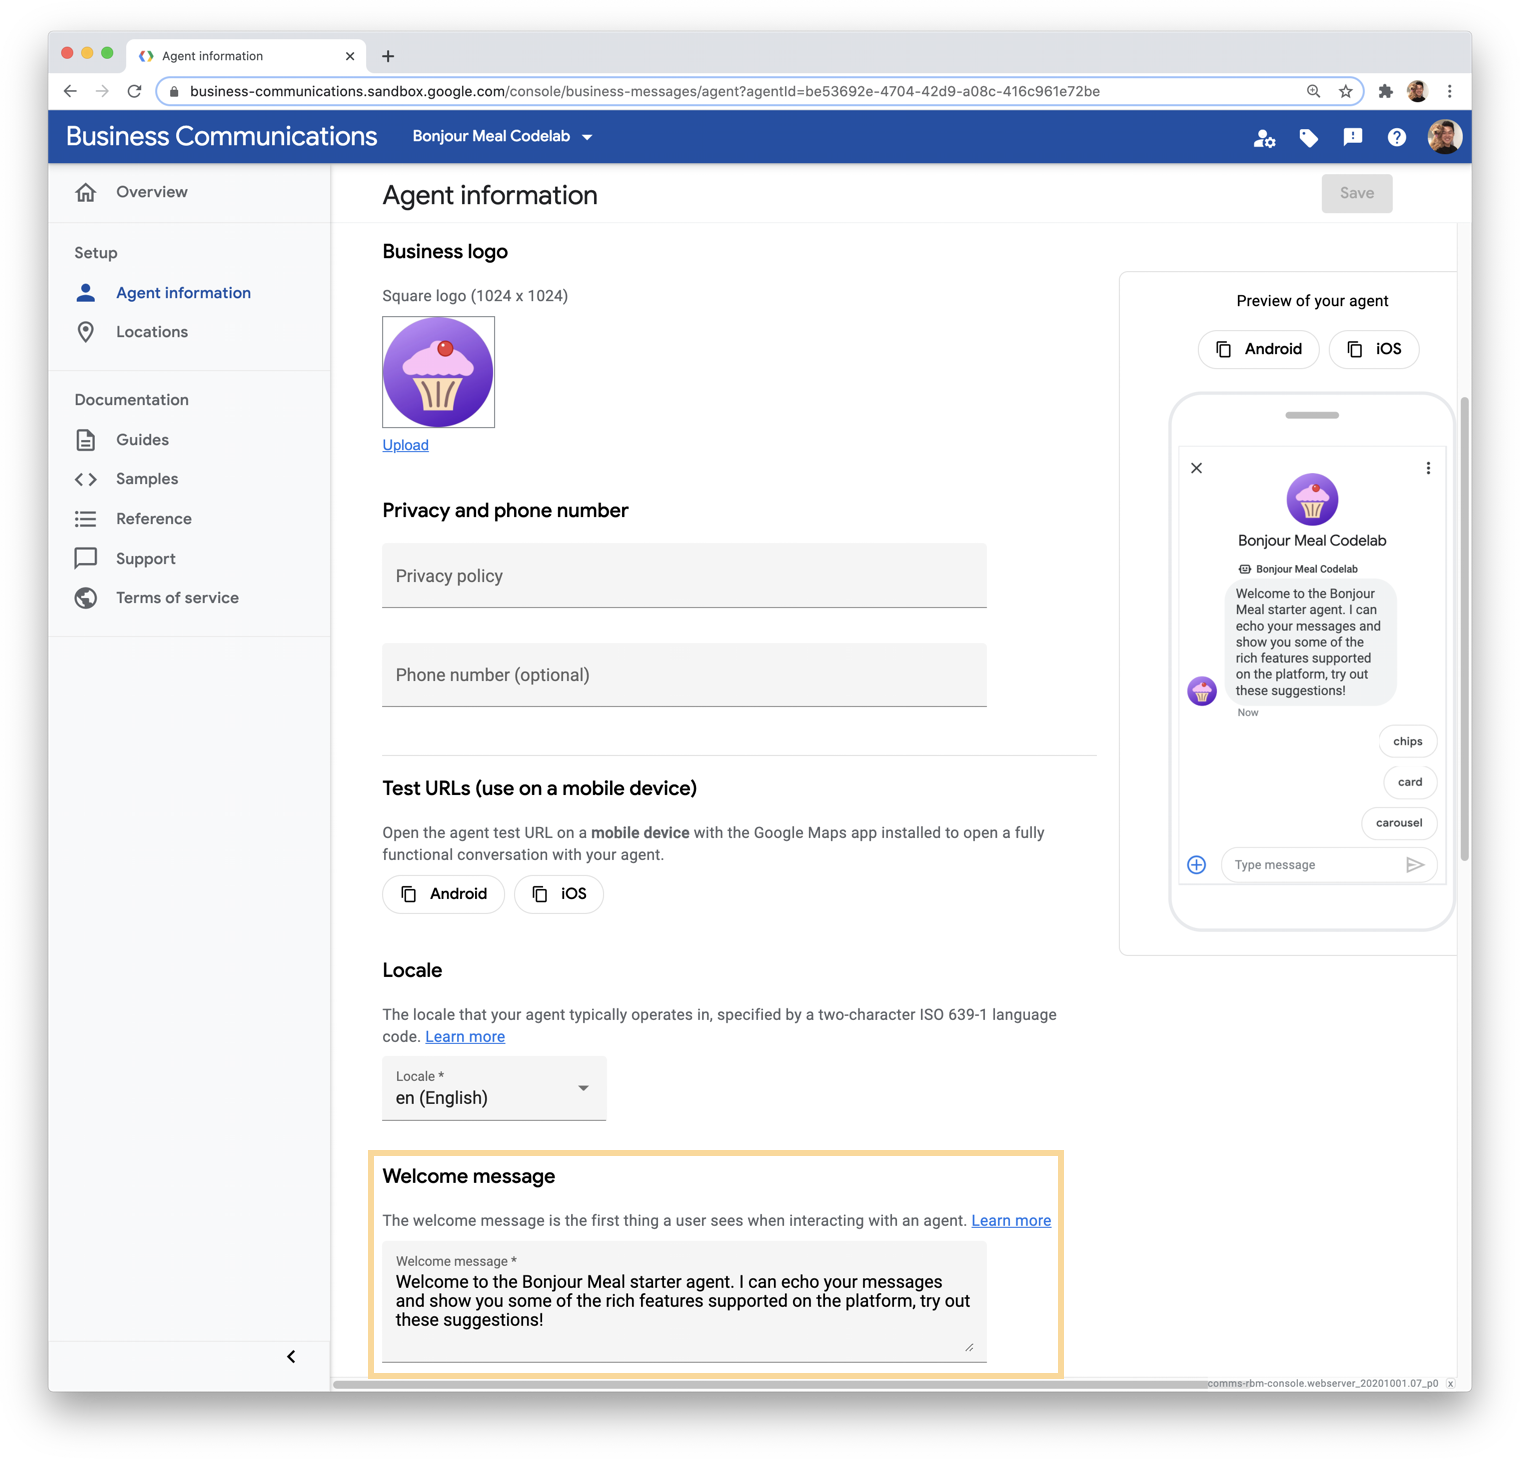
Head on over to the agent Overview page and select Agent information. Scroll down to the welcome message and conversation starters section.
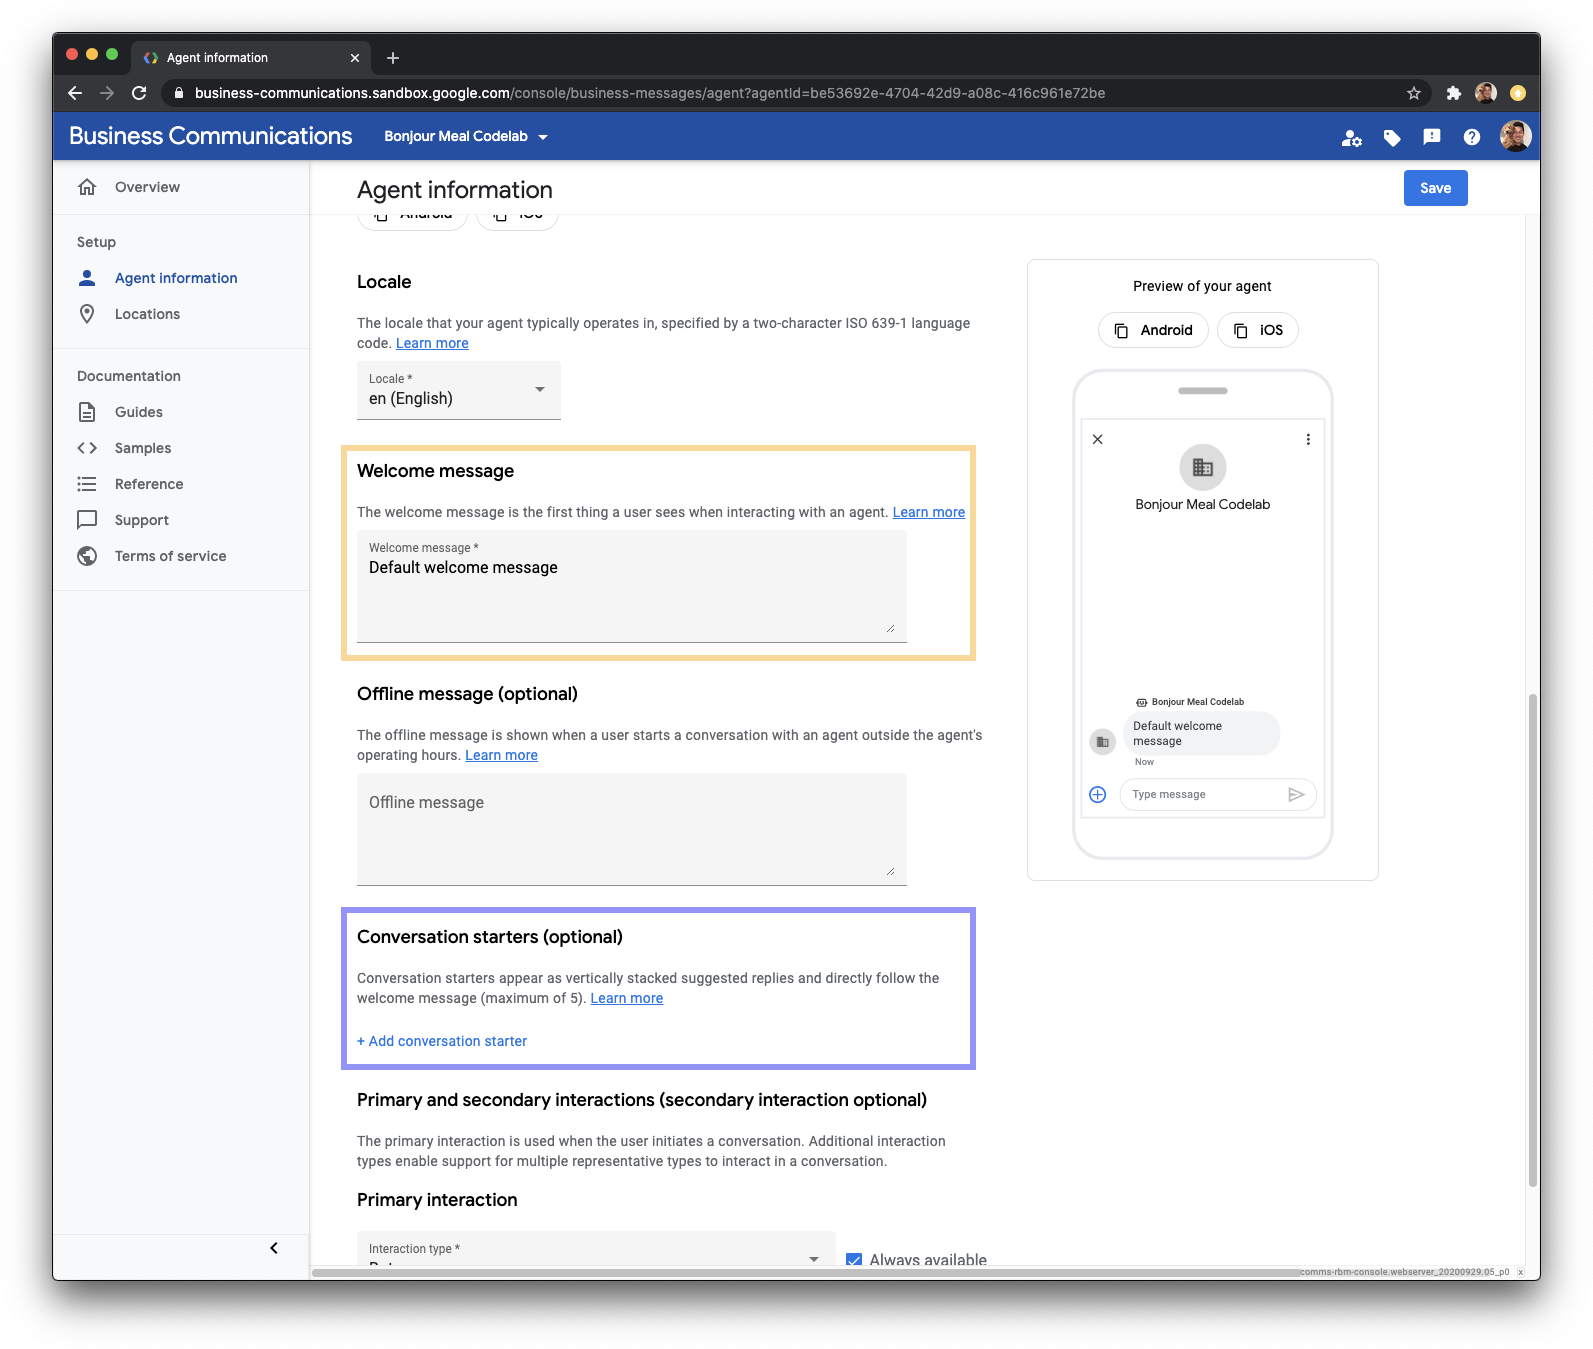
Update the welcome message (the yellow input field) to read:
Welcome to the Bonjour Meal starter agent. I can echo your messages and show you some of the rich features supported on the platform, try out these suggestions!
Click + Add conversation starter as referenced in the purple box in the image above to add conversation starters to invoke suggestion chips, carousel, and card. The conversation starters you add need a text component and a postbackData component. The text is what is displayed to the user while the postBack data is what is sent to your agent's webhook. The webhook parses for the postback data and will send the appropriate response to the user. 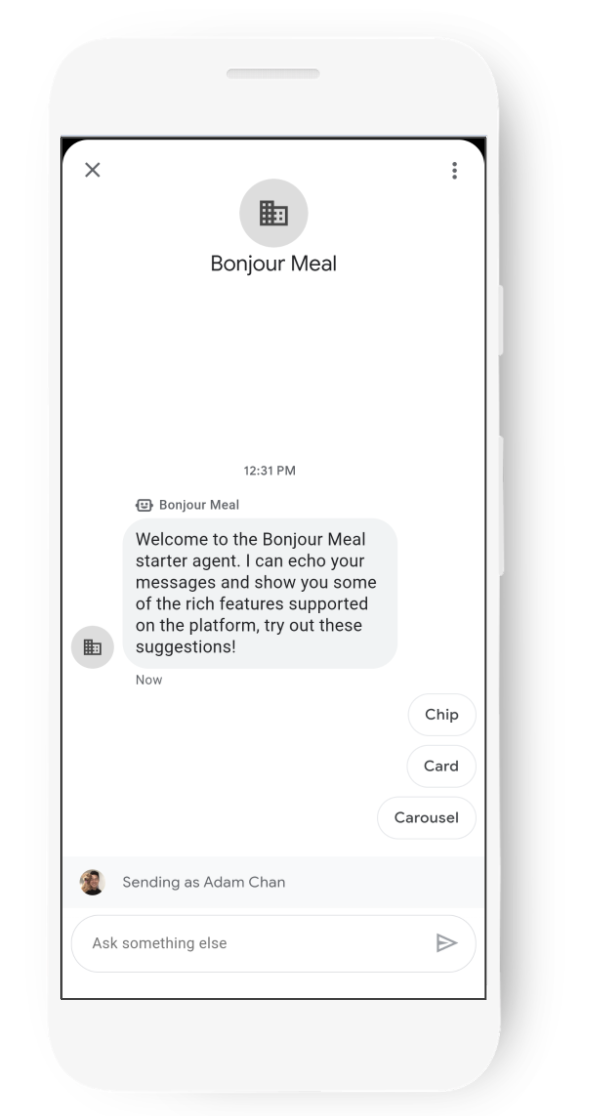
The Agent information in the console looks like this after the modification:
On the right side of the console, you see a preview of how the agent will look. Notice how the welcome message reflects what you've just changed it to and the suggestion chips that are underneath it?
This is a great tool to get an idea about what the user experience will be like. You can use it while you're building your agent and planning out the user journeys you want to support.
Unfortunately, we won't be able to see these changes reflected in the conversation immediately, as the prior data is cached within the Business Messages infrastructure. The cache is cleared approximately every 2 hours, so you should be able to try this out tomorrow.
In the meantime, let's take a look at how everything works under the hood.
4. Analyzing the starter code
A 10,000 foot view of the source code
The starter code that you deployed echoes messages back to users and can present a rich card, a carousel, or suggestion chips. Let's take a deeper dive into the source code so that we can understand how this works. Then we'll figure out what we'll need to change.
The starter code is a Django project. In a later part of this codelab series, we'll use Google Datastore to persist data like shopping carts and associated conversations. Don't worry if you haven't used Django before, it's pretty straightforward, and by the end of this codelab you'll have learned how it works.
At a high level, Django will route URLs to views, and the view logic produces a template that renders in the browser. Let's have a look at the project's urls.py.
bm-django-echo-bot/bmcodelab/urls.py [Lines 31-37]
from django.urls import include, path
import bopis.views as bopis_views

urlpatterns = [
    path('', bopis_views.landing_placeholder),
    path('callback/', bopis_views.callback),
]
Two routes are defined here, and so Django can execute logic if those two URLs are recognized. Given the project URL is https://PROJECT_ID.appspot.com/, then the routes the project is aware of are:
- https://PROJECT_ID.appspot.com/
- https://PROJECT_ID.appspot.com/callback/
Both of the URL routes refer to bopis_views which is from bopis/views.py. Let's take a look at what is going on in this file. To start, let's first understand bopis_views.landing_placeholder.
bm-django-echo-bot/bonjourmeal-codelab/step-1/bopis/views.py [Lines 302-309]
...
def landing_placeholder(request):
    return HttpResponse("<h1>Welcome to the Bonjour Meal Codelab</h1>
    <br/><br/>
    To message your Bonjour Meal agent, go to the Developer Console and retrieve
    the Test URLs for the agent you have created as described in the codelab
    <a href='https://codelabs.developers.google.com/codelabs/'>here</a>.")
...
This bit of logic is executed by your web server when it receives a web request pointing to the root of the project. Nothing too fancy happens here: we simply return an HTTPResponse containing some HTML back to the browser that made the request. So yes, you can indeed open the root URL of the project, but there's not really much to do over there as it brings you back to this codelab.
The other URL routes to a function called callback, also in bopis/views.py. So let's have a look at that function.
bm-django-echo-bot/bopis/views.py [Lines 60-101]
...
def callback(request):
    """
    Callback URL. Processes messages sent from user.
    """
    if request.method == "POST":
        request_data = request.body.decode('utf8').replace("'", '"')
        request_body = json.loads(request_data)

        print('request_body: %s', request_body)

        # Extract the conversation id and message text
        conversation_id = request_body.get('conversationId')
        print('conversation_id: %s', conversation_id)

        # Check that the message and text body exist

        if 'message' in request_body and 'text' in request_body['message']:
            message = request_body['message']['text']

            print('message: %s', message)
            route_message(message, conversation_id)
        elif 'suggestionResponse' in request_body:
            message = request_body['suggestionResponse']['postbackData']

            print('message: %s', message)
            route_message(message, conversation_id)
        elif 'userStatus' in request_body:
            if 'isTyping' in request_body['userStatus']:
                print('User is typing')
            elif 'requestedLiveAgent' in request_body['userStatus']:
                print('User requested transfer to live agent')

        return HttpResponse("Response.")

    elif request.method == "GET":
        return HttpResponse("This webhook expects a POST request.")
...
The logic here parses the request body for a message or a suggestionResponse and passes that information into a function called route_message, then returns an HttpResponse back to the Business Messages infrastructure to acknowledge receipt of the message.
This is an important function. This bit of logic is your web application's webhook, which receives messages from users interacting with your agent. You can extend the webhook to send messages to an automation tool like Dialogflow to understand what a user may be saying and produce a response from that inference. You can also forward the message so that the user can connect with a live agent. See the following diagram:
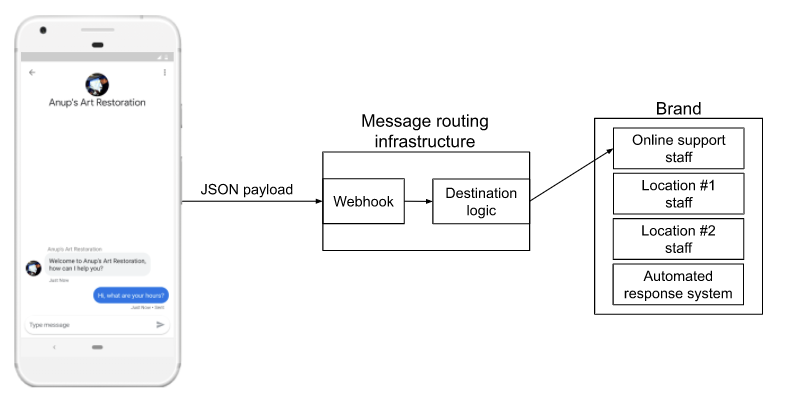
Business Messages sends the message contents as a JSON payload to your webhook where it is routed to a live agent or to some logic to respond as a bot. That routing mechanism, in our case here, is route_message. Let's have a look.
bm-django-echo-bot/bopis/views.py [Lines 105-122]
...
def route_message(message, conversation_id):
    '''
    Routes the message received from the user to create a response.

    Args:
        message (str): The message text received from the user.
        conversation_id (str): The unique id for this user and agent.
    '''
    normalized_message = message.lower()

    if normalized_message == CMD_RICH_CARD:
        send_rich_card(conversation_id)
    elif normalized_message == CMD_CAROUSEL_CARD:
        send_carousel(conversation_id)
    elif normalized_message == CMD_SUGGESTIONS:
        send_message_with_suggestions(conversation_id)
    else:
        echo_message(message, conversation_id)
...
This bit of logic begins to examine the message received by the user. First, the message is normalized by lowering all characters. Once normalized, it checks to see if the message is any of the constants defined at the top of the file.
bm-django-echo-bot/bopis/views.py [Lines 40-42]
...
# Set of commands the bot understands
CMD_RICH_CARD = 'card'
CMD_CAROUSEL_CARD = 'carousel'
CMD_SUGGESTIONS = 'chips'
...
That's to say, the bot parses for messages that specifically contain any of the strings we placed into the postback_data of the conversation starters from the previous step in this codelab. If none of those strings show up, then it simply passes the message to a function called echo_message, which you could imagine... would echo messages.
Sending Messages
So by now, you should have an idea about how messages are received by the web application. It's all done by the webhook.
But how does the application send an outbound message to a user using Business Messages?
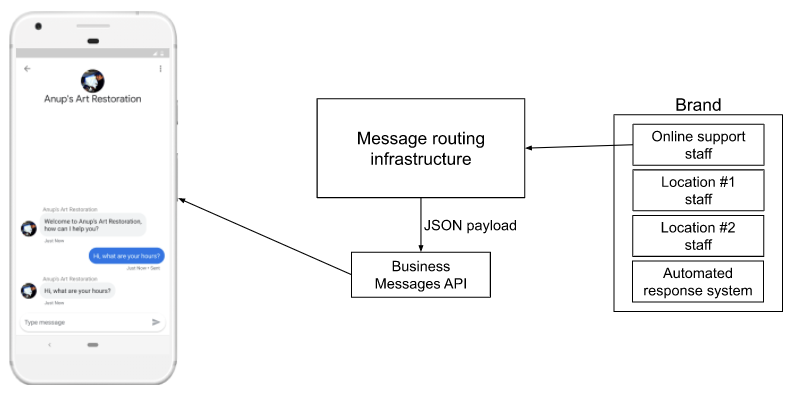
When your infrastructure responds to the user, you send the response to the Business Messages API, which delivers the message to the user.
The Business Messages API has libraries in Python, Node.js, and Java. We also have a REST API that you can make requests to directly if your infrastructure is not in a language we have a library for. Have a look at Sending Messages to see how cURL is used to send a message to a specific conversation ID.
For the purpose of this codelab, we'll focus on using the Python client library that's already integrated into the Bonjour Meal starter code that has been deployed to App Engine on your GCP project, or running locally through ngrok.
Let's look at the echo_message function and see how we interact with the API to send the message to Business Messages.
bm-django-echo-bot/bopis/views.py [Lines 199-212]
...
def echo_message(message, conversation_id):
    '''
    Sends the message received from the user back to the user.

    Args:
        message (str): The message text received from the user.
        conversation_id (str): The unique id for this user and agent.
    '''
    message_obj = BusinessMessagesMessage(
        messageId=str(uuid.uuid4().int),
        representative=BOT_REPRESENTATIVE,
        text=message)

    send_message(message_obj, conversation_id)
...
In this function, a BusinessMessagesMessage is instantiated with the message variable passed into the echo_message function. Once instantiated, the object is then passed to send_message along with the conversation ID.
bm-django-echo-bot/bopis/views.py [Lines 214-236]
...
def send_message(message, conversation_id):
    '''
    Posts a message to the Business Messages API, first sending
    a typing indicator event and sending a stop typing event after
    the message has been sent.

    Args:
        message (obj): The message object payload to send to the user.
        conversation_id (str): The unique id for this user and agent.
    '''
    credentials = ServiceAccountCredentials.from_json_keyfile_name(
        SERVICE_ACCOUNT_LOCATION,
        scopes=['https://www.googleapis.com/auth/businessmessages'])

    client = bm_client.BusinessmessagesV1(credentials=credentials)

    # Create the message request
    create_request = BusinessmessagesConversationsMessagesCreateRequest(
        businessMessagesMessage=message,
        parent='conversations/' + conversation_id)

    bm_client.BusinessmessagesV1.ConversationsMessagesService(
        client=client).Create(request=create_request)
...
All the send_message function is doing is using your service account credentials to verify that you can send messages to this conversation, instantiating a Business Messages client, and creating a request to send the message to the given conversation ID.
The rich features make use of this send_message function as well, but the messages that they create are specific to rich cards, carousels, and suggestion chips. Rich cards and carousels may include graphical assets while suggestion chips have postback_data so that the callback logic can parse it appropriately.
Now that we've seen how to send a message, investigate how the sample sends rich cards, carousels, and suggestion chips. In the following section we'll modify the source code to send messages with some of these rich features.
When you're ready, let's customize the Bonjour Meal agent.
5. Customizing your agent
If you've followed along the codelab thus far, we should see our beautiful agent.
Okay not so beautiful, it's actually looking somewhat bare and doesn't really represent our business too well. Fortunately, we have a foundational knowledge of the code supporting the agent and we have the tools we need to customize our agent in any way we want.
In the remainder of this codelab, we'll extend the agent with the following:
- Include an actual logo
- Improved welcome message
- Provide information on business hours
- Let the user know that buying items online is coming soon
- Use of conversational suggestion chips to facilitate the conversation
We'll take advantage of the Business Communications Console to help us with updating the logo, the welcome message, but you always have the option of using the Business Communications APIs directly to do the same. Then we'll have to update the source code to send appropriate messages for providing information on business hours and that Bonjour Meal will soon be offering an online shopping feature. When that's done, we'll return to the Business Communications Console and create conversational suggestion chips to help guide the conversation to the happy path experiences that the digital agent supports.
Include a logo
From the Business Communications Console, select your agent and head into Agent information. We'll want to update the Business logo, as referenced in yellow below.
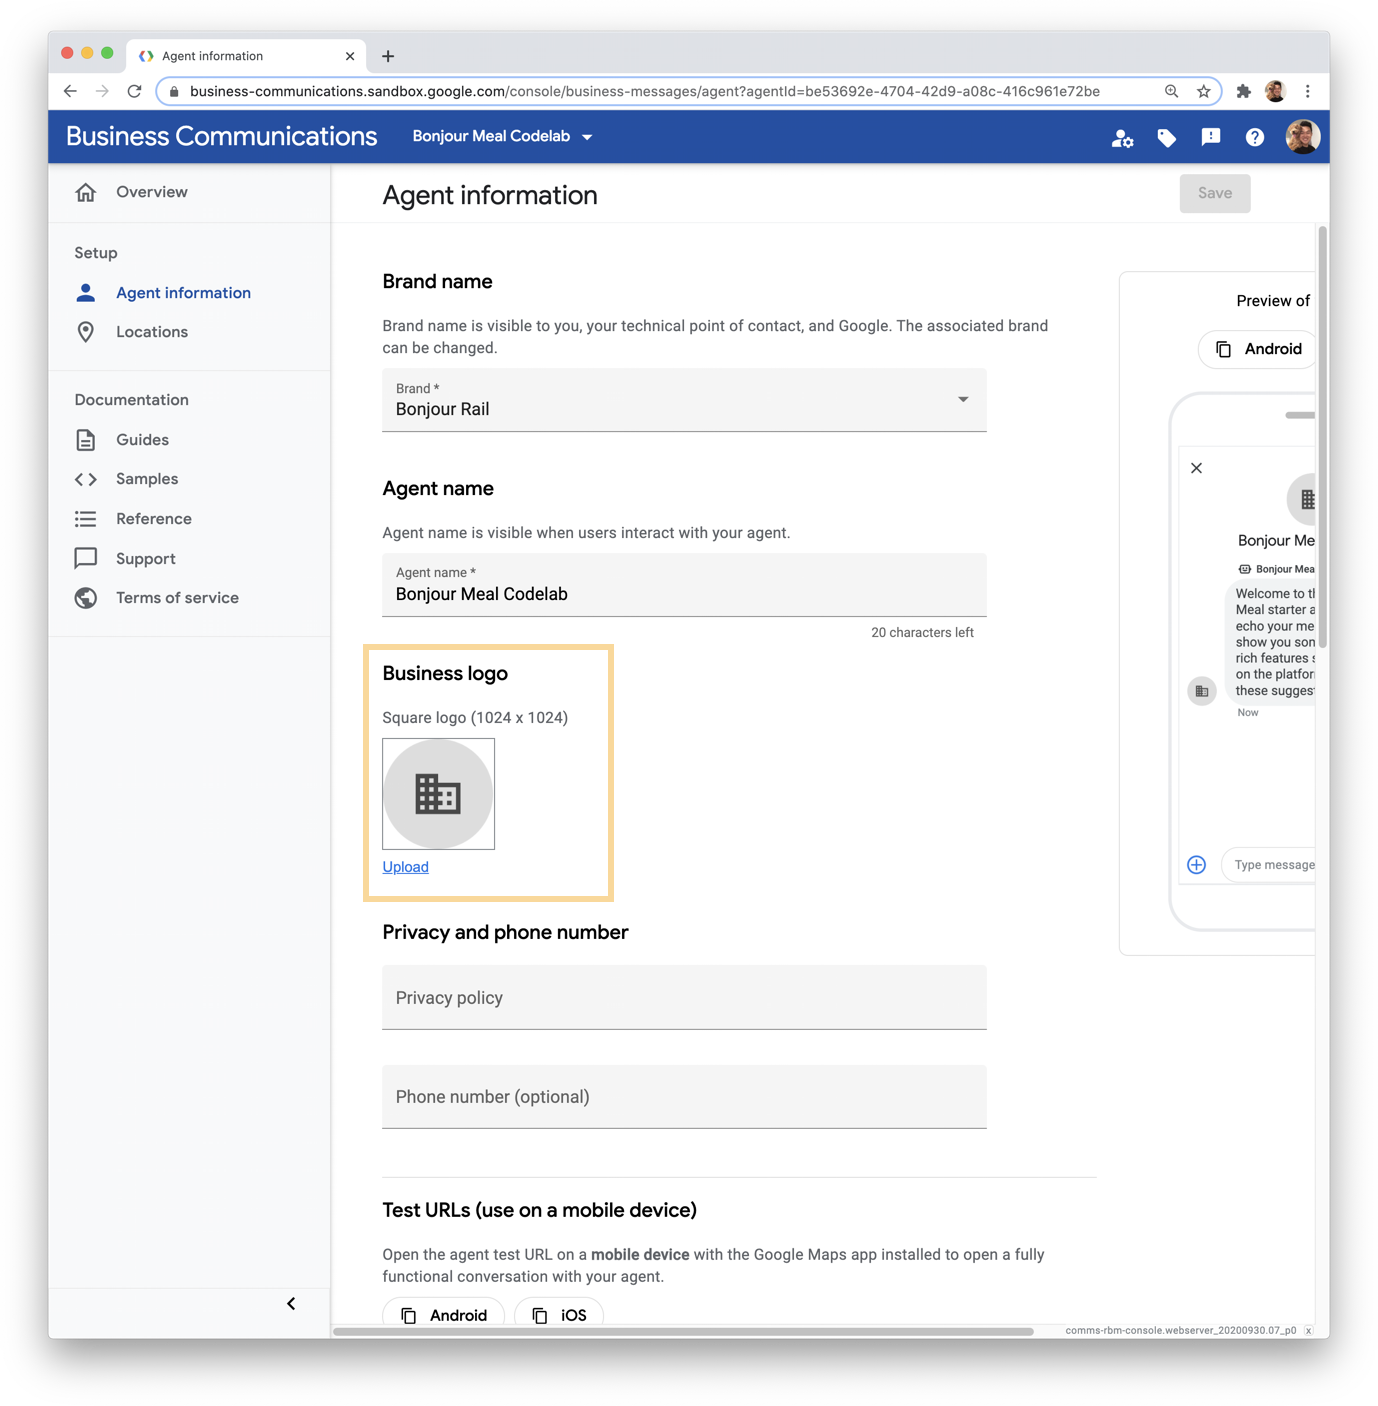
Click Upload, and you'll be able to select an image to upload or to import from a URL.
Have a look at the logo design guidelines in the documentation to learn about the best practices we recommend for using your own logos.
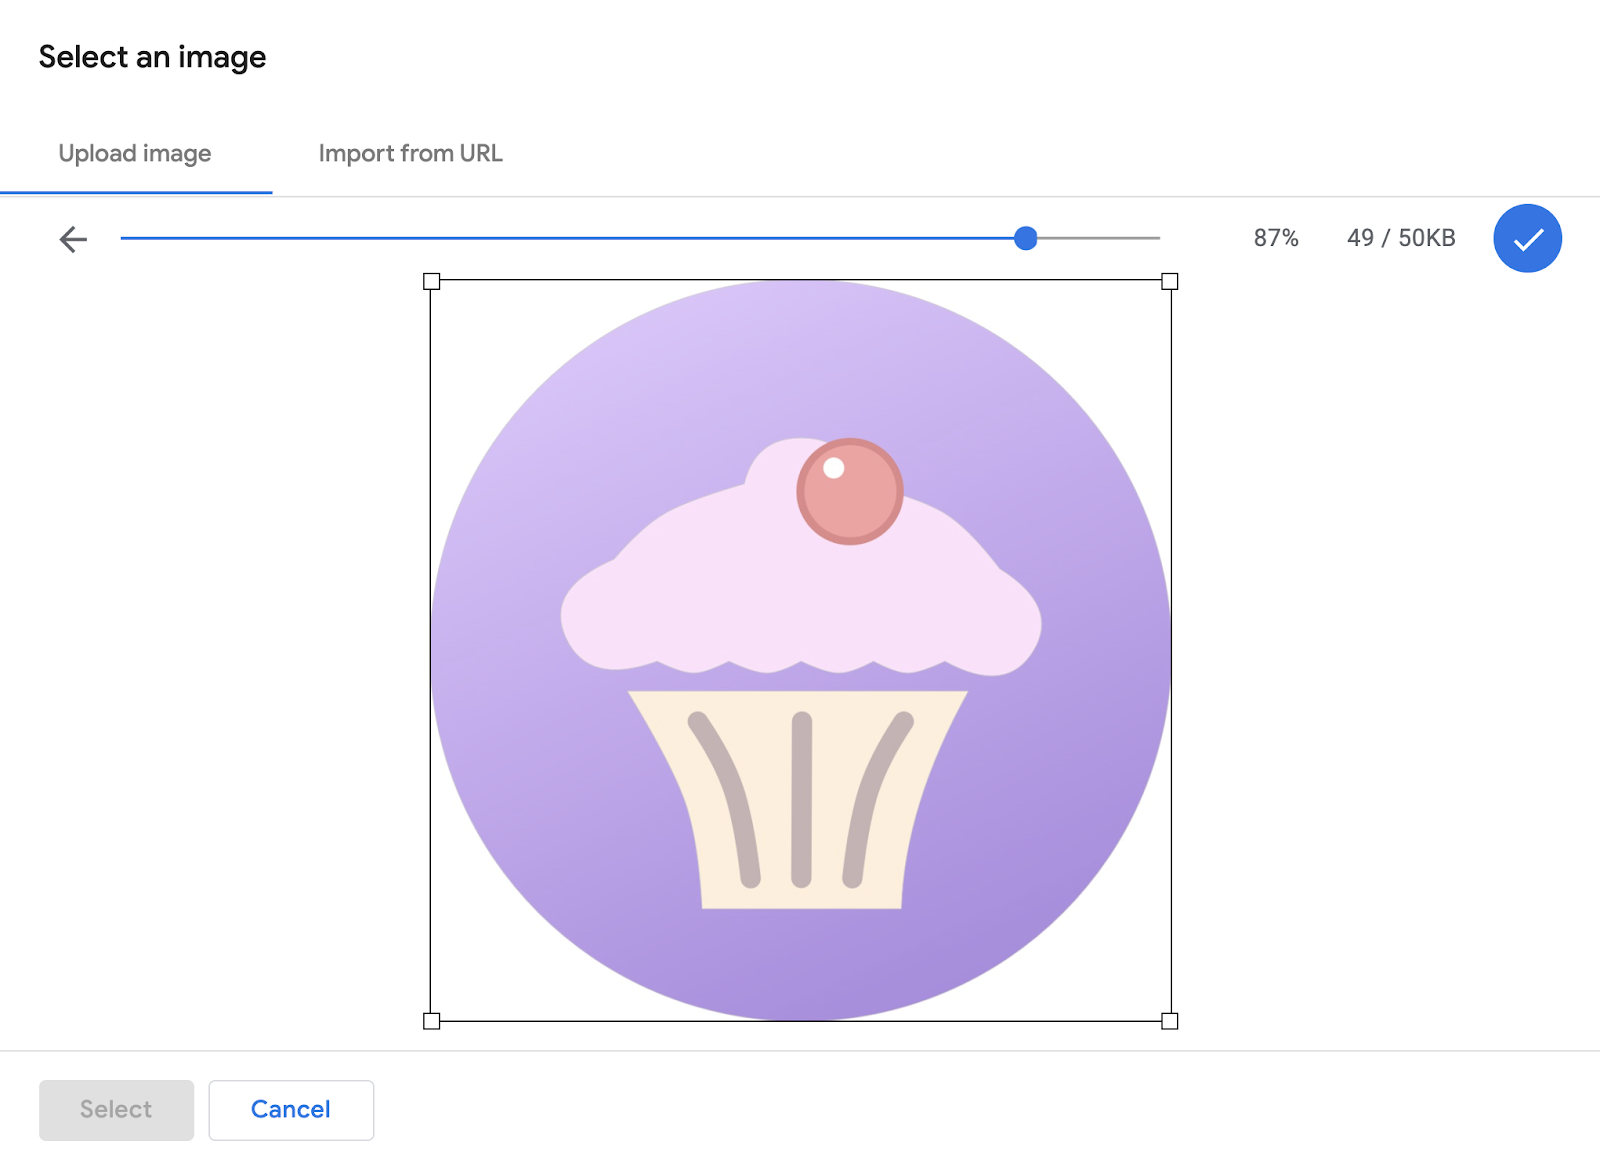
Let's upload the logo that is located in the source code you cloned at the beginning of this codelab. You can find it in the ./assets/ directory of the repository and the file is called "bonjour_meal-logo.png". You can drag the file into the modal on the web browser, a light editing tool will be presented to manipulate the image quality and crop. Adjust the image resolution and crop such that the image is less than or equal to the 50KB constraint. When you are happy with the image, click the check mark in the blue circle to confirm, and click Select at the bottom of the modal.
Finally click Save at the top right of the Agent information page. This is a change that will take some time to be reflected on your device as the agent information is cached within our servers and should be visible within two hours of the change.
Update the welcome message
Updating the welcome message is something we've already done earlier in this codelab. Let's do so again, but this time configure a welcome message more applicable to the Bonjour Meal user journey.
In the Business Communications Console, select your agent and go into Agent information. Scroll down until you see the Welcome message input field where you can update the message.
Knowing that we'll add conversation starters, we can reference them in our welcome message. In the input field, let's replace it with the following text:
"Welcome to Bonjour Meal. I'm an assistant that can help you with questions you might have about Bonjour Meal. Try out some of the following options."
Finally click Save at the top right of the Agent information page. Again, this change will take some time to be reflected due to our caching mechanism to make sure things are snappy!
Providing information on business hours
To provide this information to users, we'll send a custom message to the user using the Business Messages API.
You may recall that messages are parsed in the route_message function of views.py. The function first normalizes the string and then begins to check whether the normalized message matches any of the hard coded parameters. For simplicity, let's add an additional condition where we check to see if the normalized message is equal to a new constant which we'll call CMD_BUSINESS_HOURS_INQUIRY and will contain the value "business-hours-inquiry". If the condition evaluates to true, we'll invoke a function called send_message_with_business_hours.
The route_message function will now look like the following:
bm-django-echo-bot/bopis/views.py
...
def route_message(message, conversation_id):
    '''
    Routes the message received from the user to create a response.

    Args:
        message (str): The message text received from the user.
        conversation_id (str): The unique id for this user and agent.
    '''
    normalized_message = message.lower()

    if normalized_message == CMD_RICH_CARD:
        send_rich_card(conversation_id)
    elif normalized_message == CMD_CAROUSEL_CARD:
        send_carousel(conversation_id)
    elif normalized_message == CMD_SUGGESTIONS:
        send_message_with_suggestions(conversation_id)
    elif normalized_message == CMD_BUSINESS_HOURS_INQUIRY:
        send_message_with_business_hours(conversation_id)
    else:
        echo_message(message, conversation_id)
...
For the code to work, we'll have to make two more changes; the first is to define CMD_BUSINESS_HOURS_INQUIRY along with the other constants, the second is to actually define the function send_message_with_business_hours and send a message using the Business Messages API.
Let's first define the constant at the top of the file with the other constant declarations:
bm-django-echo-bot/bopis/views.py
...
# Set of commands the bot understands
CMD_RICH_CARD = 'card'
CMD_CAROUSEL_CARD = 'carousel'
CMD_SUGGESTIONS = 'chips'
CMD_BUSINESS_HOURS_INQUIRY = 'business-hours-inquiry'
...
And now, to define send_message_with_business_hours. You can define this function anywhere in the file, following appropriate Python syntax. As this function is simply sending a message, much like echo_message, you can use it as a template to define this function.
bm-django-echo-bot/bopis/views.py
...
def send_message_with_business_hours(conversation_id):

    message = '''Thanks for contacting us! The hours for the store are:\n
    MON 8am - 8pm\n
    TUE 8am - 8pm\n
    WED 8am - 8pm\n
    THU 8am - 8pm\n
    FRI 8am - 8pm\n
    SAT 8am - 8pm\n
    SUN 8am - 8pm
    '''

    message_obj = BusinessMessagesMessage(
        messageId=str(uuid.uuid4().int),
        representative=BOT_REPRESENTATIVE,
        text=message)

    send_message(message_obj, conversation_id)
...
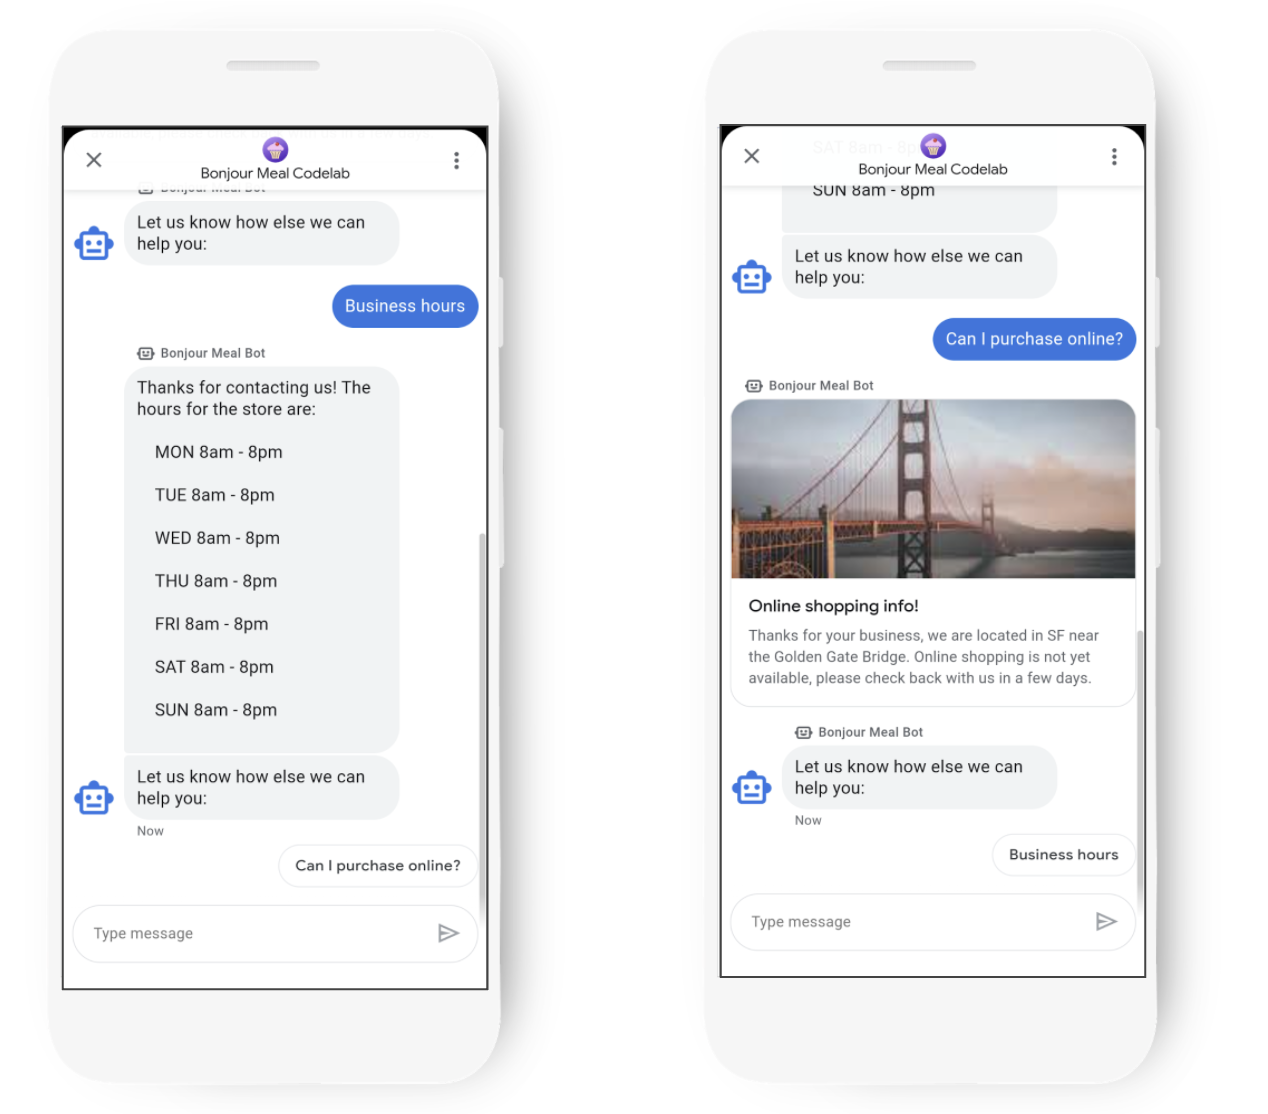
With that, our bot should be able to respond with these business hours to the user when they send the following message: "business-hours-inquiry". You can expect something like this:
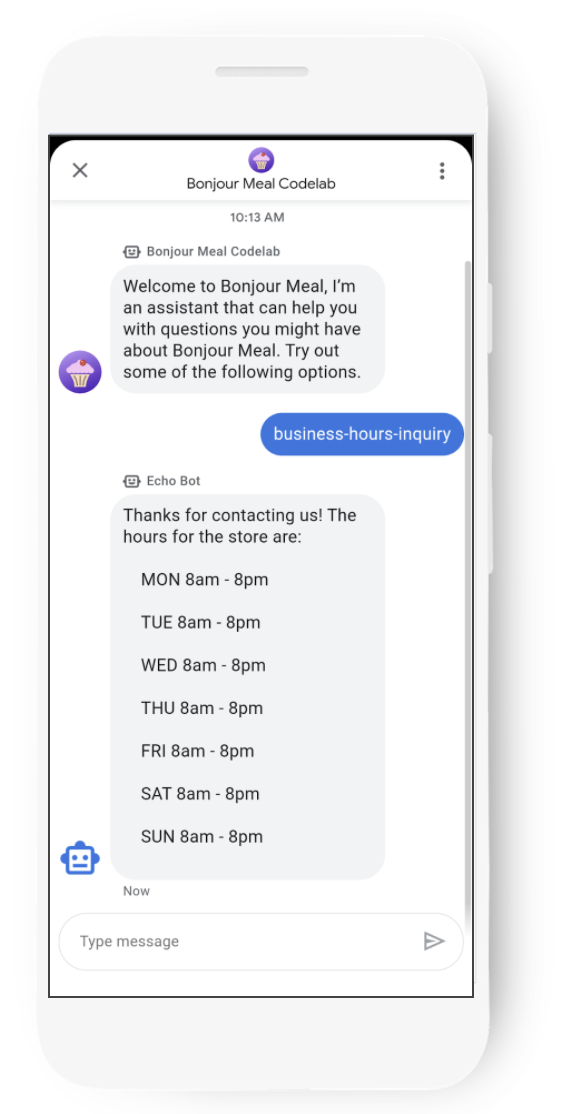
Once you deploy the source code to GCP, the changes will be visible immediately. We don't cache the web application in Google Cloud Platform in the same way that agent information is cached, so you will be able to test this experience right away.
While we have some momentum here with making source changes, let's make one more modification that will let a user inquire about shopping online. Your digital agent will respond saying that the feature is not yet available but to come back and check later.
Letting the user know that shopping online is coming soon
We'll make a similar modification as we did to inform the user about the business hours. This time, let's place the information in a rich card along with an engaging image.
Parse the normalized message and check a condition for a constant called CMD_ONLINE_SHOPPING_INQUIRY with value set to "online-shopping-inquiry" which invokes send_online_shopping_info_message if the condition is true.
bm-django-echo-bot/bopis/views.py
...
# Set of commands the bot understands
CMD_RICH_CARD = 'card'
CMD_CAROUSEL_CARD = 'carousel'
CMD_SUGGESTIONS = 'chips'
CMD_BUSINESS_HOURS_INQUIRY = 'business-hours-inquiry'
CMD_ONLINE_SHOPPING_INQUIRY = 'online-shopping-inquiry'
...
...
...
def route_message(message, conversation_id):
    '''
    Routes the message received from the user to create a response.

    Args:
        message (str): The message text received from the user.
        conversation_id (str): The unique id for this user and agent.
    '''
    normalized_message = message.lower()

    if normalized_message == CMD_RICH_CARD:
        send_rich_card(conversation_id)
    elif normalized_message == CMD_CAROUSEL_CARD:
        send_carousel(conversation_id)
    elif normalized_message == CMD_SUGGESTIONS:
        send_message_with_suggestions(conversation_id)
    elif normalized_message == CMD_BUSINESS_HOURS_INQUIRY:
        send_message_with_business_hours(conversation_id)
    elif normalized_message == CMD_ONLINE_SHOPPING_INQUIRY:
        send_online_shopping_info_message(conversation_id)
    else:
        echo_message(message, conversation_id)
...
Now to define send_online_shopping_info_message. We want this message to be sent in a rich card with an image, so let's copy the send_rich_card function to use as a template to define send_online_shopping_info_message.
First we should update the fallback text to have an appropriate message. The fallback text is used if the device cannot receive a rich card for some reason. Next, we should update BusinessMessagesRichCard to include a relevant title, description, suggestions, and a media field. Our function should look like this:
bm-django-echo-bot/bopis/views.py
...
def send_online_shopping_info_message(conversation_id):
    fallback_text = ('Online shopping will be available soon!')

    rich_card = BusinessMessagesRichCard(
        standaloneCard=BusinessMessagesStandaloneCard(
            cardContent=BusinessMessagesCardContent(
                title='Online shopping info!',
                description='Thanks for your business, we are located in SF near the Golden Gate Bridge. Online shopping is not yet available, please check back with us in a few days.',
                suggestions=[],
                media=BusinessMessagesMedia(
                    height=BusinessMessagesMedia.HeightValueValuesEnum.MEDIUM,
                    contentInfo=BusinessMessagesContentInfo(
                        fileUrl=SAMPLE_IMAGES[4],
                        forceRefresh=False
                    ))
                )))

    message_obj = BusinessMessagesMessage(
        messageId=str(uuid.uuid4().int),
        representative=BOT_REPRESENTATIVE,
        richCard=rich_card,
        fallback=fallback_text)

    send_message(message_obj, conversation_id)
...
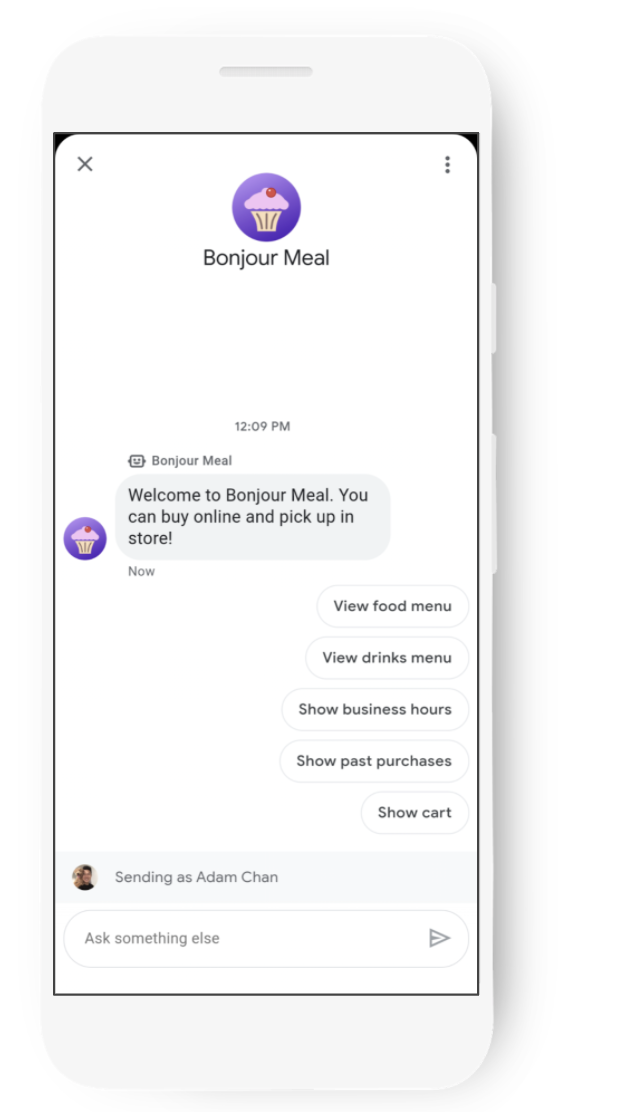
Woohoo! Our digital agent can now respond to users inquiring about online shopping. For now, our digital agent doesn't yet support online shopping, so we provide a message to the user informing them that the feature is coming soon. This is what our digital agent looks like when the user inquires about shopping online.
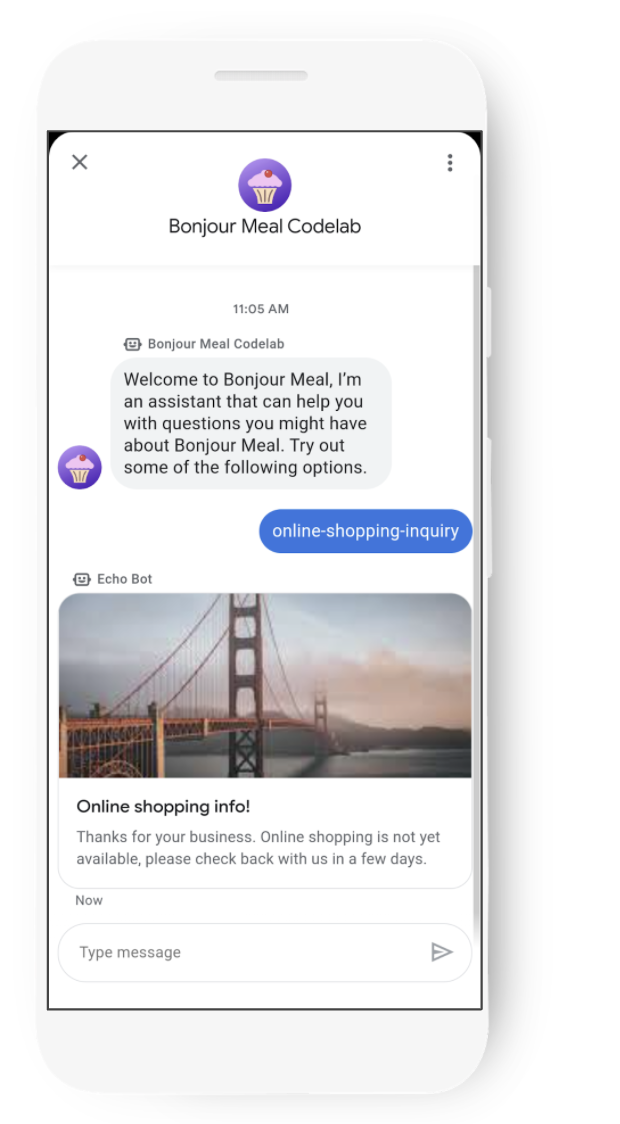
Just like the prior change we made to allow a user to inquire about business hours, this change can be seen immediately if you are using ngrok, or as soon as you deploy the code to GCP App Engine.
In the next part, we'll use conversation starters and suggestion chips to guide the conversation to the happy path.
Using chips to guide the conversation
We've made some source code changes and have deployed the updated digital agent, but we would never expect users to type "business-hours-inquiry" or "online-shopping-info" to inquire about the business. Let's update the conversation starters such that when the conversation is opened, the user is not only greeted by a nice welcome message, but also presented with conversation starters.
Head over to the Business Communications Console and access the Agent information page of your agent. We previously defined conversation starters for "chips", "card", and "carousel". While those still work, they are no longer relevant to our business function. You may leave them in to continue showcasing these rich features or remove them so that your digital agent displays conversation starters specifically for the Bonjour Meal business.
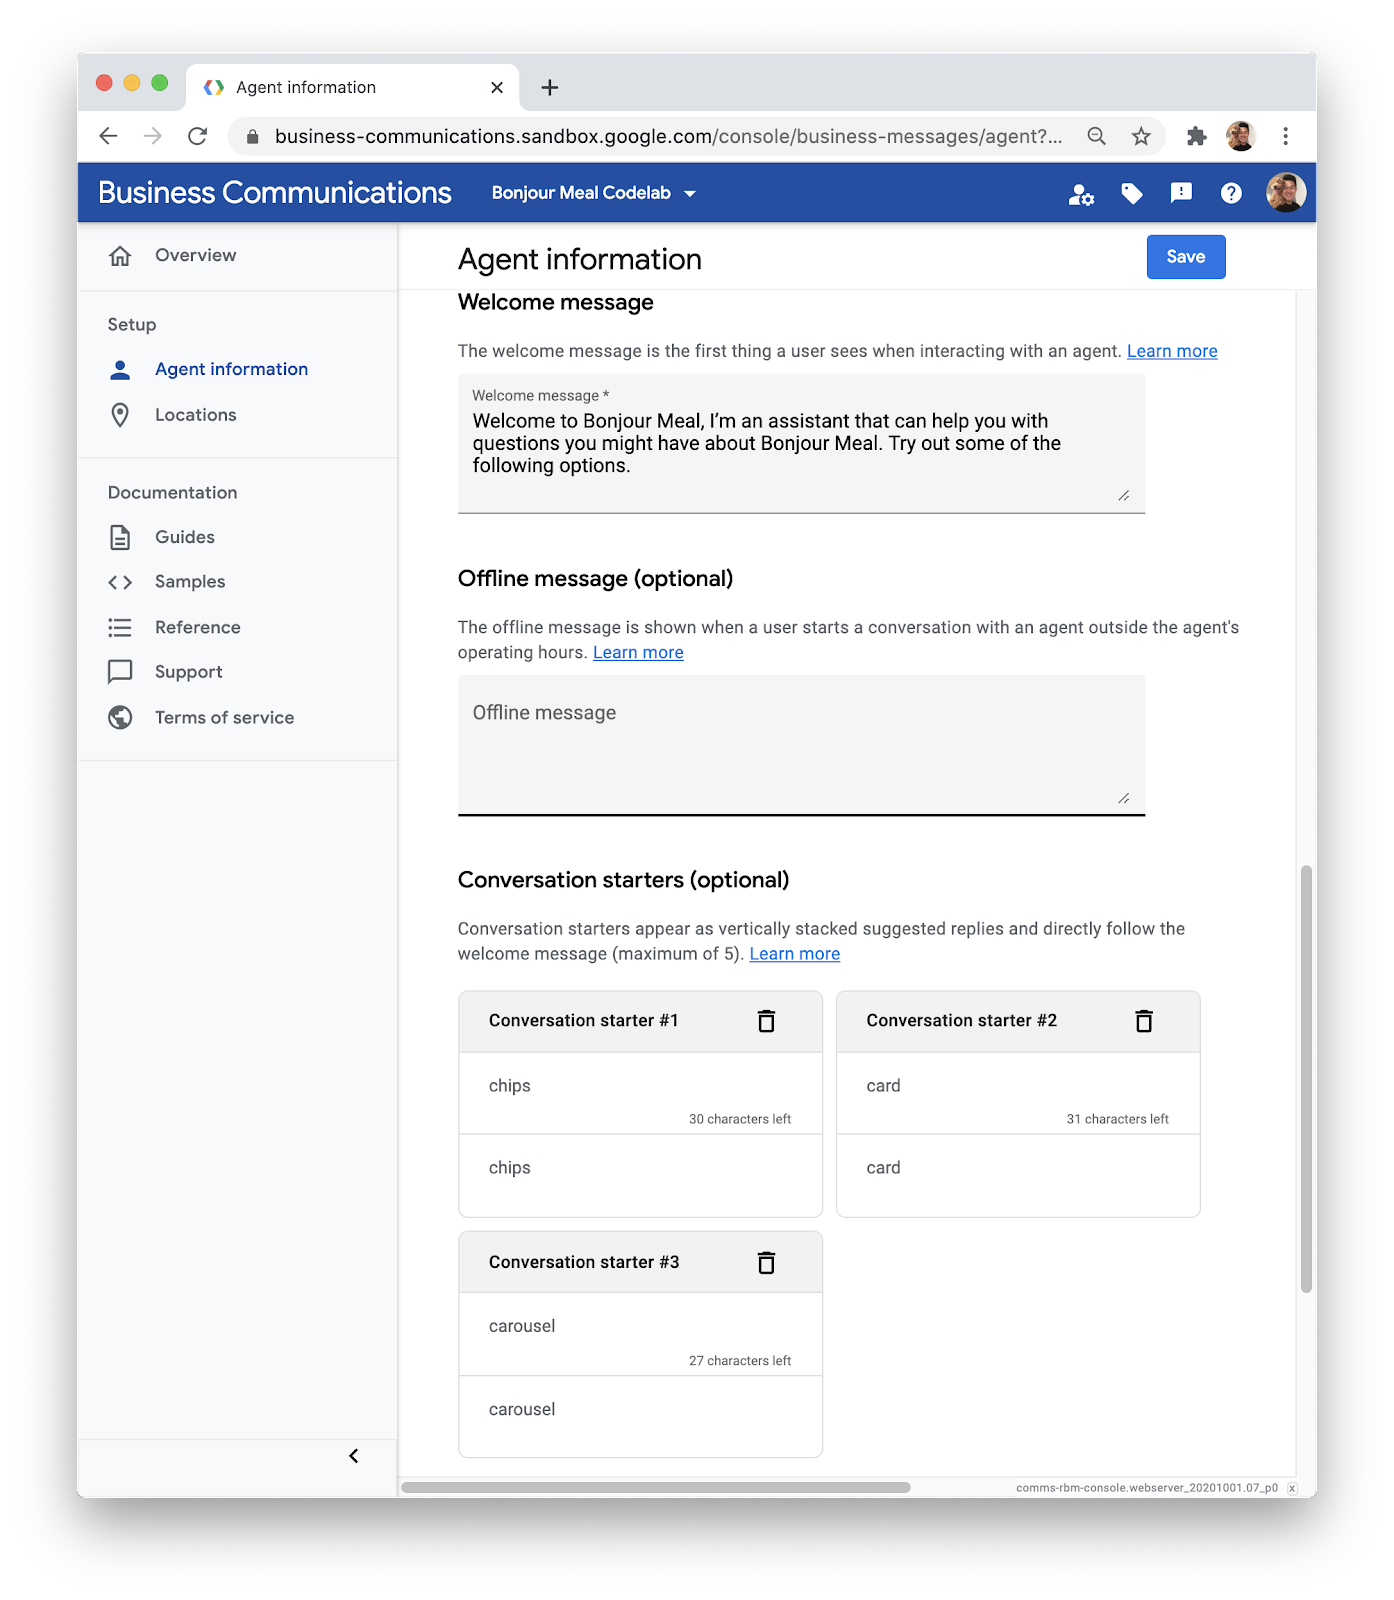
We will be creating two new conversation starters. For the first one, set the text to "What are your business hours?" and set the Postback data to "business-hours-inquiry". For the second conversation starter, set the text to "Can I make purchases here?" and set the Postback data to "online-shopping-info".
The result should be the configuration as the following screenshot:
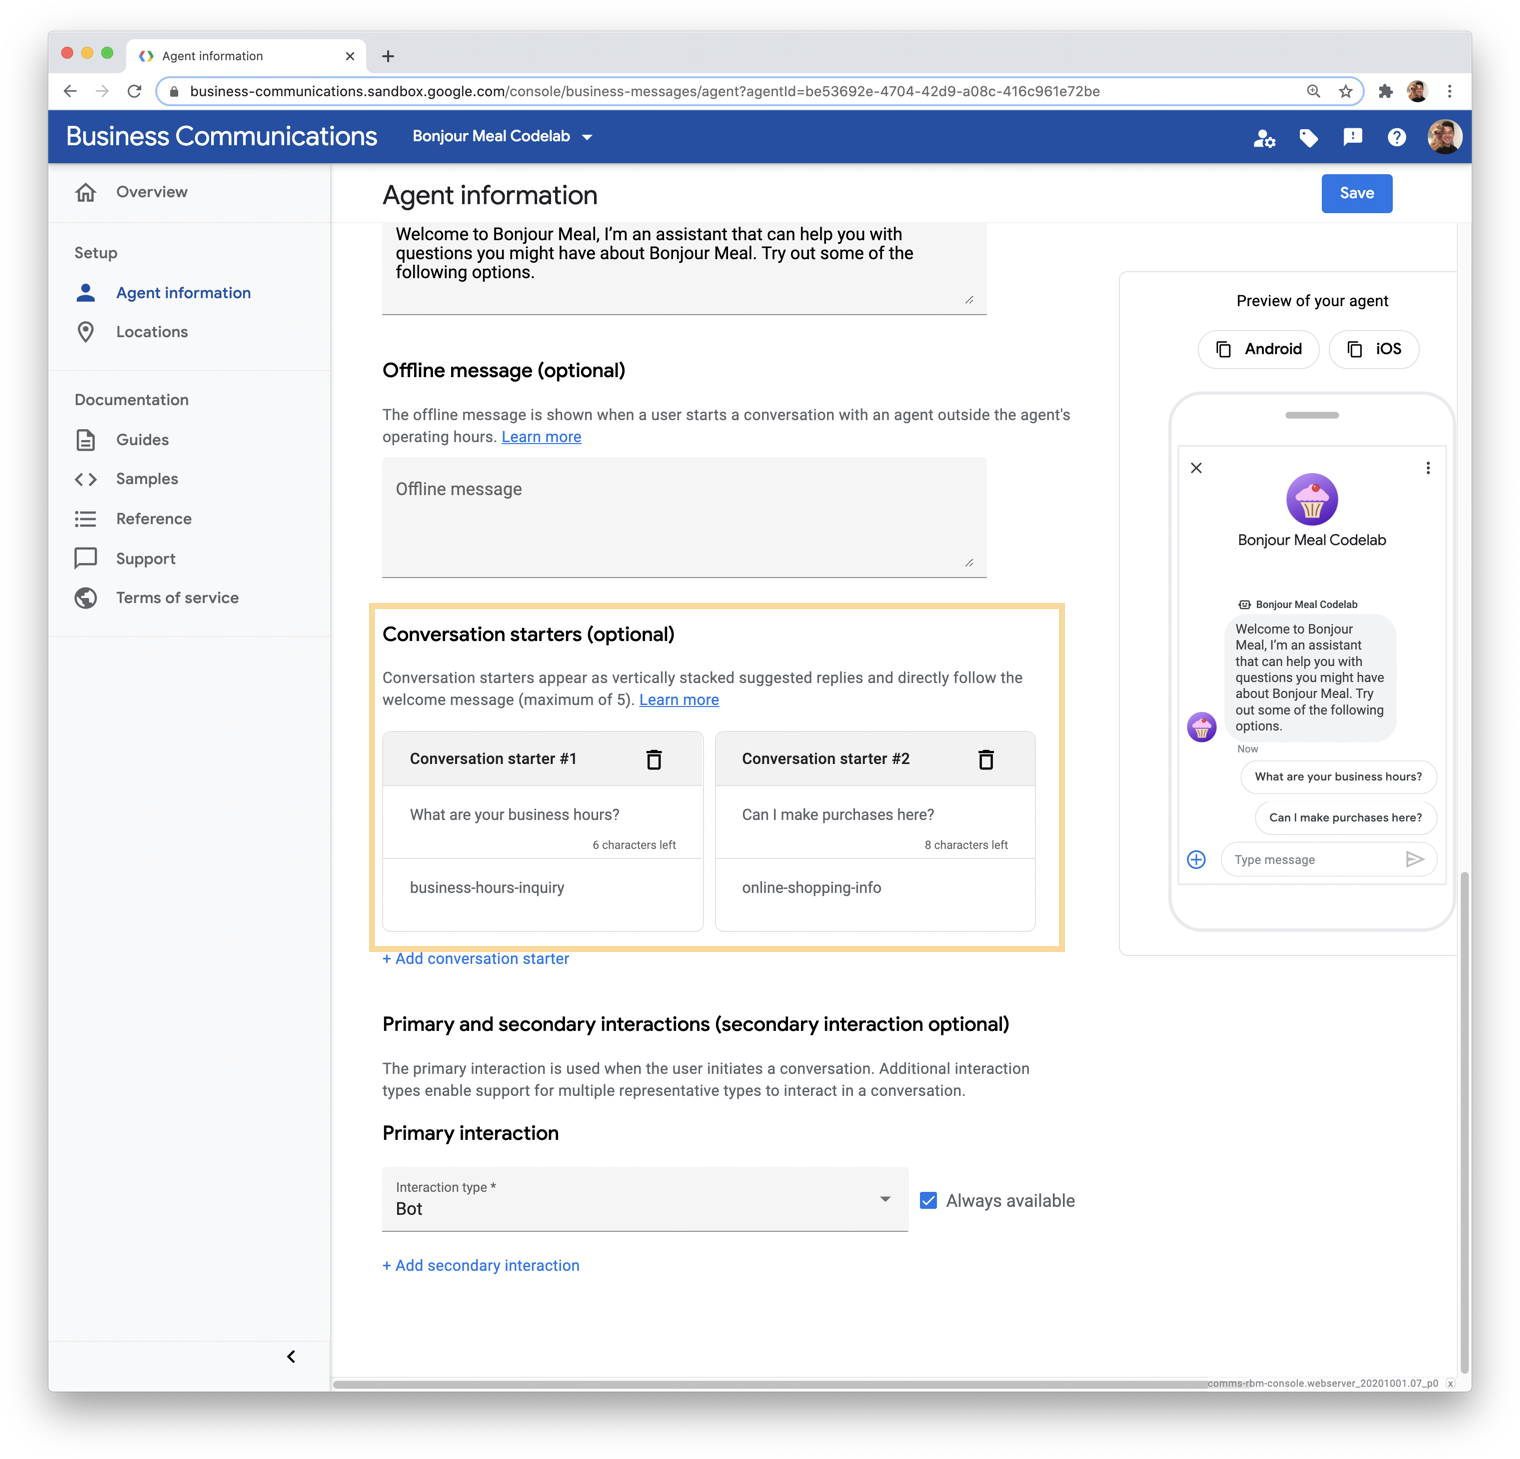
As with other changes made on the Business Communications Console, this will take some time to propagate before you will be able to see the changes produced on your mobile device.
Now that we are done with conversation starters, we'll also want a way to guide the user to a happy path once the conversation has begun. It's possible to use chips contextually after a message is sent to guide the user to other features the digital agent is capable of. So what we'll do is send a message with a suggestion to do something else with the agent whenever the user inquires about business hours or online shopping.
At the end of the function, add the following:
bm-django-echo-bot/bopis/views.py
...
def send_online_shopping_info_message(conversation_id):
...
    # at the end of the function, send a message with suggestions
    message_obj = BusinessMessagesMessage(
        messageId=str(uuid.uuid4().int),
        representative=BOT_REPRESENTATIVE,
        text='Let us know how else we can help you:',
        fallback='Please let us know how else we can help you.',
        suggestions=[
            BusinessMessagesSuggestion(
                reply=BusinessMessagesSuggestedReply(
                text='Business hours',
                postbackData='business-hours-inquiry')
            ),
        ])

    send_message(message_obj, conversation_id)
...

# Let's do the same with the business hours
def send_message_with_business_hours(conversation_id):
...
    # at the end of the function, send a message with suggestions
    message_obj = BusinessMessagesMessage(
        messageId=str(uuid.uuid4().int),
        representative=BOT_REPRESENTATIVE,
        text='Let us know how else we can help you:',
        fallback='Please let us know how else we can help you.',
        suggestions=[
            BusinessMessagesSuggestion(
                reply=BusinessMessagesSuggestedReply(
                text='Can I purchase online?',
                postbackData='online-shopping-inquiry')
            ),
        ])

    send_message(message_obj, conversation_id)
...
Be aware that the text field within a BusinessMessagesSuggestion is limited to 25 characters, as described in the documentation.
With updated conversation starters and strategic use of suggestion chips, here are some screenshots of the expected user experience.
6. Congratulations
Congratulations, you've successfully built your first Business Messages digital agent!
You deployed a web application to support your digital agent on Business Messages, used the Business Communications Console to modify the agent, and shaped the user experience with a digital agent by making changes to the source code.
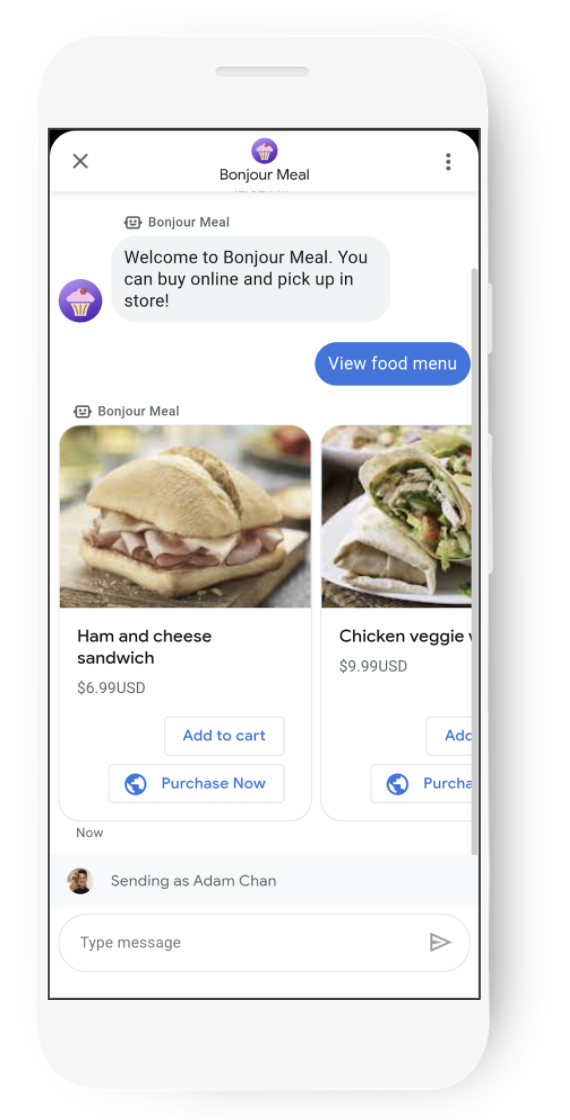
You now know the key steps required to build an interactive Business Messages experience and the possibilities from here on out are exciting. Your agent can be extended to support inventory lookup or introduce a shopping cart to track what the user might be interested in. You could use a carousel to showcase items on the menu and using suggestions, allow the user to select items they are interested in.
Here's a teaser of what that could possibly look like.
How do I build a great conversational experience?
The best agents provide contextual information to the user while giving them functionality through the conversation so they can be engaged and interact with the business as they would normally do over the phone or even in person. Think about how the following topics may apply to a conversation that you'd want to have with a business that you work with.
Provide context and set expectations
Providing context can be anything from explicitly stating how you can help the user to introducing the digital agent with a persona that the user can relate with. Successful agents on Business Messages use the representational avatar to show the user who they are talking with.
Setting expectations depends on the user experience that you are building. For instance, if your agent supports inventory lookup, first let the user know that availability may be low before providing the answer.
Provide functionality to the user
Consumers connect with businesses all the time. From inquiries like checking the status of an order to checking whether an item is in stock, Business Messages can support complex user interactions. Many users continue to call businesses over the phone to get their questions answered even if the answers are available on the businesses website. The result of this is that businesses have to invest more resources to handle call volume especially during holidays.
Keep the user engaged
Provide conversational touch points to keep the user engaged in the conversation. In between messages, you can invoke typing indicators to let the user know that you're processing an answer for the user.
With rich features like typing indicators, suggestion chips, rich cards, and carousels, you can guide the user through happy path user experiences to help them complete certain tasks such as ordering from a menu of items. The goal is to reduce call traffic to a business's phone line.
It's critical that a conversation provides functionality to the user. Users who connect with a business over messaging expect to have their questions answered quickly. In an non-ideal situation, the digital agent can't facilitate the conversation which may lead to a bad user experience. Fortunately, there are ways around this, such as transferring the conversation over to a live agent, which we'll cover in a future codelab.
What's next?
When you are ready, check out some of the following topics to learn about more complex interactions you can achieve in Business Messages
Reference docs
- SuggestedReply
- Business Messages Message reference doc
- JSON definition for RichCard