This guide describes how to set up and run a sample
Google Meet add-on by creating a main stage and side panel. The
"Hello World" examples on this page are also available on GitHub as complete
Meet add-ons built with either [basic JavaScript](https://github.com/googleworkspace/meet/tree/main/addons-web-sdk/samples/hello-world)
or [Next.js TypeScript](https://github.com/googleworkspace/meet/tree/main/addons-web-sdk/samples/hello-world-next-js).
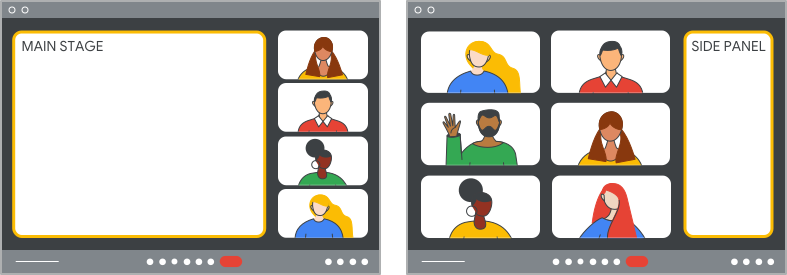 The main stage and side panel of the Meet Web Add-on.
## Install and import the SDK
You can access the SDK using npm or using gstatic.
### npm (recommended)
If your project uses npm, you can follow the instructions for the [Meet add-ons SDK npm package](https://www.npmjs.com/package/@googleworkspace/meet-addons).
First, install the npm package:
npm install @googleworkspace/meet-addons
Then, the Meet add-ons SDK is available by importing the
[`MeetAddonExport`](https://developers.google.com/workspace/meet/add-ons/reference/websdk/addon_sdk.meetaddonexport)
interface:
import {meet} from '@googleworkspace/meet-addons/meet.addons';
For TypeScript users, TypeScript definitions are packaged with the module.
TypeScript users should set `moduleResolution` to `"bundler"` within the
project's `tsconfig.json`, so that the
[package.json "exports" spec](https://www.typescriptlang.org/docs/handbook/modules/reference.html#packagejson-exports)
enables importing the [screen sharing package export](https://developers.google.com/workspace/meet/add-ons/reference/websdk/screenshare_api.meetaddonscreenshareexport).
### gstatic
The Google Meet add-ons SDK is available as a
JavaScript bundle from `gstatic`, a domain that serves static content.
To use the Meet add-ons SDK, add the following script tag to your
app:
The Meet add-ons SDK is available through the [`MeetAddon`](https://developers.google.com/workspace/meet/add-ons/reference/websdk/addon_sdk.meetaddon) interface under `window.meet.addon`.
> [!NOTE]
> **Note:** If you're using TypeScript, you can also grab the latest types from [`https://www.gstatic.com/meetjs/addons/1.1.0/meet.addons.d.ts`](https://www.gstatic.com/meetjs/addons/1.1.0/meet.addons.d.ts). Just save the file locally.
## Create a side-panel page
The side panel displays the installed add-ons that you
can select and use. Once you select your add-on, an
iframe loads the side panel URL you [specify in the
add-on manifest](https://developers.google.com/workspace/meet/add-ons/guides/deploy-add-on#create-deployment).
This should be the entry point of your app, and should at minimum do the
following things:
1. Indicate add-on loading is complete.
Meet shows a loading screen while the
add-on is loading. When the
add-on session
is established by calling the [`createAddonSession`()](https://developers.google.com/workspace/meet/add-ons/reference/websdk/addon_sdk.meetaddon.createaddonsession)
method, Meet treats this as a signal from the
add-on that loading has finished, and that the user
can interact with the third-party content. Your add-on
shouldn't call the `createAddonSession()` method until your content has finished
loading.
2. Create the side panel client. To access the Meet add-ons SDK in the
side panel, you must instantiate a [`MeetSidePanelClient`](https://developers.google.com/workspace/meet/add-ons/reference/websdk/addon_sdk.meetsidepanelclient)
interface. This provides control over your main Meet add-ons SDK
experience.
3. Start the activity. This allows others to join your
add-on and optionally opens your
add-on in the main stage.
The following code sample shows how the session creates a side panel client, and
how the side panel client starts an activity in the main stage:
### Basic JS + Webpack
In a new file named `main.js`, define a function that creates an
add-on session, the side panel client, and starts
the activity when a button with the ID `'start-activity'` is clicked:
> [!NOTE]
> **Note:** This assumes you installed the Meet add-ons SDK [using npm](https://developers.google.com/workspace/meet/add-ons/guides/quickstart#npm-recommended).
import { meet } from '@googleworkspace/meet-addons/meet.addons';
const CLOUD_PROJECT_NUMBER = 'CLOUD_PROJECT_NUMBER';
const MAIN_STAGE_URL = 'MAIN_STAGE_URL';
/**
* Prepares the add-on Side Panel Client, and adds an event to launch the
* activity in the main stage when the main button is clicked.
*/
export async function setUpAddon() {
const session = await meet.addon.createAddonSession({
cloudProjectNumber: CLOUD_PROJECT_NUMBER,
});
const sidePanelClient = await session.createSidePanelClient();
document
.getElementById('start-activity')
.addEventListener('click', async () => {
await sidePanelClient.startActivity({
mainStageUrl: MAIN_STAGE_URL
});
});
}
In a new file named `SidePanel.html`, define the button that launches the
activity, and call the function from your `main.js` on document load:
Meet add-on Side Panel
This is the add-on Side Panel. Only you can see this.
You'll also need to bundle the Meet add-ons SDK with your
`main.js` and expose them in a library. We recommend doing so by [installing webpack](https://webpack.js.org/guides/installation/#local-installation)
and using the [`library` option](https://webpack.js.org/guides/author-libraries/#expose-the-library)
in your `webpack.config.js` file:
module.exports = {
entry: './main.js',
output: {
library: 'helloWorld',
...
},
...
};
### Next.js
> [!NOTE]
> **Note:** This example uses Next.js app routing to add a page to a Next.js app. To learn more about building your first page in Next.js, see [the official
> Next.js docs on routing](https://nextjs.org/docs/app/building-your-application/routing/layouts-and-templates).
Add a new `Page` to display the side panel. This page creates an
add-on session and side panel client on load, and
starts the activity when a button is clicked:
'use client';
import { useEffect, useState } from 'react';
import {
meet,
MeetSidePanelClient,
} from '@googleworkspace/meet-addons/meet.addons';
export default function Page() {
const [sidePanelClient, setSidePanelClient] = useState();
// Launches the main stage when the main button is clicked.
async function startActivity(e: unknown) {
if (!sidePanelClient) {
throw new Error('Side Panel is not yet initialized!');
}
await sidePanelClient.startActivity({
mainStageUrl: 'MAIN_STAGE_URL'
});
}
/**
* Prepares the add-on Side Panel Client.
*/
useEffect(() => {
(async () => {
const session = await meet.addon.createAddonSession({
cloudProjectNumber: 'CLOUD_PROJECT_NUMBER',
});
setSidePanelClient(await session.createSidePanelClient());
})();
}, []);
return (
<>
This is the add-on Side Panel. Only you can see this.
);
}
Replace the following:
- CLOUD_PROJECT_NUMBER: the project number of your Google Cloud project.
- MAIN_STAGE_URL: the main stage URL that you create in the next step.
## Create a main stage page
The main stage is the main focus area where you can display the
add-on if a larger working space is needed. The main
stage opens once the activity starts. To access Meet add-ons SDK
features in the main stage, you must use the [`MeetMainStageClient`](https://developers.google.com/workspace/meet/add-ons/reference/websdk/addon_sdk.meetmainstageclient) interface.
> [!IMPORTANT]
> **Important:** Note that your add-on must again call the `createAddonSession()` method once your content has finished loading. Otherwise, the add-on fails to start in the main stage.
The following code sample shows an example of a main stage page that renders a
custom `div` to say "Hello, world!":
### Basic JS + Webpack
Add the following function to the `main.js` file you already created, so
that the main stage can signal that it has finished loading:
/**
* Prepares the add-on Main Stage Client, which signals that the add-on has
* successfully launched in the main stage.
*/
export async function initializeMainStage() {
const session = await meet.addon.createAddonSession({
cloudProjectNumber: CLOUD_PROJECT_NUMBER,
});
await session.createMainStageClient();
}
Then, add a new `MainStage.html` file, which calls the new
`initializeMainStage` function and displays custom "hello, world" content:
This is the add-on Main Stage. Everyone in the call can see this.
Hello, world!
### Next.js
Add a `Page` to display the main stage. This page creates an
add-on session and side panel client on load, and
displays custom "hello, world" content:
'use client';
import { useEffect } from 'react';
import { meet } from '@googleworkspace/meet-addons/meet.addons';
export default function Page() {
/**
* Prepares the add-on Main Stage Client, which signals that the add-on
* has successfully launched in the main stage.
*/
useEffect(() => {
(async () => {
const session = await meet.addon.createAddonSession({
cloudProjectNumber: 'CLOUD_PROJECT_NUMBER',
});
await session.createMainStageClient();
})();
}, []);
return (
<>
This is the add-on Main Stage.
Everyone in the call can see this.
Hello, world!
);
}
Replace CLOUD_PROJECT_NUMBER with the project number of your
Google Cloud project.
## Run the sample
To run locally, do the following:
### Basic JS + Webpack
Run webpack in order to bundle your `main.js` file along with the
Meet add-ons SDK:
npx webpack
Open your `SidePanel.html` file and `MainStage.html` file in any browser.
This should look the same as the deployment of the [Basic JS sample on GitHub](https://github.com/googleworkspace/meet/tree/main/addons-web-sdk/samples/hello-world)
to a [SidePanel.html](https://googleworkspace.github.io/meet/hello-world/SidePanel.html)
and [MainStage.html](https://googleworkspace.github.io/meet/hello-world/MainStage.html)
on GitHub Pages.
### Next.js
Run Next:
next dev
Navigate to `http://localhost:3000/sidepanel` or
`http://localhost:3000/mainstage`. These should look the same as the
deployment of the [Next.js sample on GitHub](https://github.com/googleworkspace/meet/tree/main/addons-web-sdk/samples/hello-world-next-js)
to a [SidePanel.html](https://googleworkspace.github.io/meet/hello-world/SidePanel.html)
and [MainStage.html](https://googleworkspace.github.io/meet/hello-world/MainStage.html)
on GitHub Pages.
> [!NOTE]
> **Note:** In the [Chrome DevTools](https://developer.chrome.com/docs/devtools) console when running locally, there's an error that says `Missing required Meet
> SDK URL parameter: meet_sdk`. This is expected until you run the application within Meet, as Meet will handle passing in this URL parameter. For more information on developer tools, see [Manage developer tools for Meet add-ons](https://developers.google.com/workspace/meet/add-ons/guides/devtools).
## Deploy the Meet add-on
Deploying an add-on is a two-step process:
1. First, you must deploy the code from this quickstart to a website that you
own, using any deployment solution you prefer. The official
[sample Google Meet add-ons on GitHub](https://github.com/googleworkspace/meet/tree/main/addons-web-sdk/samples/)
are deployed using [a GitHub workflow](https://github.com/googleworkspace/meet/blob/main/.github/workflows/publish-sample-add-ons.yml)
to GitHub Pages, but you can also use tools like
[Firebase Hosting](https://firebase.google.com/docs/hosting).
2. Once your application is deployed, you must set up the deployment of the
add-on by following the instructions to
[Deploy a Meet add-on](https://developers.google.com/workspace/meet/add-ons/guides/deploy-add-on).
Following that deployment guide creates the final
Meet add-on that's an iframe within Meet
of the application you deployed in step one.
## Run the sample
1. Go to [Meet](http://meet.google.com/new).
2. Click the meeting tools button
.
3. In the **Your add-ons** section, you should see your
add-on. Select it to run the
add-on.
## Add more features
Now that you have a basic side panel and main stage, you can begin adding other
features to your add-on:
- [Collaboration using a Meet add-on](https://developers.google.com/workspace/meet/add-ons/guides/collaborate-in-the-add-on)
- [Messages between the main stage and side panel](https://developers.google.com/workspace/meet/add-ons/guides/frame-to-frame-messaging)
- [Promotion of the add-on](https://developers.google.com/workspace/meet/add-ons/guides/promote)
You are encouraged to use the [sample Meet add-ons on GitHub](https://github.com/googleworkspace/meet/tree/main/addons-web-sdk/samples)
as references for building out these features.