As a Google Chat apps developer you might need to debug code to
test changes or troubleshoot complex issues. Debugging Chat apps
can be done in many different ways depending on your app's architecture, what
the app does, how your app is deployed, and your preferences.
This page explains how to debug an HTTP Chat app using
ngrok, which is a unified ingress platform that you can use to test local
development environments. In this guide, you test code changes in a local
environment and troubleshoot issues in a remote environment.
> [!NOTE]
> **Note:** If your Chat app is built with Google Apps Script, use the following instead:
>
> - [Test a
> deployment](https://developers.google.com/apps-script/concepts/deployments#test-deployment)
> - [Use
> the debugger and breakpoints](https://developers.google.com/apps-script/guides/support/troubleshooting#use-debugger)
## Debug from local development environment
In this section, you interact with your Chat app that
executes in your local environment.

**Figure 1.** Debug in a local development environment.
### Workshop
### Node.js
[Video](https://www.youtube.com/watch?v=vPv9dp5dwQ8)
### Python
[Video](https://www.youtube.com/watch?v=wnme61JTUiw)
### Java
[Video](https://www.youtube.com/watch?v=0k9xzyC--j4)
### Prerequisites
### Node.js
- Latest versions of `node` and `npm` [installed](https://docs.npmjs.com/downloading-and-installing-node-js-and-npm) in your local environment.
- Latest version of `nodemon` [installed](https://nodemon.io/) in your local
environment, it's used for auto-reload purposes:
npm install -g nodemon
- An HTTP Chat app that's configured for
messaging. You can follow the sections
[Prerequisites](https://developers.google.com/workspace/chat/quickstart/gcf-app#prerequisites),
[Set up the
environment](https://developers.google.com/workspace/chat/quickstart/gcf-app#set_up_the_environment),
and [Publish the app to Google
Chat](https://developers.google.com/workspace/chat/quickstart/gcf-app#publish_the_app_to) of the
[Quickstart guide](https://developers.google.com/workspace/chat/quickstart/gcf-app). The only
differences are that you need to set the **App name** to `Debug App` and
the **HTTP endpoint URL** to anything such as `http://example.com`.
- An IDE set up in your local environment that can debug. We use the
[`Visual Studio Code`
IDE](https://code.visualstudio.com/docs/setup/setup-overview) and its default
[debugging](https://developers.google.com/workspace/chat/code.visualstudio.com/docs/editor/debugging) features in
this guide for illustration purposes.
- `Git`
[installed](https://git-scm.com/book/en/v2/Getting-Started-Installing-Git)
in your local environment.
- A [`ngrok`](https://ngrok.com) account.
### Python
- Latest version of `python3` [installed](https://docs.python.org/3/using/index.html) in your local environment.
- Latest version of [`pip`](https://pypi.org/) and [`virtualenv`](https://docs.python.org/3/library/venv.html) installed in your local environment, they are used to manage Python packages and virtual environments respectively.
- An HTTP Chat app that's configured for messaging. You can follow the sections [Prerequisites](https://developers.google.com/workspace/chat/quickstart/gcf-app#prerequisites), [Set up the
environment](https://developers.google.com/workspace/chat/quickstart/gcf-app#set_up_the_environment), and [Publish the app to Google
Chat](https://developers.google.com/workspace/chat/quickstart/gcf-app#publish_the_app_to) of the [Quickstart guide](https://developers.google.com/workspace/chat/quickstart/gcf-app). The only differences are that you need to set the **App name** to `Debug App` and the **HTTP endpoint URL** to anything such as `http://example.com`.
- An IDE set up in your local environment that can debug. We use the [`Visual Studio Code`
IDE](https://code.visualstudio.com/docs/setup/setup-overview) and its default [debugging](https://developers.google.com/workspace/chat/code.visualstudio.com/docs/editor/debugging) features in this guide for illustration purposes.
- `Git` [installed](https://git-scm.com/book/en/v2/Getting-Started-Installing-Git) in your local environment.
- A [`ngrok`](https://ngrok.com) account.
- Latest version of `gcloud` [installed](https://cloud.google.com/sdk/docs/install) and [initialized](https://cloud.google.com/sdk/docs/initializing) in your local environment.
### Java
- Latest stable version of the `Java SE 11's JDK` [installed](https://docs.oracle.com/en/java/javase/11/) in your local environment.
- Latest version of `Apache Maven` [installed](https://maven.apache.org/install.html) in your local environment, it's used to manage Java projects.
- An HTTP Chat app that's configured for messaging. You can follow the sections [Prerequisites](https://developers.google.com/workspace/chat/quickstart/gcf-app#prerequisites), [Set up the
environment](https://developers.google.com/workspace/chat/quickstart/gcf-app#set_up_the_environment), and [Publish the app to Google
Chat](https://developers.google.com/workspace/chat/quickstart/gcf-app#publish_the_app_to) of the [Quickstart guide](https://developers.google.com/workspace/chat/quickstart/gcf-app). The only differences are that you need to set the **App name** to `Debug App` and the **Message** trigger **HTTP endpoint URL** to anything such as `http://example.com`.
- An IDE set up in your local environment that can debug. We use the [`Visual Studio Code`
IDE](https://code.visualstudio.com/docs/setup/setup-overview) and its default [debugging](https://developers.google.com/workspace/chat/code.visualstudio.com/docs/editor/debugging) features in this guide for illustration purposes.
- `Git` [installed](https://git-scm.com/book/en/v2/Getting-Started-Installing-Git) in your local environment.
- A [`ngrok`](https://ngrok.com) account.
- Latest version of `gcloud` [installed](https://cloud.google.com/sdk/docs/install) and [initialized](https://cloud.google.com/sdk/docs/initializing) in your local environment.
### Make the localhost service available publicly
You need to connect your local environment to the internet so that the
Chat app can access it. The `ngrok` application is used
to redirect HTTP requests made to a public URL to your local environment.
1. In a browser in your local environment, sign in to your `ngrok` account.
2. [Install the application and set up your `authtoken` in your local
environment.](https://dashboard.ngrok.com/get-started/setup)
3. [Create](https://dashboard.ngrok.com/get-started/setup) a static domain in your `ngrok` account, it's referenced as `NGROK_STATIC_DOMAIN` in the instructions of this guide.
### Configure the Chat app
Configure the Chat app to send all its HTTP requests to
your static domain.
1. In the Google API Console, open the Google Chat API page:
[Go to Google Chat API page](https://console.developers.google.com/apis/api/chat.googleapis.com)
2. Click the **Configuration** tab.
3. Go to **Interactive features** \> **Connection settings** \> **Triggers** and
set the **HTTP endpoint URL** for the triggers you want to test (such as
**Message**) to:
https://NGROK_STATIC_DOMAIN
Replace `NGROK_STATIC_DOMAIN` with the static domain in
your `ngrok` account.
4. Click **Save**.

**Figure 2.** The Chat app sends all its HTTP requests
to the static domain. The `ngrok` public service acts as a bridge between the
Chat app and the application code that executes
locally.
### Test the Chat app
You can locally deploy, configure, test, debug, and auto-reload your
Chat app.
> [!NOTE]
> **Note:** The Chat app executes with the [Functions
> Framework](https://cloud.google.com/run/docs/local-dev-functions) in the examples for `Python` and `Java` and with the [Express
> Framework](https://expressjs.com/) in the example for `Node.js`.
### Node.js
1. Clone the `googleworkspace/add-ons-samples` repository from GitHub
to your local environment, it contains the code of the application to
execute:
git clone https://github.com/googleworkspace/add-ons-samples.git
2. From the `Visual Studio Code` IDE installed in your local environment,
do the following:
1. In a new window, open the folder `add-ons-samples/node/chat/avatar-app`.
2. Configure the application for auto-reload debug by adding two
scripts in the `package.json` file:
{
...
"scripts": {
...
"debug": "node --inspect index.js",
"debug-watch": "nodemon --watch ./ --exec npm run debug"
}
...
}
3. From the root directory, install the application:
npm install
4. Create and configure a launch named `Debug Watch` that triggers the
script `debug-watch` by creating the file `.vscode/launch.json` in
the root directory:
{
"version": "0.2.0",
"configurations": [{
"type": "node",
"request": "launch",
"name": "Debug Watch",
"cwd": "${workspaceRoot}",
"runtimeExecutable": "npm",
"runtimeArgs": ["run-script", "debug-watch"]
}]
}
5. Add a breakpoint that pauses the HTTP request processing in the
`index.js` file, and [start running and
debugging](https://code.visualstudio.com/docs/editor/debugging) with the
`Debug Watch` configuration added before. The application is now
running and listening for HTTP requests on the port `9000`.
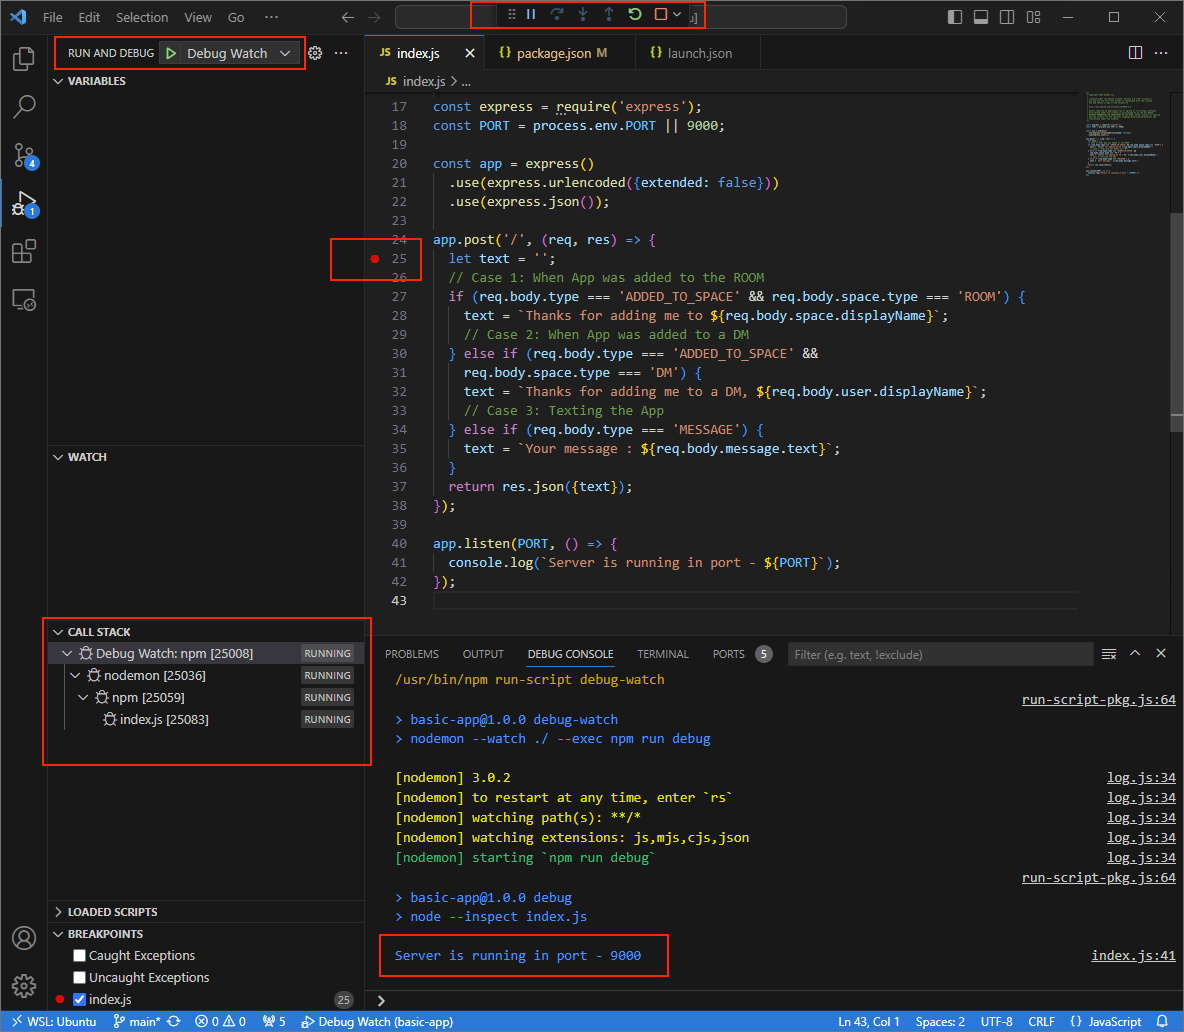
**Figure 3.** The application is running and listening for HTTP
requests on the port `9000`.
3. Launch the `ngrok` application in your local environment:
ngrok http --domain=NGROK_STATIC_DOMAIN 9000
Replace `NGROK_STATIC_DOMAIN` with the static domain in
your `ngrok` account. All requests are now redirected to your local
environment and the port used by the application.
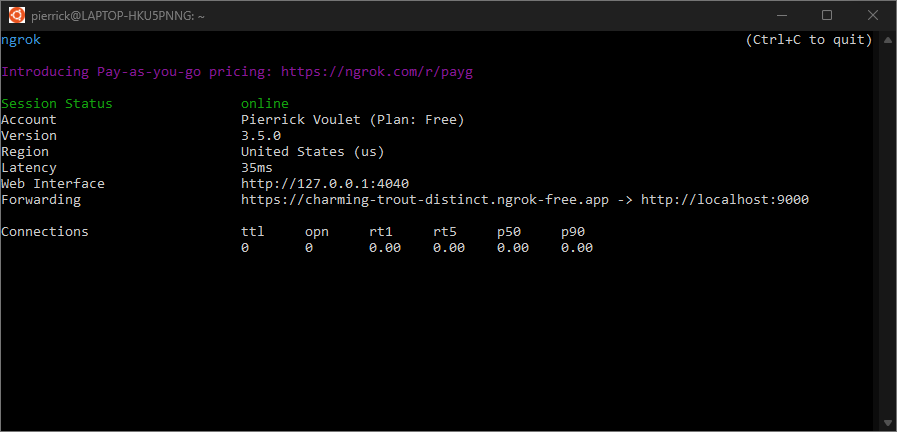
**Figure 4.** The terminal with `ngrok` server running and redirecting.
4. A web interface is also started on your localhost by the `ngrok`
application, you can monitor all activities by opening it in a browser.
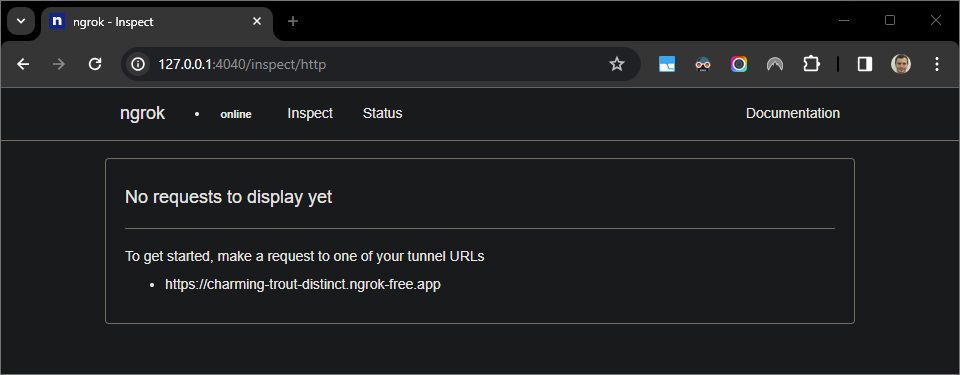
**Figure 5.** The web interface hosted by the `ngrok` application
showing no HTTP requests.
5. Test your Chat app by sending it a direct
message:
- Open Google Chat.
[Go to Google Chat](https://chat.google.com)
- Click **New chat** .
- In the dialog, enter the name of your
Chat app.
- In the search results, find your Chat app,
click **Add** \>
**Chat**.
- In the direct message space, type `Hello` and press `enter`. Your
Chat app does not reply because it's being
actively debugged.
6. In the `Visual Studio Code` in your local environment, you can see that
the execution is paused at the breakpoint that was set.
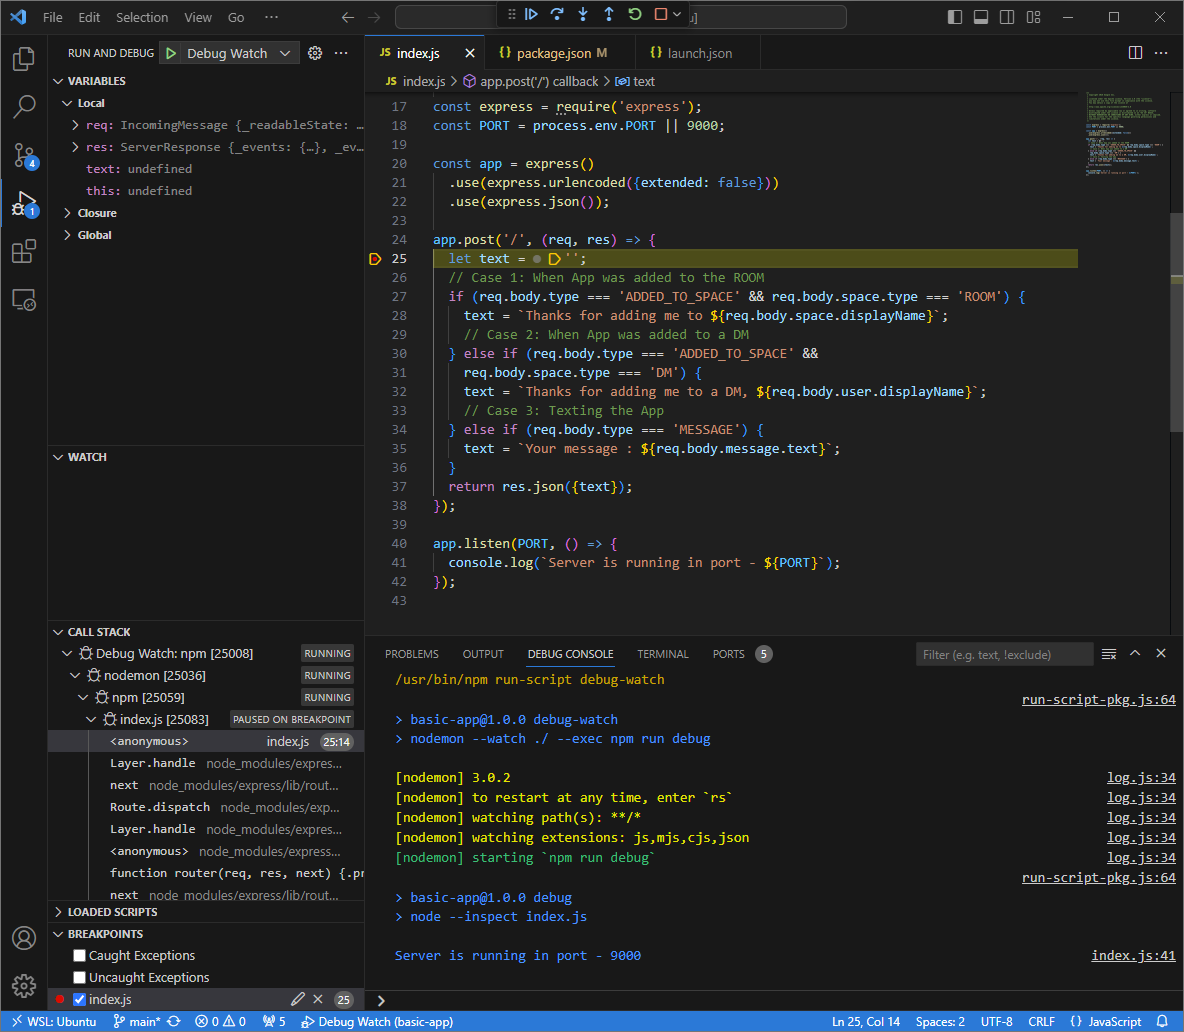
**Figure 6.** The execution is paused at the breakpoint that was set.
7. When you resume the execution from the debugger of `Visual Studio Code`
before Google Chat times out the Chat app
replies to your message.
8. You can check the HTTP request and response logs from the web interface
hosted by the `ngrok` application in your local environment.
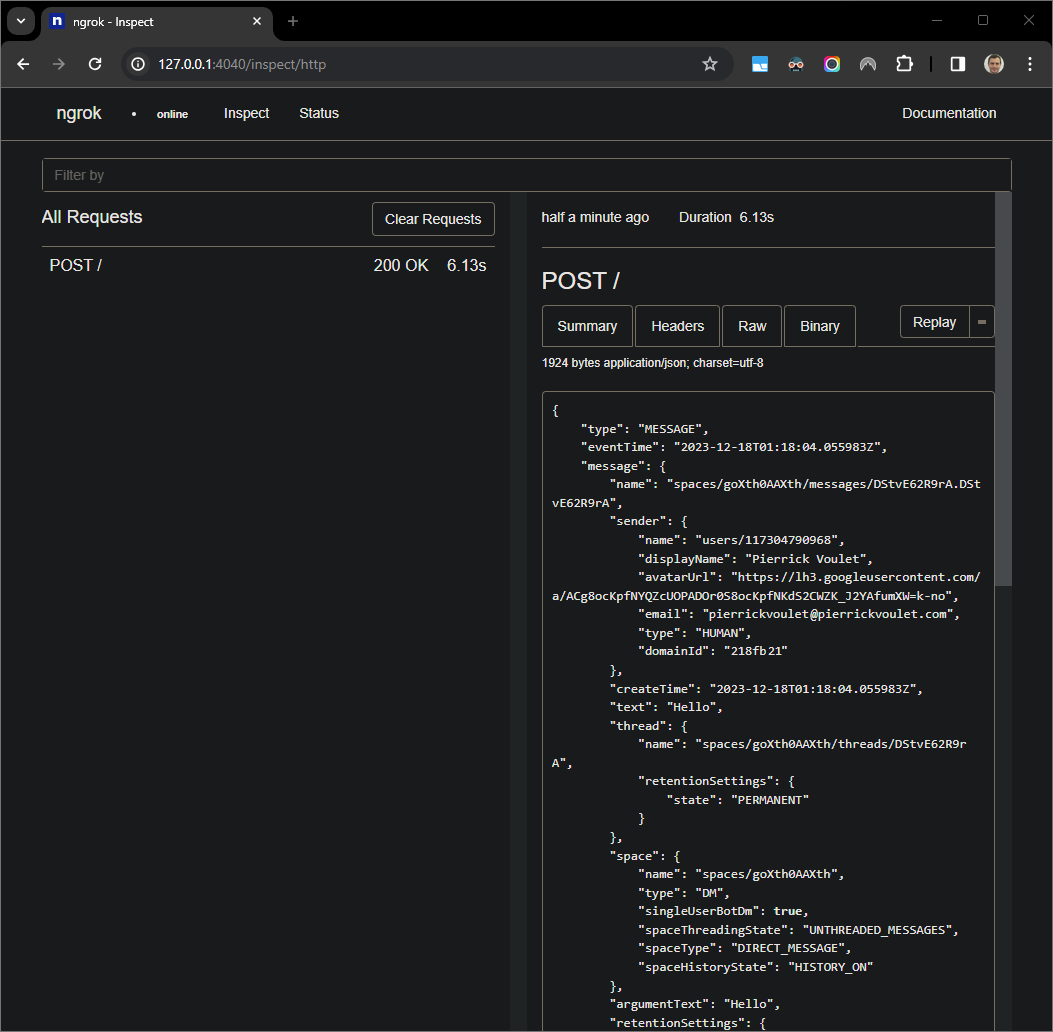
**Figure 7.** The HTTP request from the web interface hosted by the
`ngrok` application.
9. To change the application behavior, update the response text in the
`index.js` file. When you save
the file, `nodemon` automatically reloads the application with the
updated source code and `Visual Studio Code` remains in debug mode.
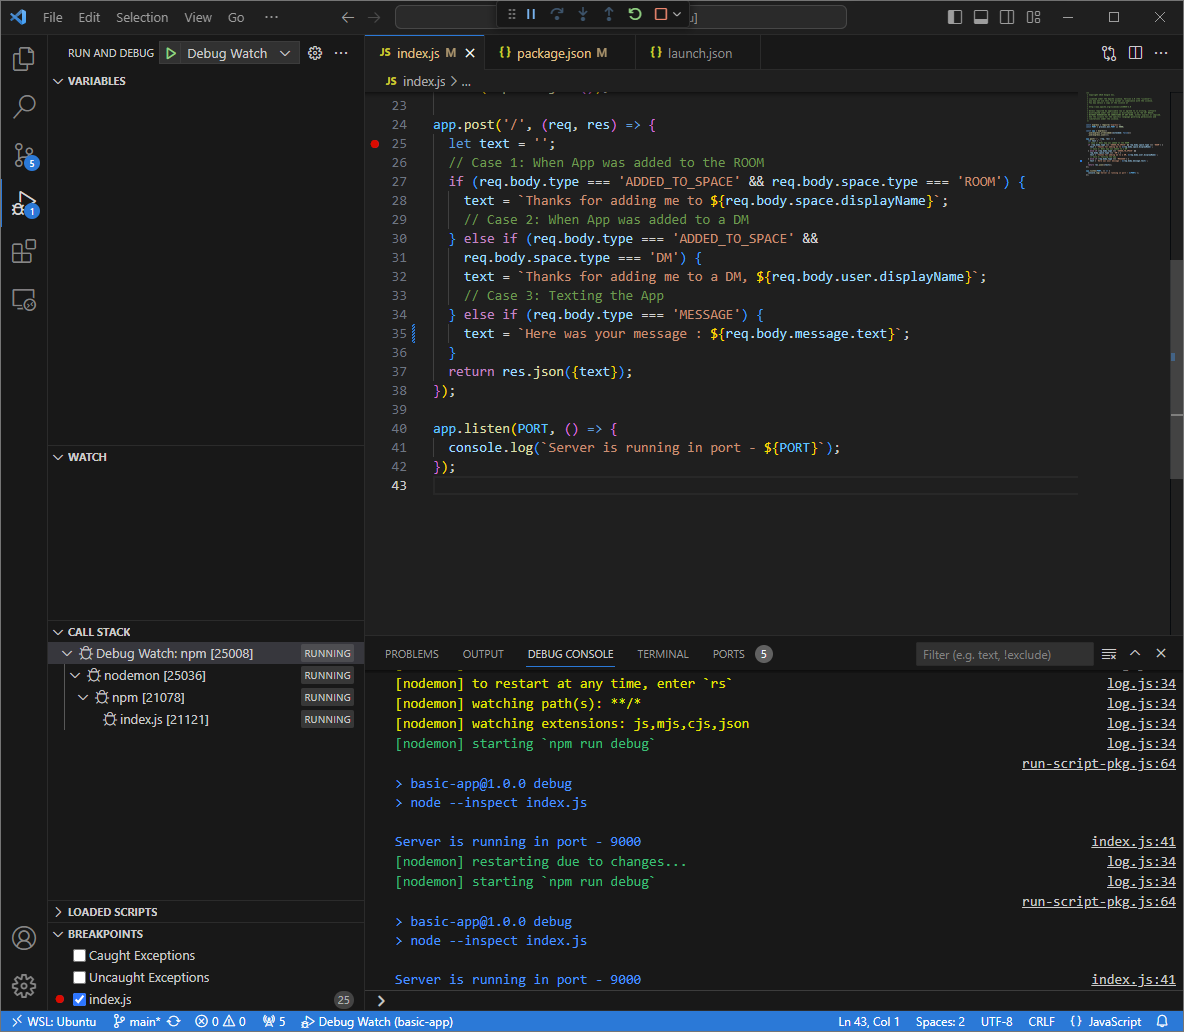
**Figure 8.** The application is running and listening for HTTP requests
on the port `9000` with the code change loaded.
10. This time, instead of sending a second message `Hello` in the space, you
can select the last HTTP request logged on the web interface hosted by
the `ngrok` application in your local environment and click `Replay`.
Same as last time, your Chat app does not reply
because it's being actively debugged.
11. When you resume the execution from the debugger of `Visual Studio Code`
you can see from the web interface hosted by the `ngrok` application in
your local environment that the application generates a response with
the updated version of the message.
### Python
1. Acquire new user credentials to use for [Application Default
Credentials](https://cloud.google.com/sdk/gcloud/reference/auth/application-default):
gcloud config set project PROJECT_ID
gcloud auth application-default login
Replace `PROJECT_ID` with the
[project ID](https://cloud.google.com/resource-manager/docs/creating-managing-projects#before_you_begin)
for the Cloud project of the app.
2. Clone the `googleworkspace/add-ons-samples` repository from GitHub
to your local environment, it contains the application code:
git clone https://github.com/googleworkspace/add-ons-samples.git
3. From the `Visual Studio Code` IDE installed in your local environment,
do the following:
1. In a new window, open the folder `add-ons-samples/python/chat/avatar-app`.
2. Create a new virtual environment for Python `env` and activate it:
virtualenv env
source env/bin/activate
3. Install all project dependencies using `pip` in the virtual
environment:
pip install -r requirements.txt
4. Create the file `.vscode/launch.json` in the root directory and
configure a launch named `Debug Watch` that triggers the application
from the module `functions-framework` on port `9000` in debug mode
on the virtual environment `env`:
{
"version": "0.2.0",
"configurations": [{
"type": "python",
"request": "launch",
"name": "Debug Watch",
"python": "${workspaceFolder}/env/bin/python3",
"module": "functions_framework",
"args": [
"--target", "avatar_app",
"--port", "9000",
"--debug"
]
}]
}
5. Add a breakpoint that pauses the HTTP request processing in the
`main.py` file, and [start running and
debugging](https://code.visualstudio.com/docs/editor/debugging) with the
`Debug Watch` configuration added before. The application is now
running and listening for HTTP requests on the port `9000`.
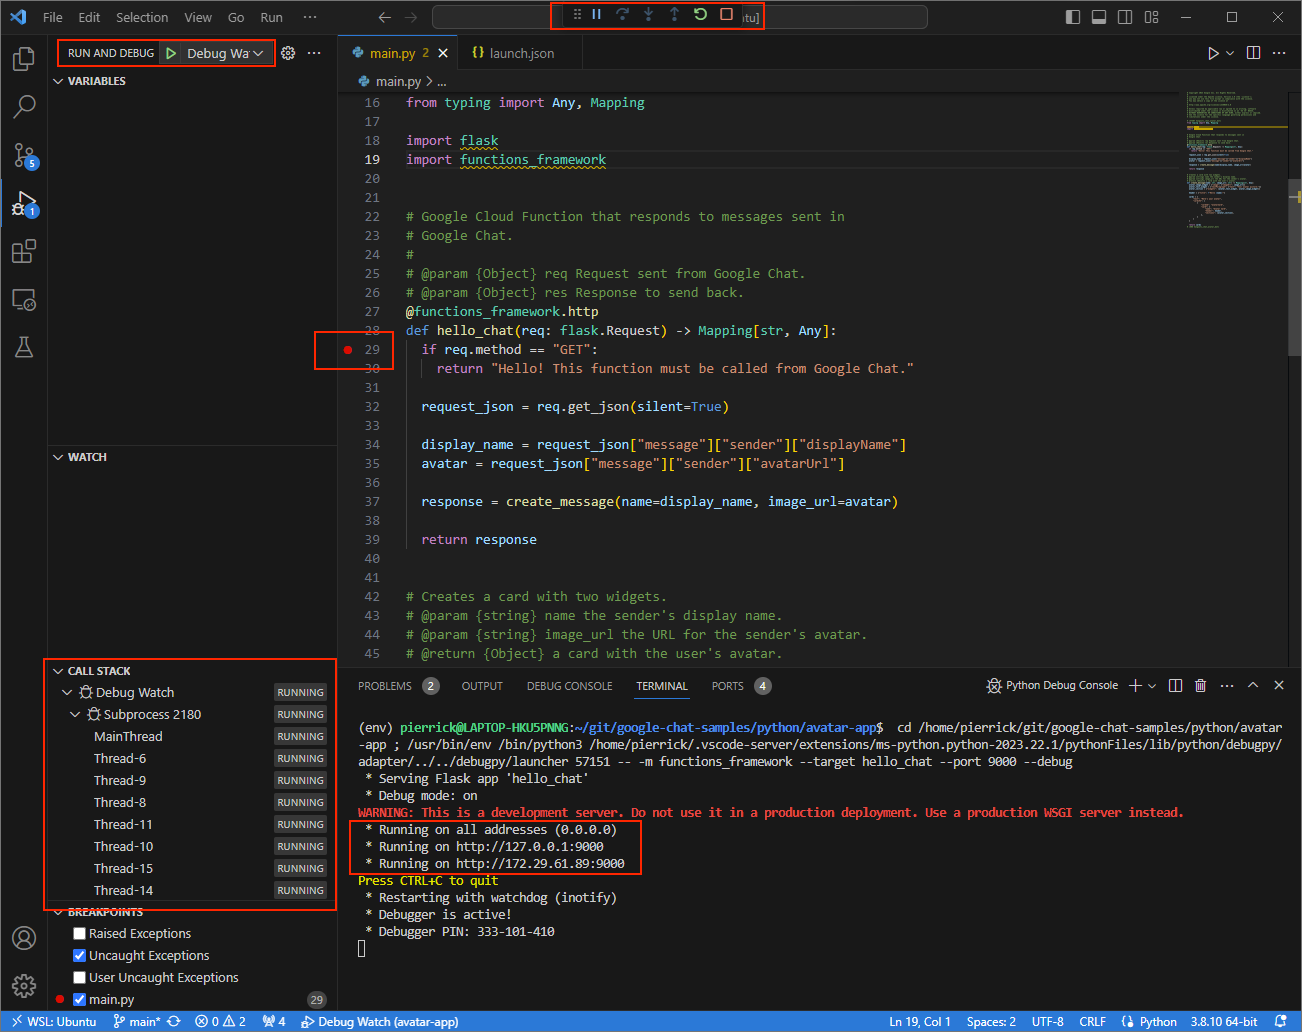
**Figure 3.** The application is running and listening for HTTP
requests on the port `9000`.
4. Launch the `ngrok` application in your local environment:
ngrok http --domain=NGROK_STATIC_DOMAIN 9000
Replace `NGROK_STATIC_DOMAIN` with the static domain in
your `ngrok` account. All requests are now redirected to your local
environment and the port used by the application.

**Figure 4.** The terminal with `ngrok` server running and redirecting.
5. A web interface is also started on your localhost by the `ngrok`
application, you can monitor all activities by opening it in a browser.

**Figure 5.** The web interface hosted by the `ngrok` application
showing no HTTP requests.
6. Test your Chat app by sending it a direct
message:
- Open Google Chat.
[Go to Google Chat](https://chat.google.com)
- Click **New chat** .
- In the dialog, enter the name of your
Chat app.
- In the search results, find your Chat app,
click **Add** \>
**Chat**.
- In the direct message space, type `Hey!` and press `enter`. Your
Chat app doesn't reply because it's being
actively debugged.
7. In the `Visual Studio Code` in your local environment, you can see that
the execution is paused at the breakpoint that was set.
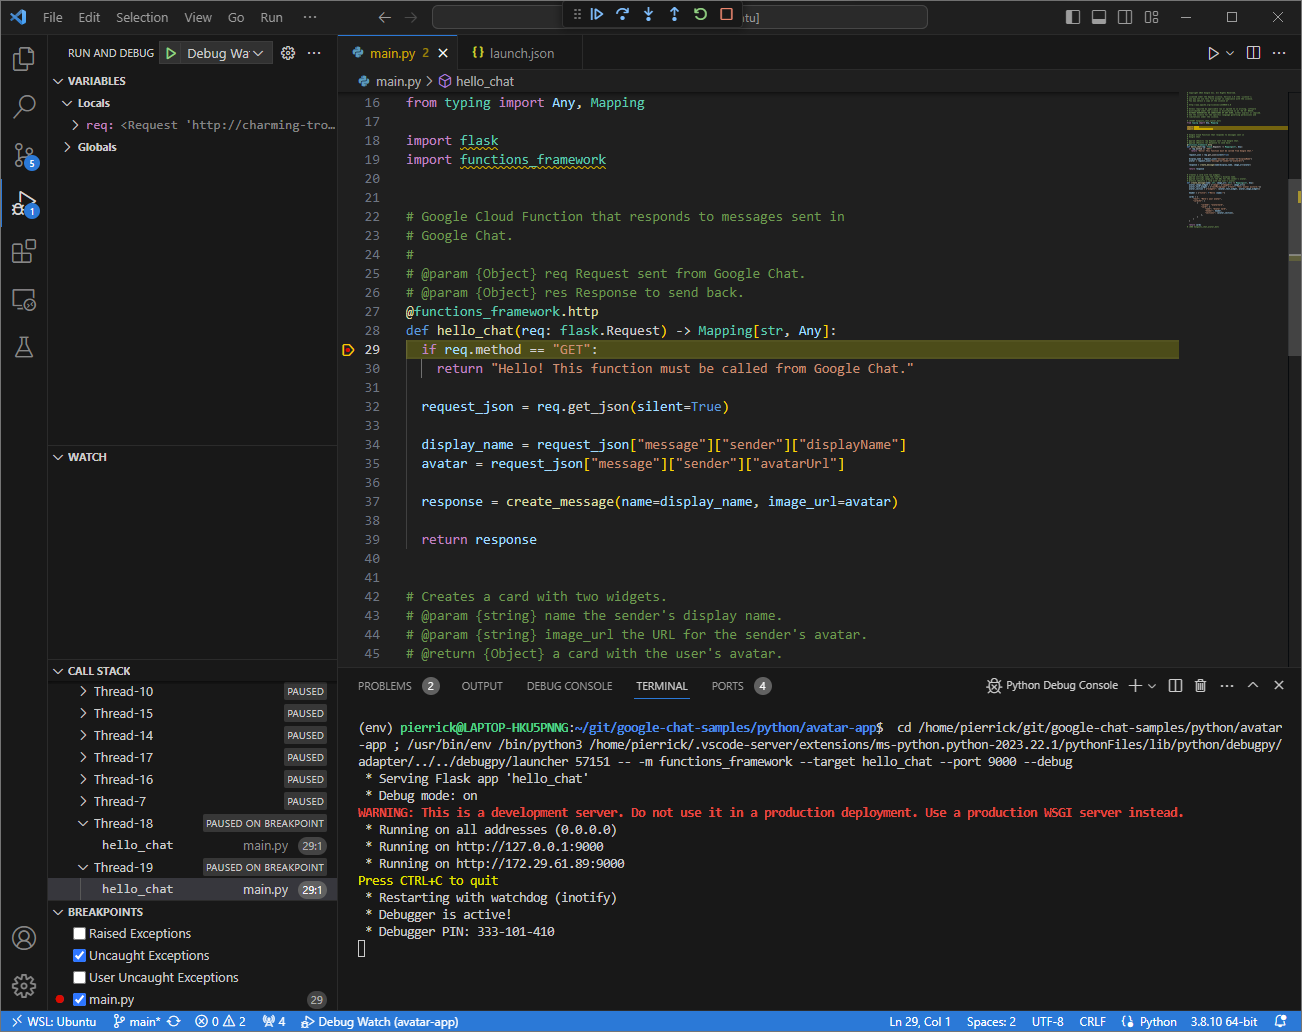
**Figure 6.** The execution is paused at the breakpoint that was set.
8. When you resume the execution from the debugger of `Visual Studio Code`
before Google Chat times out the Chat app
replies with your name and avatar picture in the message.
9. You can check the HTTP request and response logs from the web interface
hosted by the `ngrok` application in your local environment.
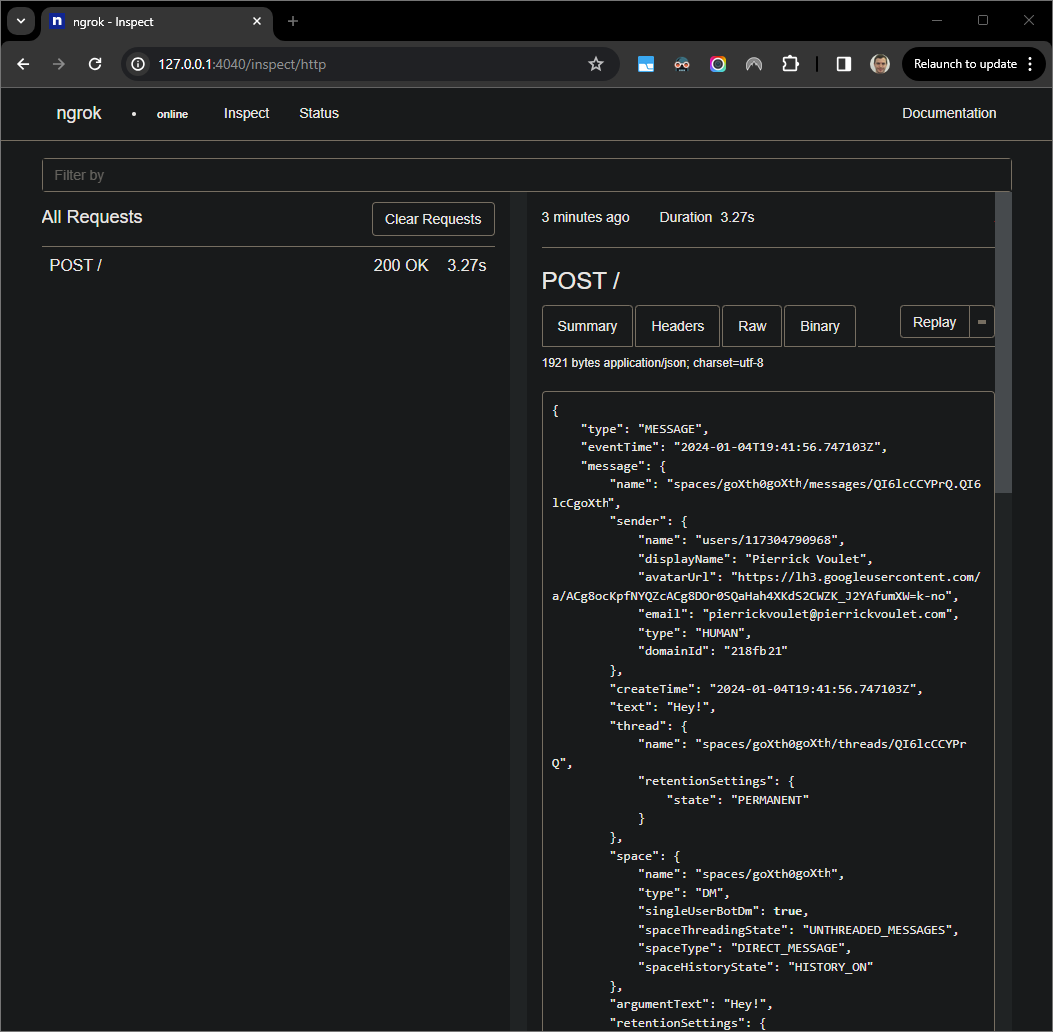
**Figure 7.** The HTTP request from the web interface hosted by the
`ngrok` application.
10. To change the application behavior, replace `Hello` with `Hey`
in the `main.py` file. When you save the file, `Visual Studio Code`
automatically reloads the application with the updated source code and
remains in debug mode.
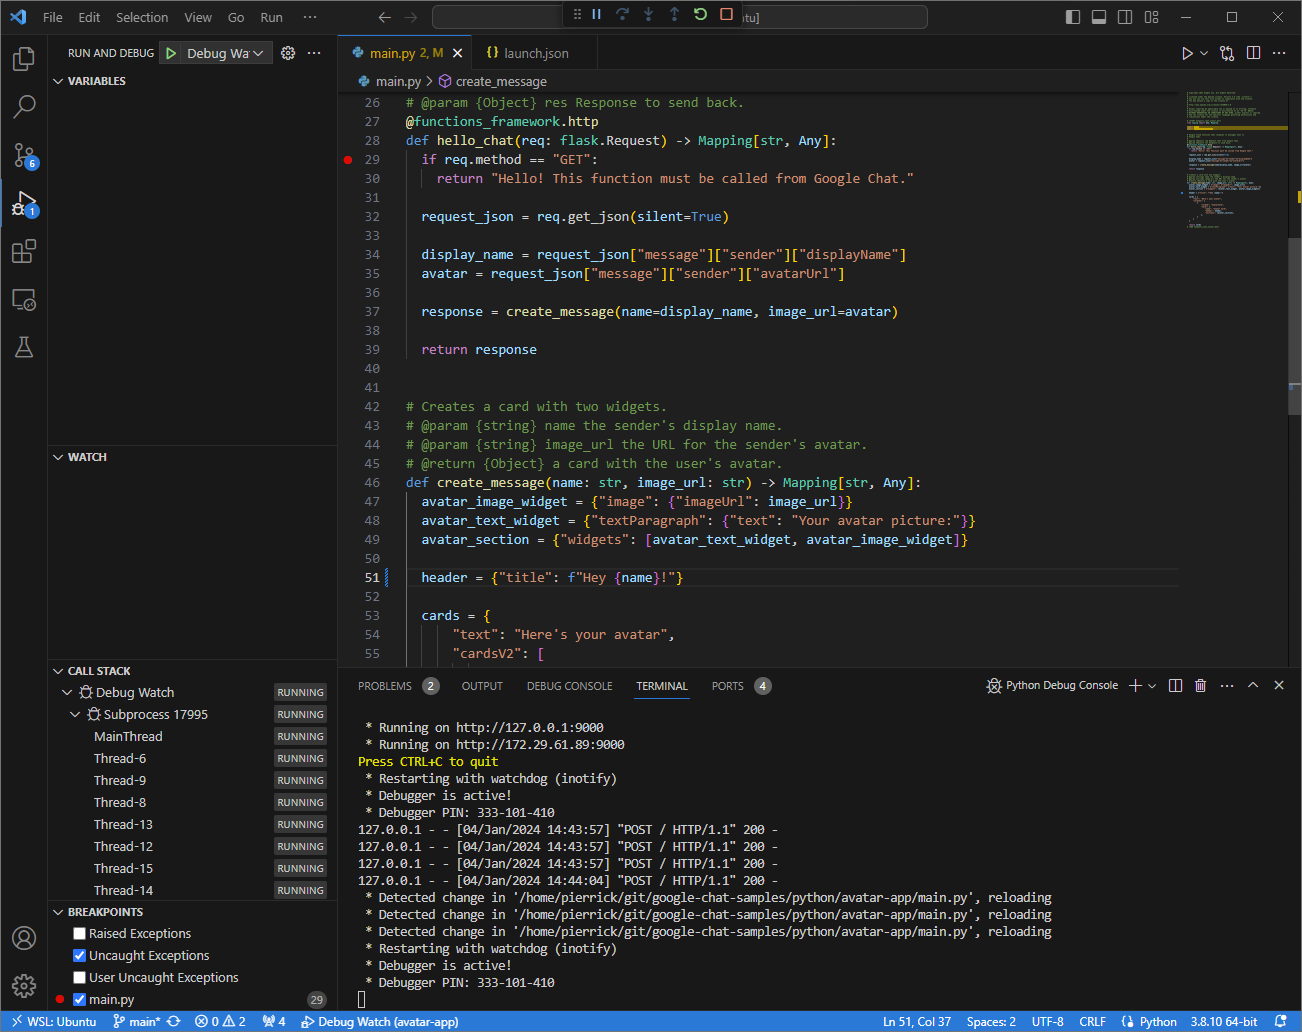
**Figure 8.** The application is running and listening for HTTP requests
on the port `9000` with the code change loaded.
11. This time, instead of sending a second message `Hey!` in the space, you
can select the last HTTP request logged on the web interface hosted by
the `ngrok` application in your local environment and click `Replay`.
Same as last time, your Chat app doesn't reply
because it's being actively debugged.
12. When you resume the execution from the debugger of `Visual Studio Code`
you can see from the web interface hosted by the `ngrok` application in
your local environment that the application generates a response with
the updated version of the message.
### Java
1. Acquire new user credentials to use for [Application Default
Credentials](https://cloud.google.com/sdk/gcloud/reference/auth/application-default):
gcloud config set project PROJECT_ID
gcloud auth application-default login
Replace `PROJECT_ID` with the
[project ID](https://cloud.google.com/resource-manager/docs/creating-managing-projects#before_you_begin)
for the Cloud project of the app.
2. Clone the `googleworkspace/add-ons-samples` repository from GitHub
in your local environment, it contains the application code:
git clone https://github.com/googleworkspace/add-ons-samples.git
3. From the `Visual Studio Code` IDE installed in your local environment,
do the following:
1. In a new window, open the folder `add-ons-samples/java/chat/avatar-app`.
2. Configure the Maven project to run the application `App` on
port `9000` locally by adding the Google Cloud
Functions Framework build plugin `function-maven-plugin` in the
`pom.xml` file:
...
com.google.cloud.functions
function-maven-plugin
0.11.0
App
9000
...
3. You can now launch it locally in debug mode:
mvnDebug function:run
Preparing to execute Maven in debug mode
Listening for transport dt_socket at address: 8000
4. Create the file `.vscode/launch.json` in the root directory and
configure a launch named `Remote Debug Watch` that attaches to the
application previously launched with port `8000`:
{
"version": "0.2.0",
"configurations": [{
"type": "java",
"request": "attach",
"name": "Remote Debug Watch",
"projectName": "http-function",
"hostName": "localhost",
"port": 8000
}]
}
5. Add a breakpoint that pauses the HTTP request processing in the
`App.java` file, and [start attaching and
debugging](https://code.visualstudio.com/docs/editor/debugging) with the
`Remote Debug Watch` configuration added before. The application is
now running and listening for HTTP requests on the port `9000`.
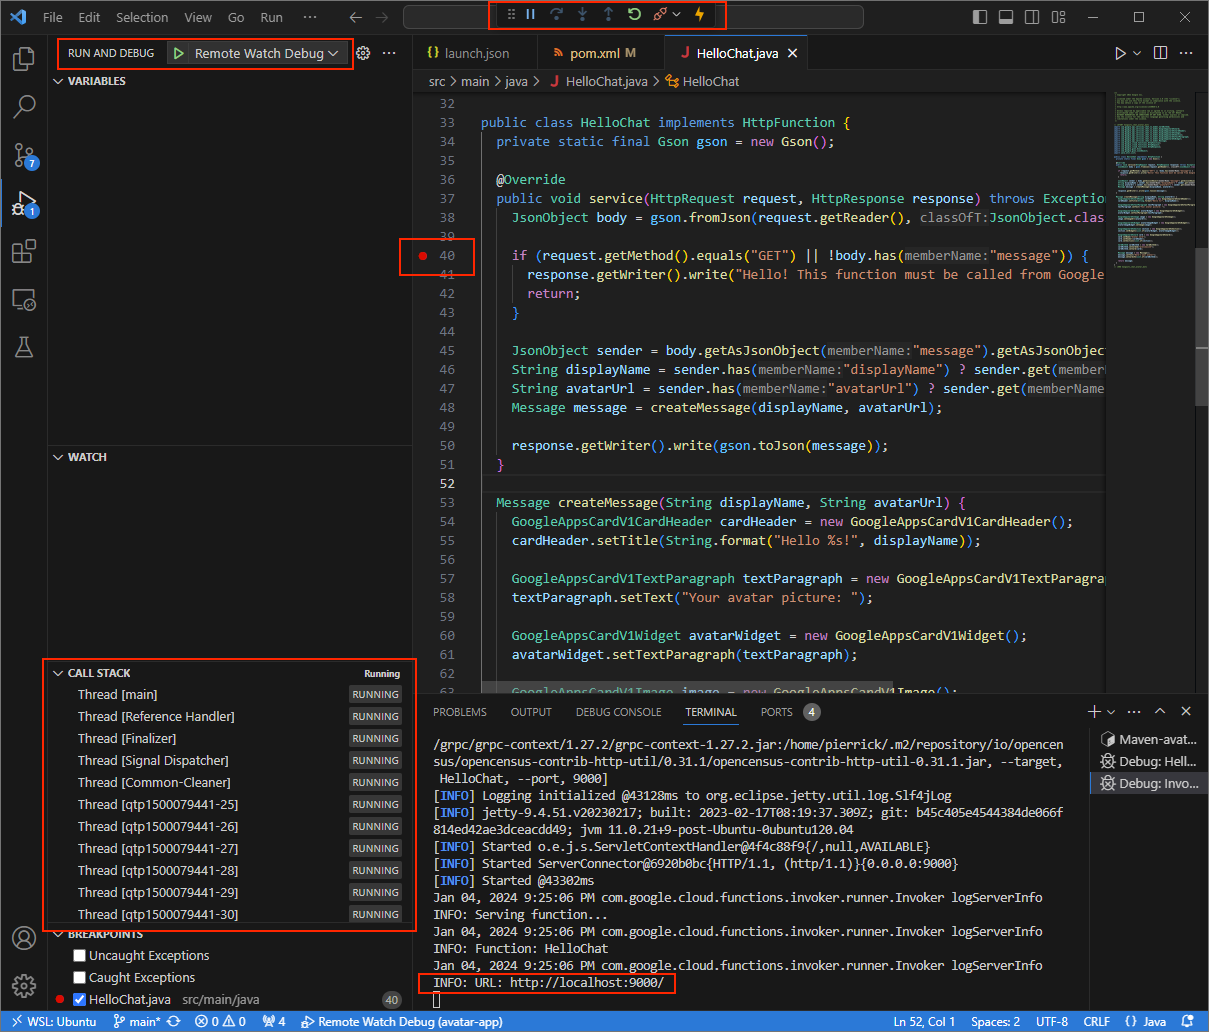
**Figure 3.** he application is running and listening for HTTP
requests on the port `9000`.
4. Launch the `ngrok` application in your local environment:
ngrok http --domain=NGROK_STATIC_DOMAIN 9000
Replace `NGROK_STATIC_DOMAIN` with the static domain in
your `ngrok` account. All requests are now redirected to your local
environment and the port used by the application.

**Figure 4.** The terminal with `ngrok` server running and redirecting.
5. A web interface is also started on your localhost by the `ngrok`
application, you can monitor all activities by opening it in a browser.

**Figure 5.** The web interface hosted by the `ngrok` application
showing no HTTP requests.
6. Test your Chat app by sending it a direct
message:
- Open Google Chat.
[Go to Google Chat](https://chat.google.com)
- Click **New chat** .
- In the dialog, enter the name of your
Chat app.
- In the search results, find your Chat app,
click **Add** \>
**Chat**.
- In the direct message space, type `Hey!` and press `enter`. Your
Chat app doesn't reply because it's being
actively debugged.
7. In the `Visual Studio Code` in your local environment, you can see that
the execution is paused at the breakpoint that was set.
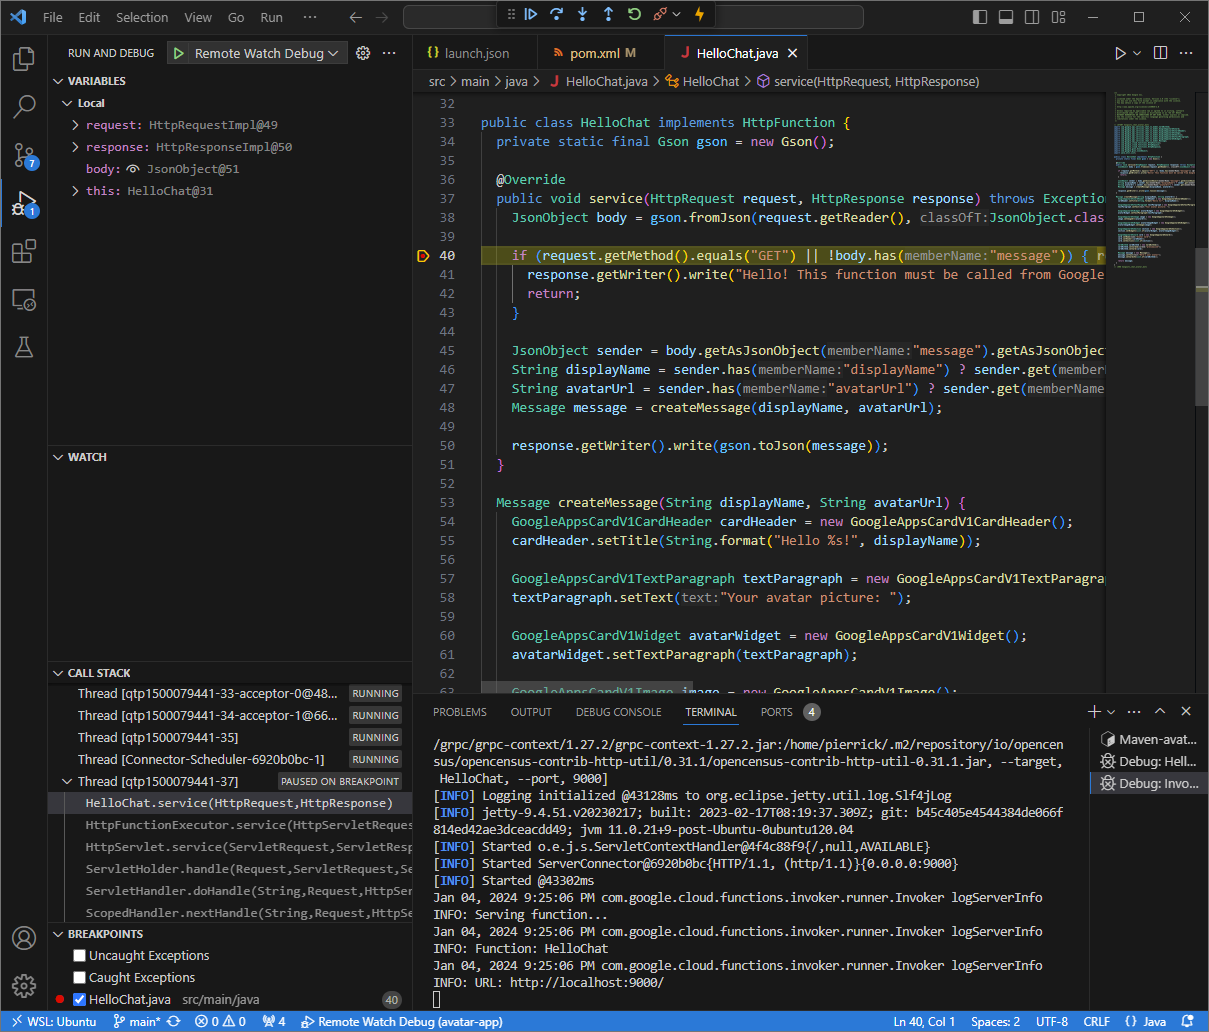
**Figure 6.** The execution is paused at the breakpoint that was set.
8. When you resume the execution from the debugger of `Visual Studio Code`
before Google Chat times out the Chat app
replies with your name and avatar picture in the message.
9. You can check the HTTP request and response logs from the web interface
hosted by the `ngrok` application in your local environment.
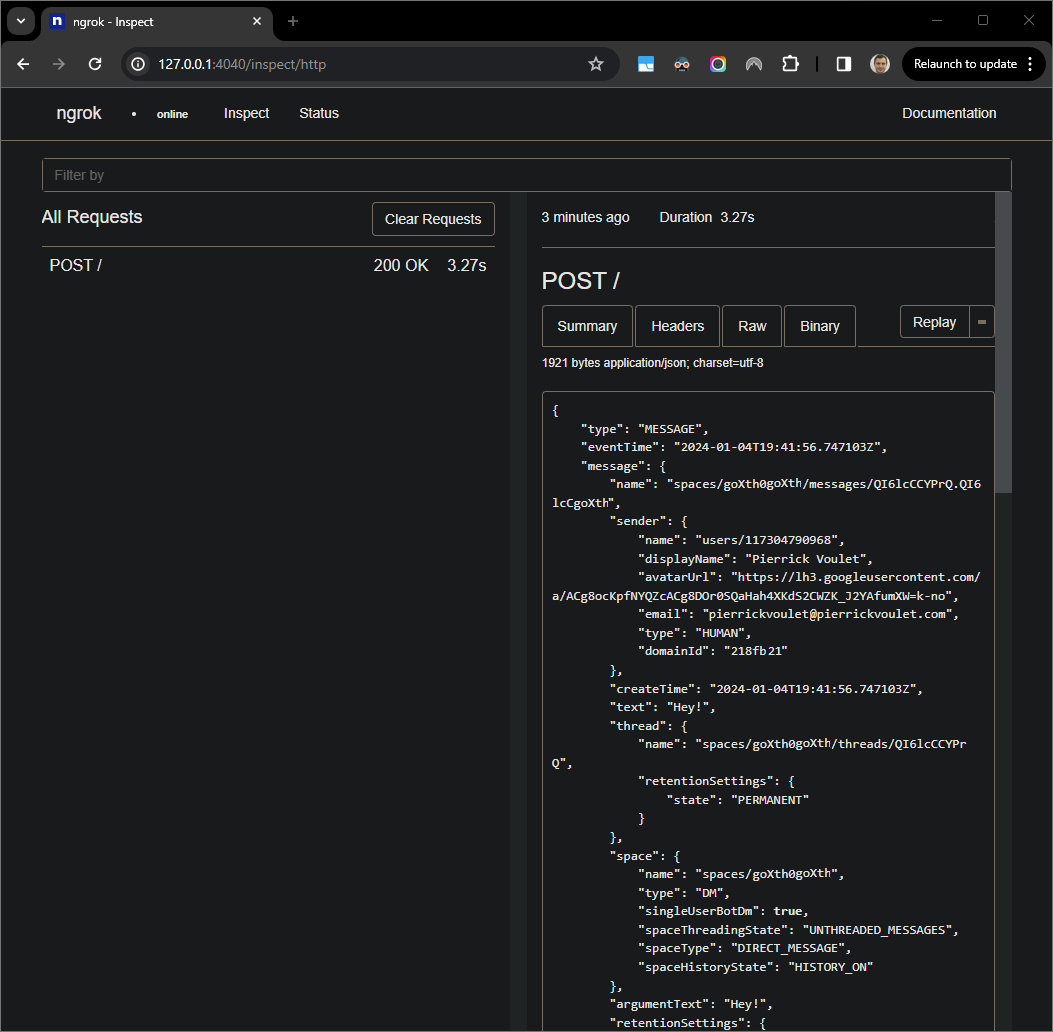
**Figure 7.** The HTTP request from the web interface hosted by the
`ngrok` application.
10. To change the application behavior, replace `Hello` with `Hey` inline
`55` of the `App.java` file, restart the `mvnDebug` process, and
relaunch `Remote Debug Watch` to [reattach and restart
debugging](https://code.visualstudio.com/docs/editor/debugging).
11. This time, instead of sending a second message `Hey!` in the space, you
can select the last HTTP request logged on the web interface hosted by
the `ngrok` application in your local environment and click `Replay`.
Same as last time, your Chat app does not reply
because it's being actively debugged.
12. When you resume the execution from the debugger of `Visual Studio Code`
you can see from the web interface hosted by the `ngrok` application in
your local environment that the application generates a response with
the updated version of the message.
## Debug from remote environment
In this section, you interact with your Chat app that
executes on a remote environment.

**Figure 9.** Debug from remote environment.
### Prerequisites
- A direct message space with your Chat app. You can follow the section [Test your Chat app](https://developers.google.com/workspace/chat/quickstart/gcf-app#test-your) of the [Quickstart guide](https://developers.google.com/workspace/chat/quickstart/gcf-app) and search for your Chat app to start one.
- Your application running in your remote environment with the debugger enabled on a given port, it's referenced as `REMOTE_DEBUG_PORT` in the instructions of this guide.
- Your local environment can `ssh` to your remote environment.
- An IDE set up in your local environment that can debug. We use the [`Visual Studio Code`
IDE](https://code.visualstudio.com/docs/setup/setup-overview) and its default [debugging](https://developers.google.com/workspace/chat/code.visualstudio.com/docs/editor/debugging) features in this guide for illustration purposes.
### Connect your local and remote environments
In your local environment from where you want to initiate a debug client
connection, set up an SSH tunnel:
ssh -L LOCAL_DEBUG_PORT:localhost:REMOTE_DEBUG_PORT REMOTE_USERNAME@REMOTE_ADDRESS
Replace the following:
- `LOCAL_DEBUG_PORT`: The debug port in your local environment.
- `REMOTE_USERNAME`: The username in your remote environment.
- `REMOTE_ADDRESS`: The address of your remote environment.
- `REMOTE_DEBUG_PORT`: The debug port in your remote environment.
The debug port in your local environment is now linked to the debug port in your
remote environment.
### Start debugging
From the `Visual Studio Code` IDE installed in your local environment, do the
following:
1. In a new window, open the source code of your app.
2. Create the file `.vscode/launch.json` in the root directory and configure a
launch named `Debug Remote` that attaches to the debug port in your local
environment:
### Node.js
{
"version": "0.2.0",
"configurations": [{
"type": "node",
"request": "attach",
"name": "Debug Remote",
"address": "127.0.0.1",
"port": LOCAL_DEBUG_PORT
}]
}
### Python
{
"version": "0.2.0",
"configurations": [{
"type": "python",
"request": "attach",
"name": "Debug Remote",
"connect": {
"host": "127.0.0.1",
"port": LOCAL_DEBUG_PORT
}
}]
}
### Java
{
"version": "0.2.0",
"configurations": [{
"type": "java",
"request": "attach",
"name": "Debug Remote",
"hostName": "127.0.0.1",
"port": LOCAL_DEBUG_PORT
}]
}
Replace `LOCAL_DEBUG_PORT` with the debug port in your
local environment.
3. Add a breakpoint in the source code of your app that pauses the HTTP request
processing, and [start running and
debugging](https://code.visualstudio.com/docs/editor/debugging) with the `Debug
Remote` configuration added before.
In the direct message space with your Chat app, type
anything you want to test and press `enter`. Your
Chat app does not reply because it's being actively
[debugged](https://learn.microsoft.com/en-us/visualstudio/debugger/debugger-feature-tour)
in the `Visual Studio Code` IDE.
## Related topics
- Learn how to [enable](https://developers.google.com/workspace/chat/turn-on-error-logging) and [query](https://developers.google.com/workspace/chat/query-logs) error logs.
- [Learn how to fix Google Chat app
errors](https://developers.google.com/workspace/chat/troubleshoot-chat-apps) like "App is not responding", "Google Chat API is only available to Google Workspace users", or "Users can be excluded from spaces".
- [Learn how to fix card errors](https://developers.google.com/workspace/chat/troubleshoot-cards) like card messages, dialogs, or link previews not rendering or working as expected.
## Chat apps that aren't add-ons: Debug Google Chat apps
The following documentation applies to Chat apps that aren't
Google Workspace add-ons. To migrate a Chat app that isn't an
add-on, see
[Convert a Chat app to a Google Workspace add-on](https://developers.google.com/workspace/chat/convert).
To debug a Chat app that isn't an
add-on from your local environment:
- In the Chat API **Configuration** tab under **Interactive features** \> **Connection settings** , select **HTTP endpoint URL** and set the **HTTP
endpoint URL** field directly to `https://NGROK_STATIC_DOMAIN`.
- Use the sample code for Chat apps that aren't add-ons from the [`googleworkspace/google-chat-samples`](https://github.com/googleworkspace/google-chat-samples) GitHub repository (`google-chat-samples/node/basic-app`, `google-chat-samples/python/avatar-app`, or `google-chat-samples/java/avatar-app`).